light MAZDA 232 1990 Workshop Manual Suplement
[x] Cancel search | Manufacturer: MAZDA, Model Year: 1990, Model line: 232, Model: MAZDA 232 1990Pages: 677, PDF Size: 61.19 MB
Page 5 of 677
GI IMPORTANT tNFORMATlUN
IMPORTANT INFORMATION
1
.ftl
1
BASIC ASSUMPTIONS
This workshop manual assumes that you have certain special tools that are necessary for the safe and effi-
cient performance of service operations on Mazda vehicles and that you know how to use
them properly.
It also assumes that you are familiar with automobile
systems and basic service and repair procedures. You
should
not attempt to use this manual unless these assumptions are correct and you understand the conse-
quences described below.
SAFETY RlSK
This manual contains certain notes, warnings, and other precautionary information that you should carefully
read and follow to reduce the risk of personal injury to yourself or others and the risk of improper service
that may damage the vehicle
or render it unsafe. If there is no such information in regard to any specific
service method, this does not mean there is no possibility that personal safety or vehicle safety will be
jeopardized by the use of incorrect methods or toots.
POSSIBLE LOSS OF WARRANTY
The manufacturer’s warranty on Mazda vehicles and engines can be voided if improper service or repairs
are performed by persons other than those at an Authorized Mazda Dealer.
WARNING ON LUBRICANTS AND GREASES ’
Avoid all prolonged and repeated contact with mineral oils, especially used oils. Used 08s contaminated
during service (e.g., engine sump oils) are more irritating and more likely to cause serious effects, including
skin cancer, in the event of gross and prolonged skin contact.
Wash skin thoroughly after work involving oil.
Protective hand cleaners may be of value provided they can be removed from the skin with water. Do not
use gasoline, paraffin, or other solvents to remove oil from the skin.
Lubricants and greases may be slightly irritating to the eyes.
Repeated or prolonged skin contact should be avoided by wearing protective clothing if necessary. Particu-
lar care should be taken with used oils and greases containing lead. Do not allow work clothing to be con-
taminated with oil. Dry clean or launder such clothing at regular intervafs.
9MUGiX-502
Page 15 of 677
GI CAUTKN
SMUGIX-a21
I VOLTMETER
1 9MUGlX-021
POWER SOURC
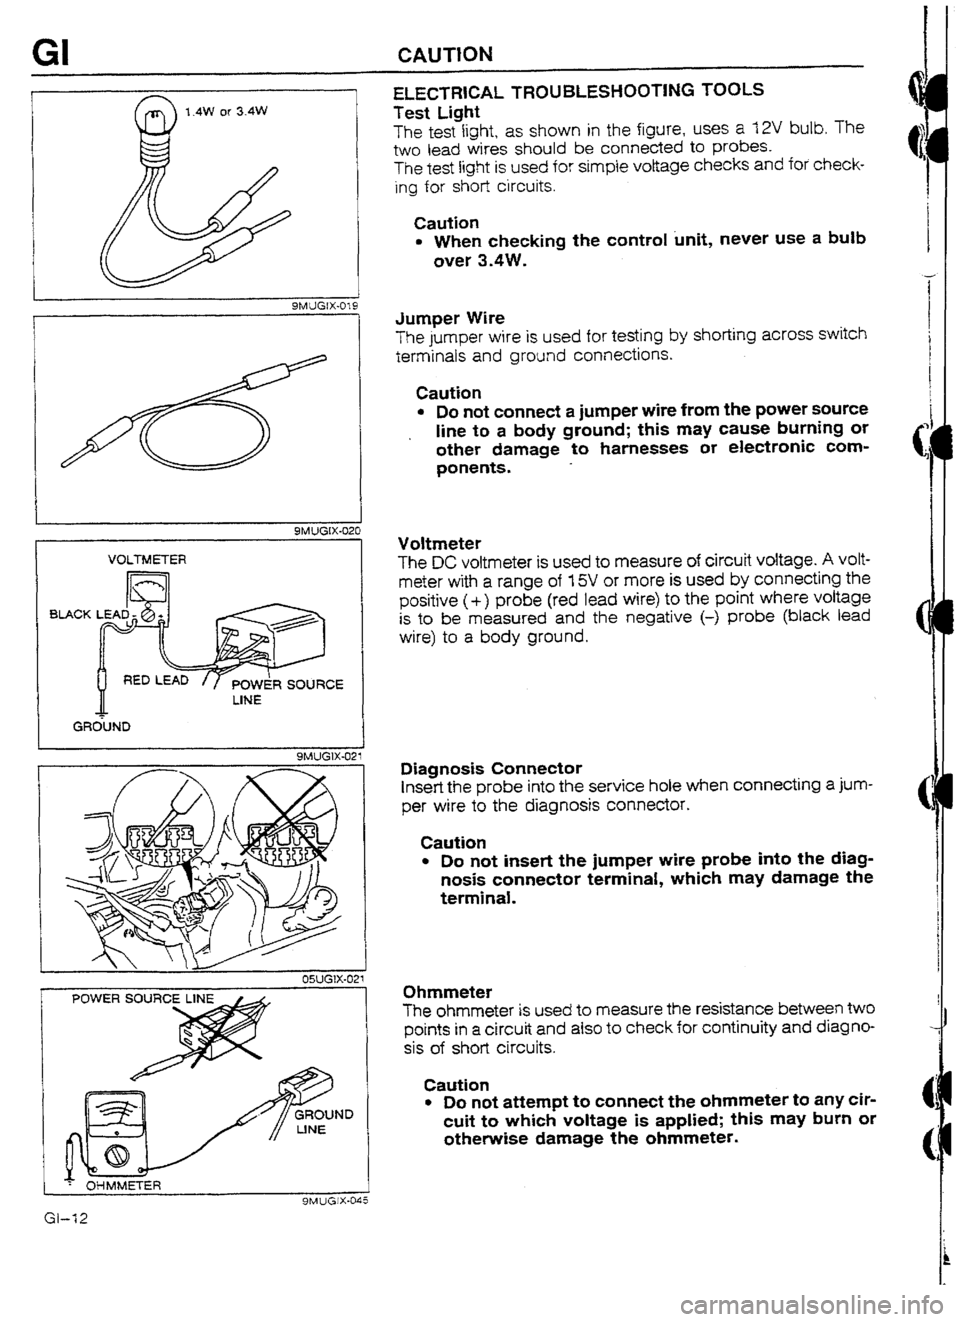
ELECTRICAL TROUBLESHOOTING TOOLS
Test Light
The test light, as shown in the figure, uses a f2V bulb. The
two lead wires should be connected to
probes.
The test light is used for simple voltage checks and for check-
ing for short circuits.
Caution
l When checking the control unit, never use a butt,
over 3.4w.
Jumper Wire
The jumper wire is used for testing by shorting across switch
terminals and ground connections.
Caution
l Do not connect a jumper wire from the power source
, line to a body ground; this may cause burning or
other damage to harnesses or electronic com-
ponents. -
Voltmeter
The DC voltmeter is used to measure of circuit
voltage. A volt-
meter with a range of 15V or more is used by connecting the
positive ( + ) probe (red lead wire) to the point where voltage
is to be measured and the negative (-1 probe (black lead
wire) to a body ground.
Diagnosis Connector
Insert the probe into the service hole when connecting a jum-
per wire to the diagnosis connector.
Caution
l Do not insert the jumper wire probe into the diag-
nosis connector terminal, which may damage the
terminal.
Ohmmeter
The ohmmeter is used to measure the resistance between two
points in a circuit and atso to check for continuity and diagno-
sis of short circuits.
Caution
l Do not attempt to connect the ohmmeter to any cir-
cuit to which voltage is applied; this may burn or
otherwise damage the ohmmeter.
Page 17 of 677
I OWGIX-028
1 SMUG IX-027
gMi)GlX-03
GI-i4
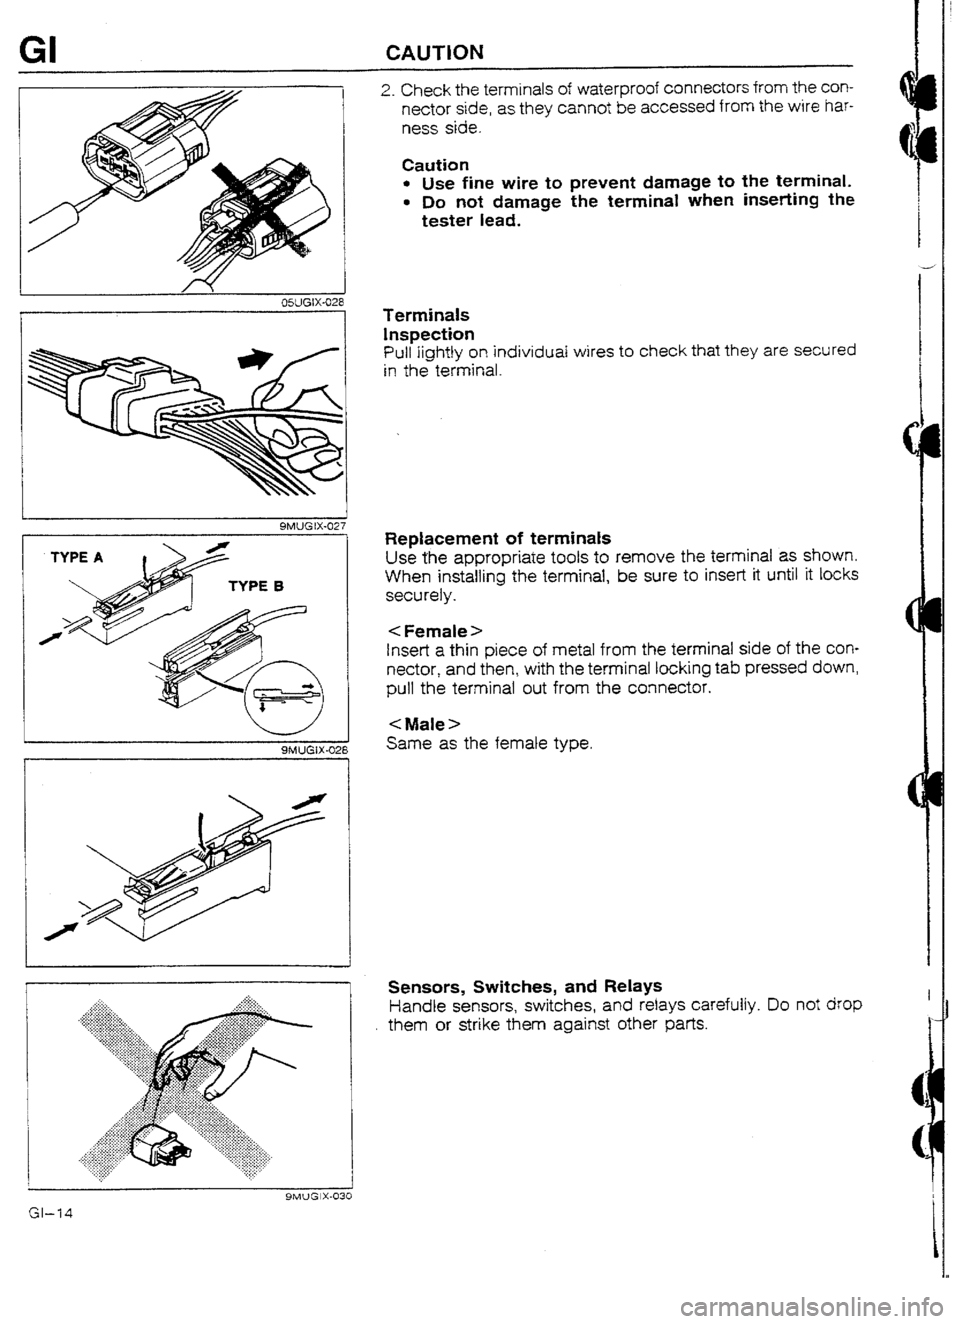
2. Check the terminals of waterproof connectors from the con-
nector side, as they cannot be accessed from the wire har-
ness side.
Caution l
Use fine wire to prevent damage to the terminal. l
Do not damage the terminal when inserting the
tester lead.
Terminals
Inspection
Pull lightly on individual wires to check that they are secured
in the terminal.
Replacement of terminals
Use the appropriate tools to remove the terminal as shown.
When installing the terminal, be sure to insert it until it locks
securely.
Insert a thin piece of metal from the terminal side of the con-
nector, and then, with the terminal locking tab pressed down,
pull the terminal out from the connector.
< Male >
Same as the female type,
Sensors, Switches, and Relays
Handle sensors, switches, and relays carefully. Do not drop
them or strike them against other parts.
4 I
i c
Page 18 of 677
CAUTION GI
I 9MUGIX-031
PULLER
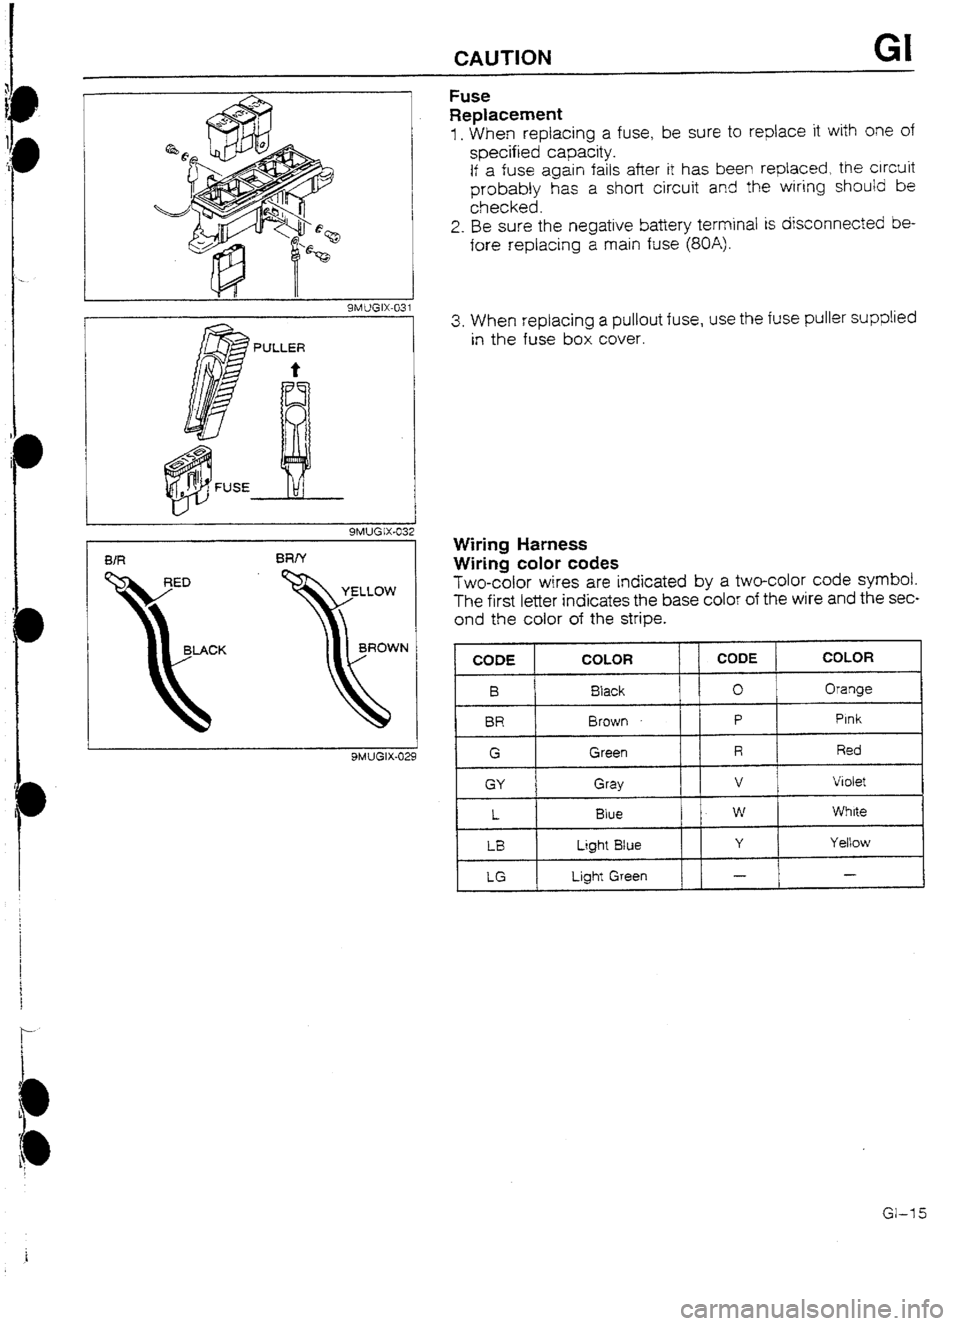
t Fuse
Replacement
1. When replacing a fuse, be sure to replace it with one of
specified capacity.
If a fuse again fails after it has been reptaced, the circuit
probably has a short circuit and the wiring should be
checked.
2. Be sure the negative battery terminal i
fore replacing a main fuse @A).
3. When replacing a pullout fuse, use the
in the fuse box cover. ; disconnected be-
use puller supplied
Wiring Harness
Wiring color codes
Two-color wires are indicated by a two-color code symbol.
The first letter indicates the
base color of the wire and the sec-
ond the color of the stripe.
1 9MUGIX-029
LG Light Green - - CODE
B COLOR
Black CODE )
0 COLOR
Orange
BR Brown P Pink
1
G
GY
t
LB Green
Gray
Blue
Light Blue R
! Red
V Violet
W White
Y Yellow
Gl-15
Page 21 of 677
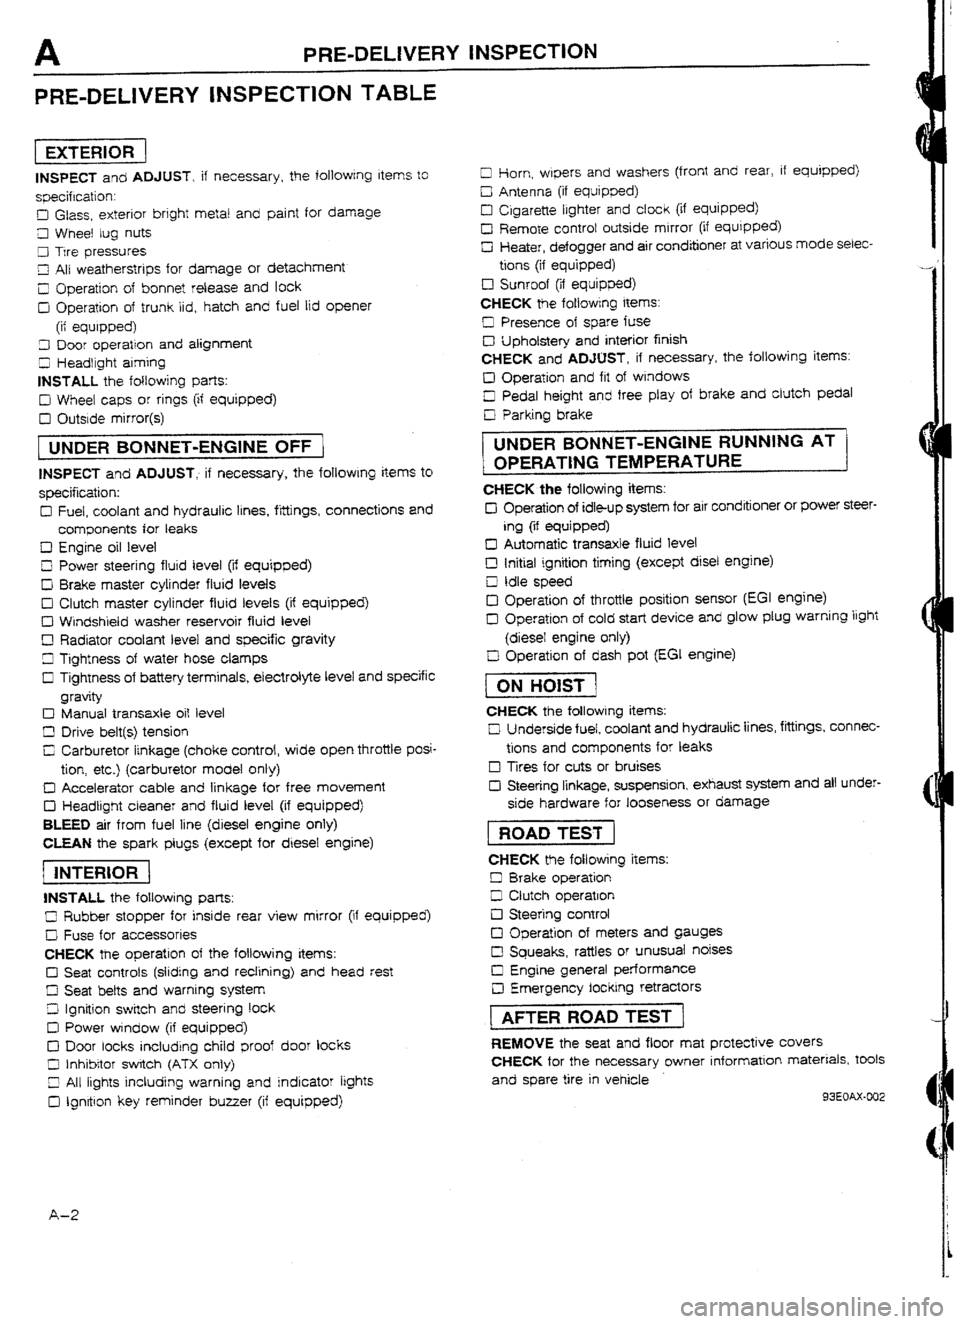
A PRE-DELIVERY INSPECTION
PRE-DELIVERY INSPECTION TABLE
pieziG-
INSPECT and ADJUST, if necessary, the following Items to
specification:
D Glass, exterior bright metal and paint for damage
Cl Wheel tug nuts
9 Trre pressures
LII All weatherstrips for damage or detachment
Z Operation of bonnet release and lock
D Operation of trunk lid, hatch and fuel lid opener
(it equipped)
3 Door operation and alignment
5 Headlight aiming
INSTALL the following parts:
D Wheel caps or rings (if equipped)
D Outside mirror(s)
[ UNDER BONNET-ENGINE OFF )
INSPECT and ADJUST, if necessary, the foIlowIng items to
specification:
Cl Fuel, coolant and hydraulrc lines, fittings, connections and
components for leaks
Cl Engine oil level
0 Power steering fluid level (if equipped)
D Brake master cylinder fluid levels
0 Clutch master cylinder fluid levels (if equipped) q
Windshield washer reservoir fluid level
D Radiator coolant level and specific gravity
Ll Tightness of water hose clamps
I3 Tightness of battery terminals, electrolyte level and specific
gravity
c) Manual transaxle oit level
D Drive belt(s) tension
C; Carburetor linkage (choke control, wide open throttle posi-
tion, etc.) (carburetor model only)
D Accelerator cable and linkage for free movement
D Headlight cleaner and fluid level (if equipped)
BLEED air from fuel line (diesel engine only)
CLEAN the spark plugs (except for diesef engine)
piicis-1
INSTALL the foflowing parts:
C Rubber stopper for inside rear view mirror (if equipped)
c! Fuse for accessories
CHECK the operation of the following items:
Cl Seat controls (sliding and redining) and head rest
ci Seat belts and warnrng system
Z! Ignition swrtch and steering lock
III Power window {if equipped)
0 Door locks including child proof door locks
0 Inhibitor switch
(ATX only)
Z All lights including warning and indicator lights
0 Ignrtron key reminder buyer (if equipped) Cl Horn, wipers and washers (front and rear, if equipped)
D Antenna (if equipped} q
Cigarette lighter and clock (if equipped)
I2 Remote controt outside mirror
(if equipped) q
Heater, defogger and air conditioner at various mode selec-
tions (if equipped)
c3 Sunroof (if equipped)
CHECK
the fotiowing items: q
Presence of spare fuse
c3 Upholstery and interior finish
CHECK and ADJUST, if necessary, the following items:
Cl Operation and fit of windows
D Pedal height and free ptay of brake and clutch pedal
Cl Parking brake
i UNDER BONNET-ENGtNE RUNNING AT ]
1 OPERATtNG TEMPERATURE
CHECK the following items:
Cl Operation of idle-up system for air conditioner or power steer-
ing (if equipped)
13 Automatic transaxle fluid level
D Initial ignition timing
(except disel engine) q
Idle speed
El Operation of throttle position sensor (EGI engine)
13 Operation of cold start device and glow plug warning light
(diesel engine only)
D Operation of dash pot [EGI engine)
t
ON HOtST 1
CHECK the following items:
U Underside fuel, coolant and hydraulic lines, fittings, connec-
tions and components for leaks q
Tires for cuts or bruises
Cl Steering linkage, suspension, exhaust system and all under-
side hardware for
looseness or damage
1 ROAD TEST 1
CHECK the foliowing items:
II Brake operation
D Clutch operation
0 Steering control
c3 Operation of meters and gauges
0 Squeaks, rattles or unusual noises q
Engine general performance
c3 Emergency Iocking retractors
rAFTER ROAD TEST 1
REMOVE the seat and floor mat protective covers
CHECK for the necessary
owner information materials, tools
and spare tire in vehicle
93EOAX-002
A-2
Page 24 of 677
!
i
i
I
i
t-
I
i
i
e
-1
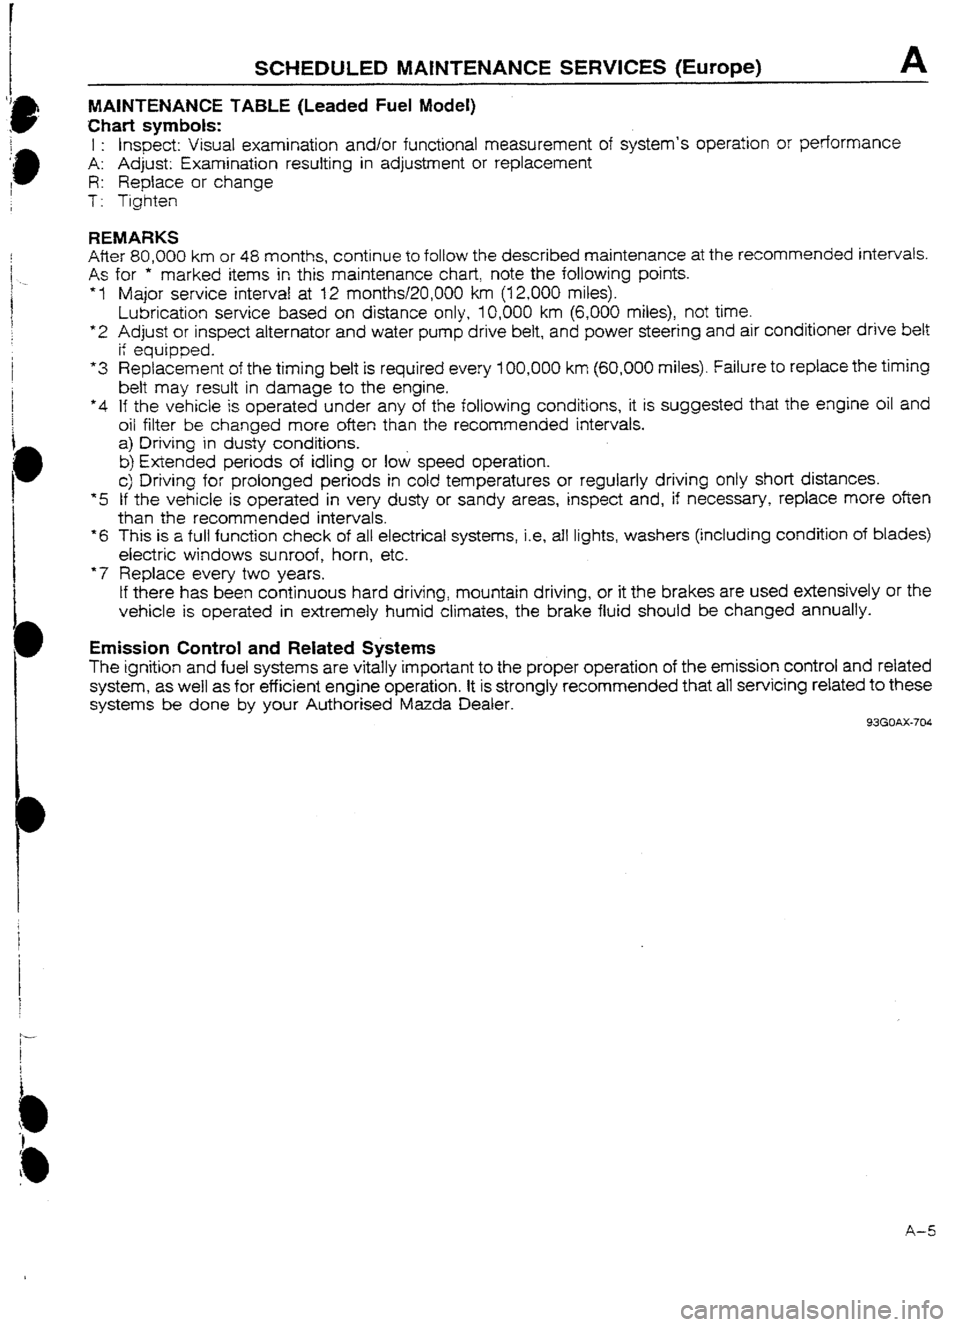
SCHEDULED MAfNTENANCE SERVICES (Europe) A
MAINTENANCE TABLE (Leaded Fuel Model)
Chart symbols:
1 : Inspect: Visual examination and/or functional measurement of system’s operation or performance
A: Adjust: Examination resulting in adjustment or replacement
R: Replace or change
T: Tighten
REMARKS
After 80.000 km or 48 months, continue to foltow the described maintenance at the recommended intervals.
As
*I
*2
“3
*4
*5
*6
*7 for *’
marked items in this’ maintenance chart, note the following points.
Major service interval at 12 months!ZO,OOO km (I 2,000 miles).
Lubrication service based on distance only, 10,000 km (6,000 miles), not time.
Adjust or inspect alternator and water pump drive belt, and power steering and air conditioner drive belt
ii equipped.
Replacement of the timing belt is required every ICQOUO km (60,000 miles). Failure to replace the timing
belt may result in damage to the engine.
If the vehicle is operated under any of the following conditions, it is suggested that the engine
oil and
oil filter be changed more often than the recommended intervals.
a) Driving in dusty conditions.
b) Extended periods of idling or low speed operation.
c) Driving for prolonged periods in cold temperatures or regularly driving only short distances.
If the vehicle is operated in very dusty or sandy areas, inspect and, if necessary, replace more often
than the recommended intervals.
This is a full function check of all electrical systems, i.e, afl lights, washers (inctuding condition of blades)
electric windows sunroof, horn, etc.
Replace every two years.
tf there has been continuous hard driving, mountain driving, or it the brakes are used extensively or the
vehicle is operated in extremely humid climates, the brake fluid should be changed annually.
Emission Control and Related Systems
The ignition and fuel systems are vitally important to the proper operation of the emission control and related
system, as well as for efficient engine operation. It is strongly recommended that all servicing related to these
systems be done by your Authorised Mazda Dealer.
93GOAX-704
A-5
Page 25 of 677
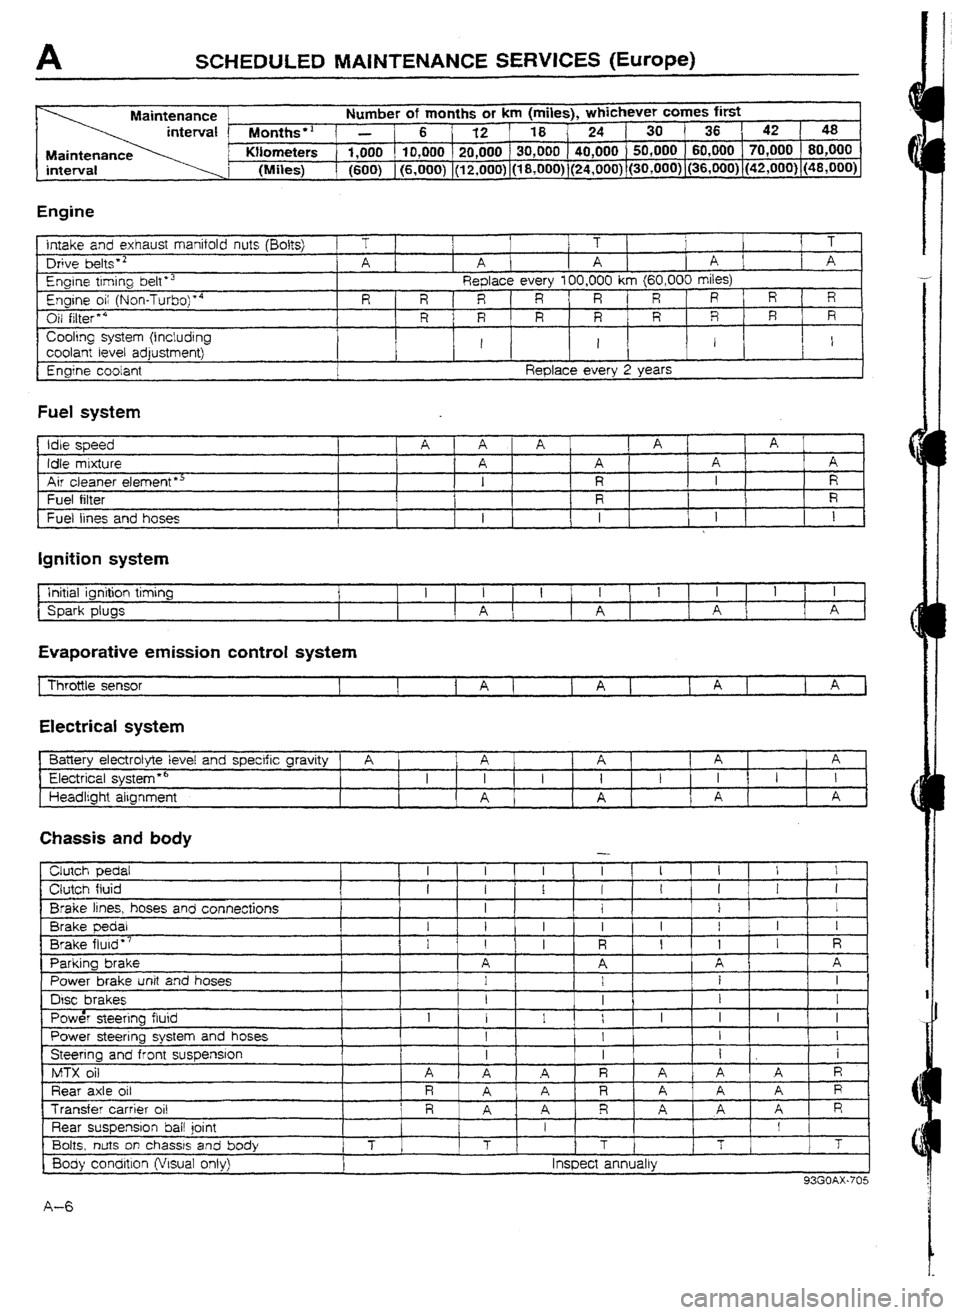
SCHEDULED MAlNTENANCE SERVICES (Europe)
Maintenance Number of months or km (miles), whichever comes first
Months” - 6 1 12 18 24 1 30
36 1 42 48
Maintenance Wometers 1,000 10,000 20,000 30,000 40,000 50,000 60,000 1 70,000 80,000
interval
(Miles) (600) (6,000) (12,000) (18,000) (24,000) (30,000) (36,000)~(42,000) (48,000)
Engine Intake
and exhaust manifold nuts (Bolts) Drive belts * 2
Engine ttming belt *’
Engine oi; (Non-Turboj’4
Oil filter * 4
Cooling system (Including coolant
level adjustment)
Enaine coolant T
1 1 1
1 1 ’
A
[ A I A 1 A ] [ A
Replace every t 00,000 km (60,000 miles)
R
R R R R R R R 1 R
R R R R R R R R
I I 1 I
Reolace everv 2 Years
Fuel system
Idle speed
Idle mixture
Air cleaner element *’ Fuel
filter
Fuel lines and hoses
I A I * A 1 A 1 A
I
A A A A
I R I R
R
I R I
1 I
t I 1 [ I
Ignition system
Initial ignition timing
Spark plugs I t I I 1 I 1 I
A A ( A A
Evaporative emission control system
Electrical system
Ejattery electrolyte level and specific gravity A
A 1 A A 1 A
Electrical system
l 6
I I I
I t I 1 I I
Headlight algnment
A A f A 1 A
Chassis and body
Clutch pedal
Clutch fluid
Brake lines, hoses and connections
Brake pedal
Brake flutd *7
Parking brake
Power brake unit and hoses
DGC brakes
Pow& steering fluid
Power steering system and hoses
Steering and front suspension
MTX oil
Rear axle oil
Transfer carrier
ui!
Rear suspension bail joint
Bolts, nuts on chassis and body
8ody condltlon (Visual onty)
-
I I I I I I I I
1 I I I I I I I
I
1 I I
i
1 I I I I I I
I I I
R I 1 I R
A A A 1 A
1
1 i 1 I
I
I I
I
I
I I I I I I I
I 1 I I
I 1 I 1 i
1 A
A R A A A R
iR,i A R A A A R
R ’
A . A R A A A R
f I
T
T T T
T
I Inspect annually
93GOAX-705
A-6
Page 27 of 677
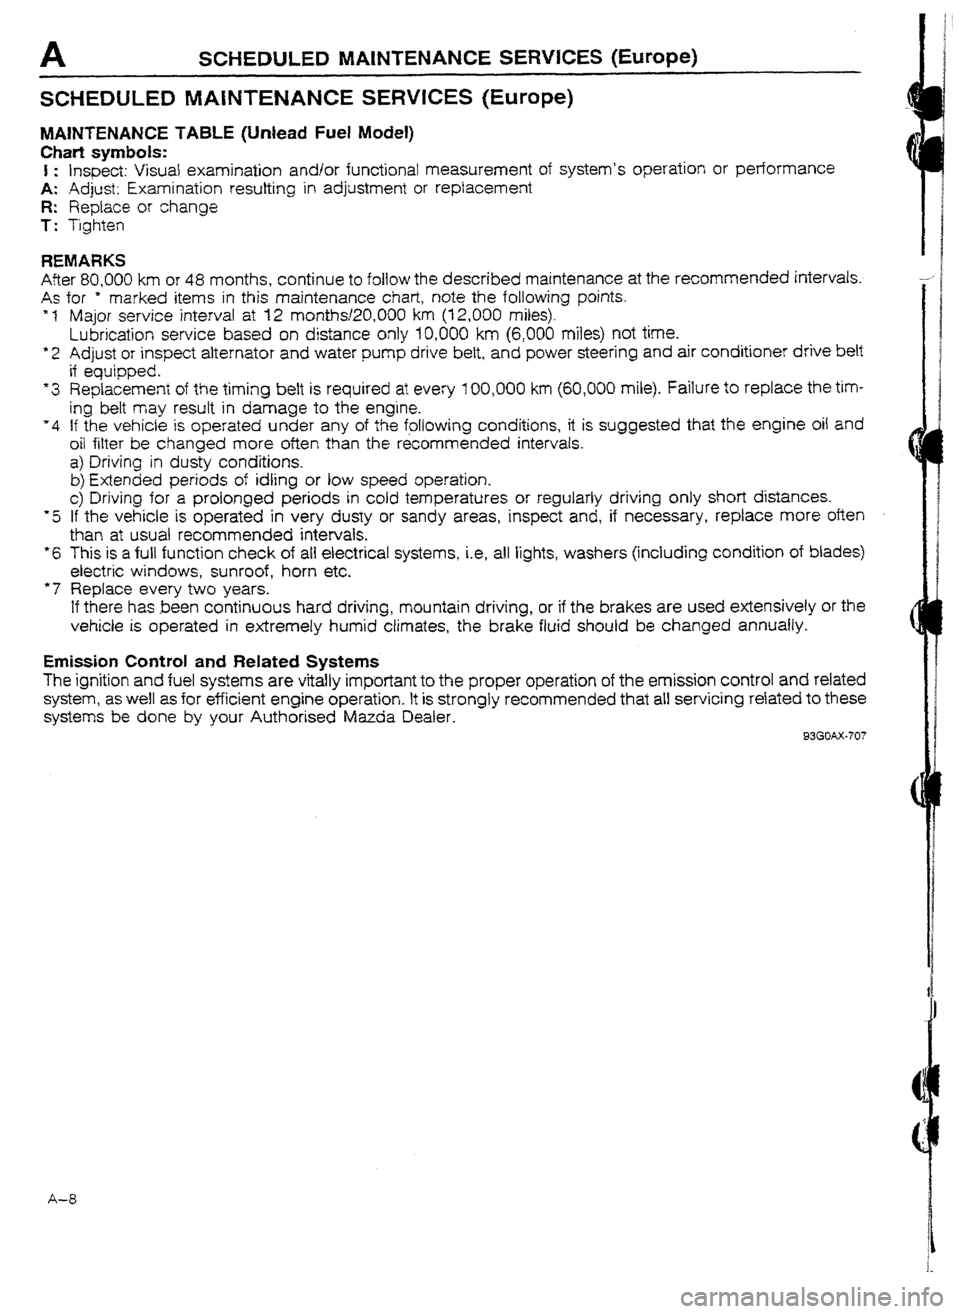
A SCHEDULED MAINTENANCE sERvw3 (Europe)
SCHEDULED MAfNTENANCE SERWCES (Europe)
MAWTENAN CE TABLE (Unlead Fuel Model)
Chati symbols:
I : Inspect: Visual examination and/or functional measurement of system’s operation or performance
A: Adjust: Examination resulting in adjustment or replacement
R: Replace or change
T: Tighten
REMARKS
After 80,000 km or 48 months, continue to follow the described maintenance at the recommended intervals.
As for * marked items in this maintenance chart, note the following points.
* 1 Major service interval at 12 months120,OOO km (12,000 miles).
Lubrication service based on distance only 10,000 km (6,000 miles) not time.
*2 Adjust or inspect alternator and water pump drive belt, and power steering and air conditioner drive belt
if equipped.
“3 Replacement of the timing belt is required at every 100,000 km (60,000 mile). failure to replace the tim-
ing belt may result in damage to the engine.
“4 If the vehicle is operated under any of the following conditions, it is suggested that the engine oil and
oil filter be changed more often than the &commended intervals.
a) Driving in dusty conditions.
b) Extended periods of idling or low speed operation.
c> Driving for a prolonged periods in cold temperatures or regularly driving only short distances.
*5 If the vehicle is operated in very dusty or sandy areas, inspect and, if necessary, replace more oten
than at usual recommended intervals.
*6 This is a full function check of all electrical systems, i.e, all lights, washers (including condition of blades)
electric windows, sunroof, horn etc.
“7 Replace every two years.
If there has been continuous hard driving, mountain driving, or if the brakes are used extensively or the
vehicle is operated in extremely humid climates, the brake fluid should be changed annually.
Emission Control and Related Systems
The ignition and fuel systems are vitally important to the proper operation of the emission control and related
system, as well as for efficient engine operation. It is strongly recommended that all servicing related to these
systems be done by your Authorised Mazda Dealer.
93GOAX-707
A-8
Page 28 of 677
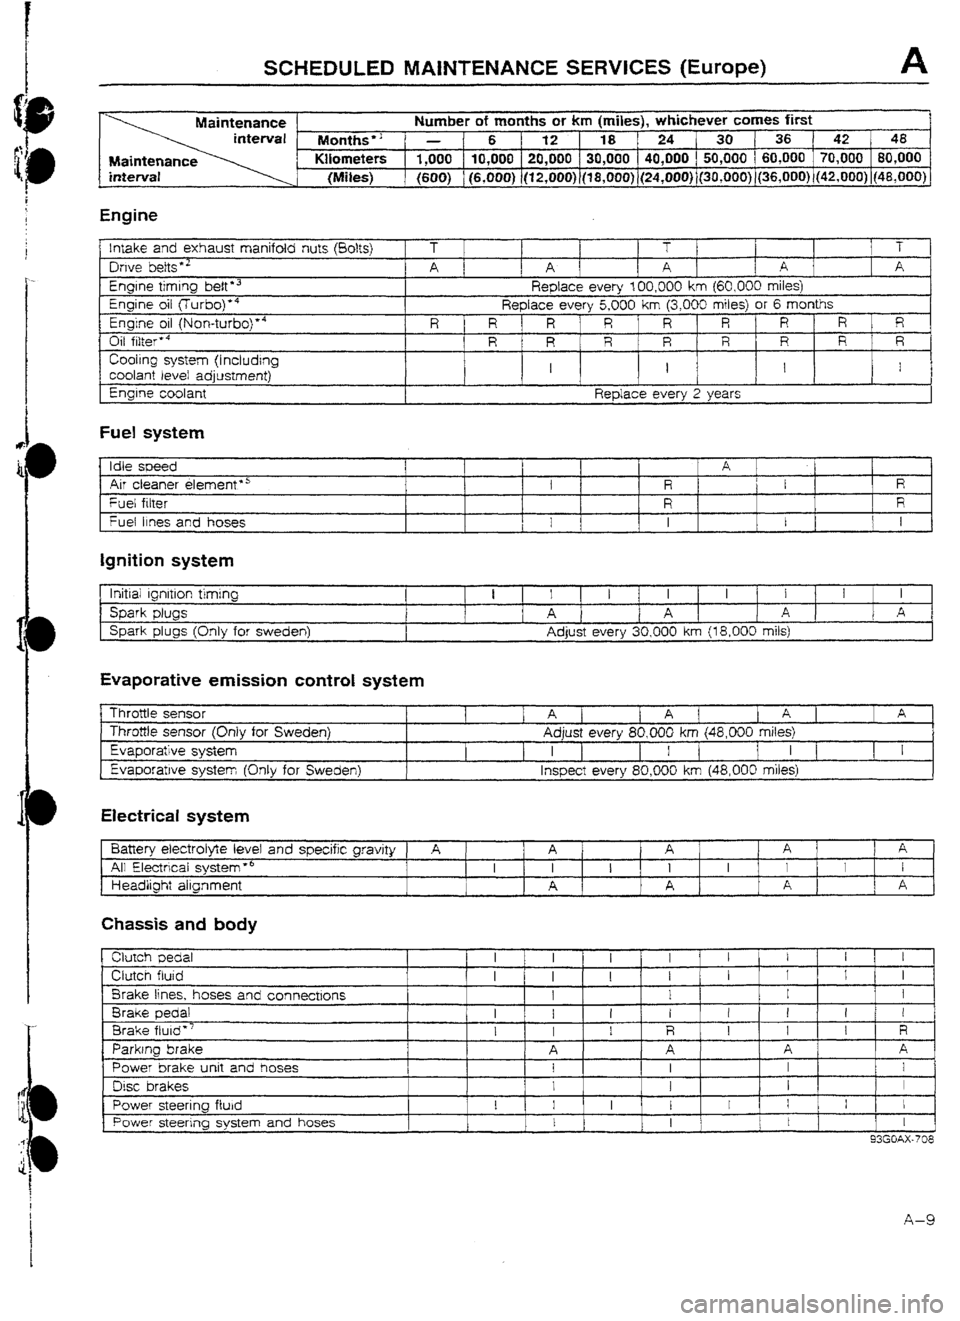
SCHEDULED MAtNTENANCE SERVICES (Europe) A
Maintenance Number of months or km (miles), whichever comes first
Months” - 6 1 12 18 ‘24 30136 42 48
Maintenance Kilometers 1,000 10,000 20,000 30,000 40,000 50,000 ( 60,000 70,000 80,000
(Miles) (600) (6,000) (12,OOO)~(l8,0~0) (24,000) (3O,UOO))(36,000) (42,000) j48,OOU)
Engine
!nrake and exhaust manifold nuts (80&j
Owe belts *’
Engrne timing belt l 3
Engine oil flurbo)‘4
Engine oil (Non-turbo)“4
Oil filter’4
Cooling system (I ncludrng
coolant level adjustment)
Engine coolant T 1 T T
A 1 1 A A 1 A A
Reptace every 100,000 km
{60,000 miles)
Replace every 5,000 km (3,000 miles) or 6 months
R R 1 R R R R ‘ R R R
R R R R R R R ’ R
I I I I
Replace every 2 years
Fuel system
Idle soeed
I A 1
Air cleaner elemenf*5 I f R E
R
Fuel fitter
R R
fuel 11~s and hoses 1
t 1 I I I I
Ignition system
lrritiai ignition timing
Spark plugs
Spark plugs (Only for Sweden) 1 I I I 1 I I 1 I I 1 I
A 1 A A 1 A
Adjust every 30,000 km {
18,000 mils)
Evaporative emission control system
Throttle sensor
Throttle sensor (Only for
Sweden)
Evaporative system Evaporatwe system Khlv
for Sweden) 1 1 Aj 1 A ( [ A ] 1 A
Adjust every 80,000 km (48,000 miles)
I 1 I [ I 1
I I [ 1 I
lnsoect everv 80.000 km (48.000 miles)
Electrical system
Battery electrolyte level and specific gravity
A 1 A A ’ 1 A ; A *
All Electrical system *’ I I 1 I I I I I I
Headlight alignment A A A I
c I A ,
Chassis and body
clutch Dedal
Clutch fluid
Brake lines, hoses and connectrons
Brake pedal
Brake fluid”’
Parking brake
Power brake unit and hoses
Disc brakes
Power steering fluid
Power steering system and hoses I
I I 1 1 1 I I
I I
I
I I I I 1 1 I
1
1 I I
I I I I t ! I I
I I I R I 1 I R
A A A A
I I I I
I 1 I 1
I 1 I I I I j I ,
I
I 1 I 1
I
93GOAX-708
A-9
Page 36 of 677
REMOVAL Bl
/
/
93G05? -72t
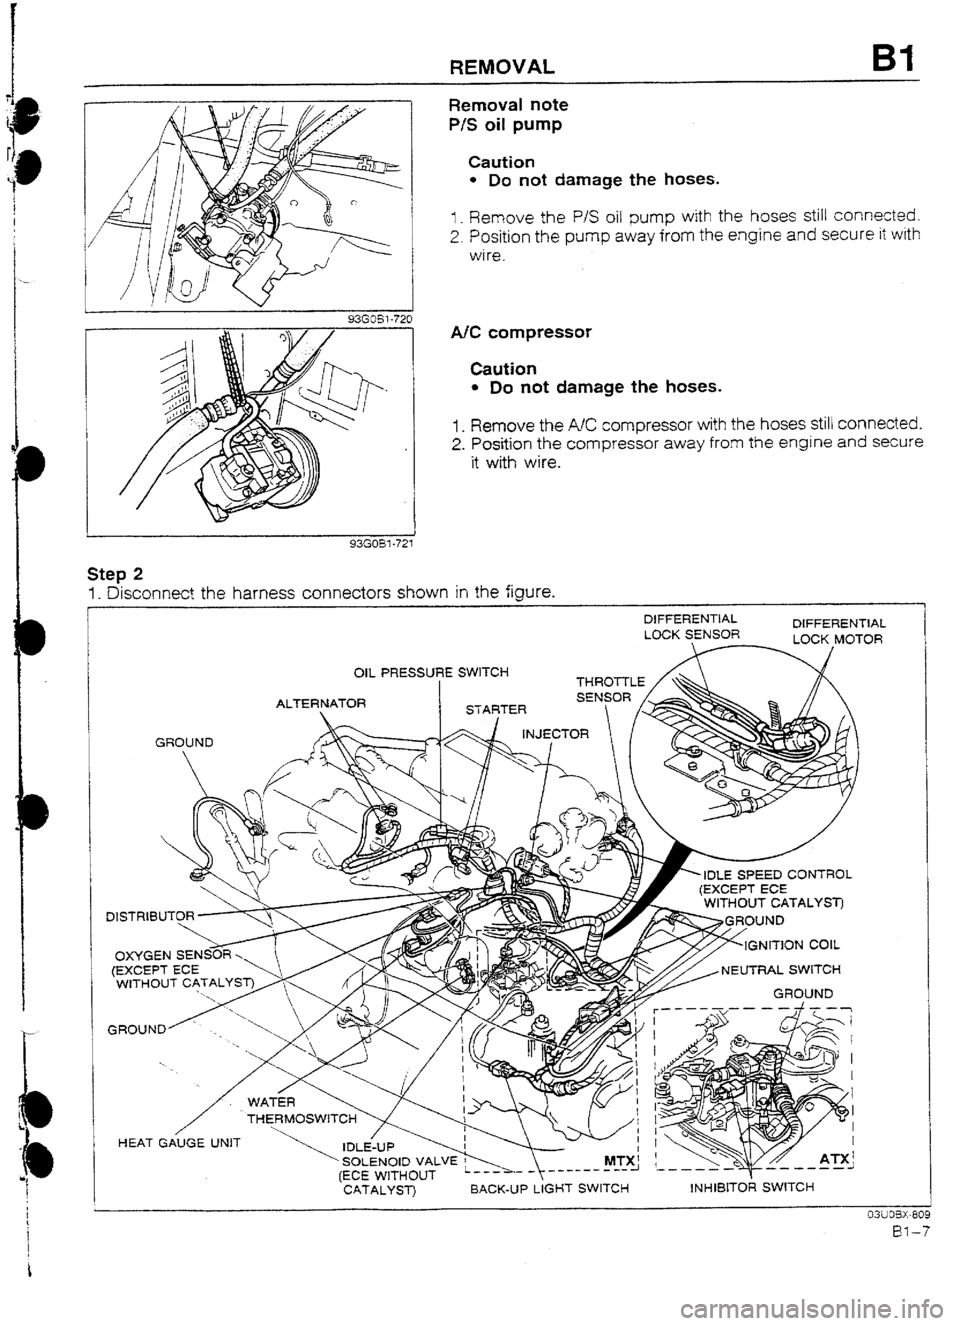
Removal note
P/S oil pump
Caution
l Do not damage the hoses.
I _ Remove the P/S oil pump with the hoses still connected.
2. Position the pump away from the engine and secure it with
wire.
A/C compressor
Caution
l Do not damage the hoses.
1. Remove the AC compressor with the hoses still connected.
2. Position the compressor away from the engine and secure
it with wire.
Step 2
1. Disconnect the harness connectors shown in the figure.
DIFFERENTIAL
DIFFERENTIAL
LUCK SENSOR
OIL PRESSURE SWITCH --- -
GROUND
r, IDLE SPEED CONTROL
NEUTRAL SWITCH
’ SOLENOID VALVE w MTX!
(ECE WITHOUT _--------I
CATALYST) BACK-UP LIGHT SWITCH
\‘C
Y ~55 ATX’
d ---a-- ,-,---1
INHIBITOR SWITCH