tires MAZDA 6 2002 Workshop Manual Suplement
[x] Cancel search | Manufacturer: MAZDA, Model Year: 2002, Model line: 6, Model: MAZDA 6 2002Pages: 909, PDF Size: 17.16 MB
Page 17 of 909

SCHEDULED MAINTENANCE
GI–13
GI
For Israel
Applied VIN (assumed):
JMZ GG1235✻
✻✻ ✻
# 202316-, JMZ GG1435✻
✻✻ ✻
# 202316-, JMZ GY19F2✻
✻✻ ✻
# 146118-, JMZ GY19F5✻
✻✻ ✻
# 146118-
Chart symbols:
I : Inspect and clean, repair, adjust, or replace if necessary.
R : Replace
C : Clean
Remarks:
Engine oil *1 R R R R R R R R R
Engine oil filter *1RRRRRRRRR
Drive belts *2 I I I
Cooling system (including coolant level adjustment) I I I I
Engine coolantReplace at first 4 years or 100,000 km (62,500 miles);
after that, every 2 years
Fuel lines and hoses I I I I
Battery electrolyte level and specific gravity IIIIIIIII
Brake fluid *3 R R R R
Brake lines, hoses and connections IIIIIIIII
Parking brake IIIIIIIII
Power brake unit and hoses IIIIIIIII
Disc brakes IIIIIIIII
Power steering fluid, lines, hoses, and connections IIIIIIIII
Steering operation and linkages I I I I
Manual transaxle oil R
Automatic transaxle fluid level I I I
Rear differential oil (for 4WD)
*7*8
Transfer oil (for 4WD)
*8
Front and rear suspension and ball joints I I I I
Driveshaft dust boots I I I I
Exhaust system and heat shields I I
Cabin air filter (if installed) (pollen filter) R R R R
Body condition
(for rust, corrosion and perforation)Inspect annually
Tires (including spare tyre)
(with inflation pressure adjustment)IIIIIIIII Maintenance ItemMaintenance Interval (Number of months or km (miles), whichever comes first)
Months 12 24 36 48 60 72 84 96 108
×1000 km 20 40 60 80 100 120 140 160 180
×1000 miles 12.5 25 37.5 50 62.5 75 87.5 100 112.5
•The ignition and fuel systems are highly important to the emission control system and to efficient engine operation. All
inspections and adjustments must be made by an Authorized Mazda Dealer.
•After the prescribed period, continue to follow the described maintenance at the recommended intervals.
•Refer below for a description of items marked* in the maintenance chart.
*1: If the vehicle is operated under any of the following conditions, change the engine oil and oil filter every 10,000 km
(6,250 miles) or shorter.
a. Driving in dusty conditions.
b. Extended periods of idling or low speed operation.
c. Driving for long period in cold temperatures or driving regularly at short distance only.
*2: Also inspect and adjust the power steering and air conditioner drive belts, if installed.
*3: If the brakes are used extensively (for example, continuous hard driving or mountain driving) or if the vehicle is
operated in extremely humid climates, change the brake fluid annually.
*4: If the vehicle is operated in very dusty or sandy areas, clean and if necessary, replace the air cleaner element more
often than the recommended intervals.
*5: This is a full function check of electrical systems such as lights, wiper and washer systems (including wiper blades),
and power windows.
Page 22 of 909

GI–18
SCHEDULED MAINTENANCE
End Of Sie
Rear differential oilCheck oil level and inspect for leakage.
Replace rear differential oil.
Transfer oil (for 4×4)Check oil level and inspect for leakage.
Replace transfer oil.
Driveshaft dust boots Inspect for grease leakage, cracks, damage and looseness.
Body condition
(for rust, corrosion and perforation)Inspect body surface for paint damage, rust, corrosion and perforation.
Exhaust system and heat shields Inspect for damage, corrosion, looseness of connections and gas leakage.
Tires
(including spare tire)
(with inflation pressure adjustment)Check air pressure and inspect tires for tread wear, damage and cracks;
and wheels for damage and corrosion.
AIR CONDITIONER SYSTEM (IF EQUIPPED)
Cabin air filter Replace cabin air filter.Maintenance Item Specific Work Required
Page 149 of 909
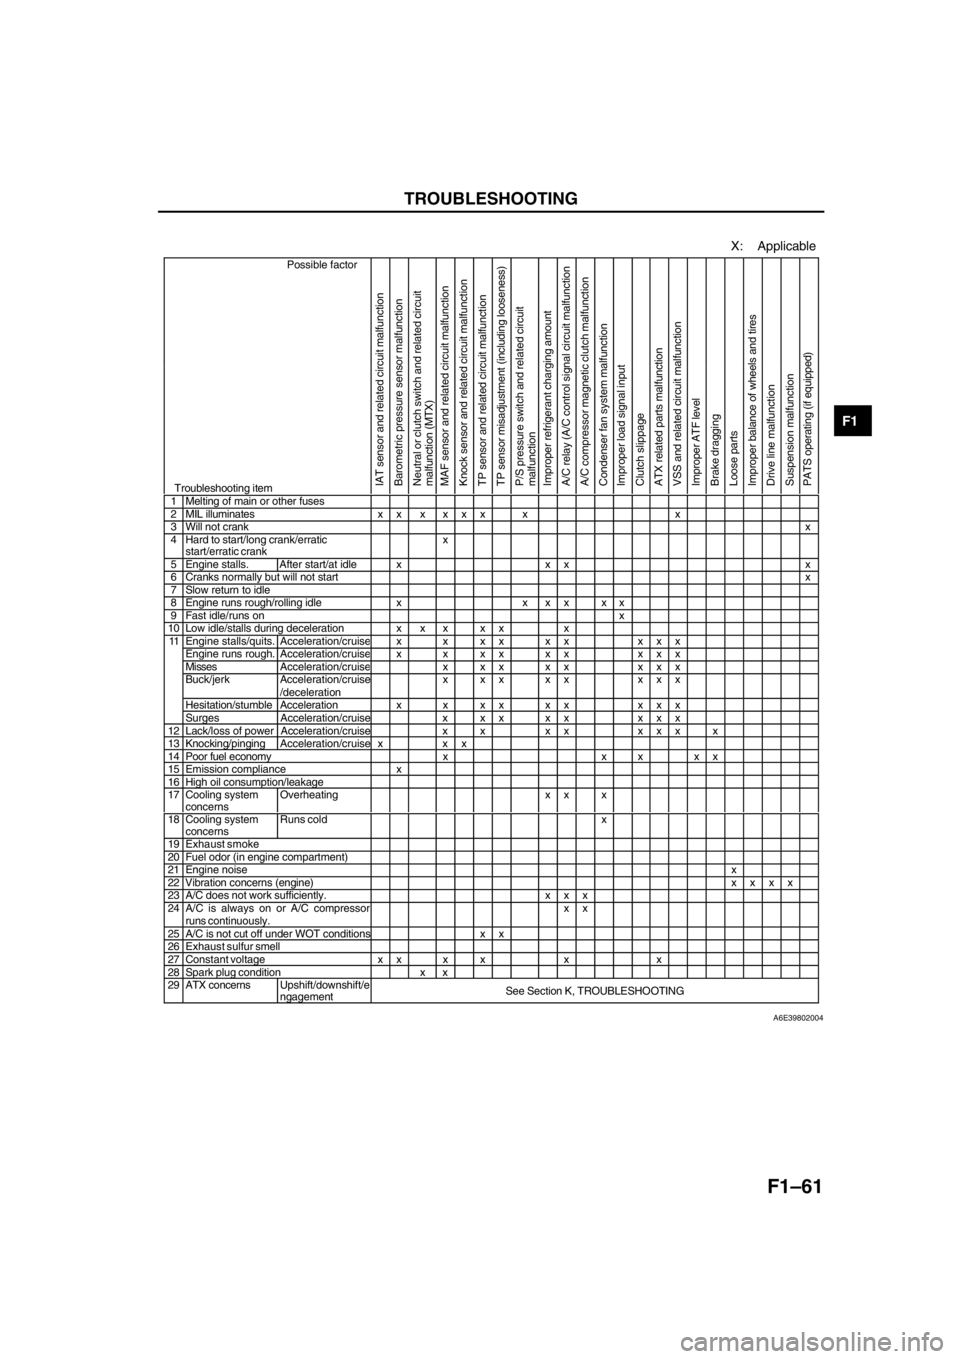
TROUBLESHOOTING
F1–61
F1
End Of Sie
X: Applicable
Possible factor
Troubleshooting itemIAT sensor and related circuit malfunction
Barometric pressure sensor malfunction
Neutral or clutch switch and related circuit
malfunction (MTX)
MAF sensor and related circuit malfunction
Knock sensor and related circuit malfunction
TP sensor and related circuit malfunction
TP sensor misadjustment (including looseness)
P/S pressure switch and related circuit
malfunction
Improper refrigerant charging amount
A/C relay (A/C control signal circuit malfunction
A/C compressor magnetic clutch malfunction
Condenser fan system malfunction
Improper load signal input
Clutch slippage
ATX related parts malfunction
VSS and related circuit malfunction
Improper ATF level
Brake dragging
Loose parts
Improper balance of wheels and tires
Drive line malfunction
Suspension malfunction
PATS operating (if equipped)
1 Melting of main or other fuses2 MIL illuminates x x x x x x x x3 Will not crankx4 Hard to start/long crank/erratic
start/erratic crankx
5 Engine stalls. After start/at idle x x x x6 Cranks normally but will not startx7 Slow return to idle8 Engine runs rough/rolling idle x x x x x x9 Fast idle/runs onx10 Low idle/stalls during deceleration x x x x x xEngine stalls/quits.Acceleration/cruisex x xx xx xxxEngine runs rough. Acceleration/cruisex x xx xx xxxMissesAcceleration/cruisex xx xx xxxBuck/jerk Acceleration/cruise
/decelerationx xx xx xxx
Hesitation/stumble Acceleration x x x x x x x x x
11
Surges Acceleration/cruise x x x x x x x x
12 Lack/loss of power Acceleration/cruise x x x x x x x x13 Knocking/pingingAcceleration/cruise x x x14 Poor fuel economy x x x x x15 Emission compliance x16 High oil consumption/leakage17 Cooling system
concernsOverheating x x x
18 Cooling system
concernsRuns cold x
19 Exhaust smoke20 Fuel odor (in engine compartment)21 Engine noisex22 Vibration concerns (engine)xxxx23 A/C does not work sufficiently. x x x24 A/C is always on or A/C compressorruns continuously.xx25 A/C is not cut off under WOT conditions x x26 Exhaust sulfur smell27 Constant voltage x x x x x x28 Spark plug condition x x29 ATX concernsUpshift/downshift/e
ngagementSee Section K, TROUBLESHOOTING
A6E39802004
Page 324 of 909
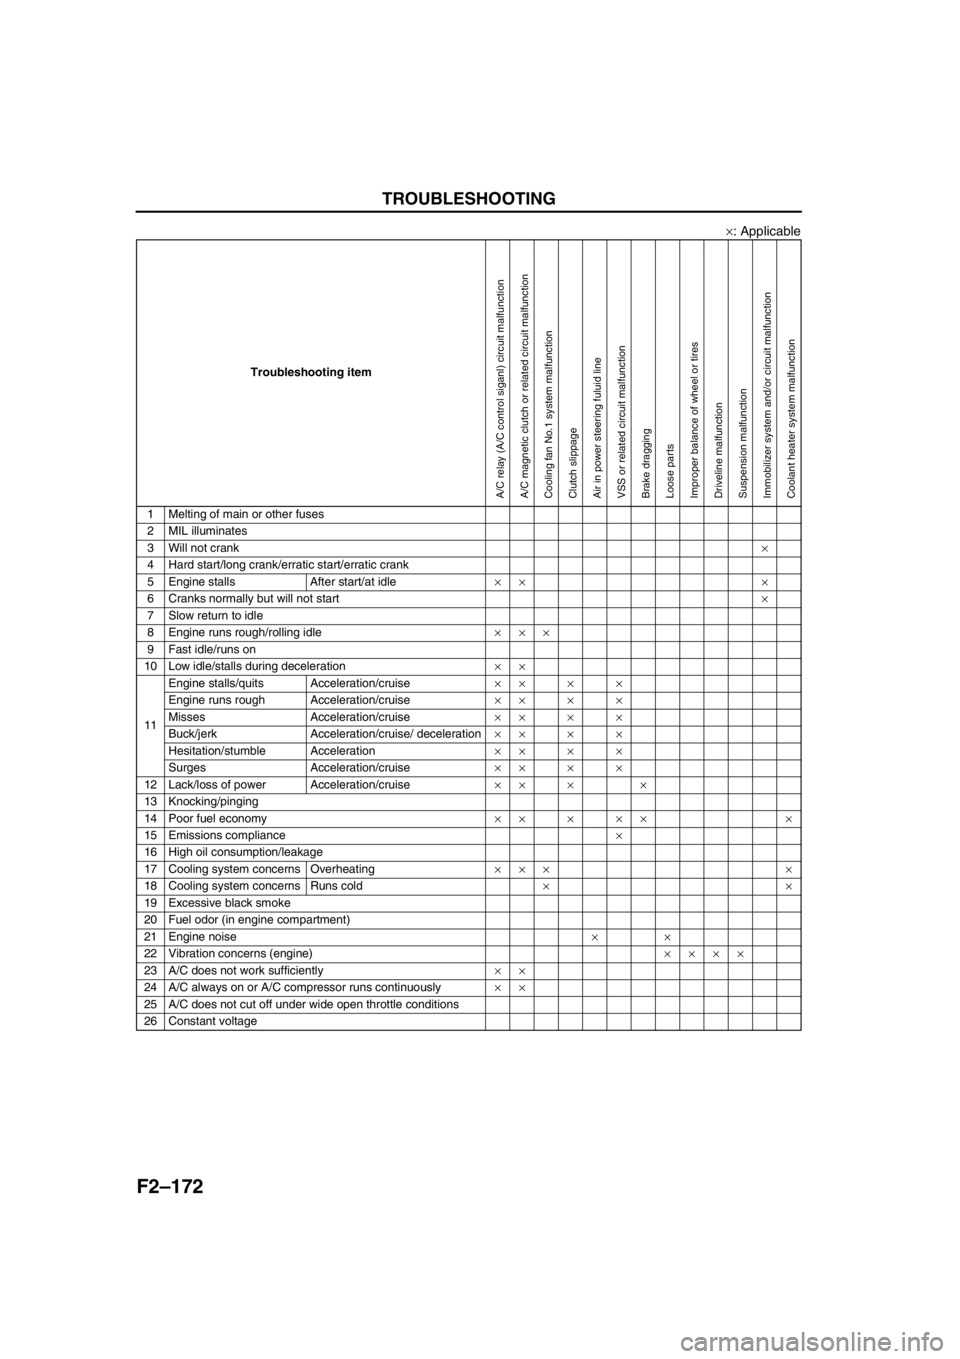
F2–172
TROUBLESHOOTING
×: Applicable
End Of Sie
Troubleshooting item
1 Melting of main or other fuses
2 MIL illuminates
3 Will not crank×
4 Hard start/long crank/erratic start/erratic crank
5 Engine stalls After start/at idle×× ×
6 Cranks normally but will not start×
7 Slow return to idle
8 Engine runs rough/rolling idle×××
9 Fast idle/runs on
10 Low idle/stalls during deceleration××
11Engine stalls/quits Acceleration/cruise××××
Engine runs rough Acceleration/cruise××××
Misses Acceleration/cruise××××
Buck/jerk Acceleration/cruise/ deceleration××××
Hesitation/stumble Acceleration××××
Surges Acceleration/cruise××××
12 Lack/loss of power Acceleration/cruise×× × ×
13 Knocking/pinging
14 Poor fuel economy××××× ×
15 Emissions compliance×
16 High oil consumption/leakage
17 Cooling system concerns Overheating××× ×
18 Cooling system concerns Runs cold××
19 Excessive black smoke
20 Fuel odor (in engine compartment)
21 Engine noise××
22 Vibration concerns (engine)××××
23 A/C does not work sufficiently××
24 A/C always on or A/C compressor runs continuously××
25 A/C does not cut off under wide open throttle conditions
26 Constant voltage
A/C relay (A/C control siganl) circuit malfunctionA/C magnetic clutch or related circuit malfunctionCooling fan No.1 system malfunctionClutch slippageAir in power steering fuluid lineVSS or related circuit malfunctionBrake draggingLoose partsImproper balance of wheel or tiresDriveline malfunctionSuspension malfunctionImmobilizer system and/or circuit malfunctionCoolant heater system malfunction
Page 372 of 909

F2–220
TROUBLESHOOTING
NO.22 VIBRATION CONCERNS (ENGINE)A6E408018881224
Diagnostic Procedure
22 VIBRATION CONCERNS (ENGINE)
DESCRIPTION•Vibration from under hood or driveline.
POSSIBLE
CAUSE•Loose attaching bolts or worn parts
•Cooling fan No.1 or cooling fan No.2 seat are improper
•Engine or transaxle mounts are improperly installed
•Components malfunction such as worn parts
•Erratic signal from CMP sensor
•ECT sensor or related circuit malfunction
•Accelerator position sensor or related circuit malfunction
•MAF/IAT sensor or related circuit malfunction
•Idle switch or related circuit malfunction
•Incorrect adjustment of accelerator position sensor and/or idle switch
•Fuel injector malfunction
•Vacuum leakage
•Improper tension or damaged drive belts
•Improper balance of wheels or tires
•Driveline malfunction
•Suspension malfunction
Warning
The following troubleshooting flow chart contains the fuel system diagnosis and repair
procedures. Read the following warnings before performing the fuel system services:
•Fuel vapor is hazardous. It can easily ignite, causing serious injury and damage. Always keep
sparks and flames away from fuel.
•Fuel line spills and leakage are dangerous. Fuel can ignite and cause serious injury or death
and damage. Fuel can also irritate skin and eyes. To prevent this, always complete “BEFORE
REPAIR PROCEDURE” and “AFTER REPAIR PROCEDURE” described in this manual.
STEP INSPECTION RESULTS ACTION
1 Inspect following components for loose attaching
bolts or worn parts:
•Cooling fan No.1
•Cooling fan No.2
•Cooling fan No.1 and cooling fan No.2 seat
•Drive belt and pulley
•Engine mounts
•Exhaust system
Are all items okay?Yes Go to next step.
No Readjust or retighten engine mount installation
position.
Service as necessary for other parts.
2 Inspect vacuum leakage.
Are vacuum hoses okay?Yes Go to next step.
No Service as necessary.
Repeat Step 2.
Page 409 of 909
MANUAL TRANSAXLE
J2–7
J2
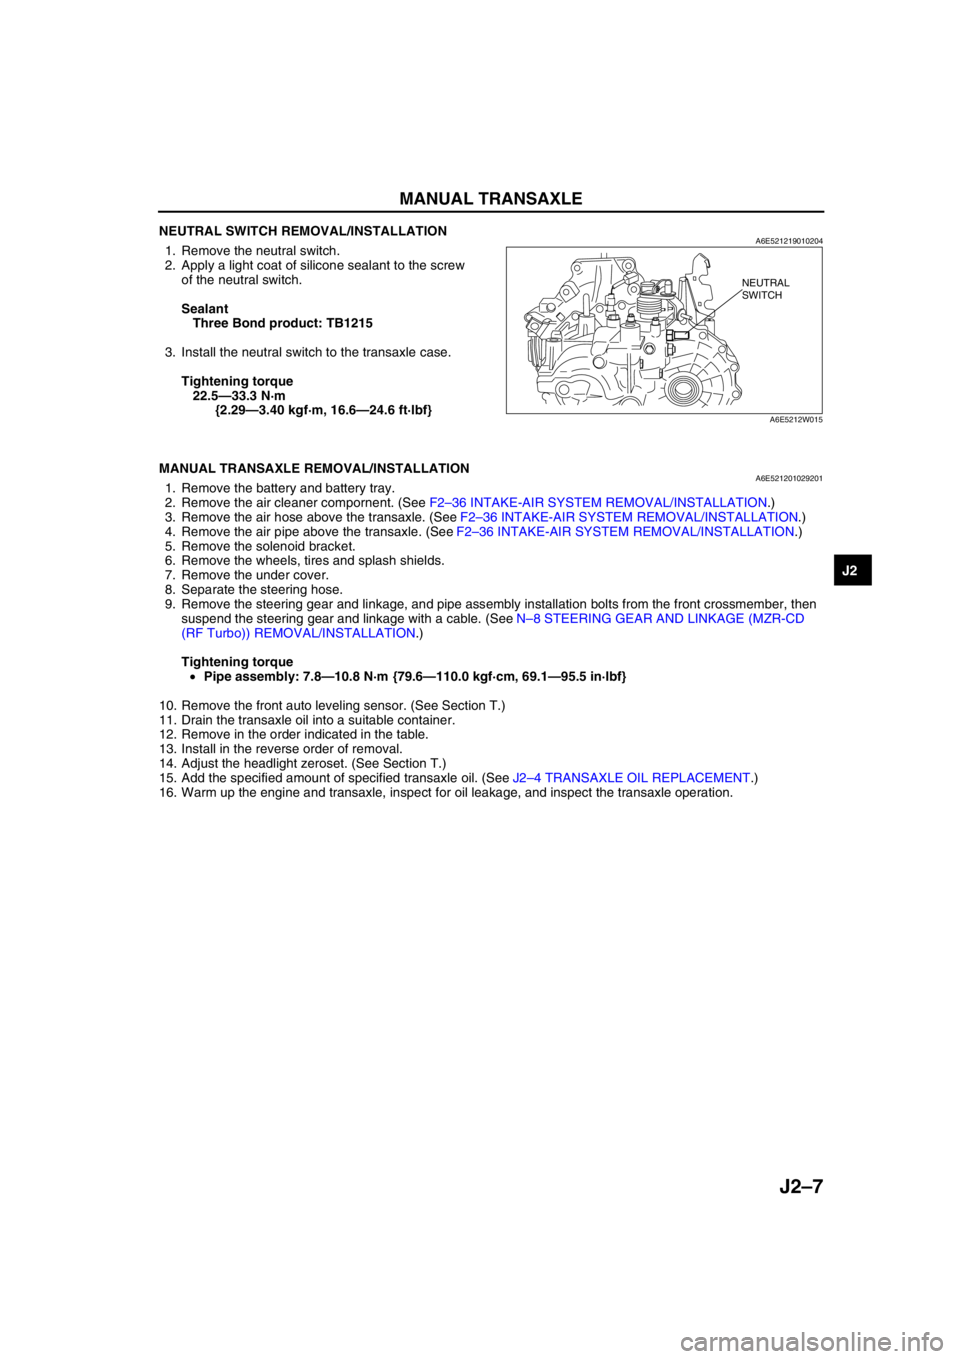
NEUTRAL SWITCH REMOVAL/INSTALLATIONA6E5212190102041. Remove the neutral switch.
2. Apply a light coat of silicone sealant to the screw
of the neutral switch.
Sealant
Three Bond product: TB1215
3. Install the neutral switch to the transaxle case.
Tightening torque
22.5—33.3 N·m
{2.29—3.40 kgf·m, 16.6—24.6 ft·lbf}
End Of Sie
MANUAL TRANSAXLE REMOVAL/INSTALLATIONA6E5212010292011. Remove the battery and battery tray.
2. Remove the air cleaner compornent. (See F2–36 INTAKE-AIR SYSTEM REMOVAL/INSTALLATION.)
3. Remove the air hose above the transaxle. (See F2–36 INTAKE-AIR SYSTEM REMOVAL/INSTALLATION.)
4. Remove the air pipe above the transaxle. (See F2–36 INTAKE-AIR SYSTEM REMOVAL/INSTALLATION.)
5. Remove the solenoid bracket.
6. Remove the wheels, tires and splash shields.
7. Remove the under cover.
8. Separate the steering hose.
9. Remove the steering gear and linkage, and pipe assembly installation bolts from the front crossmember, then
suspend the steering gear and linkage with a cable. (See N–8 STEERING GEAR AND LINKAGE (MZR-CD
(RF Turbo)) REMOVAL/INSTALLATION.)
Tightening torque
•Pipe assembly: 7.8—10.8 N·m {79.6—110.0 kgf·cm, 69.1—95.5 in·lbf}
10. Remove the front auto leveling sensor. (See Section T.)
11. Drain the transaxle oil into a suitable container.
12. Remove in the order indicated in the table.
13. Install in the reverse order of removal.
14. Adjust the headlight zeroset. (See Section T.)
15. Add the specified amount of specified transaxle oil. (See J2–4 TRANSAXLE OIL REPLACEMENT.)
16. Warm up the engine and transaxle, inspect for oil leakage, and inspect the transaxle operation.
NEUTRAL
SWITCH
A6E5212W015
Page 419 of 909

K2–4
AUTOMATIC TRANSAXLE
Bold frames:New specifications
End Of Sie
OUTLINEA6E571401030201•Adopted new JA5AX-EL automatic transaxle.
•Newly designed FF type five-speed automatic transaxle.
—Use of 3 sets of planetary gears, and a wider gear ratio setting realizes improvement of acceleration-from-
standing-start performance, fuel economy, and quietness. Also, by placement of two sets of planetary gears
in parallel with one set, the automatic transaxle is more compact.
•Adopted 2-4 brake clutch.
—Adopted a wet-type, multi-plate 2-4 brake clutch instead of the 2-4 brake band used in the past, for
smoother gear switching performance.
•Adopted centrifugal balance clutch
—The newly adopted centrifugal balance clutch pushes the clutch piston forcefully to low and high clutch by
centrifugal hydraulic pressure for smoother gear switching with batter response.
•Adopted controller area network (CAN)
—By adopting CAN, The TCM is always in contact with other computers in the car and controls the automatic
transaxle properly. This has also made troubleshooting diagnosis easier for the entire vehicle.
•Solenoid, sensor
—Adoption of four duty-type solenoids, five ON-OFF type solenoids, and three revolving sensors realizes
finer, more expedient control of gear shifting performance.
•Adoption of revers inhibit control
—If the reverse position is selected by mistake while driving in forward motion, the reverse inhibit control
system will cancel the operation electronically and set the position to neutral as a safety enhancement.
Outline of Operation
•The operation of the electronic automatic transaxle is classified into three systems: the electronic control
system, the hydraulic pressure control system, and the powertrain system (includes the torque converter
system.)
Electronic control system
•According to the signals from the switches and sensors in the input system, the TCM outputs the signal
which matches the present driving condition to the ON/OFF type solenoids and the duty-cycle type
solenoids in the hydraulic pressure control system.
Hydraulic pressure control system
•According to the signals from the TCM, each solenoid operates to switch the hydraulic passages in the
control valve body and controls the clutch engagement pressure.
•The line pressure is adjusted by the duty-cycle type pressure control solenoid. The hydraulic passages
are switched by the ON/OFF type solenoids and the clutch engagement pressure is controlled by the
duty-cycle type solenoids.
Powertrain system
•The driving force from the engine is transmitted through the torque converter to the transaxle.
•The transmitted driving force operates each clutch and brake according to the clutch engagement
pressure from the duty-cycle type solenoid, and the planetary gears change the gear ratio to the
optimal driving force. The changed driving force is transmitted through the differential to the axle shaft
and then the tires.
AUTOMATIC TRANSAXLE
Page 514 of 909
AUTOMATIC TRANSAXLE
K2–99
K2
AUTOMATIC TRANSAXLE AND TRANSFER REMOVAL/INSTALLATIONA6E5714190902011. Disconnect the negative battery cable.
2. Remove the battery and battery tray.
3. Remove the aircleaner component. (See Sectin F.)
4. Remove the front tires and splash shield.
5. Remove the under cover.
6. Separate the steering shaft and steering hose. (See N–13 STEERING GEAR AND LINKAGE (4WD)
REMOVAL/INSTALLATION.)
7. Remove the front auto leveling sensor. (See Section T.)
8. Drain the ATF. (See K2–80 AUTOMATIC TRANSAXLE FLUID (ATF) REPLACEMENT.)
Warning
•Improperly jacking a transaxle is dangerous. It can slip off the jack and may cause serious injury.
Caution
•To prevent the torque converter and transaxle from separating, remove the transaxle without
tilting it toward the torque converter.
9. Remove in the order shown in the figure.
10. Install in the reverse order of removal.
11. Adjust the headlight zeroset. (See Section T.)
12. Add ATF to the specified level. (See K2–80 AUTOMATIC TRANSAXLE FLUID (ATF) REPLACEMENT.)
13. Carry out the mechanical system test. (See K2–72 MECHANICAL SYSTEM TEST.)
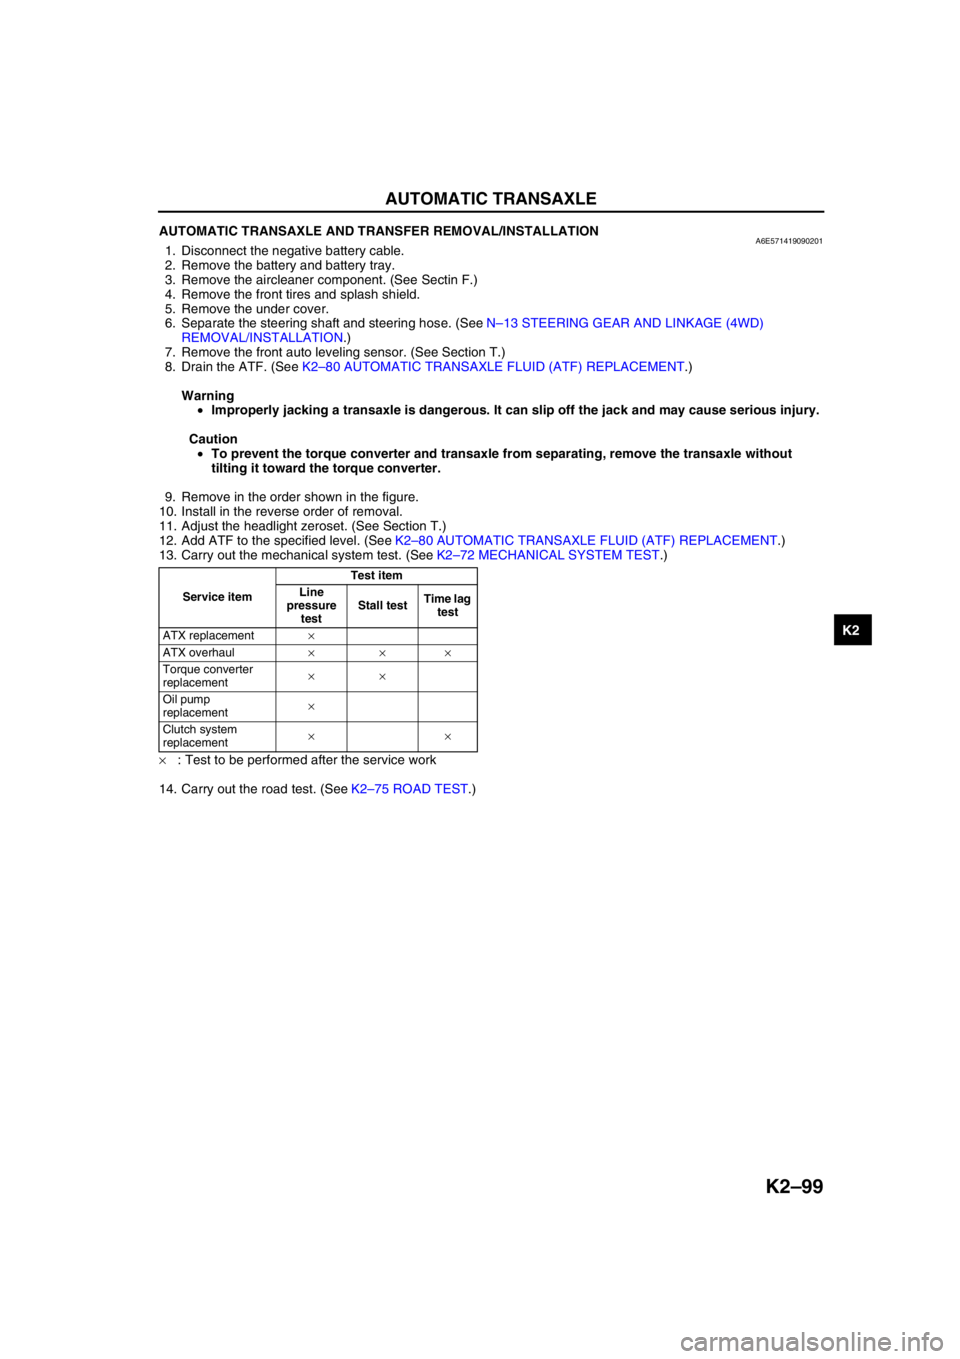
×: Test to be performed after the service work
14. Carry out the road test. (See K2–75 ROAD TEST.)
Service itemTest item
Line
pressure
testStall testTime lag
test
ATX replacement×
ATX overhaul×××
Torque converter
replacement××
Oil pump
replacement×
Clutch system
replacement××
Page 530 of 909
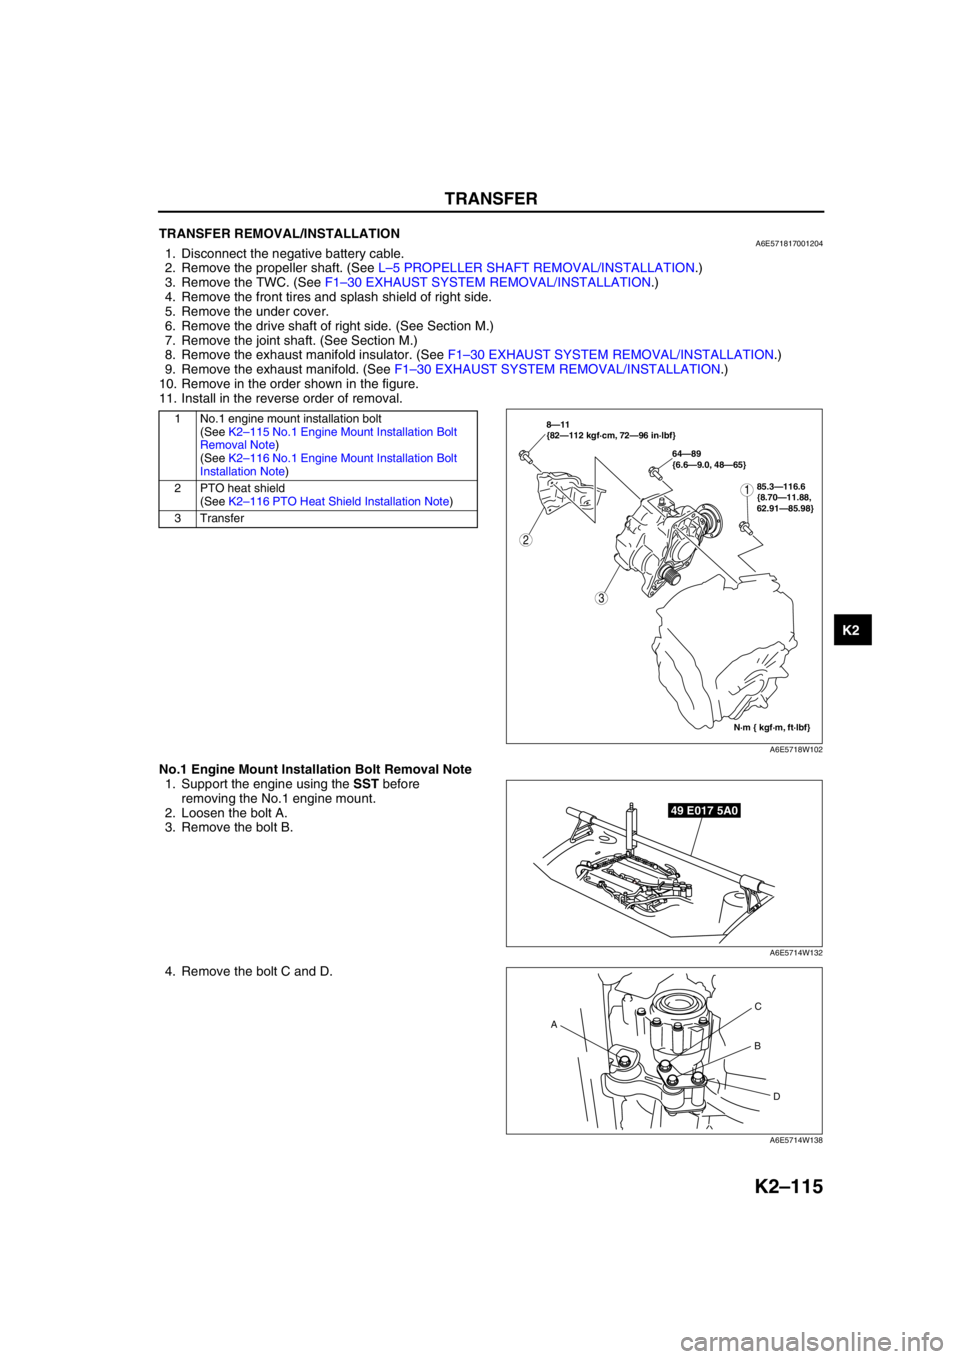
TRANSFER
K2–115
K2
End Of SieTRANSFER REMOVAL/INSTALLATIONA6E5718170012041. Disconnect the negative battery cable.
2. Remove the propeller shaft. (See L–5 PROPELLER SHAFT REMOVAL/INSTALLATION.)
3. Remove the TWC. (See F1–30 EXHAUST SYSTEM REMOVAL/INSTALLATION.)
4. Remove the front tires and splash shield of right side.
5. Remove the under cover.
6. Remove the drive shaft of right side. (See Section M.)
7. Remove the joint shaft. (See Section M.)
8. Remove the exhaust manifold insulator. (See F1–30 EXHAUST SYSTEM REMOVAL/INSTALLATION.)
9. Remove the exhaust manifold. (See F1–30 EXHAUST SYSTEM REMOVAL/INSTALLATION.)
10. Remove in the order shown in the figure.
11. Install in the reverse order of removal.
.
No.1 Engine Mount Installation Bolt Removal Note
1. Support the engine using the SST before
removing the No.1 engine mount.
2. Loosen the bolt A.
3. Remove the bolt B.
4. Remove the bolt C and D.
1 No.1 engine mount installation bolt
(See K2–115 No.1 Engine Mount Installation Bolt
Removal Note)
(See K2–116 No.1 Engine Mount Installation Bolt
Installation Note)
2 PTO heat shield
(See K2–116 PTO Heat Shield Installation Note)
3Transfer
2
3
N·m { kgf·m, ft·lbf} 8—11
{82—112 kgf·cm, 72—96 in·lbf}
64—89
{6.6—9.0, 48—65}
185.3—116.6
{8.70—11.88,
62.91—85.98}
A6E5718W102
49 E017 5A0
A6E5714W132
AC
B
D
A6E5714W138
Page 598 of 909
TROUBLESHOOTING
K2–183
K2
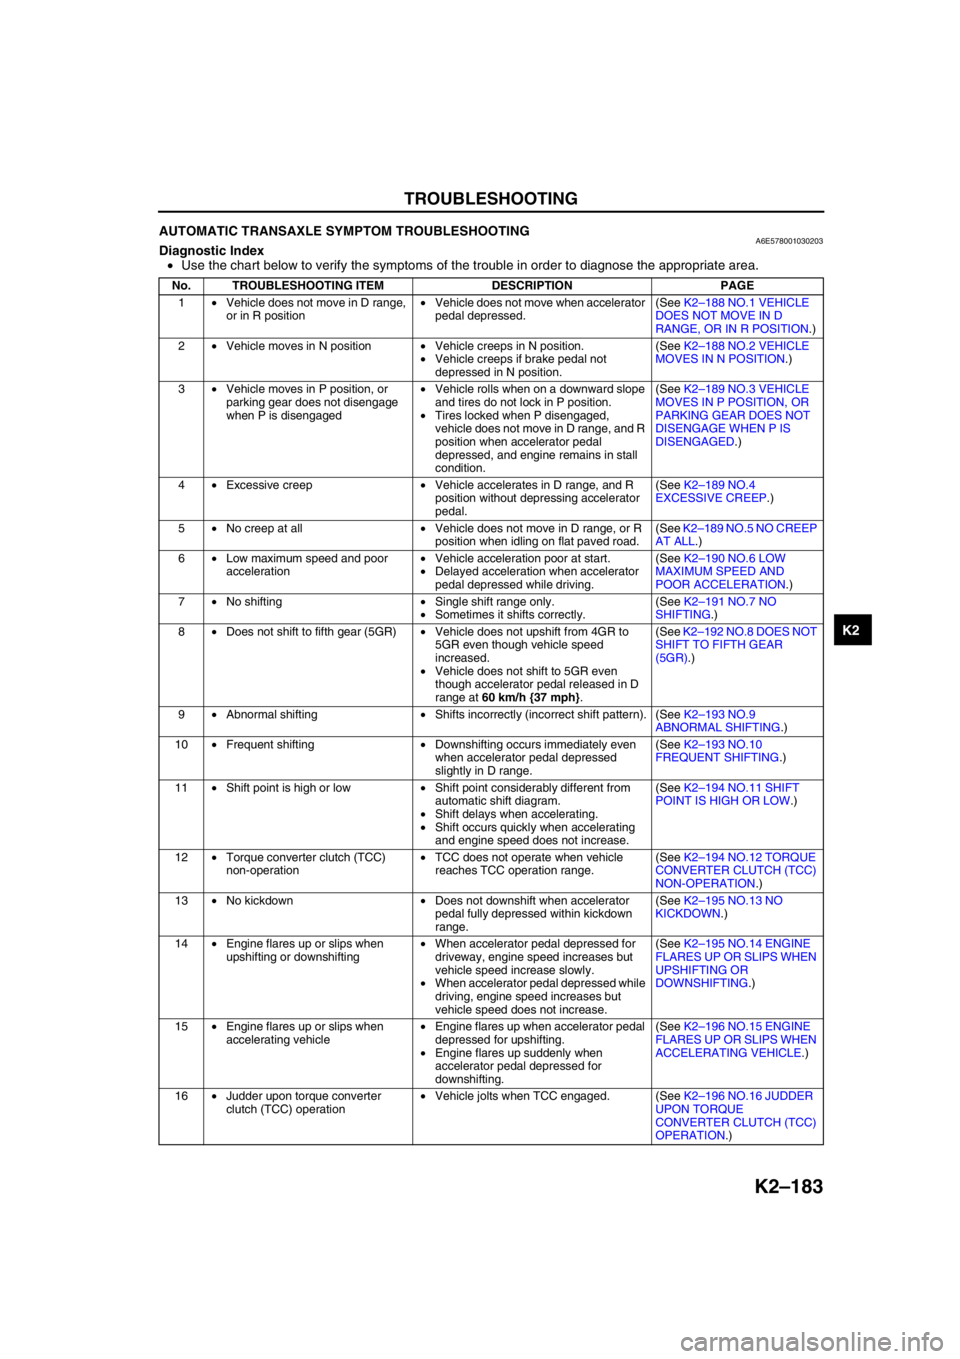
AUTOMATIC TRANSAXLE SYMPTOM TROUBLESHOOTINGA6E578001030203Diagnostic Index
•Use the chart below to verify the symptoms of the trouble in order to diagnose the appropriate area.
No. TROUBLESHOOTING ITEM DESCRIPTION PAGE
1•Vehicle does not move in D range,
or in R position•Vehicle does not move when accelerator
pedal depressed.(See K2–188 NO.1 VEHICLE
DOES NOT MOVE IN D
RANGE, OR IN R POSITION.)
2•Vehicle moves in N position•Vehicle creeps in N position.
•Vehicle creeps if brake pedal not
depressed in N position.(See K2–188 NO.2 VEHICLE
MOVES IN N POSITION.)
3•Vehicle moves in P position, or
parking gear does not disengage
when P is disengaged•Vehicle rolls when on a downward slope
and tires do not lock in P position.
•Tires locked when P disengaged,
vehicle does not move in D range, and R
position when accelerator pedal
depressed, and engine remains in stall
condition.(See K2–189 NO.3 VEHICLE
MOVES IN P POSITION, OR
PARKING GEAR DOES NOT
DISENGAGE WHEN P IS
DISENGAGED.)
4•Excessive creep•Vehicle accelerates in D range, and R
position without depressing accelerator
pedal.(See K2–189 NO.4
EXCESSIVE CREEP.)
5•No creep at all•Vehicle does not move in D range, or R
position when idling on flat paved road.(See K2–189 NO.5 NO CREEP
AT ALL.)
6•Low maximum speed and poor
acceleration•Vehicle acceleration poor at start.
•Delayed acceleration when accelerator
pedal depressed while driving.(See K2–190 NO.6 LOW
MAXIMUM SPEED AND
POOR ACCELERATION.)
7•No shifting•Single shift range only.
•Sometimes it shifts correctly.(See K2–191 NO.7 NO
SHIFTING.)
8•Does not shift to fifth gear (5GR)•Vehicle does not upshift from 4GR to
5GR even though vehicle speed
increased.
•Vehicle does not shift to 5GR even
though accelerator pedal released in D
range at 60 km/h {37 mph}.(See K2–192 NO.8 DOES NOT
SHIFT TO FIFTH GEAR
(5GR).)
9•Abnormal shifting•Shifts incorrectly (incorrect shift pattern). (See K2–193 NO.9
ABNORMAL SHIFTING.)
10•Frequent shifting•Downshifting occurs immediately even
when accelerator pedal depressed
slightly in D range.(See K2–193 NO.10
FREQUENT SHIFTING.)
11•Shift point is high or low•Shift point considerably different from
automatic shift diagram.
•Shift delays when accelerating.
•Shift occurs quickly when accelerating
and engine speed does not increase.(See K2–194 NO.11 SHIFT
POINT IS HIGH OR LOW.)
12•Torque converter clutch (TCC)
non-operation•TCC does not operate when vehicle
reaches TCC operation range.(See K2–194 NO.12 TORQUE
CONVERTER CLUTCH (TCC)
NON-OPERATION.)
13•No kickdown•Does not downshift when accelerator
pedal fully depressed within kickdown
range.(See K2–195 NO.13 NO
KICKDOWN.)
14•Engine flares up or slips when
upshifting or downshifting•When accelerator pedal depressed for
driveway, engine speed increases but
vehicle speed increase slowly.
•When accelerator pedal depressed while
driving, engine speed increases but
vehicle speed does not increase.(See K2–195 NO.14 ENGINE
FLARES UP OR SLIPS WHEN
UPSHIFTING OR
DOWNSHIFTING.)
15•Engine flares up or slips when
accelerating vehicle•Engine flares up when accelerator pedal
depressed for upshifting.
•Engine flares up suddenly when
accelerator pedal depressed for
downshifting.(See K2–196 NO.15 ENGINE
FLARES UP OR SLIPS WHEN
ACCELERATING VEHICLE.)
16•Judder upon torque converter
clutch (TCC) operation•Vehicle jolts when TCC engaged. (See K2–196 NO.16 JUDDER
UPON TORQUE
CONVERTER CLUTCH (TCC)
OPERATION.)