alternator MAZDA MIATA 1991 Factory User Guide
[x] Cancel search | Manufacturer: MAZDA, Model Year: 1991, Model line: MIATA, Model: MAZDA MIATA 1991Pages: 392, PDF Size: 29.45 MB
Page 254 of 392

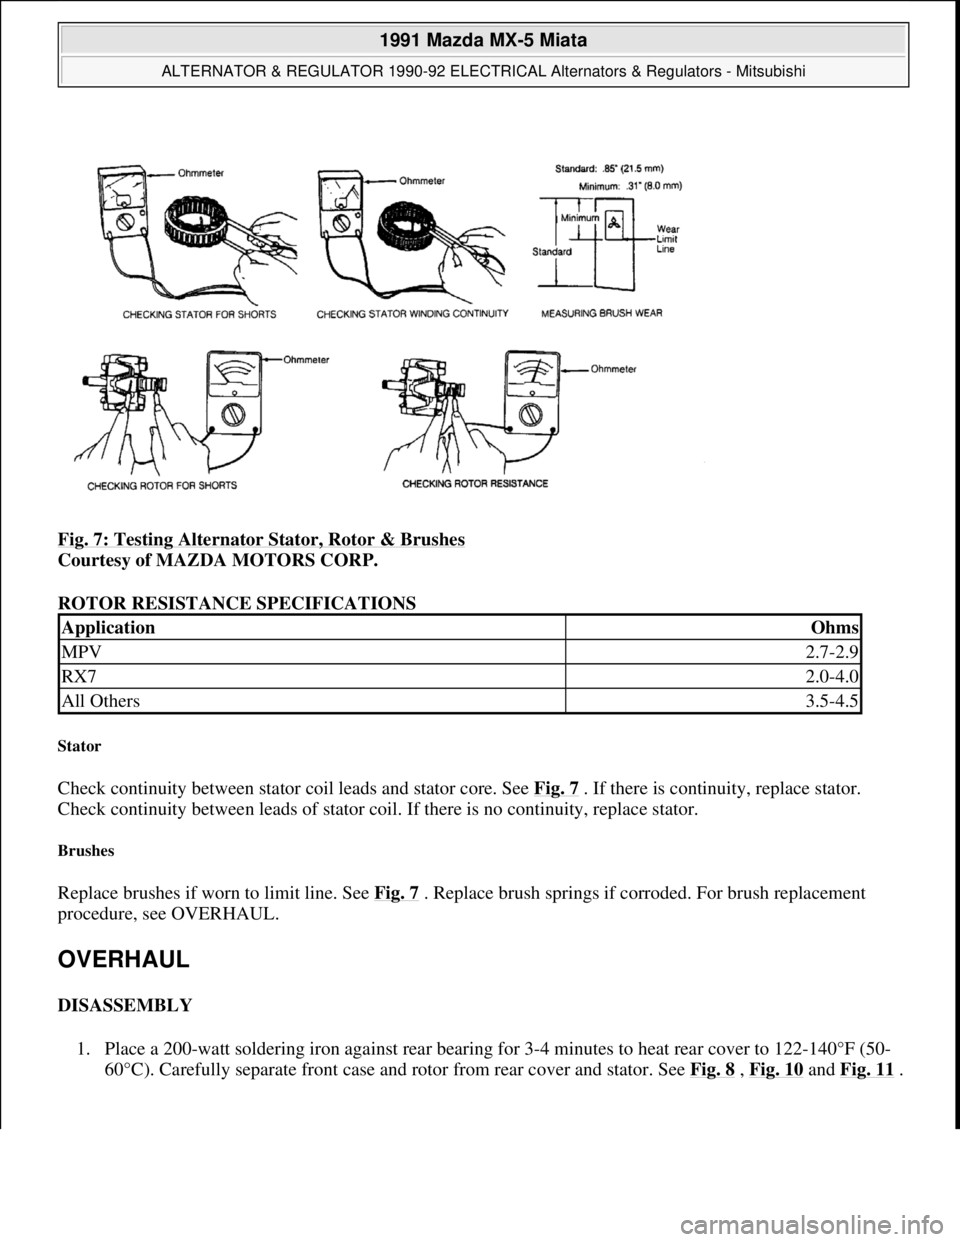
Fig. 7: Testing Alternator Stator, Rotor & Brushes
Courtesy of MAZDA MOTORS CORP.
ROTOR RESISTANCE SPECIFICATIONS
Stator
Check continuity between stator coil leads and stator core. See Fig. 7 . If there is continuity, replace stator.
Check continuity between leads of stator coil. If there is no continuity, replace stator.
Brushes
Replace brushes if worn to limit line. See Fig. 7 . Replace brush springs if corroded. For brush replacement
procedure, see OVERHAUL.
OVERHAUL
DISASSEMBLY
1. Place a 200-watt soldering iron against rear bearing for 3-4 minutes to heat rear cover to 122-140°F (50-
60°C). Carefull
y separate front case and rotor from rear cover and stator. See Fig. 8 , Fig. 10and Fig. 11.
ApplicationOhms
MPV2.7-2.9
RX72.0-4.0
All Others3.5-4.5
1991 Mazda MX-5 Miata
ALTERNATOR & REGULATOR 1990-92 ELECTRICAL Alternators & Regulators - Mitsubishi
Microsoft
Sunday, July 05, 2009 2:14:54 PMPage 10 © 2005 Mitchell Repair Information Company, LLC.
Page 255 of 392

Fig. 8: Overhauling Alternators
Courtesy of MAZDA MOTORS CORP.
2. Position rotor in vise. Remove pulley. Disassemble pulley, rotor and front case. Remove front bearing
from front case. Using a bearing puller, remove rear bearing.
3. Remove "B" terminal nut and bushing from rear cover. Remove screws from brush holder and rectifier.
Separate rear cover and stator. When unsoldering rectifier and stator leads, disconnect as quickly as
possible (5 seconds maximum) to avoid damage to rectifier. To remove brushes from holder, unsolder
pigtail from terminal.
REASSEMBLY
Brush Installation
1. Install brush and spring into holder. Allow brush to extend out of holder until wear limit line extends .08-
.16" (2-4 mm) beyond end of brush holder. See Fig. 9
. Solder pigtail onto brush holder.
2. Insert spring and brush into brush holder. Using a spring scale, pull brush into holder until end of brush
protrudes .08" (2.0 mm) from holder. See Fig. 9
. Note reading on spring scale. Replace spring if tension
is not 5.6-15.5 ozs. (160-440 g).
1991 Mazda MX-5 Miata
ALTERNATOR & REGULATOR 1990-92 ELECTRICAL Alternators & Regulators - Mitsubishi
Microsoft
Sunday, July 05, 2009 2:14:54 PMPage 11 © 2005 Mitchell Repair Information Company, LLC.
Page 256 of 392

Fig. 9: Measuring Installed Depth of Brush
Courtesy of MAZDA MOTORS CORP.
Fig. 10: Exploded View of Alternators
Courtesy of MAZDA MOTORS CORP.
1991 Mazda MX-5 Miata
ALTERNATOR & REGULATOR 1990-92 ELECTRICAL Alternators & Regulators - Mitsubishi
Microsoft
Sunday, July 05, 2009 2:14:54 PMPage 12 © 2005 Mitchell Repair Information Company, LLC.
Page 257 of 392

Fig. 11: Exploded View of Alternators
Courtesy of MAZDA MOTORS CORP.
1991 Mazda MX-5 Miata
ALTERNATOR & REGULATOR 1990-92 ELECTRICAL Alternators & Regulators - Mitsubishi
Microsoft
Sunday, July 05, 2009 2:14:54 PMPage 13 © 2005 Mitchell Repair Information Company, LLC.
Page 285 of 392

1990-93 ENGINE COOLING
Drive Belt Routing & Adjustment - MX-5 Miata
ADJUSTMENT
Fig. 1: Identifying Correct Belt Mounting
Courtesy of MAZDA MOTORS CORP.
ALTERNATOR
Loosen alternator bolts and adjust belt deflection by turning adjusting bolt. See Fig. 2
, Fig. 6 and Fig. 7 . See
ADJUSTMENT SPECIFICATIONS
. Tighten bolts to specification. See TORQUE SPECIFICATIONS. NOTE: Ensure drive belts are not worn, cracked or frayed and are correctly mounted
on pulleys. See Fig. 1
.
NOTE: If a new belt is used, adjust belt deflection at midpoint of new belt specification.
1991 Mazda MX-5 Miata
1990-93 ENGINE COOLING Drive Belt Routing & Adjustment - MX-5 Miata
1991 Mazda MX-5 Miata
1990-93 ENGINE COOLING Drive Belt Routing & Adjustment - MX-5 Miata
Microsoft
Sunday, July 05, 2009 2:14:16 PMPage 1 © 2005 Mitchell Repair Information Company, LLC.
Microsoft
Sunday, July 05, 2009 2:14:28 PMPage 1 © 2005 Mitchell Repair Information Company, LLC.
Page 286 of 392

Fig. 2: Adjusting Alternator Belt
Courtesy of MAZDA MOTORS CORP.
A/C COMPRESSOR
Loosen locknut and adjust belt deflection by turning adjusting bolt. See Fig. 3
, Fig. 6 and Fig. 7 . See
ADJUSTMENT SPECIFICATIONS
. Tighten bolts to specification. See TORQUE SPECIFICATIONS.
1991 Mazda MX-5 Miata
1990-93 ENGINE COOLING Drive Belt Routing & Adjustment - MX-5 Miata
Microsoft
Sunday, July 05, 2009 2:14:16 PMPage 2 © 2005 Mitchell Repair Information Company, LLC.
Page 291 of 392

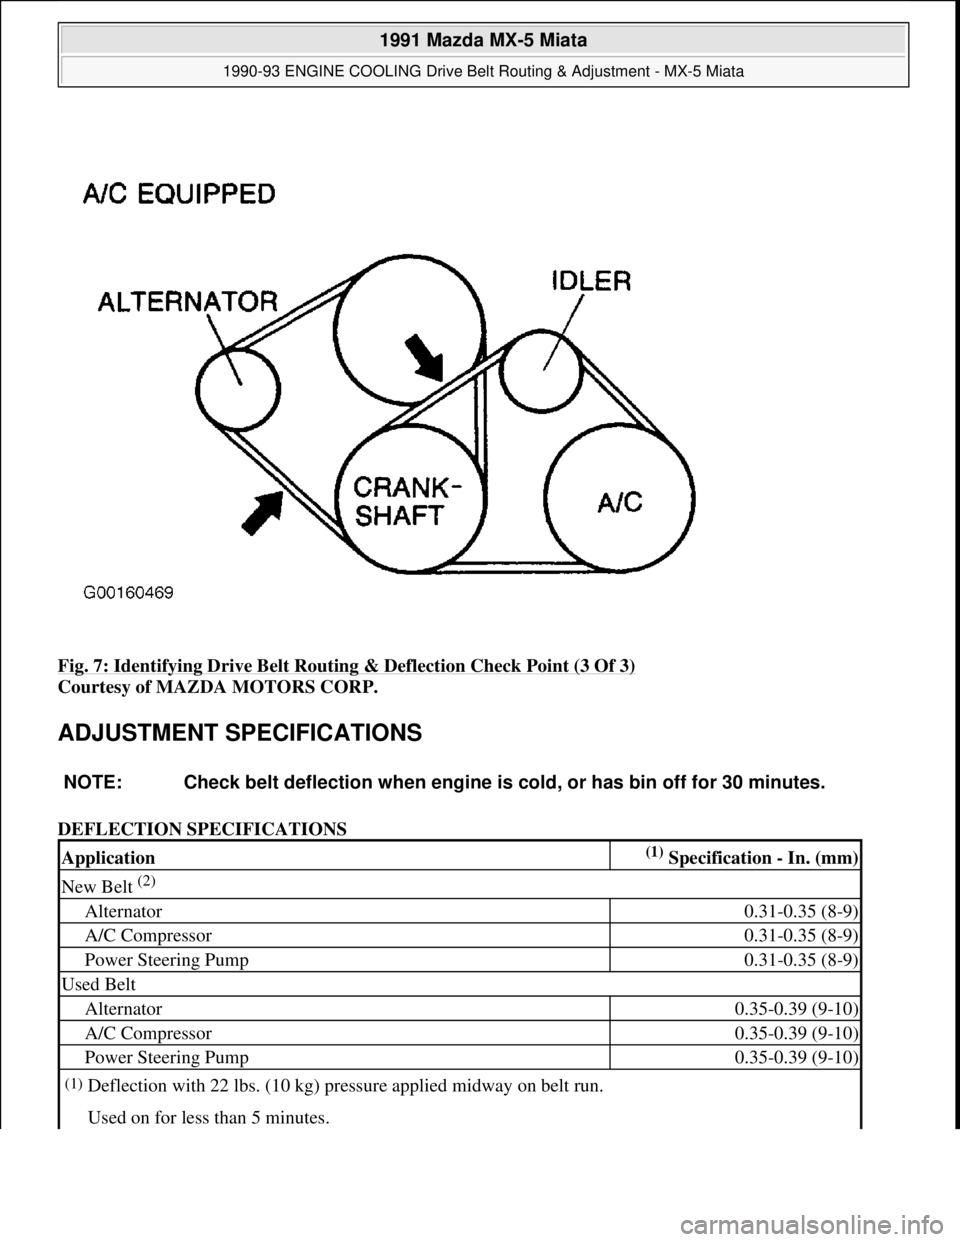
Fig. 7: Identifying Drive Belt Routing & Deflection Check Point (3 Of 3)
Courtesy of MAZDA MOTORS CORP.
ADJUSTMENT SPECIFICATIONS
DEFLECTION SPECIFICATIONS
NOTE: Check belt deflection when engine is cold, or has bin off for 30 minutes.
Application(1) Specification - In. (mm)
New Belt (2)
Alternator0.31-0.35 (8-9)
A/C Compressor0.31-0.35 (8-9)
Power Steering Pump0.31-0.35 (8-9)
Used Belt
Alternator0.35-0.39 (9-10)
A/C Compressor0.35-0.39 (9-10)
Power Steering Pump0.35-0.39 (9-10)
(1)Deflection with 22 lbs. (10 kg) pressure applied midway on belt run.
Used on for less than 5 minutes.
1991 Mazda MX-5 Miata
1990-93 ENGINE COOLING Drive Belt Routing & Adjustment - MX-5 Miata
Microsoft
Sunday, July 05, 2009 2:14:16 PMPage 7 © 2005 Mitchell Repair Information Company, LLC.
Page 292 of 392

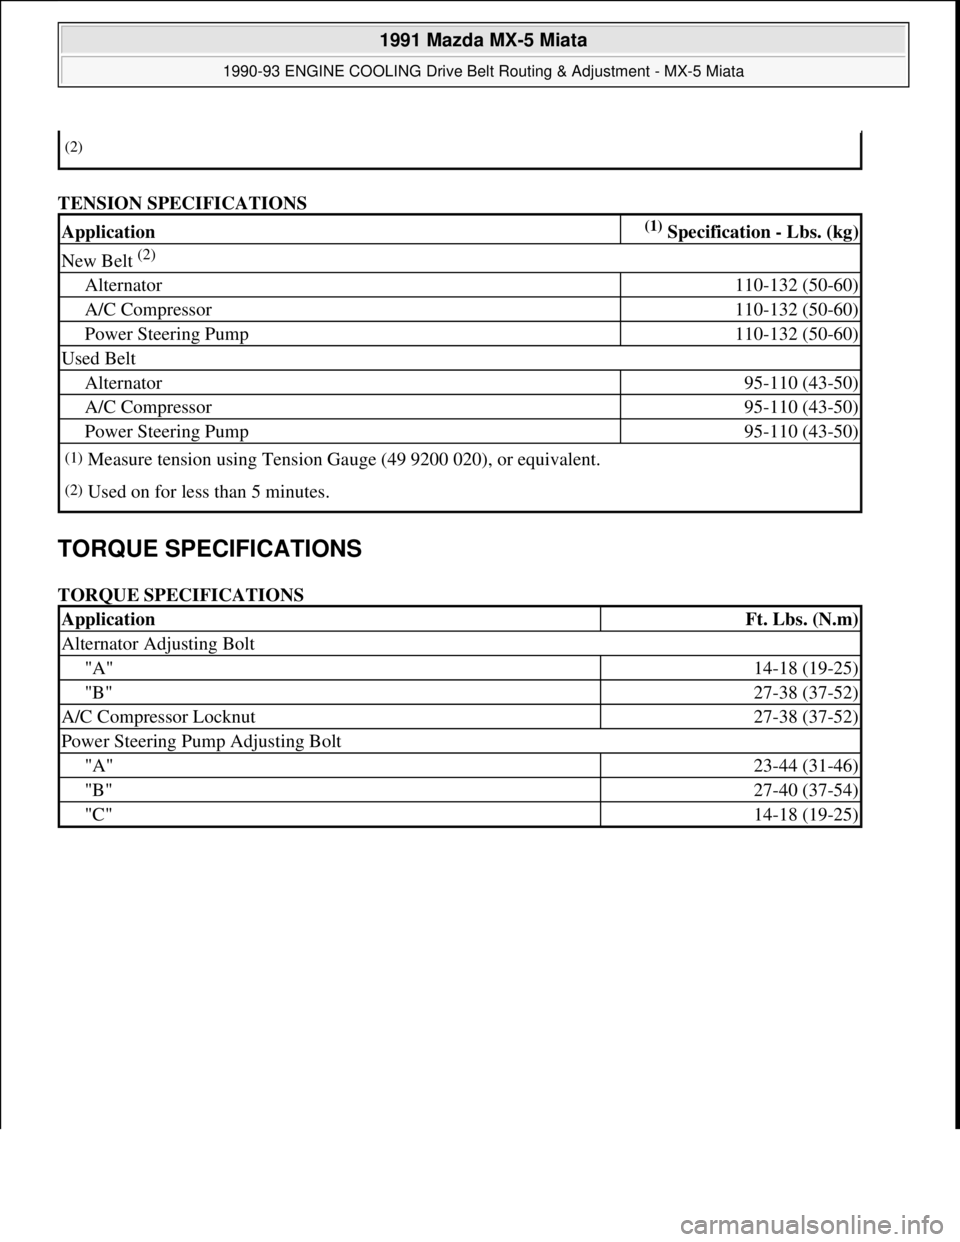
TENSION SPECIFICATIONS
TORQUE SPECIFICATIONS
TORQUE SPECIFICATIONS
(2)
Application(1) Specification - Lbs. (kg)
New Belt (2)
Alternator110-132 (50-60)
A/C Compressor110-132 (50-60)
Power Steering Pump110-132 (50-60)
Used Belt
Alternator95-110 (43-50)
A/C Compressor95-110 (43-50)
Power Steering Pump95-110 (43-50)
(1)Measure tension using Tension Gauge (49 9200 020), or equivalent.
(2)Used on for less than 5 minutes.
ApplicationFt. Lbs. (N.m)
Alternator Adjusting Bolt
"A"14-18 (19-25)
"B"27-38 (37-52)
A/C Compressor Locknut27-38 (37-52)
Power Steering Pump Adjusting Bolt
"A"23-44 (31-46)
"B"27-40 (37-54)
"C"14-18 (19-25)
1991 Mazda MX-5 Miata
1990-93 ENGINE COOLING Drive Belt Routing & Adjustment - MX-5 Miata
Microsoft
Sunday, July 05, 2009 2:14:16 PMPage 8 © 2005 Mitchell Repair Information Company, LLC.
Page 315 of 392

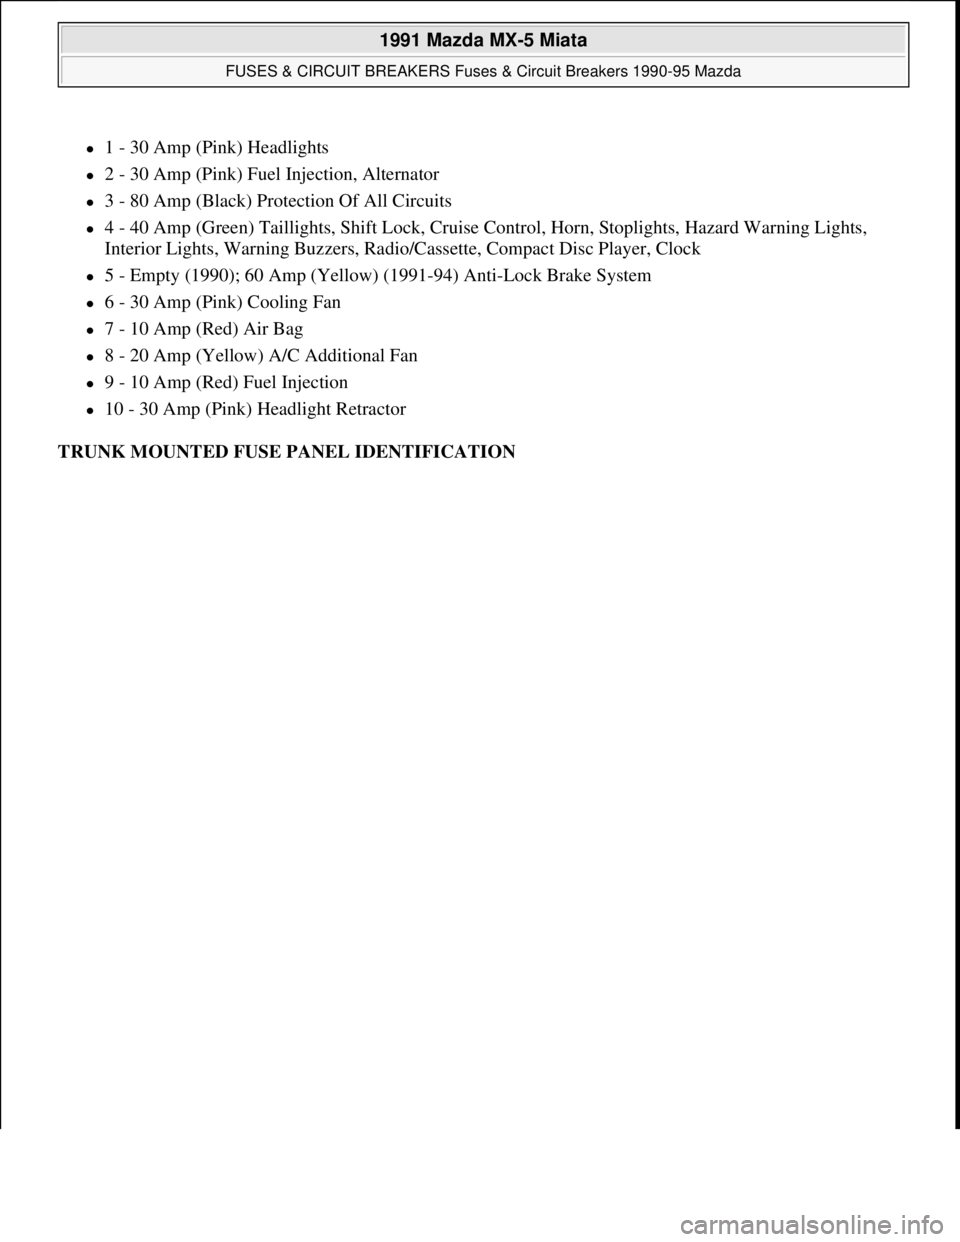
1 - 30 Amp (Pink) Headlights
2 - 30 Amp (Pink) Fuel Injection, Alternator
3 - 80 Amp (Black) Protection Of All Circuits
4 - 40 Amp (Green) Taillights, Shift Lock, Cruise Control, Horn, Stoplights, Hazard Warning Lights,
Interior Lights, Warning Buzzers, Radio/Cassette, Compact Disc Player, Clock
5 - Empty (1990); 60 Amp (Yellow) (1991-94) Anti-Lock Brake System
6 - 30 Amp (Pink) Cooling Fan
7 - 10 Amp (Red) Air Bag
8 - 20 Amp (Yellow) A/C Additional Fan
9 - 10 Amp (Red) Fuel Injection
10 - 30 Amp (Pink) Headlight Retractor
TRUNK MOUNTED FUSE PANEL IDENTIFICATION
1991 Mazda MX-5 Miata
FUSES & CIRCUIT BREAKERS Fuses & Circuit Breakers 1990-95 Mazda
Microsoft
Sunday, July 05, 2009 2:15:54 PMPage 2 © 2005 Mitchell Repair Information Company, LLC.
Page 343 of 392

table. Bleed air from system. Check fluid level. Check for leaks. Adjust alignment (if necessary).
POWER STEERING PUMP
Removal & Installation
1. Raise and support front of vehicle. On MX-6 and 626, remove right wheel and splash shield. On all
models remove belt, alternator and hydraulic lines from pump.
2. On Protege and 323, disconnect air cleaner duct and pressure switch. On all models, cap lines to prevent
contamination. Remove bracket-to-pump bolts.
3. To install, reverse removal procedure. Adjust belt tension. See POWER STEERING BELT
DEFLECTION TABLE under ADJUSTMENTS. Bleed air from system. Check for leaks.
OVERHAUL
STEERING GEAR
NOTE: See Fig. 2
-8 for exploded views of rack and pinion steering gears.
1991 Mazda MX-5 Miata
STEERING GEAR - POWER RACK & PINION 1991 STEERING Mazda - Power Rack & Pinion
Microsoft
Sunday, July 05, 2009 2:10:15 PMPage 6 © 2005 Mitchell Repair Information Company, LLC.