light MAZDA MIATA 1991 Factory User Guide
[x] Cancel search | Manufacturer: MAZDA, Model Year: 1991, Model line: MIATA, Model: MAZDA MIATA 1991Pages: 392, PDF Size: 29.45 MB
Page 146 of 392
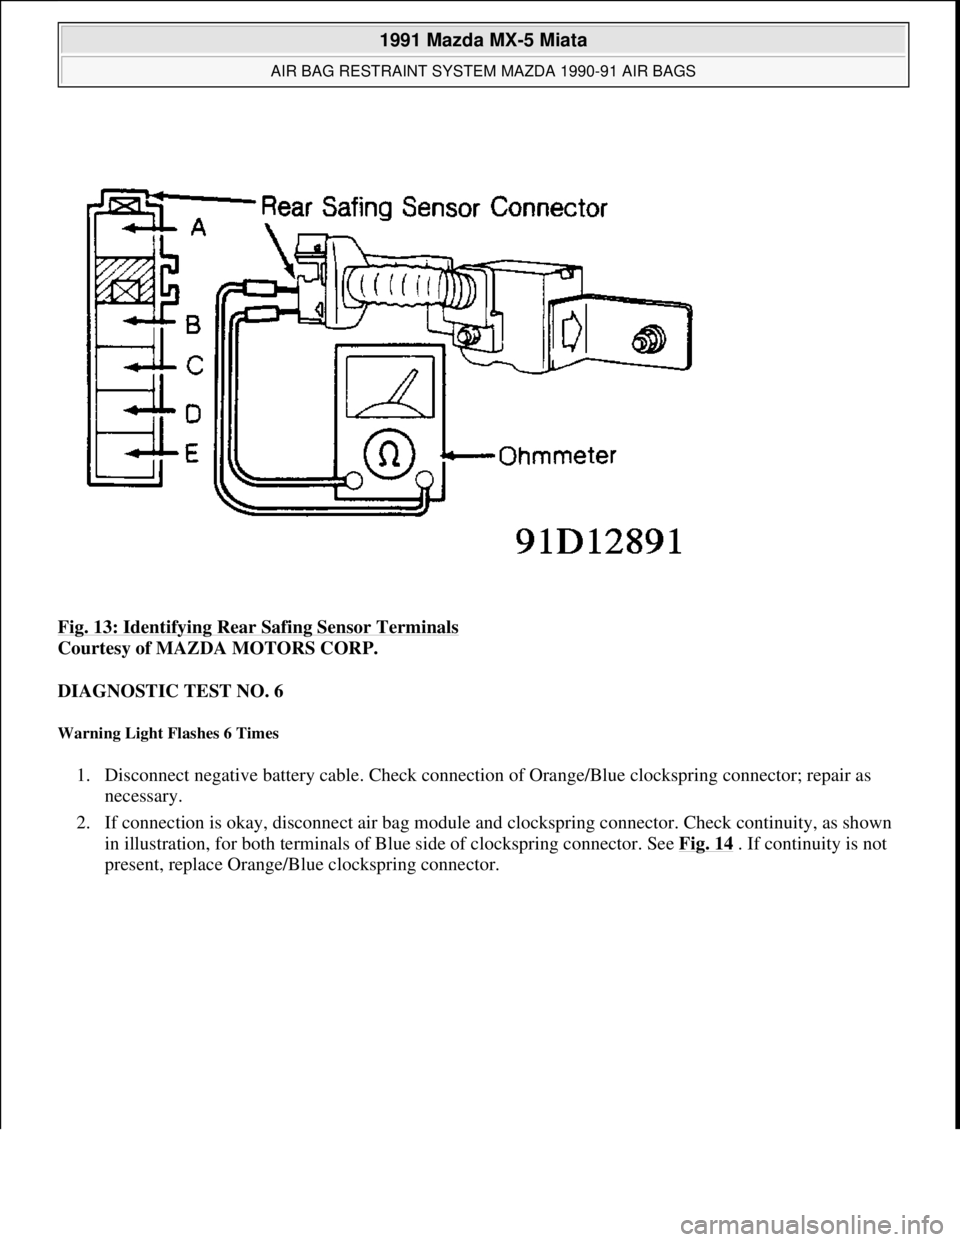
Fig. 13: Identifying Rear Safing Sensor Terminals
Courtesy of MAZDA MOTORS CORP.
DIAGNOSTIC TEST NO. 6
Warning Light Flashes 6 Times
1. Disconnect negative battery cable. Check connection of Orange/Blue clockspring connector; repair as
necessary.
2. If connection is okay, disconnect air bag module and clockspring connector. Check continuity, as shown
in illustration, for both terminals of Blue side of clockspring connector. See Fig. 14
. If continuity is not
present, replace Oran
ge/Blue clockspring connector.
1991 Mazda MX-5 Miata
AIR BAG RESTRAINT SYSTEM MAZDA 1990-91 AIR BAGS
Microsoft
Sunday, July 05, 2009 2:11:16 PMPage 21 © 2005 Mitchell Repair Information Company, LLC.
Page 147 of 392

Fig. 14: Checking Resistance at Clockspring Terminal
Courtesy of MAZDA MOTORS CORP.
3. If continuity is present, disconnect diagnostic module Black and Gray connectors. See Fig. 10
or Fig. 11.
Check continuity between diagnostic module Black connector Green/White wire and clockspring
connector Red wire. Also check continuity between diagnostic module Black connector Green/Yellow
wire and clockspring connector Green/Yellow wire. If continuity is not present, replace wire harness
assembly.
4. If continuity is present, check continuity between diagnostic module Black connector Green/Yellow wire
and ground. If continuity is present, replace wire harness assembly. If continuity is not present, replace air
bag module.
DIAGNOSTIC TEST NO. 7
Warning Light Flashes 2 Or 8 Times
1. Disable air bag system. See DISABLING & ACTIVATING AIR BAG SYSTEM. Disconnect diagnostic
module Black and Gray connectors. See Fig. 10
or Fig. 11 . Check continuity between Black connector
Brown/Yellow wire and ground. If continuity is not present, go to step 4). If continuity is present, go to
next step.
1991 Mazda MX-5 Miata
AIR BAG RESTRAINT SYSTEM MAZDA 1990-91 AIR BAGS
Microsoft
Sunday, July 05, 2009 2:11:16 PMPage 22 © 2005 Mitchell Repair Information Company, LLC.
Page 149 of 392

Warning Light Flashes 7 Times
1. Disable air bag system. See DISABLING & ACTIVATING AIR BAG SYSTEM. Disconnect diagnostic
module Black and Gray connectors. See Fig. 10
or Fig. 11 .
2. Check continuity between Black connector Black wire and ground. If continuity is present, replace
diagnostic module. If continuity is not present, replace wire harness.
WIRING DIAGRAMS
Fig. 16: Air Bag System Wiring Diagram (1990 Miata)
Courtesy of MAZDA MOTORS CORP.
1991 Mazda MX-5 Miata
AIR BAG RESTRAINT SYSTEM MAZDA 1990-91 AIR BAGS
Microsoft
Sunday, July 05, 2009 2:11:16 PMPage 24 © 2005 Mitchell Repair Information Company, LLC.
Page 153 of 392
ANTI-LOCK BRAKE SYSTEM
1988-91 BRAKES Mazda Anti-Lock Brake System
DESCRIPTION
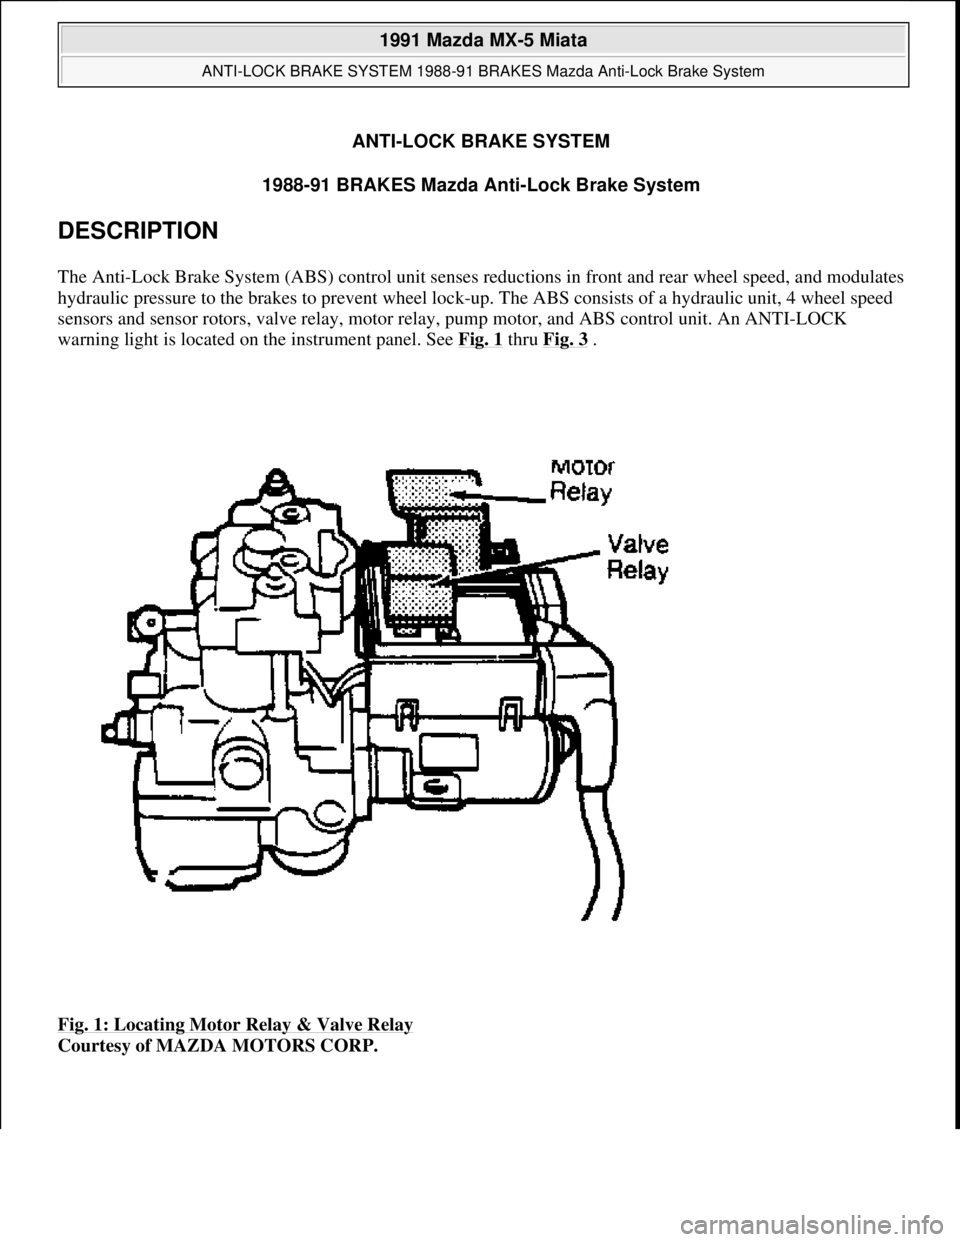
The Anti-Lock Brake System (ABS) control unit senses reductions in front and rear wheel speed, and modulates
hydraulic pressure to the brakes to prevent wheel lock-up. The ABS consists of a hydraulic unit, 4 wheel speed
sensors and sensor rotors, valve relay, motor relay, pump motor, and ABS control unit. An ANTI-LOCK
warning light is located on the instrument panel. See Fig. 1
thru Fig. 3 .
Fig. 1: Locating Motor Relay & Valve Relay
Courtesy of MAZDA MOTORS CORP.
1991 Mazda MX-5 Miata
ANTI-LOCK BRAKE SYSTEM 1988-91 BRAKES Mazda Anti-Lock Brake System
1991 Mazda MX-5 Miata
ANTI-LOCK BRAKE SYSTEM 1988-91 BRAKES Mazda Anti-Lock Brake System
Microsoft
Sunday, July 05, 2009 2:17:31 PMPage 1 © 2005 Mitchell Repair Information Company, LLC.
Microsoft
Sunday, July 05, 2009 2:17:36 PMPage 1 © 2005 Mitchell Repair Information Company, LLC.
Page 155 of 392
OPERATION
Under normal driving conditions, the anti-lock brake system functions as a standard brake system. When
vehicle speed reaches 3.8 MPH, the ABS system will diagnose pump motor by briefly operating motor. Pump
motor operation may be heard inside vehicle.
The Electronic Control Unit (ECU) controls ABS by detecting speed sensor signals and activating solenoid
valve in hydraulic unit. Control unit also controls pump motor and self-diagnostic function. If a problem in the
ABS system is detected, ABS system functions as a conventional brake system. The ANTI-LOCK brake
warning light will also come on.
With detection of wheel lock-up, short pedal pulsations, occurring in rapid succession, will be felt in brake
pedal and steering wheel. Vehicle body may also vibrate slightly. These conditions are normal. Pedal pulsation
will continue until there is no longer a need for anti-lock function or until vehicle is stopped.
ANTI-LOCK BRAKE SAFETY PRECAUTIONS
NEVER open a bleeder valve or loosen a hydraulic line while ABS is pressurized.
NEVER disconnect or reconnect any electrical connectors while ignition is on. Damage to ABS control
unit may result.
DO NOT attempt to bleed hydraulic system without first referring to the appropriate article.
Only use specially designed brake hoses/lines on ABS-equipped vehicles.
DO NOT tap on speed sensor components (sensor, sensor rings). Speed rings must be pressed, NOT
hammered into hubs. Striking these components can cause demagnetization or a loss of polarization,
affecting the accuracy of the speed signal returning to the ABS control unit.
DO NOT mix tire sizes. Increasing the width, as long as tires remain close to the original diameter, is
acceptable. Rolling diameter must be identical for all 4 tires. Some manufacturers recommend tires of the
same brand, style and type. Failure to follow this precaution may cause inaccurate wheel speed readings.
DO NOT contaminate speed sensor components with grease. Only use recommended anti-corrosion
coating.
When speed sensor components have been removed, ALWAYS check sensor-to-ring air gaps when
applicable. These specifications can be found in each appropriate article.
ONLY use recommended brake fluids. DO NOT use silicone brake fluids in an ABS-equipped vehicle.
When installing transmitting devices (CB's, telephones, etc.) on ABS-equipped vehicles, DO NOT locate
the antenna near the ABS control unit (or any control unit).
Disconnect all on-board computers, when using electric welding equipment. CAUTION: See ANTI-LOCK BRAKE SAFETY PRECAUTIONS below.
WARNING:Refer to appropriate Anti-Lock Brakes (ABS) article for description,
operation, depressurizing, testing, system bleeding, trouble shooting and
system service. Failure to depressurize ABS could lead to physical injury.
1991 Mazda MX-5 Miata
ANTI-LOCK BRAKE SYSTEM 1988-91 BRAKES Mazda Anti-Lock Brake System
Microsoft
Sunday, July 05, 2009 2:17:31 PMPage 3 © 2005 Mitchell Repair Information Company, LLC.
Page 160 of 392
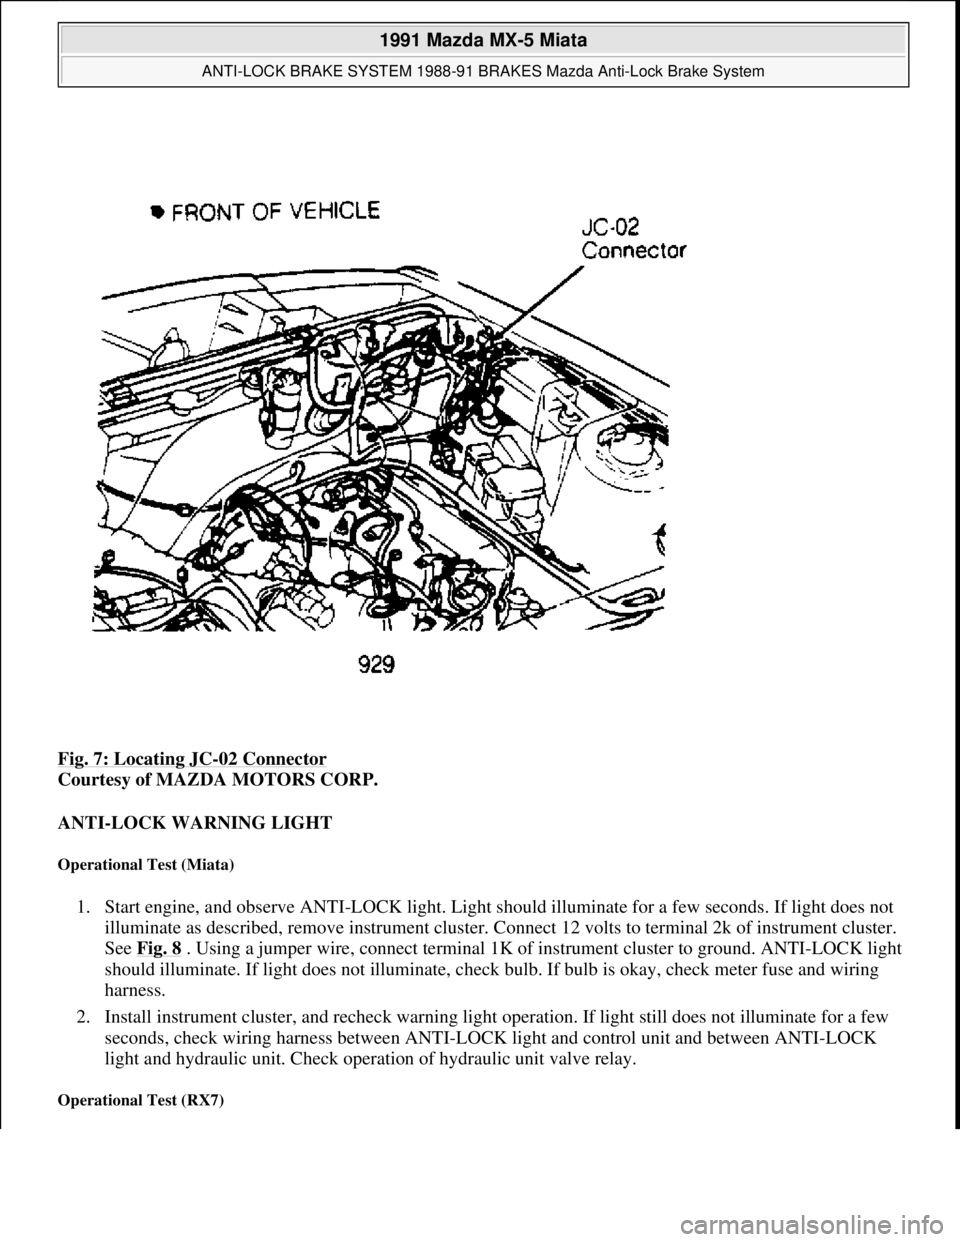
Fig. 7: Locating JC-02 Connector
Courtesy of MAZDA MOTORS CORP.
ANTI-LOCK WARNING LIGHT
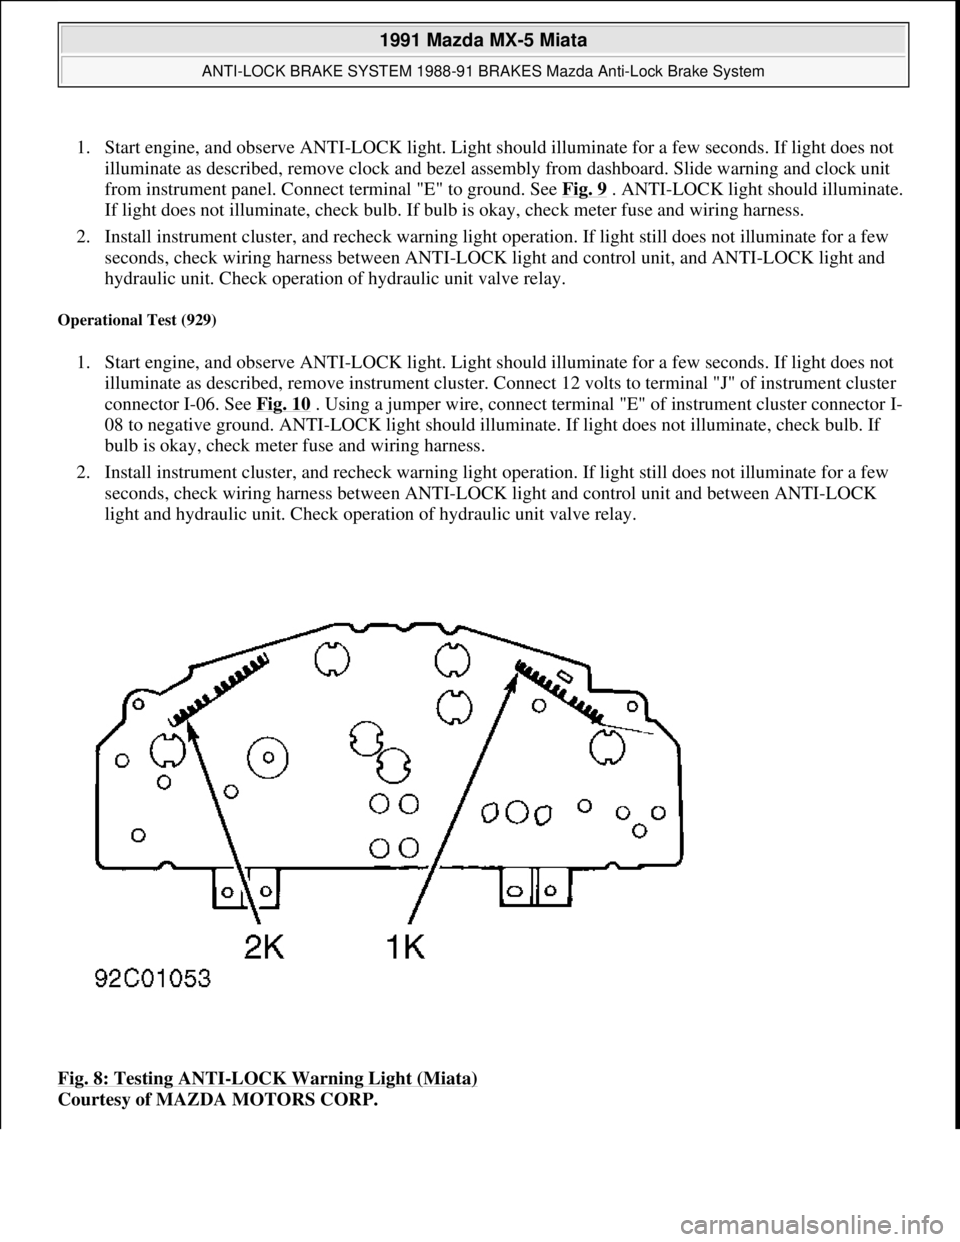
Operational Test (Miata)
1. Start engine, and observe ANTI-LOCK light. Light should illuminate for a few seconds. If light does not
illuminate as described, remove instrument cluster. Connect 12 volts to terminal 2k of instrument cluster.
See Fig. 8
. Using a jumper wire, connect terminal 1K of instrument cluster to ground. ANTI-LOCK light
should illuminate. If light does not illuminate, check bulb. If bulb is okay, check meter fuse and wiring
harness.
2. Install instrument cluster, and recheck warning light operation. If light still does not illuminate for a few
seconds, check wiring harness between ANTI-LOCK light and control unit and between ANTI-LOCK
light and hydraulic unit. Check operation of hydraulic unit valve relay.
Operational Test (RX7)
1991 Mazda MX-5 Miata
ANTI-LOCK BRAKE SYSTEM 1988-91 BRAKES Mazda Anti-Lock Brake System
Microsoft
Sunday, July 05, 2009 2:17:31 PMPage 8 © 2005 Mitchell Repair Information Company, LLC.
Page 161 of 392
1. Start engine, and observe ANTI-LOCK light. Light should illuminate for a few seconds. If light does not
illuminate as described, remove clock and bezel assembly from dashboard. Slide warning and clock unit
from instrument panel. Connect terminal "E" to ground. See Fig. 9
. ANTI-LOCK light should illuminate.
If light does not illuminate, check bulb. If bulb is okay, check meter fuse and wiring harness.
2. Install instrument cluster, and recheck warning light operation. If light still does not illuminate for a few
seconds, check wiring harness between ANTI-LOCK light and control unit, and ANTI-LOCK light and
hydraulic unit. Check operation of hydraulic unit valve relay.
Operational Test (929)
1. Start engine, and observe ANTI-LOCK light. Light should illuminate for a few seconds. If light does not
illuminate as described, remove instrument cluster. Connect 12 volts to terminal "J" of instrument cluster
connector I-06. See Fig. 10
. Using a jumper wire, connect terminal "E" of instrument cluster connector I-
08 to negative ground. ANTI-LOCK light should illuminate. If light does not illuminate, check bulb. If
bulb is okay, check meter fuse and wiring harness.
2. Install instrument cluster, and recheck warning light operation. If light still does not illuminate for a few
seconds, check wiring harness between ANTI-LOCK light and control unit and between ANTI-LOCK
light and hydraulic unit. Check operation of hydraulic unit valve relay.
Fig. 8: Testing ANTI
-LOCK Warning Light (Miata)
Courtesy of MAZDA MOTORS CORP.
1991 Mazda MX-5 Miata
ANTI-LOCK BRAKE SYSTEM 1988-91 BRAKES Mazda Anti-Lock Brake System
Microsoft
Sunday, July 05, 2009 2:17:31 PMPage 9 © 2005 Mitchell Repair Information Company, LLC.
Page 162 of 392

Fig. 9: Testing ANTI-LOCK Warning Light (RX7)
Courtesy of MAZDA MOTORS CORP.
1991 Mazda MX-5 Miata
ANTI-LOCK BRAKE SYSTEM 1988-91 BRAKES Mazda Anti-Lock Brake System
Microsoft
Sunday, July 05, 2009 2:17:31 PMPage 10 © 2005 Mitchell Repair Information Company, LLC.
Page 163 of 392

Fig. 10: Testing ANTI-LOCK Warning Light (929)
Courtesy of MAZDA MOTORS CORP.
STOPLIGHT SWITCH
Continuity Test
Disconnect stoplight switch connector. Using a DVOM, check continuity between Green or Green/White wire
and White/Green wire with brake pedal depressed. Ensure continuity exists. Release pedal, and note reading on
DVOM. Continuity should not be present. If continuity is not as specified, replace switch.
FRONT & REAR VALVES
Resistance Test (Miata)
1. Disconnect hydraulic unit 12-pin connector. Using a DVOM, measure resistance between the following
wires: Yellow/Green wire and Black wire; Brown wire and Black wire; Black/White wire and Black wire.
Resistance should be 1-1.2 ohms in each measurement.
2. If resistance is not as specified, replace hydraulic unit. If resistance is as specified, check wiring harness
between ABS control unit and hydraulic unit.
Resistance Test (RX7 & 929)
1991 Mazda MX-5 Miata
ANTI-LOCK BRAKE SYSTEM 1988-91 BRAKES Mazda Anti-Lock Brake System
Microsoft
Sunday, July 05, 2009 2:17:31 PMPage 11 © 2005 Mitchell Repair Information Company, LLC.
Page 172 of 392

Fig. 16: Test 4 System Voltage Test
Courtesy of MAZDA MOTORS CORP.
TEST 5A. ANTI-LOCK LIGHT TEST
Fig. 17: Test 5A. Anti
-Lock Light Test
Courtesy of MAZDA MOTORS CORP.
TEST 5B. BRAKE LIGHT SWITCH TEST
1991 Mazda MX-5 Miata
ANTI-LOCK BRAKE SYSTEM 1988-91 BRAKES Mazda Anti-Lock Brake System
Microsoft
Sunday, July 05, 2009 2:17:32 PMPage 20 © 2005 Mitchell Repair Information Company, LLC.