4WD MAZDA MIATA 1991 Factory Owner's Manual
[x] Cancel search | Manufacturer: MAZDA, Model Year: 1991, Model line: MIATA, Model: MAZDA MIATA 1991Pages: 392, PDF Size: 29.45 MB
Page 283 of 392

1991 TORQUE SPECIFICATIONS (PROTEGE 4WD)
1990-91 TORQUE SPECIFICATIONS (RX7)
Differential Carrier Bearing Cap Bolts27-38 (37-52)
Differential Carrier Bearing Lock Tab14-19 (19-26)
Differential Carrier-to-Housing17-20 (23-27)
Differential Case
Front Mounts33-50 (45-68)
Rear Mounts80-97 (109-132)
Drive Pinion Lock Nut87-130 (118-176)
Filler Plug29-40 (39-54)
Ring Gear Retaining Bolts51-61 (69-83)
Suspension & Mounts
Drive Axle Inner CV Joint Nut40-47 (54-64)
Drive Shaft Companion Flange20-22 (27-30)
Front Mount33-50 (45-68)
Lateral Link46-55 (62-75)
Rear Mount80-97 (109-132)
Stabilizer Bar10-13 (14-18)
Trailing Link69-86 (94-117)
Wheel Lug Nuts65-87 (88-118)
ApplicationFt. Lbs. (N.m)
Differential Carrier Bearing Cap Bolts27-38 (37-52)
Differential Carrier Bearing Lock Plate Bolt13-19 (18-26)
Differential Carrier-To-Housing Nuts17-20 (23-27)
Differential Case
Front Mounts39-47 (53-63)
Rear Mounts68-86 (93-116)
Drive Axle Inner CV Joint Nut40-47 (54-64)
Drive Pinion Lock Nut87-130 (118-176)
Drive Shaft Companion Flange Nuts20-22 (27-30)
Filler Plug29-40 (39-54)
Lateral Link Bolts46-55 (62-75)
Ring Gear Retaining Bolts51-61 (69-83)
Stabilizer Bar Bolts31-43 (43-58)
Trailing Link Bolts68-93 (93-126)
Wheel Lug Nuts65-87 (88-118)
ApplicationFt. Lbs. (N.m)
Differential Carrier-to-Housing17-20 (23-27)
Differential Carrier
1991 Mazda MX-5 Miata
1990-91 DRIVE AXLES Differentials & Drive Axles - 929, B2200, B2600i, MX-5 Miata, MPV, Protege & RX-7
Microsoft
Sunday, July 05, 2009 2:17:01 PMPage 25 © 2005 Mitchell Repair Information Company, LLC.
Page 299 of 392

SUSPENSION - FRONT
1990-91 SUSPENSION Front
DESCRIPTION
An independent front suspension with MacPherson struts is used on all models except Miata. Miata uses a
double wishbone design with coil over shock absorbers. See Fig. 1
. Strut assemblies mount between steering
knuckle and upper fender panels. Strut assemblies consist of inner shock absorbers and coil springs surrounding
outside of strut tube housing.
The steering knuckle is connected to lower control arm and strut. Lower control arm pivots at crossmember and
is connected by ball joint to steering knuckle. All models are equipped with a stabilizer bar which attaches to
each lower control arm and frame. See Fig. 1
- Fig. 5 . Some models may also be equipped with Auto Adjust
Suspension (AAS). For more information on this system, see ELECTRONIC SUSPENSION article in the
SUSPENSION section.
ADJUSTMENTS & INSPECTION
WHEEL ALIGNMENT SPECIFICATIONS & PROCEDURES
See WHEEL ALIGNMENT SPECIFICATIONS AND PROCEDURES article in the WHEEL ALIGNMENT
section.
WHEEL BEARING
Miata, Protege & 323
Raise and support vehicle. Remove wheel assembly. Remove and wire aside brake caliper. Remove rotor.
Install a dial indicator against wheel hub and measure axial movement. Axial movement should be .002" (.05
mm) maximum. If specification is exceeded, check and adjust lock nut torque or replace bearing on Protege and
323 or hub and bearing assembly on Miata.
MPV & 929
Raise and support vehicle. Remove wheel assembly. Remove and wire aside brake caliper. Install a dial
indicator against wheel hub and measure axial movement. Maximum axial movement should be .002" (.05
mm). If specification is exceeded, check and adjust lock nut torque or replace bearing on MPV 4WD and 929 or
hub and bearing assembly on MPV 2WD.
RX7
1. Raise and support vehicle. Remove wheel assembly. Remove and wire aside brake caliper. Install a dial
indicator against hub and measure axial movement. Axial movement should be zero. If specification is
exceeded, adjust preload or replace wheel bearing.
2. To ad
just preload, remove grease cap, cotter pin and set cover. Loosen lock nut. Tighten to 14-22 ft. lbs.
1991 Mazda MX-5 Miata
SUSPENSION - FRONT 1990-91 SUSPENSION Front
1991 Mazda MX-5 Miata
SUSPENSION - FRONT 1990-91 SUSPENSION Front
Microsoft
Sunday, July 05, 2009 2:08:53 PMPage 1 © 2005 Mitchell Repair Information Company, LLC.
Microsoft
Sunday, July 05, 2009 2:09:01 PMPage 1 © 2005 Mitchell Repair Information Company, LLC.
Page 304 of 392

Fig. 5: Identifying Front Suspension Components (MX-6 & 626)
Courtesy of MAZDA MOTORS CORP.
REMOVAL & INSTALLATION
WHEEL BEARING
Removal (Miata & MPV 2WD)
Raise and support vehicle. Remove wheel assembly. Remove and wire aside brake caliper. Remove grease cap
and lock nut. Remove brake rotor. Remove hub and bearing assembly.
Removal (MPV 4WD)
NOTE: Refer to Fig. 1 - Fig. 5 during removal and installation.
NOTE: On Miata & MPV 2WD, replace hub and bearing assembly as a unit.
1991 Mazda MX-5 Miata
SUSPENSION - FRONT 1990-91 SUSPENSION Front
Microsoft
Sunday, July 05, 2009 2:08:54 PMPage 6 © 2005 Mitchell Repair Information Company, LLC.
Page 306 of 392

LOWER CONTROL ARM
Removal
Raise and support vehicle. Remove wheel assembly. Remove engine splash shield (if equipped). Remove
stabilizer bar from lower control arm. Remove strut rod (if equipped). Remove ball joint clamp bolt or pivot
nut, and separate ball joint from steering knuckle. Remove lower control arm pivot bolts. Remove lower control
arm.
Inspection
Check lower control arm for damage or cracks. Check bushings for deterioration and excessive wear. Check
ball joint for excessive wear. Examine dust boot for damage. Replace parts as necessary.
Bushing Replacement (Miata)
Cut or press old bushing from control arm. Coat new bushing with paraffin-based oil. Press new bushing into
control arm. To install, reverse removal procedure.
Bushing Replacement (MPV 4WD)
Cut away bushing inner collar. Using a vise and Remover/Installer (49-G033-102 and 49-FO27-009), push out
front bushing. Press out rear bushing using a press and Remover/Installer (49-U034-202 and 49-GO26-103). To
install front bushing, apply soapy water to bushing and use remover/installer to press in. To install rear bushing,
align arrows on bushing with marks on lower arm and use remover/installer to press in.
Bushing Replacement (MX-6 & 626)
Cut away bushing inner collar. Using a vise and Remover/Installer (49-GO34-2A0), push out bushing. To
install, apply soapy water to bushing and use remover/installer to press in. Always install bushing from outer
side of arm. Press in bushing until collar contacts arm.
Bushing Replacement (Protege & 323)
Using a vise and Remover/Installer Set (49-BO34-2A0), push out bushing. To install, apply soapy water to
bushing and use remover/installer to press in. Always install bushing from outer side of arm. Press in bushing
until collar contacts arm.
Bushing Replacement (929)
Cut away bushing outer collar. Using a vise and Remover/Installer (49-HO34-202 and 49-HO34-201), remove
bushing from control arm. To install, reverse removal procedure.
Bushing Replacement (RX7)
NOTE: Lower control arm bushings are not replaceable on MPV 2WD models. Replace
control arm assembly if bushings are worn or damaged.
1991 Mazda MX-5 Miata
SUSPENSION - FRONT 1990-91 SUSPENSION Front
Microsoft
Sunday, July 05, 2009 2:08:54 PMPage 8 © 2005 Mitchell Repair Information Company, LLC.
Page 311 of 392

Lower Control Arm-To-Frame54-69 (73-93)
Lug Nuts65-87 (88-118)
Stabilizer Bar Bolts (Frame)13-19 (18-26)
Stabilizer Bar Link Bolts27-40 (36-54)
Shock Absorber Assembly-To-Body Nuts21-27 (29-36)
Shock Absorber Lower Bolt54-69 (73-93)
Shock Absorber Lock Nut23-34 (31-46)
Tie Rod-To-Knuckle Nut21-32 (29-44)
Upper Ball Joint-To-Knuckle Nut30-46 (41-62)
Upper Control Arm-To-Frame87-102 (118-138)
MPV
Ball Joint-To-Lower Control Arm Bolt (4WD)75-101 (102-137)
Ball Joint-To-Lower Control Arm Nut (4WD)94-127 (128-172)
Brake Caliper Bracket Bolts65-80 (88-108)
Drive Axle Lock Nut131-173 (177-235)
Lower Control Arm-To-Frame (2WD)94-108 (127-146)
Lower Control Arm-To-Frame (4WD)101-127 (137-172)
Lug Nuts65-87 (88-118)
Stabilizer Bar Bolts (Frame) (2WD)37-45 (50-61)
Stabilizer Bar Bolts (Frame) (4WD)14-19 (19-26)
Strut Assembly Lock Nut47-59 (64-80)
Strut Assembly-To-Body Nuts21-27 (29-36)
Strut Assembly-To-Knuckle Bolt69-86 (93-117)
Strut Rod Body Bushing Bolt61-76 (83-103)
Strut Rod-To-Body Nut108-127 (146-172)
Strut Rod-To-Lower Control Arm76-92 (103-125)
Tie Rod-To-Knuckle Nut44-58 (59-78)
MX-6 & 626
Ball Joint-To-Steering Knuckle Nut27-40 (36-54)
Brake Caliper Bracket Bolts58-72 (78-98)
Drive Axle Lock Nut173-235 (235-319)
Lower Control Arm-To-Frame58-78 (78-106)
Lug Nuts65-87 (88-118)
Stabilizer Bar Bolts (Frame)27-40 (36-54)
Strut Assembly Lock Nut47-59 (64-80)
Strut Assembly-To-Body Nuts34-46 (46-63)
Strut Assembly-To-Knuckle Bolt69-86 (93-117)
Tie Rod-To-Knuckle Nut31-42 (42-57)
Wheel Speed Sensor Bolt12-17 (16-23)
Protege & 323
Ball Joint-To-Lower Control Arm Nut69-86 (93-117)
1991 Mazda MX-5 Miata
SUSPENSION - FRONT 1990-91 SUSPENSION Front
Microsoft
Sunday, July 05, 2009 2:08:54 PMPage 13 © 2005 Mitchell Repair Information Company, LLC.
Page 339 of 392

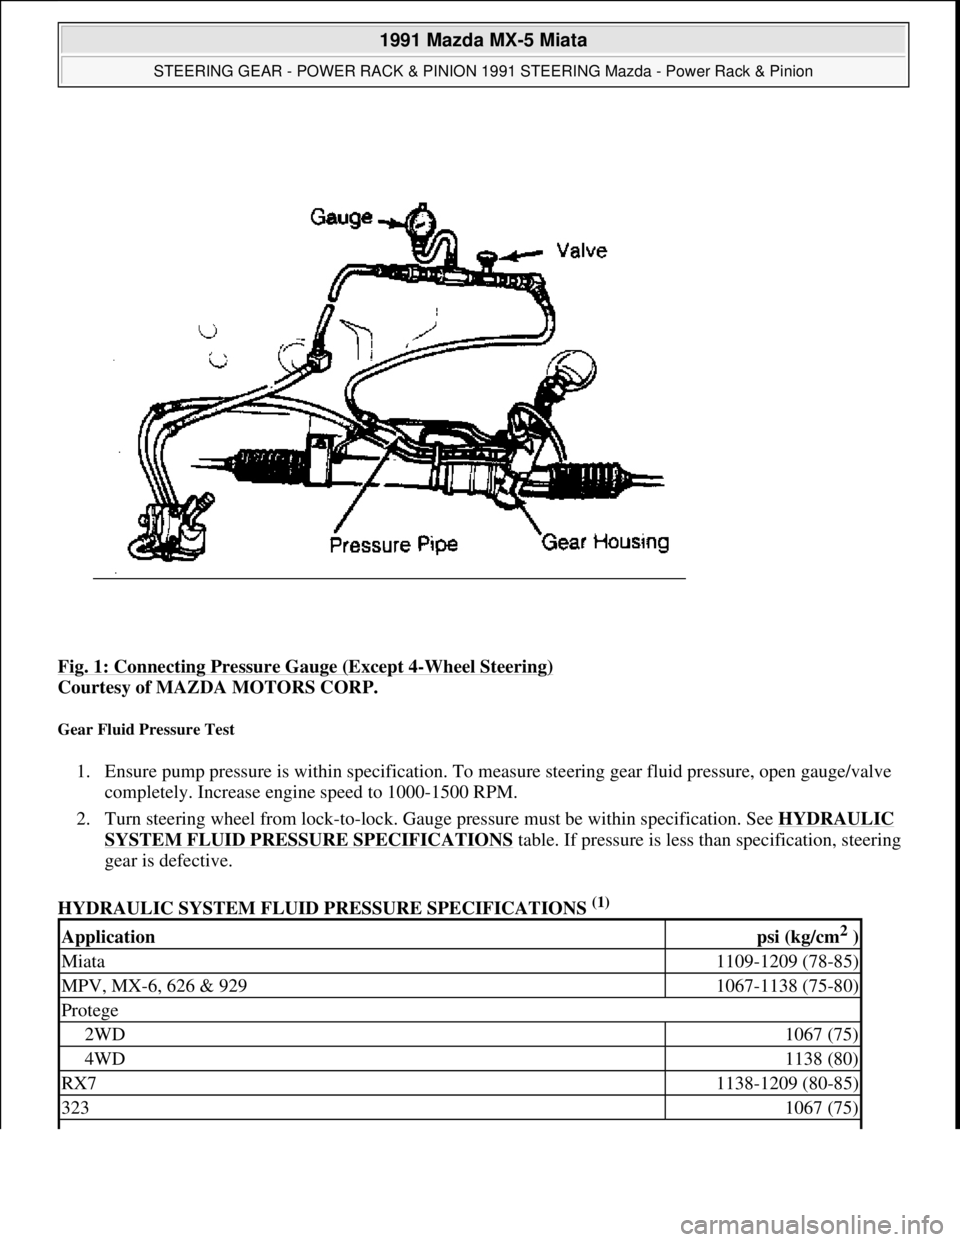
Fig. 1: Connecting Pressure Gauge (Except 4-Wheel Steering)
Courtesy of MAZDA MOTORS CORP.
Gear Fluid Pressure Test
1. Ensure pump pressure is within specification. To measure steering gear fluid pressure, open gauge/valve
completely. Increase engine speed to 1000-1500 RPM.
2. Turn steering wheel from lock-to-lock. Gauge pressure must be within specification. See HYDRAULIC
SYSTEM FLUID PRESSURE SPECIFICATIONStable. If pressure is less than specification, steering
gear is defective.
HYDRAULIC SYSTEM FLUID PRESSURE SPECIFICATIONS
(1)
Applicationpsi (kg/cm2 )
Miata1109-1209 (78-85)
MPV, MX-6, 626 & 9291067-1138 (75-80)
Protege
2WD1067 (75)
4WD1138 (80)
RX71138-1209 (80-85)
3231067 (75)
1991 Mazda MX-5 Miata
STEERING GEAR - POWER RACK & PINION 1991 STEERING Mazda - Power Rack & Pinion
Microsoft
Sunday, July 05, 2009 2:10:15 PMPage 2 © 2005 Mitchell Repair Information Company, LLC.
Page 364 of 392

to field coil housing. If continuity exists, repair or replace field coil.
OVERRUNNING CLUTCH PINION DRIVE
Hold overrunning clutch housing and turn pinion gear by hand. If pinion turns in both directions, clutch is faulty
and must be replaced. DO NOT clean overrunning clutch with solvent, as it is packed with grease and sealed by
manufacturer.
REMOVAL & INSTALLATION
1. Disconnect negative battery cable. Raise vehicle on hoist. Remove undercover. Disconnect wiring from
starter. Remove differential lock assembly (4WD models). On Protege (M/T) and 323 models, remove
support brace from under intake manifold. Remove starter mounting bolts. Remove lowest mounting bolt
last. Remove starter from under side of vehicle.
2. To install starter, reverse removal procedure. Tighten mounting bolts to 23-24 ft. lbs. (31-46 N.m).
Tighten battery terminal nut to 87-104 INCH lbs. (9.8-12 N.m).
OVERHAUL
DISASSEMBLY & ASSEMBLY
1. Mark rear cover, field coil housing and front drive housing for reassembly reference. Remove solenoid
and shims, rear cover and brush plate. Remove field coil housing and pull armature and yoke lever from
front drive housing. See Fig. 4
& Fig. 5. Use arbor press to remove circlip, stopper and pinion drive from
armature shaft. See Fig. 6
.
2. To assemble, reverse removal procedures. Lubricate solenoid plunger, yoke lever and armature bushings.
Use arbor press and pinion drive to install stopper and circlip on armature shaft. See Fig. 6
. Ensure brush
plate, rear cover and field coil housin
g are aligned when installing through bolts.
1991 Mazda MX-5 Miata
STARTER - DIRECT DRIVE 1990-92 ELECTRICAL Mazda Starters - Direct Drive
Microsoft
Sunday, July 05, 2009 2:13:20 PMPage 8 © 2005 Mitchell Repair Information Company, LLC.