Port MAZDA MIATA 1991 Factory Owner's Manual
[x] Cancel search | Manufacturer: MAZDA, Model Year: 1991, Model line: MIATA, Model: MAZDA MIATA 1991Pages: 392, PDF Size: 29.45 MB
Page 262 of 392
1. Raise and support vehicle. Remove rear wheels. Remove brake drum and shoes. Using a dial indicator,
measure axle flange lateral movement. Replace bearing if play exceeds If bearing play exceeds .023" (.57
mm). Disconnect brake line from wheel cylinder. Plug line openings. Disconnect parking brake cable.
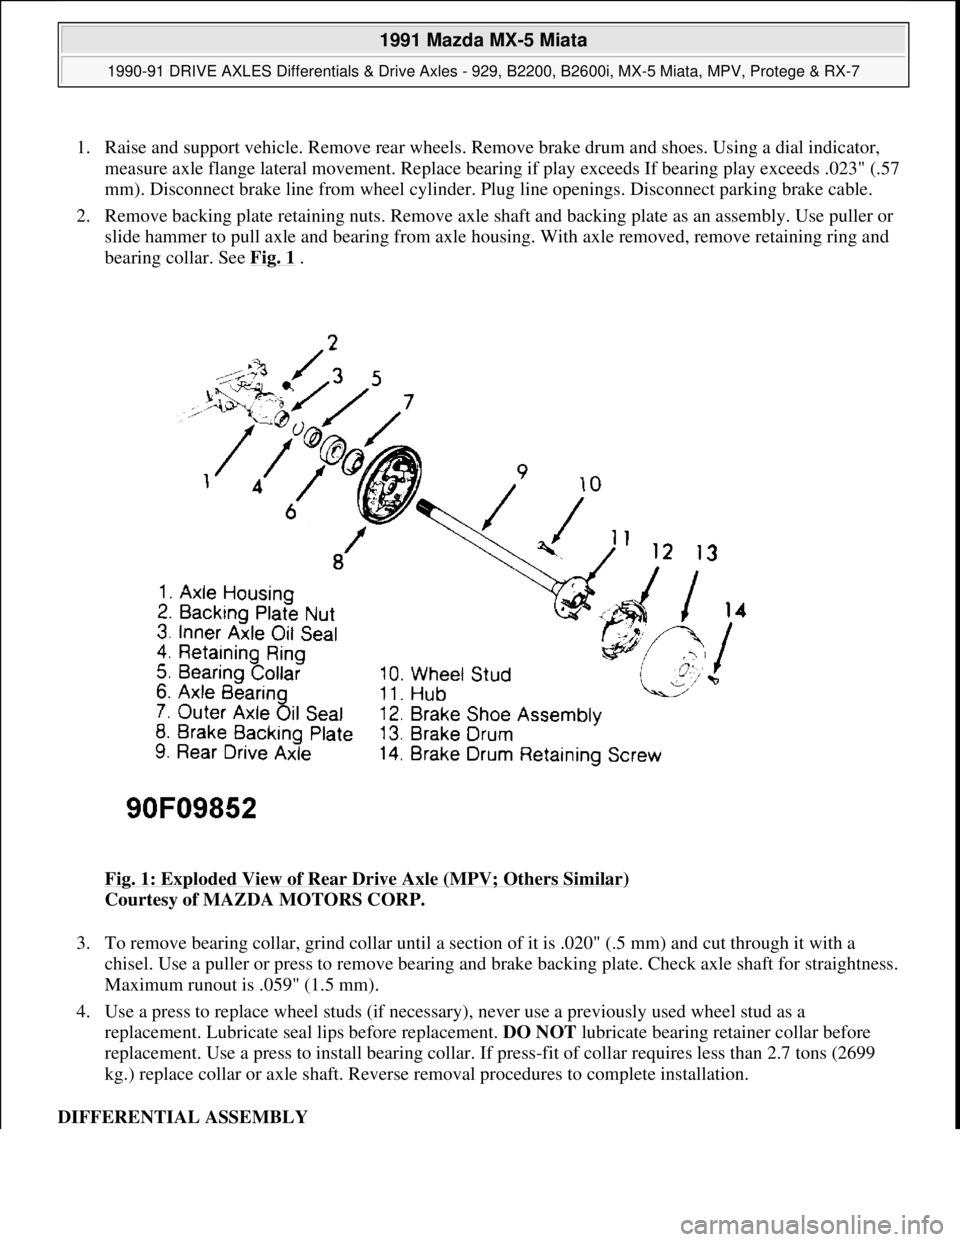
2. Remove backing plate retaining nuts. Remove axle shaft and backing plate as an assembly. Use puller or
slide hammer to pull axle and bearing from axle housing. With axle removed, remove retaining ring and
bearing collar. See Fig. 1
.
Fig. 1: Exploded View of Rear Drive Axle (MPV; Others Similar)
Courtesy of MAZDA MOTORS CORP.
3. To remove bearing collar, grind collar until a section of it is .020" (.5 mm) and cut through it with a
chisel. Use a puller or press to remove bearing and brake backing plate. Check axle shaft for straightness.
Maximum runout is .059" (1.5 mm).
4. Use a press to replace wheel studs (if necessary), never use a previously used wheel stud as a
replacement. Lubricate seal lips before replacement. DO NOT lubricate bearing retainer collar before
replacement. Use a press to install bearing collar. If press-fit of collar requires less than 2.7 tons (2699
kg.) replace collar or axle shaft. Reverse removal procedures to complete installation.
DIFFERENTIAL ASSEMBLY
1991 Mazda MX-5 Miata
1990-91 DRIVE AXLES Differentials & Drive Axles - 929, B2200, B2600i, MX-5 Miata, MPV, Protege & RX-7
Microsoft
Sunday, July 05, 2009 2:17:01 PMPage 4 © 2005 Mitchell Repair Information Company, LLC.
Page 263 of 392

Removal (Front - B2600i & MPV 4WD)
1. Raise and support vehicle. Remove engine skid plate. Drain differential. On MPV 4WD, remove tie rod
end and lower arm. Remove front axle shafts. See AXLE SHAFTS
- FRONT article. Mark drive shaft
position, and remove drive shaft.
2. On B2600i, remove differential subframe mounting bolts and nuts. Remove differential, Remote Free
Wheel (RFW) and subframe assembly from vehicle. Remove RFW assembly from right side of
differential housing. Pull drive coupler from carrier. Remove differential carrier retaining bolts. Remove
differential carrier.
3. On MPV 4WD, remove differential housing mounting bolts and mount at end of Remote Free Wheel
(RFW) extension housing. Remove differential and extension housing from vehicle. Remove RFW
assembly from right side of differential housing. Pull drive coupler from carrier. Remove differential
carrier retaining bolts. Remove differential carrier.
Installation
To install, reverse removal procedure. See Fig. 2 or Fig. 3 . Apply Sealant (8527 77 739 ) to carrier mating
flange. Align marks made during removal. Refill differential with lubricant. Tighten all fasteners to
specification. See TORQUE SPECIFICATIONS
.
1991 Mazda MX-5 Miata
1990-91 DRIVE AXLES Differentials & Drive Axles - 929, B2200, B2600i, MX-5 Miata, MPV, Protege & RX-7
Microsoft
Sunday, July 05, 2009 2:17:01 PMPage 5 © 2005 Mitchell Repair Information Company, LLC.
Page 265 of 392

Fig. 3: Installing Front Differential (MPV 4WD)
Courtesy of MAZDA MOTORS CORP.
Removal; Rear - B2200, B2600i, MPV 2WD, PROTEGE 4WD, RX7, 929
1. Raise and support vehicle. Drain differential. Mark drive axles and drive shaft positions. On B2200,
1991 Mazda MX-5 Miata
1990-91 DRIVE AXLES Differentials & Drive Axles - 929, B2200, B2600i, MX-5 Miata, MPV, Protege & RX-7
Microsoft
Sunday, July 05, 2009 2:17:01 PMPage 7 © 2005 Mitchell Repair Information Company, LLC.
Page 266 of 392

B2600i and MPV, remove brake drum and drive axles. See REAR AXLE SHAFTS & BEARINGS. On
Protege 4WD, RX7 and 929, disconnect CV joint drive axles from differential assembly and wire aside.
2. On all models, mark flanges and disconnect drive shaft. Remove ABS sensor (if equipped). On RX7,
remove rear exhaust system and differential mount on left side of pinion flange. Remove hanger mounts
and allow left side to hang down. Disconnect sublinks and remove differential.
3. On Protege 4WD and 929 models, remove differential housing assembly-to-chassis mounting bolts.
Remove differential housing assembly from vehicle. On all models, remove differential carrier-to-
housing nuts. Remove differential carrier.
Installation
To install, reverse removal procedure. Apply Sealant (8527 77 739 ) to carrier mating flange. Align marks made
during removal. Refill differential with correct type and amount of lubricant. Tighten all fasteners to
specification. See TORQUE SPECIFICATIONS
.
Fig. 4: Exploded View of Differential Assembly (RX7)
Courtesy of MAZDA MOTORS CORP.
Removal (Miata)
1. Raise and support vehicle. Drain differential. Mark flanges and remove drive shaft. Note locations and
disconnect wiring harness from Power Plant Frame (PPF). See Fig. 5
.
1991 Mazda MX-5 Miata
1990-91 DRIVE AXLES Differentials & Drive Axles - 929, B2200, B2600i, MX-5 Miata, MPV, Protege & RX-7
Microsoft
Sunday, July 05, 2009 2:17:01 PMPage 8 © 2005 Mitchell Repair Information Company, LLC.
Page 267 of 392
2. Support transmission with a jack. Remove PPF bracket from rear transmission extension housing.
Remove PPF-to-differential side bolts and pry out spacer. Remove PPF/differential mounting spacer. See
Fig. 6
. Install metric bolt (M14 X 1.5) into sleeve. See Fig. 7 .
3. Twist bolt side-to-side while pulling bolt downward. Install a metric bolt (M6 X 1) into hole in housing
block to hold sleeve and remove long bolt (M14 X 1.5). Remove short bolt (M6 X 1).
4. Remove PPF-to-transmission side bolts and remove PPF. Mark and disconnect CV joint drive axles from
differential assembly and wire aside. Remove differential carrier-to-housing nuts. Remove differential
carrier.
INSTALLATION
1. To install, reverse removal procedure. Apply Sealant (8527 77 739 ) to carrier mating flange. Align marks
made during removal and install differential carrier. Install differential. Raise transmission until engine
and transmission are level.
2. To install Power Plant Frame (PPF), position PPF in place. Install PPF/differential mounting spacer and
tighten bolts to 27-38 ft. lbs. (37-52 N.m). Install PPF-to-transmission side mounting bolts and tighten.
3. Ensure sleeve is installed into PPF housing block. Install spacer and bolts. Ensure reamer bolt is installed
into front hole and tighten. See Fig. 6
.
4. Install transmission-to-PPF bracket. Install remaining PPF bolts and tighten all bolts to specification. See
TORQUE SPECIFICATIONS
. To complete installation, reverse removal procedure.
NOTE: On Miata, front PPF-to-differential side mounting bolt is reamer bolt, which
aligns power plant frame. See Fig. 6
.
1991 Mazda MX-5 Miata
1990-91 DRIVE AXLES Differentials & Drive Axles - 929, B2200, B2600i, MX-5 Miata, MPV, Protege & RX-7
Microsoft
Sunday, July 05, 2009 2:17:01 PMPage 9 © 2005 Mitchell Repair Information Company, LLC.
Page 284 of 392

1990-91 TORQUE SPECIFICATIONS (929)
Bearing Cap Bolts (1) 54-79 (73-107)
Differential Carrier Bearing Cap Bolts (2) 50-66 (73-107)
Differential Carrier Bearing Lock Tab13-19 (18-26)
Differential Case Front Hanger Nut65-77 (88-104)
Differential Case Rear Mounts54-69 (73-94)
Differential Ring Gear Bolts51-61 (69-83)
Drive Axle Inner CV Joint Nut40-47 (54-64)
Drive Pinion Lock Nut94-210 (127-285)
Drive Shaft Companion Flange36-43 (49-58)
Filler Plug29-40 (39-54)
Ring Gear Retaining Bolts51-61 (69-83)
Support Strut Mounting Bolt54-69 (73-94)
Wheel Lug Nuts65-87 (88-118)
(1)1990 Model.
(2)1991 Model.
ApplicationFt. Lbs. (N.m)
ABS Sensor-to-Hub Support Bolt12-17 (16-23)
Differential Carrier Bearing
Cap Bolts50-66 (68-90)
Lock Tabs13-18 (18-24)
Differential Carrier-to-Housing17-20 (23-27)
Differential Case
Front Hanger Nut69-86 (94-117)
Rear Mounts69-86 (94-117)
Drive Axle Inner CV Joint Nut40-47 (54-64)
Drive Pinion Lock Nut94-130 (127-176)
Drive Shaft Companion Flange Bolts36-43 (49-58)
Filler Plug29-40 (39-54)
Ring Gear Retaining Bolts51-61 (69-83)
Wheel Lug Nuts65-87 (88-118)
1991 Mazda MX-5 Miata
1990-91 DRIVE AXLES Differentials & Drive Axles - 929, B2200, B2600i, MX-5 Miata, MPV, Protege & RX-7
Microsoft
Sunday, July 05, 2009 2:17:01 PMPage 26 © 2005 Mitchell Repair Information Company, LLC.
Page 299 of 392
SUSPENSION - FRONT
1990-91 SUSPENSION Front
DESCRIPTION
An independent front suspension with MacPherson struts is used on all models except Miata. Miata uses a
double wishbone design with coil over shock absorbers. See Fig. 1
. Strut assemblies mount between steering
knuckle and upper fender panels. Strut assemblies consist of inner shock absorbers and coil springs surrounding
outside of strut tube housing.
The steering knuckle is connected to lower control arm and strut. Lower control arm pivots at crossmember and
is connected by ball joint to steering knuckle. All models are equipped with a stabilizer bar which attaches to
each lower control arm and frame. See Fig. 1
- Fig. 5 . Some models may also be equipped with Auto Adjust
Suspension (AAS). For more information on this system, see ELECTRONIC SUSPENSION article in the
SUSPENSION section.
ADJUSTMENTS & INSPECTION
WHEEL ALIGNMENT SPECIFICATIONS & PROCEDURES
See WHEEL ALIGNMENT SPECIFICATIONS AND PROCEDURES article in the WHEEL ALIGNMENT
section.
WHEEL BEARING
Miata, Protege & 323
Raise and support vehicle. Remove wheel assembly. Remove and wire aside brake caliper. Remove rotor.
Install a dial indicator against wheel hub and measure axial movement. Axial movement should be .002" (.05
mm) maximum. If specification is exceeded, check and adjust lock nut torque or replace bearing on Protege and
323 or hub and bearing assembly on Miata.
MPV & 929
Raise and support vehicle. Remove wheel assembly. Remove and wire aside brake caliper. Install a dial
indicator against wheel hub and measure axial movement. Maximum axial movement should be .002" (.05
mm). If specification is exceeded, check and adjust lock nut torque or replace bearing on MPV 4WD and 929 or
hub and bearing assembly on MPV 2WD.
RX7
1. Raise and support vehicle. Remove wheel assembly. Remove and wire aside brake caliper. Install a dial
indicator against hub and measure axial movement. Axial movement should be zero. If specification is
exceeded, adjust preload or replace wheel bearing.
2. To ad
just preload, remove grease cap, cotter pin and set cover. Loosen lock nut. Tighten to 14-22 ft. lbs.
1991 Mazda MX-5 Miata
SUSPENSION - FRONT 1990-91 SUSPENSION Front
1991 Mazda MX-5 Miata
SUSPENSION - FRONT 1990-91 SUSPENSION Front
Microsoft
Sunday, July 05, 2009 2:08:53 PMPage 1 © 2005 Mitchell Repair Information Company, LLC.
Microsoft
Sunday, July 05, 2009 2:09:01 PMPage 1 © 2005 Mitchell Repair Information Company, LLC.
Page 300 of 392

(20-29 N.m). Turn wheel hub a few times to seat bearings. Loosen lock nut slightly until it can be turned
by hand.
3. Attach spring scale to hub bolt, and measure preload. Note value. Tighten lock nut until preload is .09-2.2
lbs. (.4-1.0 kg) more than amount measured in step 2).
MX-6 & 626
Raise and support vehicle. Remove wheel assembly. Remove and wire aside brake caliper. Install a dial
indicator against wheel hub and measure axial movement. Axial movement should not exceed .008" (.2 mm). If
specification is exceeded, replace wheel bearing.
BALL JOINT CHECKING
Remove lower control arm. Rotate ball joint stud 3-4 times. Install Preload Attachment (49 0180 510B) to ball
joint stud. Measure ball joint preload using spring scale. Preload for all models except Miata, MPV 2WD and
929 is 4.4-7.7 lbs. (2.0-3.5 kg). Preload for Miata is 1.1-3.3 lbs. (.5-1.5 kg). Preload for MPV 2WD is 39.6 lbs.
(18. kg) or less. Preload for 929 is 1.1-2.6 lbs. (.5-1.2 kg).
Fig. 1: Exploded View of Front Suspension (Miata)
Courtesy of MAZDA MOTORS CORP.
1991 Mazda MX-5 Miata
SUSPENSION - FRONT 1990-91 SUSPENSION Front
Microsoft
Sunday, July 05, 2009 2:08:53 PMPage 2 © 2005 Mitchell Repair Information Company, LLC.
Page 304 of 392

Fig. 5: Identifying Front Suspension Components (MX-6 & 626)
Courtesy of MAZDA MOTORS CORP.
REMOVAL & INSTALLATION
WHEEL BEARING
Removal (Miata & MPV 2WD)
Raise and support vehicle. Remove wheel assembly. Remove and wire aside brake caliper. Remove grease cap
and lock nut. Remove brake rotor. Remove hub and bearing assembly.
Removal (MPV 4WD)
NOTE: Refer to Fig. 1 - Fig. 5 during removal and installation.
NOTE: On Miata & MPV 2WD, replace hub and bearing assembly as a unit.
1991 Mazda MX-5 Miata
SUSPENSION - FRONT 1990-91 SUSPENSION Front
Microsoft
Sunday, July 05, 2009 2:08:54 PMPage 6 © 2005 Mitchell Repair Information Company, LLC.
Page 305 of 392
1. Raise and support vehicle. Remove wheel assembly. Remove axle lock nut. Remove cotter pin, and
disconnect tie rod from steering knuckle. Remove and wire aside brake caliper.
2. Separate lower control arm from ball joint. Remove bolt attaching ball joint to steering knuckle. Remove
bolts retaining steering knuckle to strut assembly. Separate hub and knuckle from drive shaft. Remove
wheel hub and rotor from knuckle. Remove bearings and oil seals.
Removal (MX-6 & 626)
1. Raise and support vehicle. Remove wheel assembly. Disconnect tie rod end from steering knuckle.
Disconnect stabilizer bar from lower control arm. Remove axle lock nut.
2. Disconnect brake line from strut assembly. Remove and wire aside brake caliper. Remove wheel speed
sensor. Remove bolt attaching ball joint to steering knuckle. Remove bolts attaching steering knuckle to
strut assembly. Remove steering knuckle.
3. Remove wheel hub from knuckle using Puller Set (49-G033-1A1). Remove snap ring. Remove wheel
bearing from steering knuckle using Remover (49-G033-106).
Removal (Protege, 323 & 929)
1. Raise and support vehicle. Remove wheel assembly. Remove axle lock nut. Remove cotter pin, and
disconnect tie rod from steering knuckle. Remove and wire aside brake caliper. Separate lower control
arm from ball joint. Remove bolts retaining steering knuckle to strut assembly.
2. On Protege and 323, separate hub and knuckle from drive shaft. Remove wheel hub and rotor from
knuckle. Place alignment marks on rotor and wheel hub. Separate and remove dust cover. Remove
bearings, oil seals, bearing outer races and spacer.
3. On 929, remove hub and rotor. Remove grease seal, sensor ring and circlip. Press bearing from hub
assembly. DO NOT reuse old bearing once pressed from hub.
Removal (RX7)
Raise and support vehicle. Remove wheel assembly. Remove and wire aside brake caliper. Remove grease cap,
cotter pin, nut lock and spindle nut. Remove washer and outer wheel bearing. Remove hub and rotor assembly.
Remove wheel speed sensor ring. Remove inner oil seal and wheel bearing.
Inspection (All Models)
Wash all disassembled parts before inspection. Check for damage, excessive wear and signs of bearing seizure.
Inspect steering knuckle and hub for cracks, scoring and rust. Check for damaged dust cover and poor fit with
steering knuckle.
Installation (All Models)
To install, reverse removal procedure. Adjust wheel bearing preload. See WHEEL BEARING under
ADJUSTMENTS & INSPECTION
. NOTE: If bearings need to be replaced on RX7, also replace hub.
1991 Mazda MX-5 Miata
SUSPENSION - FRONT 1990-91 SUSPENSION Front
Microsoft
Sunday, July 05, 2009 2:08:54 PMPage 7 © 2005 Mitchell Repair Information Company, LLC.