mazda3 model 2010 MAZDA MODEL 3 4-DOOR 2011 Repair Manual
[x] Cancel search | Manufacturer: MAZDA, Model Year: 2011, Model line: MODEL 3 4-DOOR, Model: MAZDA MODEL 3 4-DOOR 2011Pages: 514, PDF Size: 6.58 MB
Page 333 of 514

Black plate (333,1)
Multi Information Displayí
Steering switch
Without navigation system With navigation system
Clock adjustment
buttons
Steering Switch
Left switchRight switch
Navi switch BACK switchINFO switch
Enter (up/down) switch
Interior Comfort
Interior Equipment
6-101íSome models.
Mazda3_8BM5-EA-10F_Edition3 Page333
Tuesday, October 5 2010 9:7 AM
Form No.8BM5-EA-10F
Page 345 of 514

Black plate (345,1)
Storage Compartments
WARNING
Keep storage boxes closed when
driving:Driving with the storage boxes open
is dangerous. To reduce the
possibility of injury in an accident or
a sudden stop, keep the storage
boxes closed when driving.
CAUTION
Do not leave lighters or eyeglasses in
the storage boxes while parked under
the sun. A lighter could explode or
the plastic material in eyeglasses
could deform and crack from high
temperature.
qOverhead Consoleí
This console box is designed to store
eyeglasses or other accessories.
Push and release to open.
qGlove Compartment
To open the glove compartment, pull the
latch toward you.
To close the glove compartment, firmly
press in the center of the glove
compartment lid.
qCenter Console
To open, pull the lower release handle.
Interior Comfort
Interior Equipment
6-113íSome models.
Mazda3_8BM5-EA-10F_Edition3 Page345
Tuesday, October 5 2010 9:7 AM
Form No.8BM5-EA-10F
Page 346 of 514

Black plate (346,1)
Storage trayí
The storage tray can be installed to the
left/right side of the center console.
Storage tray
Using the armrestí
CAUTION
ØWhen sliding the armrest, be
careful not to hit a drink cup
placed in a cup holder and spill its
contents. Remove cups or other
drink containers from the cup
holders before pulling out the
armrest.
Ø Before opening the center console,
store the armrest first. Otherwise,
the armrest or center console may
be damaged. Press the button to slide the armrest
frontward.
To retract the armrest, slide it completely
to the rear.
q
Cargo Securing Loops (5 Door)
WARNING
Make sure luggage and cargo is
secured before driving:
Not securing cargo while driving is
dangerous as it could move or be
crushed during sudden braking or a
collision and cause injury.
6-114
Interior Comfort
íSome models.
Interior Equipment
Mazda3_8BM5-EA-10F_Edition3 Page346
Tuesday, October 5 2010 9:7 AM
Form No.8BM5-EA-10F
Page 363 of 514

Black plate (363,1)
qLocking Lug Nutsí
If your vehicle has optional antitheft
wheel lug nuts, one on each wheel will
lock the tires and you must use a special
key to unlock them. This key is attached
to the lug wrench and is stored with the
spare tire. Register them with the lock
manufacturer by filling out the card
provided in the glove box and mailing it
in the accompanying envelope. If you lose
this key, consult an Authorized Mazda
Dealer or use the lock manufacturer's
order form, which is with the registration
card.
Special key
Antitheft lug nut
To remove an antitheft lug nut
1. Obtain the key for the antitheft lug nut.
2. Place the key on top of the nut, and be
sure to hold the key square to it. If you
hold the key at an angle, you may
damage both key and nut. Don't use a
power impact wrench.
3. Place the lug wrench on top of the key and apply pressure. Turn the wrench
counterclockwise.
To install the nut
1. Place the key on top of the nut, and besure to hold the key square to it. If you
hold the key at an angle, you may
damage both key and nut. Don't use a
power impact wrench.
2. Place the lug wrench on top of the key, apply pressure, and turn it clockwise.
qMounting the Spare Tire
1. Remove dirt and grime from the
mounting surfaces of the wheel and
hub, including the hub bolts, with a
cloth.
WARNING
Make sure the mounting surfaces of
the wheel, hub and lug nuts are clean
before changing or replacing tires: When changing or replacing a tire,
not removing dirt and grime from the
mounting surfaces of the wheel, hub
and hub bolts is dangerous. The lug
nuts could loosen while driving and
cause the tire to come off, resulting in
an accident.
2. Mount the spare tire.
In Case of an Emergency
Flat Tire
7-13íSome models.
Mazda3_8BM5-EA-10F_Edition3 Page363
Tuesday, October 5 2010 9:7 AM
Form No.8BM5-EA-10F
Page 379 of 514

Black plate (379,1)
8Maintenance and Care
How to keep your Mazda in top condition.
Introduction .................................................................................. 8-2Introduction ............................................................................... 8-2
Scheduled Maintenance ................................................................ 8-3 Scheduled Maintenance (USA, Canada, and Puerto Rico) ....... 8-3
Scheduled Maintenance (Mexico) ............................................. 8-8
Owner Maintenance ................................................................... 8-15 Owner Maintenance Schedule ................................................ 8-15
Owner Maintenance Precautions ............................................. 8-16
Engine Compartment Overview .............................................. 8-17
Engine Oil ............................................................................... 8-18
Engine Coolant ....................................................................... 8-21
Brake/Clutch Fluid .................................................................. 8-23
Power Steering Fluid ............................................................... 8-24
Automatic Transaxle Fluid (ATF)
í........................................ 8-24
Washer Fluid ........................................................................... 8-26
Body Lubrication .................................................................... 8-27
Wiper Blades ........................................................................... 8-27
Battery ..................................................................................... 8-31
Tires ........................................................................................ 8-35
Light Bulbs ............................................................................. 8-42
Fuses ....................................................................................... 8-54
Appearance Care ........................................................................ 8-60 How to Minimize Environmental Paint Damage .................... 8-60
Exterior Care ........................................................................... 8-62
Interior Care ............................................................................ 8-66
8-1íSome models.
Mazda3_8BM5-EA-10F_Edition3 Page379
Tuesday, October 5 2010 9:7 AM
Form No.8BM5-EA-10F
Page 402 of 514

Black plate (402,1)
Power Steering Fluid
qInspecting Power Steering Fluid
Level
CAUTION
To avoid damage to the power
steering pump, don't operate the
vehicle for long periods when the
power steering fluid level is low.
NOTE
Use specified power steering fluid (page 10-4).
Inspect the fluid level in the reservoir at
each engine oil change with the engine off
and cold. Add fluid if necessary; it does
not require periodic changing.
The level must be kept between MIN and
MAX.
Visually examine the lines and hoses for
leaks and damage.
If new fluid is required frequently, consult
an Authorized Mazda Dealer.
Automatic Transaxle Fluid
(ATF)
í
q Inspecting Automatic Transaxle
Fluid Level
The automatic transaxle fluid level should
be inspected regularly. Measure it as
described below.
CAUTION
Ø Always check the automatic
transaxle fluid level according to
the following procedure. If the
procedure is not done correctly,
the automatic transaxle fluid level
cannot be measured accurately
which could lead to automatic
transaxle damage.
Ø A low fluid level can cause
transaxle slippage. Overfilling can
cause foaming, loss of fluid, and
transaxle malfunction.
Ø It is recommended to use Mazda
Genuine automatic transaxle fluid
(page 10-4).
1. Park on a level surface and set the parking brake firmly.
2. Make sure there is no ATF leakage from the ATF hose or the housing.
3. Shift the shift lever to the park position (P), start the engine and warm it up.
CAUTION
Do not shift the shift lever while the
engine is warming up. If the ATF level
is extremely low, the automatic
transaxle could be damaged.
8-24
Maintenance and Care
íSome models.
Owner Maintenance
Mazda3_8BM5-EA-10F_Edition3 Page402
Tuesday, October 5 2010 9:7 AM
Form No.8BM5-EA-10F
Page 414 of 514
Black plate (414,1)
qTire Inflation Pressure
WARNING
Always inflate the tires to the correct
pressure:
Overinflation or underinflation of
tires is dangerous. Adverse handling
or unexpected tire failure could result
in a serious accident.
Refer to specification charts on page
10-11.
Use only a Mazda-genuine tire valve
cap: Use of a non-genuine part is
dangerous as the correct tire air
pressure cannot be maintained if the
tire valve becomes damaged. If the
vehicle is driven under this condition,
the tire air pressure will decrease
which could result in a serious
accident. Do not use any part for the
tire valve cap that is not a Mazda-
genuine part. The Tire Pressure Monitoring System
í
does not alleviate the need to check the
tire condition every day, including
whether the tires all look inflated properly.
Inspect all tire pressure monthly
(including the spare) when the tires are
cold. Maintain recommended pressures
for the best ride, handling, and minimum
tire wear.
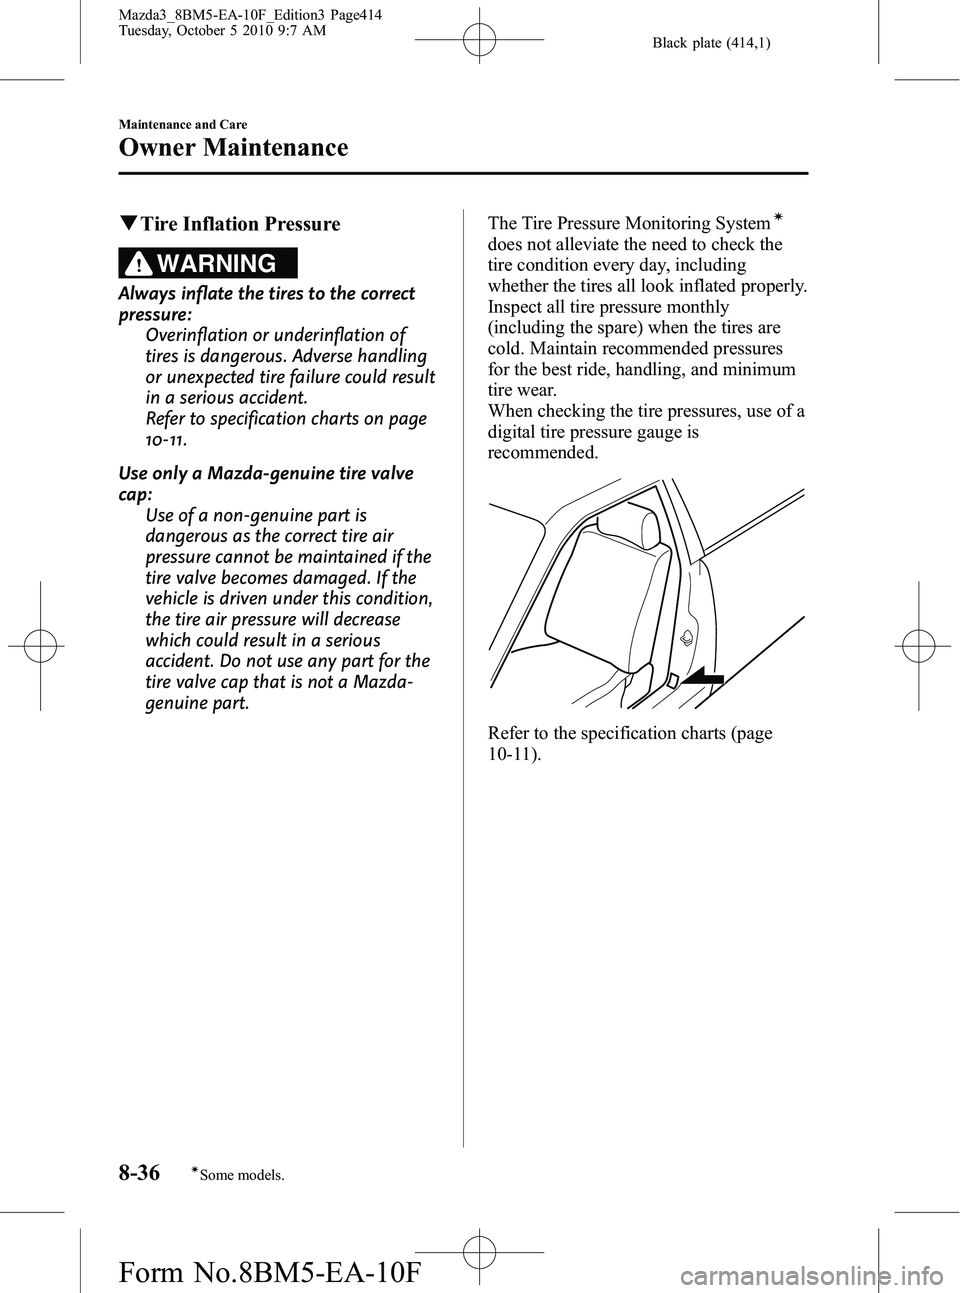
When checking the tire pressures, use of a
digital tire pressure gauge is
recommended.
Refer to the specification charts (page
10-11).
8-36
Maintenance and Care
íSome models.
Owner Maintenance
Mazda3_8BM5-EA-10F_Edition3 Page414
Tuesday, October 5 2010 9:7 AM
Form No.8BM5-EA-10F
Page 420 of 514
Black plate (420,1)
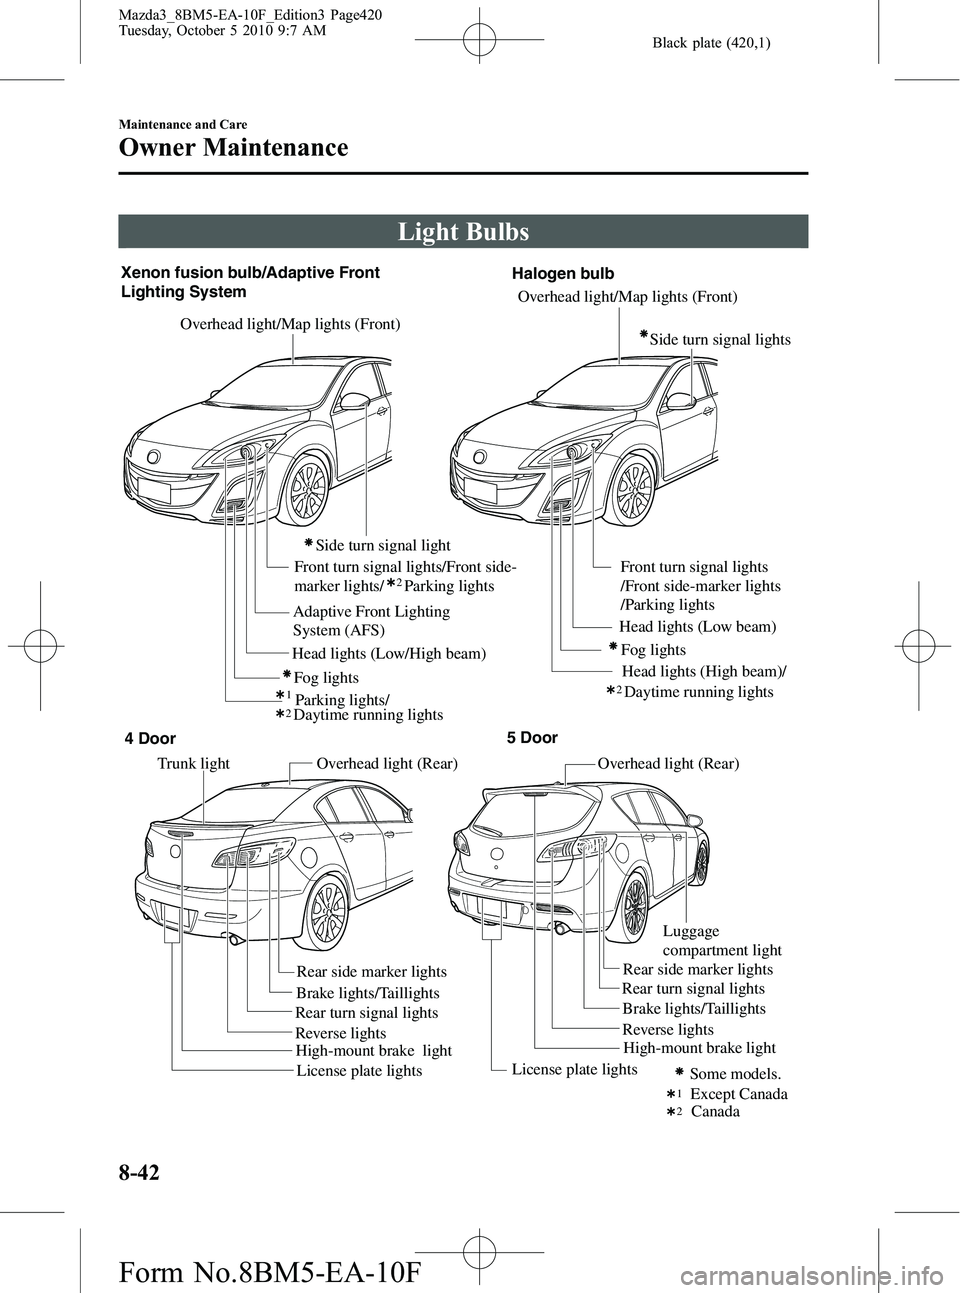
Light Bulbs
Overhead light/Map lights (Front)Overhead light (Rear) Overhead light (Rear)
Front turn signal lights/Front side-
marker lights/ Parking lights
Xenon fusion bulb/Adaptive Front
Lighting System
Fog lights
Parking lights/
Adaptive Front Lighting
System (AFS)
Overhead light/Map lights (Front)
Front turn signal lights
/Front side-marker lights
/Parking lights
Head lights (Low beam)
Head lights (Low/High beam) Fog lights
Side turn signal light
Trunk light
Brake lights/Taillights Brake lights/Taillights
Rear turn signal lights Rear turn signal lights
Rear side marker lights
Rear side marker lights
Except Canada
Some models.
Reverse lights
Reverse lights
License plate lights License plate lights
High-mount brake light Halogen bulb
212
2
12
High-mount brake light
Luggage
compartment light
4 Door
5 Door
Canada
Daytime running lights
Head lights (High beam)/
Daytime running lights
Side turn signal lights
8-42
Maintenance and Care
Owner Maintenance
Mazda3_8BM5-EA-10F_Edition3 Page420
Tuesday, October 5 2010 9:7 AM
Form No.8BM5-EA-10F
Page 425 of 514
Black plate (425,1)
6. Install the new bulb in the reverse orderof the removal procedure.
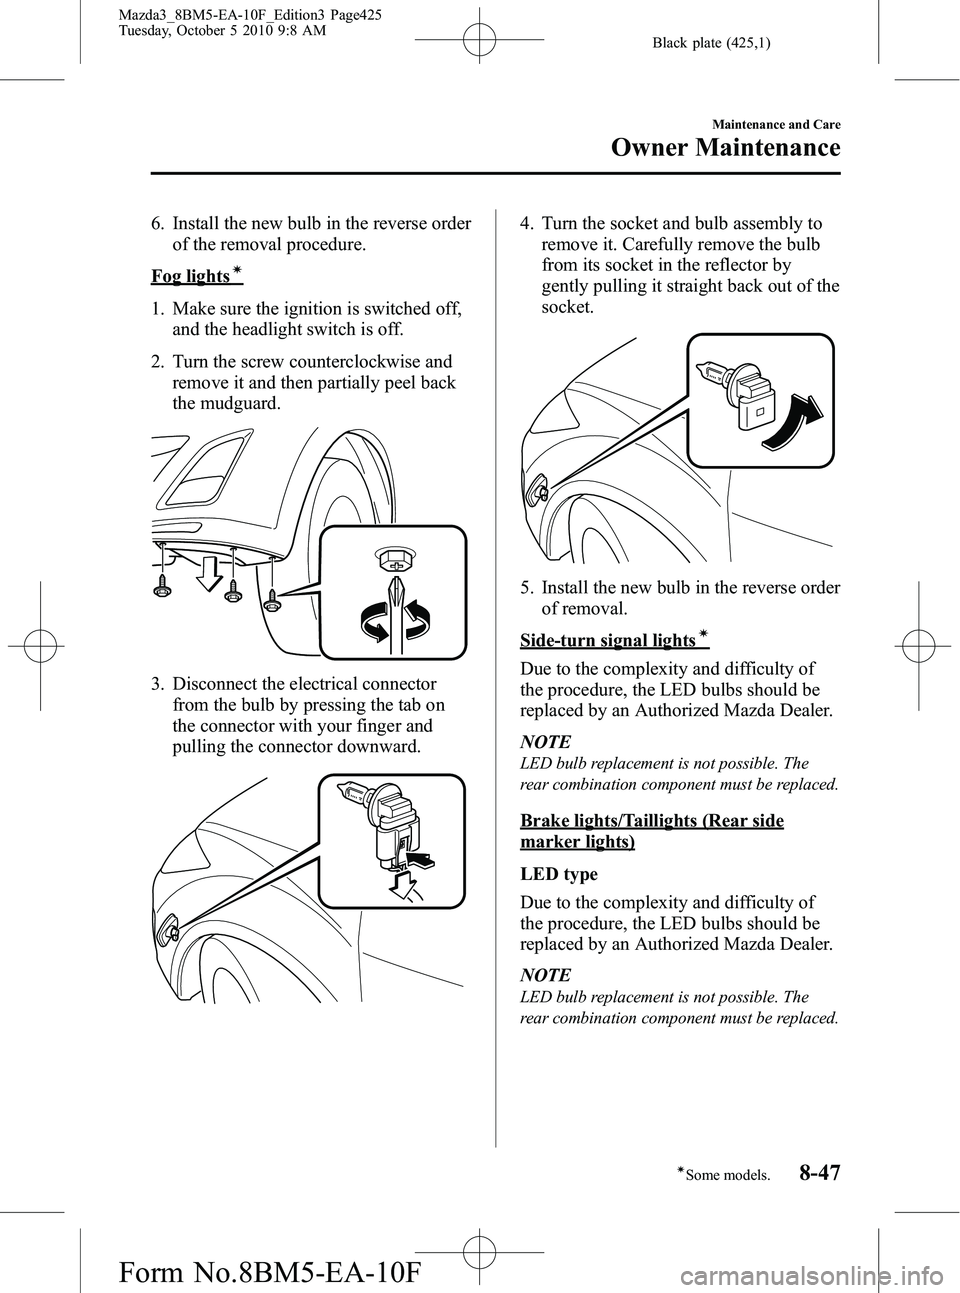
Fog lightsí
1. Make sure the ignition is switched off,and the headlight switch is off.
2. Turn the screw counterclockwise and remove it and then partially peel back
the mudguard.
3. Disconnect the electrical connector
from the bulb by pressing the tab on
the connector with your finger and
pulling the connector downward.
4. Turn the socket and bulb assembly toremove it. Carefully remove the bulb
from its socket in the reflector by
gently pulling it straight back out of the
socket.
5. Install the new bulb in the reverse order
of removal.
Side-turn signal lightsí
Due to the complexity and difficulty of
the procedure, the LED bulbs should be
replaced by an Authorized Mazda Dealer.
NOTE
LED bulb replacement is not possible. The
rear combination component must be replaced.
Brake lights/Taillights (Rear side
marker lights)
LED type
Due to the complexity and difficulty of
the procedure, the LED bulbs should be
replaced by an Authorized Mazda Dealer.
NOTE
LED bulb replacement is not possible. The
rear combination component must be replaced.
Maintenance and Care
Owner Maintenance
8-47íSome models.
Mazda3_8BM5-EA-10F_Edition3 Page425
Tuesday, October 5 2010 9:8 AM
Form No.8BM5-EA-10F
Page 430 of 514
Black plate (430,1)
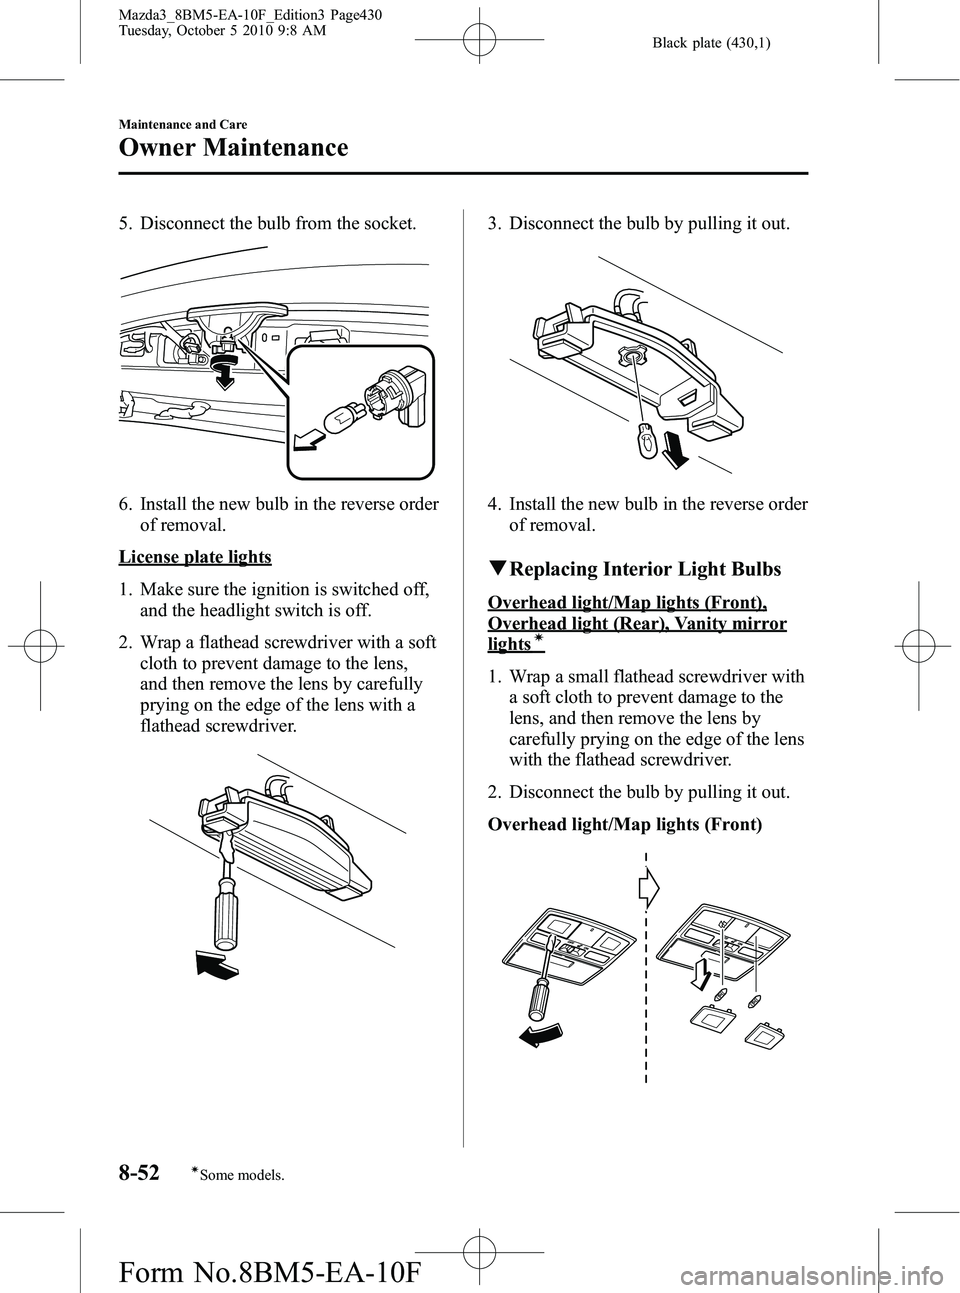
5. Disconnect the bulb from the socket.
6. Install the new bulb in the reverse orderof removal.
License plate lights
1. Make sure the ignition is switched off,and the headlight switch is off.
2. Wrap a flathead screwdriver with a soft cloth to prevent damage to the lens,
and then remove the lens by carefully
prying on the edge of the lens with a
flathead screwdriver.
3. Disconnect the bulb by pulling it out.
4. Install the new bulb in the reverse orderof removal.
qReplacing Interior Light Bulbs
Overhead light/Map lights (Front),
Overhead light (Rear), Vanity mirror
lightsí
1. Wrap a small flathead screwdriver with
a soft cloth to prevent damage to the
lens, and then remove the lens by
carefully prying on the edge of the lens
with the flathead screwdriver.
2. Disconnect the bulb by pulling it out.
Overhead light/Map lights (Front)
8-52
Maintenance and Care
íSome models.
Owner Maintenance
Mazda3_8BM5-EA-10F_Edition3 Page430
Tuesday, October 5 2010 9:8 AM
Form No.8BM5-EA-10F