bulb MAZDA MODEL 3 5-DOOR 2017 User Guide
[x] Cancel search | Manufacturer: MAZDA, Model Year: 2017, Model line: MODEL 3 5-DOOR, Model: MAZDA MODEL 3 5-DOOR 2017Pages: 612
Page 465 of 612
6–53
Maintenance and Care
Owner Maintenance
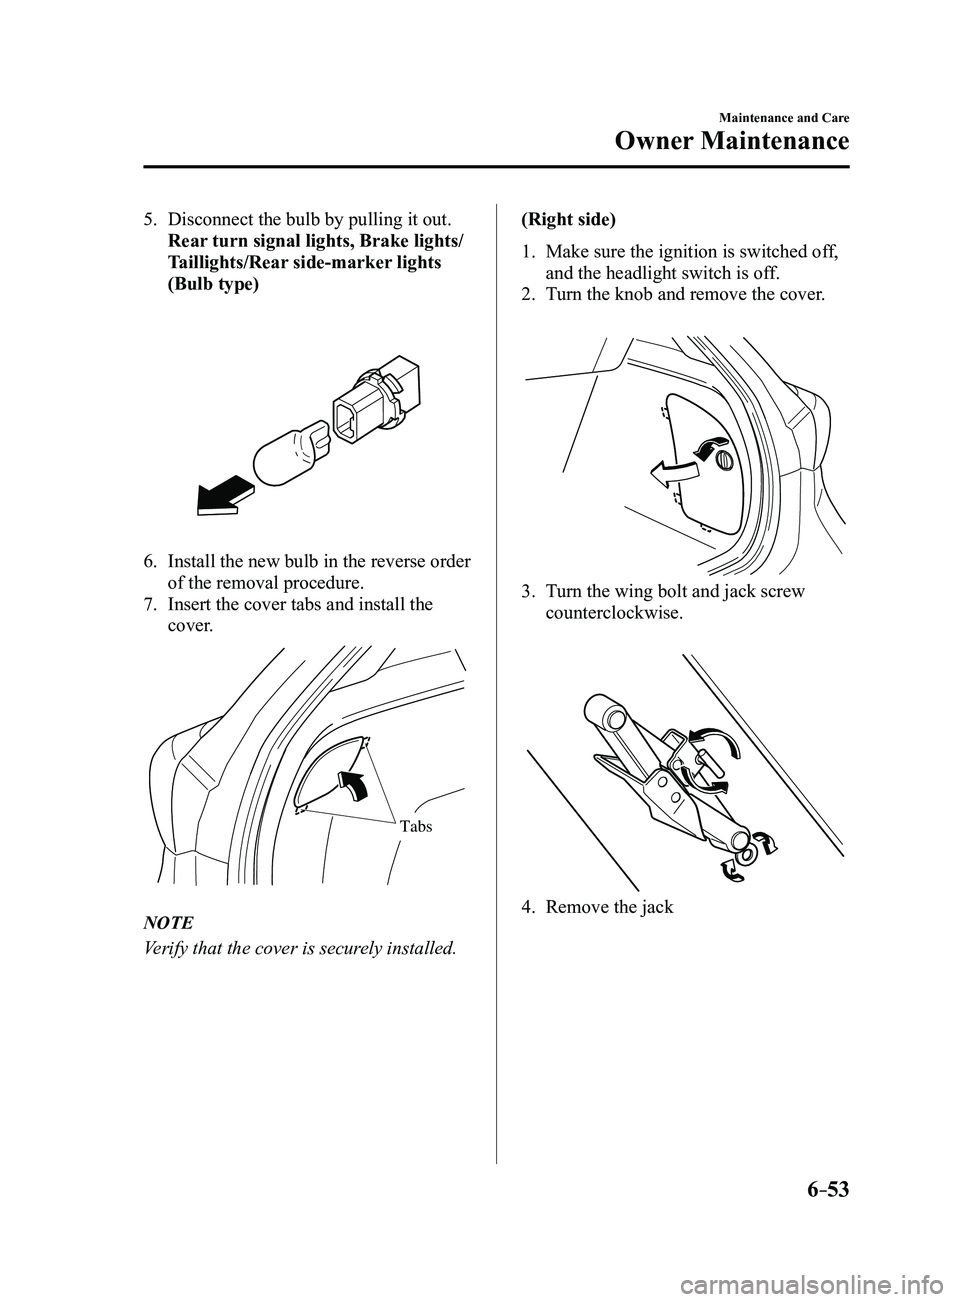
5. Disconnect the bulb by pulling it out.
Rear turn signal lights, Brake lights/
Taillights/Rear side-marker lights
(Bulb type)
6. Install the new bulb in the reverse order
of the removal procedure.
7. Insert the cover tabs and install the
cover.
Tabs
NOTE
Verify that the cover is securely installed.(Right side)
1. Make sure the ignition is switched of
f,
and the headlight switch is off.
2. Turn the knob and remove the cover.
3. Turn the wing bolt and jack screw
counterclockwise.
4. Remove the jack
Mazda3_8FL6-EA-16F_Edition2.indb 532016/08/10 17:38:55
Page 466 of 612
6–54
Maintenance and Care
Owner Maintenance
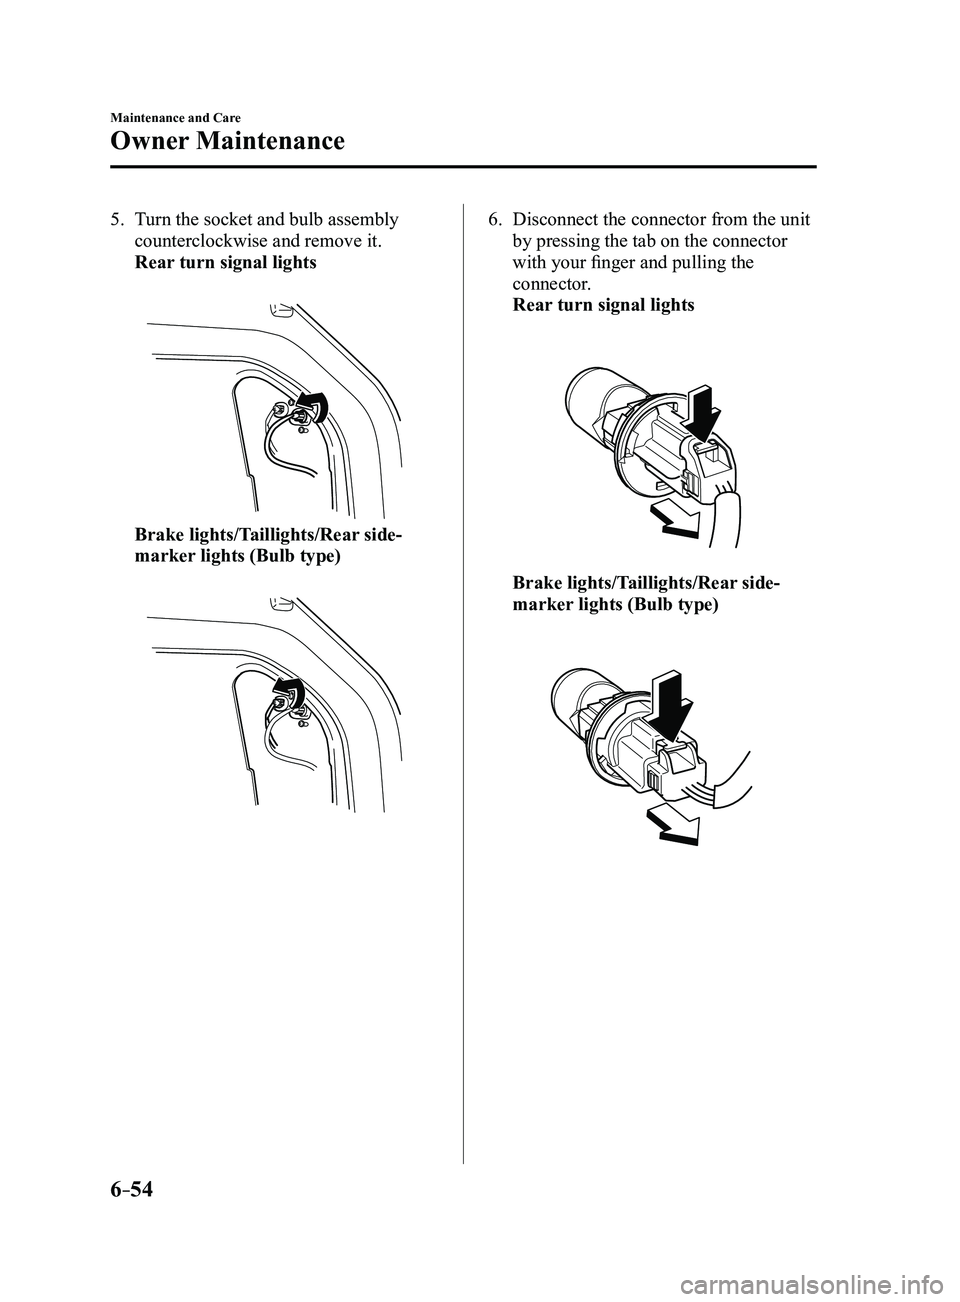
5. Turn the socket and bulb assembly
counterclockwise and remove it.
Rear turn signal lights
Brake lights/Taillights/Rear side-
marker lights (Bulb type)
6. Disconnect the connector from the unit
by pressing the tab on the connector
with your finger and pulling the
connector.
Rear turn signal lights
Brake lights/Taillights/Rear side-
marker lights (Bulb type)
Mazda3_8FL6-EA-16F_Edition2.indb 542016/08/10 17:38:56
Page 467 of 612
6–55
Maintenance and Care
Owner Maintenance
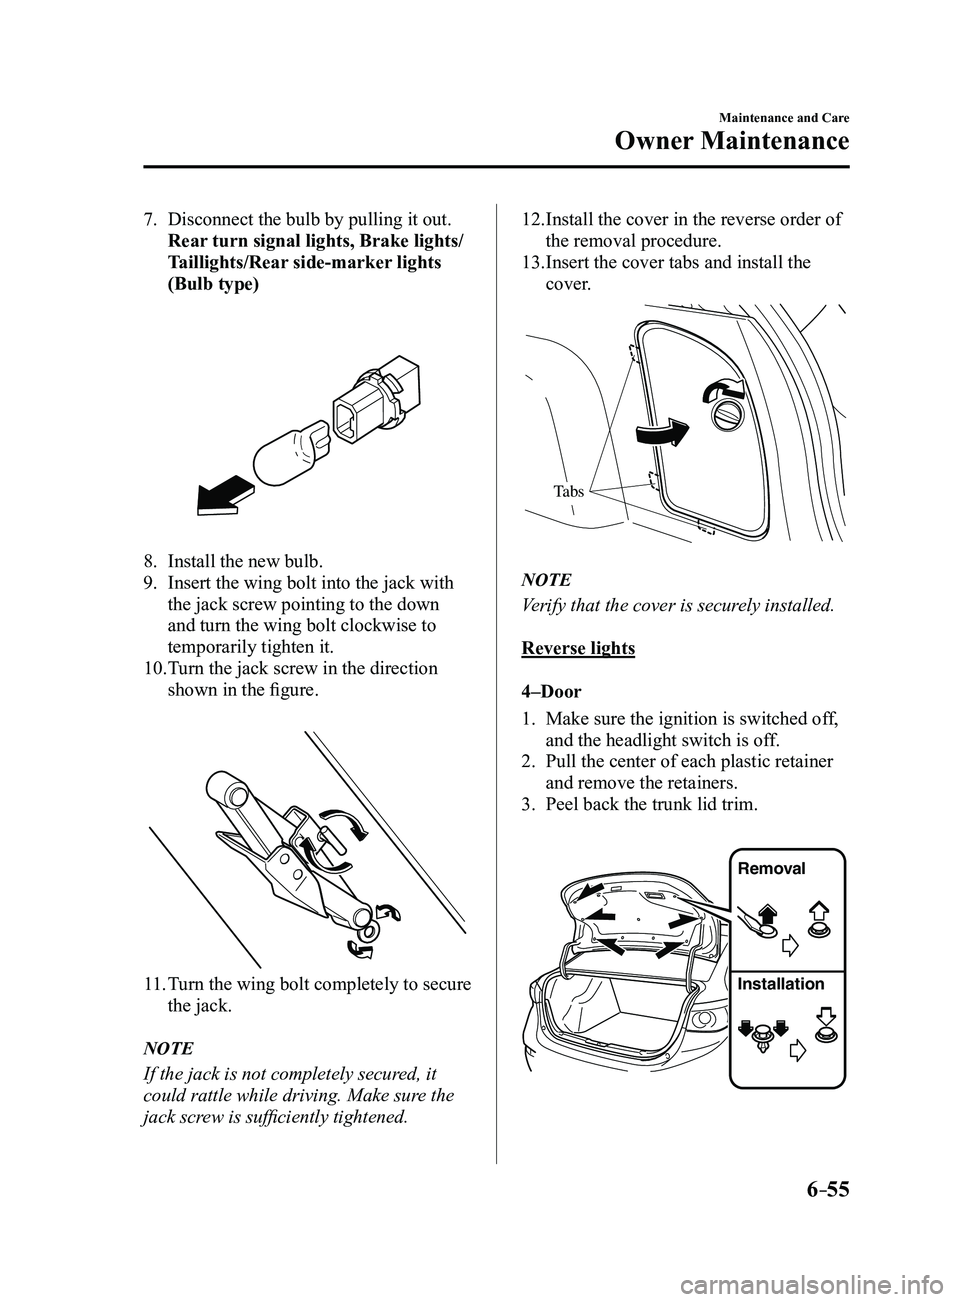
7. Disconnect the bulb by pulling it out.
Rear turn signal lights, Brake lights/
Taillights/Rear side-marker lights
(Bulb type)
8. Install the new bulb.
9. Insert the wing bolt into the jack with
the jack screw pointing to the down
and turn the wing bolt clockwise to
temporarily tighten it.
10. Turn the jack screw in the direction
shown in the figure.
11. Turn the wing bolt completely to secure
the jack.
NOTE
If the jack is not completely secured, it
could rattle while driving. Make sure the
jack screw is sufficiently tightened.
12. Install the cover in the reverse order of
the removal procedure.
13. Insert the cover tabs and install the
cover.
Tabs
NOTE
Verify that the cover is securely installed.
Reverse lights
4–Door
1. Make sure the ignition is switched off,
and the headlight switch is off.
2. Pull the center of each plastic retainer
and remove the retainers.
3. Peel back the trunk lid trim.
Removal
Installation
Mazda3_8FL6-EA-16F_Edition2.indb 552016/08/10 17:38:56
Page 468 of 612
6–56
Maintenance and Care
Owner Maintenance
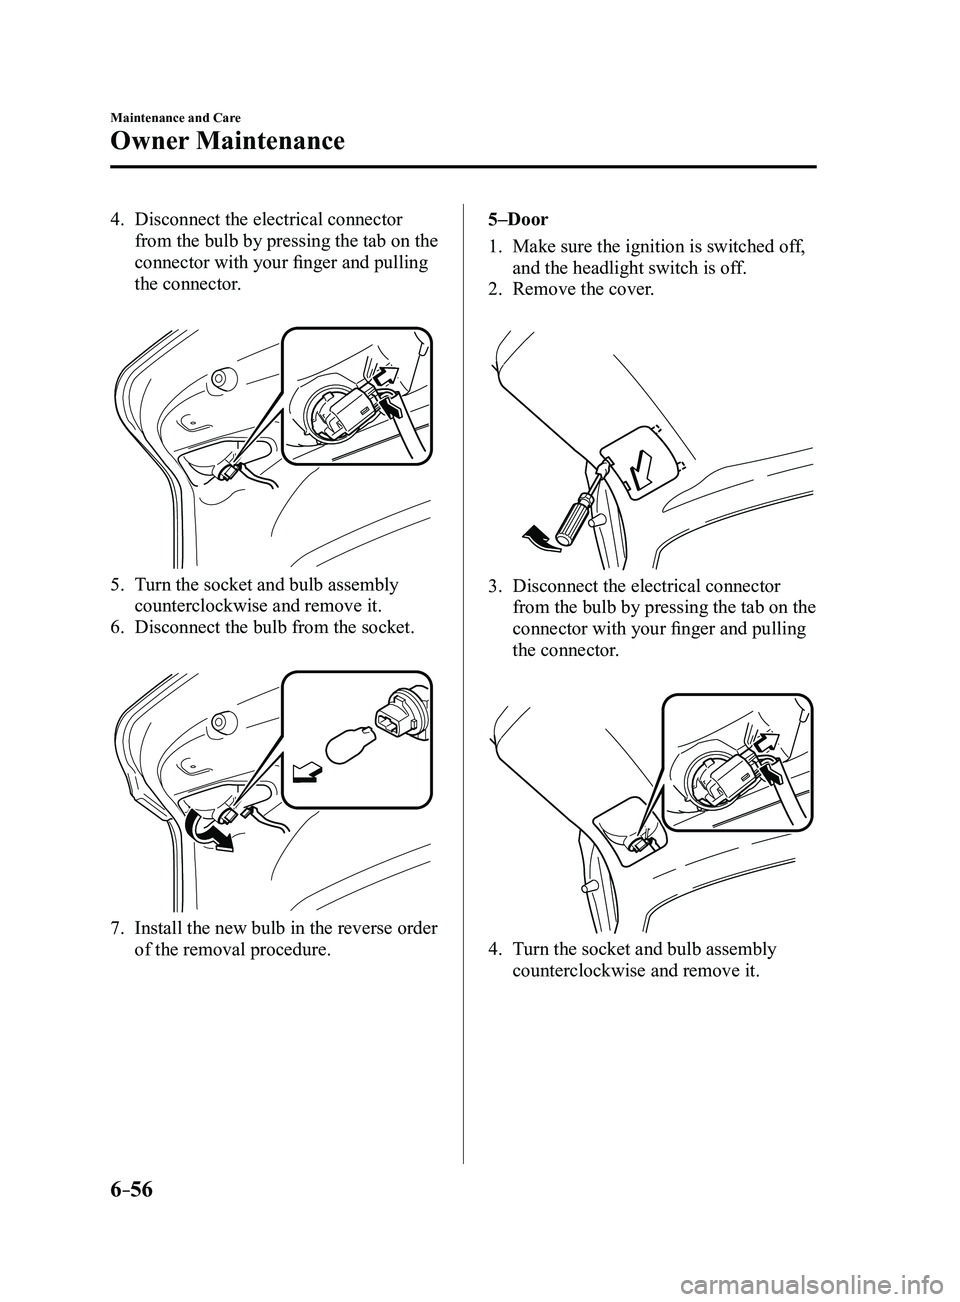
4. Disconnect the electrical connector
from the bulb by pressing the tab on the
connector with your finger and pulling
the connector.
5. Turn the socket and bulb assembly
counterclockwise and remove it.
6. Disconnect the bulb from the socket.
7. Install the new bulb in the reverse order
of the removal procedure.5–Door
1. Make sure the ignition is switched of
f,
and the headlight switch is off.
2. Remove the cover.
3. Disconnect the electrical connector
from the bulb by pressing the tab on the
connector with your finger and pulling
the connector.
4. Turn the socket and bulb assembly
counterclockwise and remove it.
Mazda3_8FL6-EA-16F_Edition2.indb 562016/08/10 17:38:57
Page 469 of 612
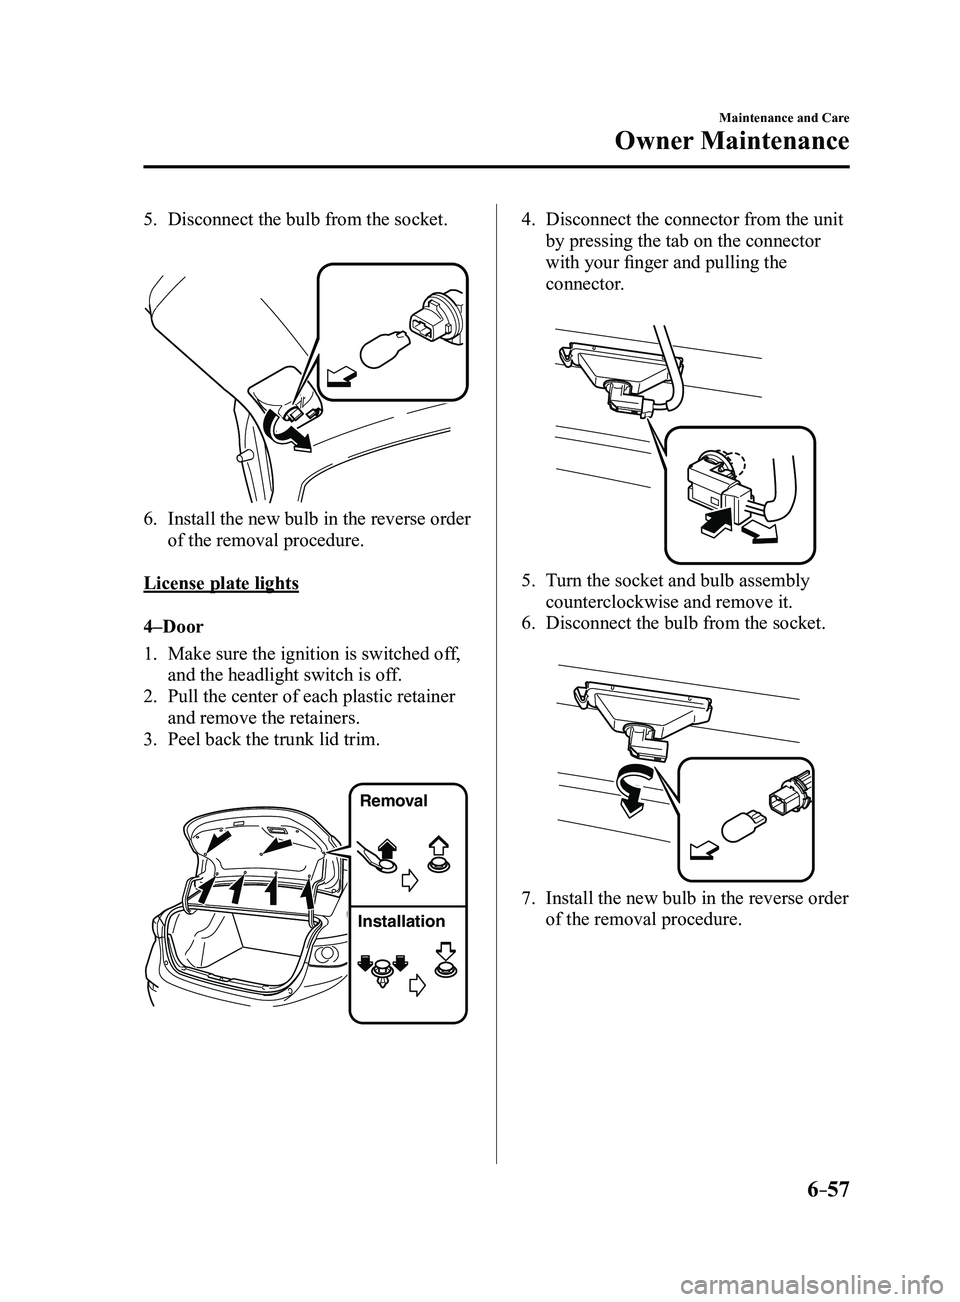
6–57
Maintenance and Care
Owner Maintenance
5. Disconnect the bulb from the socket.
6. Install the new bulb in the reverse order
of the removal procedure.
License plate lights
4–Door
1. Make sure the ignition is switched of f,
and the headlight switch is off.
2. Pull the center of each plastic retainer
and remove the retainers.
3. Peel back the trunk lid trim.
Removal
Installation
4. Disconnect the connector from the unit
by pressing the tab on the connector
with your finger and pulling the
connector.
5. Turn the socket and bulb assembly
counterclockwise and remove it.
6. Disconnect the bulb from the socket.
7. Install the new bulb in the reverse order
of the removal procedure.
Mazda3_8FL6-EA-16F_Edition2.indb 572016/08/10 17:38:58
Page 470 of 612
6–58
Maintenance and Care
Owner Maintenance
*Some models.
5–Door
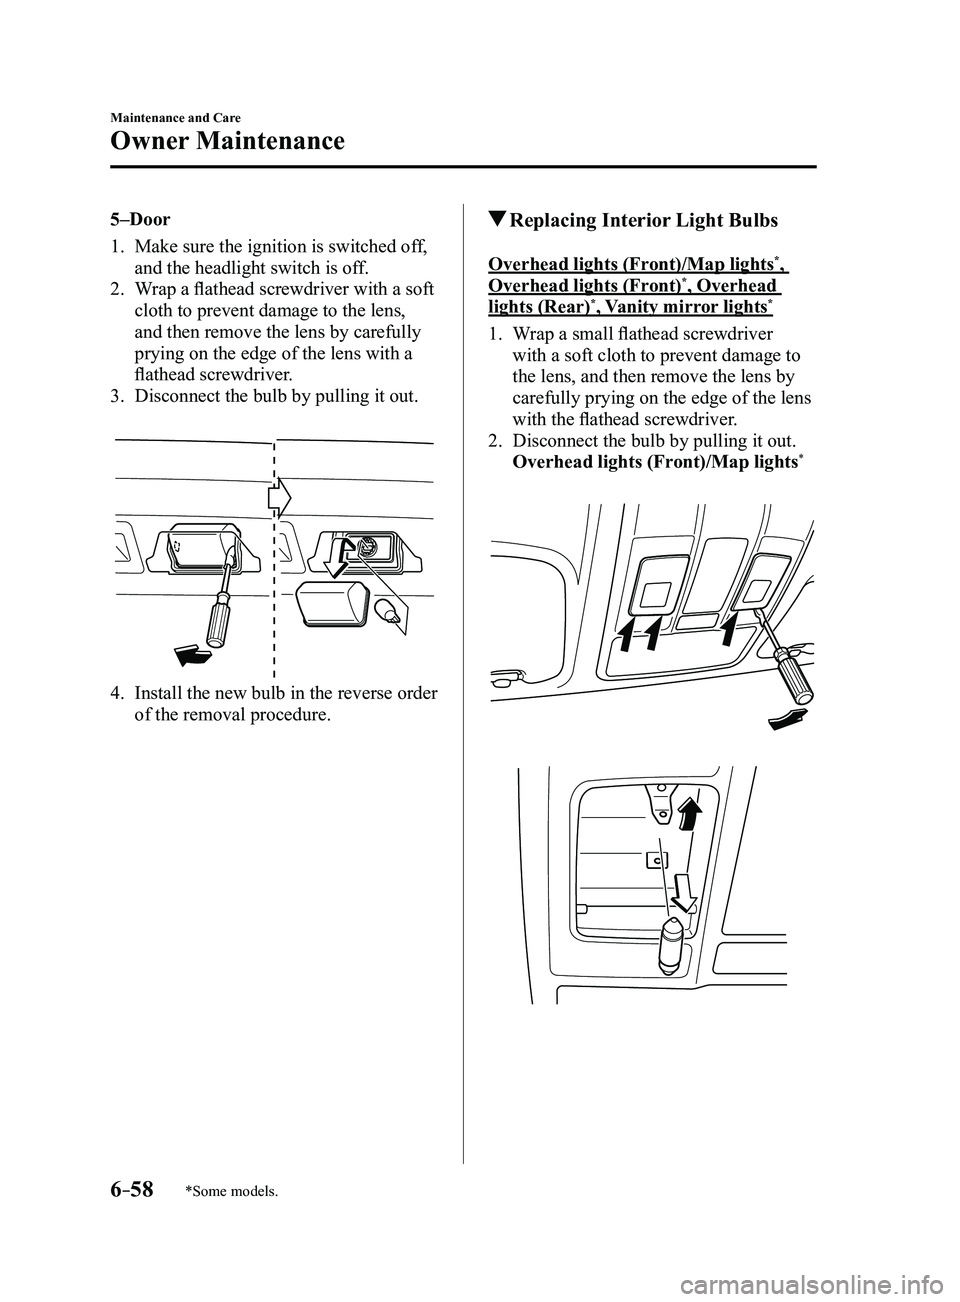
1. Make sure the ignition is switched off,
and the headlight switch is off.
2. Wrap a flathead screwdriver with a soft
cloth to prevent damage to the lens,
and then remove the lens by carefully
prying on the edge of the lens with a
flathead screwdriver.
3. Disconnect the bulb by pulling it out.
4. Install the new bulb in the reverse order
of the removal procedure.
Replacing Interior Light Bulbs
Overhead lights (Front)/Map lights*,
Overhead lights (Front)*, Overhead
lights (Rear)*, Vanity mirror lights*
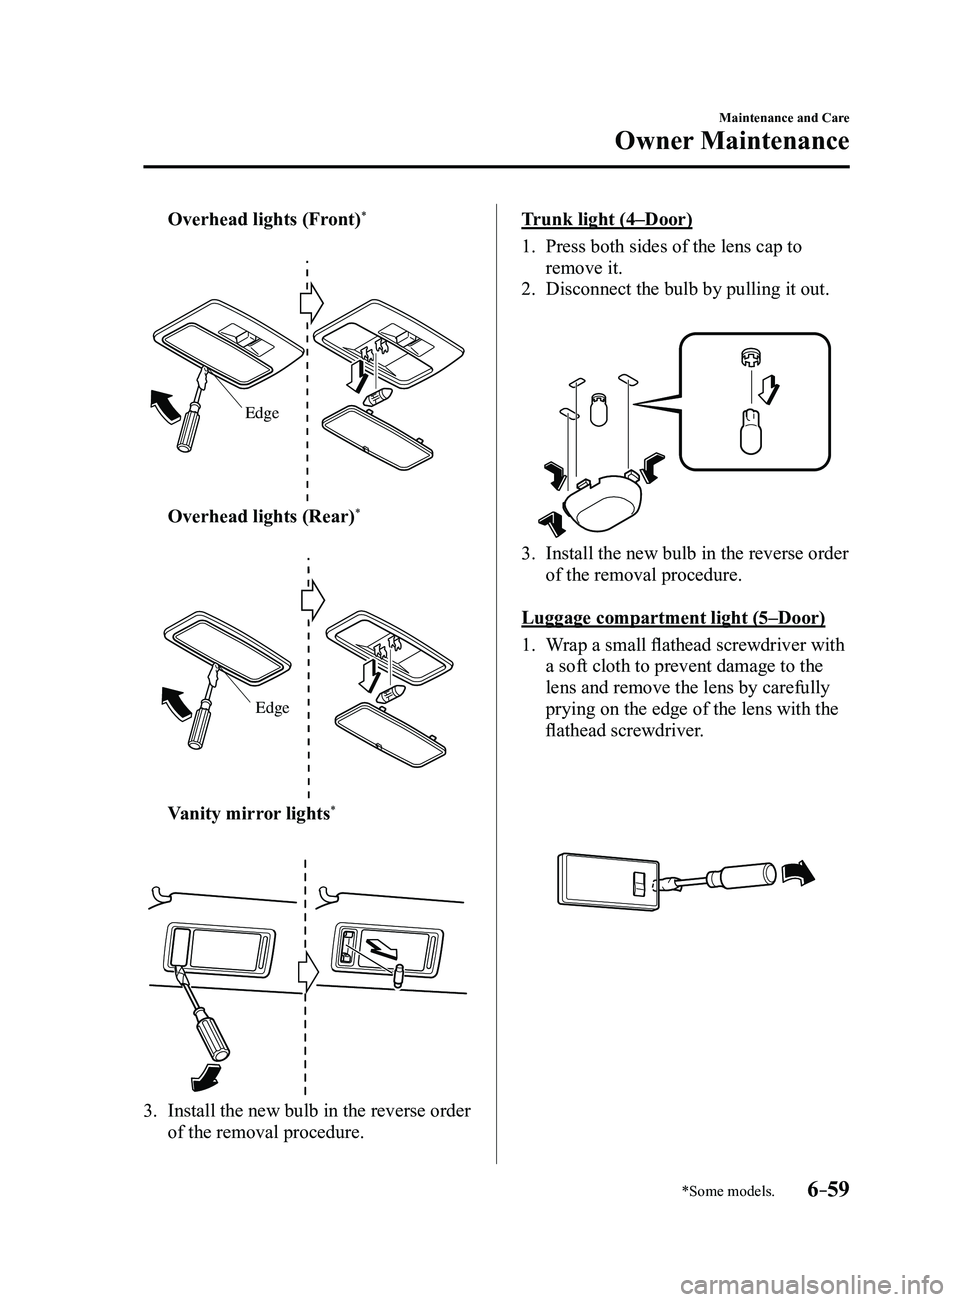
1. Wrap a small flathead screwdriver
with a soft cloth to prevent damage to
the lens, and then remove the lens by
carefully prying on the edge of the lens
with the flathead screwdriver.
2. Disconnect the bulb by pulling it out.
Overhead lights (Front)/Map lights*
Mazda3_8FL6-EA-16F_Edition2.indb 582016/08/10 17:38:59
Page 471 of 612
6–59
Maintenance and Care
Owner Maintenance
*Some models.
Overhead lights (Front)*
Edge
Overhead lights (Rear)*
Edge
Vanity mirror lights*
3. Install the new bulb in the reverse order
of the removal procedure.
Trunk light (4–Door)
1. Press both sides of the lens cap to
remove it.
2. Disconnect the bulb by pulling it out.
3. Install the new bulb in the reverse order
of the removal procedure.
Luggage compartment light (5–Door)
1. Wrap a small flathead screwdriver with
a soft cloth to prevent damage to the
lens and remove the lens by carefully
prying on the edge of the lens with the
flathead screwdriver.
Mazda3_8FL6-EA-16F_Edition2.indb 592016/08/10 17:39:00
Page 472 of 612
6–60
Maintenance and Care
Owner Maintenance
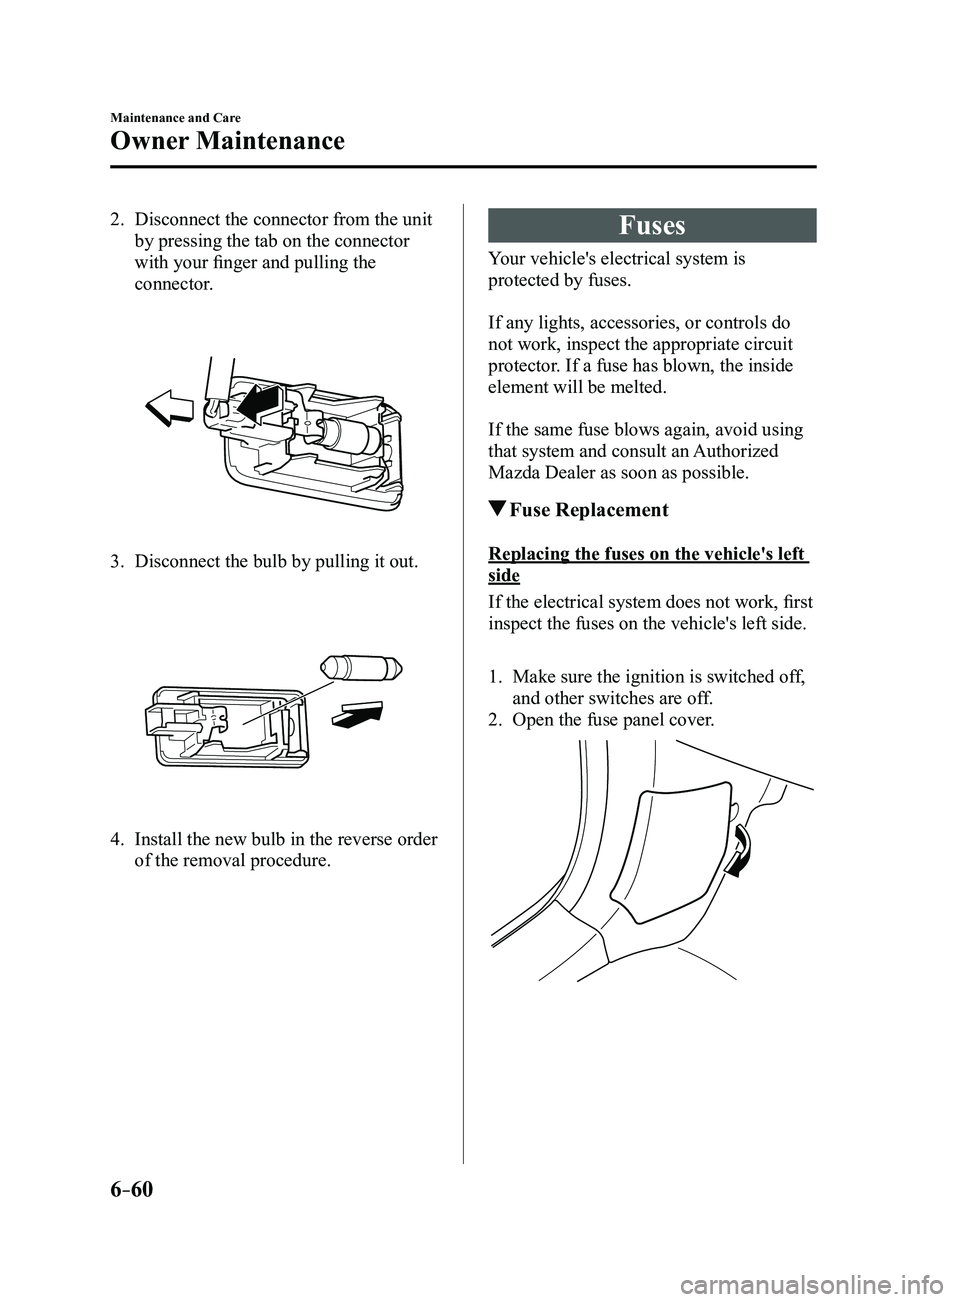
2. Disconnect the connector from the unit
by pressing the tab on the connector
with your finger and pulling the
connector.
3. Disconnect the bulb by pulling it out.
4. Install the new bulb in the reverse order
of the removal procedure.
Fuses
Your vehicle's electrical system is
protected by fuses.
If any lights, accessories, or controls do
not work, inspect the appropriate circuit
protector. If a fuse has blown, the inside
element will be melted.
If the same fuse blows again, avoid using
that system and consult an Authorized
Mazda Dealer as soon as possible.
Fuse Replacement
Replacing the fuses on the vehicle's left
side
If the electrical system does not work, first
inspect the fuses on the vehicle's left side.
1. Make sure the ignition is switched off,
and other switches are off.
2. Open the fuse panel cover.
Mazda3_8FL6-EA-16F_Edition2.indb 602016/08/10 17:39:01
Page 593 of 612
9–9
Specifications
Specifications
*Some models.
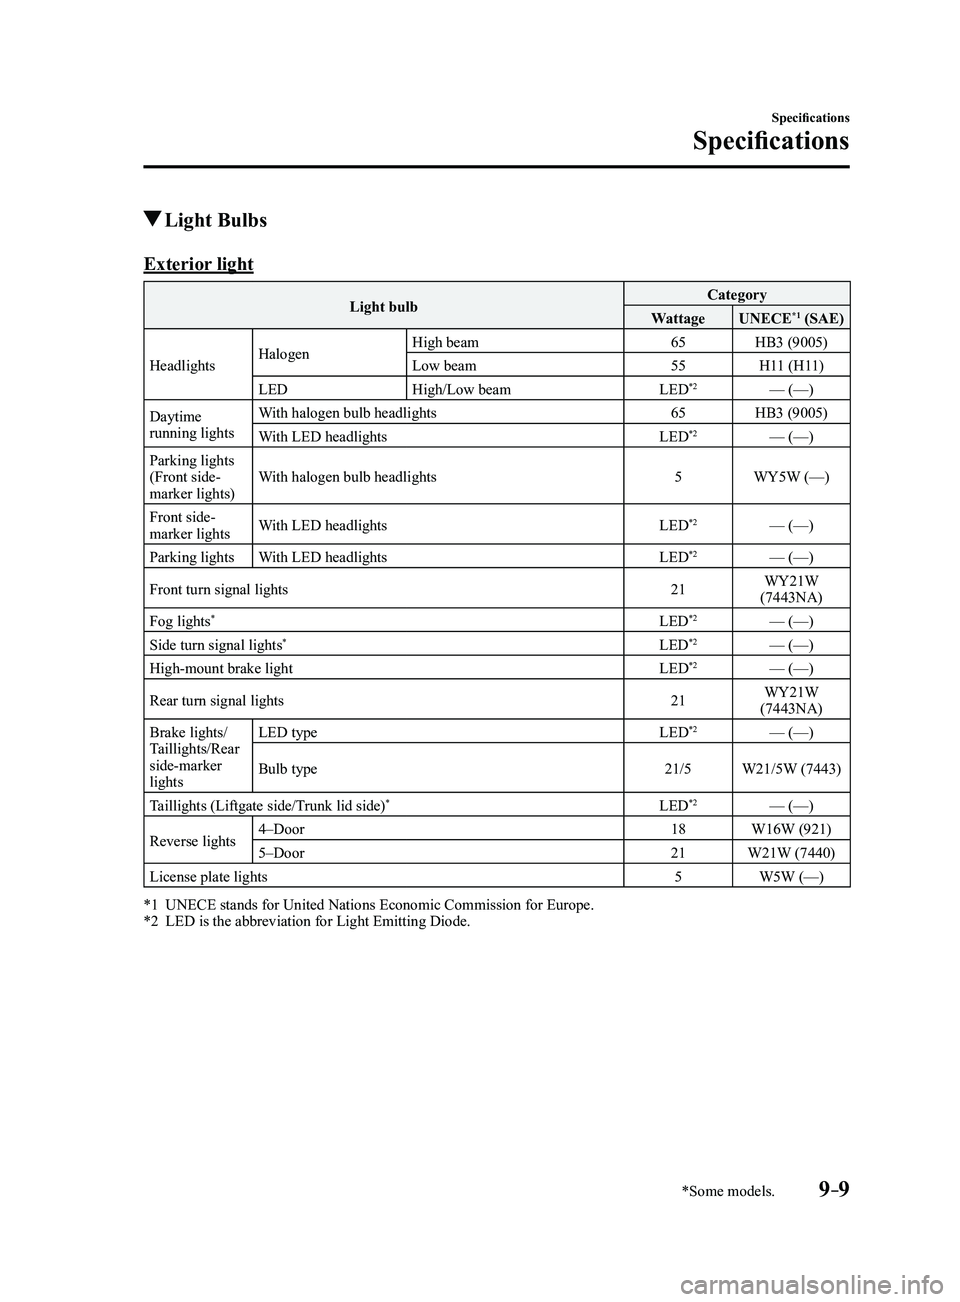
Light Bulbs
Exterior light
Light bulbCategory
Wattage UNECE*1 (SAE)
Headlights Halogen High beam
65HB3 (9005)
Low beam 55H11 (H11)
LED High/Low beam LED
*2— (—)
Daytime
running lights With halogen bulb headlights
65HB3 (9005)
With LED headlights LED
*2— (—)
Parking lights
(Front side-
marker lights) With halogen bulb headlights
5WY5W (—)
Front side-
marker lights With LED headlights
LED
*2— (—)
Parking lights With LED headlights LED
*2— (—)
Front turn signal lights 21WY21W
(7443NA)
Fog lights
*LED*2— (—)
Side turn signal lights*LED*2— (—)
High-mount brake light LED*2— (—)
Rear turn signal lights 21WY21W
(7443NA)
Brake lights/
Taillights/Rear
side-marker
lights LED type
LED
*2— (—)
Bulb type 21/5W21/5W (7443)
Taillights (Liftgate side/Trunk lid side)
*LED*2— (—)
Reverse lights 4–Door
18W16W (921)
5–Door 21W21W (7440)
License plate lights 5W5W (—)
*1 UNECE stands for United Nations Economic Commission for Europe.*2 LED is the abbreviation for Light Emitting Diode.
Mazda3_8FL6-EA-16F_Edition2.indb 92016/08/10 17:39:54
Page 594 of 612
9–10
Specifications
Specifications
*Some models.
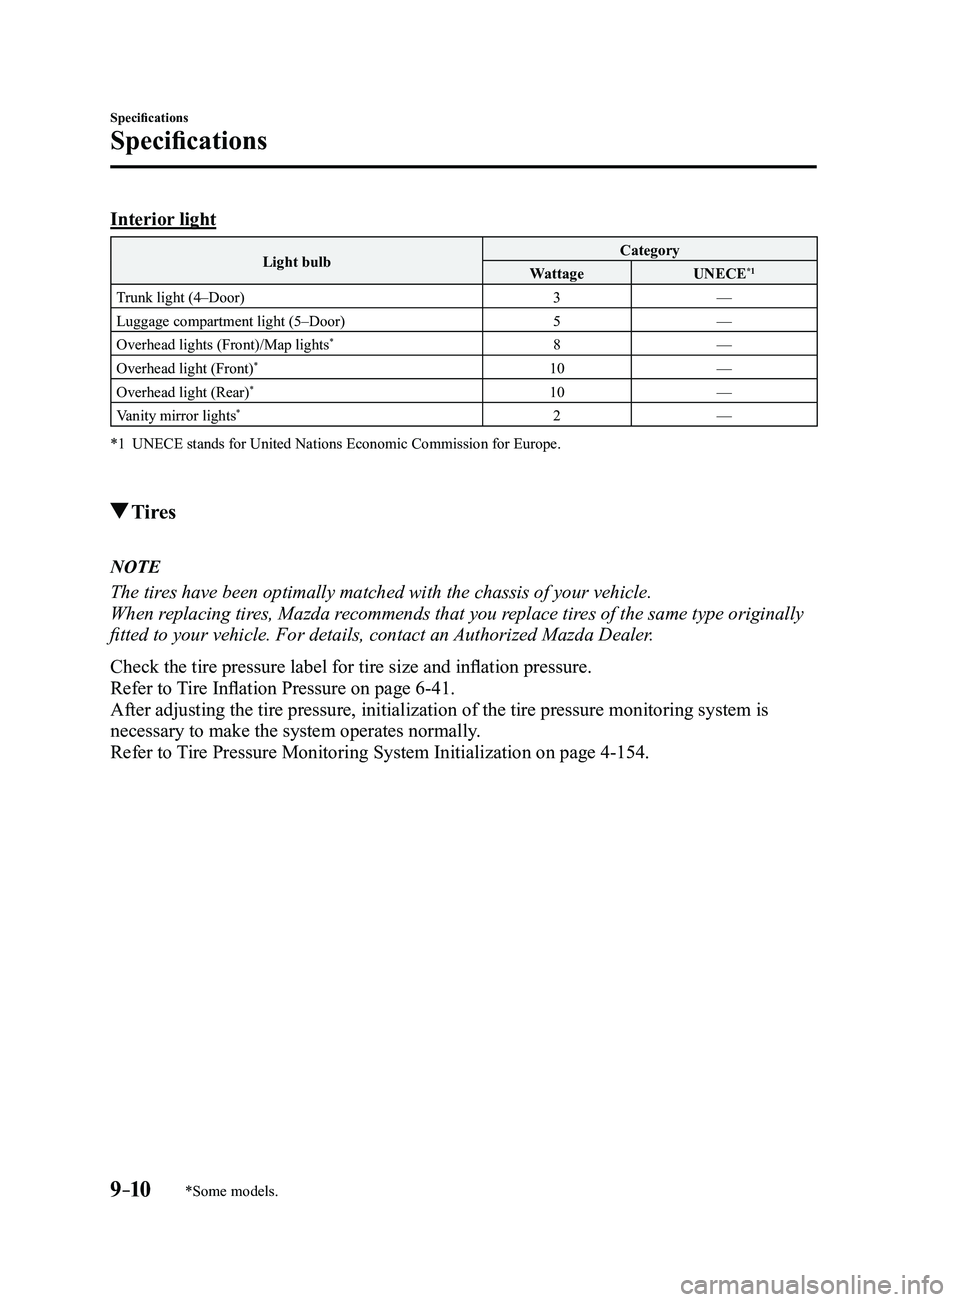
Interior light
Light bulbCategory
Wattage UNECE*1
Trunk light (4–Door) 3—
Luggage compartment light (5–Door) 5—
Overhead lights (Front)/Map lights
*8 —
Overhead light (Front)*10 —
Overhead light (Rear)*10 —
Vanity mirror lights*2 —
*1 UNECE stands for United Nations Economic Commission for Europe.
Tires
NOTE
The tires have been optimally matched with the chassis of your vehicle.
When replacing tires, Mazda recommends that you replace tires of the same type originally
fitted to your vehicle. For details, contact an Authorized Mazda Dealer.
Check the tire pressure label for tire size and inflation pressure.
Refer to Tire Inflation Pressure on page
6-41.
After adjusting the tire pressure, initialization of the tire pressure m\
onitoring system is
necessary to make the system operates normally.
Refer to Tire Pressure Monitoring System Initialization on page
4-154.
Mazda3_8FL6-EA-16F_Edition2.indb 102016/08/10 17:39:54