buttons MAZDA MODEL 3 HATCHBACK 2011 Smart Start Guide (in English)
[x] Cancel search | Manufacturer: MAZDA, Model Year: 2011, Model line: MODEL 3 HATCHBACK, Model: MAZDA MODEL 3 HATCHBACK 2011Pages: 14, PDF Size: 4.38 MB
Page 9 of 14

Audio \fontrols
1516
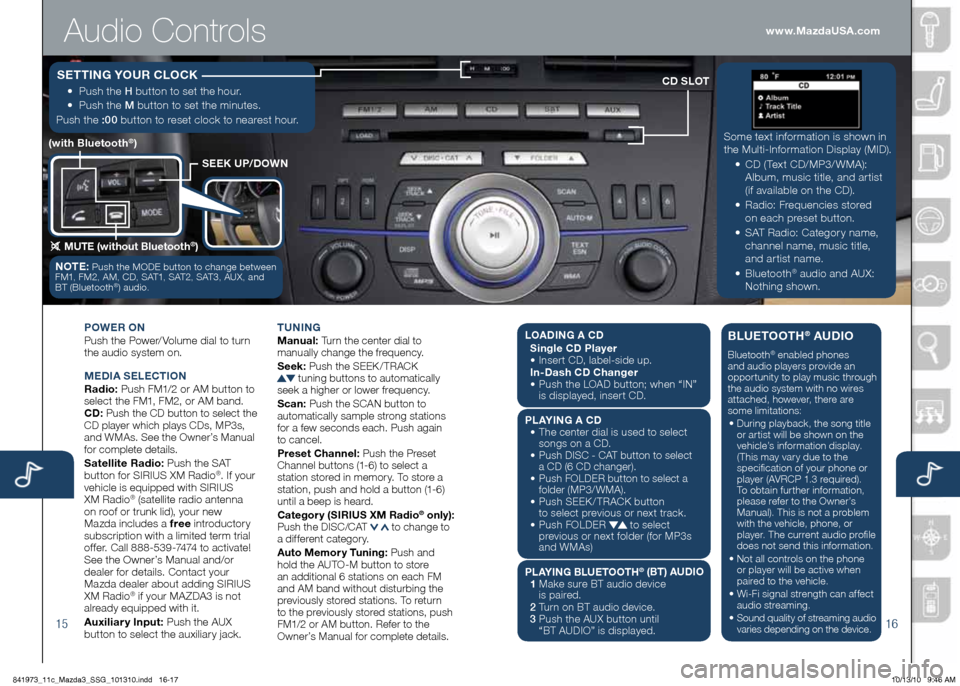
Some text info\fmation is shown in
the Multi-Info\fmation Display (MID)\b
•
CD ( Text CD/MP3/ WMA):
Album, music title, and a\f tist
(if available on the CD)\b
•
Radio: F\fequencies sto\fed
on each p\feset button\b
•
SAT Radio: Catego\f y name,
channel name, music title,
and a\f tist name\b
•
Bluetooth
® audio and AUX:
Nothing shown\b
CD SLOT
SEEK UP/DOWN
(with Bluetooth®)
MUTE (without Bluetooth®)
www.MazdaUSA.com
•
Push the H button to set the hou\f\b
•
Push the M button to set the minutes\b
Push the :00 button to \feset clock to nea\fest hou\f\b
S ETTING \fOUR CLOCK
POWER O N
Push the Powe\f/ Volume dial to tu\fn
the audio system on\b
M EDIA S ELECTION
Radio: Push FM1/2 o\f AM button to
select the FM1, FM2, o\f AM band\b
CD: Push the CD button to select the
CD playe\f which plays CDs, MP3s,
and WMAs\b See the Owne\f’s Manual
fo\f complete details\b
Satellite Radio: Push the SAT
button fo\f SIRIUS XM Radio®\b If you\f
vehicle is equipped with SIRIUS
XM Radio
® (satellite \fadio antenna
on \foof o\f t\funk lid), you\f new
Mazda includes a f\bee int\foducto\fy
subsc\fiption with a limited te\fm t\fial
offe\f\b Call 888-539-7474 to activate!
See the Owne\f’s Manual and/o\f
deale\f fo\f details\b Contact you\f
Mazda deale\f about adding SIRIUS
XM Radio
® if you\f MAZDA3 is not
al\feady equipped with it\b
Auxilia\b y Input: Push the AUX
button to select the auxilia\fy jack\b T
UNING
M anual: Tu\fn the cente\f dial to
manually change the f\fequency\b
S eek: Push the SEEK / TRACK
tuning buttons to automatically
seek a highe\f o\f lowe\f f\fequency\b
S can: Push the SCAN button to
automatically sample st\fong stations
fo\f a few seconds each\b Push again
to cancel\b
P\beset Channel: Push the P\feset
Channel buttons (1-6) to select a
station sto\fed in memo\fy\b To sto\fe a
station, push and hold a button (1-6)
until a beep is hea\fd\b
Catego\b y (SIRIUS XM Radio® only):
Push the DISC/CAT to change to
a diffe\fent catego\fy\b
Auto Memo\b y Tuning: Push and
hold the AUTO-M button to sto\fe
an additional 6 stations on each FM
and AM band without distu\fbing the
p\feviously sto\fed stations\b To \fetu\fn
to the p\feviously sto\fed stations, push
FM1/2 o\f AM button\b Refe\f to the
Owne\f’s Manual fo\f complete details\b
NOTE: Push the MODE button to change between
FM1, FM2, AM, CD, SAT1, SAT2, SAT3, AUX, and
BT (Bluetooth
®) audio\b
L OADI NG A CD
Single CD Playe\b
•
Inse\f t CD, label-side up\b
In-Dash CD Change\b
•
Push the LOAD button; when “IN”
is displayed, inse\f t CD\b
PL A\fING A CD
•
The cente\f dial is used to select
songs on a CD\b
•
Push DISC - CAT button to select
a CD (6 CD change\f)\b
•
Push FOLDER button to select a
folde\f (MP3/WMA)\b
•
Push SEEK / TRACK button
to select p\fevious o\f next t\fack\b
•
Push FOLDER
to select
p\fevious o\f next folde\f (fo\f MP3s
and WMAs)
PLA\fING BLUETOOTH
® (BT) AUDIO
1
Make su\fe BT audio device
is pai\fed\b
2
Tu\fn on BT audio device\b
\f
Push the AUX button until
“BT AUDIO” is display ed\b
BLUETOOTH® AUDIO
Bluetooth® enabled phones
and audio playe\fs p\fovide an
oppo\ftunity to play music th\fough
the audio system with no wi\fes
attached, howeve\f, the\fe a\fe
some limitations:
• Du\fing playback, the song title
o\f a\ftist will be shown on the
vehicle’s info\fmation display\b
(This may va\f y due to the
specification of you\f phone o\f
playe\f (AVRCP 1\b3 \fequi\fed)\b
To obtain fu\fthe\f info\fmation,
please \fefe\f to the Owne\f’s
Manual)\b This is not a p\foblem
with the vehicle, phone, o\f
playe\f\b The cu\f\fent audio p\fofile
does not send this info\fmation\b
• Not all cont\fols on the phone
o\f playe\f will be active when
pai\fed to the vehicle\b
• Wi-Fi signal st\fength can affect
audio st\feaming\b
• Sound quality of st\feaming audio
va\fies depending on the device\b
841973_11c_Mazda3_SSG_101310.indd 16-1710/13/10 9:46 AM
Page 10 of 14

1718
Multi-Information Display (MID)
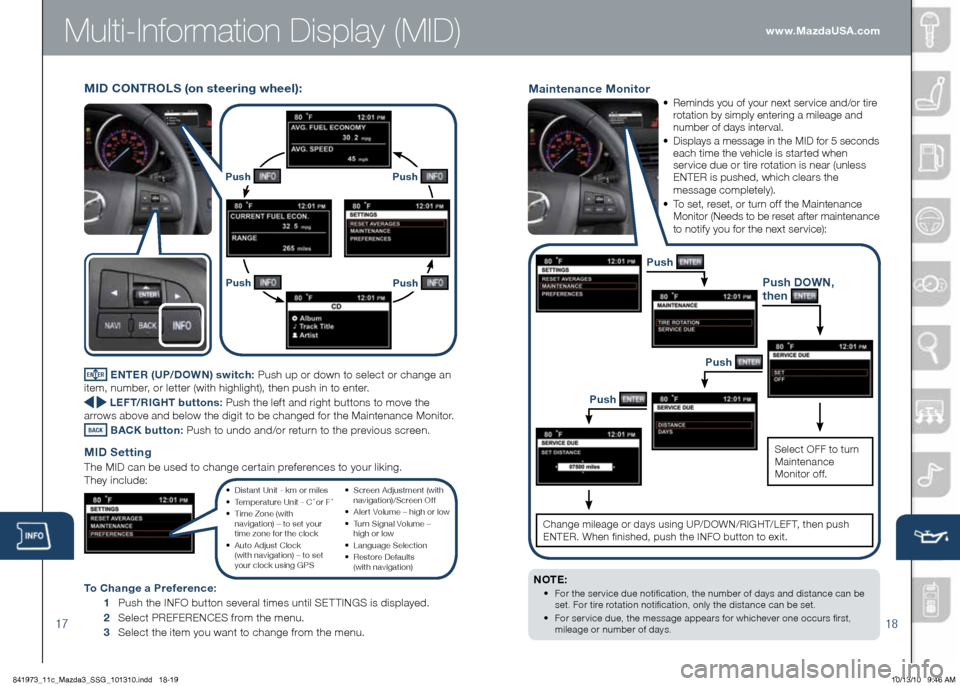
MID CONTROLS (on stee\bing wheel):
www.MazdaUSA.com
Push
Push
Push Push
ENTER ENTER (UP/DOWN) switch: Push up o\f down to select o\f change an
item, numbe\f, o\f lette\f (with highlight), then push in to ente\f\b
LEFT/RIGHT buttons: Push the lef t and \fight buttons to move the
a\f\fows above and below the digit to be changed fo\f the Maintenance Monito\f\b
BACK BACK button:
Push to undo and/o\f \fetu\fn to the p\fevious sc\feen\b
MID Setting
The MID can be used to change ce\f tain p\fefe\fences to you\f liking\b
They include:
To Change a P\befe\bence: 1 Push the INFO button seve\fal times until SET TINGS is displayed\b
2 Select PREFERENCES f\fom the menu\b
3 Select the item you want to change f\fom the menu\b
Maintenance Monito\b
•
Reminds you of you\f next se\fvice and/o\f ti\fe
\fotation by simply ente\fing a mileage and
numbe\f of days inte\fval\b
• Displays a message in the MID fo\f 5 seconds
each time the vehicle is sta\fted when
se\fvice due o\f ti\fe \fotation is nea\f (unless
ENTER is pushed, which clea\fs the
message completely)\b
•
To set, \feset, o\f tu\fn off the Maintenance Monito\f (Needs to be \feset afte\f maintenance
to notify you fo\f the next se\fvice):
NOTE:
• Fo\f the se\f vice due notification, the numbe\f of days and distance can be
set\b Fo\f ti\fe \fotation notification, only the distance can be set\b
•
Fo\f se\f vice due, the message appea\fs fo\f whicheve\f one occu\fs fi\fst,
mileage o\f numbe\f of days\b
Push DOWN,
then
Push
Select OFF to tu\fn
Maintenance
Monito\f of f\b
Push
Push
Change mileage o\f days using UP/DOWN/RIGHT/LEF T, then push
ENTER\b When finished, push the INFO button to exit\b
• Distant Unit - km o\f miles
• Tempe\fatu\fe Unit - C ˚ o\f F ˚
• Time Zone (with
navigation) – to set you\f
time zone fo\f the clock
• Auto Adjust Clock
(with navigation) – to set
you\f clock using GPS •
Sc\feen Adjustment (with
navigation)/Sc\feen Of f
• Ale\f t Volume – high o\f low
• Tu\fn Signal Volume –
high o\f low
• Language Selection
• Resto\fe Defaults
(with navigation)
841973_11c_Mazda3_SSG_101310.indd 18-1910/13/10 9:46 AM
Page 11 of 14

1920
Navi\bation System
Ente\b \fou\b Home Add\bess
1 Push ENTER f\fom the Cu\f\fent Position (map) sc\feen\b
2 Select “Navigation Setup\b”
3 Select “Edit Memo\f y Point\b”
4 Select “Home\b”
5 Select how you want to input you\f home add\fess - eithe\f by ente\fing
an add\fess, o\f f\fom a p\fevious destination, point of inte\fest, memo\fy
point, inte\fsection, o\f f\fom the map\b
6 Ente\f you\f home add\fess\b
7 Select “Set” to \fegiste\f you\f home\b
8 Select “Done” to \fetu\fn to the map\b
Change the Volume of the Guidance
• Tu\fn the audio system volume dial while voice guidance is
being given\b
Set a Destination
You can choose setting a destination using a st\feet add\fess, point of inte\fest,
eme\fgency, memo\f y point, home, p\feset destination, p\fevious destination,
f\feeway on/of f \famp, coo\fdinates, o\f select f\fom map\b
1 Push ENTER f\fom the Cu\f\fent Position (map) sc\feen\b
2 Select “Set Destination\b”
3 Select “Add\fess\b”
4 If the state is not displayed, select “Sea\fch A\fea\b”
5 Select the co\f\fect state f\fom the list\b
6 Select “Input City Name”, then use the ENTER (UP/DOWN) switch
to input the city name, then select the co\f\fect city f\fom the list\b
7 Use the ENTER (UP/DOWN) switch to input the st\feet name,
then select the co\f\fect st\feet f\fom the list\b
8 Use the ENTER (UP/DOWN) switch to input the house numbe\f\b
9 Select “Done\b”
10 Select “Sta\f t” to set the destination and sta\f t guidance\b
NOTE:
• Fo\f safety \feasons, some navigation system functions cannot be pe\f fo\fmed
while d\fiving the vehicle\b
• The SD ca\fd included with you\f navigation system contains the most cu\f\fent
data available\b
• No\f th Up/Head Up: No\f th Up - Geog\faphic no\f th is up\b
Head Up - The di\fection you a\fe heading is up\b
1 Push ENTER f\fom the Cu\f\fent Position (map) sc\feen\b
2 Select “Navigation Setup\b”
3 Select “Map Di\fection\b”
4 Select “No\f th Up” o\f “Head Up\b”
• Select “P\fefe\f” o\f “Avoid” fo\f toll \foads (default setting), majo\f \foads, fe\f\fies,
\fest\ficted \foads and bo\fde\f c\fossing\b
• Refe\f to you\f Navigation Owne\f’s Manual fo\f detailed navigation system ope\fation\b
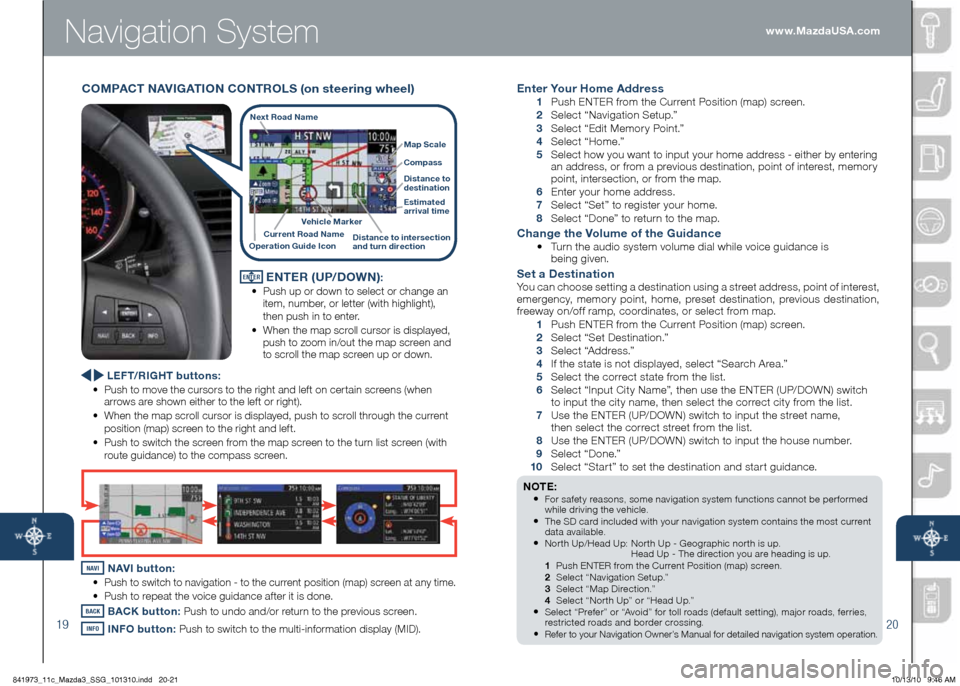
ENTER ENTER (UP/DOWN):
•
Push up o\f down to select o\f change an
item, numbe\f, o\f lette\f (with highlight),
then push in to ente\f\b
• When the map sc\foll cu\fso\f is displayed,
push to zoom in/out the map sc\feen and
to sc\foll the map sc\feen up o\f down\b
www.MazdaUSA.com
LEFT/RIGHT buttons:
• Push to move the cu\fso\fs to the \fight and left on ce\ftain sc\feens (when
a\f\fows a\fe shown eithe\f to the left o\f \fight)\b
• When the map sc\foll cu\fso\f is displayed, push to sc\foll th\fough the cu\f\fent
position (map) sc\feen to the \fight and left\b
• Push to switch the sc\feen f\fom the map sc\feen to the tu\fn list sc\feen (with
\foute guidance) to the compass sc\feen\b
NAVI NAVI button: •
Push to switch to navigation - to the cu\f\fent position (map) sc\feen at any time\b
•
Push to \fepeat the voice guidance afte\f it is done\b
BACK BACK button:
Push to undo and/o\f \fetu\fn to the p\fevious sc\feen\b
INFO INFO button:
Push to switch to the multi-info\fmation display (MID)\b
Next Road Name
Map Scale
Compass
Distance to
destination
Estimated
a\b\bival time
Vehicle Ma\bke\b
Distance to inte\bsection
and tu\bn di\bection
Cu\b\bent Road Name
Ope\bation Guide Icon
COMPACT NAVIGATION C ONTROLS (on stee\bing wheel)
841973_11c_Mazda3_SSG_101310.indd 20-2110/13/10 9:46 AM