clock MAZDA MODEL 3 HATCHBACK 2019 Owners Manual (in English)
[x] Cancel search | Manufacturer: MAZDA, Model Year: 2019, Model line: MODEL 3 HATCHBACK, Model: MAZDA MODEL 3 HATCHBACK 2019Pages: 592, PDF Size: 12.19 MB
Page 59 of 592
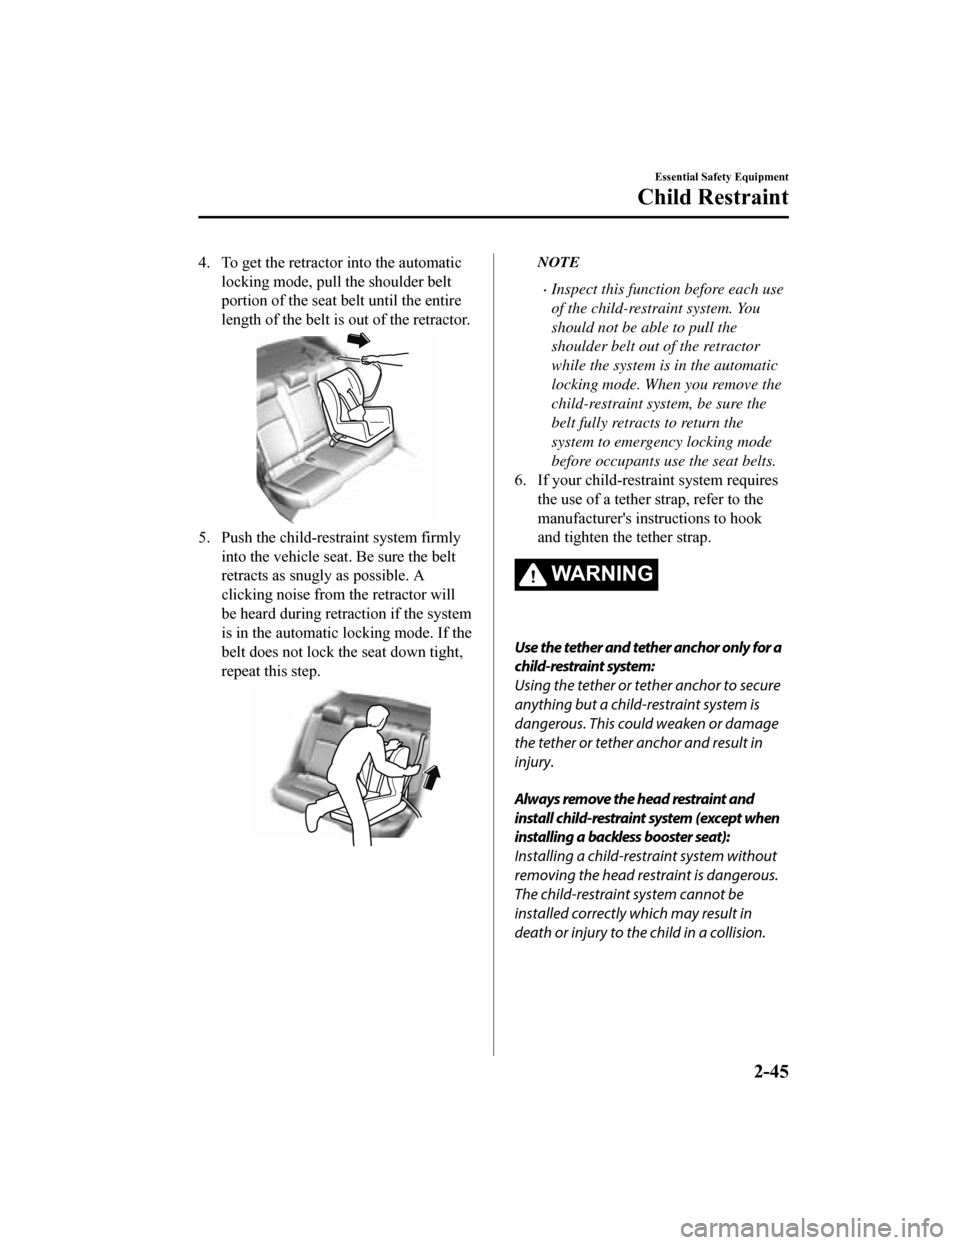
4. To get the retractor into the automaticlocking mode, pull the shoulder belt
portion of the seat belt until the entire
length of the belt is out of the retractor.
5. Push the child-restraint system firmlyinto the vehicle seat. Be sure the belt
retracts as snugly as possible. A
clicking noise from the retractor will
be heard during retraction if the system
is in the automatic locking mode. If the
belt does not lock the seat down tight,
repeat this step.
NOTE
Inspect this function before each use
of the child-restraint system. You
should not be able to pull the
shoulder belt out of the retractor
while the system is in the automatic
locking mode. When you remove the
child-restraint system, be sure the
belt fully retracts to return the
system to emergency locking mode
before occupants use the seat belts.
6. If your child-restraint system requires the use of a tether strap, refer to the
manufacturer's instructions to hook
and tighten the tether strap.
WA R N I N G
Use the tether and tether anchor only for a
child-restraint system:
Using the tether or tether anchor to secure
anything but a child-restraint system is
dangerous. This could weaken or damage
the tether or tether anchor and result in
injury.
Always remove the head restraint and
install child-restraint system (except when
installing a backless booster seat):
Installing a child-restraint system without
removing the head restraint is dangerous.
The child-restraint system cannot be
installed correctly which may result in
death or injury to the child in a collision.
Essential Safety Equipment
Child Restraint
2-45
Mazda3_8HE9-EA-18K_Edition1 2018-10-17 19:05:10
Page 117 of 592
CAUTION
Always use only a genuine Mazda
fuel-filler cap or an approved equivalent,
available at an Authorized Mazda
Dealer. The wrong cap can result in a
serious malfunction of the fuel and
emission control systems.
It may also cause the check engine light
in the instrument cluster to illuminate.
When using an automatic car wash or a
high water pressure car wash, lock the
driver's door. Otherwise, the fuel lid may
open unexpectedly and could be
damaged.
▼ Refueling
Before refueling, close all the doors,
windows, and liftgate/trunk lid, and switch
the ignition OFF.
1. Unlock the driver’s door.
NOTE
When unlocking the driver's door,
the fuel lid is also unlocked at the
same time.
When locking the driver's door, the
fuel lid is locked after 90 seconds.
The time until the fuel lid is locked
after locking the driver's door can be
changed.
Refer to the Settings section in the
Mazda Connect Owner's Manual.
However, when the driver's door is
locked using the following functions,
the fuel lid is also
locked at the same
time.
Auto lock/unlock function (page
3-16)
Auto re-lock function (page 3-5,
3-13)
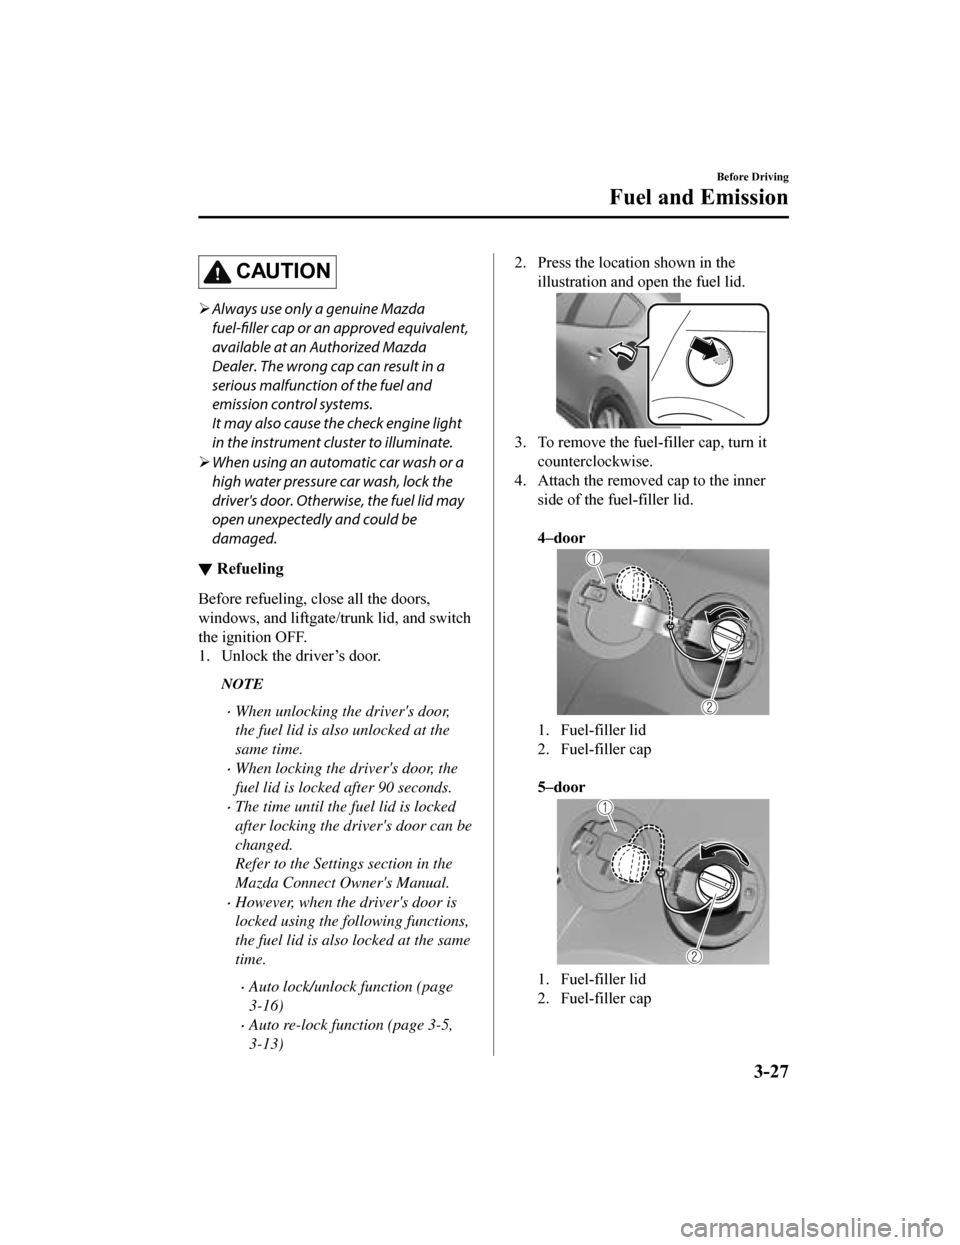
2. Press the location shown in the
illustration and open the fuel lid.
3. To remove the fuel-filler cap, turn itcounterclockwise.
4. Attach the removed cap to the inner
side of the fuel-filler lid.
4–door
1. Fuel-filler lid
2. Fuel-filler cap
5–door
1. Fuel-filler lid
2. Fuel-filler cap
Before Driving
Fuel and Emission
3-27
Mazda3_8HE9-EA-18K_Edition1 2018-10-17 19:05:10
Page 118 of 592
5. Insert the refueling nozzle all the wayand begin refueling. Pull out the
refueling nozzle a fter the refueling
stops automatically.
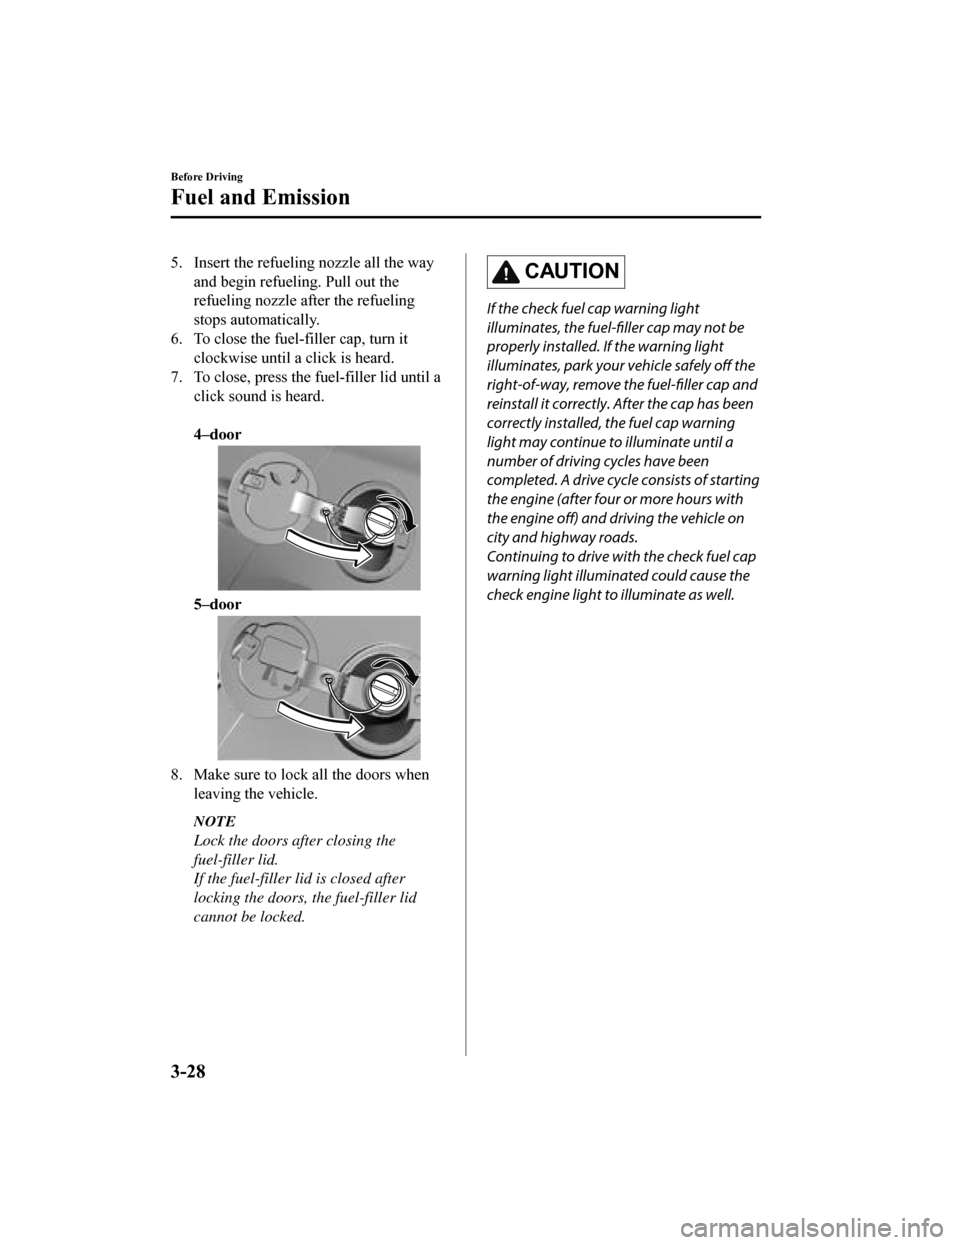
6. To close the fuel-filler cap, turn it
clockwise until a click is heard.
7. To close, press the fuel-filler lid until a click sound is heard.
4–door
5–door
8. Make sure to lock all the doors whenleaving the vehicle.
NOTE
Lock the doors after closing the
fuel-filler lid.
If the fuel-filler lid is closed after
locking the doors, the fuel-filler lid
cannot be locked.
CAUTION
If the check fuel cap warning light
illuminates, the fuel-filler cap may not be
properly installed. If the warning light
illuminates, park your vehicle safely off the
right-of-way, remove the fuel-filler cap and
reinstall it correctly. After the cap has been
correctly installed, the fuel cap warning
light may continue to illuminate until a
number of driving cycles have been
completed. A drive cycle consists of starting
the engine (after four or more hours with
the engine off) and driving the vehicle on
city and highway roads.
Continuing to drive with the check fuel cap
warning light illuminated could cause the
check engine light to illuminate as well.
Before Driving
Fuel and Emission
3-28
Mazda3_8HE9-EA-18K_Edition1 2018-10-17 19:05:10
Page 387 of 592
Manual Type
▼Manual Type
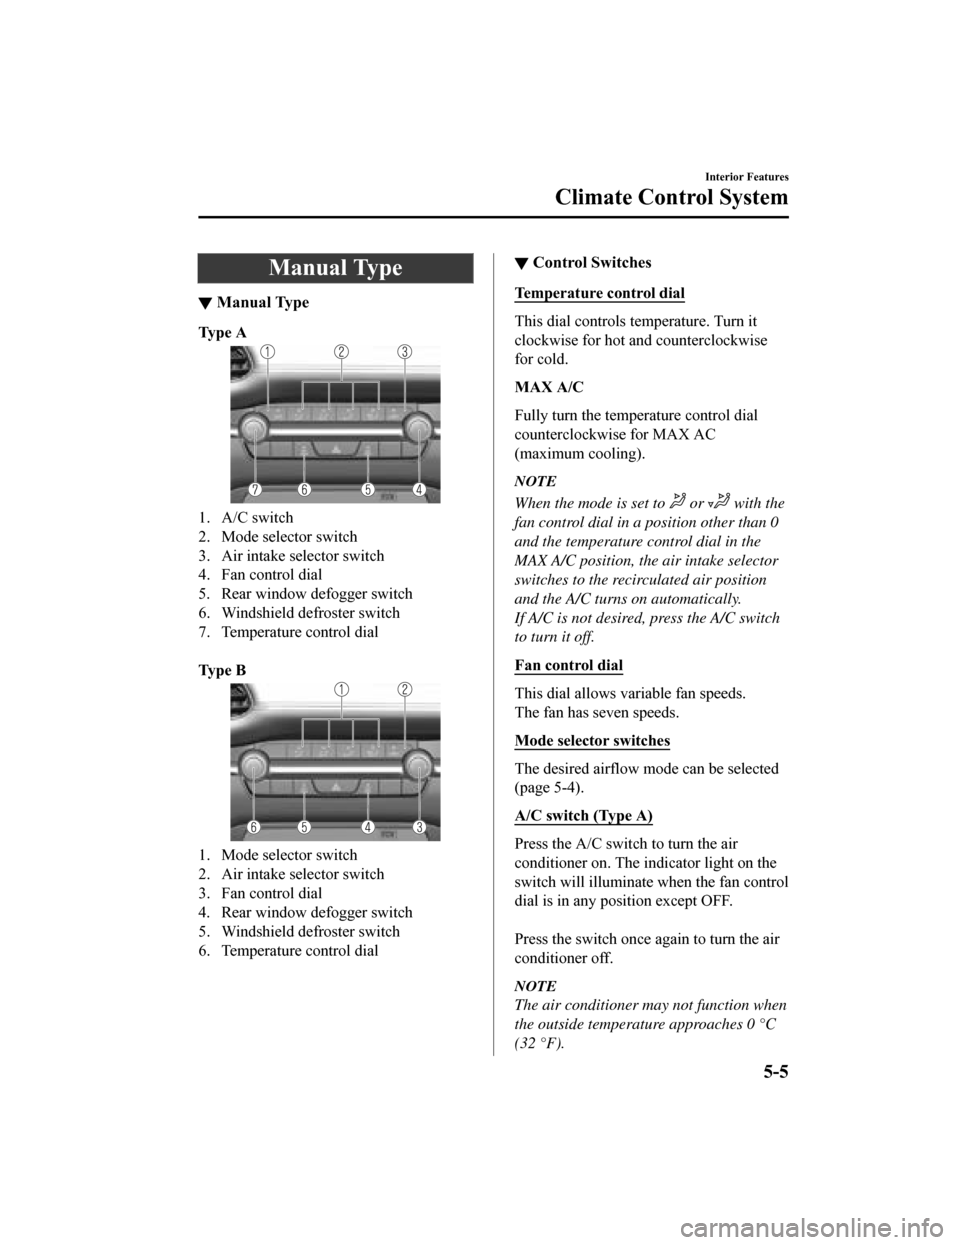
Ty p e A
1. A/C switch
2. Mode selector switch
3. Air intake selector switch
4. Fan control dial
5. Rear window defogger switch
6. Windshield defroster switch
7. Temperature control dial
Ty p e B
1. Mode selector switch
2. Air intake selector switch
3. Fan control dial
4. Rear window defogger switch
5. Windshield defroster switch
6. Temperature control dial
▼Control Switches
Temperature control dial
This dial controls t
emperature. Turn it
clockwise for hot and counterclockwise
for cold.
MAX A/C
Fully turn the temperature control dial
counterclockwise for MAX AC
(maximum cooling).
NOTE
When the mode is set to or with the
fan control dial in a position other than 0
and the temperature control dial in the
MAX A/C position, the air intake selector
switches to the recirculated air position
and the A/C turns on automatically.
If A/C is not desired, press the A/C switch
to turn it off.
Fan control dial
This dial allows v ariable fan speeds.
The fan has seven speeds.
Mode selector switches
The desired airflow mode can be selected
(page 5-4).
A/C switch (Type A)
Press the A/C swit ch to turn the air
conditioner on. The indicator light on the
switch will illuminate when the fan control
dial is in any position except OFF.
Press the switch once again to turn the air
conditioner off.
NOTE
The air conditioner may not function when
the outside temperature approaches 0 °C
(32 °F).
Interior Features
Climate Control System
5-5
Mazda3_8HE9-EA-18K_Edition1 2018-10-17 19:05:10
Page 389 of 592
▼Cooling (Type A)
1. Press the switch.
2. Set the temperature control dial to the
cold position.
3. Set the fan control dial to the desired
speed.
4. Turn on the air conditioner by pressing
the A/C switch.
5. After cooling begins, adjust the fan control dial and temperature control
dial as needed to maintain maximum
comfort.
CAUTION
If the air conditioner is used while driving
up long hills or in heavy traffic, monitor the
high engine coolant temperature warning
indication to see if it is displayed (page
7-28).
The air conditioner may cause engine
overheating. If the warning indication is
displayed, turn the air conditioner off (page
7-20).
NOTE
When maximum cooling is desired, set
the temperature control dial to the
extreme cold position and set the air
intake selector to the recirculated air
position, then turn the fan control dial
fully clockwise.
If warmer air is desired at floor level,
press the
switch and adjust the
temperature control dial to maintain
maximum comfort.
The air to the floor is warmer than air
to the face (except wh en the temperature
control dial is set at the extreme hot or
cold position).
▼ Ventilation
1. Press the switch.
2. Set the air intake selector to the outside air position (indicator light turns off).
3. Set the temperature control dial to the
desired position.
4. Set the fan control dial to the desired
speed.
▼Windshield Defrosting and
Defogging
1. Press the switch.
2. Set the temperature control dial to the
desired position.
3. Set the fan control dial to the desired
speed.
4. If dehumidified heating is desired, turn
on the air conditioner.
WA R N I N G
Do not defog the windshield using the
switch with the temperature control set to
the cold position:
Using the
switch with the temperature
control set to the cold position is
dangerous as it will cause the outside of the
windshield to fog up. Your vision will be
hampered, which could lead to a serious
accident. Set the temperature control to
the hot or warm position when using the
switch.
NOTE
(Type A)
Fogging on the windows clears up more
easily while the air conditioner is on,
but they will fog up more easily if the air
conditioner is turned off.
Interior Features
Climate Control System
5-7
Mazda3_8HE9-EA-18K_Edition1 2018-10-17 19:05:10
Page 390 of 592

(Type A)
Be careful that the windows do not fog
up when doing any of the following:
Switching to recirculate mode
Turning off the air conditioner
(Type A)
For maximum defrosting, turn on the air
conditioner, set the temperature control
dial to the extreme hot position, and turn
the fan control dial fully clockwise.
If warm air is desired at the floor, press
the
switch.
Wi t h t h e or *1 switch, the air
conditioner is automatically turned on
and the outside air position is
automatically selected to defrost the
windshield. In the
switch, the
outside air position cannot be changed
to the recirculated air position.
*1 Depending on the market.
▼ Dehumidifying (Type A)
Operate the air condi
tioner in cool or cold
weather to help defog the windshield and
side windows.
1. Press the desired mode switch you
want to set.
2. Set the air intake s elector to the outside
air position (indicator light turns off).
3. Set the temperature control dial to the
desired position.
4. Set the fan control dial to the desired
speed.
5. Turn on the air conditioner by pressing the A/C switch.
NOTE
One of the functions of the air conditioner
is dehumidifying the air and, to use this
function, the temperature does not have to
be set to cold. Th erefore, set the
temperature control dial to the desired
position (hot or cold) and turn on the air
conditioner when you want to dehumidify
the cabin air.
Interior Features
Climate Control System
5-8
Mazda3_8HE9-EA-18K_Edition1 2018-10-17 19:05:10
Page 392 of 592

When the AUTO switch indicator light is
on, it indicates auto operation, and the
system will function automatically.
If any of the following switches are
operated while in auto control, the
AUTO switch indicator turns off.
Mode selector switch
Fan control switch
Windshield defroster switch
The functions for switches other than
those operated continue to operate in
auto control.
Power switch (System On/Off)
The climate control system turns on or off
by pressing the power switch.
Temperature control dial
This dial controls t emperature. Turn it
clockwise for hot and counterclockwise
for cold.
When the SYNC switch is on:
Turn the driver temperature control dial
to control the temperature throughout
the entire cabin.
When the SYNC switch is off:
Turn the driver or front passenger
temperature control dial to
independently control the temperature
on each side of the cabin.
NOTE
The climate control system changes to
the individual operation mode (SYNC
switch indicator light turns off) by
turning the front passenger temperature
control dial even when the SYNC switch
is on, which allows individual control of
the set temperature for the driver and
front passenger.
When you set the temperature to the
lower or upper limit, “Lo” or “Hi” is
displayed.
The temperature units for the
temperature setting display can be
changed in conjunction with the
temperature units for the outside
temperature display.
Refer to Outside Temperature Display
on page 4-19.
Fan control switch
The fan has 7 speeds. The selected speed
will be displayed.
Mode selector switch
The desired airflow mode can be selected
(page 5-4).
NOTE
With the airflow mode set to the
position and the temperature control
dial set at a medium temperature,
heated air is directed to the feet and air
at a comparably lower temperature will
flow through the central, left and right
vents.
To set the air vent to , press the
windshield defroster switch.
In the position, the outside air
position is automatically selected.
A/C switch
Pressing the A/C swit ch while the AUTO
switch is turned on w ill turn off the air
conditioner (cooling/dehumidifying
functions).
The on/off of the air conditioner switches
each time the A/C switch is pressed.
Interior Features
Climate Control System
5-10
Mazda3_8HE9-EA-18K_Edition1 2018-10-17 19:05:10
Page 460 of 592
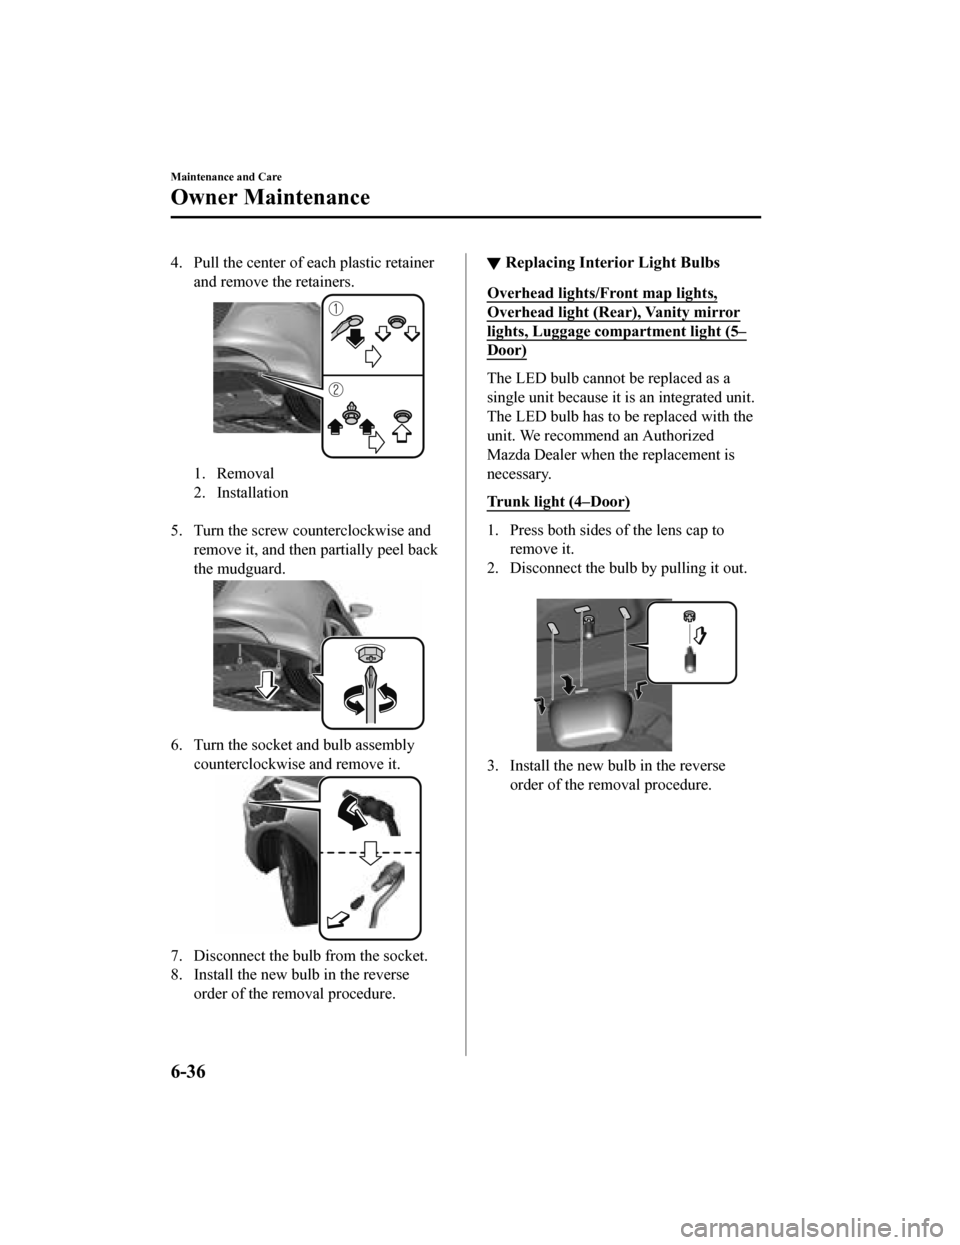
4. Pull the center of each plastic retainer
and remove the retainers.
1. Removal
2. Installation
5. Turn the screw counterclockwise and remove it, and then partially peel back
the mudguard.
6. Turn the socket and bulb assembly
counterclockwise and remove it.
7. Disconnect the bulb from the socket.
8. Install the new bulb in the reverseorder of the removal procedure.
▼Replacing Interior Light Bulbs
Overhead lights/Front map lights,
Overhead light (Rear), Vanity mirror
lights, Luggage compartment light (5–
Door)
The LED bulb cannot be replaced as a
single unit because it is
an integrated unit.
The LED bulb has to be replaced with the
unit. We recommend an Authorized
Mazda Dealer when the replacement is
necessary.
Trunk light (4–Door)
1. Press both sides of the lens cap to remove it.
2. Disconnect the bulb by pulling it out.
3. Install the new bulb in the reverse
order of the removal procedure.
Maintenance and Care
Owner Maintenance
6-36
Mazda3_8HE9-EA-18K_Edition1 2018-10-17 19:05:10
Page 480 of 592
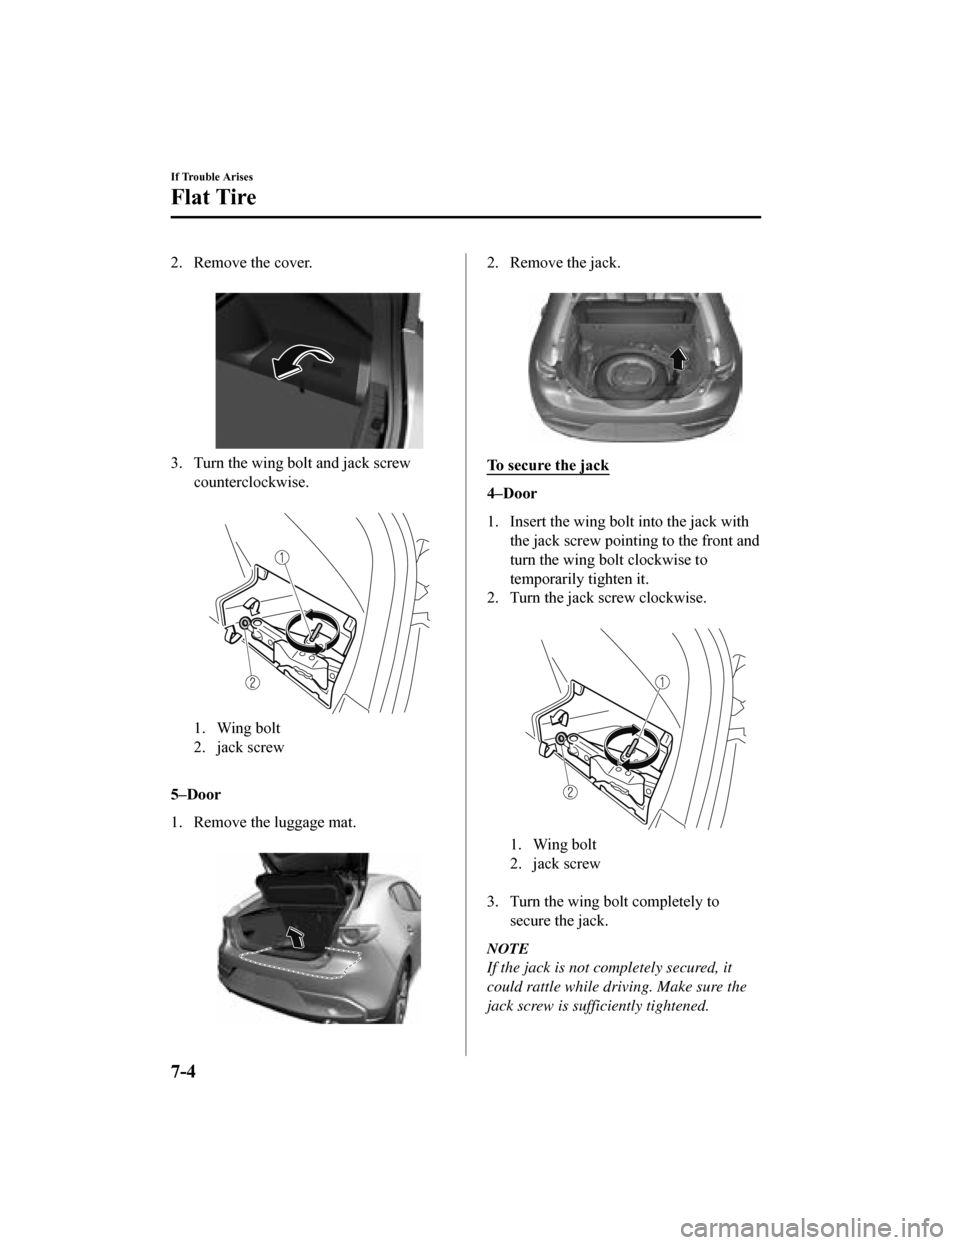
2. Remove the cover.
3. Turn the wing bolt and jack screwcounterclockwise.
1. Wing bolt
2. jack screw
5–Door
1. Remove the luggage mat.
2. Remove the jack.
To secure the jack
4–Door
1. Insert the wing bo lt into the jack with
the jack screw pointing to the front and
turn the wing bolt clockwise to
temporarily tighten it.
2. Turn the jack screw clockwise.
1. Wing bolt
2. jack screw
3. Turn the wing bolt completely to secure the jack.
NOTE
If the jack is not comp letely secured, it
could rattle while driving. Make sure the
jack screw is sufficiently tightened.
If Trouble Arises
Flat Tire
7-4
Mazda3_8HE9-EA-18K_Edition1 2018-10-17 19:05:10
Page 482 of 592
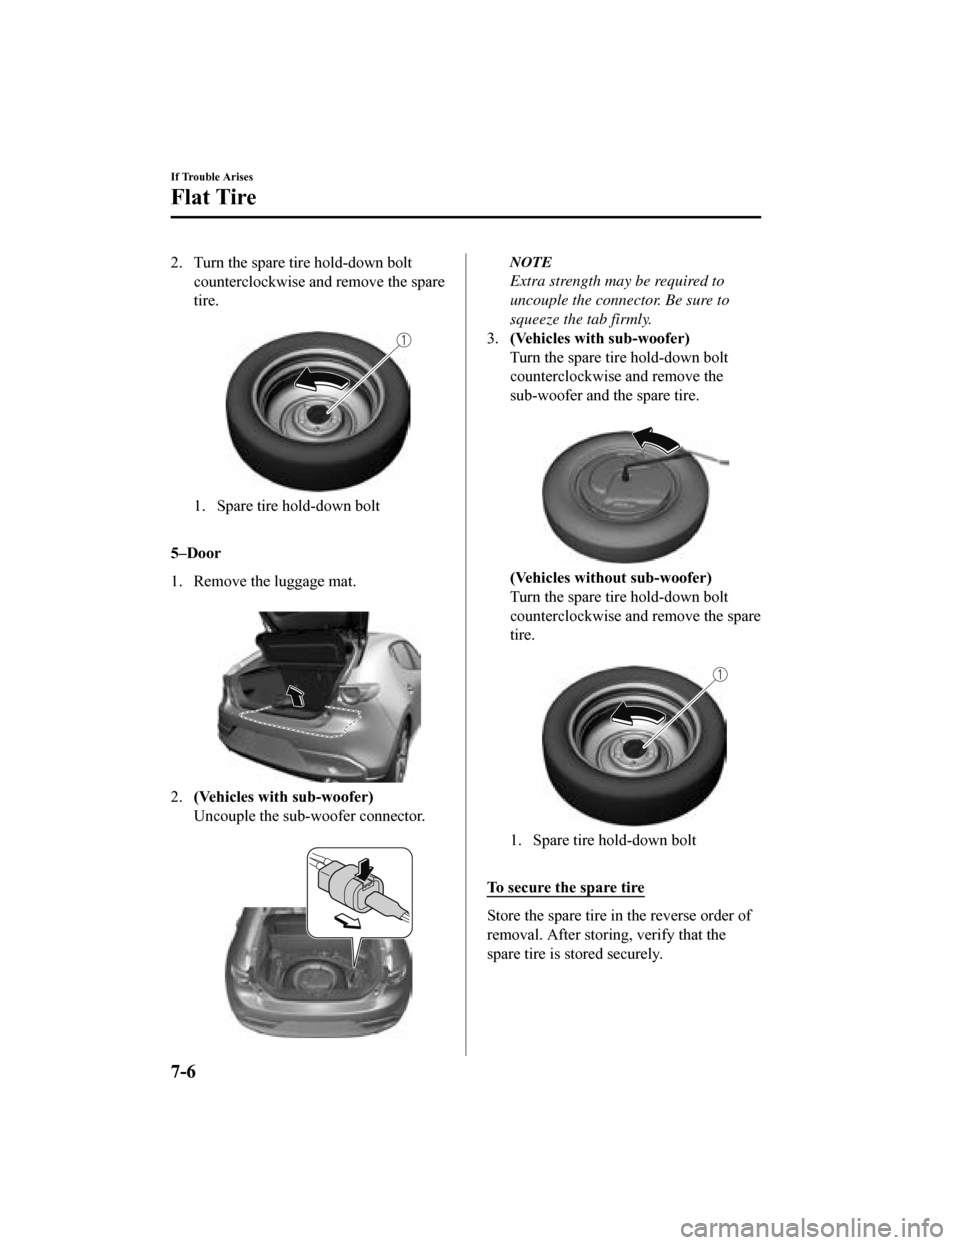
2. Turn the spare tire hold-down boltcounterclockwise and remove the spare
tire.
1. Spare tire hold-down bolt
5–Door
1. Remove the luggage mat.
2.(Vehicles with sub-woofer)
Uncouple the sub-woofer connector.
NOTE
Extra strength may be required to
uncouple the connector. Be sure to
squeeze the tab firmly.
3. (Vehicles with sub-woofer)
Turn the spare tire hold-down bolt
counterclockwise and remove the
sub-woofer and the spare tire.
(Vehicles without sub-woofer)
Turn the spare tire hold-down bolt
counterclockwise and remove the spare
tire.
1. Spare tire hold-down bolt
To secure the spare tire
Store the spare tire in the reverse order of
removal. After storing, verify that the
spare tire is stored securely.
If Trouble Arises
Flat Tire
7-6
Mazda3_8HE9-EA-18K_Edition1 2018-10-17 19:05:10