lock MAZDA MODEL 5 2012 Owners Manual
[x] Cancel search | Manufacturer: MAZDA, Model Year: 2012, Model line: MODEL 5, Model: MAZDA MODEL 5 2012Pages: 440, PDF Size: 5.51 MB
Page 344 of 440

Black plate (344,1)
Wiper Blades
CAUTION
ØHot waxes applied by automatic
car washers have been known to
affect the wiper's ability to clean
windows.
Ø To prevent damage to the wiper
blades, do not use gasoline,
kerosene, paint thinner, or other
solvents on or near them.
Ø When the wiper lever is in the
AUTO position and the ignition is
switched ON, the wipers may
move automatically in the
following cases:
ØIf the windshield above the rain
sensor is touched.
ØIf the windshield above the rain
sensor is wiped with a cloth.
ØIf the windshield is struck with
a hand or other object.
ØIf the rain sensor is struck with
a hand or other object from
inside the vehicle.
Be careful not to pinch hands or
fingers as it may cause injury, or
damage the wipers. When
washing or servicing your Mazda,
make sure the wiper lever is in the
OFF position.
Contamination of either the windshield or
the blades with foreign matter can reduce
wiper effectiveness. Common sources are
insects, tree sap, and hot wax treatments
used by some commercial car washes.
If the blades are not wiping properly,
clean the window and blades with a good
cleaner or mild detergent; then rinse
thoroughly with clean water. Repeat if
necessary.
qReplacing Windshield Wiper Blades
When the wipers no longer clean well, the
blades are probably worn or cracked.
Replace them.
CAUTION
To prevent damage to the wiper arms
and other components, don't try to
sweep the wiper arm by hand.
NOTE
To prevent damage to the wiper arm blades
when raising both the driver and passenger
side wiper arms, raise the driver side wiper
arm first. Conversely, when setting down the
wiper arms, set the passenger side wiper arm
down first.
1. Raise the wiper arm and turn the blade assembly to expose the plastic locking
clip.
Slide the assembly downward; then lift
it off the arm.
Plastic locking clip
CAUTION
To prevent damage to the windshield
let the wiper arm down easily, don't
let it slap down on the windshield.
8-26
Maintenance and Care
Owner Maintenance
Mazda5_8BR9-EA-10J_Edition3 Page344
Monday, February 21 2011 1:45 PM
Form No.8BR9-EA-10J
Page 346 of 440
Black plate (346,1)
CAUTION
To prevent damage to the wiper arm
and other components, don't try to
sweep the wiper arm by hand.
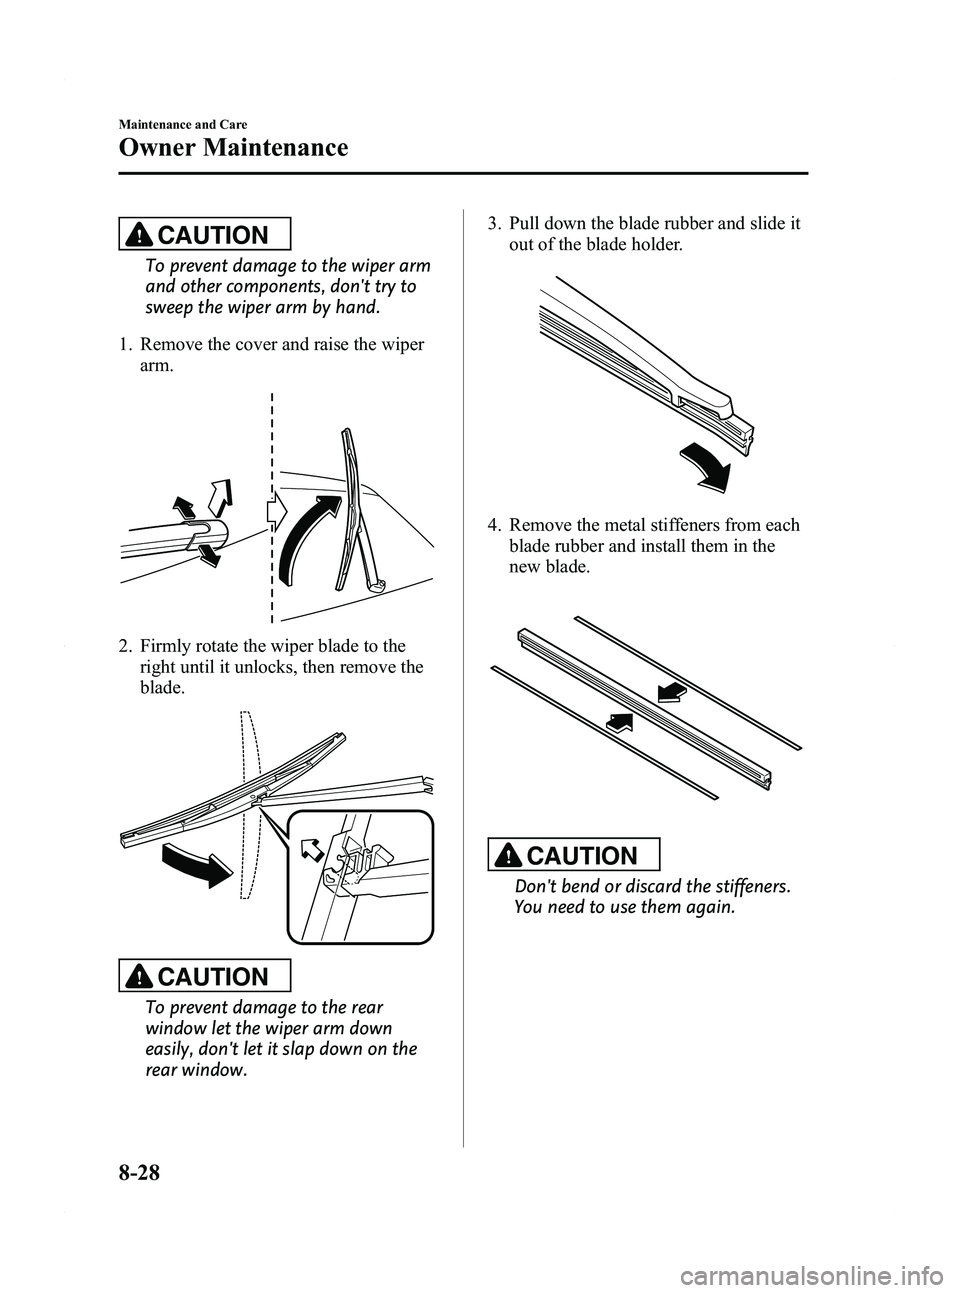
1. Remove the cover and raise the wiper arm.
2. Firmly rotate the wiper blade to theright until it unlocks, then remove the
blade.
CAUTION
To prevent damage to the rear
window let the wiper arm down
easily, don't let it slap down on the
rear window. 3. Pull down the blade rubber and slide it
out of the blade holder.
4. Remove the metal stiffeners from each
blade rubber and install them in the
new blade.
CAUTION
Don't bend or discard the stiffeners.
You need to use them again.
8-28
Maintenance and Care
Owner Maintenance
Mazda5_8BR9-EA-10J_Edition3 Page346
Monday, February 21 2011 1:45 PM
Form No.8BR9-EA-10J
Page 350 of 440

Black plate (350,1)
NOTE
Remove the battery cover before performing
battery maintenance.
CAUTION
ØDo not use a tool which applies
excessive force such as a
screwdriver or pliers.
If excessive force is applied to the
clips, they could be damaged.
To prevent damaging the battery
cover, remove/install the battery
cover using the following
procedure.
Removing battery cover
1 Detach the clip facing the side of
the vehicle first and pull it outward
with your finger approx. 4 mm (0.2
in). Then, lift the cover slightly to
clear the lock.
Clip
2 Detach the clip facing the vehicle interior first and pull it outward
with your finger approx. 4 mm (0.2
in). Then, lift the cover slightly to
clear the lock.
Clip
8-32
Maintenance and Care
Owner Maintenance
Mazda5_8BR9-EA-10J_Edition3 Page350
Monday, February 21 2011 1:45 PM
Form No.8BR9-EA-10J
Page 360 of 440

Black plate (360,1)
5. Turn the bulb assemblycounterclockwise and remove it.
Carefully remove the bulb from its
socket in the reflector by gently pulling
it straight backward out of the socket.
6. Install the new bulb in the reverse order
of removal.
Low-beam bulbs
(Xenon fusion bulb)
You cannot replace the low beam bulbs by
yourself. The bulbs must be replaced at an
Authorized Mazda Dealer.
(Halogen bulb)
1. Make sure the ignition is switched off, and the headlight switch is off.
2. Lift the hood. 3. Disconnect the electrical connector
from the bulb by pressing the tab on
the connector with your finger and
pulling the connector.
4. Turn the bulb assemblycounterclockwise and remove it.
Carefully remove the bulb from its
socket in the reflector by gently pulling
it straight backward out of the socket.
5. Install the new bulb in the reverse order
of removal.
Fog light bulbsí
1. Make sure the ignition is switched off,and the headlight switch is off.
8-42
Maintenance and Care
íSome models.
Owner Maintenance
Mazda5_8BR9-EA-10J_Edition3 Page360
Monday, February 21 2011 1:45 PM
Form No.8BR9-EA-10J
Page 361 of 440
Black plate (361,1)
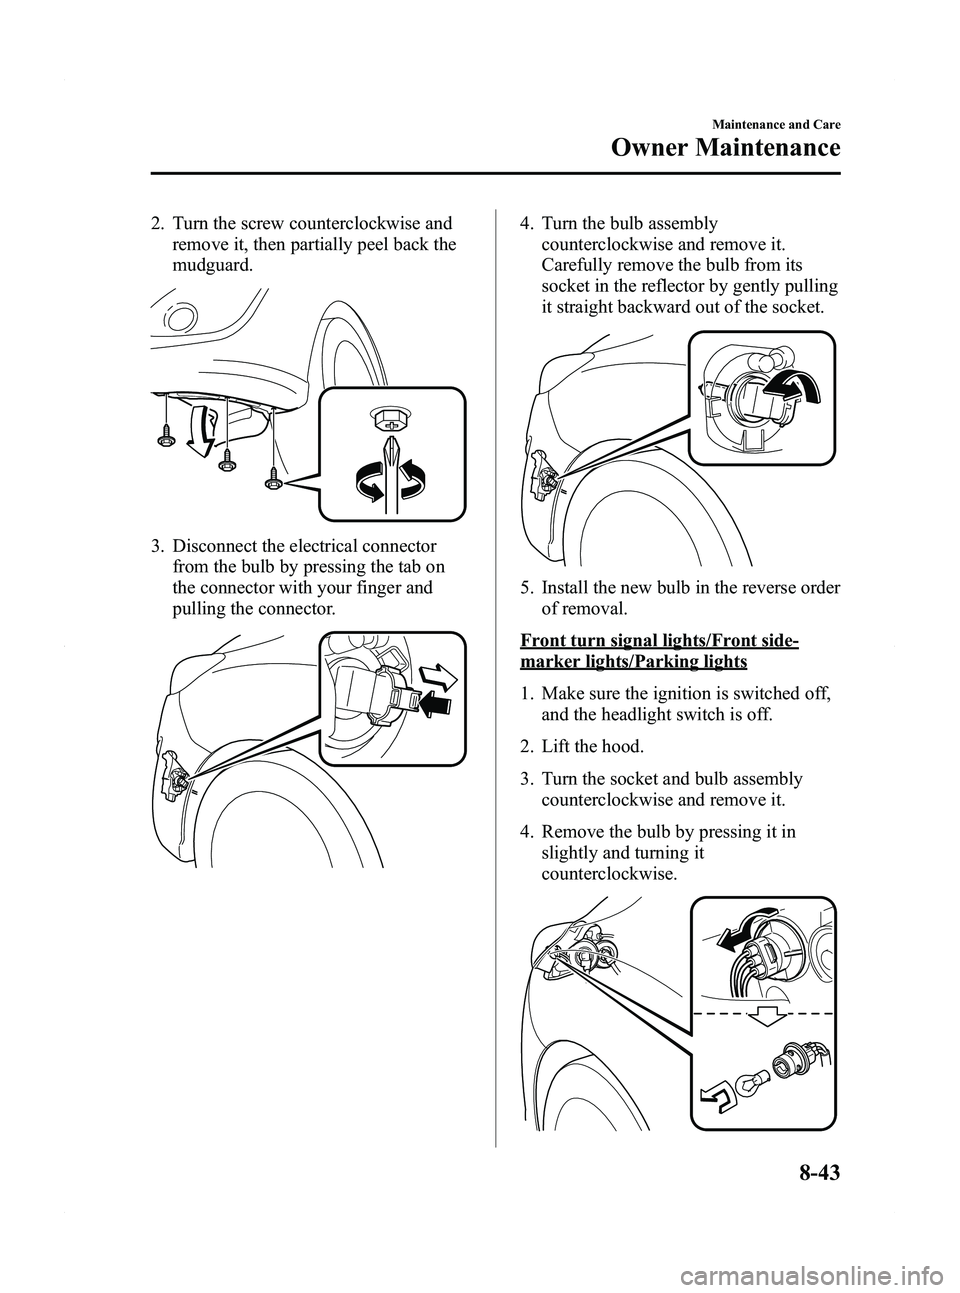
2. Turn the screw counterclockwise andremove it, then partially peel back the
mudguard.
3. Disconnect the electrical connectorfrom the bulb by pressing the tab on
the connector with your finger and
pulling the connector.
4. Turn the bulb assemblycounterclockwise and remove it.
Carefully remove the bulb from its
socket in the reflector by gently pulling
it straight backward out of the socket.
5. Install the new bulb in the reverse order
of removal.
Front turn signal lights/Front side-
marker lights/Parking lights
1. Make sure the ignition is switched off,and the headlight switch is off.
2. Lift the hood.
3. Turn the socket and bulb assembly counterclockwise and remove it.
4. Remove the bulb by pressing it in slightly and turning it
counterclockwise.
Maintenance and Care
Owner Maintenance
8-43
Mazda5_8BR9-EA-10J_Edition3 Page361
Monday, February 21 2011 1:45 PM
Form No.8BR9-EA-10J
Page 362 of 440
Black plate (362,1)
5. Install the new bulb in the reverse orderof removal.
Brake lights/Taillights/Rear side-
marker lights, Rear turn signal lights
1. Make sure the ignition is switched off,and the headlight switch is off.
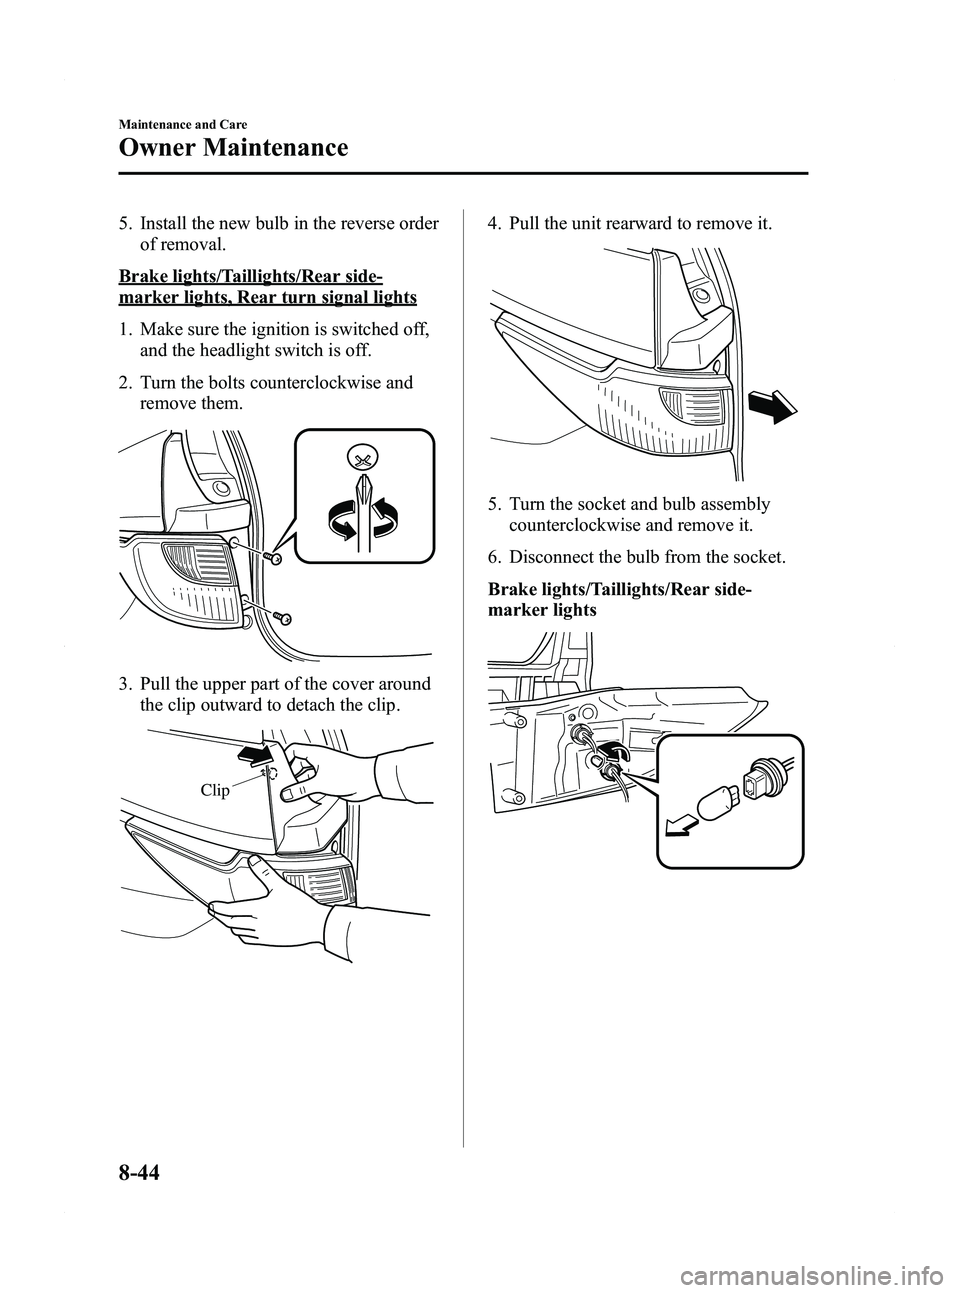
2. Turn the bolts counterclockwise and remove them.
3. Pull the upper part of the cover around
the clip outward to detach the clip.
Clip
4. Pull the unit rearward to remove it.
5. Turn the socket and bulb assemblycounterclockwise and remove it.
6. Disconnect the bulb from the socket.
Brake lights/Taillights/Rear side-
marker lights
8-44
Maintenance and Care
Owner Maintenance
Mazda5_8BR9-EA-10J_Edition3 Page362
Monday, February 21 2011 1:45 PM
Form No.8BR9-EA-10J
Page 363 of 440
Black plate (363,1)
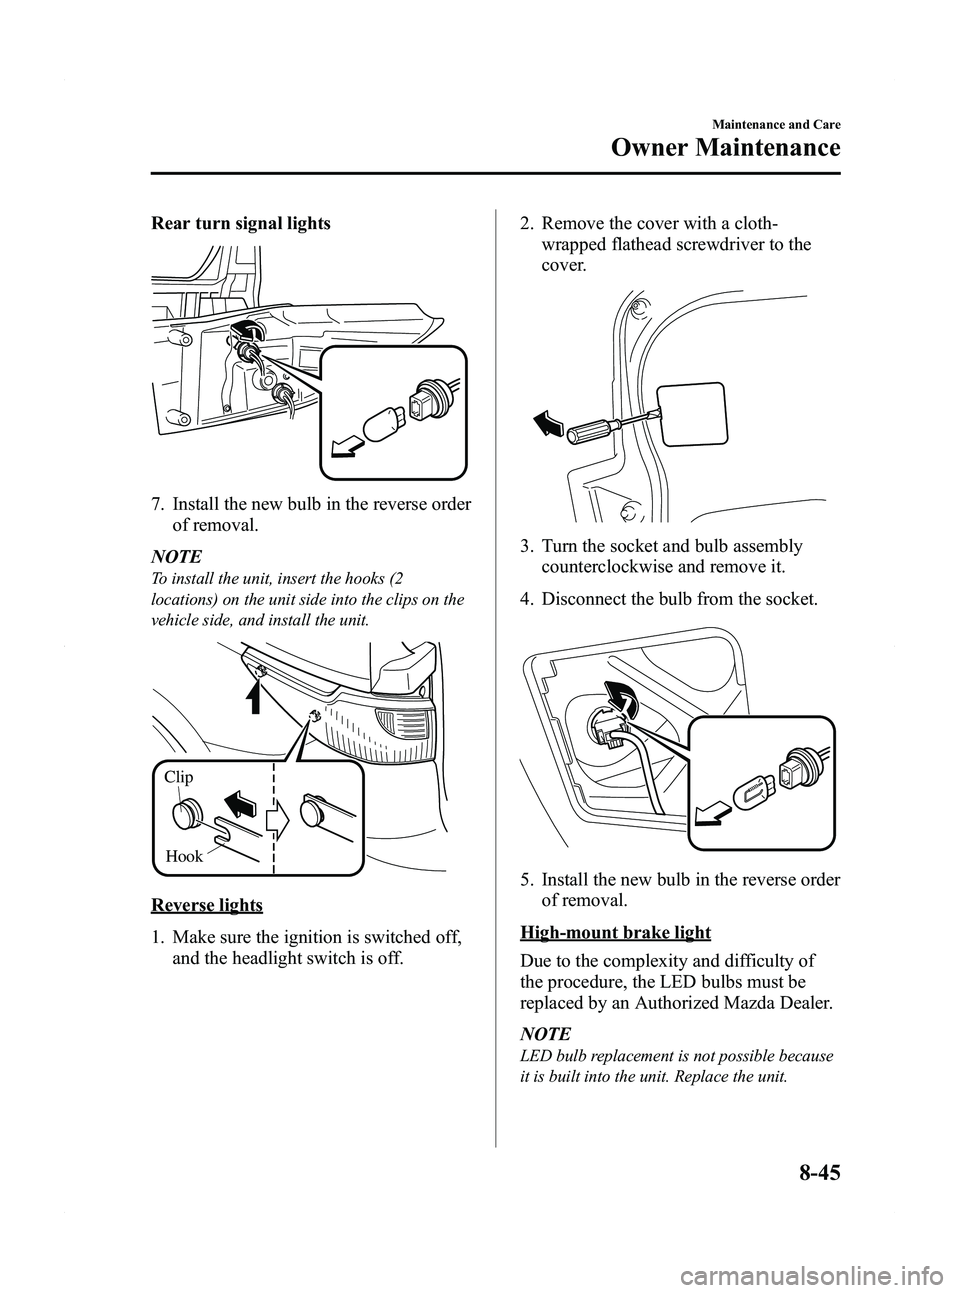
Rear turn signal lights
7. Install the new bulb in the reverse orderof removal.
NOTE
To install the unit, insert the hooks (2
locations) on the unit side into the clips on the
vehicle side, and install the unit.
Clip
Hook
Reverse lights
1. Make sure the ignition is switched off, and the headlight switch is off. 2. Remove the cover with a cloth-
wrapped flathead screwdriver to the
cover.
3. Turn the socket and bulb assemblycounterclockwise and remove it.
4. Disconnect the bulb from the socket.
5. Install the new bulb in the reverse order of removal.
High-mount brake light
Due to the complexity and difficulty of
the procedure, the LED bulbs must be
replaced by an Authorized Mazda Dealer.
NOTE
LED bulb replacement is not possible because
it is built into the unit. Replace the unit.
Maintenance and Care
Owner Maintenance
8-45
Mazda5_8BR9-EA-10J_Edition3 Page363
Monday, February 21 2011 1:45 PM
Form No.8BR9-EA-10J
Page 364 of 440
Black plate (364,1)
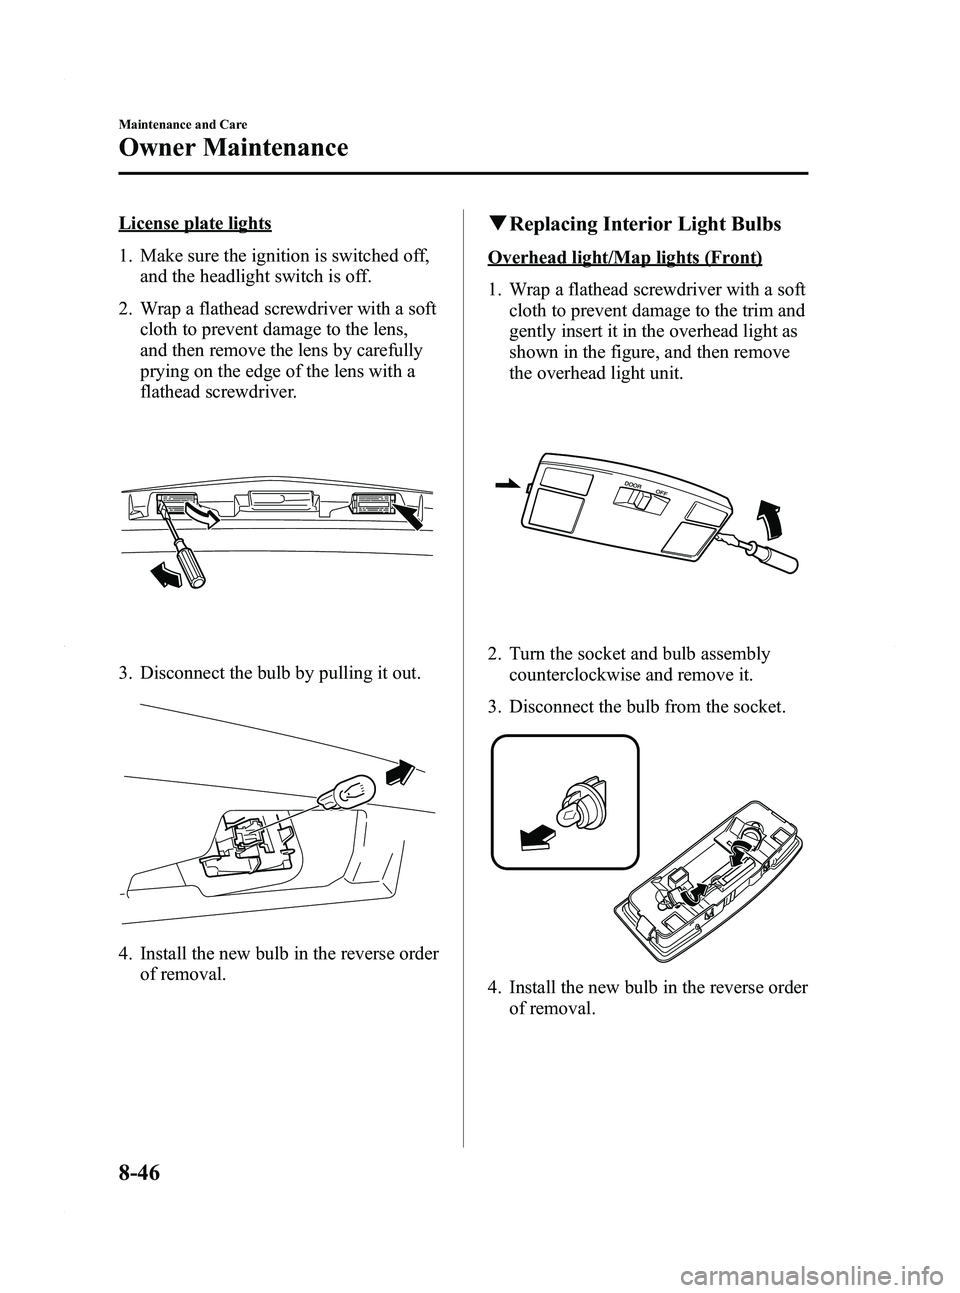
License plate lights
1. Make sure the ignition is switched off,and the headlight switch is off.
2. Wrap a flathead screwdriver with a soft cloth to prevent damage to the lens,
and then remove the lens by carefully
prying on the edge of the lens with a
flathead screwdriver.
3. Disconnect the bulb by pulling it out.
4. Install the new bulb in the reverse orderof removal.
qReplacing Interior Light Bulbs
Overhead light/Map lights (Front)
1. Wrap a flathead screwdriver with a soft
cloth to prevent damage to the trim and
gently insert it in the overhead light as
shown in the figure, and then remove
the overhead light unit.
2. Turn the socket and bulb assembly
counterclockwise and remove it.
3. Disconnect the bulb from the socket.
4. Install the new bulb in the reverse order of removal.
8-46
Maintenance and Care
Owner Maintenance
Mazda5_8BR9-EA-10J_Edition3 Page364
Monday, February 21 2011 1:45 PM
Form No.8BR9-EA-10J
Page 366 of 440

Black plate (366,1)
Fuses
Your vehicle's electrical system is
protected by fuses.
If any lights, accessories, or controls don't
work, inspect the appropriate circuit
protector. If a fuse has blown, the inside
element will be melted.
If the same fuse blows again, avoid using
that system and consult an Authorized
Mazda Dealer as soon as possible.
qFuse Replacement
Replacing the fuses on the vehicle's left
side
If the electrical system does not work,
first inspect the fuses on the vehicle's left
side.
1. Make sure the ignition is switched off,
and other switches are off.
2. Remove the cover.
CAUTION
Pulling the cover off sideways may
break the retaining tabs off. 3. Locate the position of the suspected
fuse by using the chart inside the fuse
block cover.
4. Pull the fuse straight out with the fuse puller provided on the inside of the
engine compartment fuse block cover.
5. Inspect the fuse and replace it if it'sblown.
Normal Blown
6. Insert a new fuse of the same amperage
rating, and make sure it fits tightly. If it
does not fit tightly, have an expert
install it. We recommend an
Authorized Mazda Dealer.
If you have no spare fuses, borrow one
of the same rating from a circuit not
essential to vehicle operation, such as
the AUDIO or CIGAR circuit.
8-48
Maintenance and Care
Owner Maintenance
Mazda5_8BR9-EA-10J_Edition3 Page366
Monday, February 21 2011 1:45 PM
Form No.8BR9-EA-10J
Page 367 of 440

Black plate (367,1)
CAUTION
Always replace a fuse with one of the
same rating. Otherwise you may
damage the electric system.
7. Reinstall the cover and make sure that it is securely installed.
Replacing the fuses under the hood
If the headlights or other electrical
components do not work and the fuses in
the cabin are normal, inspect the fuse
block under the hood. If a fuse is blown, it
must be replaced. Follow these steps:
1. Make sure the ignition is switched off,and other switches are off.
2. Remove the fuse block cover.
Fuse block
3. If any fuse but the MAIN fuse is blown, replace it with a new one of the
same amperage rating .
Normal
Blown
WARNING
Do not replace the main fuse by
yourself. Have an Authorized Mazda
Dealer perform the replacement:
Replacing the fuse by yourself is
dangerous because the MAIN fuse is
a high current fuse. Incorrect
replacement could cause an electrical
shock or a short circuit resulting in a
fire.
Main fuse
4. Reinstall the cover and make sure that
it is securely installed.
Maintenance and Care
Owner Maintenance
8-49
Mazda5_8BR9-EA-10J_Edition3 Page367
Monday, February 21 2011 1:45 PM
Form No.8BR9-EA-10J