trunk MAZDA MODEL 5 2015 Owners Manual
[x] Cancel search | Manufacturer: MAZDA, Model Year: 2015, Model line: MODEL 5, Model: MAZDA MODEL 5 2015Pages: 458, PDF Size: 5.46 MB
Page 257 of 458

Black plate (257,1)
Audio profile
lA2DP (Advanced Audio Distribution
Profile) Ver. 1.0
lAVRCP (Audio/Video Remote Control
Profile) Ver. 1.0/1.3
A2DP is a profile which transmits only
audio to the Bluetooth
®unit. If your
Bluetooth®audio device corresponds only
to A2DP, but not AVRCP, you cannot
operate it using the control panel of the
vehicle's audio system. In this case, the
Bluetooth
®audio device can be operated
by controlling the device itself, the same
as when a portable audio system without
the Bluetooth
®communication function is
connected to the AUX terminal.
Function A2DP A2DP·AVRCP
Ver. 1.0 Ver. 1.3
Playback No Yes Yes
Pause No Yes Yes
File (Track)
up/down No Yes Yes
Reverse No No Yes
Fast-forward No No Yes
Text display No No Yes
Yes: Available
No: Not available NOTE
lThe system may not operate normally
depending on the Bluetooth®audio device.lTo make sure that your Bluetooth®audio
device is Ver. 1.0 or 1.3, refer to the
Owner's Manual for the Bluetooth
®audio
device.
lIt may not be possible to play a Bluetooth®
audio device if it is placed anywhere
transmission is compromised, such as
inside a metal container or the trunk. Move
the Bluetooth
®audio device to a location
where transmission is possible.
lBattery consumption of Bluetooth®audio
devices is higher while Bluetooth®-
connected.
lIf a non-Bluetooth®device is to be used, a
commercially-available Bluetooth®adapter
is required. When playing an audio device
with a Bluetooth
®adapter installed,
programming of the audio device may not
be possible or audio may not be heard from
the vehicle speakers if the connection of the
adapter and the device is poor. If this
happens, check if the Bluetooth
®adapter is
properly connected.
Interior Comfort
Bluetooth® Audio
6-61
Mazda5_8DW3-EA-14H_Edition3 Page257
Thursday, December 18 2014 9:27 AM
Form No.8DW3-EA-14H
Page 262 of 458

Black plate (262,1)
NOTElSome Bluetooth®audio devices need a
certain amount of time before the “
”
symbol is displayed.
lIf a hands-free type mobile phone has been
the most recently programmed device, the
Bluetooth
®unit links this device. If you
would like to use a Bluetooth®audio type
device which has been previously
programmed to the Bluetooth
®unit, the link
must be changed to this device.
lIf an error occurs while trying to link a
device, “Err ”flashes in the display for
three seconds, and the display returns to
“ LINK CHANGE ”. If this occurs, check the
programming status of the Bluetooth
®
audio device and the location of the device
in the vehicle (not in the trunk or a metal-
type box), and then try the link operation
again.
lDevice selection can also be done using
voice recognition (page 6-85).
How to confirm the device currently
linked
Switch to the link-change mode. (Refer to
“ Changing the link to a Bluetooth
®audio
device ”)
The device name displayed first is the
device which is currently linked.
Deleting the link to a Bluetooth®audio
device
1. Using the audio control dial, select the
pairing delete mode “PAIR DELETE ”
in the “BT SETUP” mode. (Refer to
“ Bluetooth
®audio device set-up ”for
details.)
2. Press the audio control dial to determine the mode.
3. The name of the first device among the programmed devices is displayed. 4. Rotate the audio control dial and select
the name of the programmed device
you would like to delete.
Device name 1
Device name 2
Device name 3
Device name 4
Device name 5
Device name 6
Device name 7
NOTE
Only the names of programmed devices can be
displayed. If only one device is programmed,
only the name for this device is displayed.
5. If a selection other than “GO BACK ”
is made and the audio control dial is
pressed, “SURE ? NO ”is displayed.
6. Rotate the audio control dial clockwise and switch the display to “SURE ?
YES ”.
NOTE
The display changes as follows depending on
whether the audio control dial is rotated
clockwise or counterclockwise.
-Clockwise: “SURE ? YES ”displayed
-Counterclockwise: “SURE ? NO ”displayed
6-66
Interior Comfort
Bluetooth® Audio
Mazda5_8DW3-EA-14H_Edition3 Page262
Thursday, December 18 2014 9:27 AM
Form No.8DW3-EA-14H
Page 267 of 458

Black plate (267,1)
lA2DP (Advanced Audio Distribution
Profile) Ver. 1.0
lOPP (Object Push Profile) Ver. 1.1
NOTE
lThe Bluetooth®Hands-Free system is
operable several seconds after the ignition
is switched to ACC or ON (requires less
than 15 seconds).
lIf the ignition is switched off during a
hands-free call, the line is transferred to the
device (Mobile phone) automatically.
lIf the device (Mobile phone) is in a location
where radio reception is difficult such as a
metal container or in the trunk, the call may
not be connected using Bluetooth
®.If
communication is not possible, change the
location of the device (Mobile phone).
q Component Parts
Bluetooth®Hands-Free consists of the
following items:
lTalk buttonlPick-up buttonlHang-up buttonlInformation displaylMicrophonelAudio unit
Talk button, Pick-Up button and Hang-
Up button
Basic functions of Bluetooth
®Hands-Free
can be used for such things as making
calls or hanging up using the talk button,
pick-up button and hang-up button on the
steering wheel.
NOTE
The talk button, pick-up button, and hang-up
button are operable with the audio unit turned
off.
Talk button Hang-up
button
Pick-up button
Talk button operations
A short press or a long press of the talk
button is used to operate the system as
follows:
lShort press (Press the button less than
0.7 sec.)
lLong press (Press the button 0.7 sec. or
more.)
Information display
When available, the information display
shows telephone numbers, Bluetooth
®
Hands-Free messages, and operation
status.
Bluetooth phone connected
Interior Comfort
Bluetooth® Hands-Free
6-71
Mazda5_8DW3-EA-14H_Edition3 Page267
Thursday, December 18 2014 9:27 AM
Form No.8DW3-EA-14H
Page 303 of 458

Black plate (303,1)
CAUTION
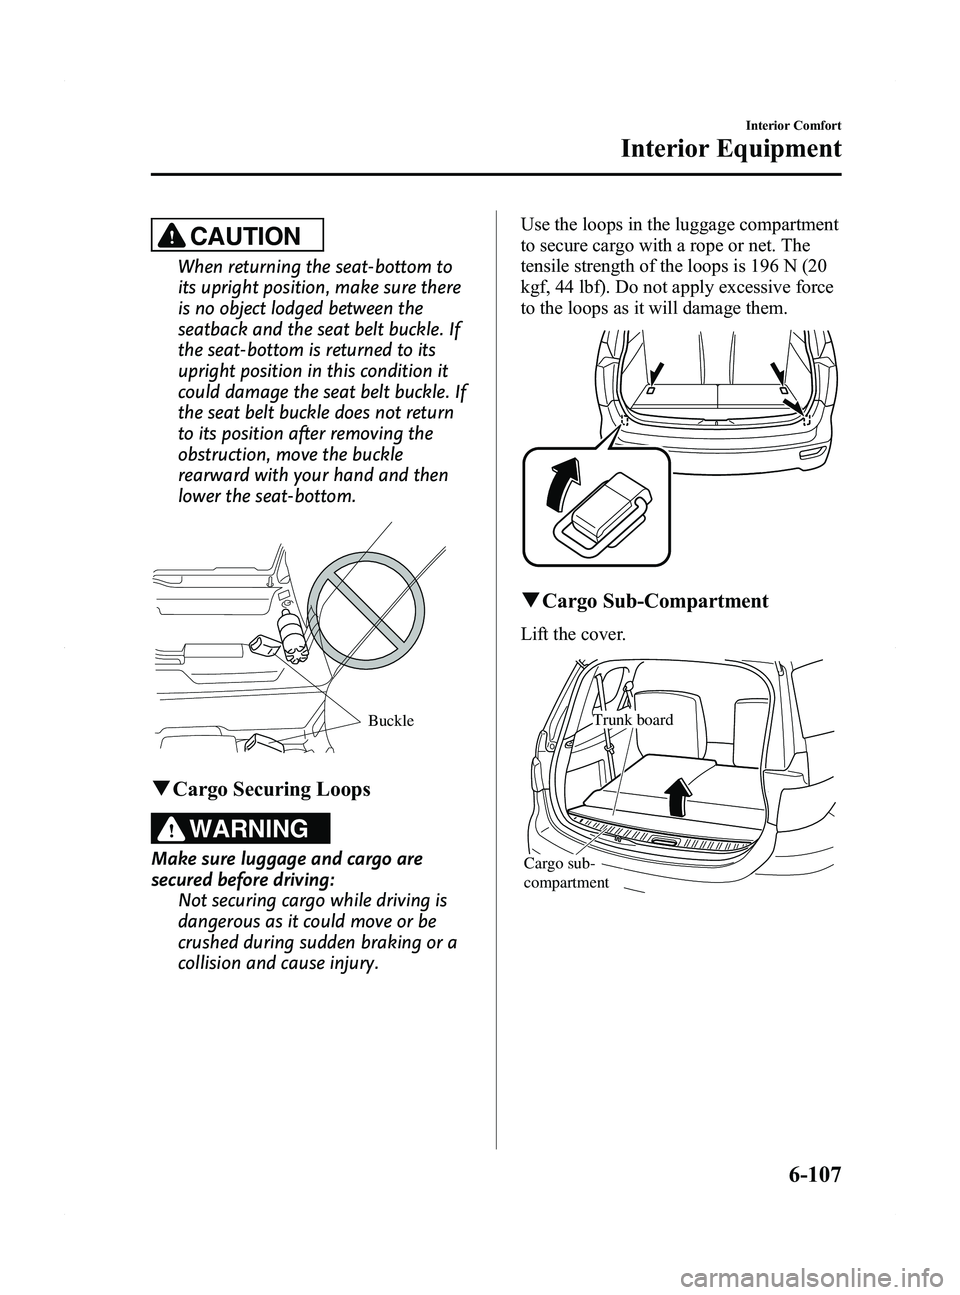
When returning the seat-bottom to
its upright position, make sure there
is no object lodged between the
seatback and the seat belt buckle. If
the seat-bottom is returned to its
upright position in this condition it
could damage the seat belt buckle. If
the seat belt buckle does not return
to its position after removing the
obstruction, move the buckle
rearward with your hand and then
lower the seat-bottom.
Buckle
qCargo Securing Loops
WARNING
Make sure luggage and cargo are
secured before driving:
Not securing cargo while driving is
dangerous as it could move or be
crushed during sudden braking or a
collision and cause injury. Use the loops in the luggage compartment
to secure cargo with a rope or net. The
tensile strength of the loops is 196 N (20
kgf, 44 lbf). Do not apply excessive force
to the loops as it will damage them.
q
Cargo Sub-Compartment
Lift the cover.
Trunk board
Cargo sub-
compartment
Interior Comfort
Interior Equipment
6-107
Mazda5_8DW3-EA-14H_Edition3 Page303
Thursday, December 18 2014 9:28 AM
Form No.8DW3-EA-14H
Page 312 of 458

Black plate (312,1)
2. Open and fold back the trunk boardover the third-row seatback.
Trunk board
3. Remove the cargo sub-compartment.
Cargo sub-
compartment
4. Turn the tire hold-down bolt
counterclockwise with the lug wrench.
To secure the spare tire
Perform the removal procedure in reverse.
7-6
In Case of an Emergency
Flat Tire
Mazda5_8DW3-EA-14H_Edition3 Page312
Thursday, December 18 2014 9:28 AM
Form No.8DW3-EA-14H
Page 329 of 458

Black plate (329,1)
Tiedown Hooksí
CAUTION
Do not use the front and rear
tiedown eyelets for towing the
vehicle.
They have been designed only for
securing the vehicle to a transport
vessel during shipping.
Using the eyelets for any other
purpose could result in the vehicle
being damaged.
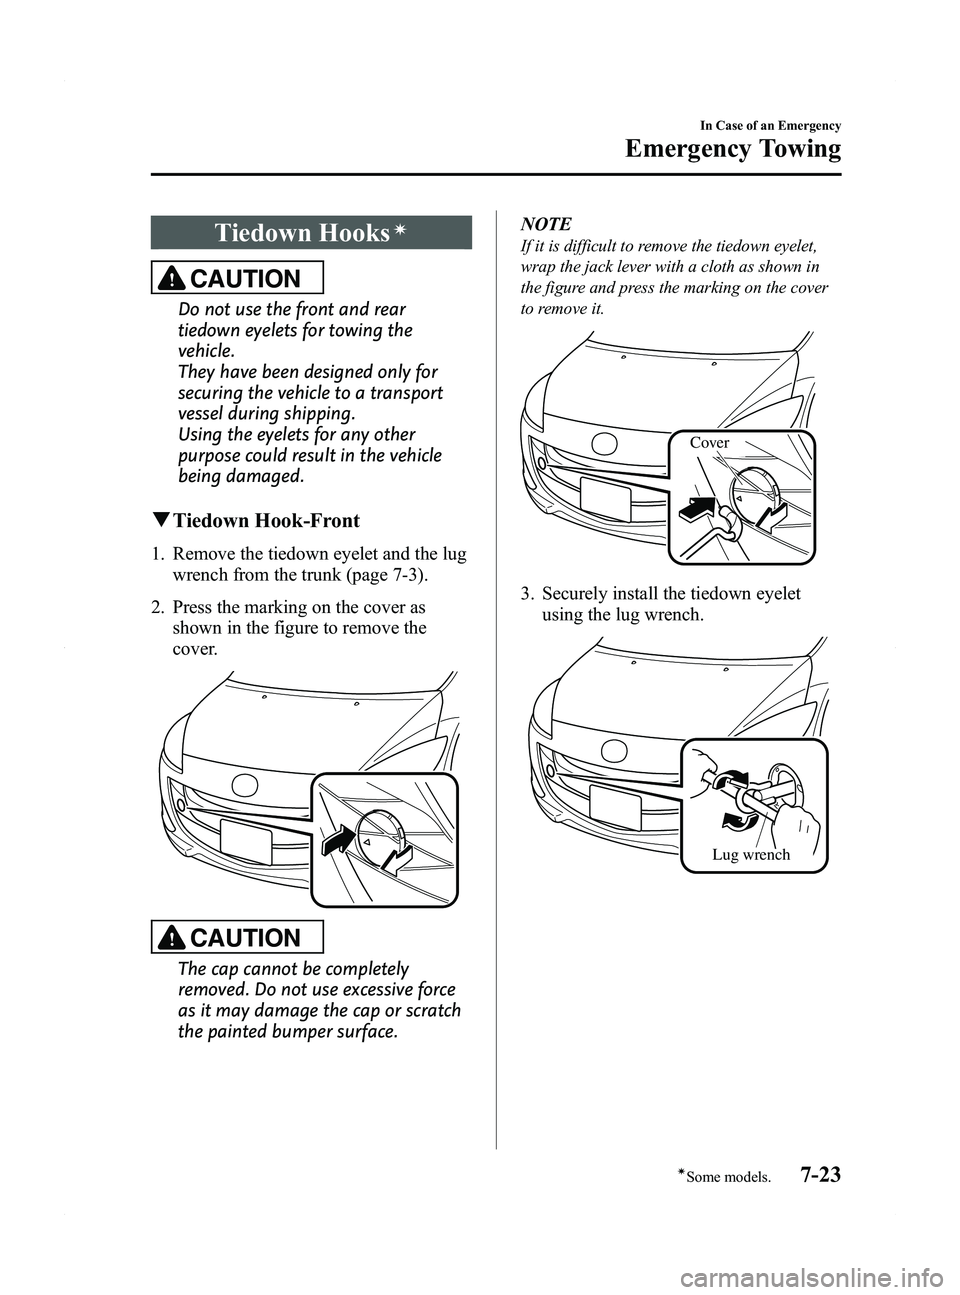
qTiedown Hook-Front
1. Remove the tiedown eyelet and the lug
wrench from the trunk (page 7-3).
2. Press the marking on the cover as shown in the figure to remove the
cover.
CAUTION
The cap cannot be completely
removed. Do not use excessive force
as it may damage the cap or scratch
the painted bumper surface. NOTE
If it is difficult to remove the tiedown eyelet,
wrap the jack lever with a cloth as shown in
the figure and press the marking on the cover
to remove it.
Cover
3. Securely install the tiedown eyelet
using the lug wrench.
Lug wrench
In Case of an Emergency
Emergency Towing
7-23íSome models.
Mazda5_8DW3-EA-14H_Edition3 Page329
Thursday, December 18 2014 9:28 AM
Form No.8DW3-EA-14H