buttons MAZDA MODEL 6 2005 Owners Manual (in English)
[x] Cancel search | Manufacturer: MAZDA, Model Year: 2005, Model line: MODEL 6, Model: MAZDA MODEL 6 2005Pages: 340, PDF Size: 3.73 MB
Page 80 of 340
Black plate (80,1)
NOTE
l(U.S.A.)
This device complies with part 15 of
the FCC Rules. Operation is subject
to the following two conditions: (1)
This device may not cause harmful
interference, and (2) this device must
accept any interference received,
including interference that may cause
undesired operation.
l(CANADA)
This device complies with RSS-210
of Industry CANADA. Operation is
subject to the following two
conditions: (1) this device may not
cause interference, and (2) this
device must accept any interference,
including interference that may cause
undesired operation of the device.
NOTE
lIf the lock and unlock buttons are
pressed sequentially, the hazard
warning lights may not flash
correctly.
l(With theft-deterrent system)
The hazard warning lights only flash
when the system is armed or turned
off.
Refer to the theft-deterrent system
(page 3-32).
Lock button
To lock the doors and the hatch/liftgate,
press the lock button and the hazard
warning lights will flash once.To confirm that all the doors and the
hatch/liftgate have been locked, press the
lock button again within 5 seconds. If
they are closed and locked, the horn will
sound.
NOTE
(Without theft-deterrent system)
The hazard warning lights will flash
once to indicate that the doors are
locked.
NOTE
lAll doors and the hatch/liftgate
cannot be locked when any door is
open and the key is in the ignition
switch.
lConfirm that all the doors and the
hatch/liftgate are locked visually or
audibly by use of the double click.
Unlock button
To unlock the driver's door, press the
unlock button and the hazard warning
lights will flash twice.
To unlock all the doors and the hatch/
liftgate, press the unlock button again
within 5 seconds.
NOTE
(Without theft-deterrent system)
The hazard warning lights will flash
twice to indicate that the doors are
unlocked.
3-4
Knowing Your Mazda
Doors and Locks
Mazda6_8T56-EC-04G_Edition2 Page80
Monday, November 15 2004 4:32 PM
Form No.8T56-EC-04G
Page 112 of 340
Black plate (112,1)
NOTE
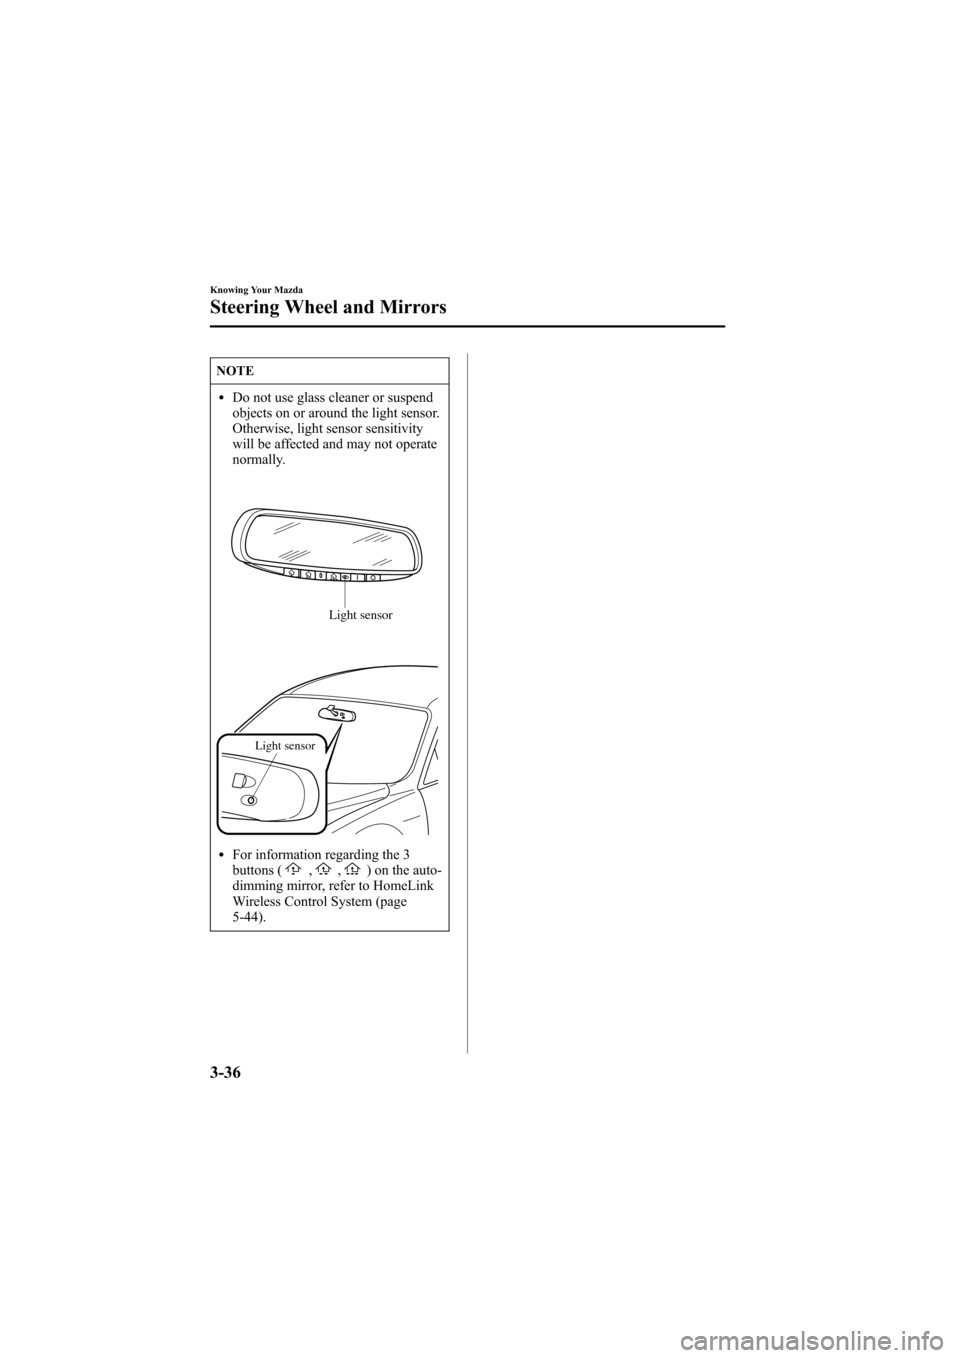
lDo not use glass cleaner or suspend
objects on or around the light sensor.
Otherwise, light sensor sensitivity
will be affected and may not operate
normally.
Light sensor
Light sensor
lFor information regarding the 3
buttons (,,) on the auto-
dimming mirror, refer to HomeLink
Wireless Control System (page
5-44).
3-36
Knowing Your Mazda
Steering Wheel and Mirrors
Mazda6_8T56-EC-04G_Edition2 Page112
Monday, November 15 2004 4:33 PM
Form No.8T56-EC-04G
Page 170 of 340
Black plate (170,1)
qProgramming the HomeLink
System
CAUTION
When programming a garage door
opener or a gate, disconnect the power
to these devices before performing
programming, as continuous operation
of the devices could damage the motor.
The HomeLink system provides 3 buttons
which can be individually selected and
programmed using the transmitters for
current, on-market devices as follows:
1. Press and hold the two outer
HomeLink buttons (buttons one and
three) - releasing only when the
indicator light begins to flash (after 20
seconds).Do nothold the buttons for
longer than 30 seconds anddo not
repeat step 1to program a second and/
or third hand-held transmitter to the
remaining two HomeLink buttons.
2. Position the end of your hand-held
transmitter 2.5―7.5 cm (1―3 inches)
away from the HomeLink button you
wish to program while keeping the
indicator light in view.
3. Simultaneously press and hold both the
chosen HomeLink and hand-held
transmitter buttons.Do not release the
buttons until step 4 has been
completed.
NOTE
Some gate operators and garage door
openers may require you to replace this
Programming Step 3 with procedures
noted in the“Gate Operator/Canadian
Programming”section.4. After the HomeLink indicator light
changes from a slow to a rapidly
blinking light, release both the
HomeLink and hand-held transmitter
buttons.
NOTE
If the HomeLink indicator light does
not change to a rapidly blinking light,
contact HomeLink at
www.homelink.comor call1-800-355-
3515for assistance.
5. Press and hold the just-trained
HomeLink button and observe the
indicator light.
If the indicator lightstays on constantly,
programming is completeand your
device should activate when the
HomeLink button is pressed and released.
NOTE
To program the remaining two
HomeLink buttons, begin with
“Programming”- step 2. Do not repeat
step 1.
If the indicator light blinksrapidly for
two seconds and then turns to a
constant light, continue with
“Programming”steps 6―8to complete
the programming of a rolling code
equipped device (most commonly a
garage door opener).
6. At the garage door opener receiver
(motor-head unit) in the garage, locate
the“learn”or“smart”button. This can
usually be found where the hanging
antenna wire is attached to the motor-
head unit.
5-46
Driving Your Mazda
Switches and Controls
Mazda6_8T56-EC-04G_Edition2 Page170
Monday, November 15 2004 4:34 PM
Form No.8T56-EC-04G
Page 171 of 340
Black plate (171,1)
7. Firmly press and release the“learn”or
“smart”button. (The name and color of
the button may vary by manufacturer.)
NOTE
There are 30 seconds in which to
initiate step 8.
8. Return to the vehicle and firmlypress,
hold for two seconds and releasethe
programmed HomeLink button. Repeat
the“press/hold/release”sequence a
second time, and, depending on the
brand of the garage door opener (or
other rolling code equipped device),
repeat this sequence a third time to
complete the programming process.
HomeLink should now activate your
rolling code equipped device.
NOTE
To program the remaining two
HomeLink buttons, begin with
“Programming”- step 2. Do not repeat
step 1.
For questions or comments, please contact
HomeLink atwww.homelink.comor1-
800-355-3515.
qGate operator/Canadian
Programming
Canadian radio-frequency laws require
transmitter signals to“time-out”(or quit)
after several seconds of transmission -
which may not be long enough for
HomeLink to pick up the signal during
programming. Similar to this Canadian
law, some U.S. gate operators are
designed to“time-out”in the same
manner.
If you live in Canada or you are having
difficulties programming a gate operator
by using the“Programming”procedures
(regardless of where you live),replace
“Programming HomeLink”step 3with
the following:
NOTE
If programming a garage door opener or
gate operator, it is advised to unplug the
device during the“cycling”process to
prevent possible overheating.
Continue to press and hold the HomeLink
button while youpress and release -
every two seconds(“cycle”) your hand-
held transmitter until the frequency signal
has successfully been accepted by
HomeLink. (The indicator light will flash
slowly and then rapidly.)
Proceed with“Programming”step 4 to
complete.
qOperating the HomeLink System
Press the programmed HomeLink button
to operate a programmed device. The
code will continue being transmitted for a
maximum of 20 seconds.
Driving Your Mazda
Switches and Controls
5-47
Mazda6_8T56-EC-04G_Edition2 Page171
Monday, November 15 2004 4:34 PM
Form No.8T56-EC-04G
Page 172 of 340
Black plate (172,1)
qReprogramming the HomeLink
system
To program a device to HomeLink using a
HomeLink button previously trained,
follow these steps:
1. Press and hold the desired HomeLink
button.DO NOTrelease the button.
2. The indicator light will begin to flash
after 20 seconds. Without releasing the
HomeLink button, proceed with
“Programming”- step 2.
qErasing Programmed HomeLink
Buttons
To erase the existing programming from
all three operating channels, press and
hold the two outside buttons (
,)
on the auto-dimming mirror until the
HomeLink indicator light begins to flash
after approximately 20 seconds.
Verify that the programming has been
erased when you resell the vehicle.
5-48
Driving Your Mazda
Switches and Controls
Mazda6_8T56-EC-04G_Edition2 Page172
Monday, November 15 2004 4:34 PM
Form No.8T56-EC-04G
Page 200 of 340
Black plate (200,1)
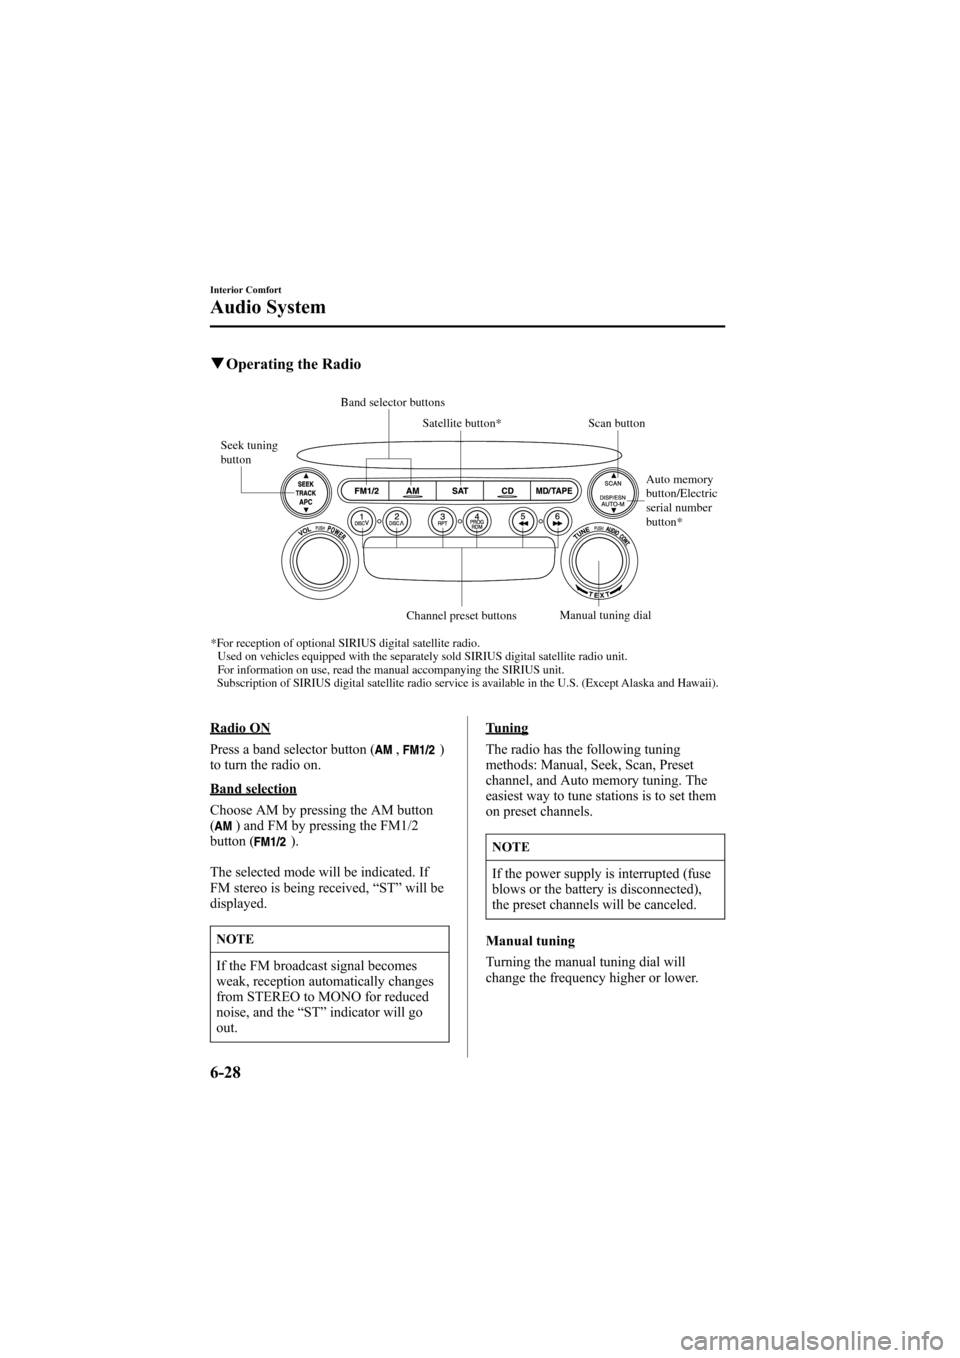
qOperating the Radio
Seek tuning
buttonScan button
Channel preset buttonsManual tuning dial
Satellite button* Band selector buttons
*For reception of optional SIRIUS digital satellite radio.
Used on vehicles equipped with the separately sold SIRIUS digital satellite radio unit.
For information on use, read the manual accompanying the SIRIUS unit.
Subscription of SIRIUS digital satellite radio service is available in the U.S. (Except Alaska and Hawaii).Auto memory
button/Electric
serial number
button*
Radio ON
Press a band selector button (
,)
to turn the radio on.
Band selection
Choose AM by pressing the AM button
(
) and FM by pressing the FM1/2
button ().
The selected mode will be indicated. If
FM stereo is being received,“ST”will be
displayed.
NOTE
If the FM broadcast signal becomes
weak, reception automatically changes
from STEREO to MONO for reduced
noise, and the“ST”indicator will go
out.
Tuning
The radio has the following tuning
methods: Manual, Seek, Scan, Preset
channel, and Auto memory tuning. The
easiest way to tune stations is to set them
on preset channels.
NOTE
If the power supply is interrupted (fuse
blows or the battery is disconnected),
the preset channels will be canceled.
Manual tuning
Turning the manual tuning dial will
change the frequency higher or lower.
6-28
Interior Comfort
Audio System
Mazda6_8T56-EC-04G_Edition2 Page200
Monday, November 15 2004 4:34 PM
Form No.8T56-EC-04G
Page 204 of 340
Black plate (204,1)
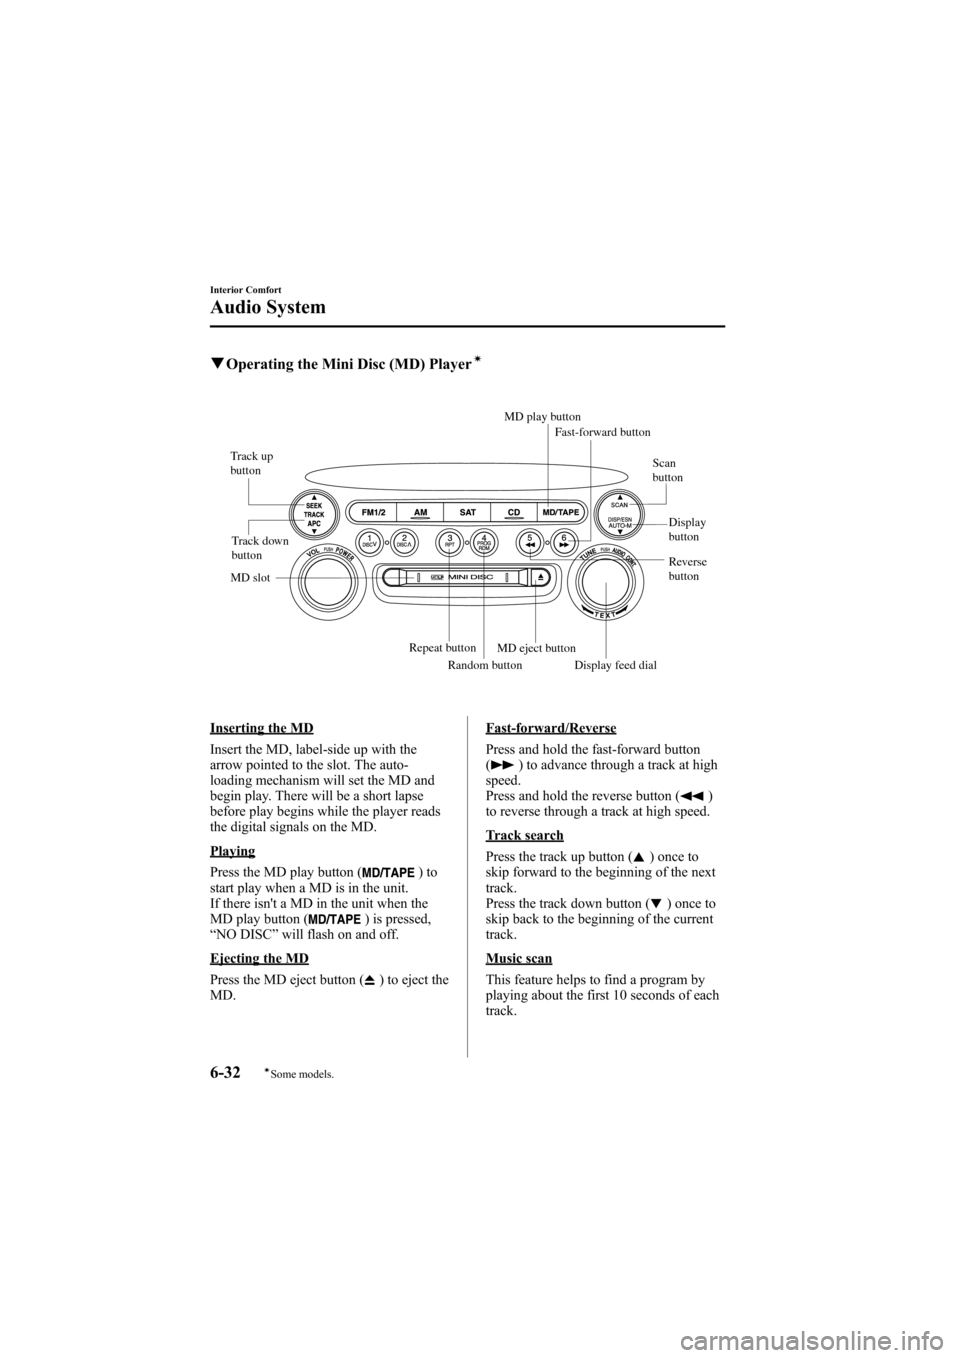
qOperating the Mini Disc (MD) Playerí
Track up
button
Track down
buttonScan
button
Display
button
Reverse
button
Display feed dial Repeat button
Random buttonMD eject buttonFast-forward button
MD slotMD play button
Inserting the MD
Insert the MD, label-side up with the
arrow pointed to the slot. The auto-
loading mechanism will set the MD and
begin play. There will be a short lapse
before play begins while the player reads
the digital signals on the MD.
Playing
Press the MD play button (
)to
start play when a MD is in the unit.
If there isn't a MD in the unit when the
MD play button (
) is pressed,
“NO DISC”will flash on and off.
Ejecting the MD
Press the MD eject button (
) to eject the
MD.
Fast-forward/Reverse
Press and hold the fast-forward button
(
) to advance through a track at high
speed.
Press and hold the reverse button (
)
to reverse through a track at high speed.
Track search
Press the track up button (
) once to
skip forward to the beginning of the next
track.
Press the track down button (
) once to
skip back to the beginning of the current
track.
Music scan
This feature helps to find a program by
playing about the first 10 seconds of each
track.
6-32
Interior Comfort
íSome models.
Audio System
Mazda6_8T56-EC-04G_Edition2 Page204
Monday, November 15 2004 4:34 PM
Form No.8T56-EC-04G
Page 208 of 340
Black plate (208,1)
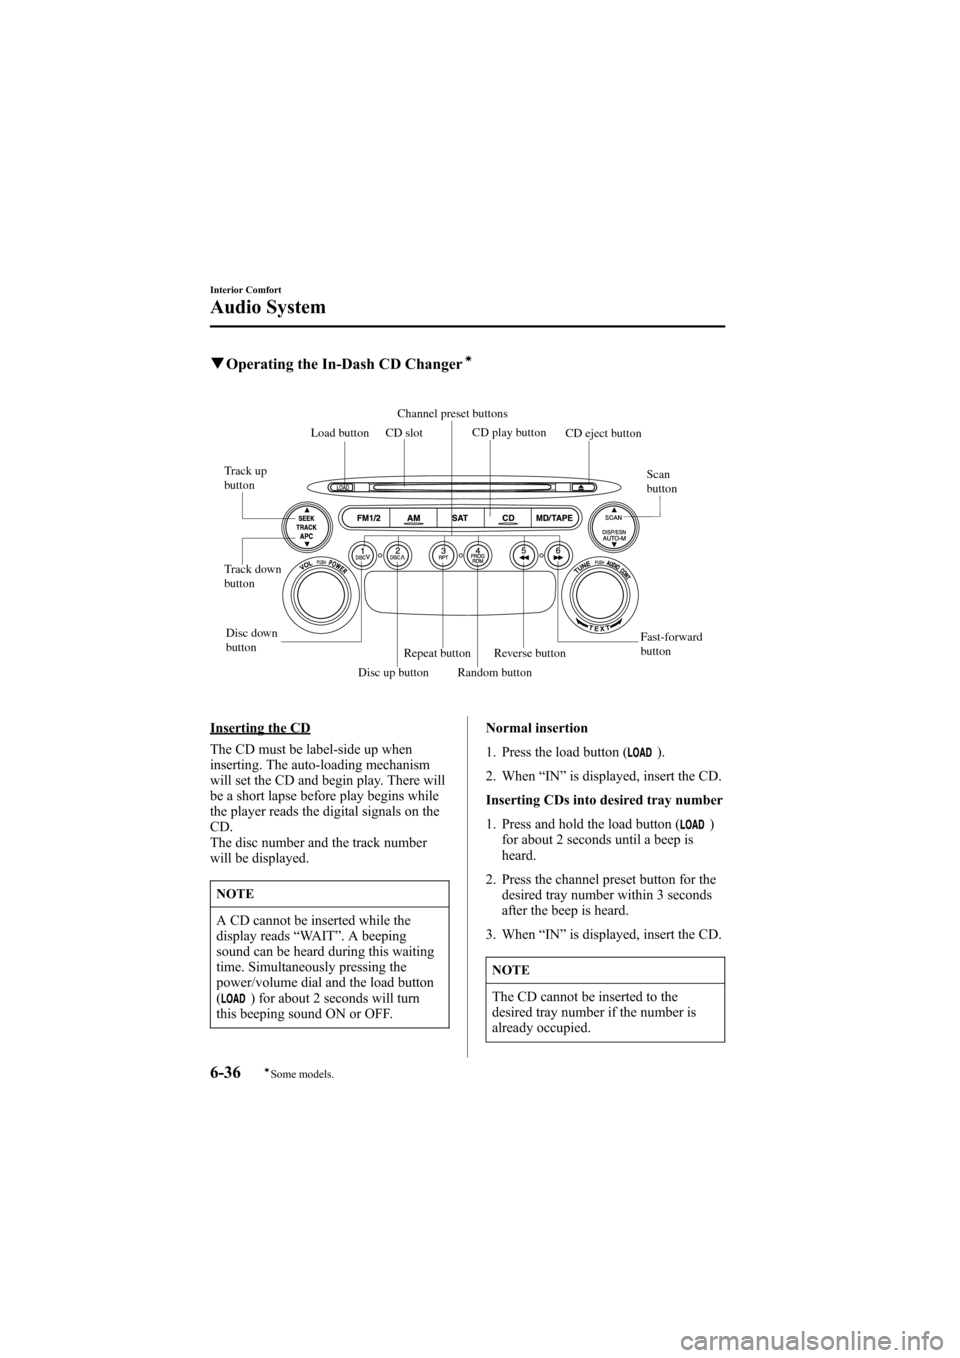
qOperating the In-Dash CD Changerí
Fast-forward
button Disc down
button Track down
button Track up
buttonScan
button Channel preset buttons
CD eject button CD slot Load button
Reverse button
Disc up button
Random button Repeat buttonCD play button
Inserting the CD
The CD must be label-side up when
inserting. The auto-loading mechanism
will set the CD and begin play. There will
be a short lapse before play begins while
the player reads the digital signals on the
CD.
The disc number and the track number
will be displayed.
NOTE
A CD cannot be inserted while the
display reads“WAIT”. A beeping
sound can be heard during this waiting
time. Simultaneously pressing the
power/volume dial and the load button
(
) for about 2 seconds will turn
this beeping sound ON or OFF.Normal insertion
1. Press the load button (
).
2. When“IN”is displayed, insert the CD.
Inserting CDs into desired tray number
1. Press and hold the load button (
)
for about 2 seconds until a beep is
heard.
2. Press the channel preset button for the
desired tray number within 3 seconds
after the beep is heard.
3. When“IN”is displayed, insert the CD.
NOTE
The CD cannot be inserted to the
desired tray number if the number is
already occupied.
6-36
Interior Comfort
íSome models.
Audio System
Mazda6_8T56-EC-04G_Edition2 Page208
Monday, November 15 2004 4:34 PM
Form No.8T56-EC-04G