buttons MAZDA MODEL 6 2008 Navigation Manual (in English)
[x] Cancel search | Manufacturer: MAZDA, Model Year: 2008, Model line: MODEL 6, Model: MAZDA MODEL 6 2008Pages: 58, PDF Size: 3.93 MB
Page 4 of 58

4
Before Use
Navigation
Set Up
RDM-TMCIf
necessary
Rear View
Monitor
Contents
Preparation
nBefore Use
Accessories ........................................................................................ 2
Laser products: .................................................................................. 2
Contents ............................................................................................. 4
Safety Information .............................................................................. 6
Introduction ........................................................................................ 8
(Use This Product Safety), (Navigation System), (Screens),
(LCD (Liquid crystal display))
Names and Functions ...................................................................... 10
Immediate use
nGetting startedlActivation....................................................................................... 12(Removing the Map Disc), (Buttons on the screen)
lMenu ............................................................................................. 14lSet Clock ....................................................................................... 15lNavigation Set Up ......................................................................... 16(User Setting), (Quick POI Selection), (Language), (Map Configuration),
(Calibration), (Restore System Defaults)
l
Screen Names and Functions....................................................... 25(Screens Before Setting Route), (Screens During Route Guidance),
(Screen adjustments and settings)
l
Screen change .............................................................................. 27(Changing the Map Orientation/Scale)
nRoutinglDestination Entry and Route Search............................................. 28(Change (Change Search Area)), (Address), (Point of interest),
(Emergency), (Memory Point), (Home), (Preset Destination),
(Previous Destination), (Intersection), (Freeway On/Off Ramp),
(Coordinates), (Select from map)
l
Quick POI ...................................................................................... 36(Displaying POI(s) on a Map), (Local Search), (Deleting POI Markers),
(Showing POI Data)
l
Character Entry ............................................................................. 37(To enter the street name, city name, and other.),
(To enter the house phone number, and other.)
l
Direct Destination Input................................................................. 38(Direct Destination Input), (Selecting Route)
lPOI Icons on Maps / Delete Destination ....................................... 39(POI (Point of Interest) Icons), (Delete destination)
lRoute Options ............................................................................... 40(Route Preferences), (Modification of Destination or Way Point Positions),
(Deletion of Destination or Way Points), (Detour), (Turn List),
(Display Preview), (Route Preview)
<00310025003e00280025001a004300320025003a002d0043002900250012004600530053004f0004000400340045004b00490004001800040004002a0056004d00480045005d00100004002e0059005200490004001c00100004001600140014001b000400
040017001e0019001b000400340031>
Page 11 of 58
11
Before Use
Ifnecessary
Rear View
Monitor
you hear it engage.
Note
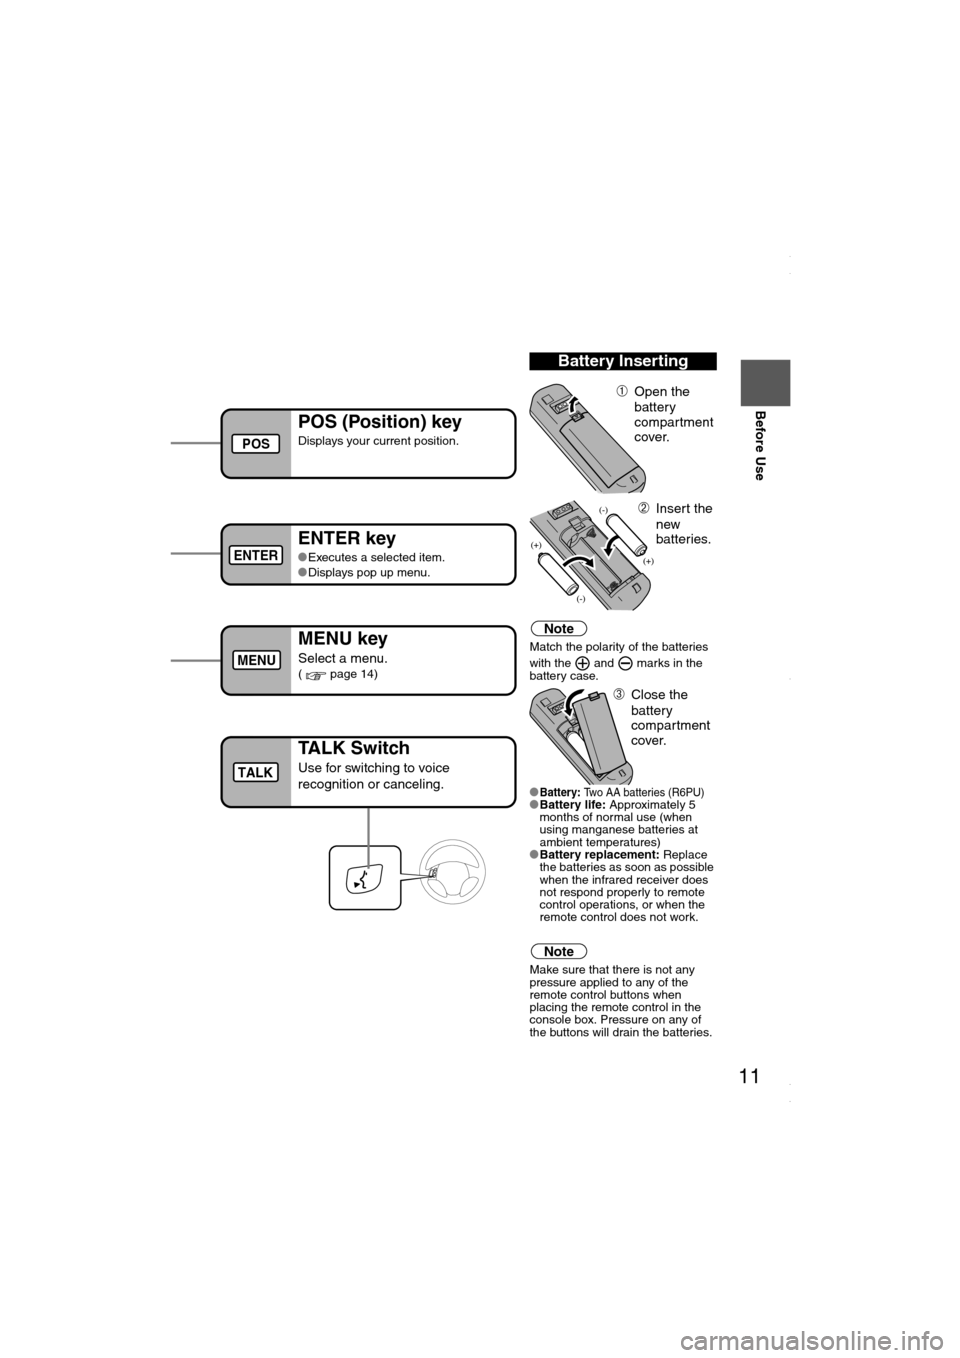
Match the polarity of the batteries
with the and marks in the
battery case.
l
Battery: Two AA batteries (R6PU)lBattery life: Approximately 5
months of normal use (when
using manganese batteries at
ambient temperatures)
lBattery replacement: Replace
the batteries as soon as possible
when the infrared receiver does
not respond properly to remote
control operations, or when the
remote control does not work.
Note
Make sure that there is not any
pressure applied to any of the
remote control buttons when
placing the remote control in the
console box. Pressure on any of
the buttons will drain the batteries.
Battery Inserting
ÀOpen the
battery
compartment
cover.
ÁInsert the
new
batteries.
ÂClose the
battery
compartment
cover.
POS (Position) key
Displays your current position.
ENTER key
lExecutes a selected item.
lDisplays pop up menu.
MENU key
Select a menu.( page 14)
Infrared transmitter
POS
ENTER
MENU
TALK Switch
Use for switching to voice
recognition or canceling.TALK
<00310025003e00280025001a004300320025003a002d0043002900250012004600530053004f0004000400340045004b004900040015001500040004002a0056004d00480045005d00100004002e0059005200490004001c00100004001600140014001b00
0400040017001e0019001b000400340031>
Page 13 of 58
13
Getting started
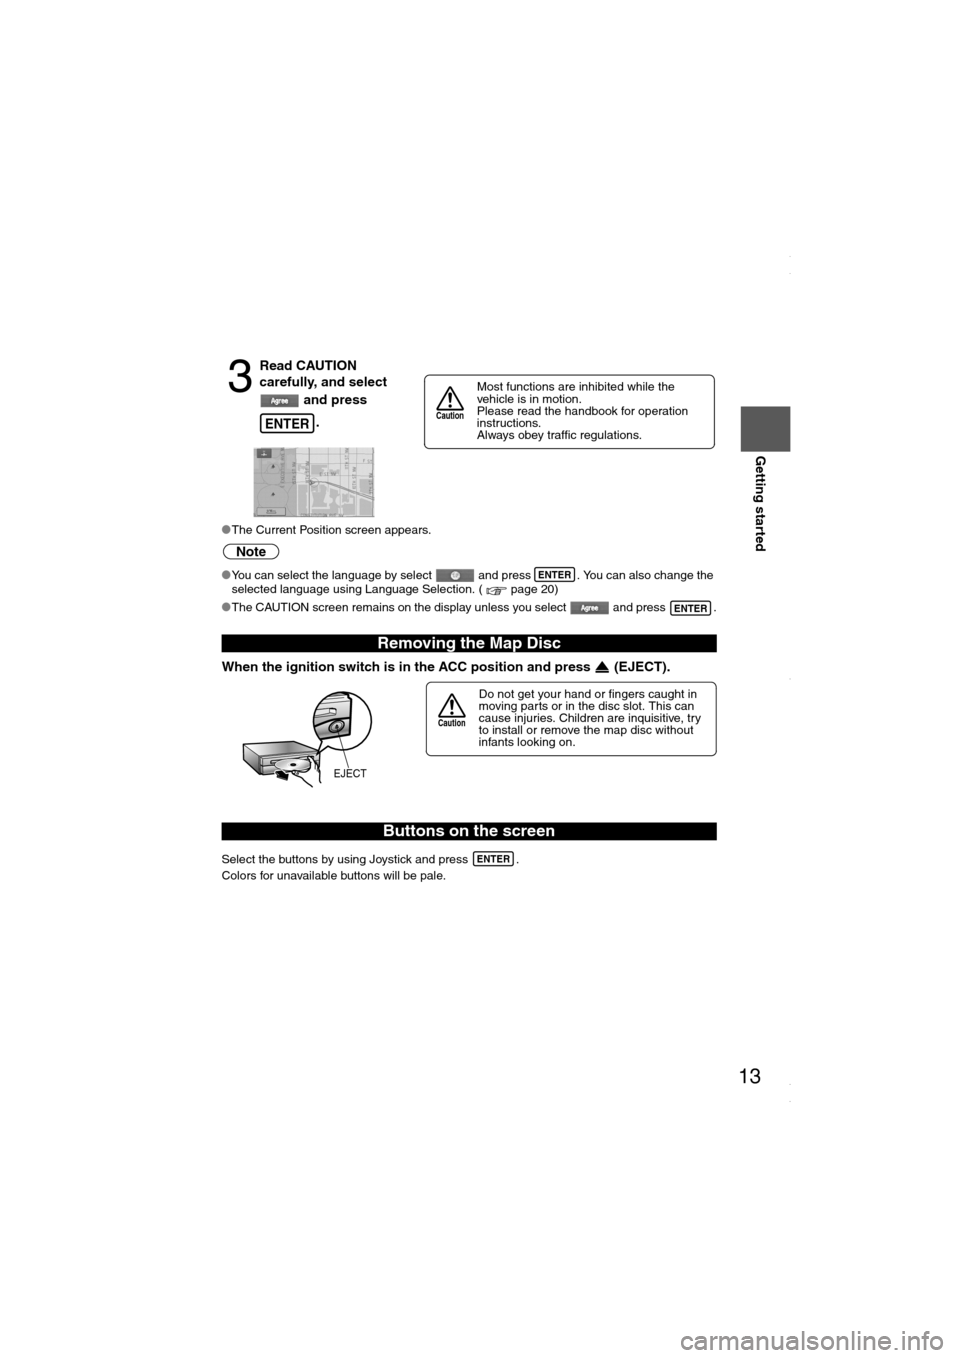
lThe Current Position screen appears.
Note
lYou can select the language by select and press . You can also change the
selected language using Language Selection. ( page 20)
lThe CAUTION screen remains on the display unless you select and press .
When the ignition switch is in the ACC position and press (EJECT).
Select the buttons by using Joystick and press .
Colors for unavailable buttons will be pale.
3
Read CAUTION
carefully, and select
and press
.
Removing the Map Disc
Buttons on the screen
ENTER
Most functions are inhibited while the
vehicle is in motion.
Please read the handbook for operation
instructions.
Always obey traffic regulations.
Caution
ENTER
ENTER
Do not get your hand or fingers caught in
moving parts or in the disc slot. This can
cause injuries. Children are inquisitive, try
to install or remove the map disc without
infants looking on.
Caution
EJECT
ENTER
<00310025003e00280025001a004300320025003a002d0043002900250012004600530053004f0004000400340045004b004900040015001700040004002a0056004d00480045005d00100004002e0059005200490004001c00100004001600140014001b00
0400040017001e0019001b000400340031>
Page 26 of 58
26
RoutingAddress
Book
Getting started
Display Menu screen will be shown when you press (DISP) and hold.
Note
Display Menu screen will be disappeared when they have been unused during a few seconds.
nAdjusting the screen quality
lAdjusts the screen brightness
Select "ADJ", and then "BRIGHT". The screen will brighten when scrolling to the right, or
darken when scrolling to the left.
lAdjusts the screen contrast
Select "ADJ", and then "CONTRAST". The screen will lighten when scrolling to the right, or
deepen when scrolling to the left.
Note
lAdjust by scrolling the Joystick to the right and left.
lRestore the adjustment value to the default when selecting “RESET”, press .
nClearing the screen
Select “DISP OFF”, press and the screen will disappear.
The screen will appear again when pressing any buttons.
nDaytime screen/Night screen
The screen can be returned to the daytime screen when the headlights or running lights
are on. Press (DISPLAY) and hold, then select "DAY MODE" and press .
lThe screen can be returned to the daytime screen while the headlights or running lights
are on using the dashboard illumination switch in the dashboard (Black-out meter).
Screen adjustments and settings
VOICE
ENTER
ENTER
VOICEENTER
<00310025003e00280025001a004300320025003a002d0043002900250012004600530053004f0004000400340045004b004900040016001a00040004002a0056004d00480045005d00100004002e0059005200490004001c00100004001600140014001b00
0400040017001e0019001b000400340031>
Page 42 of 58
![MAZDA MODEL 6 2008 Navigation Manual (in English) 42
Before
UseGetting
started
Routing
Route Options
Before Steps select
Display
Preview
Route
Preview
MENUENTER
Open the
[ROUTE
OPTIONS] MenuSelect
Select
Use the buttons displaye
: Move th MAZDA MODEL 6 2008 Navigation Manual (in English) 42
Before
UseGetting
started
Routing
Route Options
Before Steps select
Display
Preview
Route
Preview
MENUENTER
Open the
[ROUTE
OPTIONS] MenuSelect
Select
Use the buttons displaye
: Move th](/img/28/13578/w960_13578-41.png)
42
Before
UseGetting
started
Routing
Route Options
Before Steps select
Display
Preview
Route
Preview
MENUENTER
Open the
[ROUTE
OPTIONS] MenuSelect
Select
Use the buttons displaye
: Move the start point.
: Carry out a simulation ru
be displayed as , a
: Stop the simulation run
: Carry out a simulation rube displayed as , an : Move to the destination
: Displays the EDIT ROU
: Stops: Stops: DeletPOIs: Display the six P
selected, it will be displselected to display item
ENTER
<00310025003e00280025001a004300320025003a002d0043002900250012004600530053004f0004000400340045004b004900040018001600040004002a0056004d00480045005d00100004002e0059005200490004001c00100004001600140014001b00
0400040017001e0019001b000400340031>
Page 43 of 58
43
Before
UseGetting
started
Routing
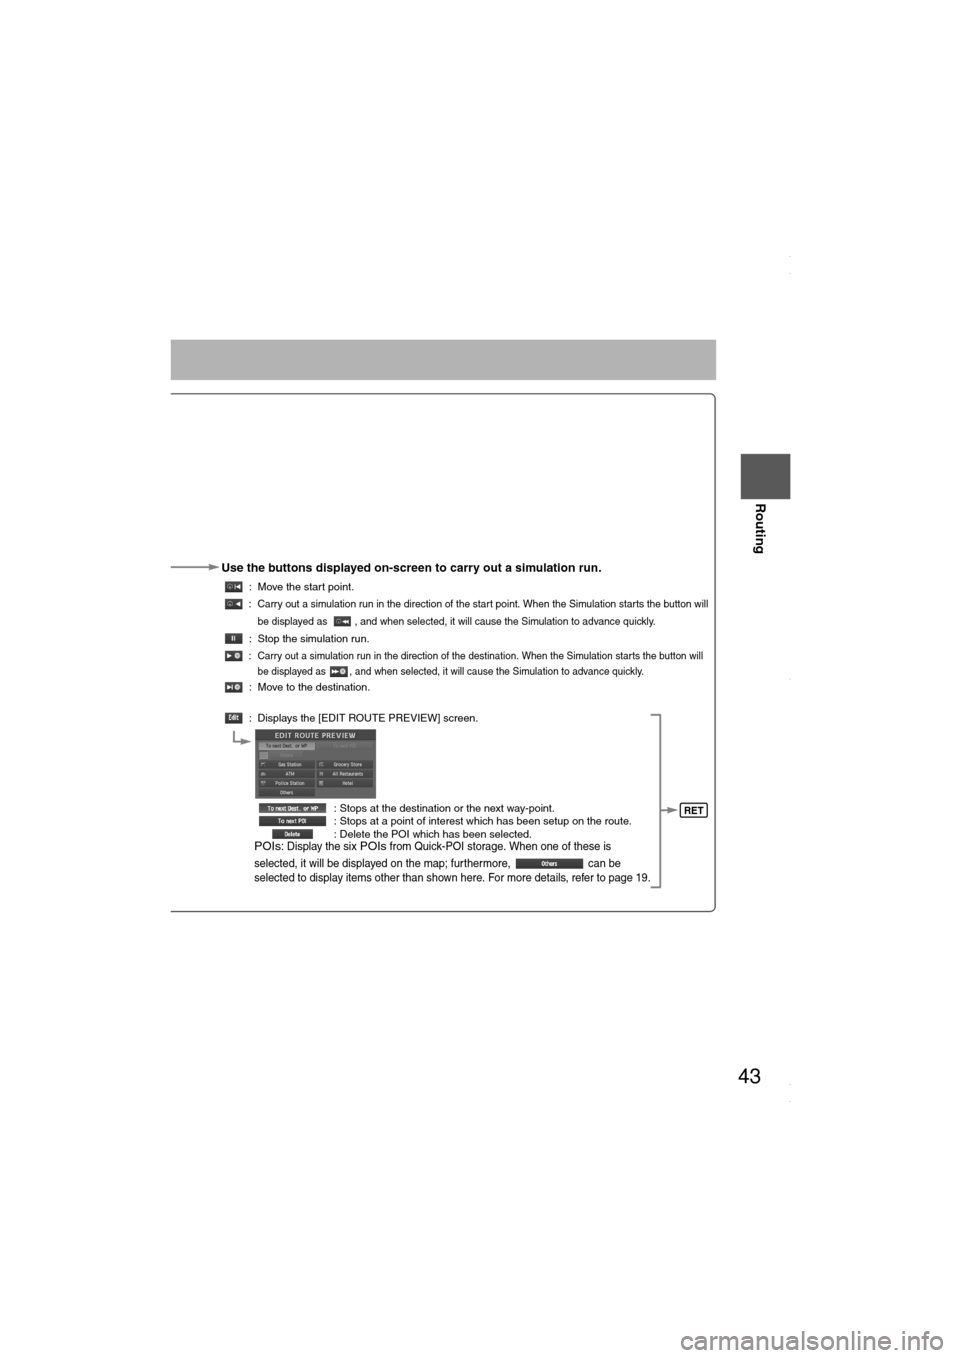
Use the buttons displayed on-screen to carry out a simulation run.
: Move the start point.
: Carry out a simulation run in the direction of the start point. When the Simulation starts the button will
be displayed as , and when selected, it will cause the Simulation to advance quickly.
: Stop the simulation run.
: Carry out a simulation run in the direction of the destination. When the Simulation starts the button will
be displayed as , and when selected, it will cause the Simulation to advance quickly.
: Move to the destination.
: Displays the [EDIT ROUTE PREVIEW] screen.
: Stops at the destination or the next way-point.
: Stops at a point of interest which has been setup on the route.
: Delete the POI which has been selected.
POIs: Display the six POIs from Quick-POI storage. When one of these is
selected, it will be displayed on the map; furthermore, can be
selected to display items other than shown here. For more details, refer to page 19.
RET
<00310025003e00280025001a004300320025003a002d0043002900250012004600530053004f0004000400340045004b004900040018001700040004002a0056004d00480045005d00100004002e0059005200490004001c00100004001600140014001b00
0400040017001e0019001b000400340031>
Page 56 of 58
56
Before
UseGetting
startedRoutingAddress
Book
Voice Recognition
If necessary
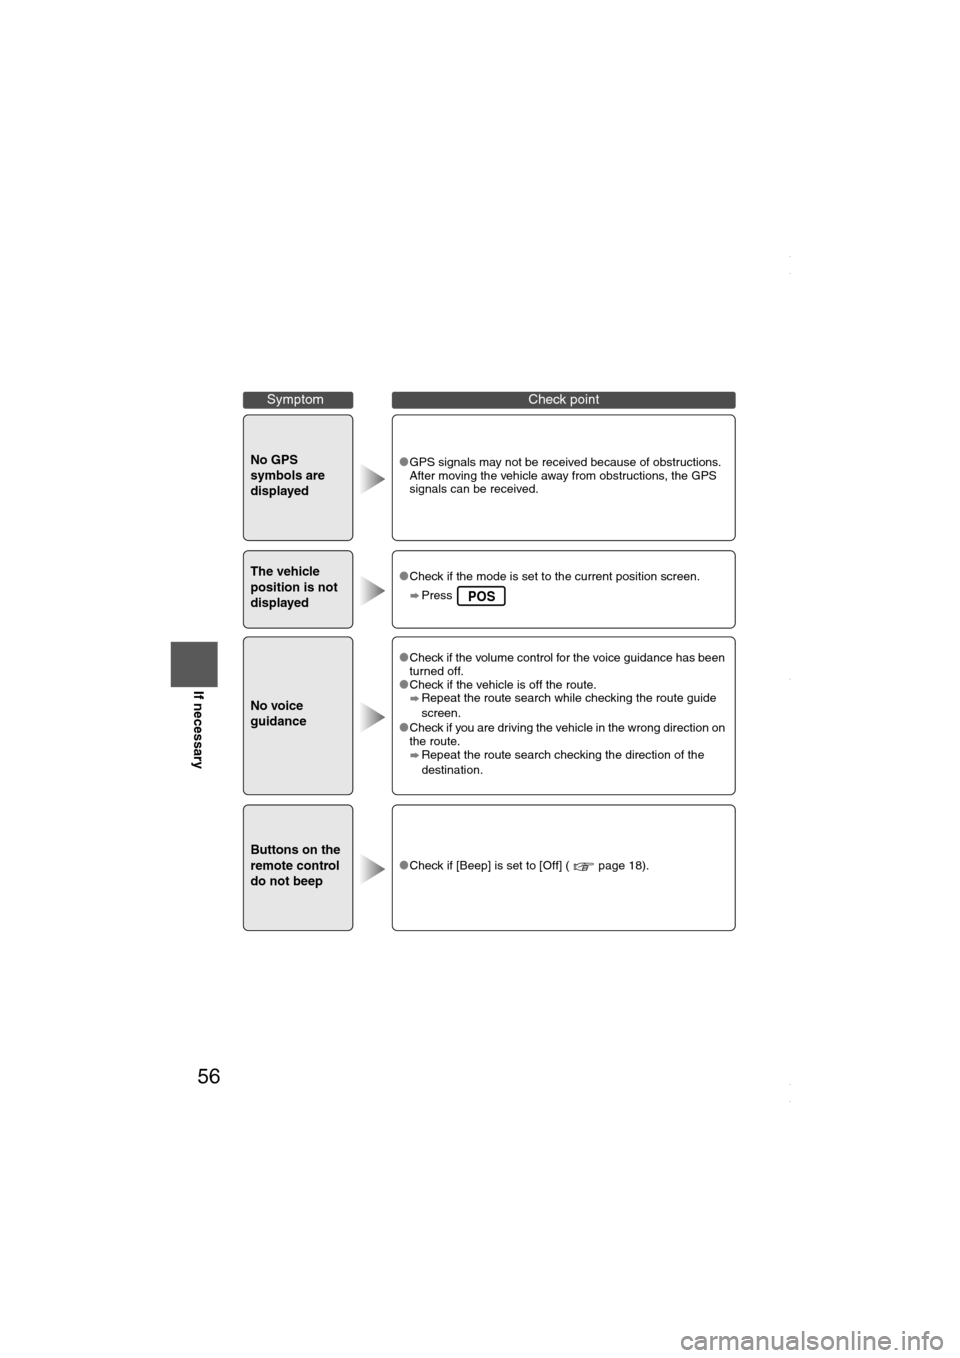
No GPS
symbols are
displayedlGPS signals may not be received because of obstructions.
After moving the vehicle away from obstructions, the GPS
signals can be received.
The vehicle
position is not
displayedlCheck if the mode is set to the current position screen.
Press
No voice
guidance
lCheck if the volume control for the voice guidance has been
turned off.
lCheck if the vehicle is off the route.
Repeat the route search while checking the route guide
screen.
lCheck if you are driving the vehicle in the wrong direction on
the route.
Repeat the route search checking the direction of the
destination.
Buttons on the
remote control
do not beeplCheck if [Beep] is set to [Off] ( page 18).
SymptomCheck point
POS
<00310025003e00280025001a004300320025003a002d0043002900250012004600530053004f0004000400340045004b004900040019001a00040004002a0056004d00480045005d00100004002e0059005200490004001c00100004001600140014001b00
0400040017001e0019001b000400340031>