turn signal MAZDA MODEL 6 2008 (in English) User Guide
[x] Cancel search | Manufacturer: MAZDA, Model Year: 2008, Model line: MODEL 6, Model: MAZDA MODEL 6 2008Pages: 440, PDF Size: 6.49 MB
Page 177 of 440

Black plate (177,1)
Turn and Lane-Change
Signals
qTurn Signal
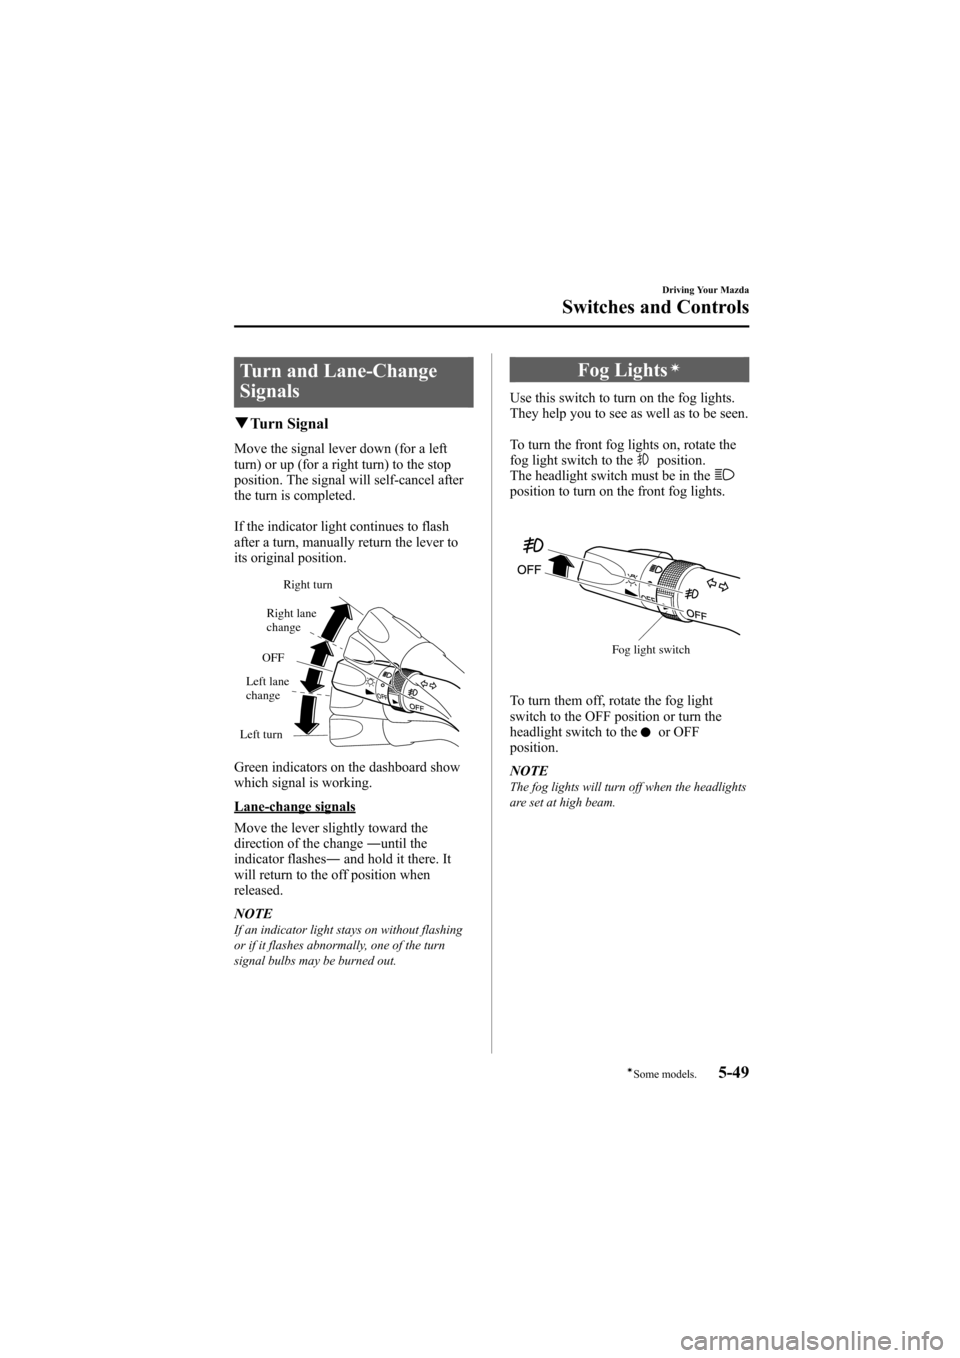
Move the signal lever down (for a left
turn) or up (for a right turn) to the stop
position. The signal will self-cancel after
the turn is completed.
If the indicator light continues to flash
after a turn, manually return the lever to
its original position.
Right turn
Left turn OFF
Right lane
change
Left lane
change
Green indicators on the dashboard show
which signal is working.
Lane-change signals
Move the lever slightly toward the
direction of the change ―until the
indicator flashes ―and hold it there. It
will return to the off position when
released.
NOTE
If an indicator light stays on without flashing
or if it flashes abnormally, one of the turn
signal bulbs may be burned out.
Fog Lightsí
Use this switch to turn on the fog lights.
They help you to see as well as to be seen.
To turn the front fog lights on, rotate the
fog light switch to the
position.
The headlight switch must be in the
position to turn on the front fog lights.
Fog light switch
To turn them off, rotate the fog light
switch to the OFF position or turn the
headlight switch to the
or OFF
position.
NOTE
The fog lights will turn off when the headlights
are set at high beam.
Driving Your Mazda
Switches and Controls
5-49íSome models.
Mazda6_8X47-EA-07G_Edition1 Page177
Tuesday, May 29 2007 3:43 PM
Form No.8X47-EA-07G
Page 181 of 440

Black plate (181,1)
Horn
To sound the horn, press themark on
the steering wheel.
Hazard Warning Flasher
The hazard warning lights should always
be used when you stop on or near a
roadway in an emergency.
The hazard warning lights warn other
drivers that your vehicle is a traffic hazard
and that they must take extreme caution
when near it.
Depress the hazard warning flasher and all
the turn signals will flash.
NOTE
lThe turn signals do not work when the
hazard warning lights are on.
lCheck local regulations about the use of
hazard warning lights while the vehicle is
being towed to verify that it is not in
violation of the law.
Driving Your Mazda
Switches and Controls
5-53
Mazda6_8X47-EA-07G_Edition1 Page181
Tuesday, May 29 2007 3:43 PM
Form No.8X47-EA-07G
Page 184 of 440

Black plate (184,1)
5. Press and hold the just-trainedHomeLink button and observe the
indicator light.
If the indicator light stays on constantly,
programming is complete and your
device should activate when the
HomeLink button is pressed and released.
NOTE
To program the remaining two HomeLink
buttons, begin with “Programming ”― step 2.
Do not repeat step 1.
If the indicator light blinks rapidly for
two seconds and then turns to a
constant light, continue with
“ Programming ”steps 6 ―8to complete
the programming of a rolling code
equipped device (most commonly a
garage door opener).
6. At the garage door opener receiver (motor-head unit) in the garage, locate
the “learn ”or “smart ”button. This can
usually be found where the hanging
antenna wire is attached to the motor-
head unit.
7. Firmly press and release the “learn ”or
“ smart ”button. (The name and color of
the button may vary by manufacturer.)
NOTE
There are 30 seconds in which to initiate step
8.
8. Return to the vehicle and firmly press,
hold for two seconds and release the
programmed HomeLink button. Repeat
the “press/hold/release ”sequence a
second time, and, depending on the
brand of the garage door opener (or
other rolling code equipped device),
repeat this sequence a third time to
complete the programming process. HomeLink should now activate your
rolling code equipped device.
NOTE
To program the remaining two HomeLink
buttons, begin with
“Programming ”― step 2.
Do not repeat step 1.
For questions or comments, please contact
HomeLink at www.homelink.com or1-
800-355-3515.
q Gate operator/Canadian
Programming
Canadian radio-frequency laws require
transmitter signals to “time-out ”(or quit)
after several seconds of transmission ―
which may not be long enough for
HomeLink to pick up the signal during
programming. Similar to this Canadian
law, some U.S. gate operators are
designed to “time-out ”in the same
manner.
If you live in Canada or you are having
difficulties programming a gate operator
by using the “Programming ”procedures
(regardless of where you live), replace
“ Programming HomeLink ”step 3 with
the following:
NOTE
If programming a garage door opener or gate
operator, it is advised to unplug the device
during the “cycling ”process to prevent
possible overheating.
5-56
Driving Your Mazda
Switches and Controls
Mazda6_8X47-EA-07G_Edition1 Page184
Tuesday, May 29 2007 3:43 PM
Form No.8X47-EA-07G
Page 214 of 440

Black plate (214,1)
qOperating the Radio
Seek tuning
button Scan button
Channel preset buttons Manual tuning dial
Band selector buttons
Auto memory
button/Electric
serial number
button
Satellite button
Radio ON
Press a band selector button (
,)
to turn the radio on.
Band selection
Choose AM by pressing the AM button
(
) and FM by pressing the FM1/2
button ().
The selected mode will be indicated. If
FM stereo is being received, “ST ”will be
displayed.
NOTE
If the FM broadcast signal becomes weak,
reception automatically changes from
STEREO to MONO for reduced noise, and the
“ ST ”indicator will go out.
Tuning
The radio has the following tuning
methods: Manual, Seek, Scan, Preset
channel, and Auto memory tuning. The
easiest way to tune stations is to set them
on preset channels.
NOTE
If the power supply is interrupted (fuse blows
or the battery is disconnected), the preset
channels will be canceled.
Manual tuning
Turning the manual tuning dial will
change the frequency higher or lower.
Seek tuning
Pressing the seek tuning button (
,)
will cause the tuner to seek a higher or
lower frequency automatically.
6-28
Interior Comfort
Audio System
Mazda6_8X47-EA-07G_Edition1 Page214
Tuesday, May 29 2007 3:44 PM
Form No.8X47-EA-07G
Page 222 of 440

Black plate (222,1)
qOperating the In-Dash CD Changerí
Fast-forward
button
Disc
down/Folder
down button Track down
button Track up
button
Scan
button
Channel preset buttons
CD eject button
CD slot
Load button
Reverse button
Disc up/Folder up button Random button
Repeat button CD play button
Music CD player (non-MP3 compatible)
Music CD/MP3 CD player (MP3 compatible)
Display
feed dial
There are two types of In-dash CD
changers. Check which In-dash CD
changer your vehicle is equipped with.
Type Playable data
Music CD player
(non-MP3 compatible) · Music data (CD-DA)
Music CD/MP3 CD
player
(MP3 compatible) · Music data (CD-DA)
· MP3 file
NOTEIf a disc has both music data (CD-DA) and
MP3 files, playback of the two file types differs
depending on how the disc was recorded.
Inserting the CD
The CD must be label-side up when
inserting. The auto-loading mechanism
will set the CD and begin play. There will
be a short lapse before play begins while
the player reads the digital signals on the
CD.
The disc number and the track number
will be displayed.
NOTE
The CD will begin playback automatically
after insertion.
A CD cannot be inserted while the display
reads
“WAIT ”. A beeping sound can be heard
during this waiting time. Simultaneously
pressing the power/volume dial and the load
button (
) for about 2 seconds will turn
this beeping sound ON or OFF.
6-36
Interior Comfort
íSome models.
Audio System
Mazda6_8X47-EA-07G_Edition1 Page222
Tuesday, May 29 2007 3:44 PM
Form No.8X47-EA-07G
Page 244 of 440

Black plate (244,1)
Parking in an Emergency
The hazard warning lights should always
be used when you stop on or near a
roadway in an emergency.
The hazard warning lights warn other
drivers that your vehicle is a traffic hazard
and that they must take extreme caution
when near it.
Depress the hazard warning flasher and all
the turn signals will flash.
NOTE
lThe turn signals do not work when the
hazard warning lights are on.
lCheck local regulations about the use of
hazard warning lights while the vehicle is
being towed to verify that it is not in
violation of the law.
7-2
In Case of an Emergency
Parking in an Emergency
Mazda6_8X47-EA-07G_Edition1 Page244
Tuesday, May 29 2007 3:44 PM
Form No.8X47-EA-07G
Page 251 of 440

Black plate (251,1)
NOTElMake sure the jack is well lubricated before
using it.
(With Tire Pressure Monitoring System)
lBe sure to register the tire pressure sensor
ID signal code whenever tires or wheels are
changed (page 5-29).
1. Park on a level surface off the right-of- way and firmly set the parking brake.
2. Put a vehicle with an automatic transaxle in Park (P), a manual
transaxle in Reverse (R) or 1, and turn
off the engine.
3. Turn on the hazard warning flasher.
4. Have everyone get out of the vehicle and away from the vehicle and traffic.
5. Remove the jack, tool, and spare tire (page 7-3).
6. Block the wheel diagonally opposite the flat tire. When blocking a wheel,
place a tire block both in front and
behind the tire.
NOTEWhen blocking a tire, use rocks or wood blocks
of sufficient size if possible to hold the tire in
place.
qRemoving a Flat Tire
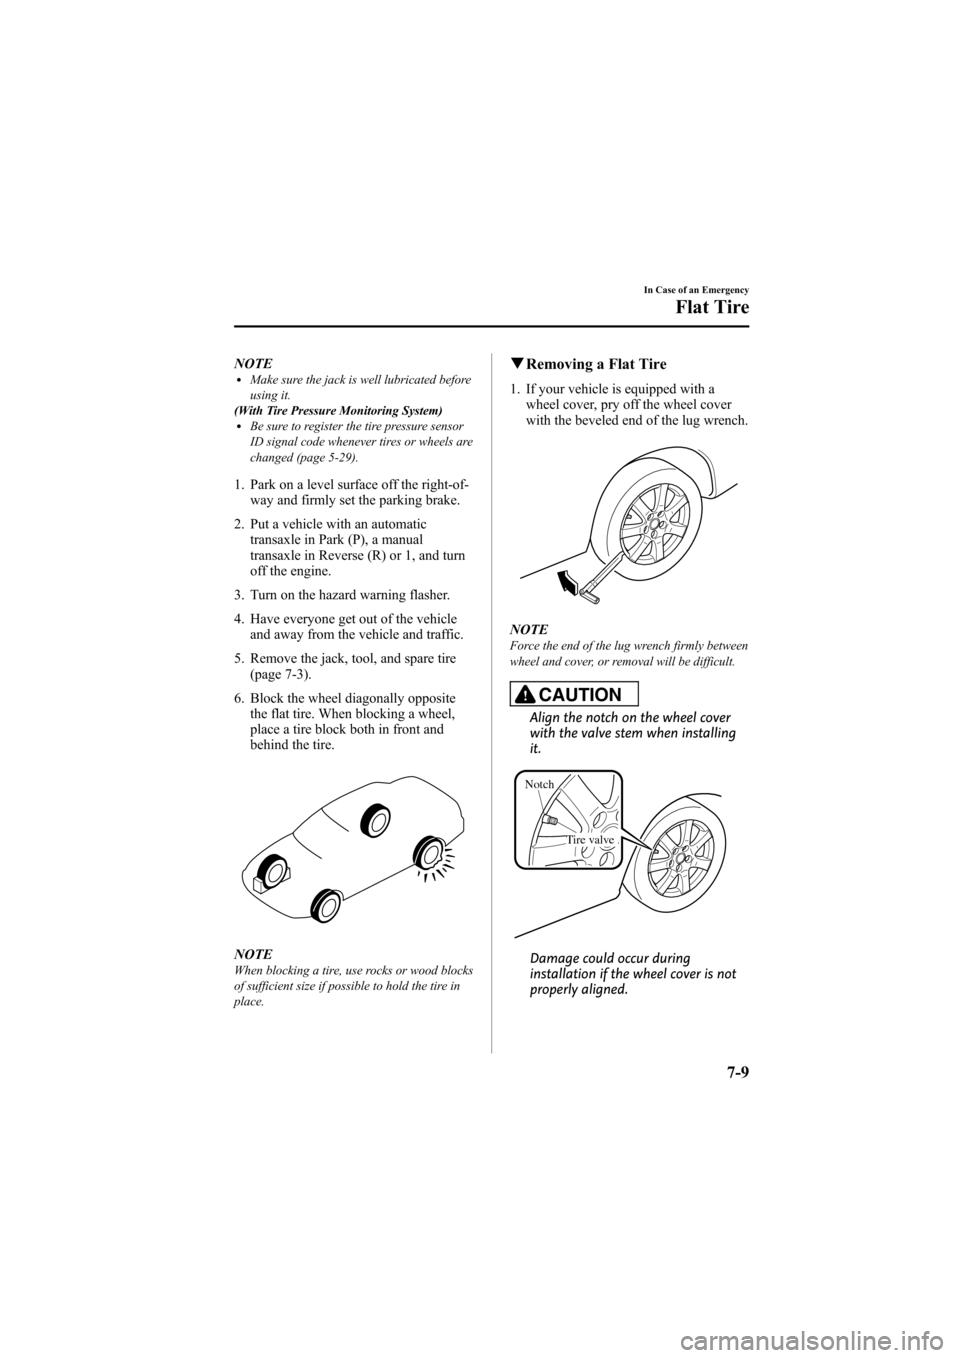
1. If your vehicle is equipped with a
wheel cover, pry off the wheel cover
with the beveled end of the lug wrench.
NOTEForce the end of the lug wrench firmly between
wheel and cover, or removal will be difficult.
CAUTION
Align the notch on the wheel cover
with the valve stem when installing
it.
Notch
Tire valve
Damage could occur during
installation if the wheel cover is not
properly aligned.
In Case of an Emergency
Flat Tire
7-9
Mazda6_8X47-EA-07G_Edition1 Page251
Tuesday, May 29 2007 3:44 PM
Form No.8X47-EA-07G
Page 302 of 440

Black plate (302,1)
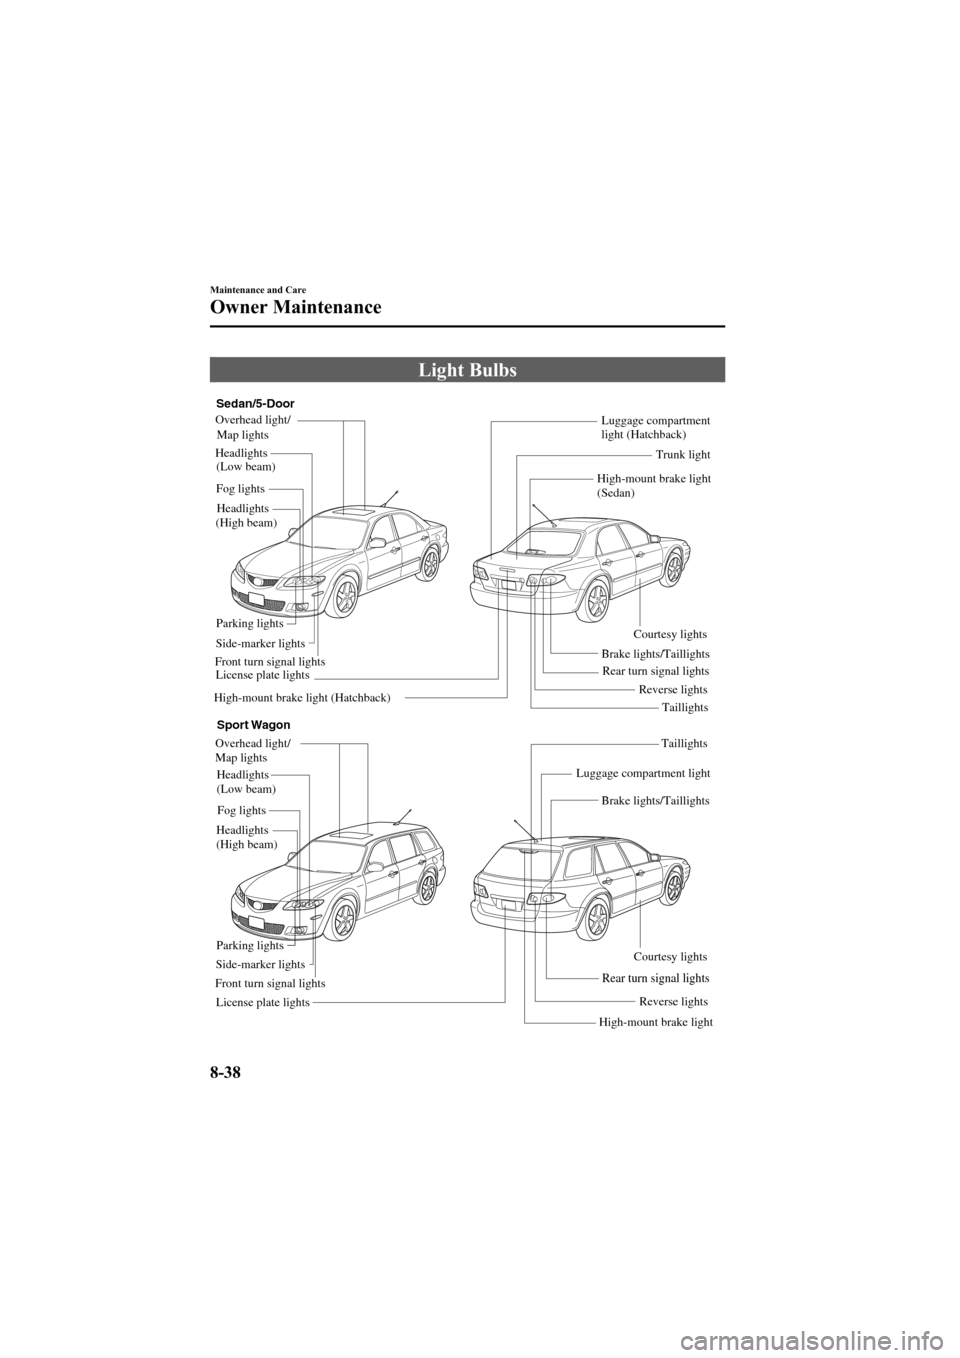
Light Bulbs
Luggage compartment
light (Hatchback)
High-mount brake light
(Sedan)
Headlights
(High beam) Headlights
(Low beam)
Overhead light/
Map lights
Luggage compartment light
Sport Wagon
Taillights
Side-marker lights License plate lights Courtesy lights
Front turn signal lights Parking lights
Reverse lights
Rear turn signal lights
Brake lights/Taillights
High-mount brake light
Fog lights
Sedan/5-Door
Taillights
Side-marker lights
License plate lights
Courtesy lights
Front turn signal lights Parking lights
Reverse lights
Rear turn signal lights
Brake lights/Taillights Trunk light
Fog lights
High-mount brake light (Hatchback) Headlights
(High beam) (Low beam)
Headlights Map lights
Overhead light/
8-38
Maintenance and Care
Owner Maintenance
Mazda6_8X47-EA-07G_Edition1 Page302
Tuesday, May 29 2007 3:45 PM
Form No.8X47-EA-07G
Page 304 of 440

Black plate (304,1)
5. Disconnect the socket and bulbassembly from the electrical connector
by pressing the tab on the connector
with your finger and pulling it.
NOTElIf the halogen bulb is accidentally touched,
it should be cleaned with rubbing alcohol
before being used.
lTo replace the bulb, contact an Authorized
Mazda Dealer.
lUse the protective cover and carton for the
replacement bulb to dispose of the old bulb
promptly and out of the reach of children.
6. Install the new socket and bulbassembly in the reverse order of
removal.
Front turn signal lights
1. Turn the socket and bulb assemblycounterclockwise and remove it. 2. Remove the bulb by pushing it in
slightly and turning it
counterclockwise.
3. Install the new bulb in the reverse orderof removal.
Side-marker lights
1. If you are changing the left side-maker
light, start the engine, turn the steering
wheel all the way to the right, and turn
off the engine. If you are changing the
right side-maker light, turn the steering
wheel to the left.
2. Turn the screws counterclockwise and remove them.
8-40
Maintenance and Care
Owner Maintenance
Mazda6_8X47-EA-07G_Edition1 Page304
Tuesday, May 29 2007 3:45 PM
Form No.8X47-EA-07G
Page 305 of 440

Black plate (305,1)
3. Turn the center section of the plasticretainers counterclockwise and remove
them, and partially peel back the
mudguard.
Removal
Installation
4. Turn the socket and bulb assemblycounterclockwise and remove it.
5. Disconnect the bulb from the socket.
6. Install the new bulb in the reverse order of removal.
Brake lights/Taillights, Rear turn signallights
(Sedan)
1. Pull the center section of the plasticretainer and remove the retainers and
partially open the trunk side trim.
Removal
Installation
2. Turn the socket and bulb assembly counterclockwise and remove it.
3. Disconnect the bulb from the socket.
Brake lights/Taillights
Maintenance and Care
Owner Maintenance
8-41
Mazda6_8X47-EA-07G_Edition1 Page305
Tuesday, May 29 2007 3:45 PM
Form No.8X47-EA-07G