dashboard MAZDA MODEL 6 2008 Owners Manual (in English)
[x] Cancel search | Manufacturer: MAZDA, Model Year: 2008, Model line: MODEL 6, Model: MAZDA MODEL 6 2008Pages: 440, PDF Size: 6.49 MB
Page 7 of 440
Black plate (7,1)
1Your Vehicle at a Glance
Interior, exterior views and part identification of your Mazda.
Dashboard and Interior Overview .............................................. 1-2
Exterior Overview ......................................................................... 1-4
1-1
Mazda6_8X47-EA-07G_Edition1 Page7
Tuesday, May 29 2007 3:42 PM
Form No.8X47-EA-07G
Page 8 of 440
Black plate (8,1)
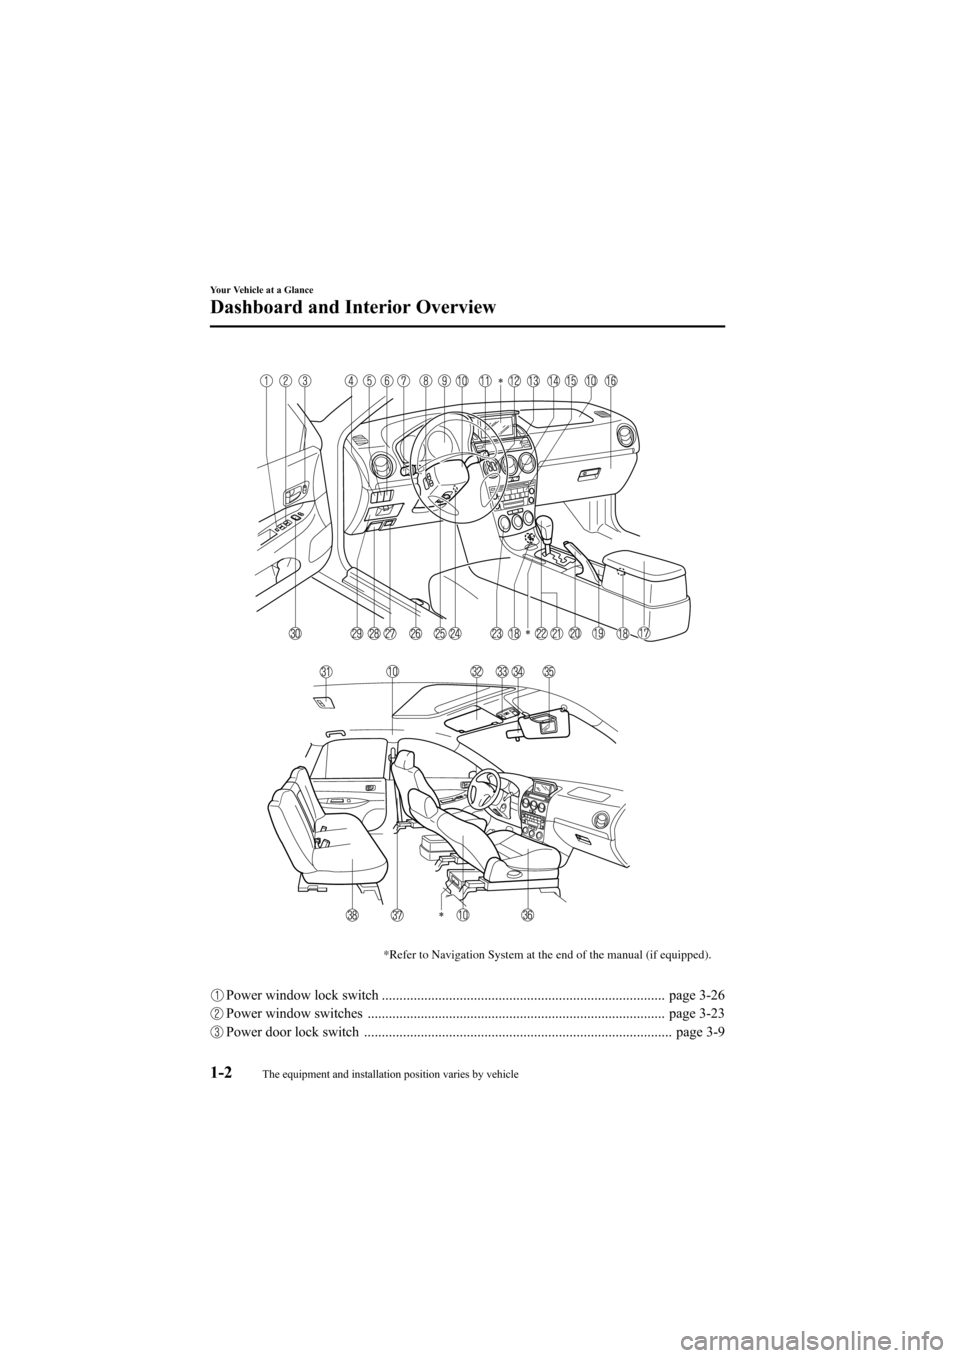
*Refer to Navigation System at the end of the manual (if equipped).
Power window lock switch ................................................................................ page 3-26
Power window switches .................................................................................... page 3-23
Power door lock switch ....................................................................................... page 3-9
1-2
Your Vehicle at a Glance
The equipment and installation position varies by vehicle
Dashboard and Interior Overview
Mazda6_8X47-EA-07G_Edition1 Page8
Tuesday, May 29 2007 3:42 PM
Form No.8X47-EA-07G
Page 9 of 440
Black plate (9,1)
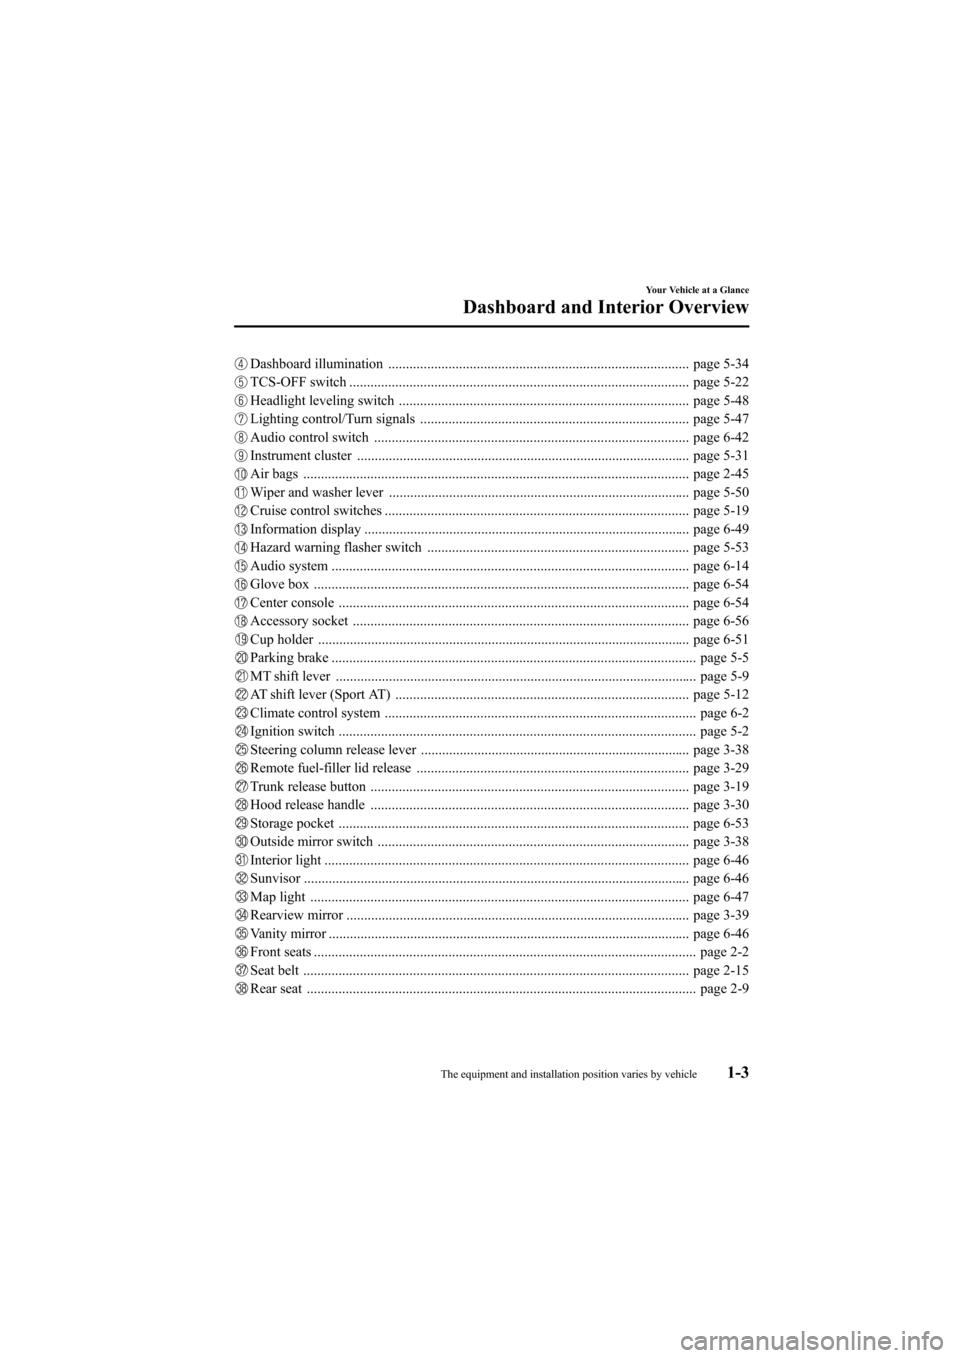
Dashboard illumination ..................................................................................... page 5-34
TCS-OFF switch ................................................................................................ page 5-22
Headlight leveling switch .................................................................................. page 5-48
Lighting control/Turn signals ............................................................................ page 5-47
Audio control switch ......................................................................................... page 6-42
Instrument cluster .............................................................................................. page 5-31
Air bags ............................................................................................................. page 2-45
Wiper and washer lever ..................................................................................... page 5-50
Cruise control switches ...................................................................................... page 5-19
Information display ............................................................................................ page 6-49
Hazard warning flasher switch .......................................................................... page 5-53
Audio system ..................................................................................................... page 6-14
Glove box .......................................................................................................... page 6-54
Center console ................................................................................................... page 6-54
Accessory socket ............................................................................................... page 6-56
Cup holder ......................................................................................................... page 6-51
Parking brake ....................................................................................................... page 5-5
MT shift lever ...................................................................................................... page 5-9
AT shift lever (Sport AT) ................................................................................... page 5-12
Climate control system ........................................................................................ page 6-2
Ignition switch ..................................................................................................... page 5-2
Steering column release lever ............................................................................ page 3-38
Remote fuel-filler lid release ............................................................................. page 3-29
Trunk release button .......................................................................................... page 3-19
Hood release handle .......................................................................................... page 3-30
Storage pocket ................................................................................................... page 6-53
Outside mirror switch ........................................................................................ page 3-38
Interior light ....................................................................................................... page 6-46
Sunvisor ............................................................................................................. page 6-46
Map light ........................................................................................................... page 6-47
Rearview mirror ................................................................................................. page 3-39
Vanity mirror ...................................................................................................... page 6-46
Front seats ............................................................................................................ page 2-2
Seat belt ............................................................................................................. page 2-15
Rear seat .............................................................................................................. page 2-9
Your Vehicle at a Glance
Dashboard and Interior Overview
1-3The equipment and installation position varies by vehicle
Mazda6_8X47-EA-07G_Edition1 Page9
Tuesday, May 29 2007 3:42 PM
Form No.8X47-EA-07G
Page 59 of 440

Black plate (59,1)
Supplemental Restraint Systems (SRS) Precautions
The front and side supplemental restraint systems (SRS) include up to 6 air bags.Please
verify which kinds of air bags are equipped on your vehicle by locating the “SRS
AIRBAG ”location indicators. These indicators are visible in the area where the air bags
are installed.
The air bags are installed in the following locations:
lThe steering wheel hub (driver air bag)lThe front passenger dashboard (front passenger air bag)lThe outboard sides of the front seatbacks (side air bags)lThe front and rear window pillars, and the roof edge along both sides (curtain air bags)
These systems operate independently depending on the type of accident encountered; if
you have side and curtain air bags, the side and curtain air bags are not likely to deploy on
both sides in the same accident because a vehicle is not often hit from both sides. The side
and curtain air bags and the frontal air bag system will not normally deploy during the
same type of accident unless a combination of frontal and side impacts occur.
The air bag supplemental restraint systems are designed to provide supplemental protection
only in the front seats in certain situations and the rear outside passenger positions only in
same-side collisions, so seat belts are always important in the following ways:
Without seat belt usage, the air bags cannot provide adequate protection during an accident.
Seat belt usage is necessary to:
lKeep the occupant from being thrown into an inflating air bag.lReduce the possibility of injuries during an accident that is not designed for air bag
inflation, such as roll-over or rear impact.
lReduce the possibility of injuries in frontal or side collisions that are not severe enough
to activate the air bags.
lReduce the possibility of being thrown from your vehicle.lReduce the possibility of injuries to lower body and legs during an accident because the
air bags provide no protection to these parts of the body.
lHold the driver in a position which allows better control of the vehicle.
Small children must be protected by a child-restraint system as stipulated by law in every
state and province. In certain states and provinces, larger children must use a child-restraint
system (page 2-29).
Carefully consider which child-restraint system is necessary for your child and follow the
installation directions in this Owner's Manual as well as the child-restraint system
manufacturer's instructions.
Essential Safety Equipment
SRS Air Bags
2-45
Mazda6_8X47-EA-07G_Edition1 Page59
Tuesday, May 29 2007 3:43 PM
Form No.8X47-EA-07G
Page 63 of 440

Black plate (63,1)
Supplemental Restraint System Components
The supplemental restraint systems (SRS) have two basic subsystems:lThe air bag system with inflators and air bags.lThe electrical system with crash sensors and diagnostic module.
The air bags are mounted in the following locations:
lThe steering wheel hublThe front passenger dashboardlThe outboard sides of the front seatbackslThe front and rear window pillars, and the roof edge along both sides
The air bags are out of sight until activated.
Essential Safety Equipment
SRS Air Bags
2-49
Mazda6_8X47-EA-07G_Edition1 Page63
Tuesday, May 29 2007 3:43 PM
Form No.8X47-EA-07G
Page 75 of 440
Black plate (75,1)
WARNING
Do not operate a vehicle with damaged
air bag/seat belt pretensioner system
components:Expended or damaged air bag/seat
belt pretensioner system components
must be replaced after any collision
which caused them to deploy or
damage them. Only a trained
Authorized Mazda Dealer can fully
evaluate these systems to see that
they will work in any subsequent
accident. Driving with an expended
or damaged air bag or pretensioner
unit will not afford you the necessary
protection in the event of any
subsequent accident which could
result in serious injury or death.
Do not remove interior air bag parts: Removing any components such as
the front seats, front dashboard, the
steering wheel or parts on the front
and rear window pillars and along
the roof edge, containing air bag
parts or sensors is dangerous. These
parts contain essential air bag
components. The air bag could
accidentally activate and cause
serious injuries. Always have an
Authorized Mazda Dealer remove
these parts.
Dispose of the air bag properly: Improper disposal of an air bag or a
vehicle with live air bags in it can be
extremely dangerous. Unless all
safety procedures are followed, injury
can result. Ask an Authorized Mazda
Dealer how to safely dispose of an air
bag or how to scrap an air bag
equipped vehicle. NOTEIf it becomes necessary to have the components
or wiring system for the supplementary
restraint system modified to accommodate a
person with certain medical conditions in
accordance with a certified physician, contact
an Authorized Mazda Dealer, refer to
“
Customer Assistance (U.S.A.) ”(page 9-2).
Essential Safety Equipment
SRS Air Bags
2-61
Mazda6_8X47-EA-07G_Edition1 Page75
Tuesday, May 29 2007 3:43 PM
Form No.8X47-EA-07G
Page 79 of 440
Black plate (79,1)
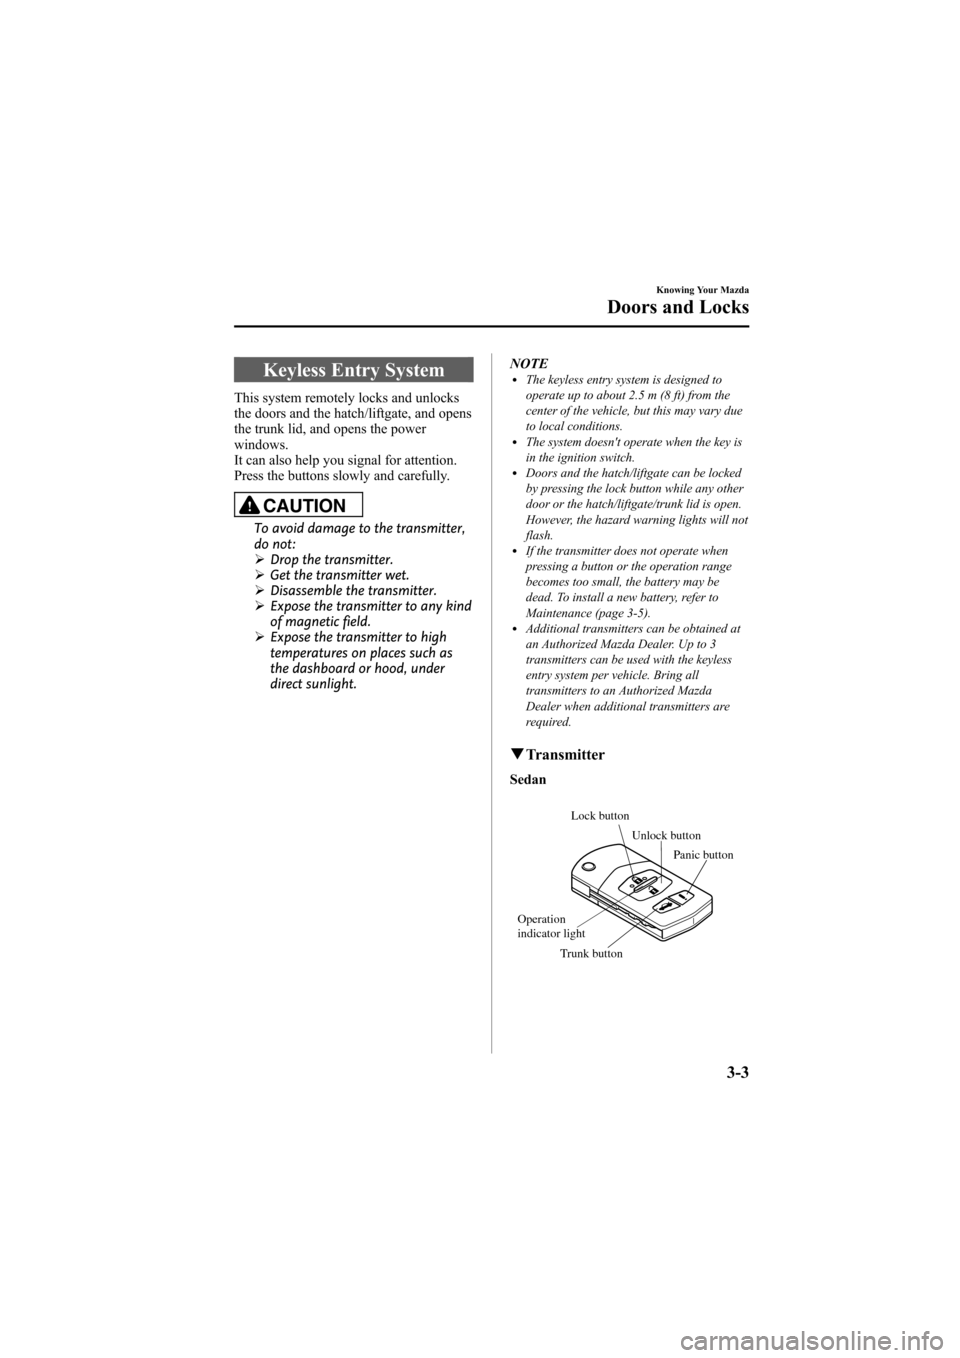
Keyless Entry System
This system remotely locks and unlocks
the doors and the hatch/liftgate, and opens
the trunk lid, and opens the power
windows.
It can also help you signal for attention.
Press the buttons slowly and carefully.
CAUTION
To avoid damage to the transmitter,
do not:
ØDrop the transmitter.
Ø Get the transmitter wet.
Ø Disassemble the transmitter.
Ø Expose the transmitter to any kind
of magnetic field.
Ø Expose the transmitter to high
temperatures on places such as
the dashboard or hood, under
direct sunlight. NOTE
lThe keyless entry system is designed to
operate up to about 2.5 m (8 ft) from the
center of the vehicle, but this may vary due
to local conditions.
lThe system doesn't operate when the key is
in the ignition switch.
lDoors and the hatch/liftgate can be locked
by pressing the lock button while any other
door or the hatch/liftgate/trunk lid is open.
However, the hazard warning lights will not
flash.
lIf the transmitter does not operate when
pressing a button or the operation range
becomes too small, the battery may be
dead. To install a new battery, refer to
Maintenance (page 3-5).
lAdditional transmitters can be obtained at
an Authorized Mazda Dealer. Up to 3
transmitters can be used with the keyless
entry system per vehicle. Bring all
transmitters to an Authorized Mazda
Dealer when additional transmitters are
required.
q
Transmitter
Sedan
Lock button
Unlock button
Trunk button Panic button
Operation
indicator light
Knowing Your Mazda
Doors and Locks
3-3
Mazda6_8X47-EA-07G_Edition1 Page79
Tuesday, May 29 2007 3:43 PM
Form No.8X47-EA-07G
Page 109 of 440

Black plate (109,1)
Immobilizer System
The immobilizer system allows the engine
to start only with a key the system
recognizes.
If someone attempts to start the engine
with an unrecognized key, the engine will
not start, thereby helping to prevent the
theft of your vehicle.
CAUTION
ØRadio equipment like this is
governed by laws in the United
States.
Changes or modifications not
expressly approved by the party
responsible for compliance could
void the user's authority to
operate the equipment.
Ø To avoid damage to the key, do
not:
ØDrop the key.ØGet the key wet.ØExpose the key to any kind of
magnetic field.
ØExpose the key to high
temperatures on places such as
the dashboard or hood, under
direct sunlight.
CAUTION
When starting the engine do not
allow the following, as the engine
may not start due to the electronic
signal from the ignition key not being
transmitted correctly.
ØA key ring rests on the key grip.
ØMetal parts of other keys or metal
objects touch the key grip.
ØSpare keys or keys for other
vehicles equipped with an
immobilizer system touch or come
near the key grip.
ØDevices for electronic purchases, or
security passage touch or come
near the key.
Knowing Your Mazda
Security System
3-33
Mazda6_8X47-EA-07G_Edition1 Page109
Tuesday, May 29 2007 3:43 PM
Form No.8X47-EA-07G
Page 159 of 440
Black plate (159,1)
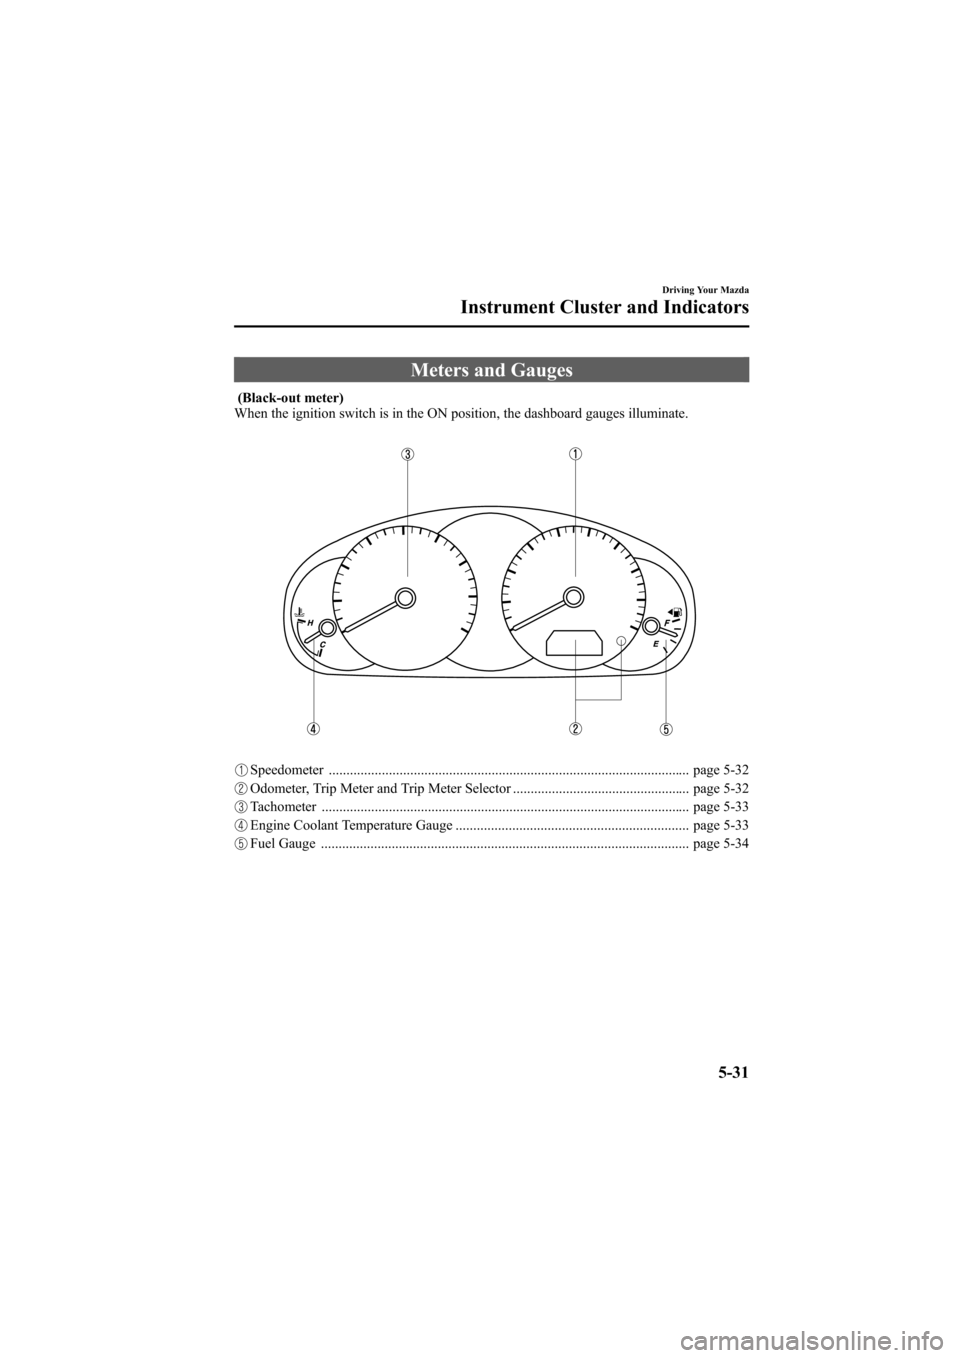
Meters and Gauges
(Black-out meter)
When the ignition switch is in the ON position, the dashboard gauges illuminate.
Speedometer ...................................................................................................... page 5-32
Odometer, Trip Meter and Trip Meter Selector .................................................. page 5-32
Tachometer ........................................................................................................ page 5-33
Engine Coolant Temperature Gauge .................................................................. page 5-33
Fuel Gauge ........................................................................................................ page 5-34
Driving Your Mazda
Instrument Cluster and Indicators
5-31
Mazda6_8X47-EA-07G_Edition1 Page159
Tuesday, May 29 2007 3:43 PM
Form No.8X47-EA-07G
Page 162 of 440
Black plate (162,1)
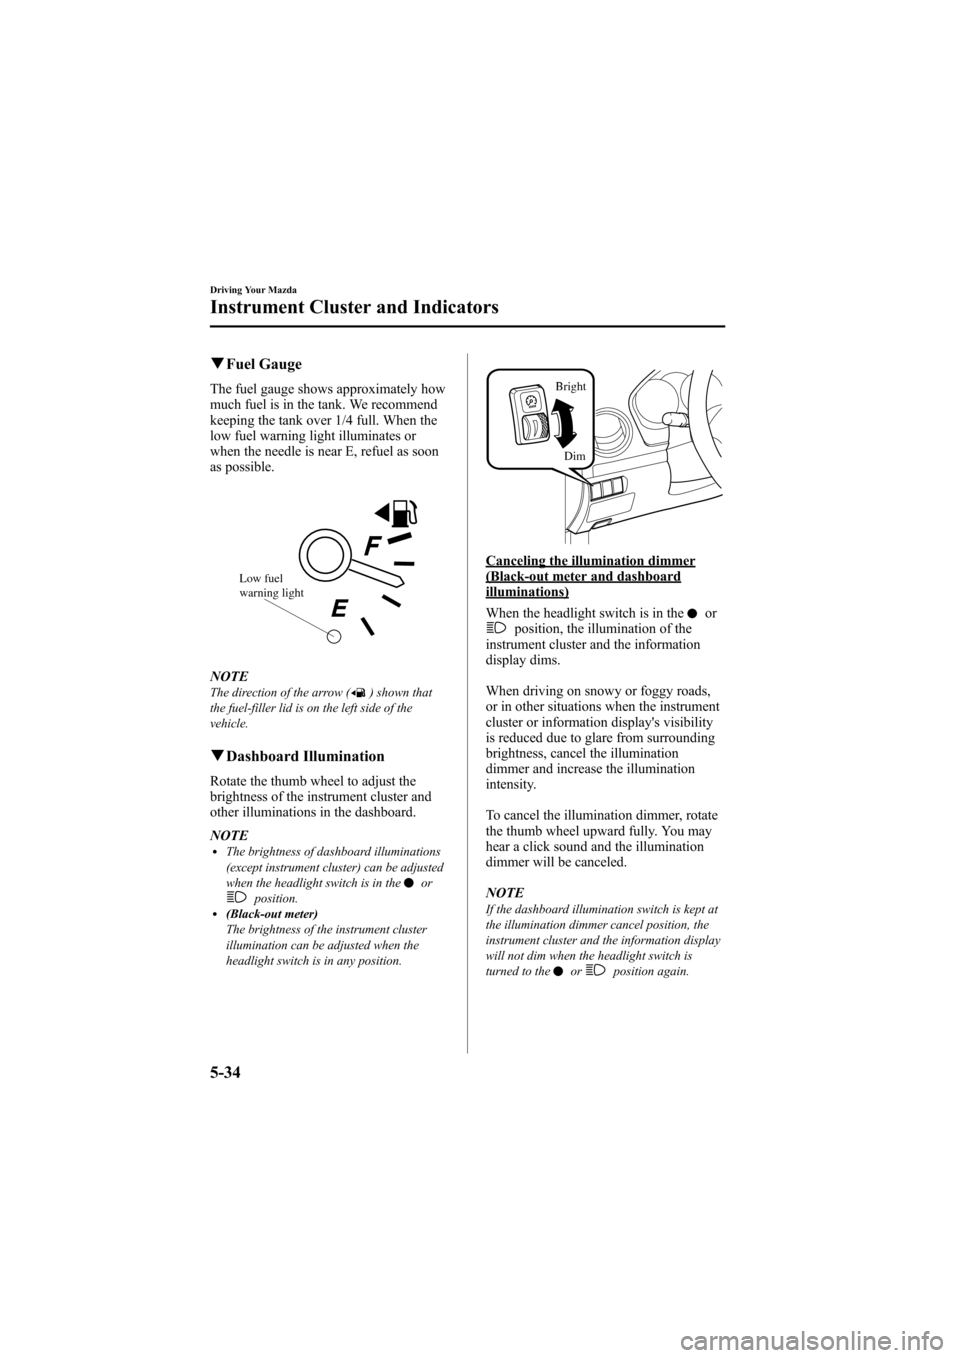
qFuel Gauge
The fuel gauge shows approximately how
much fuel is in the tank. We recommend
keeping the tank over 1/4 full. When the
low fuel warning light illuminates or
when the needle is near E, refuel as soon
as possible.
Low fuel
warning light
NOTEThe direction of the arrow () shown that
the fuel-filler lid is on the left side of the
vehicle.
q Dashboard Illumination
Rotate the thumb wheel to adjust the
brightness of the instrument cluster and
other illuminations in the dashboard.
NOTE
lThe brightness of dashboard illuminations
(except instrument cluster) can be adjusted
when the headlight switch is in the
orposition.l(Black-out meter)
The brightness of the instrument cluster
illumination can be adjusted when the
headlight switch is in any position.
Dim
Bright
Canceling the illumination dimmer(Black-out meter and dashboardilluminations)
When the headlight switch is in the
orposition, the illumination of the
instrument cluster and the information
display dims.
When driving on snowy or foggy roads,
or in other situations when the instrument
cluster or information display's visibility
is reduced due to glare from surrounding
brightness, cancel the illumination
dimmer and increase the illumination
intensity.
To cancel the illumination dimmer, rotate
the thumb wheel upward fully. You may
hear a click sound and the illumination
dimmer will be canceled.
NOTE
If the dashboard illumination switch is kept at
the illumination dimmer cancel position, the
instrument cluster and the information display
will not dim when the headlight switch is
turned to the
orposition again.
5-34
Driving Your Mazda
Instrument Cluster and Indicators
Mazda6_8X47-EA-07G_Edition1 Page162
Tuesday, May 29 2007 3:43 PM
Form No.8X47-EA-07G