Reverse MAZDA MODEL 6 2009 (in English) User Guide
[x] Cancel search | Manufacturer: MAZDA, Model Year: 2009, Model line: MODEL 6, Model: MAZDA MODEL 6 2009Pages: 464, PDF Size: 4.61 MB
Page 329 of 464

Black plate (329,1)
WARNING
Do not install the temporary spare tire
on the front wheels (driving wheels):Driving with the temporary spare tire
on one of the front driving wheels is
dangerous. Handling will be affected.
You could lose control of the vehicle,
especially on ice or snow bound
roads, and have an accident. Move a
regular tire to the front wheel and
install the temporary spare tire to the
rear.
CAUTION
ØWhen using the temporary spare
tire, driving stability may decrease
compared to when using only the
conventional tire. Drive carefully.
Ø To avoid damage to the temporary
spare tire or to the vehicle, observe
the following precautions:
ØDo not exceed 80 km/h (50
mph).
ØAvoid driving over obstacles.
Also, do not drive through an
automatic car wash. This tire's
diameter is smaller than a
conventional tire, so the ground
clearance is reduced about
7 mm (0.3 in).
ØDo not use tire chains on any
type of tire, including the spare
tire.
ØDo not use your temporary
spare tire on any other vehicle,
it has been designed only for
your Mazda.
ØUse only one temporary spare
tire on your vehicle at the same
time.
To remove the spare tire
1. Remove the trunk mat, and if a trunk
board is equipped remove it also.
2. Turn the tire hold-down boltcounterclockwise.
To secure the spare tire
Perform the removal procedure in reverse.
In Case of an Emergency
Flat Tire
7-5
Mazda6_8Z64-EA-08H_Edition1 Page329
Wednesday, June 25 2008 10:5 AM
Form No.8Z64-EA-08H
Page 330 of 464
Black plate (330,1)
Changing a Flat Tire
NOTEIf the following occurs while driving, it could
indicate a flat tire.
lSteering becomes difficult.lThe vehicle begins to vibrate excessively.lThe vehicle pulls in one direction.
If you have a flat tire, drive slowly to a
level spot that is well off the road and out
of the way of traffic to change the tire.
Stopping in traffic or on the shoulder of a
busy road is dangerous.
WARNING
Be sure to follow the directions for
changing a tire, and never get under a
vehicle that is supported only by a jack:Changing a tire is dangerous if not
done properly. The vehicle can slip off
the jack and seriously injure
someone. If getting under the vehicle
becomes necessary use vehicle
support stands.
Never allow anyone inside a vehicle
supported by a jack: Allowing someone to remain in a
vehicle supported by a jack is
dangerous. The occupant could cause
the vehicle to fall resulting in serious
injury.
NOTE
Make sure the jack is well lubricated before
using it.
1. Park on a level surface off the right-of- way and firmly set the parking brake.
2. Put a vehicle with an automatic transaxle in Park (P), a manual
transaxle in Reverse (R) or 1, and turn
off the engine. 3. Turn on the hazard warning flasher.
4. Have everyone get out of the vehicle
and away from the vehicle and traffic.
5. Remove the jack, tool, and spare tire (page 7-3).
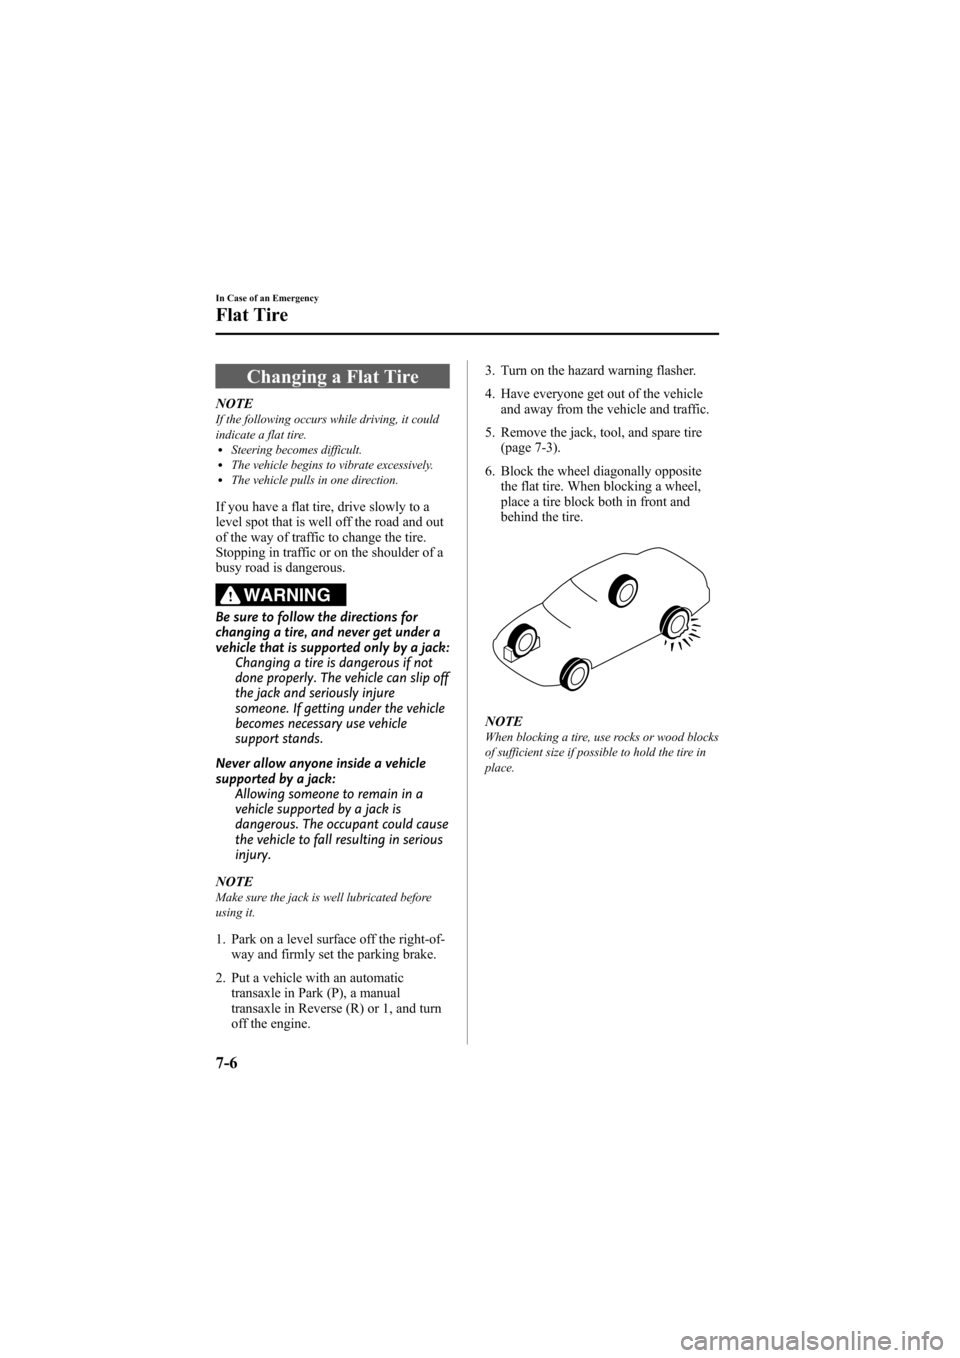
6. Block the wheel diagonally opposite the flat tire. When blocking a wheel,
place a tire block both in front and
behind the tire.
NOTEWhen blocking a tire, use rocks or wood blocks
of sufficient size if possible to hold the tire in
place.
7-6
In Case of an Emergency
Flat Tire
Mazda6_8Z64-EA-08H_Edition1 Page330
Wednesday, June 25 2008 10:5 AM
Form No.8Z64-EA-08H
Page 339 of 464
Black plate (339,1)
Keep all flames, including cigarettes, and sparks away from open battery cells:
Flames and sparks near open battery cells are dangerous. Hydrogen gas, produced
during normal battery operation, could ignite and cause the battery to explode. An
exploding battery can cause serious burns and injuries.
Do not jump-start a frozen battery or one with a low fluid level: Jump-starting a frozen battery or one with a low fluid level is dangerous. It may
rupture or explode, causing serious injury.
Connect the negative cable to a good ground point away from the battery: Connecting the end of the second jumper cable to the negative (
) terminal of the
discharged battery is dangerous.
A spark could cause the gas around the battery to explode and injure someone.
Route the jumper cables away from parts that will be moving: Connecting a jumper cable near or to moving parts (cooling fans, belts) is dangerous.
The cable could get caught when the engine starts and cause serious injury.
CAUTION
Use only a 12 V booster system. You can damage a 12 V starter, ignition system, and
other electrical parts beyond repair with a 24 V power supply (two 12 V batteries in
series or a 24 V motor generator set).
Discharged batteryDischarged battery
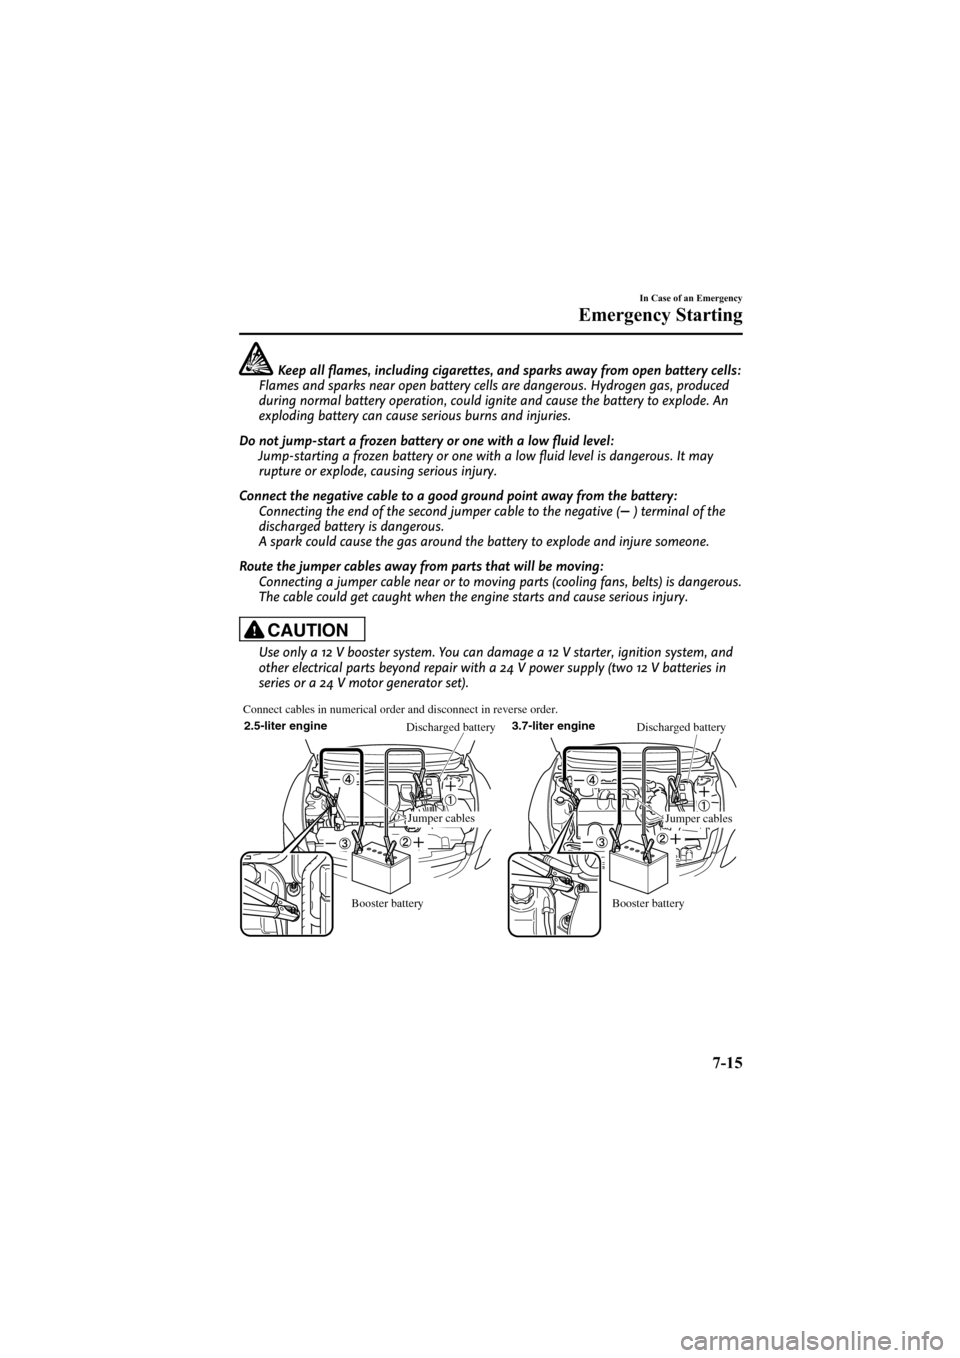
Connect cables in numerical order and disconnect in reverse order.
Booster battery
Booster battery
Jumper cablesJumper cables
2.5-liter engine3.7-liter engine
In Case of an Emergency
Emergency Starting
7-15
Mazda6_8Z64-EA-08H_Edition1 Page339
Wednesday, June 25 2008 10:5 AM
Form No.8Z64-EA-08H
Page 340 of 464
Black plate (340,1)
1. Make sure the booster battery is 12 Vand that its negative terminal is
grounded.
2. If the booster battery is in another vehicle, don't allow both vehicles to
touch. Turn off the engine of the
vehicle with the booster battery and all
unnecessary electrical loads in both
vehicles.
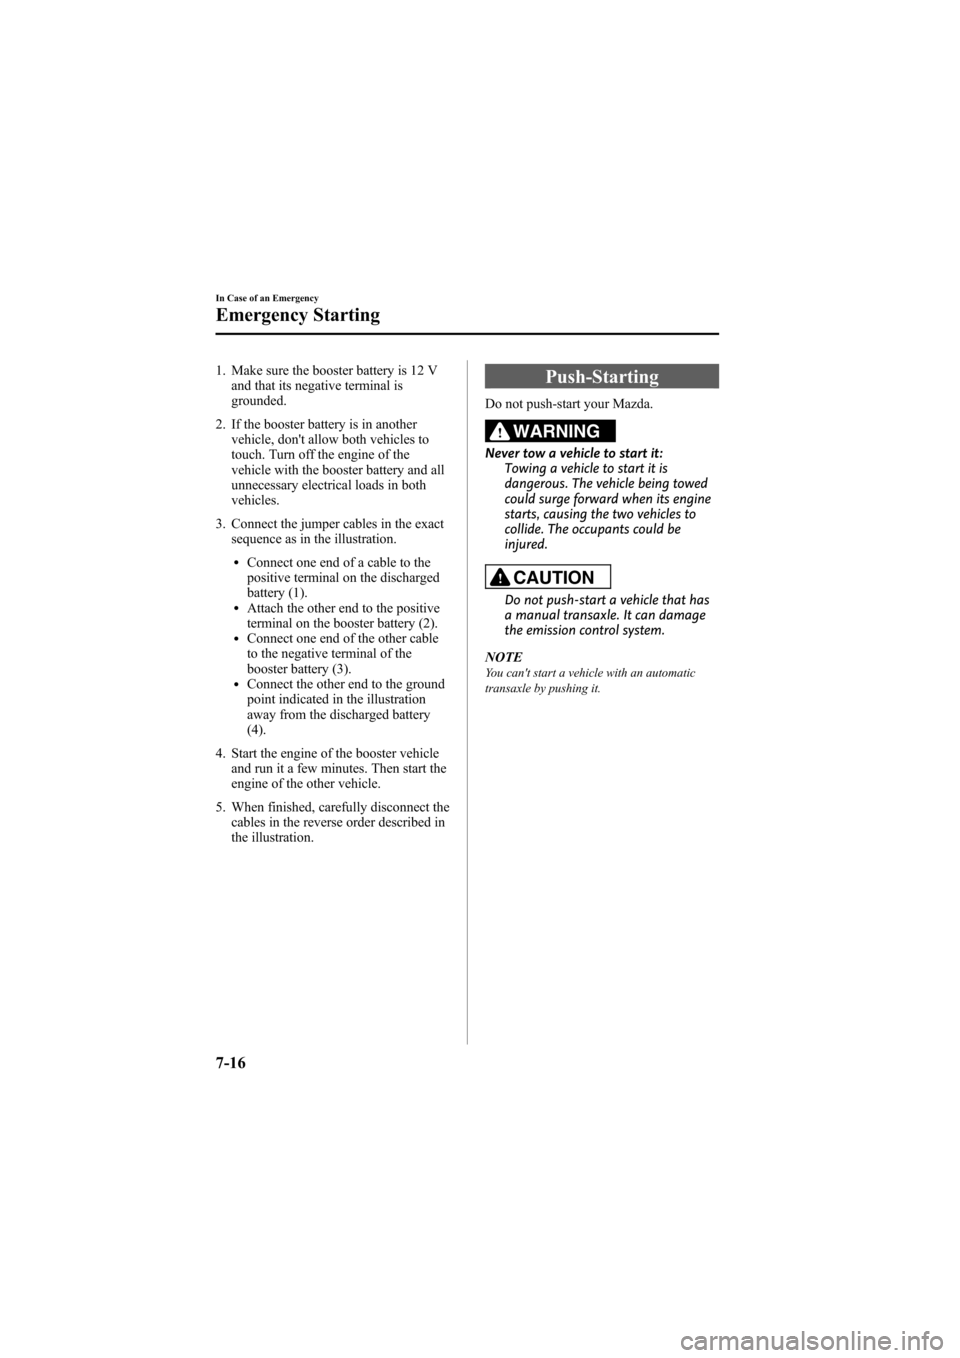
3. Connect the jumper cables in the exact sequence as in the illustration.
lConnect one end of a cable to the
positive terminal on the discharged
battery (1).
lAttach the other end to the positive
terminal on the booster battery (2).
lConnect one end of the other cable
to the negative terminal of the
booster battery (3).
lConnect the other end to the ground
point indicated in the illustration
away from the discharged battery
(4).
4. Start the engine of the booster vehicle and run it a few minutes. Then start the
engine of the other vehicle.
5. When finished, carefully disconnect the cables in the reverse order described in
the illustration.
Push-Starting
Do not push-start your Mazda.
WARNING
Never tow a vehicle to start it:
Towing a vehicle to start it is
dangerous. The vehicle being towed
could surge forward when its engine
starts, causing the two vehicles to
collide. The occupants could be
injured.
CAUTION
Do not push-start a vehicle that has
a manual transaxle. It can damage
the emission control system.
NOTE
You can't start a vehicle with an automatic
transaxle by pushing it.
7-16
In Case of an Emergency
Emergency Starting
Mazda6_8Z64-EA-08H_Edition1 Page340
Wednesday, June 25 2008 10:5 AM
Form No.8Z64-EA-08H
Page 372 of 464

Black plate (372,1)
CAUTION
ØDon't bend or discard the
stiffeners. You need to use them
again.
Ø If the metal stiffeners are
switched, the blade's wiping
efficiency could be reduced.
So don't use the driver's side metal
stiffeners on the passenger's side,
or vice versa.
Ø Be sure to reinstall the metal
stiffeners in the new blade rubber
so that the curve is the same as it
was in the old blade rubber.
6. Carefully insert the new blade rubber. Then install the blade assembly in the
reverse order of removal.
8-30
Maintenance and Care
Owner Maintenance
Mazda6_8Z64-EA-08H_Edition1 Page372
Wednesday, June 25 2008 10:5 AM
Form No.8Z64-EA-08H
Page 379 of 464
Black plate (379,1)
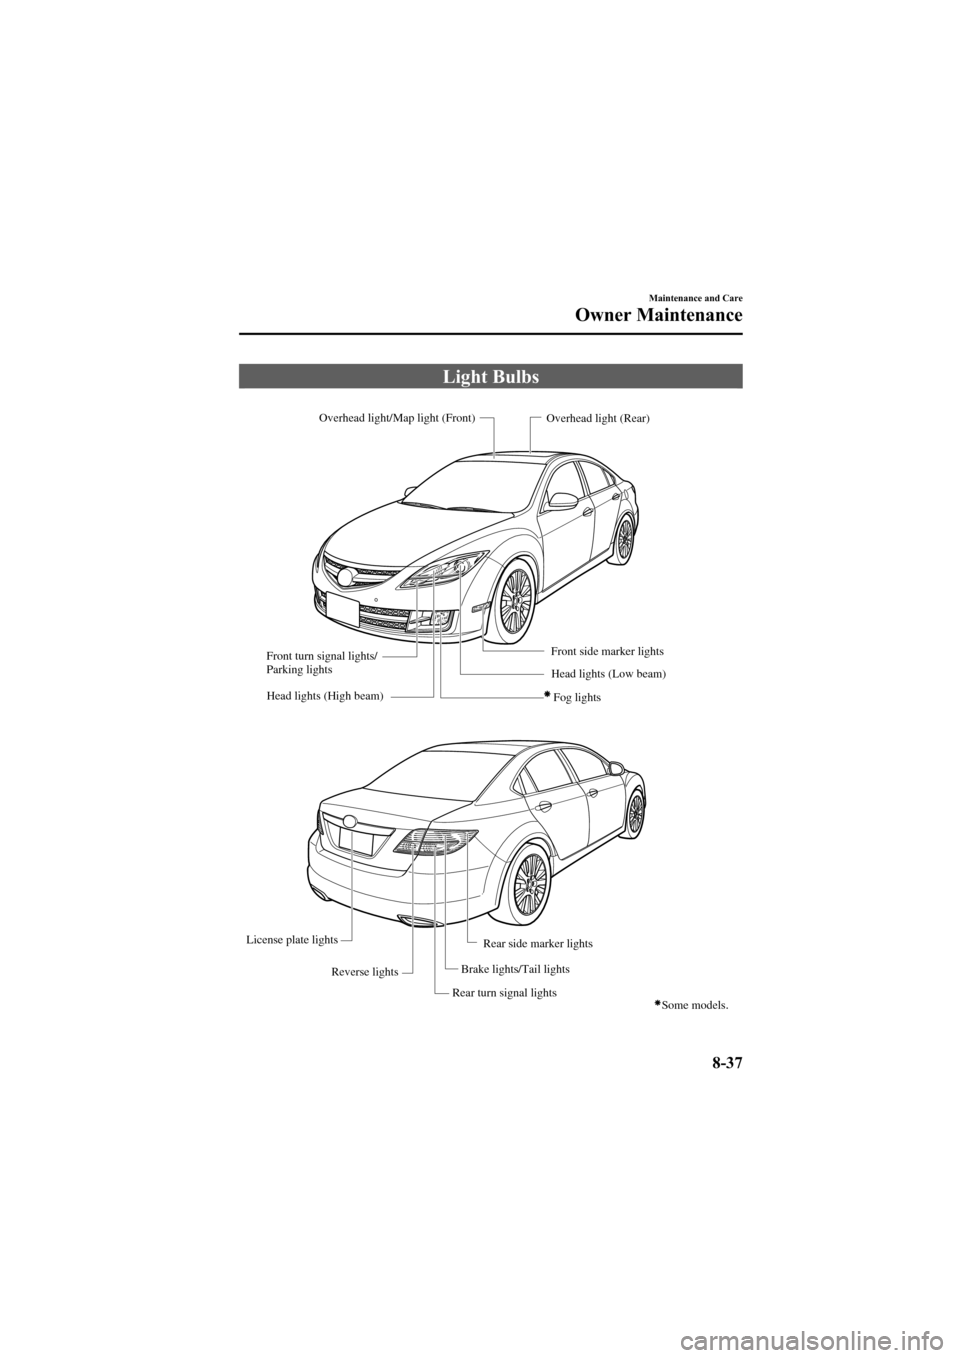
Light Bulbs
Overhead light/Map light (Front)
Head lights (High beam) Fog lights
Head lights (Low beam)
Front turn signal lights/
Parking lights
Rear turn signal lightsOverhead light (Rear)
Brake lights/Tail lights
License plate lights
Reverse lights
Some models.
Front side marker lights
Rear side marker lights
Maintenance and Care
Owner Maintenance
8-37
Mazda6_8Z64-EA-08H_Edition1 Page379
Wednesday, June 25 2008 10:5 AM
Form No.8Z64-EA-08H
Page 381 of 464

Black plate (381,1)
5. Install the new bulb in the reverse orderof removal.
6. Install the coolant reservoir. If you are unsure of how tight the bolts should be,
have them inspected at an Authorized
Mazda Dealer.
NOTE
lTo replace the bulb, contact an Authorized
Mazda Dealer.
lIf the halogen bulb is accidentally touched,
it should be cleaned with rubbing alcohol
before being used.
lUse the protective cover and carton for the
replacement bulb to dispose of the old bulb
promptly and out of the reach of children.
Low-beam bulb
(Xenon fusion bulb)
You cannot replace the low beam bulbs by
yourself.
The bulbs must be replaced at an
Authorized Mazda Dealer.
(Halogen bulbs)
1. Make sure the ignition switch is turned off and the headlight switch is off.
2. If you are changing the right headlight bulb, start the engine, turn the steering
wheel all the way to the left, and turn
off engine. If you are changing the left
headlight bulb, turn the steering wheel
to the right. 3. Turn the center section of the plastic
retainers counterclockwise and remove
them, then partially peel back
mudguard.
Removal
Installation
4. Turn the cover counterclockwise andremove it.
Maintenance and Care
Owner Maintenance
8-39
Mazda6_8Z64-EA-08H_Edition1 Page381
Wednesday, June 25 2008 10:5 AM
Form No.8Z64-EA-08H
Page 382 of 464

Black plate (382,1)
5. Detach the electrical connector fromthe bulb by pulling it to the rear.
6. Unhook the bulb retaining spring.
7. Swing the retaining spring out and
away to free the headlight bulb.
8. Carefully remove the headlight bulb from the socket by pulling it straight
back. 9. Remove the adapter.
10. Replace the bulb.
11. Install the new bulb in the reverse
order of removal.
NOTE
lTo replace the bulb, contact an Authorized
Mazda Dealer.
lIf the halogen bulb is accidentally touched,
it should be cleaned with rubbing alcohol
before being used.
lUse the protective cover and carton for the
replacement bulb to dispose of the old bulb
promptly and out of the reach of children.
8-40
Maintenance and Care
Owner Maintenance
Mazda6_8Z64-EA-08H_Edition1 Page382
Wednesday, June 25 2008 10:5 AM
Form No.8Z64-EA-08H
Page 383 of 464

Black plate (383,1)
Fog light bulbsí
1. Turn the bolt, the screws and the centersection of the plastic retainers
counterclockwise and remove them,
then partially peel back the mudguard.
Bolt
2. Disconnect the electrical connectorfrom the bulb by pressing the tab on
the connector with your finger and
pulling the connector downward.
3. Turn the socket and bulb assembly toremove it. Carefully remove the bulb
from its socket in the reflector by
gently pulling it straight backward out
of the socket.
4. Install the new bulb in the reverse order
of removal.
NOTE
lTo replace the bulb, contact an Authorized
Mazda Dealer.
lIf the halogen bulb is accidentally touched,
it should be cleaned with rubbing alcohol
before being used.
lUse the protective cover and carton for the
replacement bulb to dispose of the old bulb
promptly and out of the reach of children.
Front side marker lights
1. If you are changing the left side-maker light, start the engine, turn the steering
wheel all the way to the right, and turn
off the engine. If you are changing the
right side-maker light, turn the steering
wheel to the left.
2. Turn the screws counterclockwise and remove them.
Maintenance and Care
Owner Maintenance
8-41íSome models.
Mazda6_8Z64-EA-08H_Edition1 Page383
Wednesday, June 25 2008 10:5 AM
Form No.8Z64-EA-08H
Page 384 of 464
Black plate (384,1)
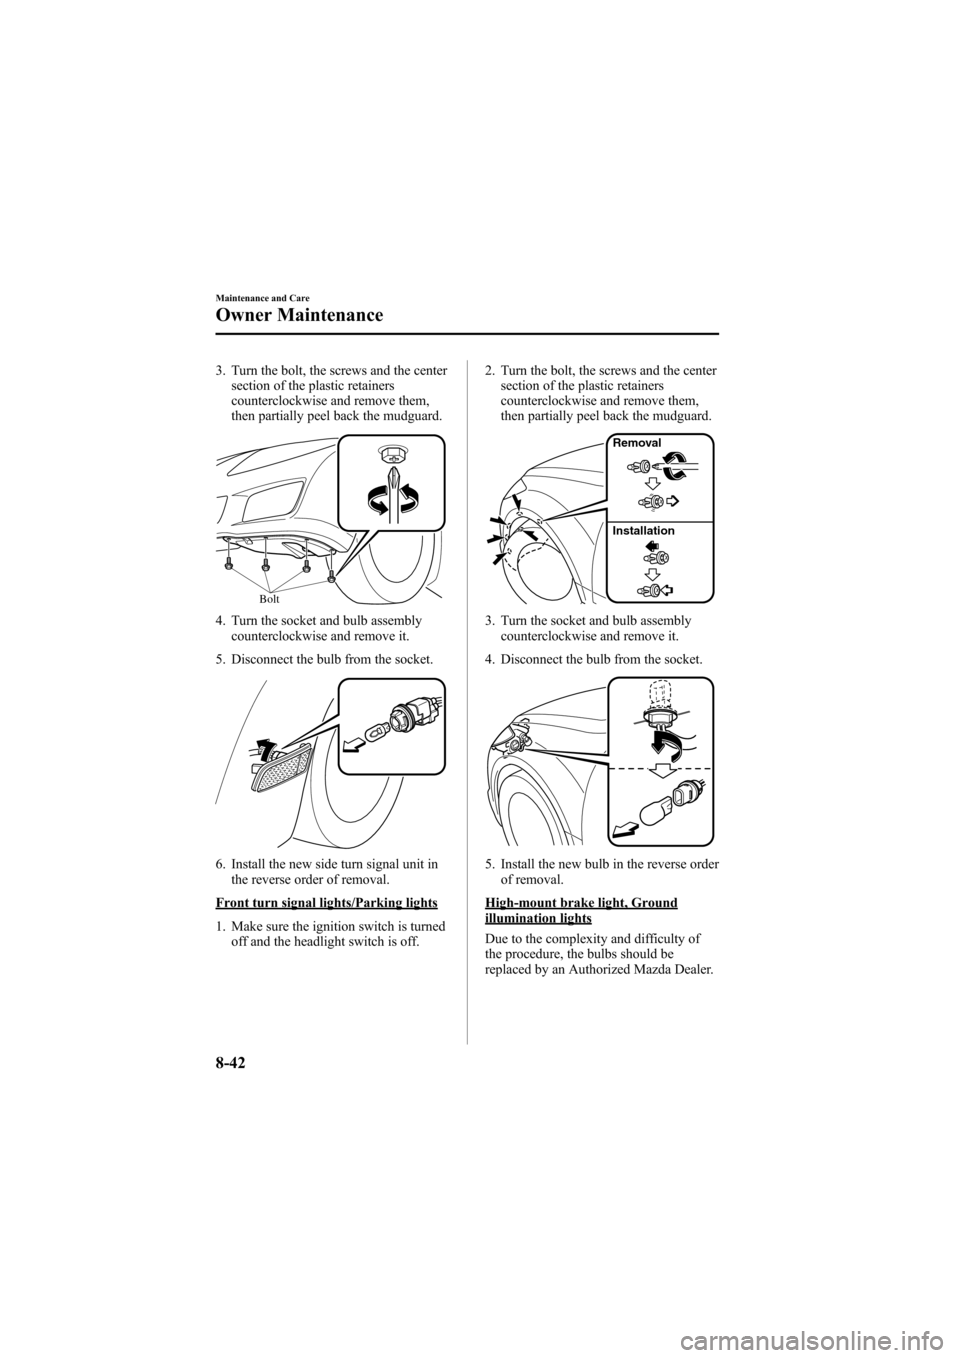
3. Turn the bolt, the screws and the centersection of the plastic retainers
counterclockwise and remove them,
then partially peel back the mudguard.
Bolt
4. Turn the socket and bulb assemblycounterclockwise and remove it.
5. Disconnect the bulb from the socket.
6. Install the new side turn signal unit in the reverse order of removal.
Front turn signal lights/Parking lights
1. Make sure the ignition switch is turnedoff and the headlight switch is off. 2. Turn the bolt, the screws and the center
section of the plastic retainers
counterclockwise and remove them,
then partially peel back the mudguard.
Removal
Installation
3. Turn the socket and bulb assemblycounterclockwise and remove it.
4. Disconnect the bulb from the socket.
5. Install the new bulb in the reverse order of removal.
High-mount brake light, Groundillumination lights
Due to the complexity and difficulty of
the procedure, the bulbs should be
replaced by an Authorized Mazda Dealer.
8-42
Maintenance and Care
Owner Maintenance
Mazda6_8Z64-EA-08H_Edition1 Page384
Wednesday, June 25 2008 10:5 AM
Form No.8Z64-EA-08H