MAZDA MODEL 6 2009 Smart Start Guide (in English)
Manufacturer: MAZDA, Model Year: 2009, Model line: MODEL 6, Model: MAZDA MODEL 6 2009Pages: 26, PDF Size: 4.83 MB
Page 1 of 26
2009 m{ZD{ 6
SM{RT ST{RT GUIDE
Optional equipment shown.
189242_09c_Mazda6_SSG_112108.indd 111/21/08 3:18:35 PM
Page 2 of 26
Key
1
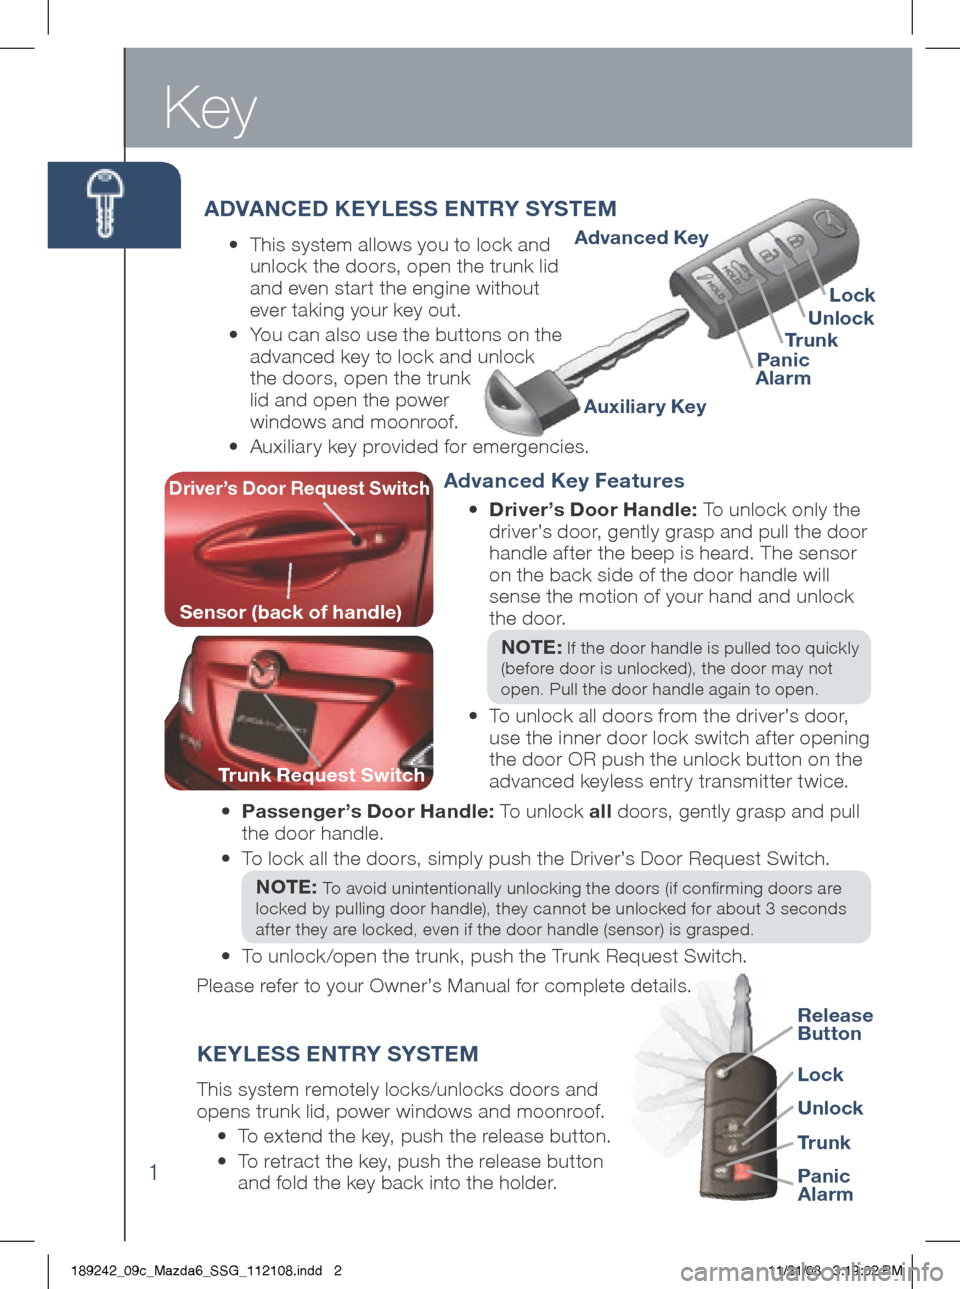
Lock
Tr u n k
Panic
Alarm Unlock
Auxiliar y Key
Advanced Key
ADVANCED KEYLESS ENTRY SYSTEM
•
This system allows you to lock and
unlock the doors, open the trunk lid
and even star t the engine without
ever taking your key out.
•
You can also use the buttons on the
advanced key to lock and unlock
the doors, open the trunk
lid and open the power
windows and moonroof.
•
Auxiliary key provided for emergencies.
Lock
Tr u n k Panic
Alarm
Unlock
Advanced Key Features
•
Driver’s Door Handle: To unlock only the
driver’s door, gently grasp and pull the door
handle after the beep is heard. The sensor
on the back side of the door handle will
sense the motion of your hand and unlock
the door.
NOTE:
If the door handle is pulled too quickly
(before door is unlocked), the door may not
open. Pull the door handle again to open.
• To unlock all doors from the driver’s door,
use the inner door lock switch af ter opening
the door OR push the unlock button on the
advanced keyless entry transmitter twice.
KEYLESS ENTRY SYSTEM
This system remotely locks/unlocks doors and
opens trunk lid, power windows and moonroof.
• To extend the key, push the release button.
• To retract the key, push the release button
and fold the key back into the holder.
Driver’s Door Request Switch
Trunk Request Switch
Sensor (back of handle)
Release
Button
•
Passenger’s Door Handle: To unlock all doors, gently grasp and pull
the door handle.
•
To lock all the doors, simply push the Driver’s Door Request Switch.
NOTE:
To avoid unintentionally unlocking the doors (if confirming doors are
locked by pulling door handle), they cannot be unlocked for about 3 seconds
after they are locked, even if the door handle (sensor) is grasped.
• To unlock /open the trunk, push the Trunk Request Switch.
Please refer to your Owner’s Manual for complete details.
189242_09c_Mazda6_SSG_112108.indd 211/21/08 3:19:02 PM
Page 3 of 26
2
Release
Button
S TART iN g THE EN giNE wi TH THE A DVANCED K EY
With the Advanced Key on you…
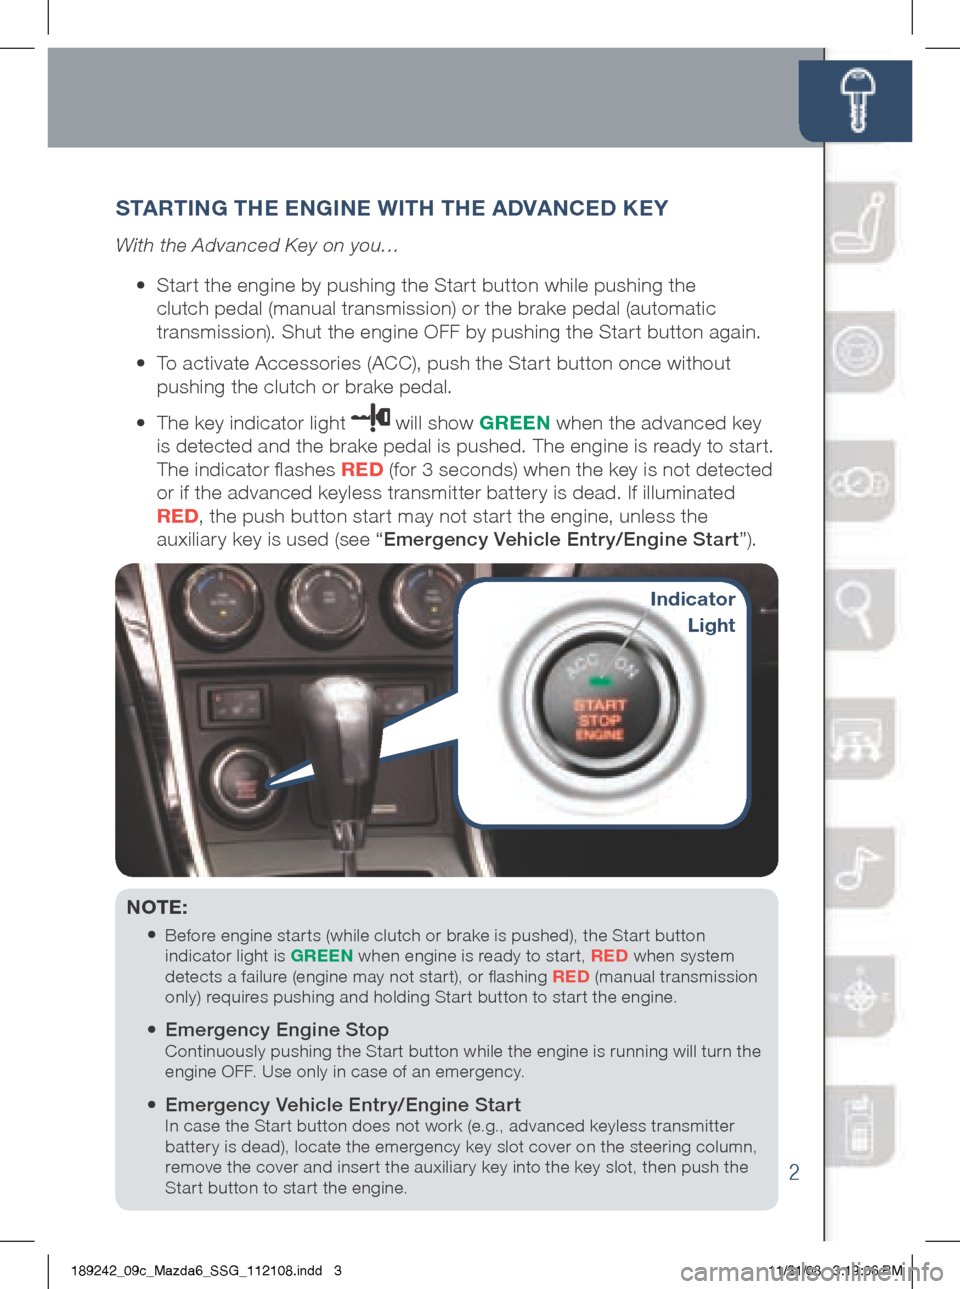
• Start the engine by pushing the Start button while pushing the
clutch pedal (manual transmission) or the brake pedal (automatic
transmission). Shut the engine OFF by pushing the Start button again.
•
To activate Accessories (ACC), push the Start button once without
pushing the clutch or brake pedal.
•
The key indicator light
will show g REEN when the advanced key
is detected and the brake pedal is pushed. The engine is ready to start.
The indicator flashes RED (for 3 seconds) when the key is not detected
or if the advanced keyless transmitter battery is dead. If illuminated
RED , the push button start may not start the engine, unless the
auxiliary key is used (see “ Emergency Vehicle Entry/Engine Start ”).
NOTE:
•
Before engine star ts (while clutch or brake is pushed), the Star t button
indicator light is g REEN when engine is ready to start, RED when system
detects a failure (engine may not start), or flashing RED (manual transmission
only) requires pushing and holding Start button to start the engine.
• Emergency Engine Stop Continuously pushing the Start button while the engine is running will turn the
engine OFF. Use only in case of an emergency.
• Emergency Vehicle Entry/Engine Start In case the Start button does not work (e.g., advanced keyless transmitter
battery is dead), locate the emergency key slot cover on the steering column,
remove the cover and insert the auxiliary key into the key slot, then push the
Start button to start the engine.
indicator
Light
189242_09c_Mazda6_SSG_112108.indd 311/21/08 3:19:06 PM
Page 4 of 26
3
Seats
ELECTRONiCALLY OPERATED DRiVER SEAT w/MEMORY
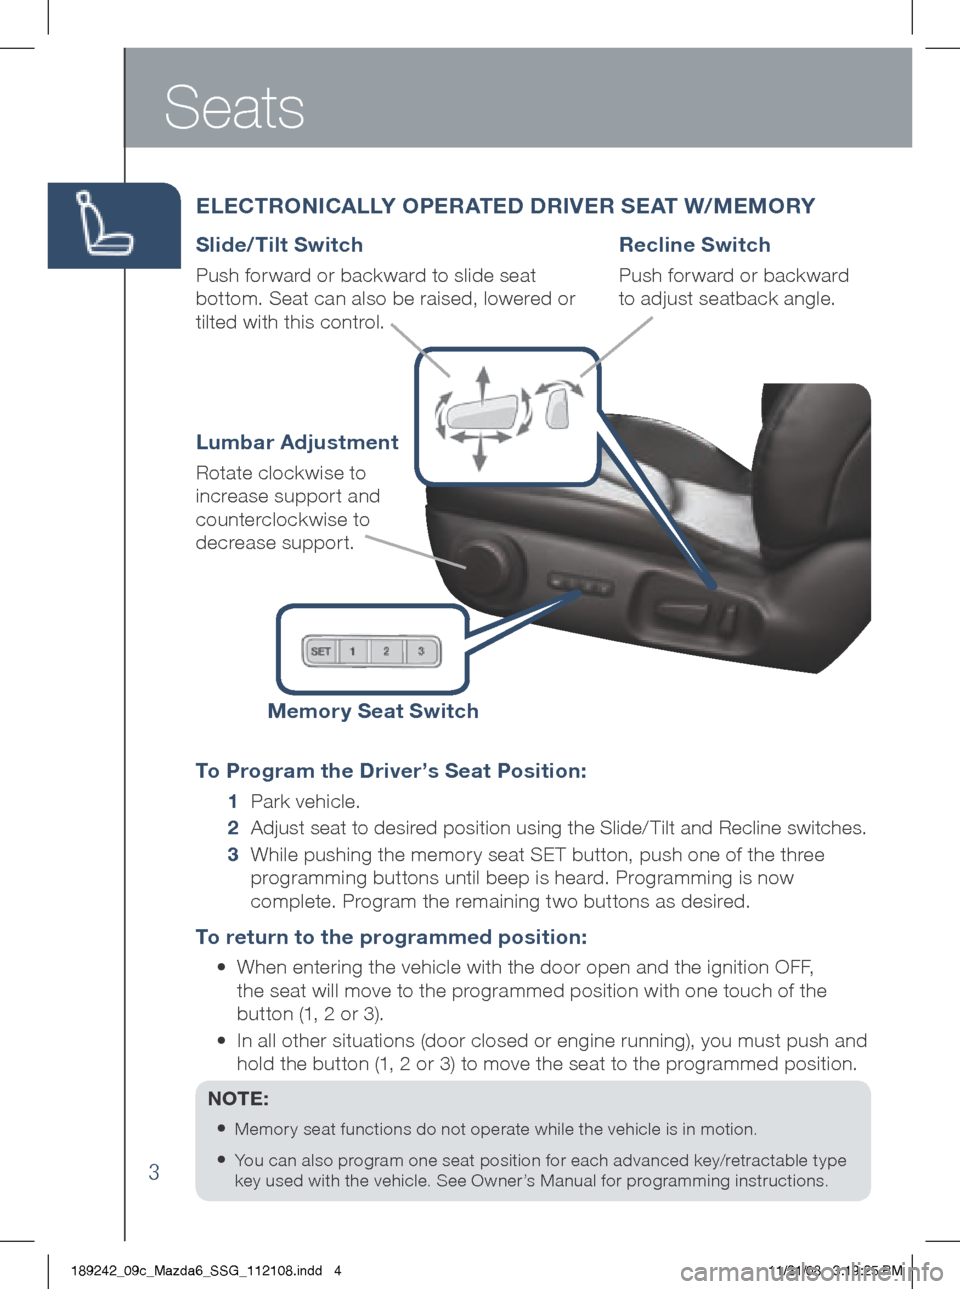
Slide/Tilt Switch
Push forward or backward to slide seat
bottom. Seat can also be raised, lowered or
tilted with this control.
To Program the Driver’s Seat Position:
1 Park vehicle.
2
Adjust seat to desired position using the Slide/ Tilt and Recline switches.
3
While pushing the memory seat SET button, push one of the three
programming buttons until beep is heard. Programming is now
complete. Program the remaining two buttons as desired.
To return to the programmed position:
•
When entering the vehicle with the door open and the ignition OFF,
the seat will move to the programmed position with one touch of the
button (1, 2 or 3).
•
In all other situations (door closed or engine running), you must push and
hold the button (1, 2 or 3) to move the seat to the programmed position.
NOTE:
•
Memory seat functions do not operate while the vehicle is in motion.
• You can also program one seat position for each advanced key/retractable type
key used with the vehicle. See Owner’s Manual for programming instructions.
Lumbar Adjustment
Rotate clockwise to
increase support and
counterclockwise to
decrease support.
Recline Switch
Push forward or backward
to adjust seatback angle.
Memory Seat Switch
189242_09c_Mazda6_SSG_112108.indd 411/21/08 3:19:25 PM
Page 5 of 26
4
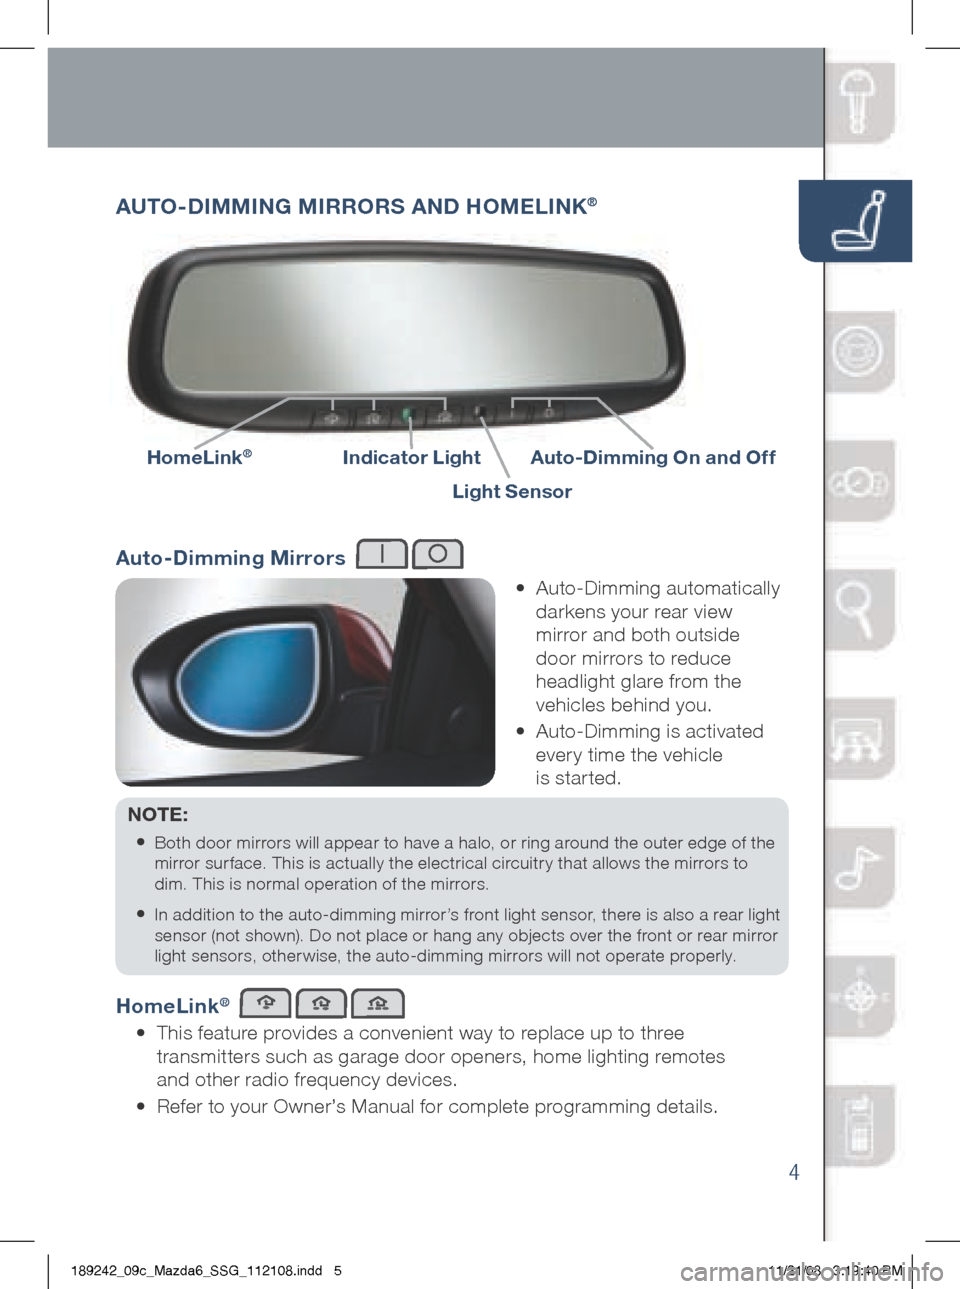
AUTO -DiMMi Ng Mi RROR S AND HOME LiNK®
•
Auto-Dimming automatically
darkens your rear view
mirror and both outside
door mirrors to reduce
headlight glare from the
vehicles behind you.
•
Auto-Dimming is activated
every time the vehicle
is started.
NOTE:
•
Both door mirrors will appear to have a halo, or ring around the outer edge of the
mirror surface. This is actually the electrical circuitry that allows the mirrors to
dim. This is normal operation of the mirrors.
• In addition to the auto-dimming mirror’s front light sensor, there is also a rear light
sensor (not shown). Do not place or hang any objects over the front or rear mirror
light sensors, otherwise, the auto-dimming mirrors will not operate properly.
HomeLink®
•
This feature provides a convenient way to replace up to three
transmitters such as garage door openers, home lighting remotes
and other radio frequency devices.
• Refer to your Owner’s Manual for complete programming details.
i ndicator LightAuto-Dimming On and Off
HomeLink®
Light Sensor
Auto-Dimming Mirrors
189242_09c_Mazda6_SSG_112108.indd 511/21/08 3:19:40 PM
Page 6 of 26
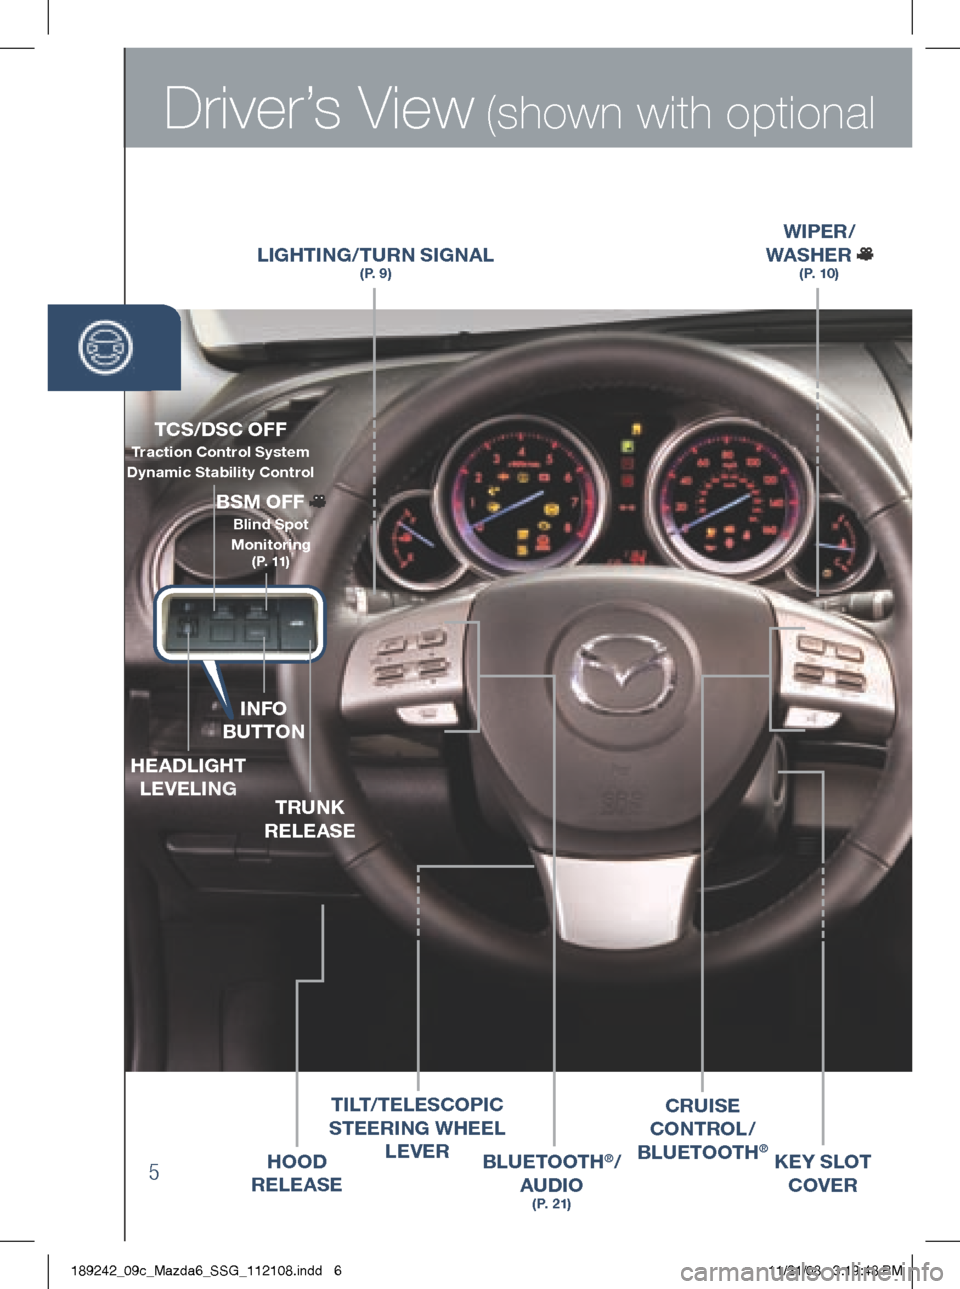
Driver’s View (shown with optional
5
LigHTiNg/T URN S ig NAL(P. 9)
wi PER /
wASHER
(P. 10)
BLUETOOTH®/
AUDi O
(P. 21)
CRU iSE
CONTROL /
B LUETOOTH
®HOOD
RELEASE
TCS/DSC OFF Traction Control System
Dynamic Stabilit y Control
i NFO
BUTTON
HEADLig HT
LEVELi Ng
TRUNK
RELEASE
BSM OFF
Blind Spot
Monitoring
(P. 11)
Ti LT /TELESCOP iC
STEER iN g w HEEL
LEVER
KEY SLOT
COVER
189242_09c_Mazda6_SSG_112108.indd 611/21/08 3:19:48 PM
Page 7 of 26
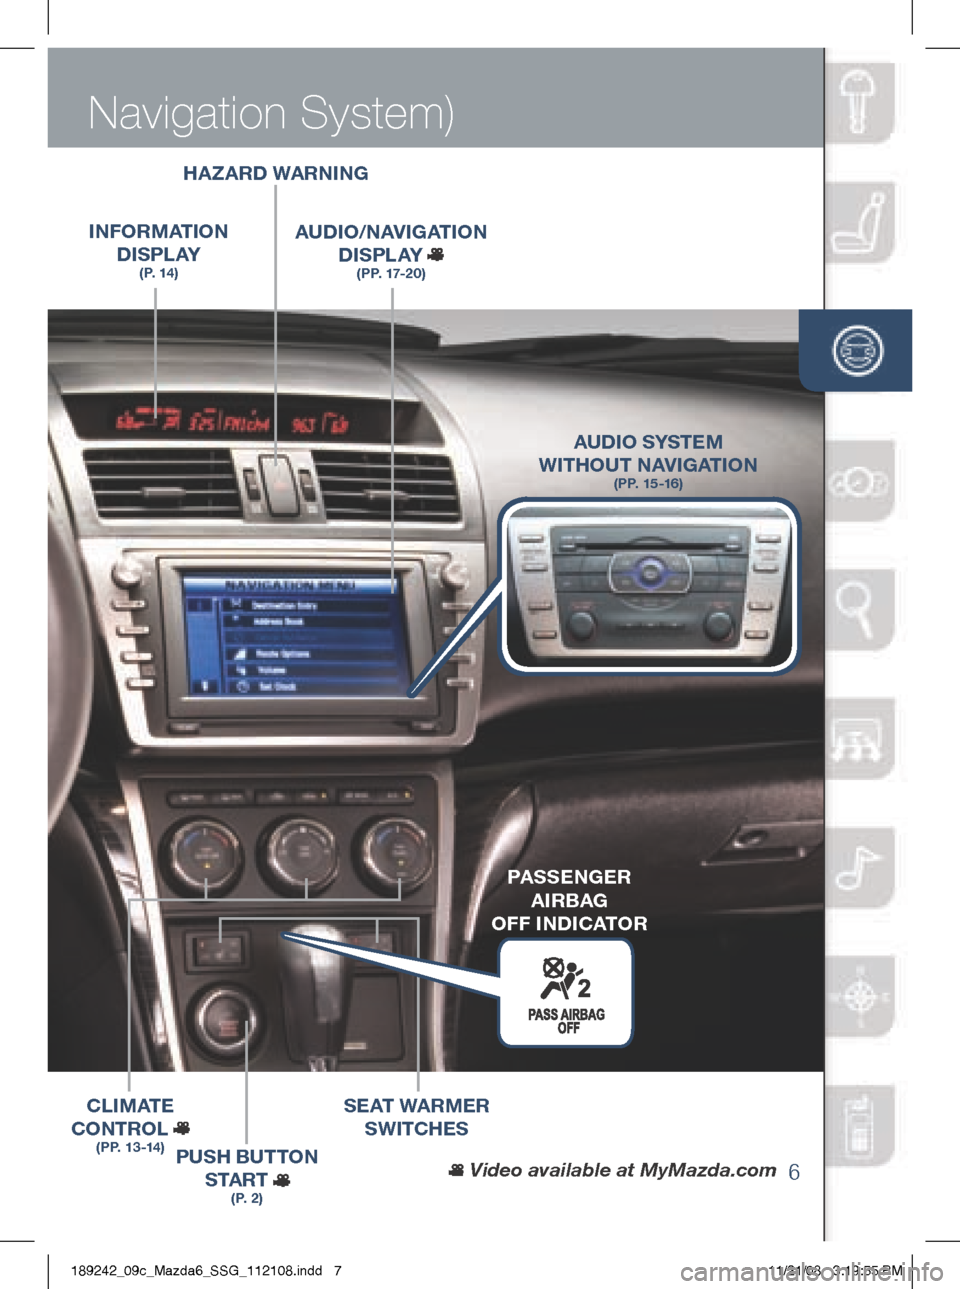
Driver’s View (shown with optional
6
Navigation System)
wiPER /
wASHER
(P. 10)
HAzARD wARN iNg
iNFORMAT iON
D iS P L AY
(P. 14)
AUD iO /NAV igAT iON
D iS P L AY
(PP. 17-20)
PUSH BUTTON
S TA R T
(P. 2)
SEAT wARMER
SwiTCHE S
C L
iM AT E
CONTROL
(PP. 13-14)
Video available at MyMazda.com
AUD iO SYSTEM
wi THOUT NAV igAT iON
(PP. 15 -16)
PASSEN gER
Ai RBAg
OFF iND iCATOR
189242_09c_Mazda6_SSG_112108.indd 711/21/08 3:19:55 PM
Page 8 of 26
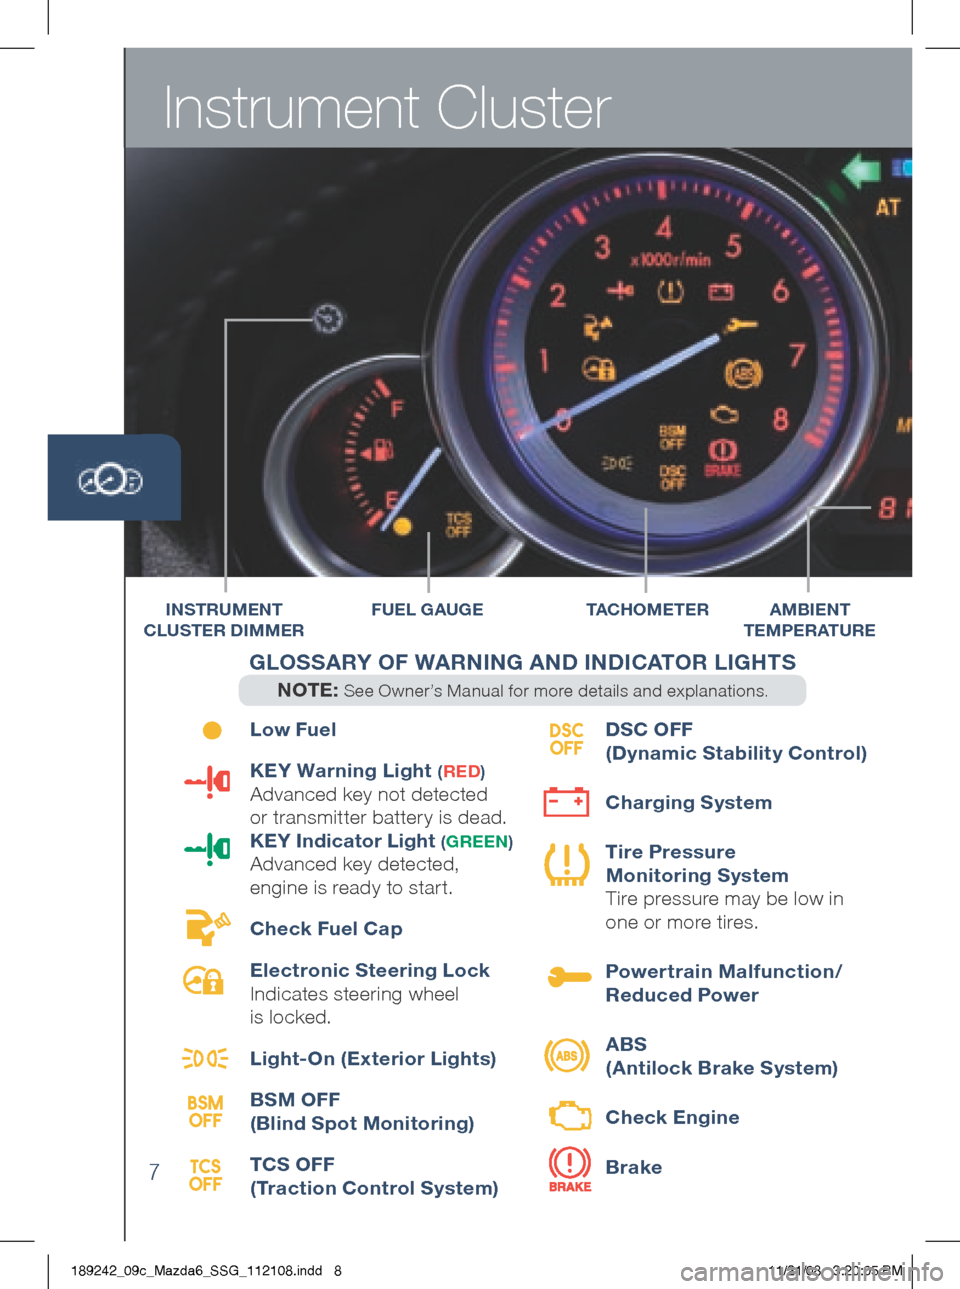
Instrument Cluster
7
Low Fuel
KEY warning Light
(RED )
Advanced key not detected
or transmitter battery is dead.
KEY i ndicator Light
(gREEN )
Advanced key detected,
engine is ready to start.
Check Fuel Cap
Electronic Steering Lock
Indicates steering wheel
is locked.
Light-On (Exterior Lights)
BSM OFF
(Blind Spot Monitoring)
TCS OFF
(Traction Control System) DSC OFF
(Dynamic Stability Control)
Charging System
Tire Pressure
Monitoring System
Tire pressure may be low in
one or more tires.
Powertrain Malfunction/
Reduced Power
ABS
(Antilock Brake System)
Check Engine
Brake
F UEL gAU gE TAC H O M E T E R
BSM
OFF
TCS
OFF DSC
OFF
iNSTR UMENT
CLUSTER D iMMERAMB iENT
TEMPERATURE
g LOSSARY OF wARN iN g AND i NDiCATOR L igHTS
NOTE: See Owner’s Manual for more details and explanations.
189242_09c_Mazda6_SSG_112108.indd 811/21/08 3:20:05 PM
Page 9 of 26
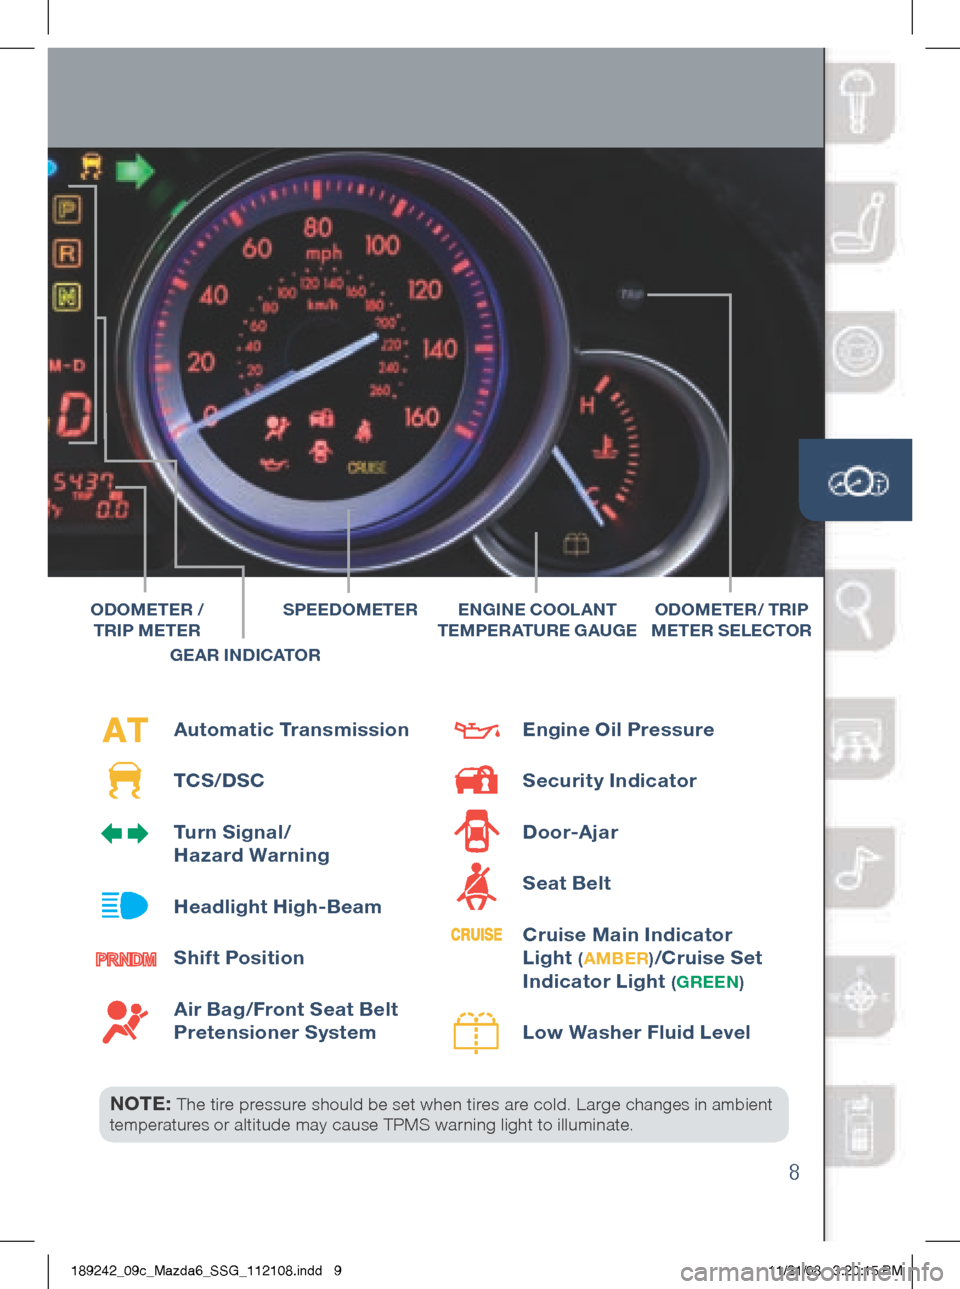
8
NOTE: The tire pressure should be set when tires are cold. Large changes in ambient
temperatures or altitude may cause TPMS warning light to illuminate.
Automatic Transmission
TCS/DSC
Turn Signal/
Hazard warning
Headlight High-Beam
Shift Position
Air Bag/Front Seat Belt
Pretensioner System Engine Oil Pressure
Security
indicator
Door-Ajar
Seat Belt
Cruise Main indicator
Light
( A MBER )/Cruise Set
i ndicator Light
(gREEN )
Low washer Fluid Level
SPEEDOMETERENgiNE COOLANT
T EMPERATURE g AUgEODOMETER / TR iP
METER SELECTORODOMETER /
TR iP METER
g EAR i NDiCATOR
189242_09c_Mazda6_SSG_112108.indd 911/21/08 3:20:15 PM
Page 10 of 26
Feature Highlights
9
PORTABLE AUDiO PL AYER iNTE gRAT iON
US iN g THE AUX JACK
Your vehicle is equipped with an AUX or auxiliary jack
that will allow you to play your portable audio player
through the vehicle’s audio system.
1 Locate the AUX jack inside the center console.
2 Plug your por table audio player into the AUX jack
and turn it on.
3 Turn the vehicle audio system on.
4 • without Navigation System: Push AUX button on audio system OR
push Mode button on steering wheel controls until “AUX” is displayed.
• with Navigation System: Push Source button on audio system,
then push AUX1 on screen OR push Mode button on steering wheel
controls until “AUX1” is displayed.
5 Use the portable audio player controls to play music.
NOTE: Set the volume level on your portable audio player to the highest level
before distortion starts. Then, adjust volume in the vehicle using the audio system
power/volume control or the steering wheel volume up and down controls.
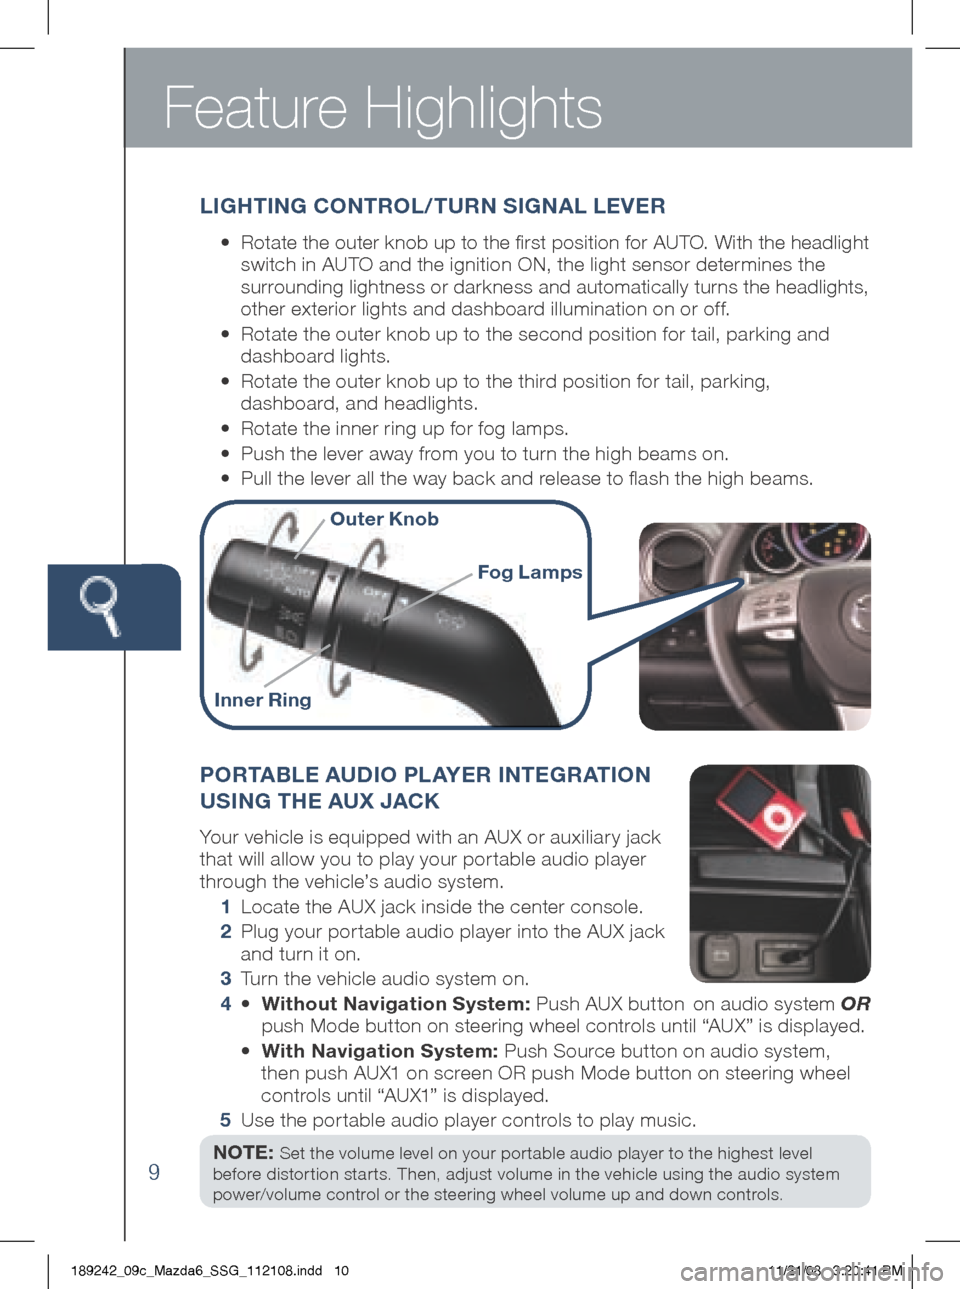
L ig HT iN g CONTROL/TURN S igNAL LEVER
•
Rotate the outer knob up to the first position for AUTO. With the headlight
switch in AUTO and the ignition ON, the light sensor determines the
surrounding lightness or darkness and automatically turns the headlights,
other exterior lights and dashboard illumination on or off.
•
Rotate the outer knob up to the second position for tail, parking and
dashboard lights.
•
Rotate the outer knob up to the third position for tail, parking,
dashboard, and headlights.
• Rotate the inner ring up for fog lamps.
• Push the lever away from you to turn the high beams on.
• Pull the lever all the way back and release to flash the high beams.
Outer Knob
i nner Ring
Fog Lamps
189242_09c_Mazda6_SSG_112108.indd 1011/21/08 3:20:41 PM