brake MAZDA MODEL 6 2009 (in English) Workshop Manual
[x] Cancel search | Manufacturer: MAZDA, Model Year: 2009, Model line: MODEL 6, Model: MAZDA MODEL 6 2009Pages: 464, PDF Size: 4.61 MB
Page 360 of 464

Black plate (360,1)
Engine Compartment Overview
Automatic transaxle fluid-level dipstick
(only for automatic transaxle)Brake/Clutch
fluid reservoir
Brake fluid reservoir
Power steering fluid reservoir
Power steering fluid reservoir Engine oil-filler cap
Engine oil-filler capWindscreen washer
fluid reservoir
Windscreen washer
fluid reservoir Fuse block
BatteryEngine oil dipstick
Engine oil dipstick
Fuse block
BatteryEngine coolant
reservoir Engine coolant
reservoir
Automatic transaxle fluid-level dipstick
2.5-liter engine
3.7-liter engine
8-18
Maintenance and Care
Owner Maintenance
Mazda6_8Z64-EA-08H_Edition1 Page360
Wednesday, June 25 2008 10:5 AM
Form No.8Z64-EA-08H
Page 364 of 464

Black plate (364,1)
CAUTION
ØRadiator coolant will damage
paint.
Rinse it off quickly if spilled.
Ø Use only soft (demineralized)
water in the coolant mixture.
Water that contains minerals will
cut down on the coolant's
effectiveness.
Ø Don't add only water. Always add
a proper coolant mixture.
Ø The engine has aluminum parts
and must be protected by an
ethylene-glycol-based coolant to
prevent corrosion and freezing.
Ø DO NOT USE coolants Containing
Alcohol, methanol, Borate or
Silicate.
These coolants could damage the
cooling system.
Ø DO NOT MIX alcohol or methanol
with the coolant. This could
damage the cooling system.
Ø Don't use a solution that contains
more than 60% antifreeze.
This would reduce effectiveness.
If the coolant reservoir is empty or new
coolant is required frequently, consult an
Authorized Mazda Dealer.
Brake/Clutch Fluid
qInspecting Brake/Clutch Fluid Level
The brakes and clutch draw fluid from the
same reservoir.
Inspect the fluid level in the reservoir
regularly. It should be kept at MAX.
The level normally drops with
accumulated distance, a condition
associated with wear of brake and clutch
linings. If it is excessively low, have the
brake/clutch system inspected by an
Authorized Mazda Dealer.
2.5-liter engine
3.7-liter engine
8-22
Maintenance and Care
Owner Maintenance
Mazda6_8Z64-EA-08H_Edition1 Page364
Wednesday, June 25 2008 10:5 AM
Form No.8Z64-EA-08H
Page 365 of 464

Black plate (365,1)
qAdding Brake/Clutch Fluid
WARNING
Be careful not to spill brake fluid on
yourself or on the engine:
Spilled brake fluid is dangerous. If it
gets in your eyes, they could be
seriously injured. If this happens,
immediately flush your eyes with
water and get medical attention.
Brake fluid spilled on a hot engine
could cause a fire.
If the brake/clutch fluid level is low,
have the brakes and clutch inspected: Low brake/clutch fluid levels are
dangerous. Low levels could signal
brake lining wear or a brake system
leak. Your brakes could fail and
cause an accident.
If the fluid level is low, add fluid until it
reaches MAX.
Before adding fluid, thoroughly clean the
area around the cap.
CAUTION
Ø Brake and clutch fluid will
damage painted surfaces. If brake
or clutch fluid does get on a
painted surface, wash it off with
water immediately.
Ø Using nonspecified brake and
clutch fluids (page 10-4) will
damage the systems. Mixing
different fluids will also damage
them.
If the brake/clutch system
frequently requires new fluid,
consult an Authorized Mazda
Dealer.
Power Steering Fluid
qInspecting Power Steering Fluid
Level
CAUTION
To avoid damage to the power
steering pump, don't operate the
vehicle for long periods when the
power steering fluid level is low.
NOTE
Use specified power steering fluid (page 10-4).
Inspect the fluid level in the reservoir at
each engine oil change with the engine off
and cold. Add fluid if necessary; it does
not require periodic changing.
2.5-liter engine
3.7-liter engine
Maintenance and Care
Owner Maintenance
8-23
Mazda6_8Z64-EA-08H_Edition1 Page365
Wednesday, June 25 2008 10:5 AM
Form No.8Z64-EA-08H
Page 366 of 464

Black plate (366,1)
The level must be kept between MIN and
MAX.
Visually examine the lines and hoses for
leaks and damage.
If new fluid is required frequently, consult
an Authorized Mazda Dealer.Automatic Transaxle Fluid
(ATF)
qInspecting Automatic Transaxle
Fluid Level
The automatic transaxle fluid level should
be inspected regularly. Measure it as
described below.
2.5-liter engine
CAUTION
Ø Always check the automatic
transaxle fluid level according to
the following procedure. If the
procedure is not done correctly,
the automatic transaxle fluid level
cannot be measured accurately
which could lead to automatic
transaxle damage.
Ø A low fluid level can cause
transaxle slippage. Overfilling can
cause foaming, loss of fluid, and
transaxle malfunction.
Ø Use only the specified fluid. A non-
specified fluid could result in
transaxle malfunction and failure.
1. Park on a level surface and set the parking brake firmly.
2. Make sure there is no ATF leakage from the ATF hose or the housing.
3. Shift the shift lever to the park position (P), start the engine and warm it up.
CAUTION
Do not shift the shift lever while the
engine is warming up. If the ATF level
is extremely low, the automatic
transaxle could be damaged.
8-24
Maintenance and Care
Owner Maintenance
Mazda6_8Z64-EA-08H_Edition1 Page366
Wednesday, June 25 2008 10:5 AM
Form No.8Z64-EA-08H
Page 367 of 464

Black plate (367,1)
4. While the engine is still idling, pull outthe dipstick and wipe it clean, and then
put it back.
5. Check the ATF level. If there is no ATF adhering 5 mm from the end of the
dipstick, add ATF.
CAUTION
If there is no ATF adhering to the
dipstick even after the engine has
been warmed up, do not drive the
vehicle. Otherwise, the automatic
transaxle could be damaged.
6. Shift the shift lever to each range and position, and make sure there is no
abnormality.
7. Drive the vehicle on city roads for 5 km (3.1 mile) or more.
8. Park on a level surface and set the parking brake firmly.
9. Shift the shift lever to the park position (P), check the ATF level while the
engine is idling, and make sure that the
ATF level is within the proper level. If
the ATF level is not within the proper
level, add ATF.
The proper fluid level is marked on the
dipstick as follows.
Full
Low
3.7-liter engine
The volume of fluid changes with
temperature. Fluid must be checked while
idling the engine without driving at
normal operating temperature.
CAUTION
Ø Low fluid level causes transaxle
slippage. Overfilling can cause
foaming, loss of fluid, and
transaxle malfunction.
Ø Use specified fluid (page 10-4). A
nonspecified fluid could result in
transaxle malfunction and failure.
1. Park on a level surface and set the parking brake firmly.
2. Start the engine and depress the brake pedal.
3. Move the shift lever through all ranges, then set it at P.
WARNING
Make sure the brake pedal is applied
before shifting the shift lever: Shifting the shift lever without first
depressing the brake pedal is
dangerous. The vehicle could move
suddenly and cause an accident.
4. With the engine still idling, pull out the dipstick, wipe it clean, and put it back.
Maintenance and Care
Owner Maintenance
8-25
Mazda6_8Z64-EA-08H_Edition1 Page367
Wednesday, June 25 2008 10:5 AM
Form No.8Z64-EA-08H
Page 379 of 464
Black plate (379,1)
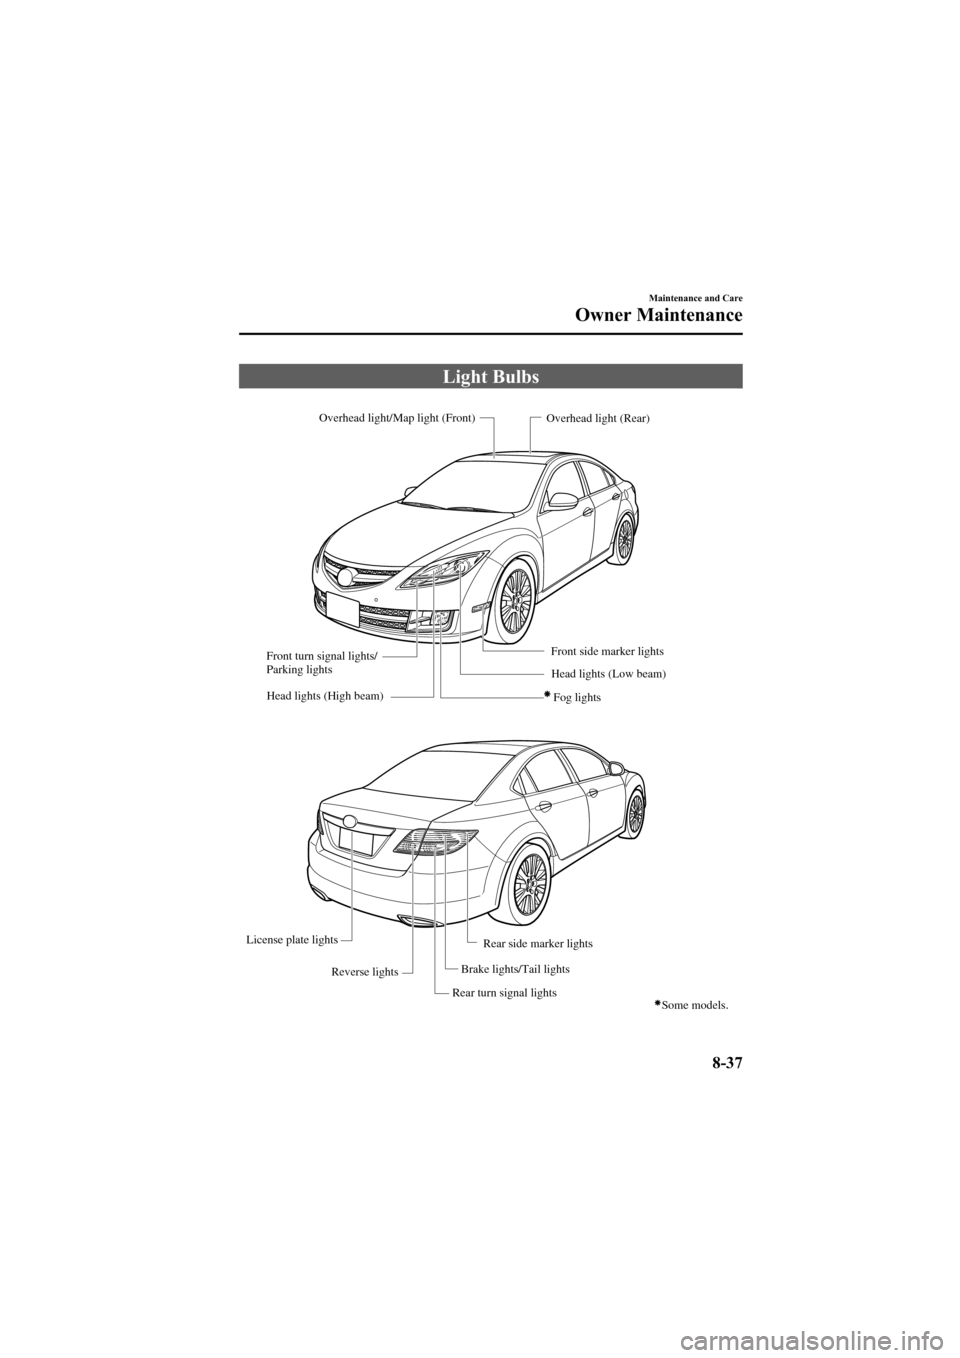
Light Bulbs
Overhead light/Map light (Front)
Head lights (High beam) Fog lights
Head lights (Low beam)
Front turn signal lights/
Parking lights
Rear turn signal lightsOverhead light (Rear)
Brake lights/Tail lights
License plate lights
Reverse lights
Some models.
Front side marker lights
Rear side marker lights
Maintenance and Care
Owner Maintenance
8-37
Mazda6_8Z64-EA-08H_Edition1 Page379
Wednesday, June 25 2008 10:5 AM
Form No.8Z64-EA-08H
Page 384 of 464
Black plate (384,1)
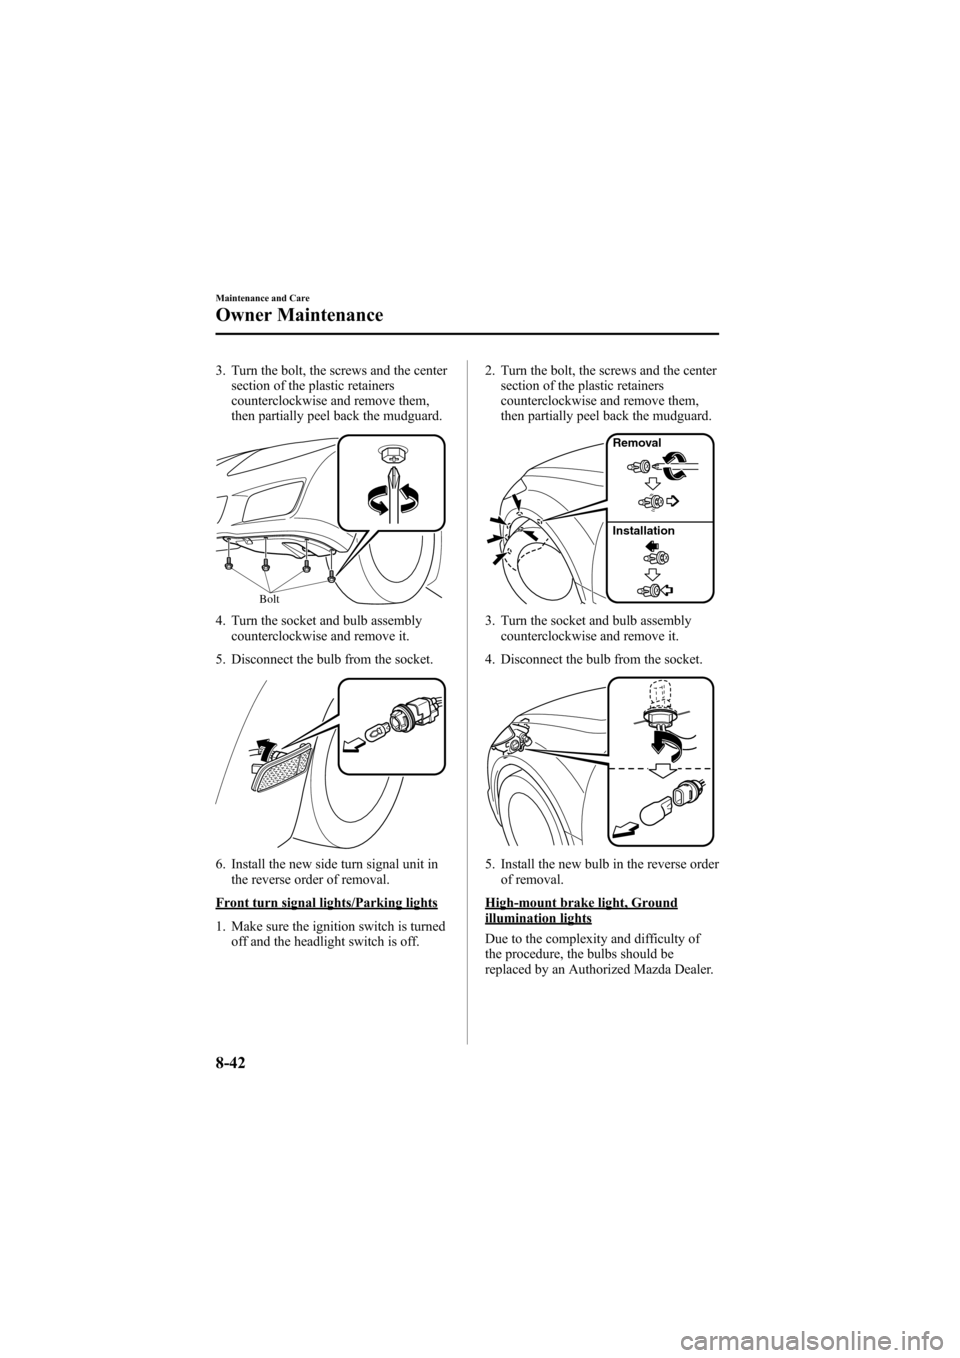
3. Turn the bolt, the screws and the centersection of the plastic retainers
counterclockwise and remove them,
then partially peel back the mudguard.
Bolt
4. Turn the socket and bulb assemblycounterclockwise and remove it.
5. Disconnect the bulb from the socket.
6. Install the new side turn signal unit in the reverse order of removal.
Front turn signal lights/Parking lights
1. Make sure the ignition switch is turnedoff and the headlight switch is off. 2. Turn the bolt, the screws and the center
section of the plastic retainers
counterclockwise and remove them,
then partially peel back the mudguard.
Removal
Installation
3. Turn the socket and bulb assemblycounterclockwise and remove it.
4. Disconnect the bulb from the socket.
5. Install the new bulb in the reverse order of removal.
High-mount brake light, Groundillumination lights
Due to the complexity and difficulty of
the procedure, the bulbs should be
replaced by an Authorized Mazda Dealer.
8-42
Maintenance and Care
Owner Maintenance
Mazda6_8Z64-EA-08H_Edition1 Page384
Wednesday, June 25 2008 10:5 AM
Form No.8Z64-EA-08H
Page 385 of 464

Black plate (385,1)
Brake lights/Taillights (Rear sidemarker lights)
With LED bulb
Due to the complexity and difficulty of
the procedure, the LED bulbs should be
replaced by an Authorized Mazda Dealer.
NOTE
LED bulb replacement is not possible. The
rear combination component must be replaced.
With Non-LED bulb
1. 1.Pull the center section of the plasticretainer and remove the retainers and
partially open the trunk side trim.
Removal
Installation
2. Turn the socket and bulb assemblycounterclockwise and remove it.
3. Disconnect the bulb from the socket.
4. Install the new bulb in the reverse order of removal.
NOTE
To replace the bulb, contact an Authorized
Mazda Dealer.
Rear turn signal lights
1. Pull the center section of the plastic retainer and remove the retainers and
partially open the trunk side trim.
Removal
Installation
2. Turn the socket and bulb assembly
counterclockwise and remove it.
3. Disconnect the bulb from the socket.
4. Install the new bulb in the reverse order of removal.
Maintenance and Care
Owner Maintenance
8-43
Mazda6_8Z64-EA-08H_Edition1 Page385
Wednesday, June 25 2008 10:5 AM
Form No.8Z64-EA-08H
Page 392 of 464

Black plate (392,1)
DESCRIPTIONFUSE
RATING PROTECTED COMPONENT
18 P.SEAT (D) 30 A Power seat
í
19 BTN 30 A For protection of various circuits
20 IG KEY2 40 A Starting system
21 BLOWER 40 A Blower motor
22 FUEL PUMP 25 A Fuel pump
23 ENGINE2 15 A Engine control system
24 EGI INJ 15 A Injector
25 PCM 10 A Engine control system
26 ENGINE 10 A
*1Engine control system
20 A*2
27 IG 20 A For protection of various circuits
28 TCM 20 A TCMí
29ESCL 10 A Electronic steering lock
30 IG KEY1 40 A For protection of various circuits
31 MAIN 125 A For protection of all circuits
32 DRL 20 A DRL
í
33 HAZARD 10 A Hazard warning flashers
34 ENG+B 10 A PCM
35 STOP 10 A Brake lights
36 HORN 15 A Horn
37 HEAD HI RH 15 A Headlight-high beam (Right)
38 HEAD LO RH 10 A Headlight-low beam (Right)
39 HEAD HI LH 15 A Headlight-high beam (Left)
40 HEAD LO LH 10 A Headlight-low beam (Left)
*1 2.5-liter engine
*2 3.7-liter engine
8-50
Maintenance and Care
íSome models.
Owner Maintenance
Mazda6_8Z64-EA-08H_Edition1 Page392
Wednesday, June 25 2008 10:5 AM
Form No.8Z64-EA-08H
Page 397 of 464

Black plate (397,1)
Pay special attention to removing salt,
dirt, mud, and other foreign material from
the underside of the fenders, and make
sure the drain holes in the lower edges of
the doors and rocker panels are clean.
Insects, tar, tree sap, bird droppings,
industrial fallout, and similar deposits can
damage the finish if not removed
immediately. When prompt washing with
plain water is ineffective, use a mild soap
made for use on vehicles.
Thoroughly rinse off all soap with
lukewarm or cold water. Don't allow soap
to dry on the finish.
After washing the vehicle, dry it with a
clean chamois to prevent water spots from
forming.
WARNING
Dry wet brakes by driving very slowly
and applying the brakes lightly until
brake performance is normal:Driving with wet brakes is
dangerous. Increased stopping
distance or the vehicle pulling to one
side when braking could result in a
serious accident. Light braking will
indicate whether the brakes have
been affected.
Waxing
Your vehicle needs to be waxed when
water no longer beads on the finish.
Always wash and dry the vehicle before
waxing it. In addition to the vehicle body,
wax the metal trim to maintain its luster.
1. Use wax which contains no abrasives.Waxes containing abrasive will remove
paint and could damage bright metal
parts. 2. Use a good grade of natural wax for
metallic, mica, and solid colors.
3. When waxing, coat evenly with the sponge supplied or a soft cloth.
4. Wipe off the wax with a soft cloth.
NOTE
A spot remover to remove oil, tar, and similar
materials will usually also take off the wax.
Rewax these areas even if the rest of the
vehicle doesn't need it.
q Repairing Damage to the Finish
Deep scratches or chips on the finish
should be repaired promptly. Exposed
metal quickly rusts and can lead to major
repairs.
CAUTION
If your Mazda is damaged and needs
metal parts repaired or replaced,
make sure the body shop applies
anti-corrosion materials to all parts,
both repaired and new. This will
prevent them from rusting.
qBright-Metal Maintenance
lUse tar remover to remove road tar and
insects. Never do this with a knife or
similar tool.
lTo prevent corrosion on bright-metal
surfaces, apply wax or chrome
preservative and rub it to a high luster.
lDuring cold weather or in coastal areas,
cover bright-metal parts with a coating
of wax or preservative heavier than
usual. It would also help to coat them
with noncorrosive petroleum jelly or
some other protective compound.
Maintenance and Care
Appearance Care
8-55
Mazda6_8Z64-EA-08H_Edition1 Page397
Wednesday, June 25 2008 10:5 AM
Form No.8Z64-EA-08H