buttons MAZDA MODEL 6 2009 Smart Start Guide (in English)
[x] Cancel search | Manufacturer: MAZDA, Model Year: 2009, Model line: MODEL 6, Model: MAZDA MODEL 6 2009Pages: 26, PDF Size: 4.83 MB
Page 2 of 26

Key
1
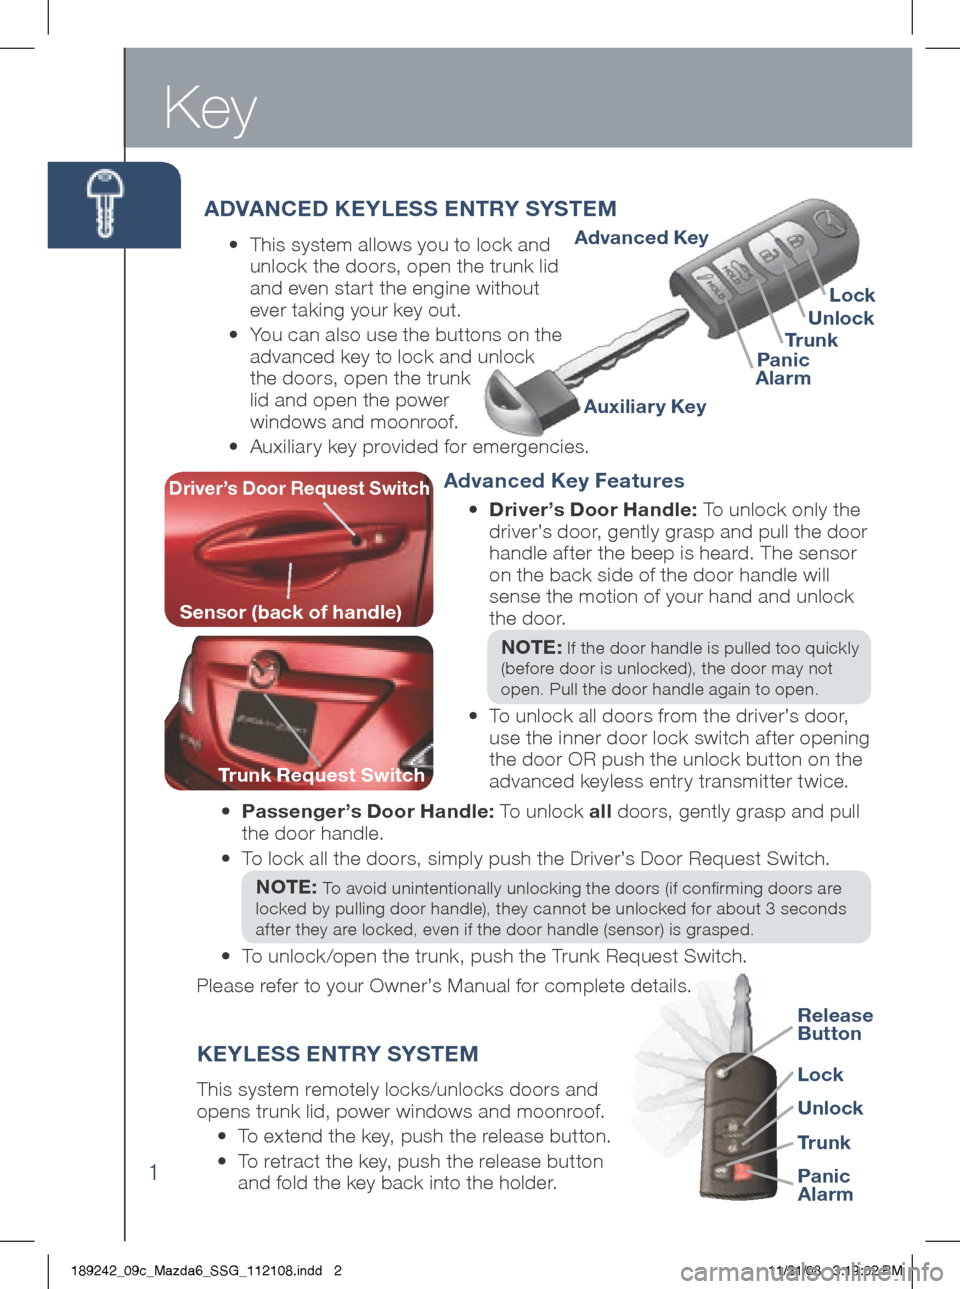
Lock
Tr u n k
Panic
Alarm Unlock
Auxiliar y Key
Advanced Key
ADVANCED KEYLESS ENTRY SYSTEM
•
This system allows you to lock and
unlock the doors, open the trunk lid
and even star t the engine without
ever taking your key out.
•
You can also use the buttons on the
advanced key to lock and unlock
the doors, open the trunk
lid and open the power
windows and moonroof.
•
Auxiliary key provided for emergencies.
Lock
Tr u n k Panic
Alarm
Unlock
Advanced Key Features
•
Driver’s Door Handle: To unlock only the
driver’s door, gently grasp and pull the door
handle after the beep is heard. The sensor
on the back side of the door handle will
sense the motion of your hand and unlock
the door.
NOTE:
If the door handle is pulled too quickly
(before door is unlocked), the door may not
open. Pull the door handle again to open.
• To unlock all doors from the driver’s door,
use the inner door lock switch af ter opening
the door OR push the unlock button on the
advanced keyless entry transmitter twice.
KEYLESS ENTRY SYSTEM
This system remotely locks/unlocks doors and
opens trunk lid, power windows and moonroof.
• To extend the key, push the release button.
• To retract the key, push the release button
and fold the key back into the holder.
Driver’s Door Request Switch
Trunk Request Switch
Sensor (back of handle)
Release
Button
•
Passenger’s Door Handle: To unlock all doors, gently grasp and pull
the door handle.
•
To lock all the doors, simply push the Driver’s Door Request Switch.
NOTE:
To avoid unintentionally unlocking the doors (if confirming doors are
locked by pulling door handle), they cannot be unlocked for about 3 seconds
after they are locked, even if the door handle (sensor) is grasped.
• To unlock /open the trunk, push the Trunk Request Switch.
Please refer to your Owner’s Manual for complete details.
189242_09c_Mazda6_SSG_112108.indd 211/21/08 3:19:02 PM
Page 4 of 26

3
Seats
ELECTRONiCALLY OPERATED DRiVER SEAT w/MEMORY
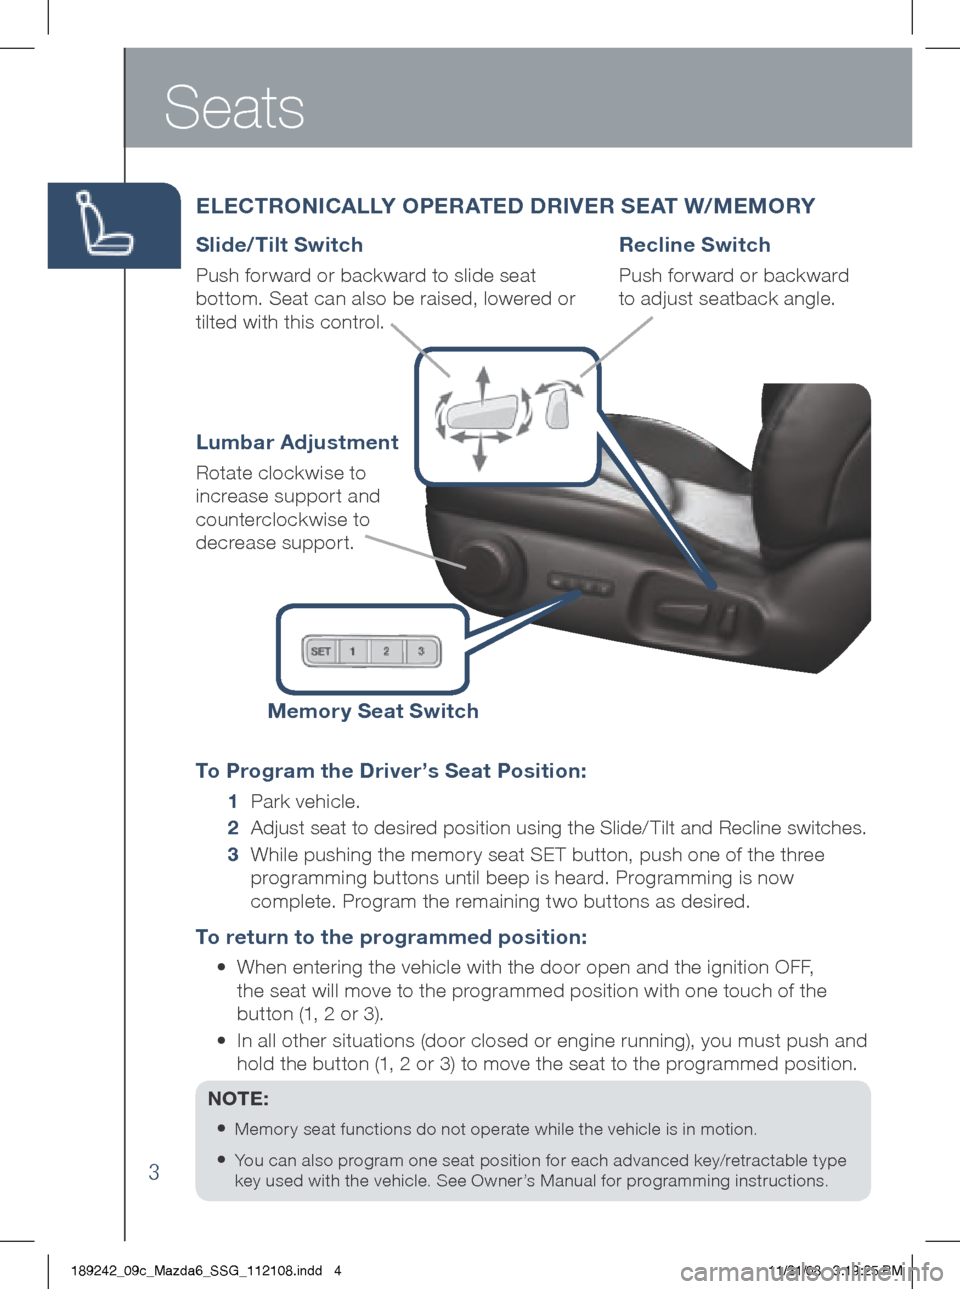
Slide/Tilt Switch
Push forward or backward to slide seat
bottom. Seat can also be raised, lowered or
tilted with this control.
To Program the Driver’s Seat Position:
1 Park vehicle.
2
Adjust seat to desired position using the Slide/ Tilt and Recline switches.
3
While pushing the memory seat SET button, push one of the three
programming buttons until beep is heard. Programming is now
complete. Program the remaining two buttons as desired.
To return to the programmed position:
•
When entering the vehicle with the door open and the ignition OFF,
the seat will move to the programmed position with one touch of the
button (1, 2 or 3).
•
In all other situations (door closed or engine running), you must push and
hold the button (1, 2 or 3) to move the seat to the programmed position.
NOTE:
•
Memory seat functions do not operate while the vehicle is in motion.
• You can also program one seat position for each advanced key/retractable type
key used with the vehicle. See Owner’s Manual for programming instructions.
Lumbar Adjustment
Rotate clockwise to
increase support and
counterclockwise to
decrease support.
Recline Switch
Push forward or backward
to adjust seatback angle.
Memory Seat Switch
189242_09c_Mazda6_SSG_112108.indd 411/21/08 3:19:25 PM
Page 16 of 26

Audio Controls Without Navigation
15
Audio System ON
• Push POWER/ VOLUME
to turn the radio on.
Media Selection
• AM, FM, CD, SAT
(SIRIUS™
Satellite radio)
, AUX (to switch to
AUX jack input and Bluetooth®
streaming audio if equipped).
NOTE:
If the FM broadcast signal
becomes weak, reception automatically
changes from STEREO to MONO for
reduced noise, and the “ST” indicator
will go out.
S AT: SIRIUS™ Satellite radio will
deliver the broadest, deepest mix of
radio enter tainment. See Owner’s
Manual for more details. Tu n i n g
The radio has the following
tuning controls:
• M ANUAL
• T RACk /SEEk
• S CAN
• P RESET CHANNEL
• A UTO MEMORY TUNIN g
Manual Tuning
• Turning the TUNE dial will
change the frequency higher
or lower.
Seek Tuning
• Pushing the TRAC k/SEE k
tuning buttons
will cause
the tuner to seek a higher or
lower frequency automatically.
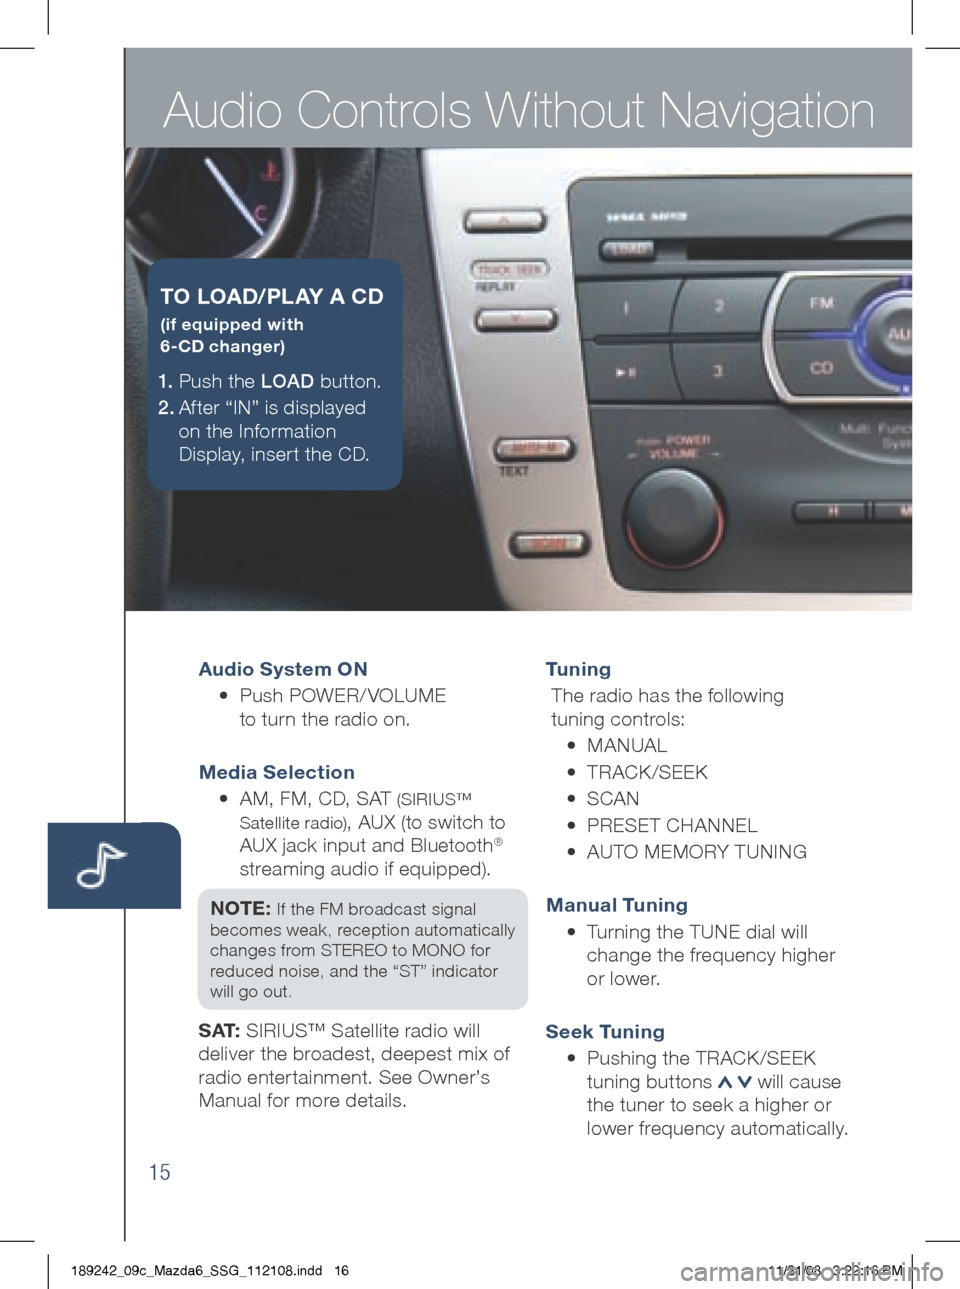
1.
Push the LOAD button.
2 . After “IN” is displayed
on the Information
Display, insert the CD.
T O LOAD /PLAY A CD
(if equipped with
6-CD changer)
189242_09c_Mazda6_SSG_112108.indd 1611/21/08 3:22:16 PM
Page 18 of 26

Audio Controls With Navigation
17
Audio System ON
• Push POWER/ VOLUME on.
• Push SOURCE button.
Media Selection
• AM, FM, DISC, SAT
(SIRIUS™
Satellite radio),
AUX (to switch to
AUX jack input and Bluetooth®
streaming audio if equipped).
Tu n i n g
• The radio has the following
tuning methods: Manual, Seek,
Scan, Auto Memory tuning, and
Preset channel.
Manual Tuning
• Turning the TUNE AUDIO dial
will change the frequency higher
or lower.
Seek / Track Tuning
• Pushing and holding the
SEE k/TRACk buttons
will cause the tuner to automatically
seek a higher or lower
frequency or track depending
on media selected.
NOTE:
If you continue to push and
hold the button, the frequency will
continue changing without stopping.
Scan Tuning
• Push the SCAN button
to automatically sample
strong stations.
•
To hold a station, push the
SCAN button again during
this inter val.
Auto-Memor y Tuning
When driving in an area where
the local stations are not known,
additional AM/FM stations can
be stored without disturbing the
previously set channels. Refer to your
Owner’s Manual for complete details.
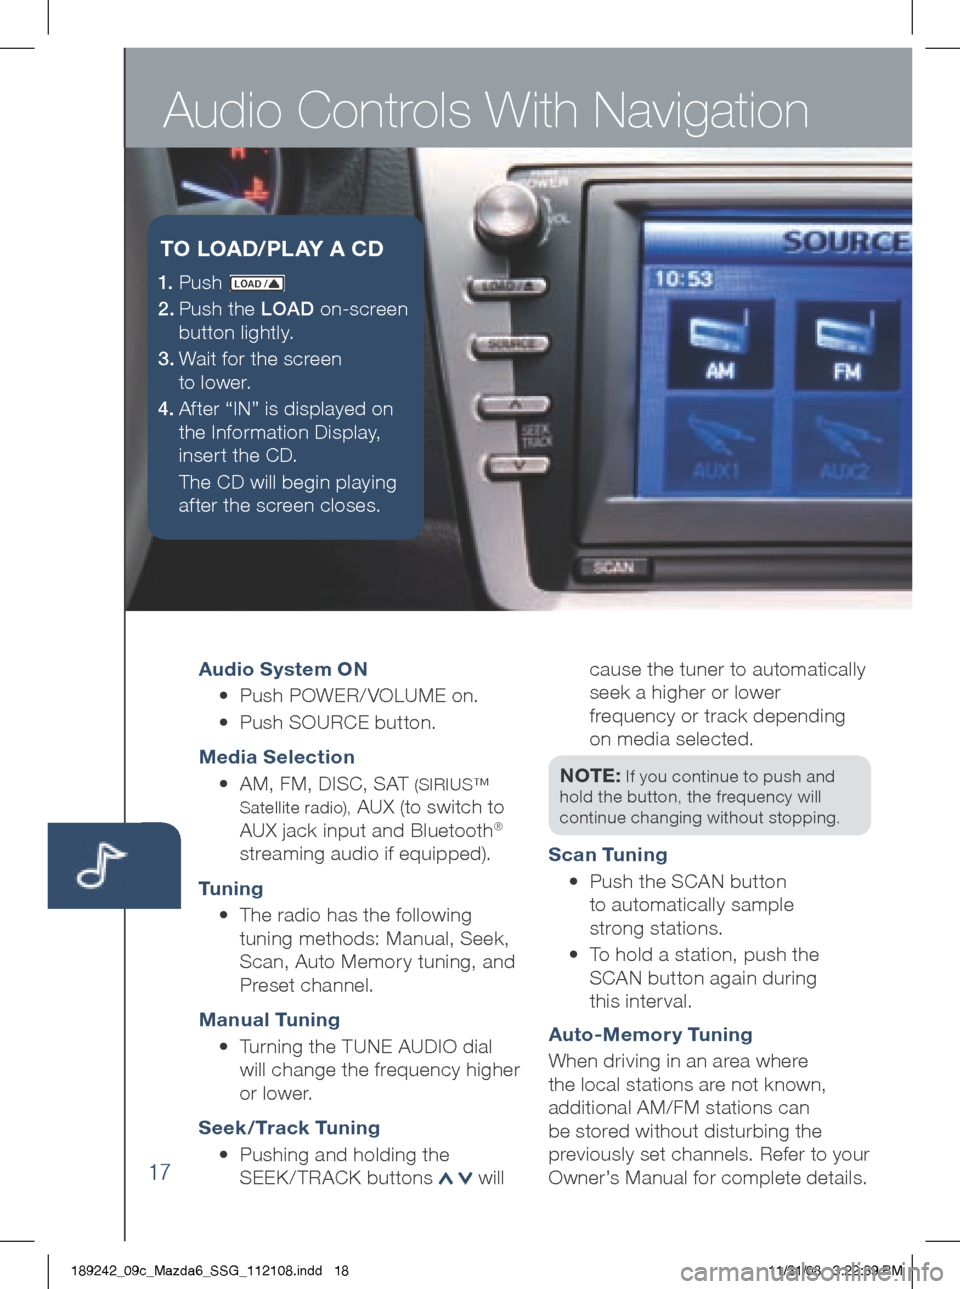
1. P u s h LOAD /
2.
Push the LOAD on-screen
button lightly.
3.
Wait for the screen
to lower.
4 . Af ter “IN” is displayed on
the Information Display,
insert the CD.
The CD will begin playing
after the screen closes.
T O LOAD /PLAY A CD
189242_09c_Mazda6_SSG_112108.indd 1811/21/08 3:22:39 PM