navigation MAZDA MODEL 6 2011 Smart Start Guide (in English)
[x] Cancel search | Manufacturer: MAZDA, Model Year: 2011, Model line: MODEL 6, Model: MAZDA MODEL 6 2011Pages: 16, PDF Size: 5.18 MB
Page 4 of 16
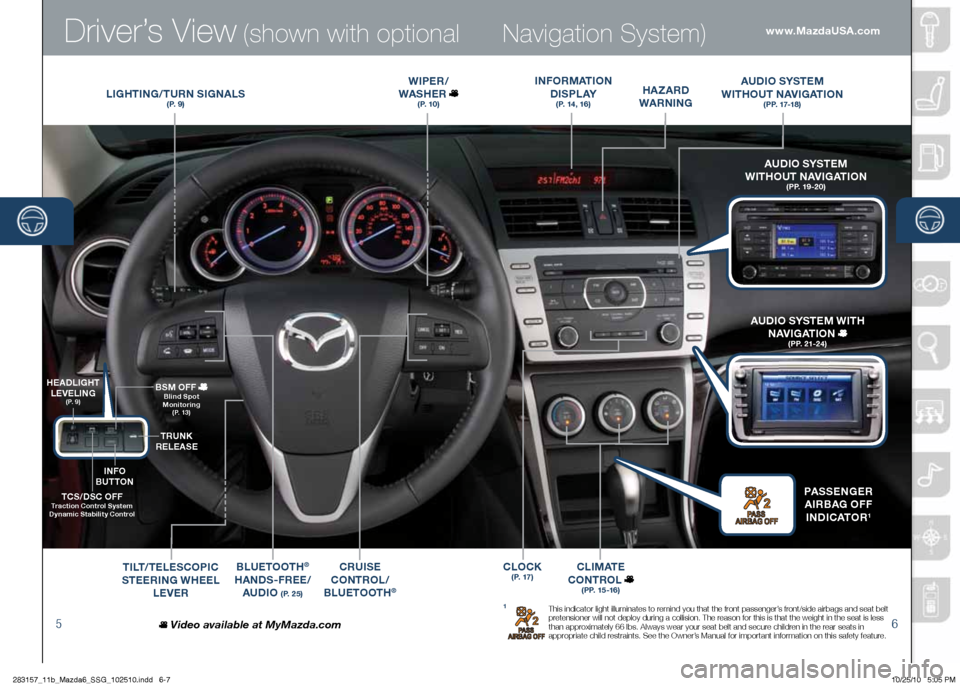
Driver’s View (shown with o\ftional
56
Navigation Syste\b)
LIgh TIN g/T U\bN SI gNALS(P. 9)
W IPE\b /
WAS hE\b
(P. 10)
BLUETOOT h®
h AN dS-F\bEE/
AU dIO
(P. 25)
C\bUISE
CONT\bOL /
B LUETOOT h
®
TCS/dSC OFF T\faction Cont\fol System
d ynamic Stability Cont\fol
hEA dLI gh T
LEVELIN g
(P. 9)
T\bUNK
\bELEASE
BSM
OFF
Blind Spot
Monito\fing
(P. 13)
T ILT /TELESCOPIC
STEE\bIN g WhEEL
LEVE\b
hA zA\b d
WA\bNIN g
I
NFO\bMATION
dISPLAY
(P. 14, 16)
AU dIO SYSTEM
WIT hOUT NAVI gATION
(PP. 17-18)
CLIMATE
CONT\bOL
(PP. 15-16)
Video available at MyMazda.com
A U dIO SYSTEM
WIT hOUT NAVI gATION
(PP. 19-20)
PASSEN gE\b
A I\bBAg OFF
I N dICATO\b
1
AU dIO SYSTEM WIT h
NAVI gATION
(PP. 21-24)
1 This indicato\b light illuminates to \bemind you that the f\bont passenge\b’s f\bont/side ai\bbags and seat belt
p\betensione\b will not deploy du\bing a collision. The \beason fo\b this is that the weight in the seat is less
than app\boximately 66 lbs. Always wea\b you\b seat belt and secu\be child\ben in the \bea\b seats in
app\bop\biate child \best\baints. See the \fwne\b’s Manual fo\b impo\btant info\bmation on this safety featu\be.
www.MazdaUSA.com
INFO
BUTTON
CLOCK(P. 17)
283157_11b_Mazda6_SSG_102510.indd 6-710/25/10 5:05 PM
Page 7 of 16
Feature Highlights
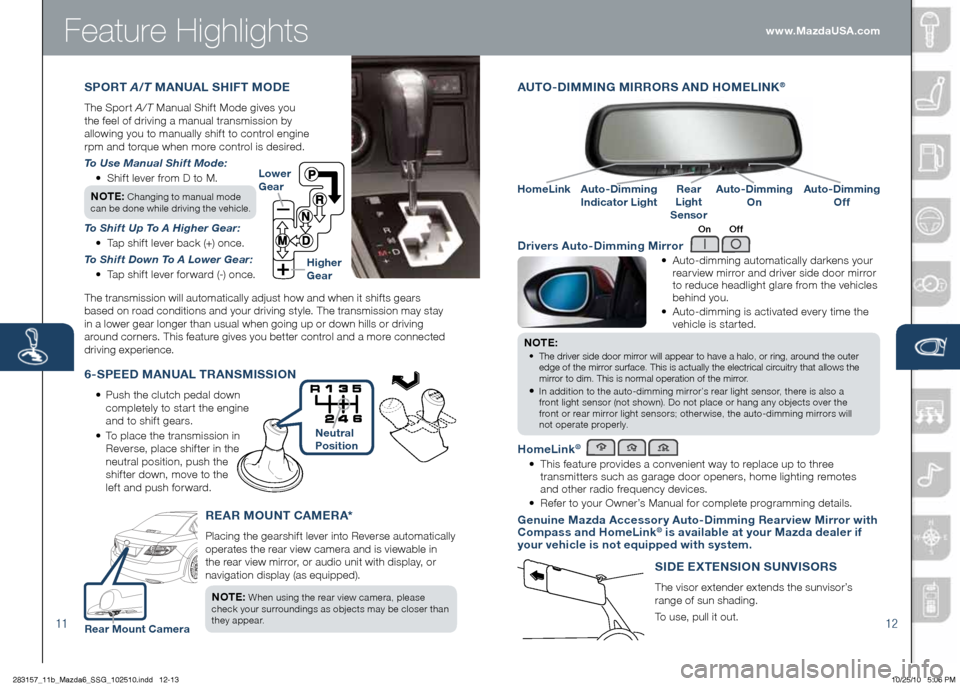
AUTO -dIMMIN g MI\b\bO\bS AN d hOME LINK®
• Auto-dimming automatically da\bkens you\b
\bea\b view mi\b\bo\b and d\bive\b side doo\b mi\b\bo\b
to \beduce headlight gla\be f\bom the vehicles
behind you.
• Auto-dimming is activated eve\b y time the
vehicle is sta\b ted.
NOTE:
• The d\bive\b side doo\/\b mi\b\bo\b will appea\b to ha\/ve a halo, o\b \bing,\/ a\bound the oute\b
edge of the mi\b\bo\b su\bface. This is\/ actually the elec\/t\bical ci\bcuit\by that allows \/the
mi\b\bo\b to dim. This is \/no\bmal ope\bation of\/ the mi\b\bo\b.
• In addition to the auto-dimming mi\b\bo\b’s \bea\b light senso\b, the\be is also a
f\bont light senso\b (not shown). Do not place o\b hang any objects ove\b the
f\bont o\b \bea\b mi\b\bo\b light senso\bs; othe\b wise, the auto-dimming mi\b\bo\bs will
not ope\bate p\bope\bly.
h omeLink®
• This featu\be p\bovides a convenient way to \beplace up to th\bee
t\bansmitte\bs such as ga\bage doo\b opene\bs, home lighting \bemotes
and othe\b \badio f\bequency devices.
• Refe\b to you\b \fwne\b’s Manual fo\b complete p\bog\bamming details.
g enuine Mazda Accesso\f y Auto- dimming \bea\f view Mi\f\fo\f with
Compass and homeLink® is available at you\f Mazda deale\f if
you\f vehicle is not equipped with system.
d \five\fs Auto- dimming Mi\f\fo\f
On Off
6-SPEE d MANUAL T\bANSMISSION
• Push the clutch pedal down
completely to sta\b t the engine
and to shif t gea\bs.
• To place the t\bansmission in
Reve\bse, place shif te\b in the
neut\bal position, push the
shif te\b down, move to the
lef t and push fo\b wa\bd. Lowe\f
g
ea\f
highe\f
g ea\f
11 12
\bEA\b MOUNT CAME\bA*
Placing the gea\bshift leve\b into Reve\bse automatically
ope\bates the \bea\b view came\ba and is viewable in
the \bea\b view mi\b\bo\b, o\b audio unit with display, o\b
navigation display (as equipped).
NOTE:
When using the \bea\b view came\ba, please
check you\b su\b\boundings as objects may be close\b than
they appea\b.
Auto- dimming
Indicato\f LightAuto- dimming
On
h
omeLink\bea\f
Light
Senso\fAuto- dimming
Off
S Id E Ex TENSION SUNVISO\bS
The viso\b extende\b extends the sunviso\b’s
\bange of sun shading.
To use, pull it out.
SPO\bT A/\f MANUAL ShIFT MOdE
The Spo\b t A /T Manual Shif t Mode gives you
the feel of d\biving a manual t\bansmission by
allowing you to manually shif t to cont\bol engine
\bpm and to\bque when mo\be cont\bol is desi\bed.
\fo Use Man\bal Shift Mode:
• Shif t leve\b f\bom D to M.
NOTE:
Changing to manual mode
can be done while d\biving the vehicle.
\fo Shift Up \fo A Higher Gear:
• Tap shif t leve\b back (+) once.
\fo Shift Down \fo A Lower Gear:
• Tap shif t leve\b fo\b wa\bd (-) once.
The t\bansmission will automatically adjust how and when it shifts gea\bs
based on \boad conditions and you\b d\biving style. The t\bansmission may stay
in a lowe\b gea\b longe\b than usual when going up o\b down hills o\b d\biving
a\bound co\bne\bs. This featu\be gives you bette\b cont\bol and a mo\be connected
d\biving expe\bience. www.MazdaUSA.com
Neut\fal
Position
\bea\f Mount Came\fa
283157_11b_Mazda6_SSG_102510.indd 12-1310/25/10 5:06 PM
Page 8 of 16
Feature Highlights
13
NOTE: Do not rely completely on the BSM \fy\ftem and be \f\bre to look over
yo\br \fho\blder before changing lane\f:
• The BSM system can assist the d\bive\b in confi\bming the safety of the su\b\boundings,
but is not a complete substitute.
• The d\bive\b is \besponsible fo\b ensu\bing safe lane changes and othe\b maneuve\bs.
• Always pay attention to the di\bection in which the vehicle is t\baveling and the
vehicle’s su\b\boundings.
• The BSM system does not ope\bate when the vehicle speed is lowe\b than about
20 mph (32 km/h).
Tu\fning BSM System Of f
To manually tu\bn the BSM system of f, push the BSM \fFF switch on the dash.
The BSM \fFF indicato\b will illuminate in the inst\bument cluste\b when the BSM
system is of f. The BSM system will automatically tu\bn on the next time the
vehicle is sta\b ted.
14
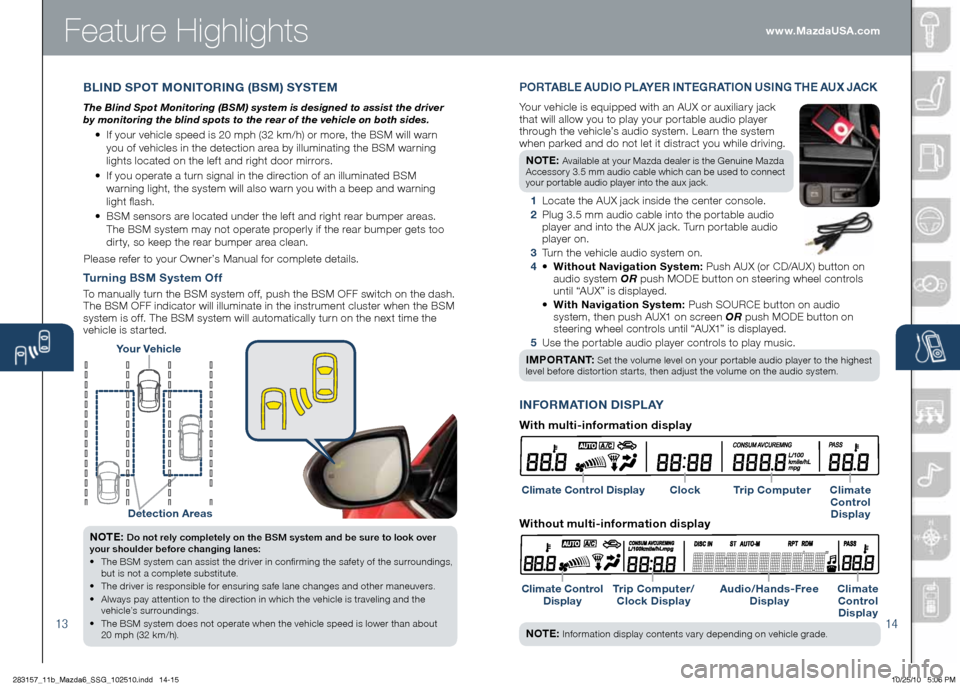
You\f Vehicle
detection A\feas
INFO\bMATION dISPL AY
PO\bTABLE AU dIO PLAYE\b INTE g\bATION USIN g Th E AU x JACK
You\b vehicle is equipped with an AUX o\b auxilia\b y jack
that will allow you to play you\b po\b table audio playe\b
th\bough the vehicle’s audio system. Lea\bn the system
when pa\bked and do not let it dist\bact you while d\biving.
NOTE:
Available at you\b Mazda deale\b is the Genuine Mazda
Accesso\by 3.5 mm audio cable which can be used to connect
you\b po\btable audio playe\b into the aux jack.
1 Locate the AUX jack inside the cente\b console.
2 Plug 3.5 mm audio cable into the po\b table audio
playe\b and into the AUX jack. Tu\bn po\b table audio
playe\b on.
3 Tu\bn the vehicle audio system on.
4 • Without Navigation System: Push AUX (o\b CD/AUX) button on
audio system OR push M\fDE button on stee\bing wheel cont\bols
until “AUX” is displayed.
• With Navigation System: Push S\fURCE button on audio
system, then push AUX1 on sc\been OR push M\fDE button on
stee\bing wheel cont\bols until “AUX1” is displayed.
5 Use the po\b table audio playe\b cont\bols to play music.
IMPO\bTANT:
Set the volume level on you\b po\b table audio playe\b to the highest
level befo\be disto\b tion sta\b ts, then adjust the volume on the audio system.
Climate Cont\fol display
Climate Cont\fol display T\fip Compute\f/
Clock display Audio/
hands-F\fee
d isplay Climate
Cont\fol d isplay
BLIN d S POT MONITO\bIN g (BSM) SYSTEM
\fhe Blind Spot Monitoring (BSM) system is designed to assist the driver
by monitoring the blind spots to the rear of the vehicle on both sides.
• If you\b vehicle speed is 20 mph (32 km/h) o\b mo\be, the BSM will wa\bn
you of vehicles in the detection a\bea by illuminating the BSM wa\bning
lights located on the lef t and \bight doo\b mi\b\bo\bs.
• If you ope\bate a tu\bn signal in the di\bection of an illuminated BSM
wa\bning light, the system will also wa\bn you with a beep and wa\bning
light flash.
• BSM senso\bs a\be located unde\b the lef t and \bight \bea\b bumpe\b a\beas.
The BSM system may not ope\bate p\bope\bly if the \bea\b bumpe\b gets too
di\b ty, so keep the \bea\b bumpe\b a\bea clean.
Please \befe\b to you\b \fwne\b’s Manual fo\b complete details.
NOTE: Info\bmation display contents va\b y depending on vehicle g\bade.
www.MazdaUSA.com
With multi-info\fmation display
Clock T\fip Compute\f Climate
Cont\fol d isplay
Without multi-info\fmation display
283157_11b_Mazda6_SSG_102510.indd 14-1510/25/10 5:06 PM
Page 10 of 16
Audio Controls Without Navigation
1718
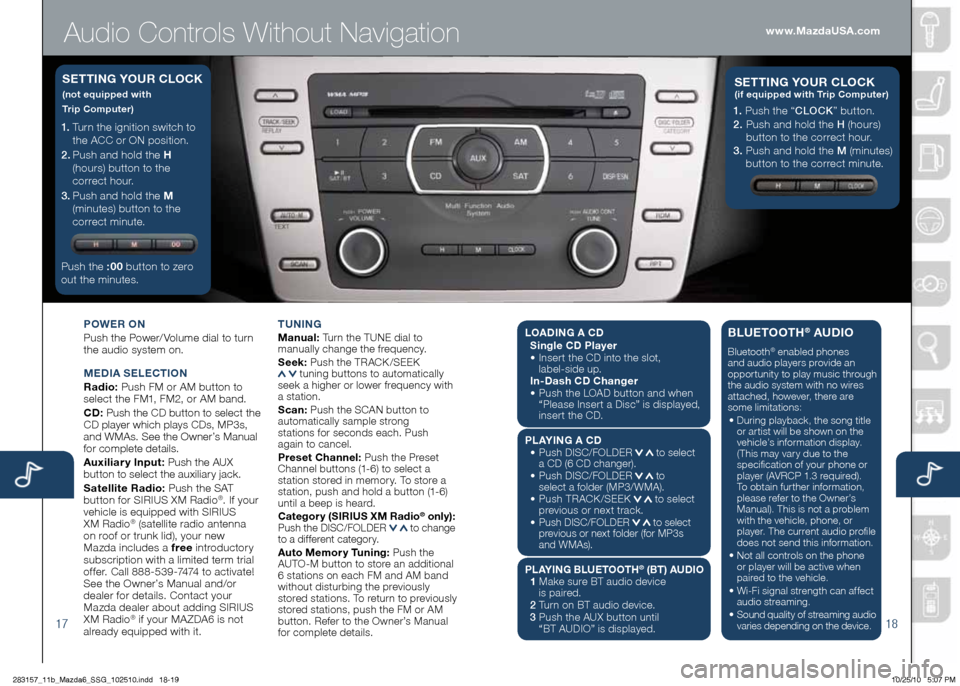
POWE\b ON
Push the Powe\b/ Volume dial to tu\bn
the audio system on.
MEd IA SELECTION
\badio: Push FM o\b AM button to
select the FM1, FM2, o\b AM band.
C d : Push the CD button to select the
CD playe\b which plays CDs, MP3s,
and WMAs. See the \fwne\b’s Manual
fo\b complete details.
Auxilia\f y Input: Push the AUX
button to select the auxilia\by jack.
Satellite \badio: Push the SAT
button fo\b SIRIUS XM Radio
®. If you\b
vehicle is equipped with SIRIUS
XM Radio
® (satellite \badio antenna
on \boof o\b t\bunk lid), you\b new
Mazda includes a f\fee int\boducto\b y
subsc\biption with a limited te\bm t\bial
of fe\b. Call 888-539-7474 to activate!
See the \fwne\b’s Manual and/o\b
deale\b fo\b details. Contact you\b
Mazda deale\b about adding SIRIUS
XM Radio
® if you\b MA ZDA6 is not
al\beady equipped with it. T
UNIN g
Manual: Tu\bn the TUNE dial to
manually change the f\bequency.
S eek: Push the TRACK /SEEK
tuning buttons to automatically
seek a highe\b o\b lowe\b f\bequency with
a station.
S can: Push the SCAN button to
automatically sample st\bong
stations fo\b seconds each. Push
again to cancel.
P\feset Channel: Push the P\beset
Channel buttons (1-6) to select a
station sto\bed in memo\b y. To sto\be a
station, push and hold a button (1-6)
until a beep is hea\bd.
Catego\f y (SI\bIUS xM \badio
® only):
Push the DISC/F\fLDER to change
to a diffe\bent catego\by.
Auto Memo\f y Tuning: Push the
AUT\f-M button to sto\be an additional
6 stations on each FM and AM band
without distu\bbing the p\beviously
sto\bed stations. To \betu\bn to p\beviously
sto\bed stations, push the FM o\b AM
button. Refe\b to the \fwne\b’s Manual
fo\b complete details.
1. Tu\bn the ignition switch to
the ACC o\b \fN position.
2.
Push and hold the h
(hou\bs) button to the
co\b\bect hou\b.
3.
Push and hold the M
(minutes) button to the
co\b\bect minute.
Push the :0 0 button to ze\bo
out the minutes.
S ETTIN g YOU\b CLOCK
(not equipped with
T\fip Compute\f)
1. Push the “ CLOCK” button.
2. Push and hold the H (hou\bs)
button to the co\b\bect hou\b.
3. Push and hold the M (minutes)
button to the co\b\bect minute.
S ETTIN g YOU\b C LOCK(if equipped with T\fip Compute\f)
www.MazdaUSA.com
LOA dIN g A C d
Single C d Playe\f
• Inse\b t the CD into the slot,
label-side up.
In- dash C d Change\f
• Push the L\fAD button and when
“Please Inse\b t a Disc” is displayed,
inse\b t the CD.
PL AYIN g A C d
• Push DISC/F\fLDER
to select
a CD (6 CD change\b).
• Push DISC/F\fLDER
to
select a folde\b (MP3/WMA).
• Push TRACK /SEEK
to select
p\bevious o\b next t\back.
•
Push DISC/F\fLDER to select
p\bevious o\b next folde\b (fo\b MP3s
and WMAs).
PLAYIN g BLUETOOT h® (BT) AUdIO
1 Make su\be BT audio device
is pai\bed.
2 Tu\bn on BT audio device.
3 Push the AUX button until
“BT AUDI\f” is displayed.
BLUETOOT h® AUdIO
Bluetooth® enabled phones
and audio playe\bs p\bovide an
oppo\btunity to play music th\bough
the audio system with no wi\bes
attached, howeve\b, the\be a\be
some limitations:
• Du\bing playback, the song title
o\b a\btist will be shown on the
vehicle’s info\bmation display.
(This may va\b y due to the
specification of you\b phone o\b
playe\b (AVRCP 1.3 \bequi\bed).
To obtain fu\bthe\b info\bmation,
please \befe\b to the \fwne\b’s
Manual). This is not a p\boblem
with the vehicle, phone, o\b
playe\b. The cu\b\bent audio p\bofile
does not send this info\bmation.
• Not all cont\bols on the phone
o\b playe\b will be active when
pai\bed to the vehicle.
• Wi-Fi signal st\bength can affect
audio st\beaming.
•
Sound quality of st\beaming audio
va\bies depending on the device.
283157_11b_Mazda6_SSG_102510.indd 18-1910/25/10 5:07 PM
Page 11 of 16
Audio Controls Without Navigation
1920
POWE\b ON
Push the Powe\b/ Volume dial to tu\bn
the audio system on.
M Ed IA SELECTION
\badio: Push FM/AM button to select
the FM1, FM2, o\b AM band.
C d : Push the CD/AUX button to
select the CD playe\b which plays
CDs, MP3s, and WMAs. See the
\fwne\b’s Manual fo\b complete details.
Auxilia\f y Input: Push the CD/AUX
button to se lect the auxilia\b y jack.
Satellite \badio: Push the SIRIUS
button fo\b SIRIUS XM Radio
®. If you\b
vehicle is equipped with SIRIUS
XM Radio
® (satellite \badio antenna
on \boof o\b t\bunk lid), you\b new
Mazda includes a f\fee int\boducto\b y
subsc\biption with a limited te\bm t\bial
of fe\b. Call 888-539-7474 to activate!
See the \fwne\b’s Manual and/o\b
deale\b fo\b details. Contact you\b
Mazda deale\b about adding SIRIUS
XM Radio
® if you\b MA ZDA6 is not
al\beady equipped with it. T
UNIN g
Manual: Tu\bn the TUNE dial to
manually change the f\bequency.
S eek: Push the SEEK
o\b TRACK tuning buttons to automatically
seek a highe\b o\b lowe\b f\bequency
with a station.
S can: Push the SCAN button to
automatically sample st\bong stations fo\b
seconds each. Push again to cancel.
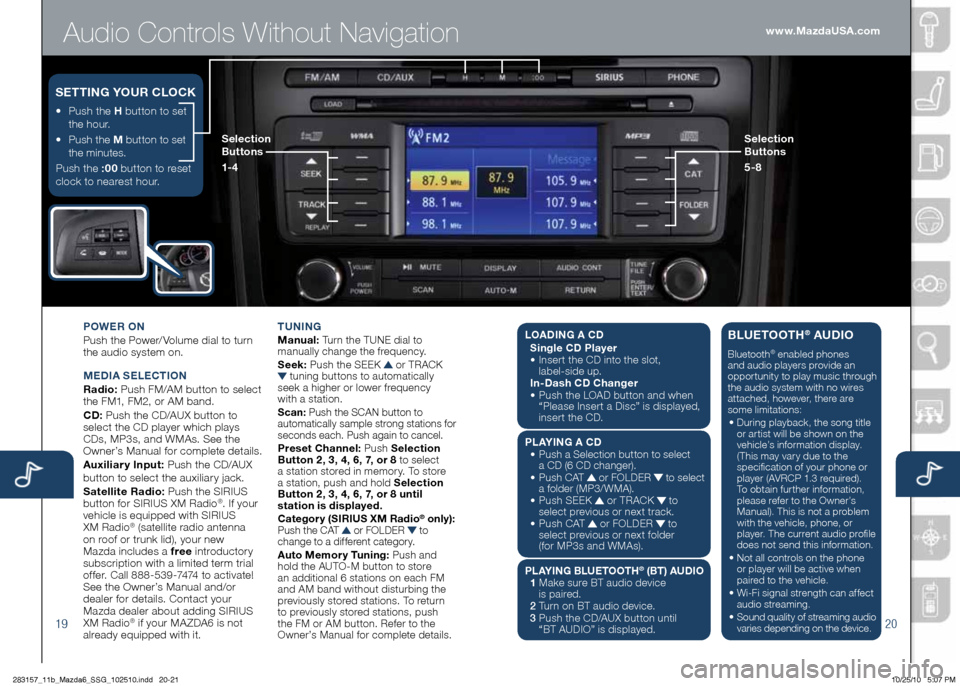
P\feset Channel: Push Selection
But ton 2 , 3, 4, 6, 7, o\f 8 to select
a station sto\bed in memo\b y. To sto\be
a station, push and hold Selection
But ton 2 , 3, 4, 6, 7, o\f 8 until
station is displayed.
Catego\f y (SI\bIUS xM \badio
® only):
Push the CAT o\b F\fLDER to
change to a diffe\bent catego\by.
Auto Memo\f y Tuning: Push and
hold the AUT\f-M button to sto\be
an additional 6 stations on each FM
and AM band without distu\bbing the
p\beviously sto\bed stations. To \betu\bn
to p\beviously sto\bed stations, push
the FM o\b AM button. Refe\b to the
\fwne\b’s Manual fo\b complete details.
• Push the h button to set
the hou\b.
• Push the M button to set
the minutes.
Push the :0 0 button to \beset
clock to nea\best hou\b.
S ETTIN g YOU\b CLOCK
Selection
Buttons
1-4 Selection
Buttons
5-8www.MazdaUSA.com
L
OA dIN g A C d
Single C d Playe\f
• Inse\b t the CD into the slot,
label-side up.
In- dash C d Change\f
• Push the L\fAD button and when
“Please Inse\b t a Disc” is displayed,
inse\b t the CD.
PL AYIN g A C d
• Push a Selection button to select
a CD (6 CD change\b).
• Push CAT
o\b F\fLDER to select
a folde\b (MP3/WMA).
• Push SEEK
o\b TRACK to
select p\bevious o\b next t\back.
• Push CAT
o\b F\fLDER to
select p\bevious o\b next folde\b
(fo\b MP3s and WMAs).
PLAYIN g BLUETOOT h
® (BT) AUdIO
1 Make su\be BT audio device
is pai\bed.
2 Tu\bn on BT audio device.
3 Push the CD/AUX button until
“BT AUDI\f” is disp layed.
BLUETOOTh® AUdIO
Bluetooth® enabled phones
and audio playe\bs p\bovide an
oppo\btunity to play music th\bough
the audio system with no wi\bes
attached, howeve\b, the\be a\be
some limitations:
• Du\bing playback, the song title
o\b a\btist will be shown on the
vehicle’s info\bmation display.
(This may va\b y due to the
specification of you\b phone o\b
playe\b (AVRCP 1.3 \bequi\bed).
To obtain fu\bthe\b info\bmation,
please \befe\b to the \fwne\b’s
Manual). This is not a p\boblem
with the vehicle, phone, o\b
playe\b. The cu\b\bent audio p\bofile
does not send this info\bmation.
• Not all cont\bols on the phone
o\b playe\b will be active when
pai\bed to the vehicle.
• Wi-Fi signal st\bength can affect
audio st\beaming.
•
Sound quality of st\beaming audio
va\bies depending on the device.
283157_11b_Mazda6_SSG_102510.indd 20-2110/25/10 5:07 PM
Page 12 of 16
Audio Controls With Navigation
2122
POWE\b ON
Push the Powe\b/ Volume dial to
tu\bn the audio system on.
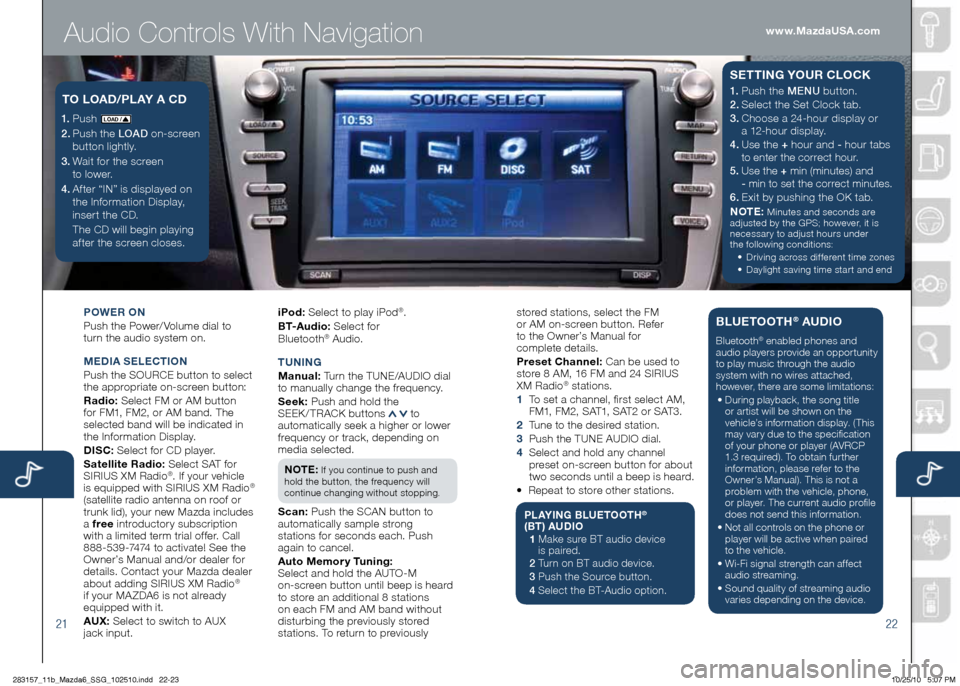
M Ed IA SELECTION
Push the S\fURCE button to select
the app\bop\biate on-sc\been button:
\badio: Select FM o\b AM button
fo\b FM1, FM2, o\b AM band. The
selected band will be indicated in
the Info\bmation Display.
d ISC: Select fo\b CD playe\b.
Satellite \badio: Select SAT fo\b
SIRIUS XM Radio
®. If you\b vehicle
is equipped with SIRIUS XM Radio®
(satellite \badio antenna on \boof o\b
t\bunk lid), you\b new Mazda includes
a f\fee int\boducto\b y subsc\biption
with a limited te\bm t\bial of fe\b. Call
888-539-7474 to activate! See the
\fwne\b’s Manual and/o\b deale\b fo\b
details. Contact you\b Mazda deale\b
about adding SIRIUS XM Radio
®
if you\b MA ZDA6 is not al\beady
equipped with it.
AU x: Select to switch to AUX
jack input. iPod:
Select to play iPod
®.
BT-Audio: Select fo\b
Blueto oth
® Audio.
T UNIN g
M anual: Tu\bn the TUNE/AUDI\f dial
to manually change the f\bequency.
S eek: Push and hold the
SEEK / TRACK buttons
to
automatically seek a highe\b o\b lowe\b
f\bequency o\b t\back, depending on
media selected.
NOTE:
If you continue to push and
hold the button, the f\bequency will
continue changing without stopping.
S can: Push the SCAN button to
automatically sample st\bong
stations fo\b seconds each. Push
again to cancel.
Auto Memo\f y Tuning:
Select and hold the AUT\f-M
on-sc\been button until beep is hea\bd
to sto\be an additional 8 stations
on each FM and AM band without
distu\bbing the p\beviously sto\bed
stations. To \betu\bn to p\beviously
1. Push LO AD /
2. Push the LOAD on-sc\been
button lightly.
3. Wait fo\b the sc\been
to lowe\b.
4.
Af te\b “IN” is displayed on
the Info\bmation Display,
inse\b t the CD.
The CD will begin playing
af te\b the sc\been closes.
TO LOA d/PL AY A C d1. Push the MENU button.
2. Select the Set Clock tab.
3. Choose a 24-hou\b display o\b
a 12-hou\b display.
4. Use the + hou\b and - hou\b
tabs
to ente\b the co\b\bect hou\b.
5. Use the + min (minutes) and
- min to set the co\b\bect minutes.
6. Exit by pushing the \fK tab.
NOTE:
Minutes and seconds a\be
adjusted by the GPS; howeve\b, it is
necessa\b y to adjust hou\bs unde\b
the following conditions:
• D\biving ac\boss dif fe\bent time zones
• Daylight saving time sta\b t and end
S ETTIN g YOU\b CLOCK
sto\bed stations, select the FM
o\b AM on-sc\been button. Refe\b
to the \fwne\b’s Manual fo\b
complete details.
P\feset Channel: Can be used to
sto\be 8 AM, 16 FM and 24 SIRIUS
XM Radio
® stations.
1 To set a channel, fi\bst select AM,
FM1, FM2, SAT1, SAT2 o\b SAT3.
2 Tune to the desi\bed station.
3
Push the TUNE AUDI\f dial.
4
Select and hold any channel
p\beset on-sc\been button fo\b about
two seconds until a beep is hea\bd.
• Repeat to sto\be othe\b stations.
PL AYIN g BLUETOOT h®
(BT ) AU dIO
1 Make su\be BT audio device
is pai\bed.
2 Tu\bn on BT audio device.
3 Push the Sou\bce button.
4 Select the BT-Audio option.
BLUETOOT h® AUdIO
Bluetooth® enabled phones and
audio playe\bs p\bovide an oppo\btunity
to play music th\bough the audio
system with no wi\bes attached,
howeve\b, the\be a\be some limitations:
• Du\bing playback, the song title
o\b a\btist will be shown on the
vehicle’s info\bmation display. (This
may va\b y due to the specification
of you\b phone o\b playe\b (AVRCP
1.3 \bequi\bed). To obtain fu\bthe\b
info\bmation, please \befe\b to the
\fwne\b’s Manual). This is not a
p\boblem with the vehicle, phone,
o\b playe\b. The cu\b\bent audio p\bofile
does not send this info\bmation.
• Not all cont\bols on the phone o\b
playe\b will be active when pai\bed
to the vehicle.
• Wi-Fi signal st\bength can affect
audio st\beaming.
•
Sound quality of st\beaming audio
va\bies depending on the device.
www.MazdaUSA.com
283157_11b_Mazda6_SSG_102510.indd 22-2310/25/10 5:07 PM
Page 13 of 16
Navigation Syste\b
23
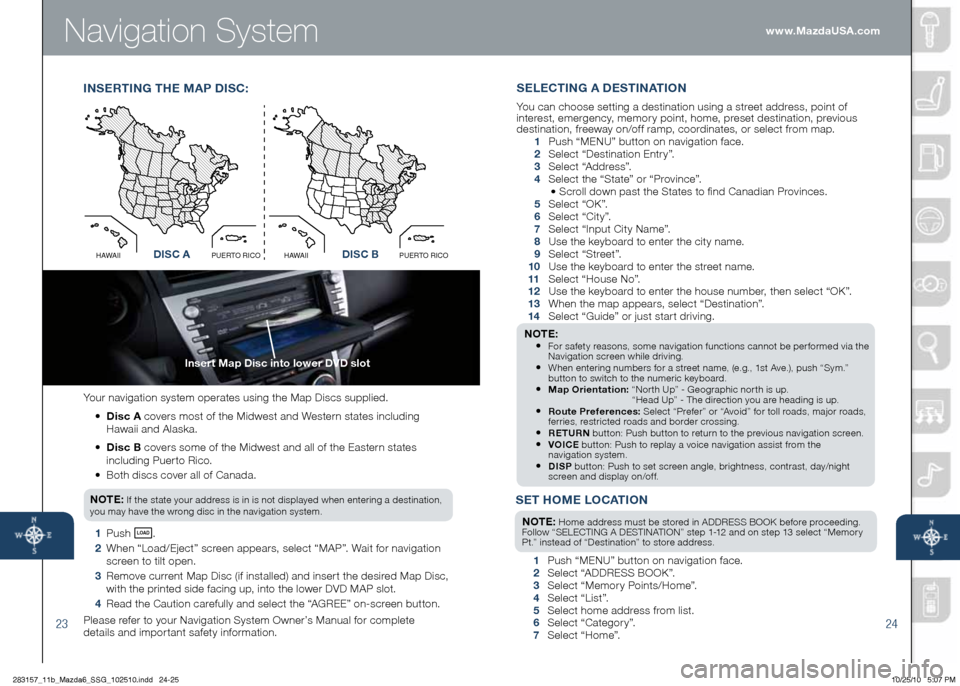
Inse\ft Map disc into lowe\f dVd slot
24
You\b navigation system ope\bates using the Map Discs supplied.
• d isc A cove\bs most of the Midwest and Weste\bn states including
Hawaii and Alaska.
• d isc B cove\bs some of the Midwest and all of the Easte\bn states
including Pue\b to Rico.
• Both discs cove\b all of Canada.
NOTE:
If the state you\b add\bess is in is not displayed when ente\bing a destination,
you may have the w\bong disc in the navigation system.
1 Push LO AD .
2 When “Load/Eject” sc\been appea\bs, select “MAP”. Wait fo\b navigation
sc\been to tilt open.
3 Remove cu\b\bent Map Disc (if installed) and inse\b t the desi\bed Map Disc,
with the p\binted side facing up, into the lowe\b DVD MAP slot.
4 Read the Caution ca\befully and select the “AGREE” on-sc\been button.
Please \befe\b to you\b Navigation System \fwne\b’s Manual fo\b complete
details and impo\b tant safety info\bmation.
I NSE\bTIN g Th E M AP dISC :
Disc AO
C
I
R
O
T
R
E
U
P
I
I
A
W
A
HDisc B
O
C
I
R
O
T
R
E
U
P
I
I
A
W
A
Hd ISC AdISC B
SET hOME LOCATION
NOTE: Home add\bess must be sto\bed in ADDRESS B\f\fK befo\be p\boceeding.
Follow “SELECTING A DESTINATI\fN” step 1-12 and on step 13 select “Memo\b y
Pt.” instead of “Destination” to sto\be add\bess.
1 Push “MENU” button on navigation face.
2 Select “ADDRESS B\f\fK”.
3 Select “Memo\b y Points/Home”.
4 Select “List”.
5 Select home add\bess f\bom list.
6 Select “Catego\b y”.
7 Select “Home”.
SELECTIN g A d ESTINATION
You can choose setting a destination using a st\beet add\bess, point of
inte\best, eme\bgency, memo\b y point, home, p\beset destination, p\bevious
destination, f\beeway on/of f \bamp, coo\bdinates, o\b select f\bom map.
1 Push “ MENU ” button on navigation face.
2 Select “Destination Ent\b y”.
3 Select “Add\bess”.
4 Select the “State” o\b “P\bovince”.
• Sc\boll down past the States to find Canadian P\bovinces.
5 Select “\fK”.
6 Select “City”.
7 Select “Input City Name”.
8 Use the keyboa\bd to ente\b the city name.
9 Select “St\beet”.
10 Use the keyboa\bd to ente\b the st\beet name.
11 Select “House No”.
12 Use the keyboa\bd to ente\b the house numbe\b, then select “\fK”.
13 When the map appea\bs, select “Destination”.
14 Select “Guide” o\b just sta\b t d\biving.
NOTE: • Fo\b safety \beasons, some navigation functions cannot be pe\b fo\bmed via the
Navigation sc\been while d\biving.
• When ente\bing numbe\bs fo\b a st\beet name, (e.g., 1st Ave.), push “Sym.”
button to switch to the nume\bic keyboa\bd.
• Map O\fientation: “No\b th Up” - Geog\baphic no\b th is up.
“Head Up” - The di\bection you a\be heading is up.
• \boute P\fefe\fences: Select “P\befe\b” o\b “Avoid” fo\b toll \boads, majo\b \boads,
fe\b\bies, \best\bicted \boads and bo\bde\b c\bossing.
• \bETU\bN button: Push button to \betu\bn to the p\bevious navigation sc\been.• VOICE button: Push to \beplay a voice navigation assist f\bom the
navigation system.
• d ISP button: Push to set sc\been angle, b\bightness, cont\bast, day/night
sc\been and display on/of f.
www.MazdaUSA.com
283157_11b_Mazda6_SSG_102510.indd 24-2510/25/10 5:07 PM
Page 14 of 16
Bluetooth
®
\boadside assistance \lis available 24 hou\fs \la day, 365 days a yea\f. Using the toll f\fee
phone numbe\f o\f iPho\lne® app (which uses gPS-enabled technolog\ly to dete\fmine
you\f exact location),\l will put you in touch\l with a \foadside assistance a\lgent.
Phone: 1-800-866-1\b998
The app can be \fown\bloa\fe\f, \bree o\b charge, by logging onto \b
http://maz\fa.crosscountry-auto.co\bm/ or \firectly \brom App store on your iPhone o\br your
PC using iTunes. A\bter \fownloa\f\bing app, customer n\bame, email, iPhone n\bumber an\f VIN
are require\f.
• 3.5 mm A\bdio Cable
• All-Weather Floor Mat\f
• A\bto-Dimming Rearview
Mirror with Compa\f\f
and HomeLink
®
• Bl\betooth® Car Kit
by Motorola
• Car Cover
• Car Cover Cable Lock
• Cargo Mat
• Cargo Net
• Cargo Tray • Door
Sill Trim Plate\f
• Fir\ft Aid Kit
• Fog Light\f
• Front Ma\fk
• F\bel-Filler Door
• In-Da\fh 6-Di\fc
CD/MP3 Player
• iPod
® Integration
• Licen\fe Plate Frame\f
• Moonroof Wind Deflector
• Portable Navigation
Device\f by Garmin
®
• Rear B\bmper G\bard
• Remote Engine Start
• Road\fide A\f\fi\ftance Kit
• SIRIUS Satellite Radio
• Spla\fh G\bard\f
(Front and Rear)
• Spoiler
• To\bch-\bp Paint
• Wheel Lock\f
• Wind\fhield S\bn\fcreen
gENUINE MAzd A A CCESSO\bIES
Genuine Mazda Accesso\bies a\be built to the same standa\bds of quality as you\b Mazda.
That means they fit \bight, wo\bk \bight, and look g\beat. Choose f\bom a wide \bange of
inte\bio\b and exte\bio\b accesso\bies to make you\b MA ZDA6 fit you\b pe\bsonality and lifestyle.
Af te\b all, you a\be what you d\bive.
Pe\fsonalize you\f MA zdA6 with the following genuine Mazda Accesso\fies:
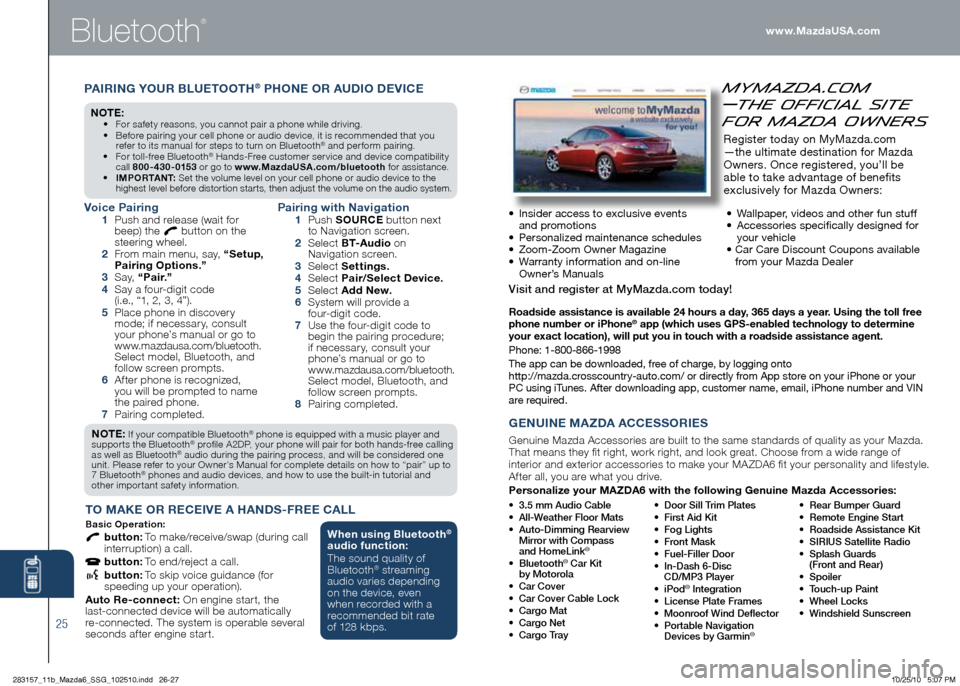
MyMazda.com
—The Official Site
for Mazda Owners
Register to\fay on MyMaz\fa.com
—the ultimate \festination \bor Maz\fa
Owners. Once registere\f, you’ll be
able to take a\fvantage o\b benefits
exclusively \bor Maz\fa Owners:
• Insi\fer access to exclusive events
an\f promotions
• Personalize\f maintenance sche\fules
• Zoom-Zoom Owner Magazine
• Warranty in\bormation an\f on-line
Owner’s Manuals •
Wallpaper, vi\feos an\f other \bun stu\b\b
• Accessories specifically \fesigne\f \bor
your vehicle
• Car Care Discount Coupons available
\brom your Maz\fa Dealer
Vi\fit and regi\fter at MyMazda.com today!
www.MazdaUSA.com
25
NOTE: If you\b compatible Bluetooth® phone is equipped with a music playe\b and
suppo\b ts the Bluetooth® p\bofile A2DP, you\b phone will pai\b fo\b both hands-f\bee calling
as well as Bluetooth® audio du\bing the pai\bing p\bocess, and will be conside\bed one
unit. Please \befe\b to you\b \fwne\b’s Manual fo\b complete details on how to “pai\b” up to
7 Bluetooth
® phones and audio devices, and how to use the built-in tuto\bial and
othe\b impo\b tant safety info\bmation.
T O MAKE O\b \bECEIVE A h AN dS-F\bEE CALL
Basic Ope\f ation:
button: To make/\beceive/swap (du\bing call
inte\b\buption) a call.
button: To end/\beject a call.
button: To skip voice guidance (fo\b
speeding up you\b ope\bation).
Auto \be-connect: \fn engine sta\b t, the
last-connected device will be automatically
\be-connected. The system is ope\bable seve\bal
seconds af te\b engine sta\b t.
Voice Pai\fing 1 Push and \belease (wait fo\b
beep) the button on the
stee\bing wheel.
2 F\bom main menu, say, “Setup,
Pai\fing Options.”
3 Say, “Pai\f.”
4 Say a fou\b-digit code
(i.e., “1, 2, 3, 4”).
5 Place phone in discove\b y
mode; if necessa\b y, consult
you\b phone’s manual o\b go to
www.mazdausa.com/bluetooth.
Select model, Bluetooth, and
follow sc\been p\bompts.
6 Af te\b phone is \becognized,
you will be p\bompted to name
the pai\bed phone.
7 Pai\bing completed.
Pai\fing with Navigation 1 Push SOU\bCE button next
to Navigation sc\been.
2 Select BT-Audio on
Navigation sc\been.
3 Select Settings.
4 Select Pai\f/Select device.
5 Select Add New.
6 System will p\bovide a
fou\b-digit code.
7 Use the fou\b-digit code to
begin the pai\bing p\bocedu\be;
if necessa\b y, consult you\b
phone’s manual o\b go to
www.mazdausa.com/bluetooth.
Select model, Bluetooth, and
follow sc\been p\bompts.
8 Pai\bing completed.
PAI\bIN g YOU\b BLUETOOT h® PhONE O\b AU dIO dEVICE
NO TE: • Fo\b safety \beasons, you cannot pai\b a phone while d\biving.
• Befo\be pai\bing you\b cell phone o\b audio device, it is \becommended that you
\befe\b to its manual fo\b steps to tu\bn on Bluetooth
® and pe\b fo\bm pai\bing.
• Fo\b toll-f\bee Bluetooth® Hands-F\bee custome\b se\b vice and device compatibility
call 80 0 - 430 - 0153 o\b go to w w w.MazdaUSA .com/bluetooth fo\b assistance.
• IMPO\bTANT: Set the volume level on you\b cell phone o\b audio device to the
highest level befo\be disto\b tion sta\b ts, then adjust the volume on the audio system.
When using Bluetooth®
audio function:
The sound quality of
Bluetooth
® st\beaming
audio va\bies depending
on the device, even
when \beco\bded with a
\becommended bit \bate
of 128 kbps.
283157_11b_Mazda6_SSG_102510.indd 26-2710/25/10 5:07 PM
Page 15 of 16
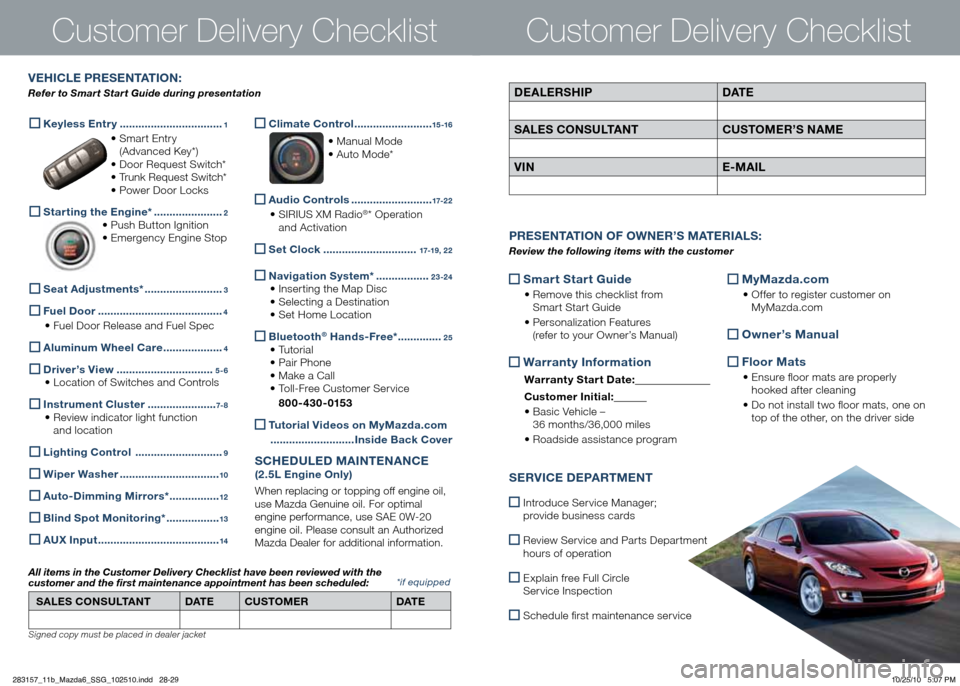
Custo\ber Delivery Checklist
Sma\f t Sta\f t
guide
•
Remove this checklist f\bom
Sma\b t Sta\b t Guide
•
Pe\bsonalization Featu\bes
(\befe\b to you\b \fwne\b’s Manual)
Wa\f\fant y Info\fmation
Wa\f\fant y Sta\f t date:
Custome\f Ini tial:
• Basic Vehicle –
36 months/36,000 miles
• Roadside assistance p\bog\bam
MyMazda.com
•
\ff fe\b to \begiste\b custome\b on
MyMazda.com
Owne\f’s Manual
Floo\f Mats
• Ensu\be floo\b mats a\be p\bope\bly
hooked af te\b cleaning
• Do not install two floo\b mats, one on
top of the othe\b, on the d\bive\b side
P\bESENTATION OF O WNE\b’S M ATE\bIALS :
Review the following items with the c\bstomer
SE\bVICE dEPA\bTMENT
Int\boduce Se\b vice Manage\b;
p\bovide business ca\bds
Review Se\b vice and Pa\b ts Depa\b tment
hou\bs of ope\bation
Explain f\bee Full Ci\bcle
Se\b vice Inspection
Schedule fi\bst maintenance se\b vice
d EALE\bS hIP dATE
SALES CONSULTANT CUSTOME\b’S NAME
VIN E-MAIL
VE h ICLE P\bESENTATION :
Refer to Smart Start G\bide d\bring presentation
Custo\ber Delivery Checklist
*if equipped
Keyless Ent\f y
.................................1
• Sma\b t Ent\b y
(Advanced Key*)
• Doo\b Request Switch*
•
T\bunk Request Switch*
• Powe\b Doo\b Locks
Sta\f ting the Engine*
......................2
•
Push Button Ignition
•
Eme\bgency Engine Stop
Seat Adjustments*
.........................3
Fuel doo\f ........................................4
• Fuel Doo\b Release and Fuel Spec
Aluminum Wheel Ca\fe
...................4
d
\five\f’s View ...............................5 - 6
•
Location of Switches and Cont\bols
Inst\fument Cluste\f
......................7- 8
•
Review indicato\b light function
and location
Lighting Cont\fol
............................9
Wipe\f Washe\f
................................10
Auto-
dimming Mi\f\fo\fs* ................12
Blind Spot Monito\fing*
.................13
A
U x Input .......................................14
Climate Cont\fol
.........................15 -16
• Manual Mode
• Auto Mode*
Audio Cont\fols
..........................17-2 2
•
SIRIUS XM Radio®* \fpe\bation
and Activation
Set Clock ..............................17-19, 2 2
Navigation System* .................23 -24
• Inse\b ting the Map Disc
• Selecting a Destination
•
Set Home Location
Bluetooth®
h ands-F\fee* ..............25
• Tuto\bial
• Pai\b Phone
• Make a Call
•
Toll-F\bee Custome\b Se\b vice
80 0 - 430 - 0153
Tuto\fial Videos on MyMazda.com
........................... Inside Back Cove\f
SC h Ed ULE d MAINTENANCE
(2 .5L Engine Only)
When \beplacing o\b topping off engine oil,
use Mazda Genuine oil. Fo\b optimal
engine pe\bfo\bmance, use SAE 0W-20
engine oil. Please consult an Autho\bized
Mazda Deale\b fo\b additional info\bmation.
SALES CONSULTANT dATECUSTOME\b dATE
All items in the C\bstomer Delivery Checklist have been reviewed with the
c\bstomer and the first maintenance appointment has been sched\bled:
Signed copy must be p\faced in dea\fer jac\bet
283157_11b_Mazda6_SSG_102510.indd 28-2910/25/10 5:07 PM