steering MAZDA MODEL 6 2017 Quick Start Guide (in English)
[x] Cancel search | Manufacturer: MAZDA, Model Year: 2017, Model line: MODEL 6, Model: MAZDA MODEL 6 2017Pages: 46, PDF Size: 5.45 MB
Page 3 of 46
1
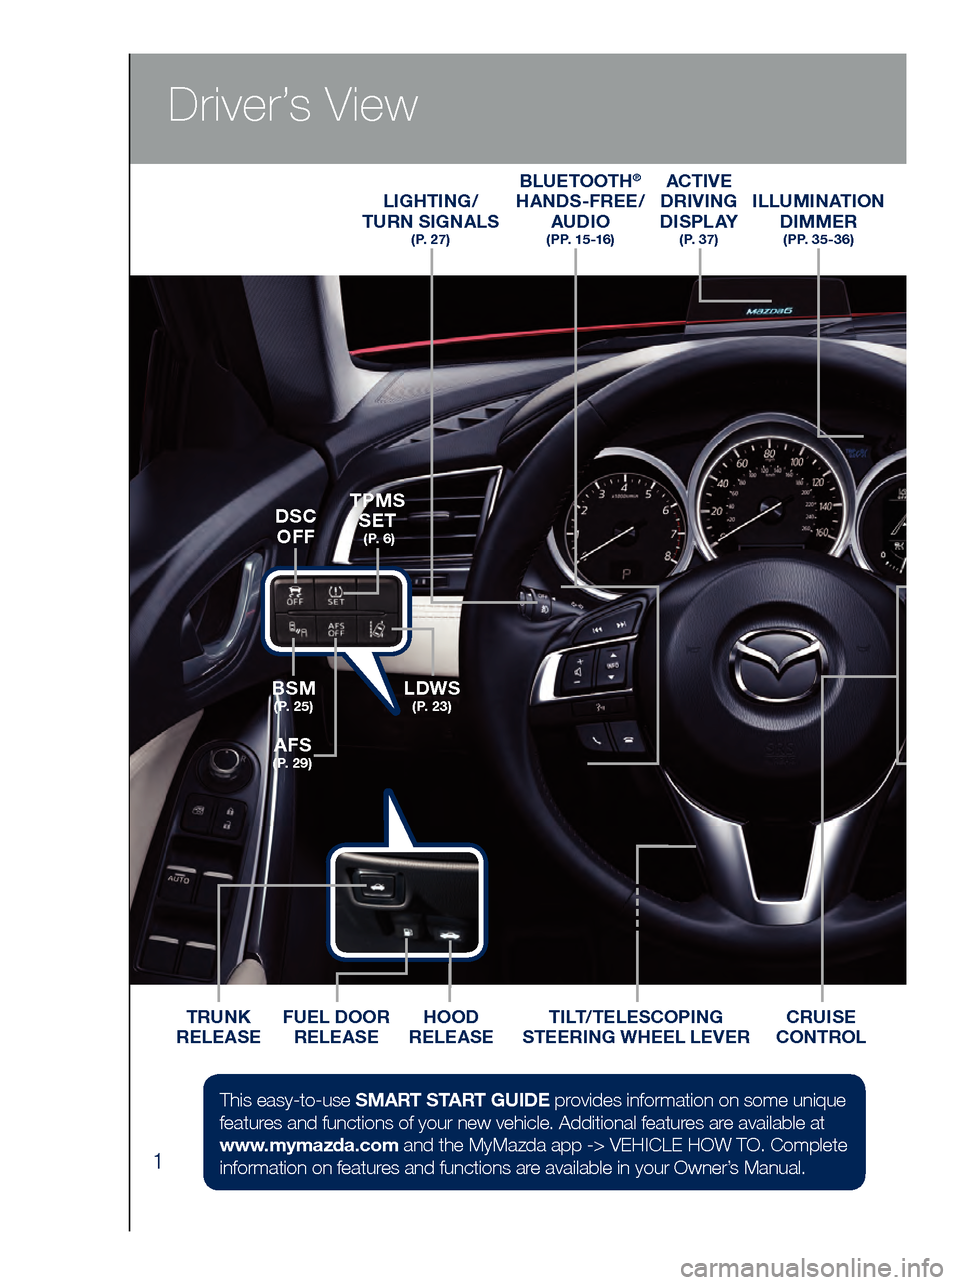
Driver’s View
ACTIVE
DRIVING
D I S P L AY
( P. 3 7 )
ILLUMINATION DIMMER
( P P. 3 5 - 3 6 )
LIGHTING/
TURN SIGNALS
( P. 2 7 )
BLUETOOTH®
HANDS-FREE/
AUDIO
( P P. 1 5 -1 6 )
HOOD
RELEASE
FUEL DOOR
RELEASE
TRUNK
RELEASE TILT/TELESCOPING
STEERING WHEEL LEVERCRUISE
CONTROL
BSM
( P. 2 5 )LDWS
( P. 2 3 )
TPMS SET
( P. 6 )
AFS
( P. 2 9 )
DSC
OFF
This easy-to-use SMART START GUIDE provides information on some unique
features and functions of your new vehicle. Additional features are available at
www.mymazda.com and the MyMazda app -> VEHICLE HOW TO. Complete
information on features and functions are available in your Owner’s Manual.
Page 4 of 46
2
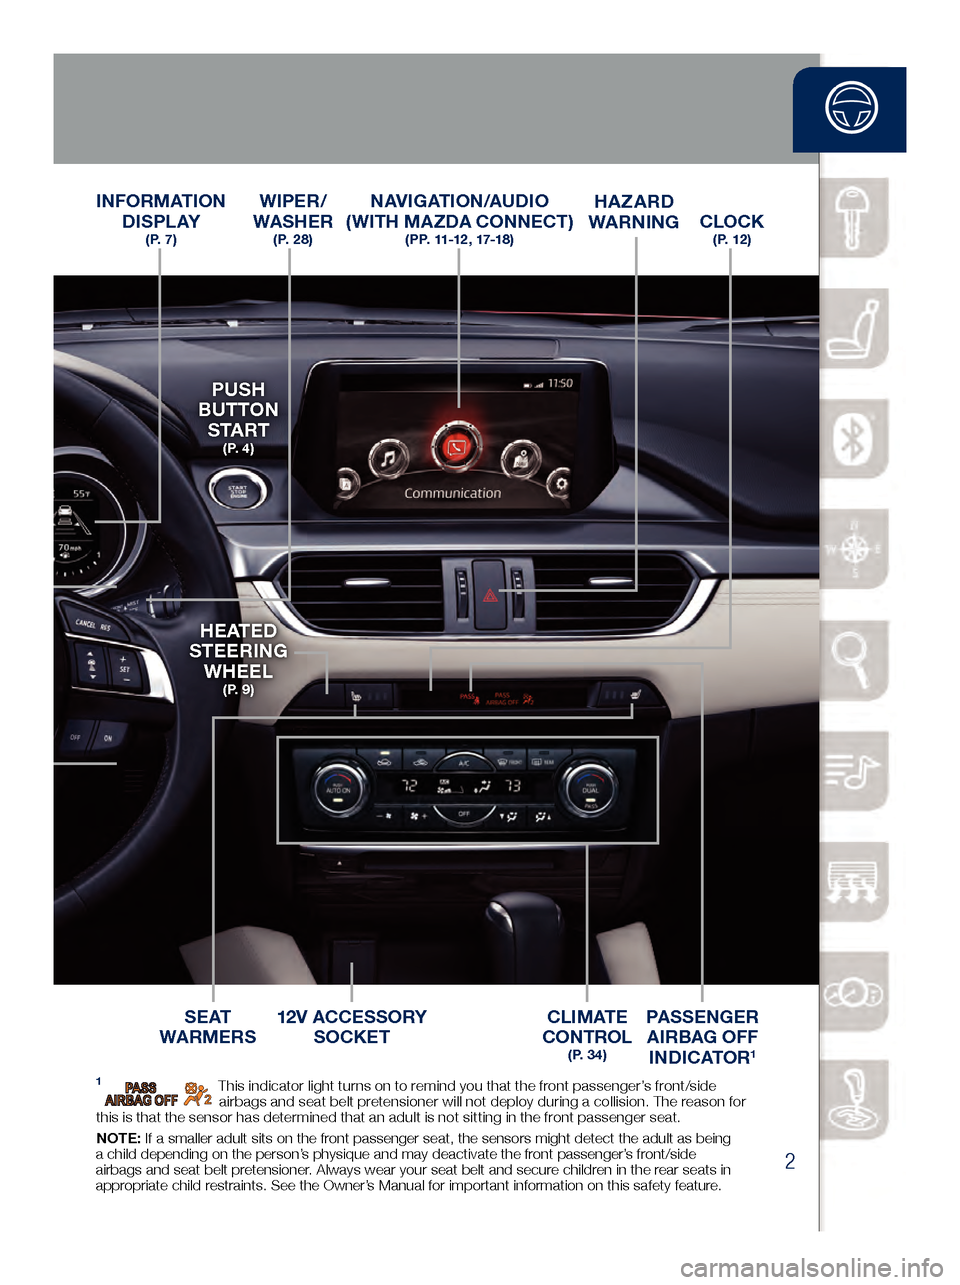
Driver’s View
CLOCK ( P. 1 2 )
INFORMATION D I S P L AY
( P. 7 )
S E AT
WARMERSC L I M AT E
CONTROL
( P. 3 4 )
PASSENGER
AIRBAG OFF INDICATOR
1
HAZARD
WARNING
12V ACCESSORY SOCKET
PUSH
BUTTON
S TA R T
( P. 4 )
H E AT E D
STEERING WHEEL
( P. 9 )
WIPER/
WASHER
( P. 2 8 )
NAVIGATION/AUDIO
(WITH MAZDA CONNECT)
( P P. 11-12 , 17-18 )
1 This indicator light turns on to remind you that the front passenger’s front/side
airbags and seat belt pretensioner will not deploy during a collision. The reason for
this is that the sensor has determined that an adult is not sitting in the front passenger seat.
NOTE: If a smaller adult sits on the front passenger seat, the sensors might detect the adult as being
a child depending on the person’s physique and may deactivate the front passenger’s front/side
airbags and seat belt pretensioner. Always wear your seat belt and secure children in the rear seats in
appropriate child restraints. See the Owner’s Manual for important information on this safety feature.
www.MazdaUSA.com
Page 9 of 46
7
Multi-Information Display
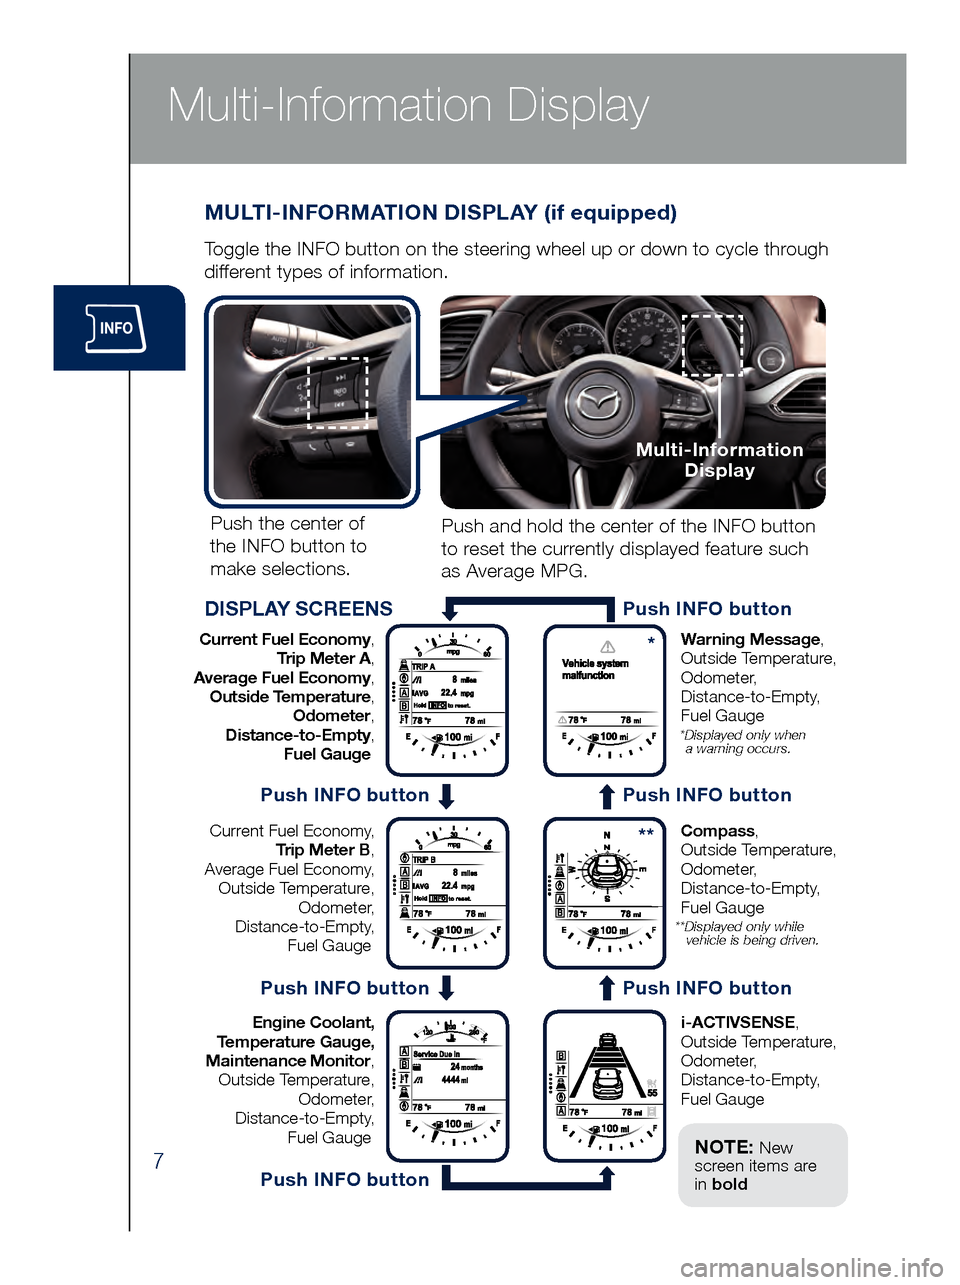
MULTI-INFORMATION DISPLAY (if equipped)
Toggle the INFO button on the steering wheel up or down to cycle through
different types of information.Push the center of
the INFO button to make selections.
Current Fuel Economy, Trip Meter A,
Average Fuel Economy, Outside Temperature, Odometer,
Distance-to-Empty, Fuel Gauge Warning Message,
Outside Temperature,
Odometer, Distance-to-Empty,
Fuel Gauge
* Displayed only when
a warning occurs.
Current Fuel Economy,
Trip Meter B,
Average Fuel Economy, Outside Temperature, Odometer,
Distance-to-Empty, Fuel Gauge Compass,
Outside Temperature,
Odometer, Distance-to-Empty,
Fuel Gauge
** Displayed only while vehicle is being driven.
Engine Coolant,
Temperature Gauge,
Maintenance Monitor, Outside Temperature, Odometer,
Distance-to-Empty, Fuel Gauge i-ACTIVSENSE,
Outside Temperature,
Odometer, Distance-to-Empty,
Fuel Gauge
Push and hold the center of the INFO button
to reset the currently displayed feature such
as Average MPG.
DISPLAY SCREENS
Multi-Information Display
Push INFO button
*
**
Push INFO button
Push INFO button
Push INFO button
Push INFO button
Push INFO button
NOTE: New
screen items are
in bold
Page 11 of 46
9
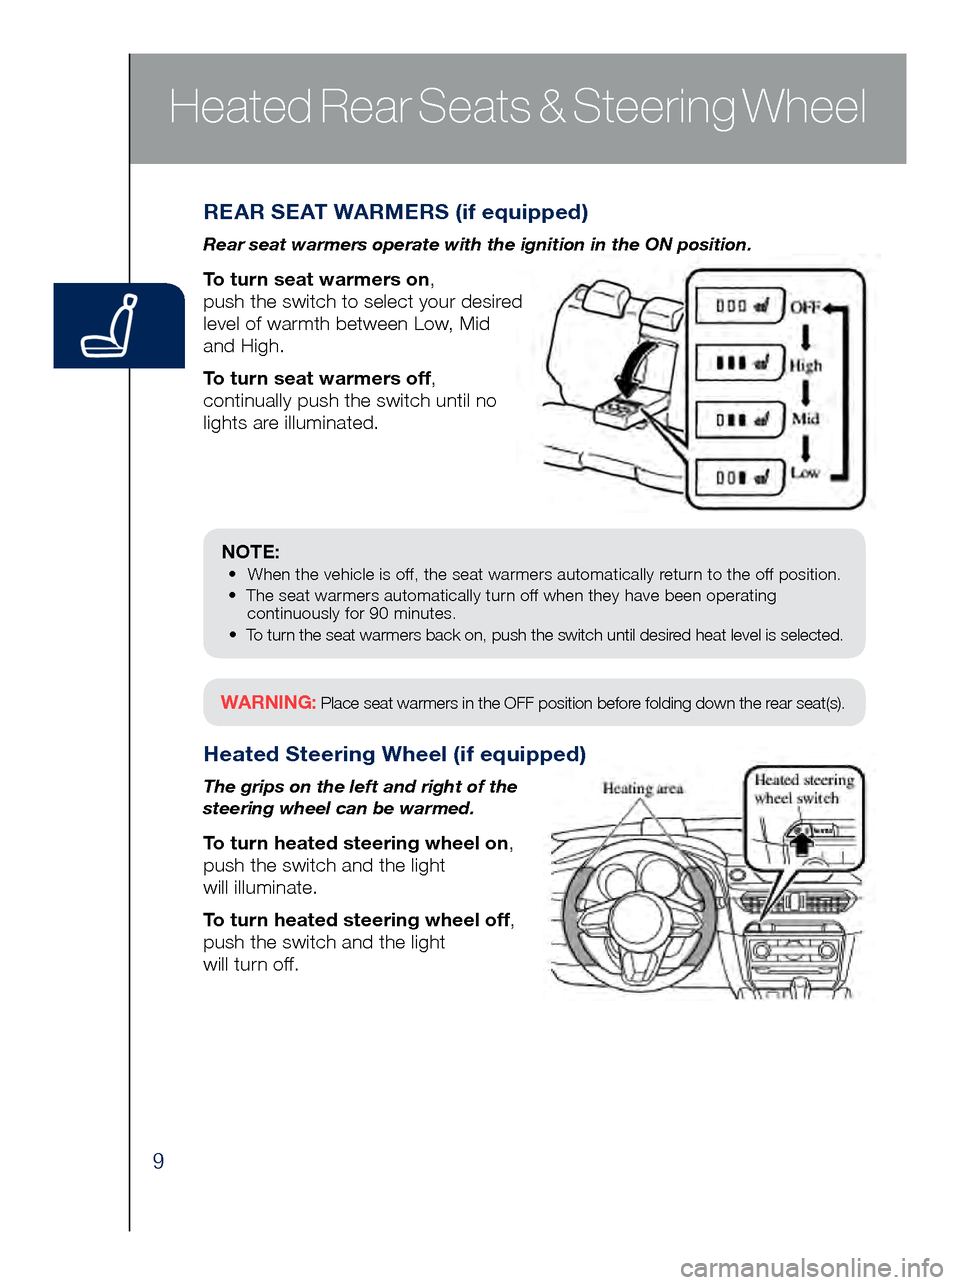
REAR SEAT WARMERS (if equipped)
Rear seat warmers operate with the ignition in the ON position.
To turn seat warmers on,
push the switch to select your desired
level of warmth between Low, Mid
and High.
To turn seat warmers off,
continually push the switch until no
lights are illuminated.
Heated Steering Wheel (if equipped)
The grips on the left and right of the
steering wheel can be warmed.
To turn heated steering wheel on,
push the switch and the light
will illuminate.
To turn heated steering wheel off,
push the switch and the light
will turn off.
Heated Rear Seats & Steering Wheel
NOTE: • When the vehicle is off, the seat warmers automatically return to the off position.
• The seat warmers automatically turn off when they have been operating
continuously for 90 minutes.
•
To turn the seat warmers back on, push the switch until desir
ed heat level is selected.
WARNING: Place seat warmers in the OFF position before folding down the rear seat(s).
Page 16 of 46
14
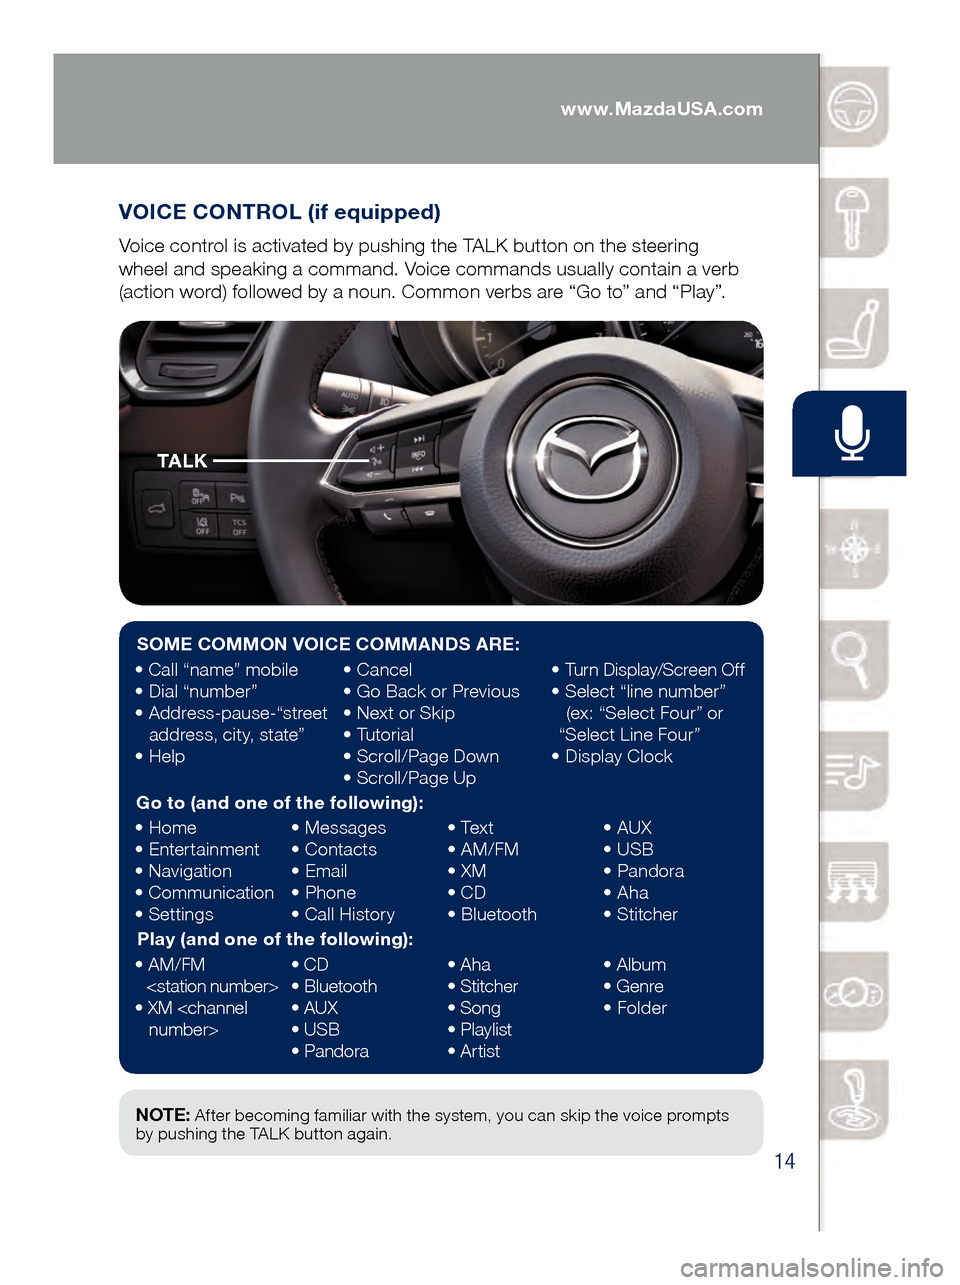
VOICE CONTROL (if equipped)
Voice control is activated by pushing the TALK button on the steering
wheel and speaking a command. Voice commands usually contain a verb
(action word) followed by a noun. Common verbs are “Go to” and “Play”.
Commander/Voice Control
NOTE: After becoming familiar with the system, you can skip the voice prompts
by pushing the TALK button again.
SOME COMMON VOICE COMMANDS ARE:
• Call “name” mobile
• Dial “number”
•
Ad
dress-pause-“street
address, city, state”
•
He
lp •
Ca
ncel
•
Go Ba
ck or Previous
•
Next o
r Skip
•
Tu
torial
•
Scro
ll/Page Down
•
Scro
ll/Page Up•
Turn
Display/Screen Off
•
Sele
ct “line number”
(ex: “Select Four” or
“Select Line Four”
•
Dis
play Clock
Go to (and one of the following):
•
Home
•
Ent
ertainment
•
Nav
igation
•
Co
mmunication
•
Set
tings •
Me
ssages
•
Con
tacts
•
Em
ail
•
Ph
one
•
Call
History•
Tex
t
•
AM/F
M
•
XM
• CD
•
Bl
uetooth•
AUX
• US
B
•
Pa
ndora
•
Ah
a
•
St
itcher
Play (and one of the following):
•
AM/F
M
•
XM <
channel
number> •
CD
•
Bl
uetooth
•
AUX
• US
B
•
Pa
ndora•
Ah
a
•
St
itcher
•
Song
•
Pl
aylist
•
Ar
tist•
Al
bum
•
Ge
nre
•
Fo
lder
TA L K
www.MazdaUSA.com
Page 20 of 46
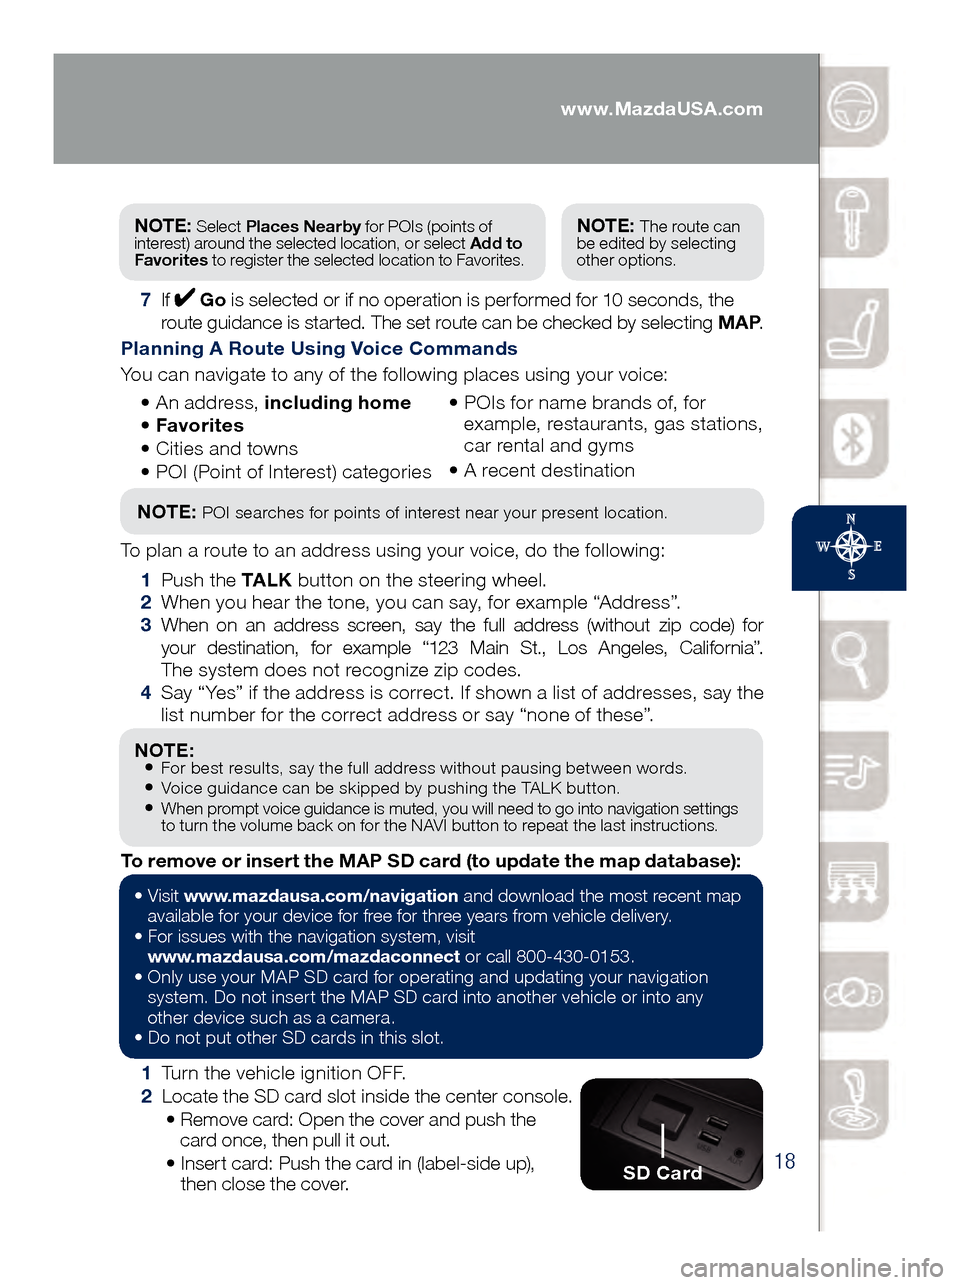
18
NOTE: • For best results, say the full address without pausing between words.• Voice guidance can be skipped by pushing the TALK button.• When prompt voice guidance is muted, you will need to go into navigation settings
to turn the volume back on for the NAVI button to repeat the last instructions.
1 Turn the vehicle ignition OFF.
2 Loc
ate the SD card slot inside the center console.
• Rem
ove card: Open the cover and push the
card once, then pull it out.
• Ins
ert card: Push the card in (label-side up),
then close the cover.
To remove or insert the MAP SD card (to update the map database):
NOTE: Select
Places Nearby for POIs (points of
interest) around the selected location, or select Add to
Favorites to register the selected location to Favorites.NOTE: The route can
be edited by selecting
other options.
7 If Go is selected or if no operation is performed for 10 seconds, the
route guidance is started. The set route can be checked by selecting MAP .
Planning A Route Using Voice Commands
You can navigate to any of the following places using your voice:
• An
address, including home
• Favo
rites
• Cit
ies and towns
• POI (
Point of Interest) categories •
POI
s for name brands of, for
example, restaurants, gas stations,
car rental and gyms
•
A rec
ent destination
NOTE: POI searches for points of interest near your present location.
To plan a route to an address using your voice, do the following:
1 Pus
h the TA L K button on the steering wheel.
2 Whe
n you hear the tone, you can say, for example “Address”.
3 Whe
n on an address screen, say the full address (without zip code) for
your destination, for example “123 Main St., Los Angeles, California”.
The system does not recognize zip codes.
4 Say “
Yes” if the address is correct. If shown a list of addresses, say the
list number for the correct address or say “none of these”.
SD Card
• Visit www .mazdausa.com/navigation and download the most recent map
available for your device for free for three years from vehicle delivery.
•
For issues with the navigation system, visit
www.mazdausa.com/mazdaconnect
or call 800-430-0153.
•
Onl
y use your MAP SD card for operating and updating your navigation
system. Do not insert the MAP SD card into another vehicle or into any
other device such as a camera.
•
Do no
t put other SD cards in this slot.
www.MazdaUSA.com
Page 25 of 46
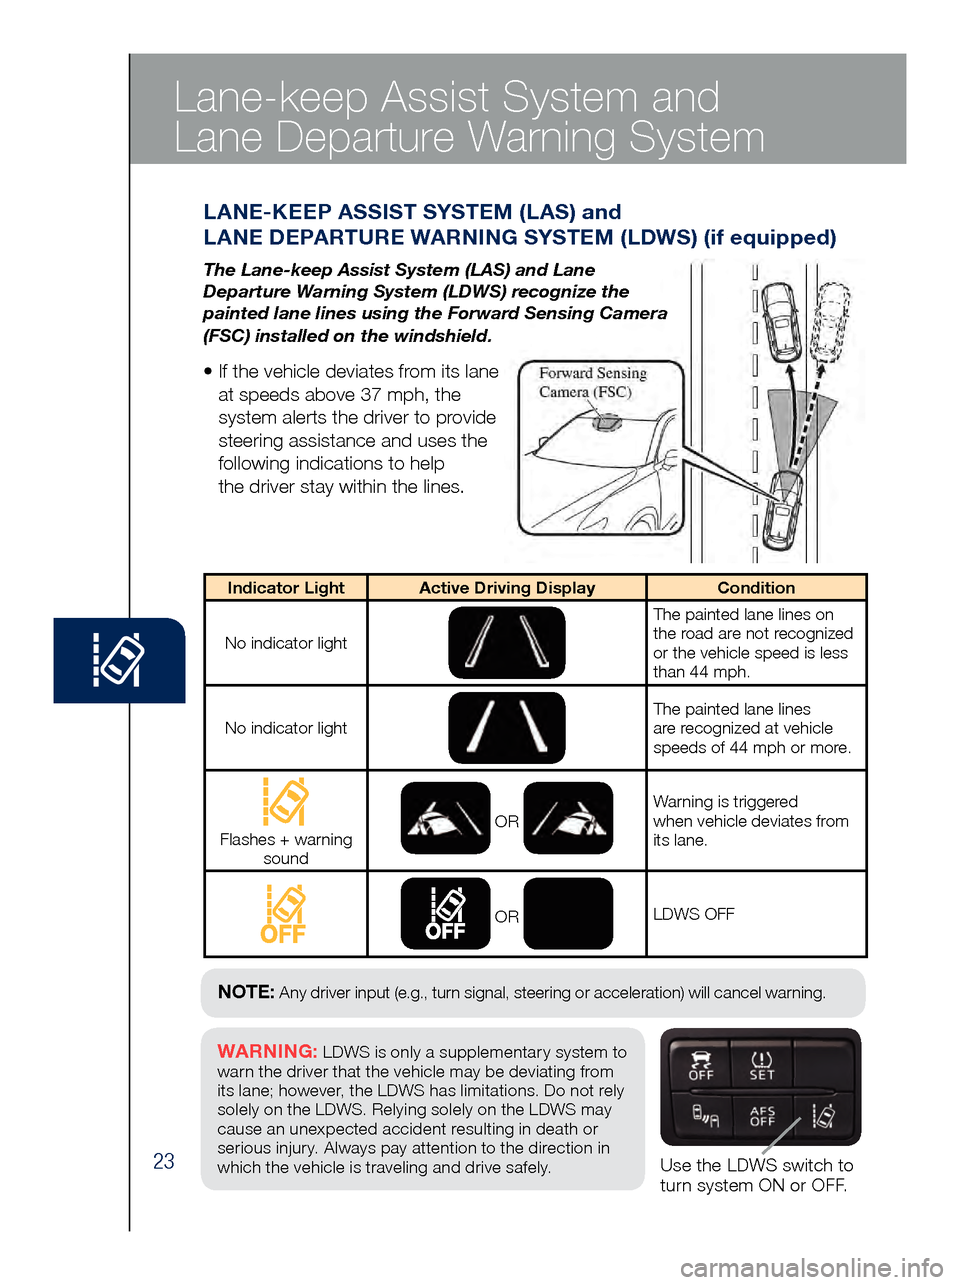
23Use the LDWS switch to
turn system ON or OFF.
WARNING: LDWS is only a supplementary system to
warn the driver that the vehicle may be deviating from
its lane ; however, the LDWS has limitations. Do not rely
solely on the LDWS. Relying solely on the LDWS may
cause an unexpected accident resulting in death or
serious injury. Always pay attention to the direction in
which the vehicle is traveling and drive safely.
NOTE: Any driver input (e.g., turn signal, steering or acceleration) will cancel warning.
Lane-keep Assist System and
Lane Departure Warning System
LAN E-KEEP ASSIST SYSTEM (LAS) and
LANE DEPARTURE WARNING SYSTEM (LDWS) (if equipped)
The Lane-keep Assist System (LAS) and Lane
Departure Warning System (LDWS) recognize the
painted lane lines using the Forward Sensing Camera
(FSC) installed on the windshield.
• If the vehicle deviates from its lane
at speeds above 37 mph, the
system alerts the driver to provide
steering assistance and uses the
following indications to help
the driver stay within the lines.
Indicator Light Active Driving Display Condition
No indicator light
The painted lane lines on
the road are not recognized
or the vehicle speed is less
than 44 mph.
No indicator light
The painted lane lines
are recognized at vehicle
speeds of 44 mph or more.
Flashes + warning sound OR
Warning is triggered
when vehicle deviates from
its lane.
OR
LDWS OFF
Page 31 of 46
29
Headlights (cont’d from pg. 25)
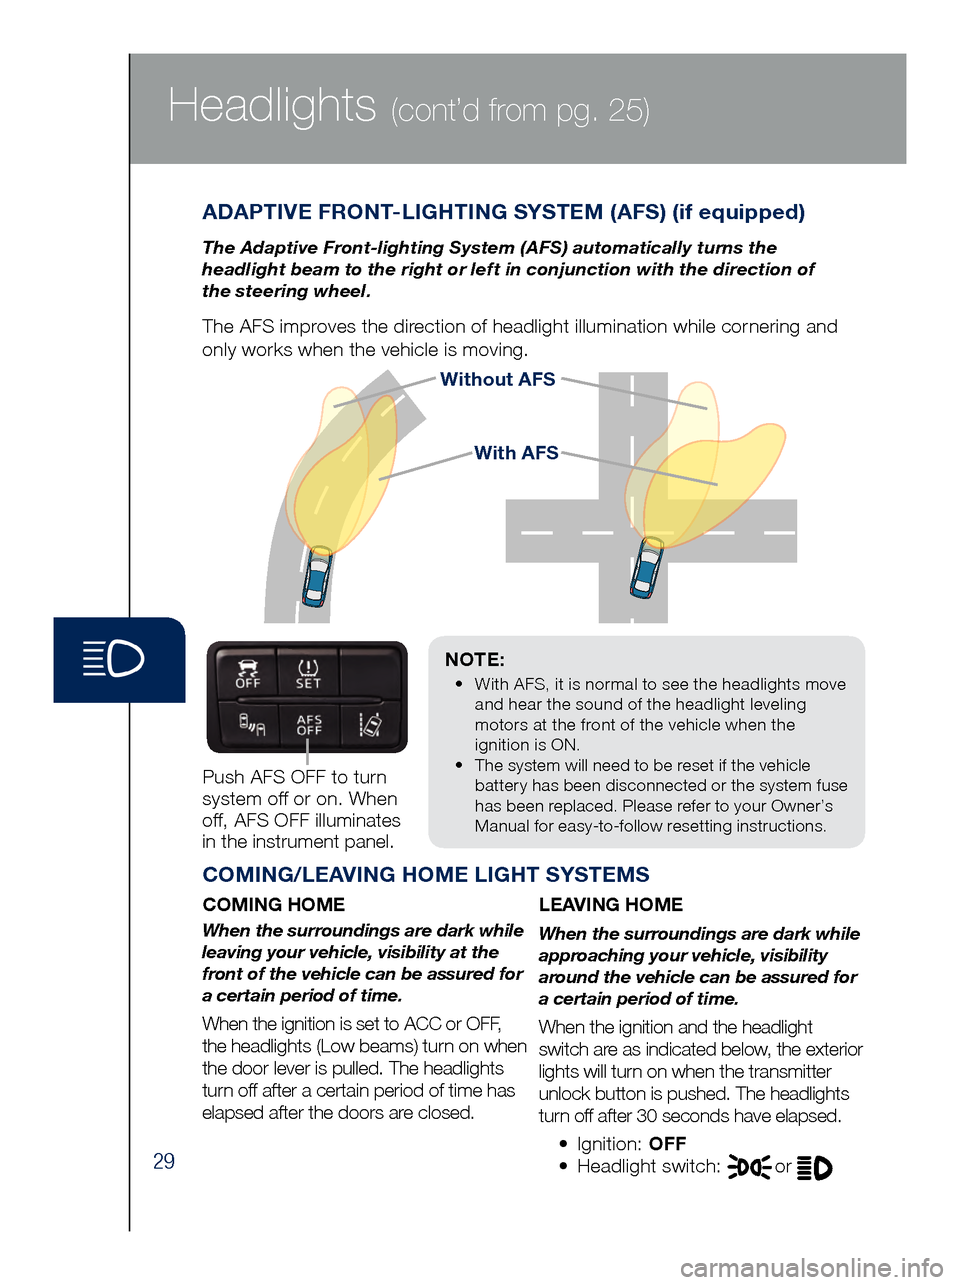
Without AFS
NOTE:
•
Wit
h AFS, it is normal to see the headlights move
and hear the sound of the headlight leveling
motors at the front of the vehicle when the
ignition is ON.
•
The s
ystem will need to be reset if the vehicle
battery has been disconnected or the system fuse
has been replaced. Please refer to your Owner’s
Manual for easy-to-follow resetting instructions.
ADAPTIVE FRONT-LIGHTING SYSTEM (AFS) (if equipped)
The Adaptive Front-lighting System (AFS) automatically turns the
headlight beam to the right or left in conjunction with the direction of
the steering wheel.
The AFS improves the direction of headlight illumination while cornering and
only works when the vehicle is moving.
Push AFS OFF to turn
system off or on. When
off, AFS OFF illuminates
in the instrument panel.
COMING/LEAVING HOME LIGHT SYSTEMS
COMING HOME
When the surroundings are dark while
leaving your vehicle, visibility at the
front of the vehicle can be assured for
a certain period of time.
When the ignition is set to ACC or OFF,
the headlights (Low beams) turn on when
the door lever is pulled. The headlights
turn off after a certain period of time has
elapsed after the doors are closed.
LEAVING HOME
When the surroundings are dark while
approaching your vehicle, visibility
around the vehicle can be assured for
a certain period of time.
When the ignition and the headlight
switch are as indicated below, the exterior
lights will turn on when the transmitter
unlock button is pushed. The headlights
turn off after 30 seconds have elapsed.
•
Ignition: OFF
• Headlight switch: or
With AFS
Page 34 of 46
32
Audio Controls (with Mazda Connect)
AUDIO OPERATION USING VOICE
Audio operation and media selection
can be done using voice recognition. Push the TALK button on the steering
wheel, wait for a beep, then say a
command in a clear, natural voice (not too fast or too slow). Some common
commands are listed below.
Play (and any of the following):
AM, FM, XM, CD, Bluetooth, Aha, Pandora, Stitcher, USB, AUX
Play or Resume / Pause or
Stop / Next or Previous
Play (and any of the following):
Song, Playlist
Artist
Tune to Station
Tune to Channel Number (XM)
HD RADIO
HD radio has a special
receiver which allows it to
receive digital broadcasts (where available) in addition to the analog broadcasts it already receives. Digital broadcasts have better sound
quality than analog broadcasts as digital broadcasts provide free, crystal clear audio.
When the HD radio button is ON (red), there could be a
noticeable difference in sound
quality and volume when a change from digital to analog signals occurs. If the sound
quality and volume become noticeably diminished or cut
off, select the HD button to turn OFF HD radio (not red).
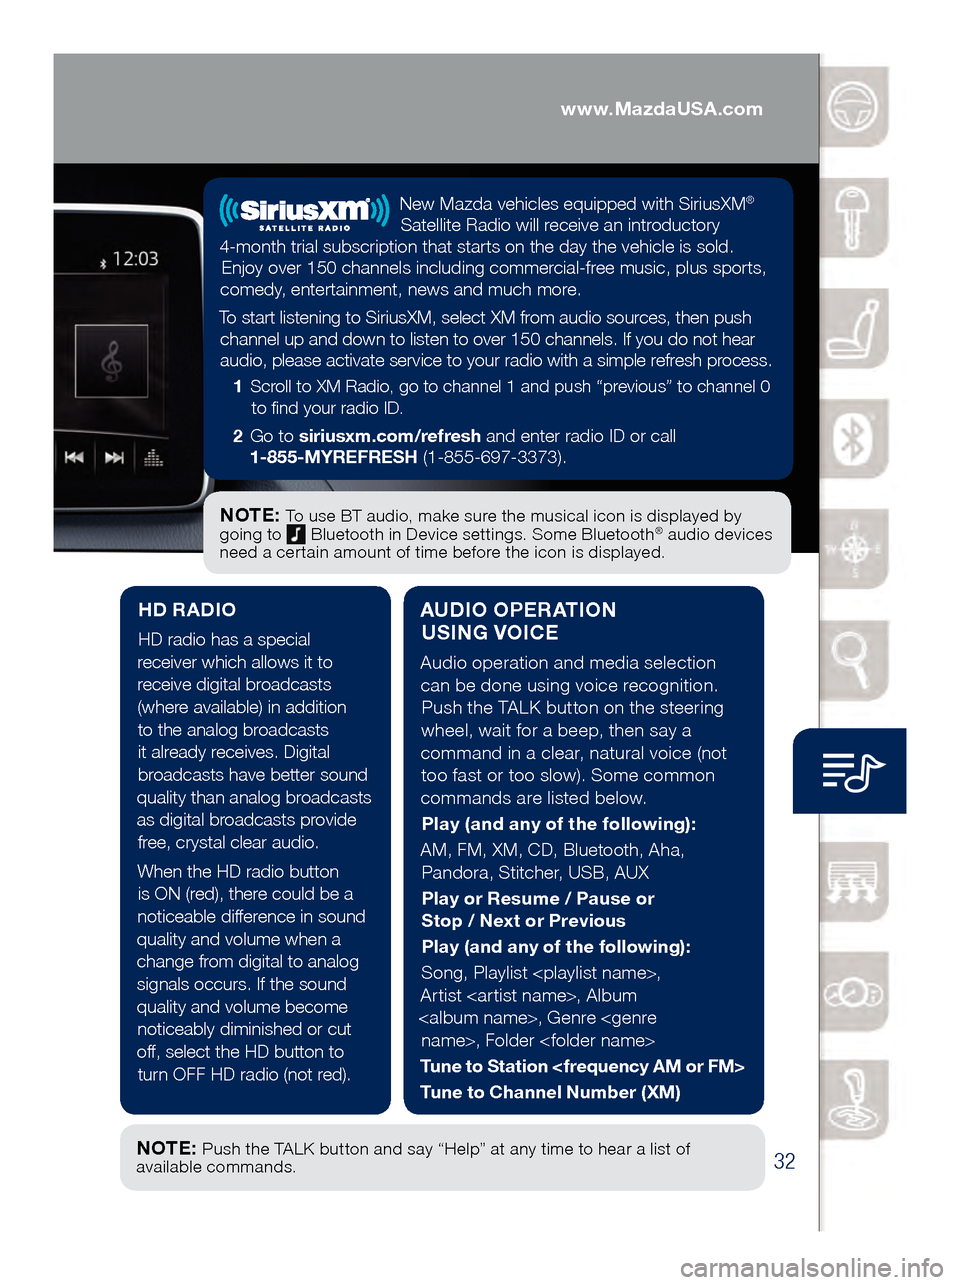
NOTE: To use BT audio, make sure the musical icon is displayed by
going to Bluetooth in Device settings. Some Bluetooth® audio devices
need a certain amount of time before the icon is displayed.
NOTE: Push the TALK button and say “Help” at any time to hear a list of
available commands.
New Mazda vehicles equipped with SiriusXM®
Satellite Radio will receive an introductory
4-month trial subscription that starts on the day the vehicle is sold. Enjoy over 150 channels including commercial-free music, plus sports,
comedy, entertainment, news and much more.
To start listening to SiriusXM, select XM from audio sources, then push channel up and down to listen to over 150 channels. If you do not hear audio, please activate service to your radio with a simple refresh process.
1 Scroll to XM Radio, go to channel 1 and push “previous” to channel 0
to find your radio ID.
2 Go to siriusxm.com/refresh and enter radio ID or call
1-855-MYREFRESH (1-855-697-3373).
www.MazdaUSA.com
Page 35 of 46
33
NOTE: You will need an audio cable with an 1/8 inch (3.5 mm)
mini stereo plug (available as a Genuine Mazda accessory) to
connect your portable audio player into the AUX jack.
I M P O R TA N T: • Set the volume level on your portable audio player to the highest level before
dis
tortion starts, then use the vehicle’s audio system to adjust the volume.
•
Unpl
ug any device from the USB port and accessory socket before turning off
the vehicle. Leaving devices plugged in can drain the battery and cause issues
during the Bluetooth pairing process at start-up. Wait about 15 seconds after
starting the vehicle before plugging anything into the USB port.
1 Locate the USB port or AUX jack.
2
Connect t
he device plug into the portable audio player and into the
USB port or AUX jack.
3
Turn t
he vehicle audio system on.
4
• Audi
o Controls (without Mazda Connect) : Push the MEDIA
butt
on on the audio unit to switch to the AUX or USB mode.
• Audi
o Controls (with Mazda Connect) : Select AUX or USB from
the Sources menu.
5
• USB Po
rt: Use the vehicle’s audio system or steering wheel controls
to con
trol the connected USB device.
• AUX Ja
ck: Use the portable audio player controls to play music.
Refer to the Owner’s Manual for additional information.
PORTABLE AUDIO PLAYER INTEGRATION
USING THE USB PORT OR AUX JACK
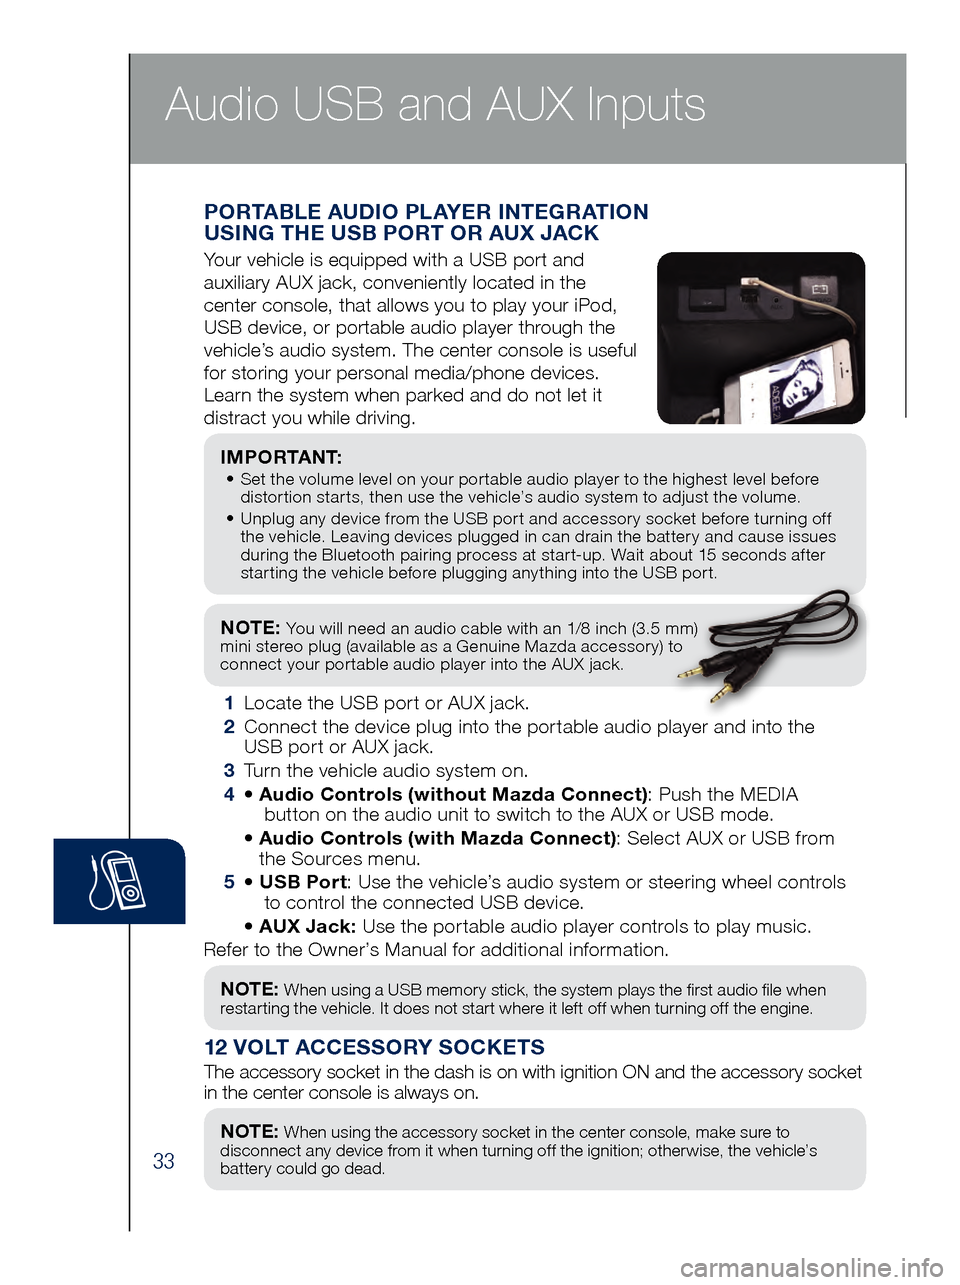
Your vehicle is equipped with a USB port and
auxiliary AUX jack, conveniently located in the
center console, that allows you to play your iPod,
USB device, or portable audio player through the
vehicle’s audio system. The center console is useful
for storing your personal media/phone devices.
Learn the system when parked and do not let it
distract you while driving.
12 VOLT ACCESSORY SOCKETS
The accessory socket in the dash is on with ignition ON and the accessor\
y socket
in the center console is always on.
NOTE: When using a USB memory stick, the system plays the first audio file when
restarting the vehicle. It does not start where it left off when turning off the engine.
NOTE: When using the accessory socket in the center console, make sure to
disconnect any device from it when turning off the ignition; otherwise, the vehicle’s
battery could go dead.
Audio USB and AUX Inputs