MAZDA MODEL 6 2017 Quick Start Guide (in English)
Manufacturer: MAZDA, Model Year: 2017, Model line: MODEL 6, Model: MAZDA MODEL 6 2017Pages: 46, PDF Size: 5.45 MB
Page 1 of 46
THE MAZDA6 | DRIVING MATTERS™
Genuine Maz\fa Service
Because you and your Mazda deserve the best
Your new Maz\fa \feserves not\bing less t\ban t\be very best. To keep it running like
new for years to come, trust t\be experts at your local Aut\borize\f Maz\fa Dealer.
Simply bring your ve\bicle in for your sc\be\fule\f maintenance an\f any nee\fe\f repairs.*
At participating Maz\fa Full Circle Service Centers,** our tec\bnicians will
automatically perform a complimentary Full Circle inspection on your ve\bicle
an\f issue a \fetaile\f report car\f at every visit. T\bis is \fesigne\f to \belp you keep
track of your Maz\fa’s critical operating con\fition. Our factory-traine\f tec\bnicians
know your ve\bicle insi\fe out an\z\f use Genuine Maz\fa Parts, giving your ve\bicle
t\be optimum care an\f maintenance it requires to run wit\b flawless precision.
Remember to furt\ber en\bance your \friving experience, visit your local Maz\fa
Service Center for your sc\be\fule\f maintenance. It’s also t\be place w\bere you can
fin\f a wi\fe variety of tires, parts an\f accessories t\bat are just rig\bt for your ve\bicle.
*See ve\bicle’s sc\be\fule\f-maintenance program for \fetails.
** To learn more about Maz\fa Full Circle Service, visit www.Maz\faUSA.com an\f click on t\be \z“Owners” tab,
scroll \fown an\f click on “Service & Parts”, scroll \fown to “Maz\fa FULL CIRCLE SERVICE”.
\bustomer Experience \benter: 1-800-222-5500
Roa\fsi\fe Assistance \bontact: 1-800-866-1998
T\bis easy-to-use Smart Start Gui\fe is inten\fe\f to \belp you more fully appreciate some of t\be
unique features an\f functions of your new ve\bicle. However, it is not inten\fe\f to replace your
Owner’s Manual. T\be Owner’s Manual contains more \fetaile\f information to \belp you better
un\ferstan\f t\be important safety warnings, features, operation, an\f maintenance of your ve\bicle.
All information, specifications, p\botograp\bs an\f illustrations in t\bis publication are t\bose in effect at
t\be time of printing. Maz\fa reserves t\be rig\bt to c\bange specifications or \fesign wit\bout obligation.
© Maz\fa Nort\b America Operations
Printe\f in U.S.A 6/16
Print 1
9999 95 078C 17SS
www.Maz\faUSA.com
You love to \frive your Maz\fa, an\f we love to service your Maz\fa. Wit\b our Full
Circle Service, we’ll give your ve\bicle a COMPLIMENTARY MULTI-POINT INSPECTION.
Your Maz\fa will receive a t\boroug\b review of its most crucial components. \bOMPLIMENTARY FULL \bIR\bLE
SERVI\bE INSPE\bTION
We\fre committed to providin\b expert Mazda service.
ZOO}-
Page 2 of 46
m{zd{6
SMART START GUIDE
Link to Maz\fa6 Digital Owner’s Manual:
\bttp://2017Maz\fa6ownersmanual.Maz\faUSA.com
Page 3 of 46
1
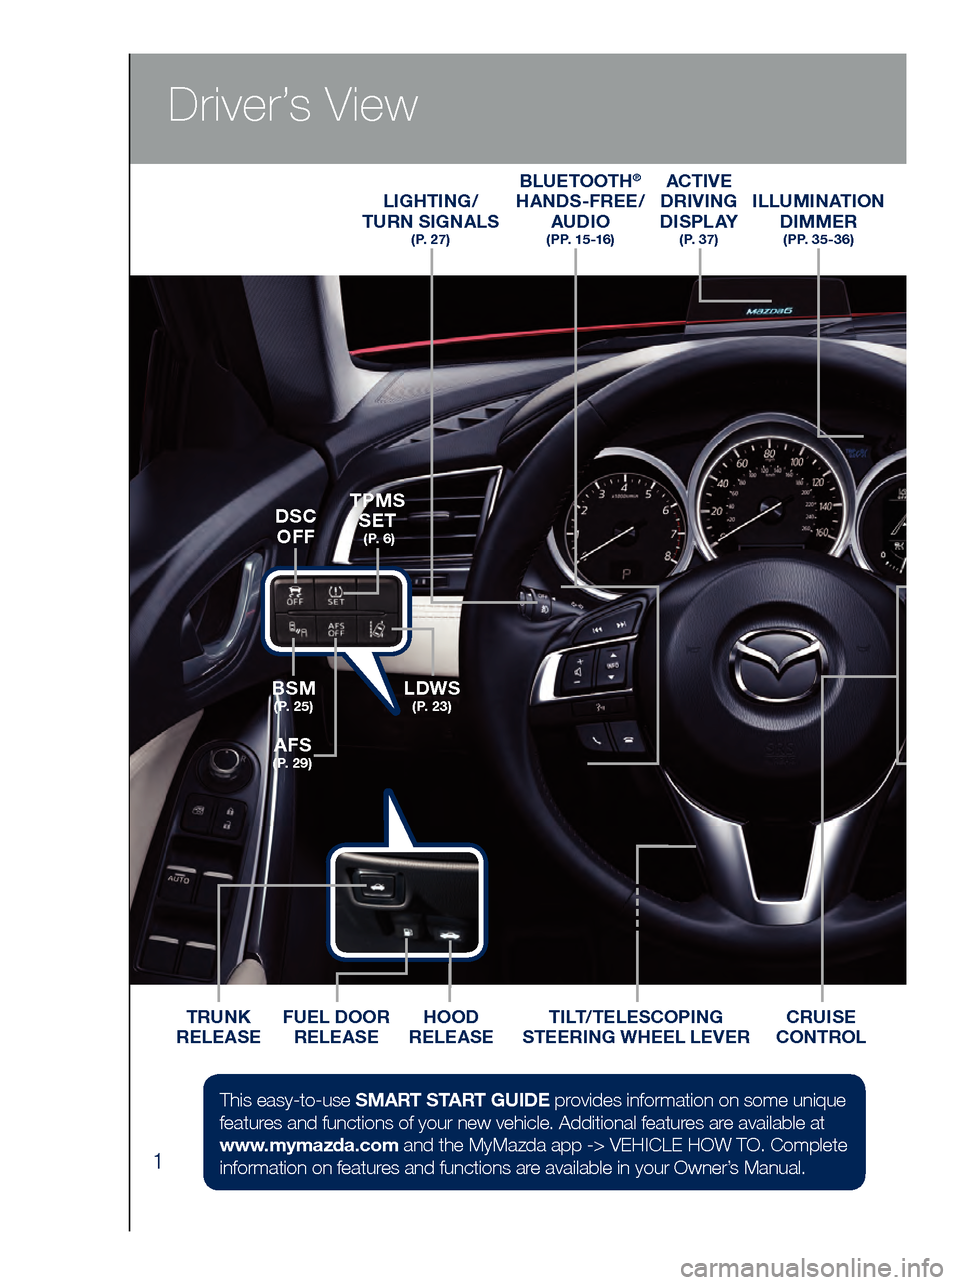
Driver’s View
ACTIVE
DRIVING
D I S P L AY
( P. 3 7 )
ILLUMINATION DIMMER
( P P. 3 5 - 3 6 )
LIGHTING/
TURN SIGNALS
( P. 2 7 )
BLUETOOTH®
HANDS-FREE/
AUDIO
( P P. 1 5 -1 6 )
HOOD
RELEASE
FUEL DOOR
RELEASE
TRUNK
RELEASE TILT/TELESCOPING
STEERING WHEEL LEVERCRUISE
CONTROL
BSM
( P. 2 5 )LDWS
( P. 2 3 )
TPMS SET
( P. 6 )
AFS
( P. 2 9 )
DSC
OFF
This easy-to-use SMART START GUIDE provides information on some unique
features and functions of your new vehicle. Additional features are available at
www.mymazda.com and the MyMazda app -> VEHICLE HOW TO. Complete
information on features and functions are available in your Owner’s Manual.
Page 4 of 46
2
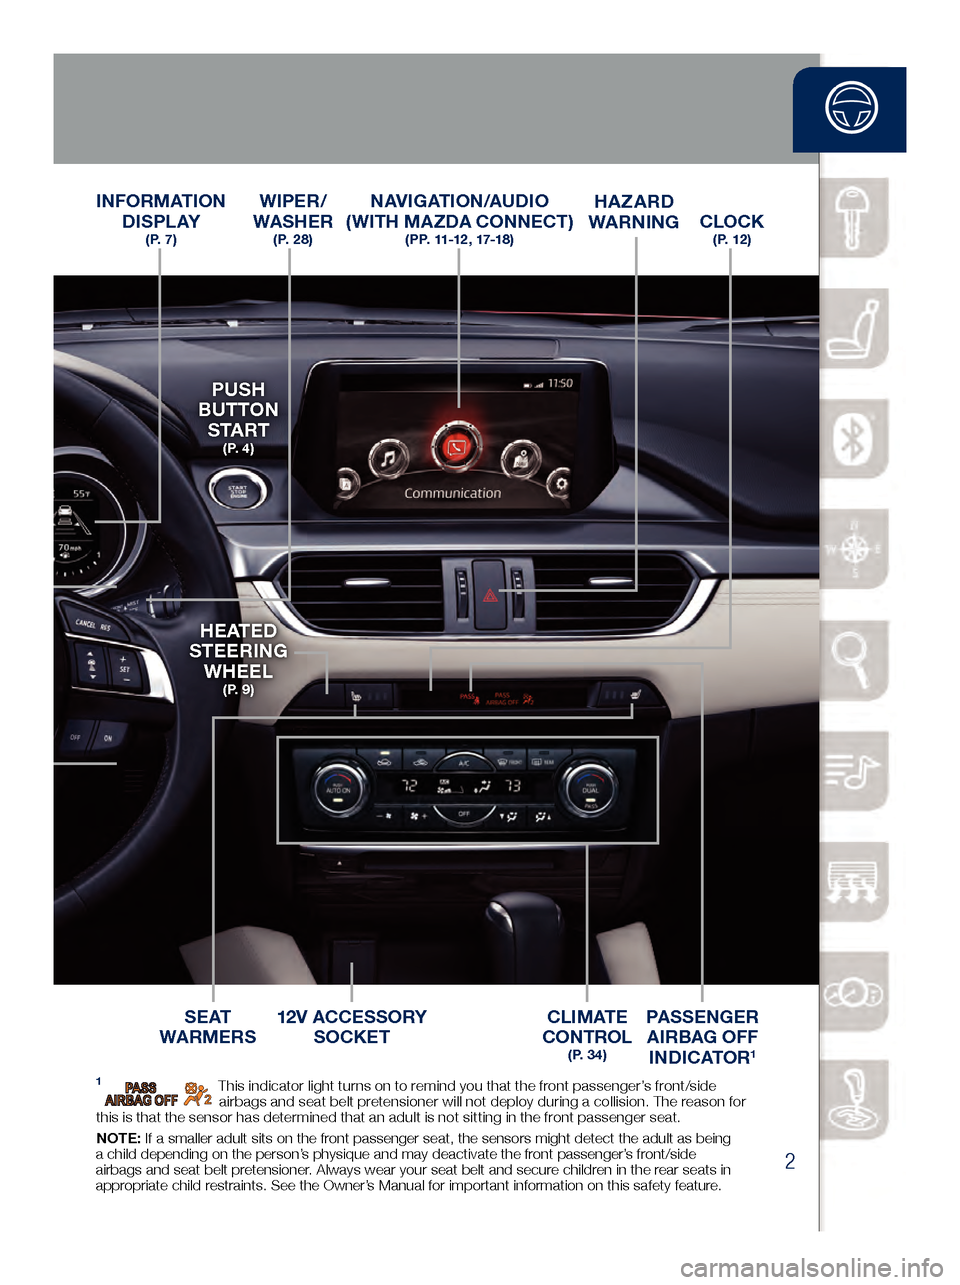
Driver’s View
CLOCK ( P. 1 2 )
INFORMATION D I S P L AY
( P. 7 )
S E AT
WARMERSC L I M AT E
CONTROL
( P. 3 4 )
PASSENGER
AIRBAG OFF INDICATOR
1
HAZARD
WARNING
12V ACCESSORY SOCKET
PUSH
BUTTON
S TA R T
( P. 4 )
H E AT E D
STEERING WHEEL
( P. 9 )
WIPER/
WASHER
( P. 2 8 )
NAVIGATION/AUDIO
(WITH MAZDA CONNECT)
( P P. 11-12 , 17-18 )
1 This indicator light turns on to remind you that the front passenger’s front/side
airbags and seat belt pretensioner will not deploy during a collision. The reason for
this is that the sensor has determined that an adult is not sitting in the front passenger seat.
NOTE: If a smaller adult sits on the front passenger seat, the sensors might detect the adult as being
a child depending on the person’s physique and may deactivate the front passenger’s front/side
airbags and seat belt pretensioner. Always wear your seat belt and secure children in the rear seats in
appropriate child restraints. See the Owner’s Manual for important information on this safety feature.
www.MazdaUSA.com
Page 5 of 46
3
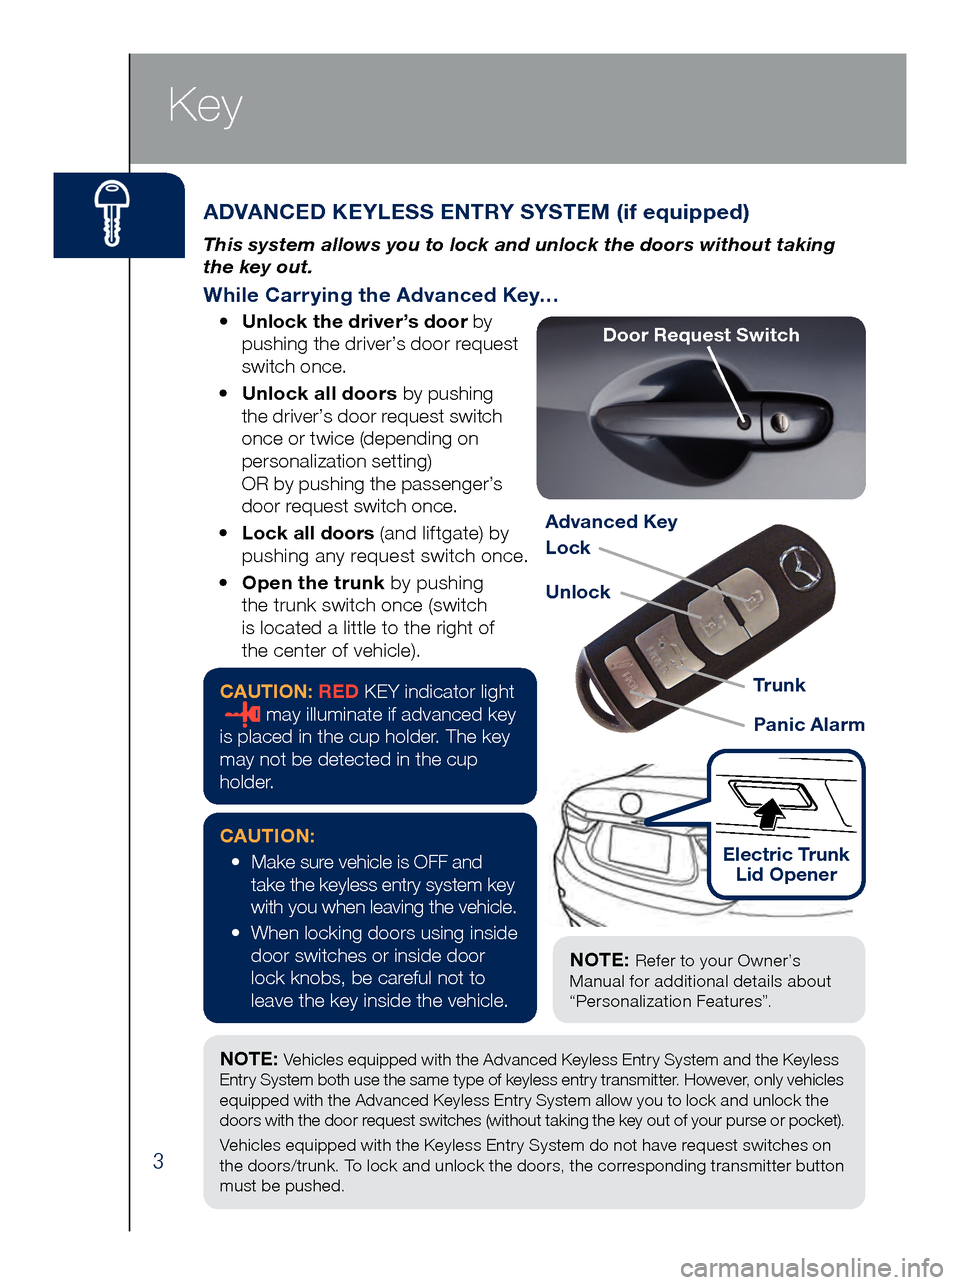
ADVANCED KEYLESS ENTRY SYSTEM (if equipped)
This system allows you to lock and unlock the doors without taking
the key out.
While Carrying the Advanced Key…
• Unlock the driver’s door by
pu
shing the driver’s door request
switch once.
•
Unlo
ck all doors by pushing
the driver’s door request switch
once or twice (depending on
personalization setting)
OR by pushing the passenger’s
door request switch once.
•
Lock all doors
(and lif tgate) by
pushing any request switch once.
•
Ope
n the trunk by pushing
the trunk switch once (switch
is located a little to the right of
the center of vehicle).
NOTE: Vehicles equipped with the Advanced Keyless Entry System and the Keyless
Entry System both use the same type of keyless entry transmitter. However, only vehicles
equipped with the Advanced Keyless Entry System allow you to lock and unlock the
doors with the door request switches (without taking the key out of your purse or pocket).
Vehicles equipped with the Keyless Entry System do not have request switches on
the doors/trunk. To lock and unlock the doors, the corresponding transmitter button
must be pushed.
Key
Advanced Key
Lock
Unlock
Panic Alarm Tr u n k
Door Request Switch
CAUTION: RED KEY indicator light
may illuminate if advanced key
is placed in the cup holder. The key
may not be detected in the cup
holder.
CAUTION:
•
Make sure vehicle is OFF and
take the keyless entry system key
with you when leaving the vehicle.
•
When locking doors using inside
door switches or inside door
lock knobs, be careful not to
leave the key inside the vehicle.
Electric Trunk
Lid Opener
NOTE: Refer to your Owner’s
Manual for additional details about
“Personalization Features”.
Page 6 of 46
4
Key
Emergency Engine Stop
Pushing and holding the START/STOP ENGINE button or repeatedly pushing
the button while the engine is running will turn the engine OFF. Use only in
case of an emergency.
If the START/STOP ENGINE button indicator light flashes AMBER, this
could indicate a problem with the engine starting system. You may not
be able to start the engine or switch the ignition to ACC or ON. Have your
vehicle inspected at an Authorized Mazda Dealer as soon as possible.
NOTE: The engine may not start if the key cannot be detected. The Key
Indicator Light may flash RED or “Key not detected” may be displayed if the key
is placed in the cup holder.
Starting the Engine
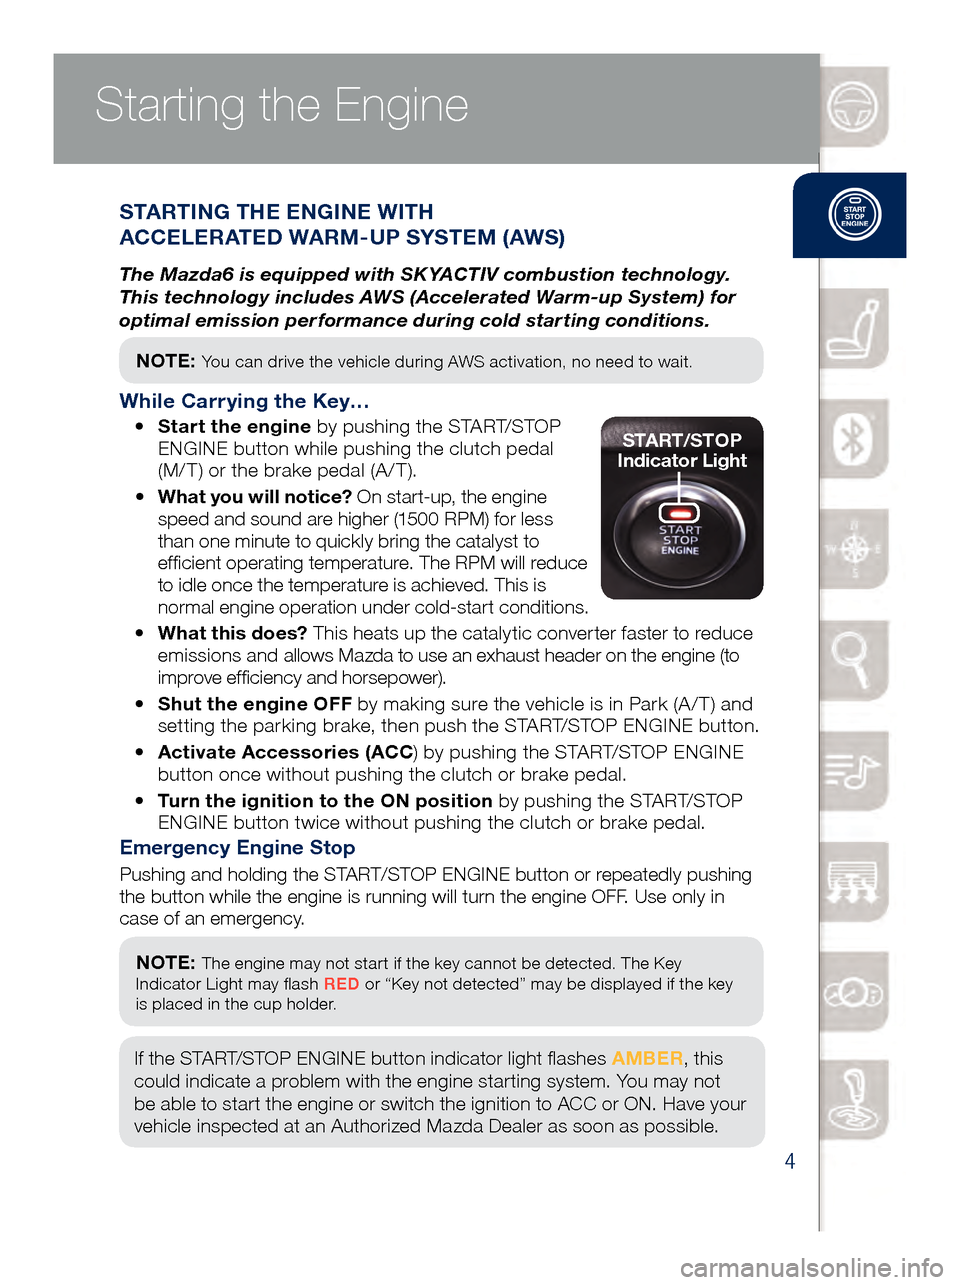
STARTING THE ENGINE WITH
ACCELERATED WARM-UP SYSTEM (AWS)
The Mazda6 is equipped with SKYACTIV combustion technology.
This technology includes AWS (Accelerated Warm-up System) for
optimal emission performance during cold starting conditions.
NOTE: You can drive the vehicle during AWS activation, no need to wait.
While Carrying the Key…
• Start the engine by pushing the START/STOP
EN
GINE button while pushing the clutch pedal
(M/ T) or the brake pedal (A / T).
•
Wha
t you will notice? On start-up, the engine
speed and sound are higher (1500 RPM) for less
than one minute to quickly bring the catalyst to
efficient operating temperature. The RPM will reduce
to idle once the temperature is achieved. This is
normal engine operation under cold-start conditions.
•
What
this does? This heats up the catalytic converter faster to reduce
emissions and allows Mazda to use an exhaust header on the engine (to
improve efficiency and horsepower).
•
Shu
t the engine OFF by making sure the vehicle is in Park (A / T) and
setting the parking brake, then push the START/STOP ENGINE button.
•
Act
ivate Accessories (ACC ) by pushing the START/STOP ENGINE
button once without pushing the clutch or brake pedal.
•
Tur
n the ignition to the ON position by pushing the START/STOP
ENGINE button twice without pushing the clutch or brake pedal.START/STOP
Indicator Light
www.MazdaUSA.com
Page 7 of 46
5
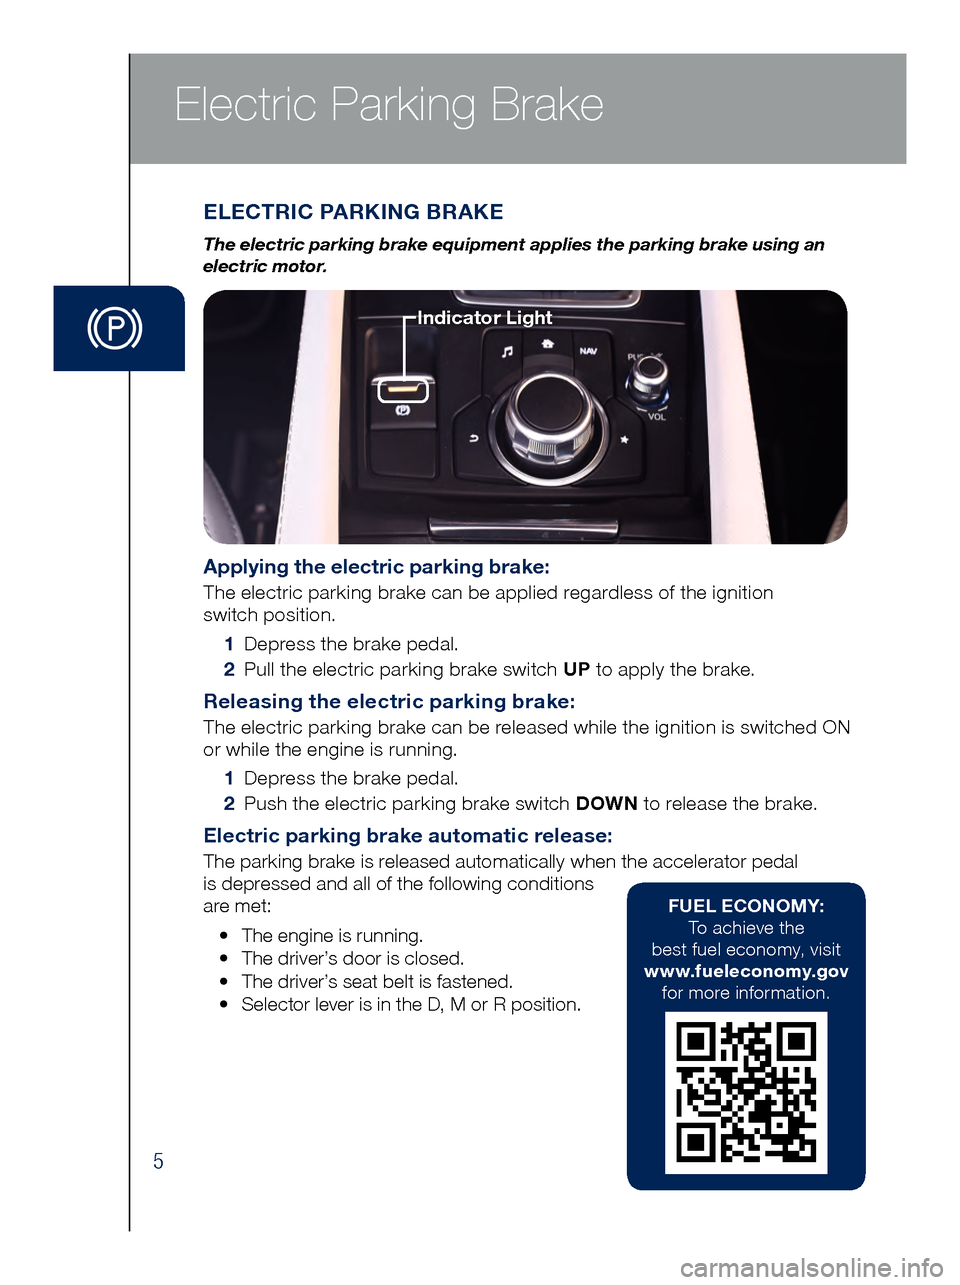
ELECTRIC PARKING BRAKE
The electric parking brake equipment applies the parking brake using an
electric motor.
Applying the electric parking brake:
The electric parking brake can be applied regardless of the ignition
switch position.
1 Dep
ress the brake pedal.
2 Pul
l the electric parking brake switch UP to apply the brake.
Releasing the electric parking brake:
The electric parking brake can be released while the ignition is switched ON
or while the engine is running.
1 Dep
ress the brake pedal.
2 Pus
h the electric parking brake switch DOWN to release the brake.
Electric parking brake automatic release:
The parking brake is released automatically when the accelerator pedal
is depressed and all of the following conditions
are met:
•
The
engine is running.
•
The d
river’s door is closed.
•
The d
river’s seat belt is fastened.
•
Sel
ector lever is in the D, M or R position.
Indicator Light
FUEL ECONOMY:
To achieve the
best fuel economy, visit
www.fueleconomy.gov
for more information.
Electric Parking Brake
Page 8 of 46
6
TIRE PRESSURE MONITORING SYSTEM (TPMS)
For your safety, the Mazda6 is equipped with TPMS that detects low
tire pressure in one or more tires. If the tire pressure starts getting
low in one or more tires, the system alerts the driver by turning on a
light in the instrument cluster (pp. 35-36) and sounding an alarm.
What to do? Don’t ignore the TPMS warning light. Stop and check your
tire pressure (when tires are cold) and inflate them to the proper pressure.
Properly inflated tires are safer, last longer, and increase fuel economy.
In the following cases, the TPMS must be “initialized” so the system can
operate normally.
• The tire pressure is adjusted (up or down) in one or more tires.
•
A tir
e rotation is performed.
•
Any t
ire or wheel is replaced.
•
The v
ehicle’s battery is disconnected, replaced or completely dead.
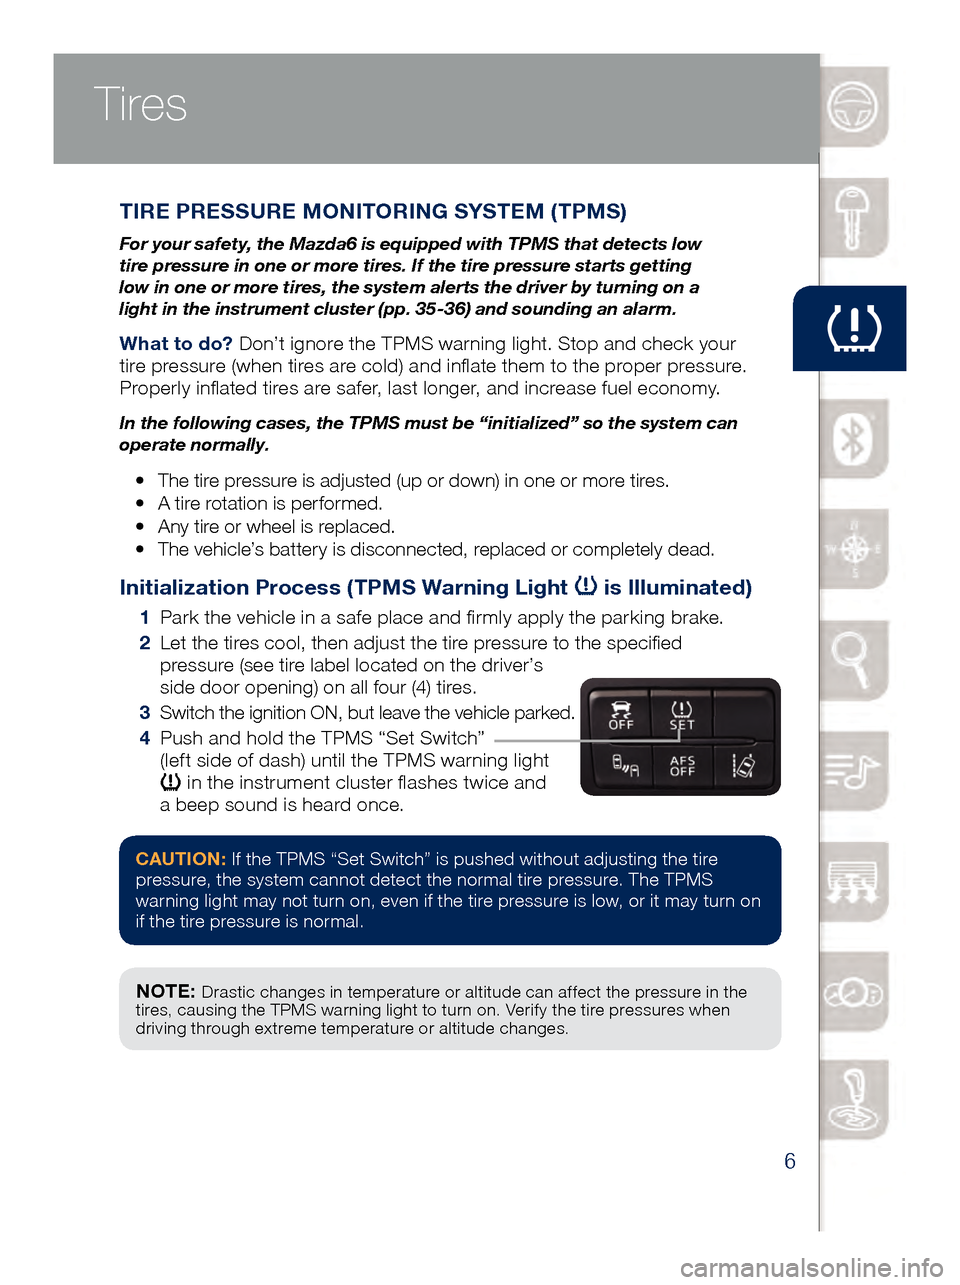
Initialization Process (TPMS Warning Light is Illuminated)
1 Park the vehicle in a safe place and firmly apply the parking brake.
2 Let t
he tires cool, then adjust the tire pressure to the specified
pressure (see tire label located on the driver’s
side door opening) on all four (4) tires.
3 Swi
tch the ignition ON, but leave the vehicle parked.
4 Pus
h and hold the TPMS “Set Switch”
(left side of dash) until the TPMS warning light
in the instrument cluster flashes twice and
a beep sound is heard once.
Tires
CAUTION: If the TPMS “Set Switch” is pushed without adjusting the tire
pressure, the system cannot detect the normal tire pressure. The TPMS
warning light may not turn on, even if the tire pressure is low, or it may turn on
if the tire pressure is normal.
NOTE: Drastic changes in temperature or altitude can affect the pressure in the
tires, causing the TPMS warning light to turn on. Verify the tire pressures when
driving through extreme temperature or altitude changes.
www.MazdaUSA.com
Page 9 of 46
7
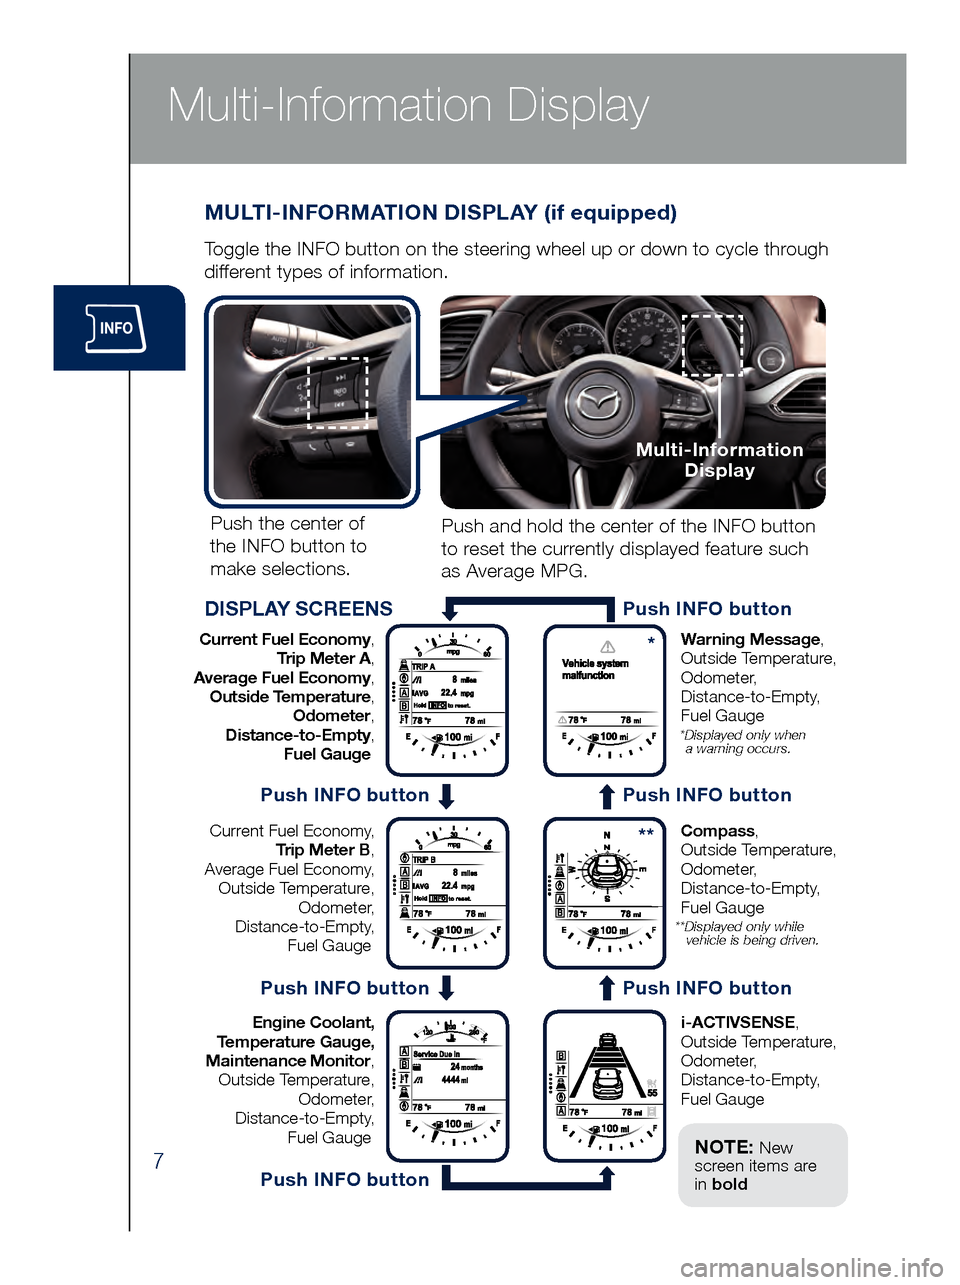
Multi-Information Display
MULTI-INFORMATION DISPLAY (if equipped)
Toggle the INFO button on the steering wheel up or down to cycle through
different types of information.Push the center of
the INFO button to make selections.
Current Fuel Economy, Trip Meter A,
Average Fuel Economy, Outside Temperature, Odometer,
Distance-to-Empty, Fuel Gauge Warning Message,
Outside Temperature,
Odometer, Distance-to-Empty,
Fuel Gauge
* Displayed only when
a warning occurs.
Current Fuel Economy,
Trip Meter B,
Average Fuel Economy, Outside Temperature, Odometer,
Distance-to-Empty, Fuel Gauge Compass,
Outside Temperature,
Odometer, Distance-to-Empty,
Fuel Gauge
** Displayed only while vehicle is being driven.
Engine Coolant,
Temperature Gauge,
Maintenance Monitor, Outside Temperature, Odometer,
Distance-to-Empty, Fuel Gauge i-ACTIVSENSE,
Outside Temperature,
Odometer, Distance-to-Empty,
Fuel Gauge
Push and hold the center of the INFO button
to reset the currently displayed feature such
as Average MPG.
DISPLAY SCREENS
Multi-Information Display
Push INFO button
*
**
Push INFO button
Push INFO button
Push INFO button
Push INFO button
Push INFO button
NOTE: New
screen items are
in bold
Page 10 of 46
8
Multi-Information Display
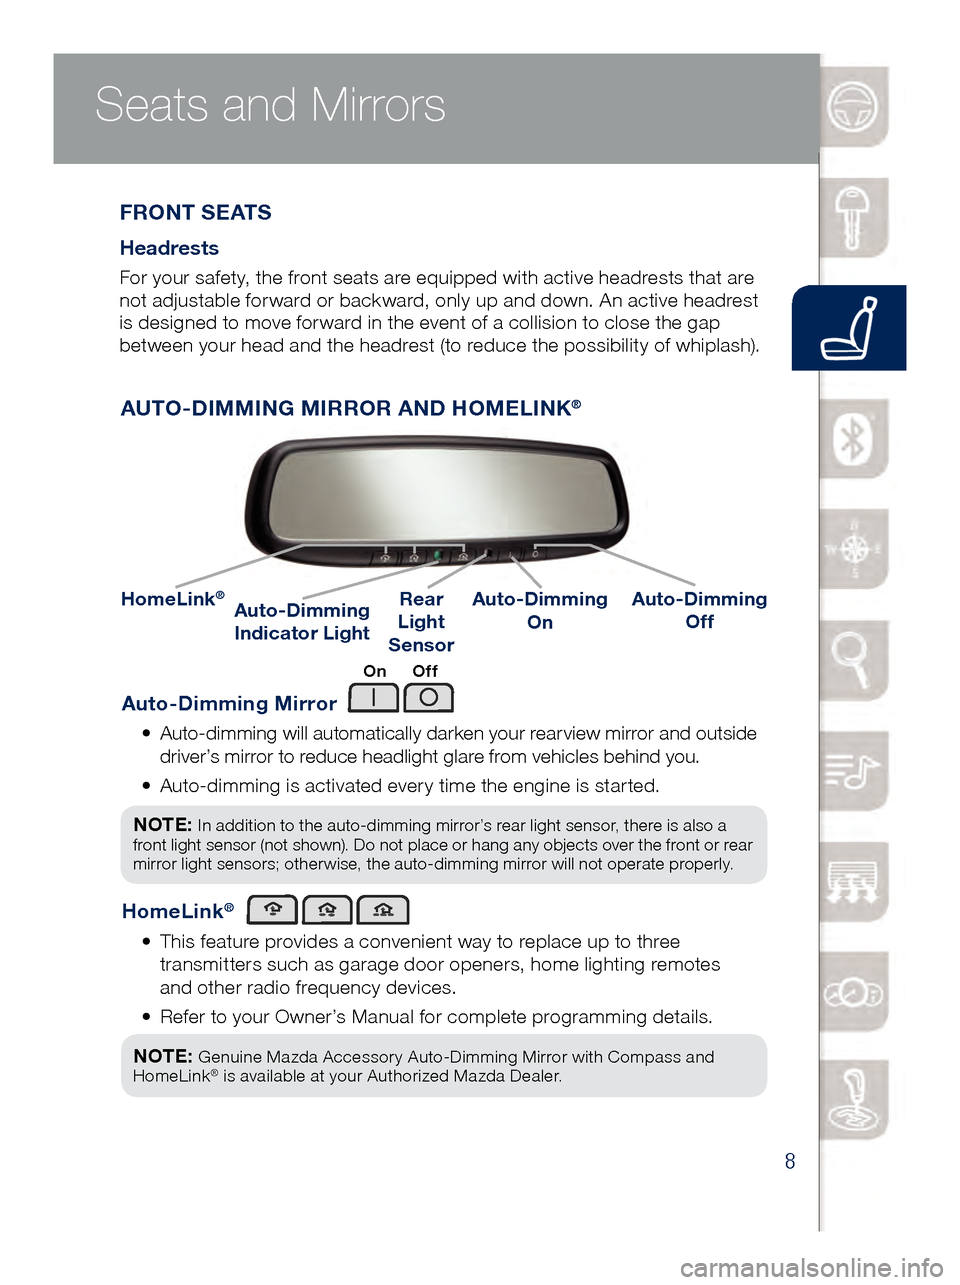
Auto-Dimming Mirror
• Auto-dimming will automatically darken your rearview mirror and outside
dr
iver’s mirror to reduce headlight glare from vehicles behind you.
•
Aut
o-dimming is activated every time the engine is started.
NOTE:
In addition to the auto-dimming mirror’s rear light sensor, there is also a
front light sensor (not shown). Do not place or hang any objects over the front or rear
mirror light sensors; otherwise, the auto-dimming mirror will not operate properly.
HomeLink®
• This feature provides a convenient way to replace up to three
tr
ansmitters such as garage door openers, home lighting remotes
and other radio frequency devices.
•
Ref
er to your Owner’s Manual for complete programming details.
NOTE:
Genuine Mazda Accessory Auto-Dimming Mirror with Compass and
HomeLink® is available at your Authorized Mazda Dealer.
AUTO-DIMMING MIRROR AND HOMELINK®
On Off
AUTO-DIMMING MIRROR AND HOMELINK®
Auto-Dimming
Indicator LightAuto-Dimming
On
HomeLink®Rear
Light
SensorAuto-Dimming
Off
F R O N T S E AT S
Headrests
For your safety, the front seats are equipped with active headrests that are
not adjustable forward or backward, only up and down. An active headrest
is designed to move forward in the event of a collision to close the gap
between your head and the headrest (to reduce the possibility of whiplash).
Seats and Mirrors
www.MazdaUSA.com