change wheel MAZDA MODEL 6 HATCHBACK 2004 Owners Manual (in English)
[x] Cancel search | Manufacturer: MAZDA, Model Year: 2004, Model line: MODEL 6 HATCHBACK, Model: MAZDA MODEL 6 HATCHBACK 2004Pages: 326, PDF Size: 3.96 MB
Page 60 of 326

Black plate (60,1)
WARNING
Hot Air Bag Inflators:
Hot air bag inflators are dangerous. Immediately after inflation, the inflators in the
steering wheel, dashboard, seatbacks, or the front and rear window pillars and along
the roof edge are very hot. You could get burned. Don't touch the internal components
of the air bag modules after the bags have inflated.
Installation of Front-End Equipment:
Installation of front-end equipment, such as frontal protection bar (kangaroo bar, bull
bar, push bar, etc.), snowplow, or winches, is dangerous. The air bag crash sensor
system could be affected. This could cause air bags to inflate unexpectedly, or it could
prevent the air bags from inflating during an accident. Front occupants could be
seriously injured. Never install any front-end equipment to your vehicle.
Suspension Adjustment:
Adjusting the vehicle suspension is dangerous. If the vehicle's height or the
suspension is changed, the vehicle will be unable to accurately detect a collision
resulting in incorrect or unexpected air bag deployment and the possibility of serious
injuries.
Modification of the Supplemental Restraint System:
Modifying the components or wiring of the supplemental restraint system is
dangerous. You could accidentally activate it or make it inoperable. Don't make any
modifications to the supplemental restraint system. This includes installing trim,
badges, or anything else over the air bag modules. It also includes installing extra
electrical equipment on or near system components or wiring. An Authorized Mazda
Dealer can provide the special care needed in the removal and installation of front
seats. It is important to protect the side and curtain air bag wiring and connections to
assure that the bags do not accidentally deploy and that the seats retain an
undamaged air bag connection.
CAUTION
To prevent damage to the side and curtain air bag wiring, don't place luggage or other
objects under the front seats.
2-46
Essential Safety Equipment
SRS Air Bags
Mazda6_8T12-EA-03K_Edition1 Page60
Friday, December 5 2003 8:54 AM
Form No.8T12-EA-03K
Page 102 of 326

Black plate (102,1)
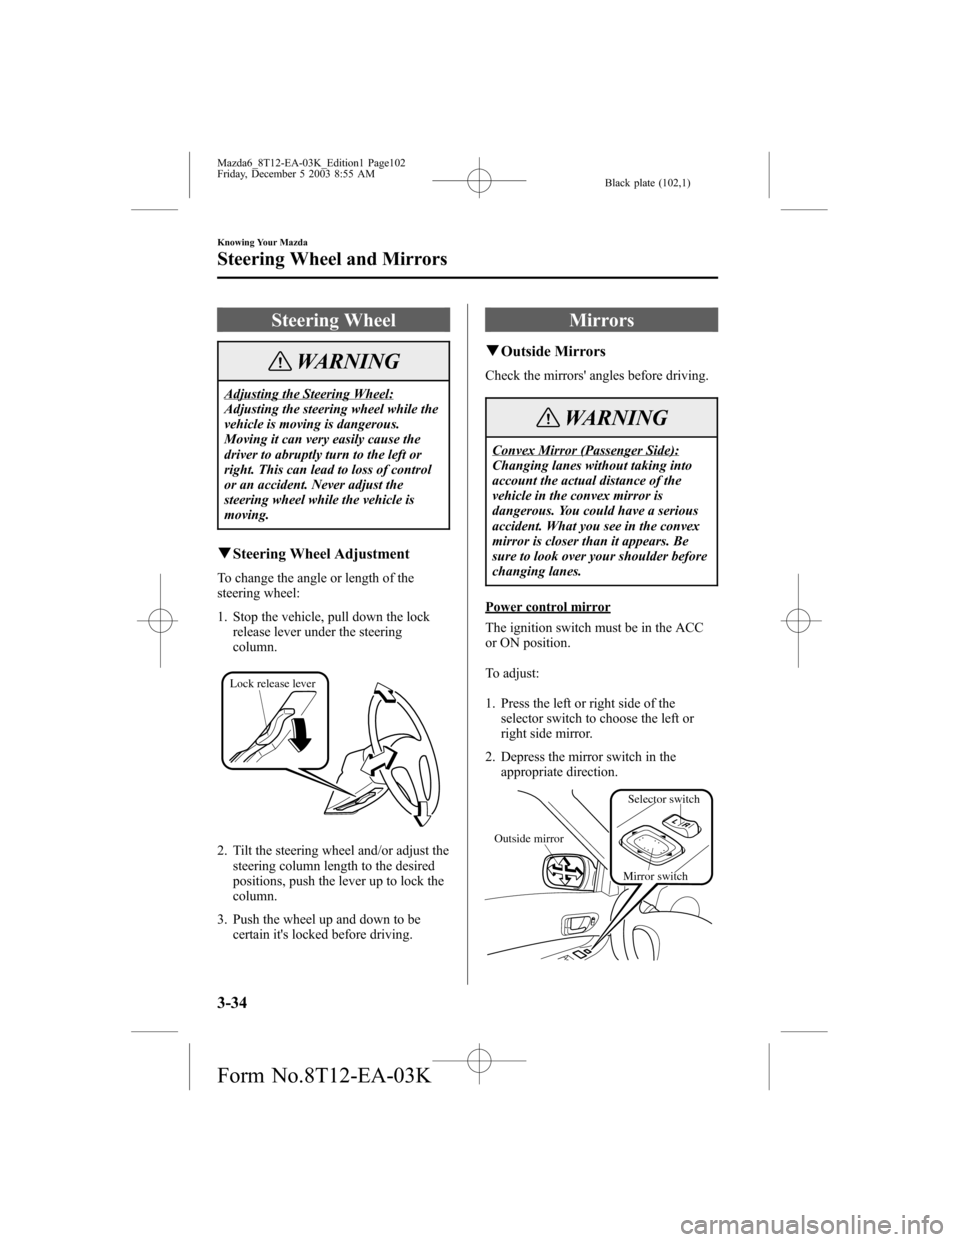
Steering Wheel
WARNING
Adjusting the Steering Wheel:
Adjusting the steering wheel while the
vehicle is moving is dangerous.
Moving it can very easily cause the
driver to abruptly turn to the left or
right. This can lead to loss of control
or an accident. Never adjust the
steering wheel while the vehicle is
moving.
qSteering Wheel Adjustment
To change the angle or length of the
steering wheel:
1. Stop the vehicle, pull down the lock
release lever under the steering
column.
Lock release lever
2. Tilt the steering wheel and/or adjust the
steering column length to the desired
positions, push the lever up to lock the
column.
3. Push the wheel up and down to be
certain it's locked before driving.
Mirrors
qOutside Mirrors
Check the mirrors' angles before driving.
WARNING
Convex Mirror (Passenger Side):
Changing lanes without taking into
account the actual distance of the
vehicle in the convex mirror is
dangerous. You could have a serious
accident. What you see in the convex
mirror is closer than it appears. Be
sure to look over your shoulder before
changing lanes.
Power control mirror
The ignition switch must be in the ACC
or ON position.
To adjust:
1. Press the left or right side of the
selector switch to choose the left or
right side mirror.
2. Depress the mirror switch in the
appropriate direction.
Outside mirrorSelector switch
Mirror switch
3-34
Knowing Your Mazda
Steering Wheel and Mirrors
Mazda6_8T12-EA-03K_Edition1 Page102
Friday, December 5 2003 8:55 AM
Form No.8T12-EA-03K
Page 112 of 326

Black plate (112,1)
Hazardous Driving
WARNING
Downshifting on Slippery Surfaces:
Downshifting into lower gear while
driving on slippery surfaces is
dangerous. The sudden change in tire
speed could cause the tires to skid.
This could lead to loss of vehicle
control and an accident. If it is
necessary to downshift on slippery
surfaces, be very careful.
When driving in water, mud, sand, or
similar hazard:
lBe cautious and allow extra distance
for braking.
lAvoid sudden braking and quick
steering.
lIf your vehicle is not equipped with
ABS, brake with the pedal by using a
light up-down motion. Don't hold the
pedal down constantly.
If your vehicle is equipped with ABS,
don't pump the brakes. Continue to
press down on the brake pedal.
lIf you get stuck, select a lower gear and
accelerate slowly. Don't spin the front
wheels.
lFor more traction in starting on
slippery surfaces, use sand, rock salt,
chains, carpeting, or other nonslip
material under the front wheels.
Rocking the Vehicle
WARNING
Spinning the Wheels:
When the vehicle is stuck, spinning
the wheels at high speed is dangerous.
The spinning tire could overheat and
explode. This could cause serious
injuries. Don't spin the wheels at more
than 56 km/h (35 mph), and don't
allow anyone to stand behind a wheel
when pushing the vehicle.
CAUTION
Too much rocking may cause engine
overheating, transaxle failure, and tire
damage.
If you must rock the vehicle to free it from
snow, sand, or mud, depress the
accelerator slightly and slowly move the
shift lever from 1 (D) to R.
4-8
Before Driving Your Mazda
Driving Tips
Mazda6_8T12-EA-03K_Edition1 Page112
Friday, December 5 2003 8:55 AM
Form No.8T12-EA-03K
Page 128 of 326

Black plate (128,1)
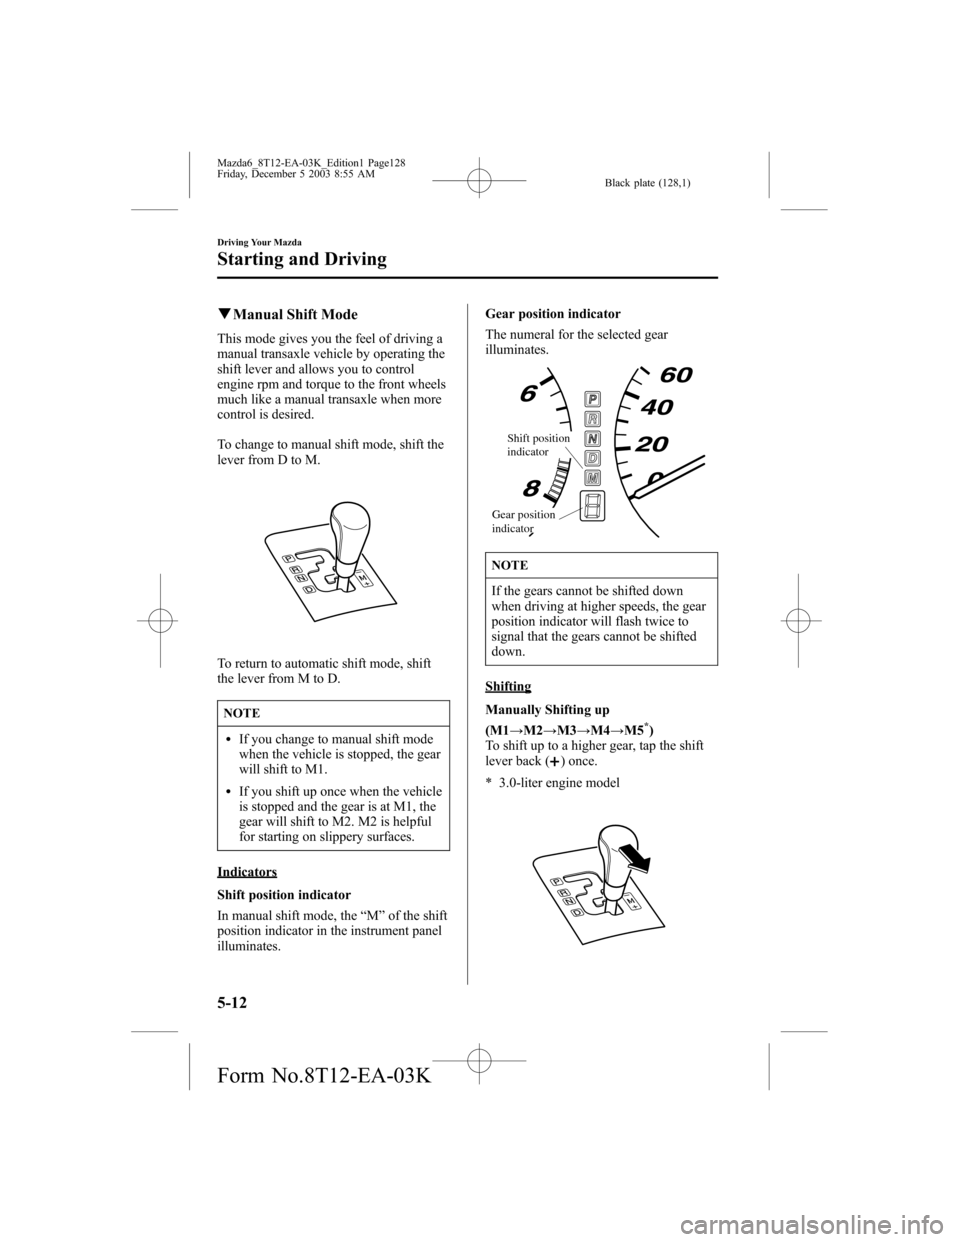
qManual Shift Mode
This mode gives you the feel of driving a
manual transaxle vehicle by operating the
shift lever and allows you to control
engine rpm and torque to the front wheels
much like a manual transaxle when more
control is desired.
To change to manual shift mode, shift the
lever from D to M.
To return to automatic shift mode, shift
the lever from M to D.
NOTE
lIf you change to manual shift mode
when the vehicle is stopped, the gear
will shift to M1.
lIf you shift up once when the vehicle
is stopped and the gear is at M1, the
gear will shift to M2. M2 is helpful
for starting on slippery surfaces.
Indicators
Shift position indicator
In manual shift mode, the“M”of the shift
position indicator in the instrument panel
illuminates.Gear position indicator
The numeral for the selected gear
illuminates.
Shift position
indicator
Gear position
indicator
NOTE
If the gears cannot be shifted down
when driving at higher speeds, the gear
position indicator will flash twice to
signal that the gears cannot be shifted
down.
Shifting
Manually Shifting up
(M1→M2→M3→M4→M5
*)
To shift up to a higher gear, tap the shift
lever back (
) once.
* 3.0-liter engine model
5-12
Driving Your Mazda
Starting and Driving
Mazda6_8T12-EA-03K_Edition1 Page128
Friday, December 5 2003 8:55 AM
Form No.8T12-EA-03K
Page 142 of 326

Black plate (142,1)
qFuel Gauge
The fuel gauge shows approximately how
much fuel is in the tank. We recommend
keeping the tank over 1/4 full. When the
low fuel warning light illuminates or
when the needle is near E, refuel as soon
as possible.
Low fuel
warning light
qDashboard Illumination
When the headlight switch is in theorposition, rotate the thumb-wheel to
adjust the brightness of the dashboard
lights.
Dim Bright
NOTE
Black-out meter
When the instrument cluster dimmer is
canceled, the instrument cluster
illumination intensity will not change
by rotating the thumb-wheel.
qInstrument Cluster Dimmer
Select Button (Black-out meter)
The instrument cluster dimmer select
button is operable when the ignition
switch is in the ON position.
Instrument cluster
dimmer select button
Adjusting the instrument clusterillumination intensity (With exteriorlights off)
When the exterior lights are off, the
instrument cluster illumination can be
adjusted to one of five levels by
successively pressing the instrument
cluster dimmer select button.
5-26
Driving Your Mazda
Instrument Cluster and Indicators
Mazda6_8T12-EA-03K_Edition1 Page142
Friday, December 5 2003 8:56 AM
Form No.8T12-EA-03K
Page 204 of 326

Black plate (204,1)
Audio Control Switch
Operation (Steering
Wheel)
í
NOTE
Mazda installed this system to help you
avoid being too distracted using audio
controls on the dashboard. Always
make safe driving your first priority.
qAdjusting the Volume
To increase the volume, press volume
button ().
To decrease the volume, press volume
button (
).
qChanging the Source
Press the mode switch () to change
the audio source (AM radio>FM1
radio>FM2 radio>Cassette tape player or
MD player> CD player or CD
changer>cyclical).
NOTE
Cassette tape, MD, CD and CD changer
modes cannot be selected in the
following cases:
lA cassette deck, MD, CD, or CD
changer is not equipped on the audio
system.
lA cassette tape, MD or CD has not
been inserted.
6-40
Interior Comfort
íSome models.
Audio System
Mazda6_8T12-EA-03K_Edition1 Page204
Friday, December 5 2003 8:57 AM
Form No.8T12-EA-03K
Page 228 of 326

Black plate (228,1)
Changing a Flat Tire
NOTE
If the following occurs while driving, it
could indicate a flat tire.
lSteering becomes difficult.
lThe vehicle begins to vibrate
excessively.
lThe vehicle pulls in one direction.
If you have a flat tire, drive slowly to a
level spot that is well off the road and out
of the way of traffic to change the tire.
Stopping in traffic or on the shoulder of a
busy road is dangerous.
WARNING
Jacking a Vehicle:
Changing a tire is dangerous if not
done properly. The vehicle can slip off
the jack and seriously injure someone.
Be sure to follow the directions for
changing a tire, and never get under a
vehicle that is supported only by a
jack.
Passenger in Vehicle Supported by aJack:
Allowing someone to remain in a
vehicle supported by a jack is
dangerous. The occupant could cause
the vehicle to fall resulting in serious
injury. Never allow anyone inside a
vehicle supported by a jack.
NOTE
Make sure the jack is well lubricated
before using it.1. Park on a level surface off the right-of-
way and firmly set the parking brake.
2. Put a vehicle with an automatic
transaxle in Park (P), a manual
transaxle in Reverse (R) or 1, and turn
off the engine.
3. Turn on the hazard warning flasher.
4. Have everyone get out of the vehicle
and away from the vehicle and traffic.
5. Remove the jack, tool, and spare tire
(page 7-3).
6. Block the wheel diagonally opposite
the flat tire. When blocking a wheel,
place a block both in front and behind
the tire.
NOTE
When blocking a tire, use rocks or
wood blocks of sufficient size to hold
the tire in place.
7-8
In Case of an Emergency
Flat Tire
Mazda6_8T12-EA-03K_Edition1 Page228
Friday, December 5 2003 8:58 AM
Form No.8T12-EA-03K
Page 229 of 326

Black plate (229,1)
qRemoving a Flat Tire
1. If your vehicle is equipped with a
wheel cover, pry off the wheel cover
with the beveled end of the lug wrench.
Wheel cover
Lug wrench
NOTE
Force the end of the lug wrench firmly
between wheel and cover, or removal
will be difficult.
CAUTION
Align the notch on the wheel cover
with the valve stem when installing it.
Notch
Tire valve
Damage could occur during installation
if the wheel cover is not properly
aligned.2. Loosen the lug nuts by turning them
counterclockwise one turn each, but
don't remove any lug nuts until the tire
has been raised off the ground.
3. Place the jack under the jacking
position closest to the tire being
changed.
Jacking position
In Case of an Emergency
Flat Tire
7-9
Mazda6_8T12-EA-03K_Edition1 Page229
Friday, December 5 2003 8:58 AM
Form No.8T12-EA-03K
Page 324 of 326

Black plate (324,1)
S
Storage Compartments ...................... 6-51
Cargo securing loops .................. 6-53
Cargo sub-compartment ............. 6-54
Center box .................................. 6-52
Center console ............................ 6-52
Glove box ................................... 6-52
Overhead console ....................... 6-51
Storage box ................................ 6-53
Storage pocket ............................ 6-52
Storage Pocket .................................. 6-52
Sunshade ........................................... 3-28
Sunvisors .......................................... 6-43
T
Tachometer ........................................ 5-25
Temporary Spare Tire ....................... 8-29
Theft-Deterrent System ..................... 3-32
Tires
Flat tire ......................................... 7-3
Inflation pressure ........................ 8-28
Replacement ............................... 8-29
Rotation ...................................... 8-28
Snow tires .................................... 4-9
Spare tire and tool storage ............ 7-3
Specifications ............................. 10-6
Tire chains .................................... 4-9
Uniform tire quality grading system
(UTQGS) ................................... 9-16
Tool ..................................................... 7-3
Towing
Description ................................. 7-20
Emergency towing ..................... 7-20
Recreational towing ................... 7-21
Trailer towing ............................. 4-11
T
Traction Control System (TCS) ........ 5-20
TCS indicator light ..................... 5-21
TCS OFF indicator light ............ 5-21
TCS OFF switch ........................ 5-21
Trailer Towing ................................... 4-11
Trip Meter ......................................... 5-24
Trunk Lid .......................................... 3-18
Trunk Light ....................................... 3-20
Turn and Lane-Change Signals ......... 5-39
V
Vanity Mirrors ................................... 6-43
Vehicle Information Labels ............... 10-2
W
Warning Lights ................................. 5-28
ABS ............................................ 5-32
Air bag system ........................... 5-32
Automatic transaxle ................... 5-34
Brake system .............................. 5-30
Charging system ......................... 5-31
Check engine .............................. 5-31
Door-ajar .................................... 5-33
Engine oil pressure ..................... 5-31
Front seat belt pretensioner
system ........................................ 5-32
Low fuel ..................................... 5-33
Low washer fluid level ............... 5-33
Seat belt ...................................... 5-33
Warranty .............................................. 9-9
Washer Fluid ..................................... 8-18
Weights ............................................. 10-5
Wheel Replacement .......................... 8-30
Windows
Power windows .......................... 3-22
Windshield Washer ........................... 5-41
11-6
Index
Mazda6_8T12-EA-03K_Edition1 Page324
Friday, December 5 2003 9:0 AM
Form No.8T12-EA-03K