reset MAZDA MODEL 6 HATCHBACK 2007 Quick Tips (in English)
[x] Cancel search | Manufacturer: MAZDA, Model Year: 2007, Model line: MODEL 6 HATCHBACK, Model: MAZDA MODEL 6 HATCHBACK 2007Pages: 12, PDF Size: 1.27 MB
Page 3 of 12

GETTING STARTED
Always check the Owner’s Manual for more operating information and safety features
Getting
Started
Getting
Started
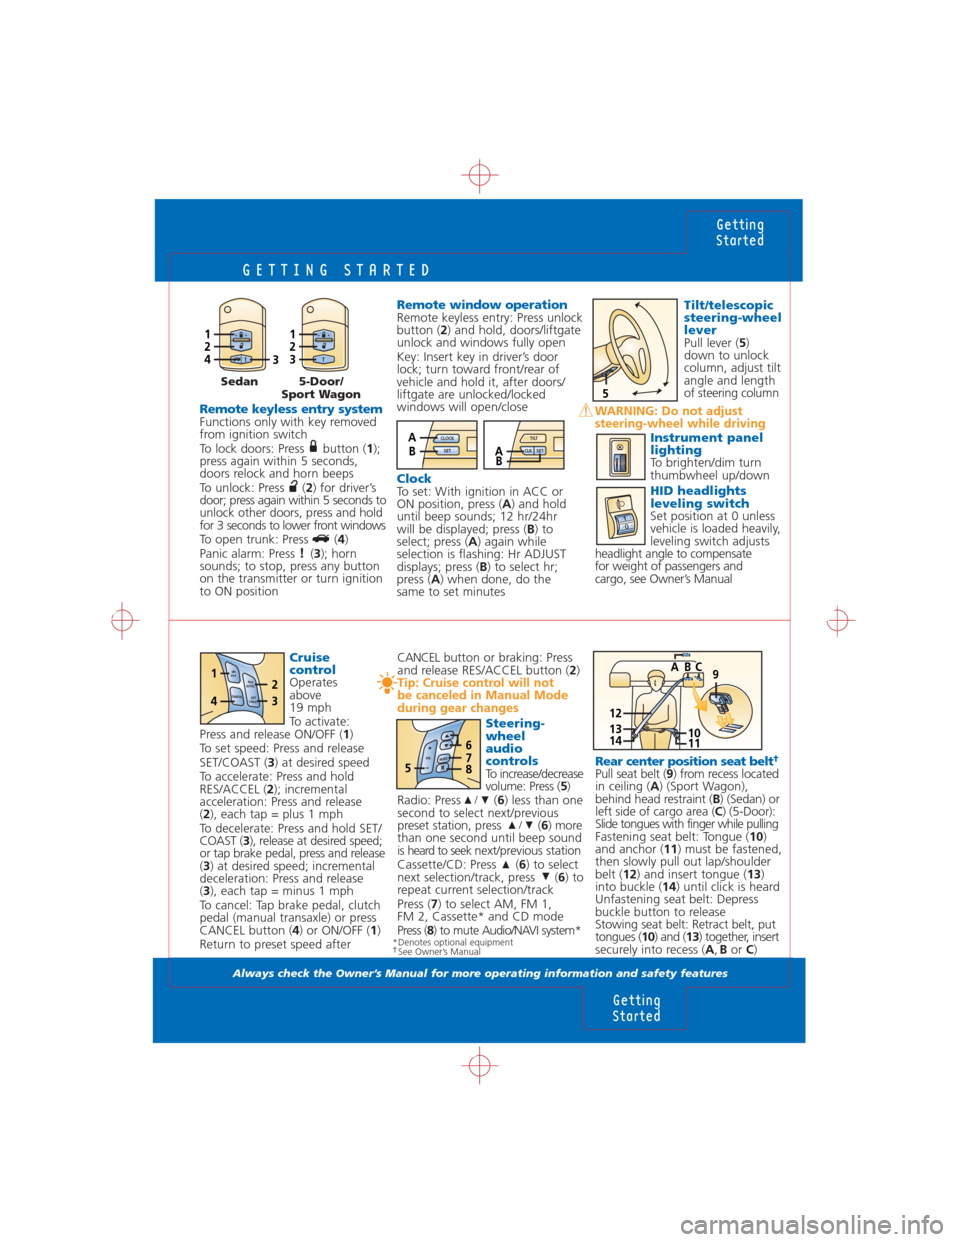
Cruise
control
Operates
above
19 mph
To activate:
Press and release ON/OFF (1)
To set speed: Press and release
SET/COAST (3) at desired speed
To accelerate: Press and hold
RES/ACCEL (2); incremental
acceleration: Press and release
(2), each tap = plus 1 mph
To decelerate: Press and hold SET/
COAST (3), release at desired speed;
or tap brake pedal, press and release
(3) at desired speed; incremental
deceleration: Press and release
(3), each tap = minus 1 mph
To cancel: Tap brake pedal, clutch
pedal (manual transaxle) or press
CANCEL button (4) or ON/OFF (1)
Return to preset speed after
Remote keyless entry systemFunctions only with key removed
from ignition switch
To lock doors: Press button (1);
press again within 5 seconds,
doors relock and horn beeps
To unlock: Press (2) for driver’s
door; press again within 5 seconds to
unlock other doors, press and hold
for 3 seconds to lower front windows
To open trunk: Press (4)
Panic alarm: Press (3); horn
sounds; to stop, press any button
on the transmitter or turn ignition
to ON position
Tilt/telescopic
steering-wheel
lever
Pull lever (5)
down to unlock
column, adjust tilt
angle and length
of steering column
WARNING: Do not adjust
steering-wheel while driving
Instrument panel
lighting
To brighten/dim turn
thumbwheel up/down
HID headlights
leveling switch
Set position at 0 unless
vehicle is loaded heavily,
leveling switch adjusts
headlight angle to compensate
for weight of passengers and
cargo, see Owner’s Manual
Remote window operationRemote keyless entry: Press unlock
button (2) and hold, doors/liftgate
unlock and windows fully open
Key: Insert key in driver’s door
lock; turn toward front/rear of
vehicle and hold it, after doors/
liftgate are unlocked/locked
windows will open/close
ClockTo set: With ignition in ACC or
ON position, press (A) and hold
until beep sounds; 12 hr/24hr
will be displayed; press (B) to
select; press (A) again while
selection is flashing: Hr ADJUST
displays; press (B) to select hr;
press (A) when done, do the
same to set minutes
1243
123
5
10111413
9B AC
12
Sedan 5-Door/
Sport Wagon
10
Rear center position seat belt†
Pull seat belt (9) from recess located
in ceiling (A) (Sport Wagon),
behind head restraint (B) (Sedan) or
left side of cargo area (C) (5-Door):
Slide tongues with finger while pulling
Fastening seat belt: Tongue (10)
and anchor (11) must be fastened,
then slowly pull out lap/shoulder
belt (12) and insert tongue (13)
into buckle (14) until click is heard
Unfastening seat belt: Depress
buckle button to release
Stowing seat belt: Retract belt, put
tongues (10) and (13) together, insert
securely into recess (A,Bor C) CANCELbutton or braking: Press
and release RES/ACCEL button (2)
Tip: Cruise control will not
be canceled in Manual Mode
during gear changes
Steering-
wheel
audio
controls
To increase/decrease
volume: Press (5)
Radio: Press (6) less than one
second to select next/previous
preset station, press (6) more
than one second until beep sound
is heard to seek next/previous station
Cassette/CD: Press (6) to select
next selection/track, press (6) to
repeat current selection/track
Press (7) to select AM, FM 1,
FM 2, Cassette* and CD mode
Press (8) to mute Audio/NAVI system*
/
/
M
O
D
EV
O
L5
678
RES
ACCEL ON
OFF
CANCELSET
COAST43
12
*Denotes optional equipment†See Owner’s Manual
CLOCK
SETABTILT
SET CLKAB
Page 4 of 12

INSTRUMENT CLUSTER
Always check the Owner’s Manual for more operating information and safety features
Instrument
Cluster
Instrument
Cluster
HF
E C
P
R
N
D
M
2
12213121411
0 123x1000r/min
4
5
6
7
8
19202221232518246
8
109
4
15
17
16
0 20mph
km/h4060
80
100
120
140
TRIPA8
O.O
20 406080100120
140
160
180
200
220
240
75
3
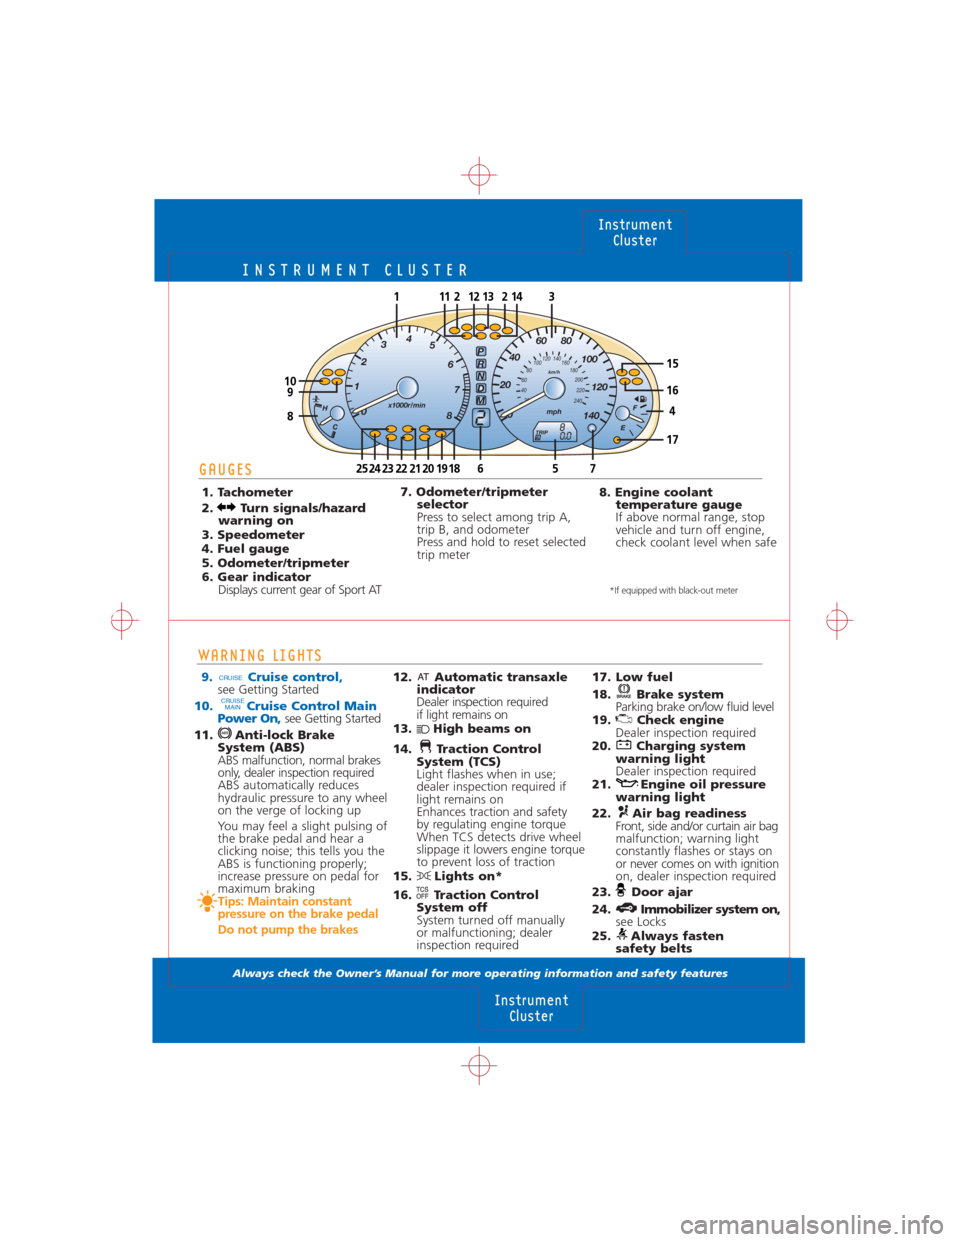
17. Low fuel
18. Brake system
Parking brake on/low fluid level
19. Check engine
Dealer inspection required
20. Charging system
warning light
Dealer inspection required
21. Engine oil pressure
warning light
22. Air bag readiness
Front, side and/or curtain air bag
malfunction; warning light
constantly flashes or stays on
or never comes on with ignition
on, dealer inspection required
23. Door ajar
24. Immobilizer system on,
see Locks
25. Always fasten
safety belts
8. Engine coolant
temperature gauge
If above normal range, stop
vehicle and turn off engine,
check coolant level when safe
12. Automatic transaxle
indicator
Dealer inspection required
if light remains on
13. High beams on
14. Traction Control
System (TCS)
Light flashes when in use;
dealer inspection required if
light remains on
Enhances traction and safety
by regulating engine torque
When TCS detects drive wheel
slippage it lowers engine torque
to prevent loss of traction
15. Lights on*
16. Traction Control
System off
System turned off manually
or malfunctioning; dealer
inspection required7. Odometer/tripmeter
selector
Press to select among trip A,
trip B, and odometer
Press and hold to reset selected
trip meter
WARNING LIGHTS
9. Cruise control,see Getting Started
10. Cruise Control Main
Power On,see Getting Started
11. Anti-lock Brake
System (ABS)
ABS malfunction, normal brakes
only, dealer inspection required
ABS automatically reduces
hydraulic pressure to any wheel
on the verge of locking up
You may feel a slight pulsing of
the brake pedal and hear a
clicking noise; this tells you the
ABS is functioning properly;
increase pressure on pedal for
maximum braking
Tips: Maintain constant
pressure on the brake pedal
Do not pump the brakes
CRUISE
MAIN
CRUISE
GAUGES
1. Tachometer
2. Turn signals/hazard
warning on
3. Speedometer
4. Fuel gauge
5. Odometer/tripmeter
6. Gear indicator
Displays current gear of Sport AT
*If equipped with black-out meter
Page 5 of 12

DRIVER CONTROLS
Always check the Owner’s Manual for more operating information and safety features
Driver
Controls
Switches
12
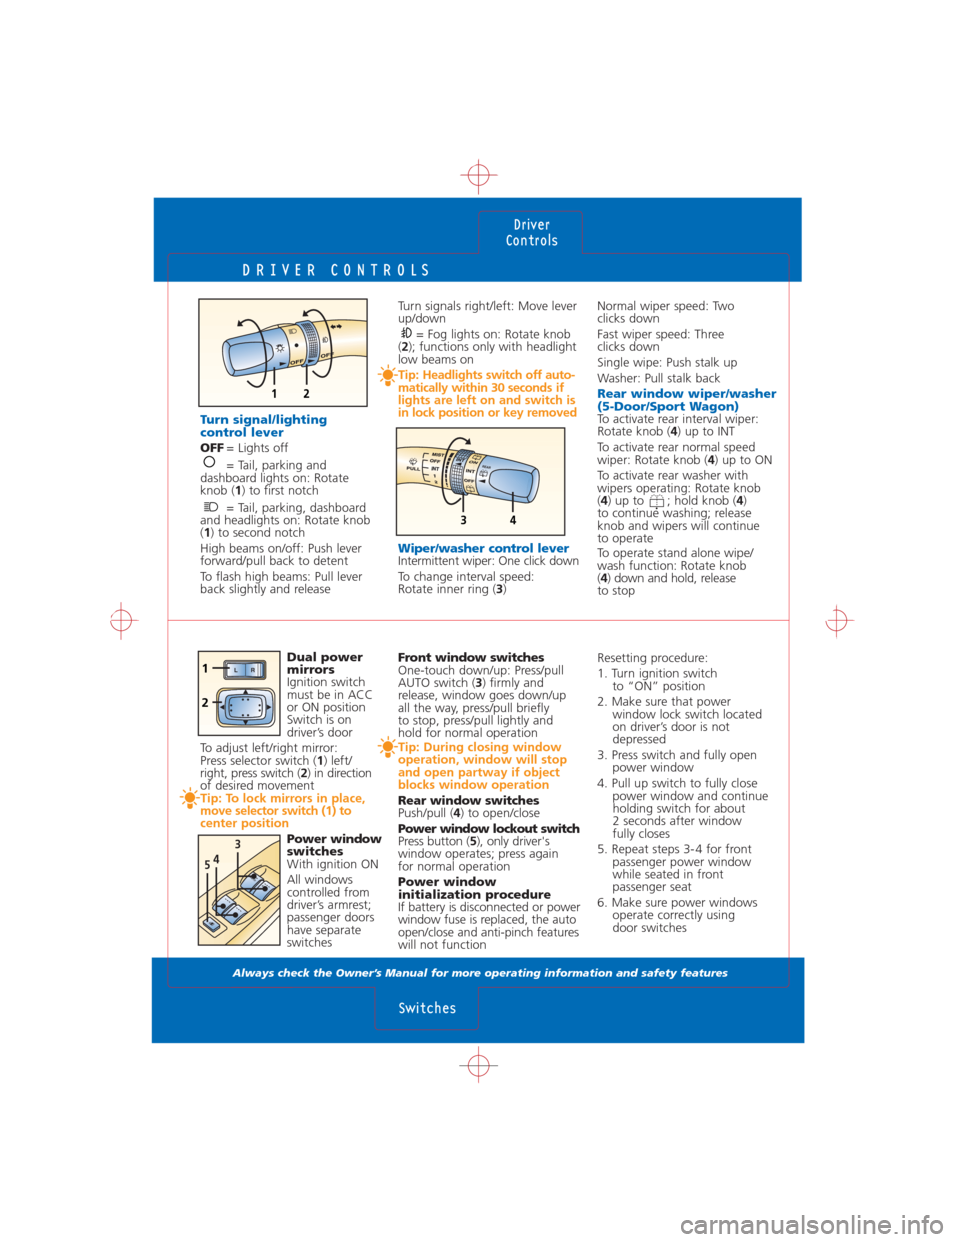
Turn signals right/left: Move lever
up/down
= Fog lights on: Rotate knob
(2); functions only with headlight
low beams on
Tip: Headlights switch off auto-
matically within 30 seconds if
lights are left on and switch is
in lock position or key removed
Wiper/washer control lever
Intermittent wiper: One click down
To change interval speed:
Rotate inner ring (3)
Normal wiper speed: Two
clicks down
Fast wiper speed: Three
clicks down
Single wipe: Push stalk up
Washer: Pull stalk back
Rear window wiper/washer
(5-Door/Sport Wagon)
To activate rear interval wiper:
Rotate knob (4) up to INT
To activate rear normal speed
wiper: Rotate knob (4) up to ON
To activate rear washer with
wipers operating: Rotate knob
(4) up to ; hold knob (4)
to continue washing; release
knob and wipers will continue
to operate
To operate stand alone wipe/
wash function: Rotate knob
(4) down and hold, release
to stop
Front window switches
One-touch down/up: Press/pull
AUTO switch (3) firmly and
release, window goes down/up
all the way, press/pull briefly
to stop, press/pull lightly and
hold for normal operation
Tip: During closing window
operation, window will stop
and open partway if object
blocks window operation
Rear window switches
Push/pull (4) to open/close
Power window lockout switch
Press button (5), only driver's
window operates; press again
for normal operation
Power window
initialization procedure
If battery is disconnected or power
window fuse is replaced, the auto
open/close and anti-pinch features
will not functionResetting procedure:
1. Turn ignition switch
to “ON” position
2. Make sure that power
window lock switch located
on driver’s door is not
depressed
3. Press switch and fully open
power window
4. Pull up switch to fully close
power window and continue
holding switch for about
2 seconds after window
fully closes
5. Repeat steps 3- 4 for front
passenger power window
while seated in front
passenger seat
6. Make sure power windows
operate correctly using
door switches
Dual power
mirrors
Ignition switch
must be in ACC
or ON position
Switch is on
driver’s door
To adjust left/right mirror:
Press selector switch (1) left/
right, press switch (2) in direction
of desired movement
Tip: To lock mirrors in place,
move selector switch (1) to
center position
Power window
switches
With ignition ON
All windows
controlled from
driver’s armrest;
passenger doors
have separate
switches
Turn signal/lighting
control lever
OFF= Lights off
= Tail, parking and
dashboard lights on: Rotate
knob (1) to first notch
= Tail, parking, dashboard
and headlights on: Rotate knob
(1) to second notch
High beams on/off: Push lever
forward/pull back to detent
To flash high beams: Pull lever
back slightly and release
34
R
E
A
R
543
AU
TOA
U
TO
LR
2
1
Page 9 of 12

AM/FM STEREO/CASSETTE/CD CHANGER
Always check the Owner’s Manual for more operating information and safety features
Audio
Systems
Audio
Systems
To eject specific disc: Press
and hold Eject (11) until beep
sound is heard; within five
seconds press the desired tray
number 1-6 (4)
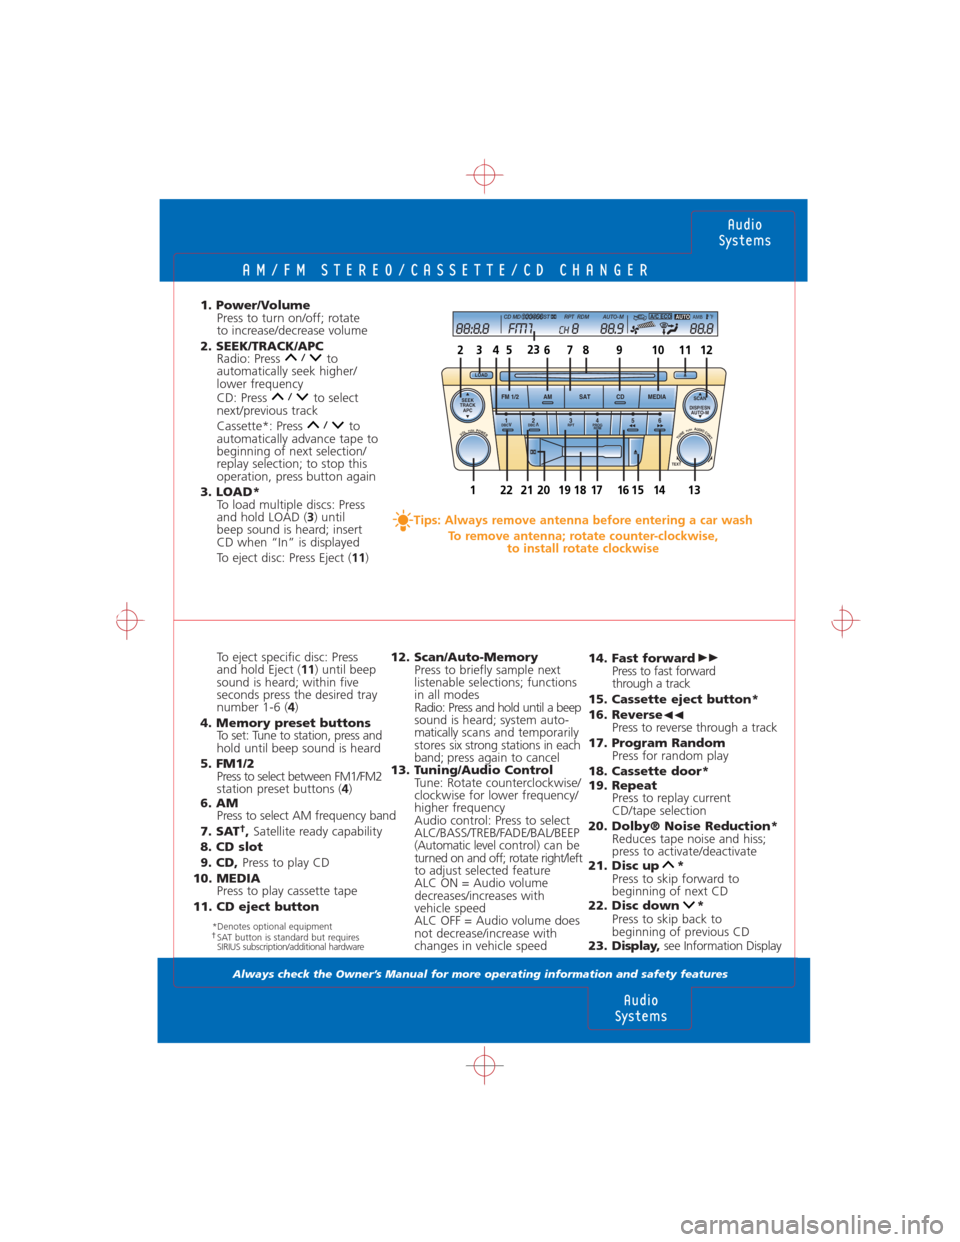
4. Memory preset buttons
To set: Tune to station, press and
hold until beep sound is heard
5. FM1/2
Press to select between FM1/FM2
station preset buttons (4)
6. AM
Press to select AM frequency band
7. SAT
†, Satellite ready capability
8. CD slot
9. CD, Press to play CD
10. MEDIA
Press to play cassette tape
11. CD eject button1. Power/Volume
Press to turn on/off; rotate
to increase/decrease volume
2. SEEK/TRACK/APC
Radio: Press to
automatically seek higher/
lower frequency
CD: Press to select
next/previous track
Cassette*: Press to
automatically advance tape to
beginning of next selection/
replay selection; to stop this
operation, press button again
3. LOAD*
To load multiple discs: Press
and hold LOAD (3) until
beep sound is heard; insert
CD when “In” is displayed
To eject disc: Press Eject (11)
12. Scan/Auto-Memory
Press to briefly sample next
listenable selections; functions
in all modes
Radio: Press and hold until a beep
sound is heard; system auto-
maticallyscans and temporarily
stores six strong stations in each
band; press again to cancel
13. Tuning/Audio Control
Tune: Rotate counterclockwise/
clockwise for lower frequency/
higher frequency
Audio control: Press to select
ALC/BASS/TREB/FADE/BAL/BEEP
(Automatic level control) can be
turned on and off; rotate right/left
to adjust selected feature
ALC ON = Audio volume
decreases/increases with
vehicle speed
ALC OFF = Audio volume does
not decrease/increase with
changes in vehicle speed14. Fast forward
Press to fast forward
through a track
15. Cassette eject button*
16. Reverse
Press to reverse through a track
17. Program Random
Press for random play
18. Cassette door*
19. Repeat
Press to replay current
CD/tape selection
20. Dolby® Noise Reduction*
Reduces tape noise and hiss;
press to activate/deactivate
21. Disc up *
Press to skip forward to
beginning of next CD
22. Disc down *
Press to skip back to
beginning of previous CD
23. Display, see Information Display
VOL PUSH POWER
SEEK
TRACK
APC
1DBCV2DBC 56 3RPT4PROG
RDMV
FM 1/2 AM SAT CD MEDIA
TUNE PUSH AUDIO CONT.
TEXT
SCAN
AUTO-M DISP/ESN
LOAD
25679108311124
13114
88:8.8 FM1 88.9 88.8CHCD MD 1 2 3 4 5 6 ST RPT RDM AUTO-M8AMB FOAUTOA/C ECO
22
23
15201816171921
*Denotes optional equipment†SAT button is standard but requires
SIRIUS subscription/additional hardware
Tips: Always remove antenna before entering a car wash
To remove antenna; rotate counter-clockwise,
to install rotate clockwise