warning MAZDA MODEL B-SERIES 2002 (in English) User Guide
[x] Cancel search | Manufacturer: MAZDA, Model Year: 2002, Model line: MODEL B-SERIES, Model: MAZDA MODEL B-SERIES 2002Pages: 287, PDF Size: 2.47 MB
Page 17 of 287

Charging system
Illuminates when the battery is not
charging properly.
Check fuel cap
Illuminates when the fuel cap is not
installed correctly. Check the fuel
cap for proper installation. When
the fuel filler cap is properly
re-installed, the light(s) will turn off
after a period of normal driving. Continuing to operate the vehicle with
the check fuel cap light on, can activate theCheck Enginewarning light.
It may take a long period of time for the system to detect an
improperly installed fuel filler cap.
For more information, refer toFuel filler capin theMaintenance and
specificationschapter.
Speed control
Illuminates when the speed control
is activated.
O/D off
Illuminates when the overdrive
function has been turned OFF using
the transmission control switch
(TCS).
If the light does not come on or the light flashes steadily, have
your vehicle serviced as soon as possible, damage to the
transmission could occur.
CHECK
FUEL
CAP
SPEED
CONT
O/D
OFF
Instrument Cluster
17
Page 19 of 287

Safety belt warning chime
Sounds to remind you to fasten your safety belts.
BeltMinder chime
Sounds intermittently to remind you to fasten your safety belts.
Supplemental restraint system (SRS) warning chime
Sounds when a malfunction in the supplemental restraint system (front
or side airbags) has been detected. Have the supplemental restraint
system inspected immediately.
Supplemental restraint system (SRS) warning chime
Sounds when a malfunction in the supplemental restraint system (front
or side airbags) has been detected. Have the supplemental restraint
system inspected immediately.
Headlamps ON warning chime
Sounds when the headlamps or parking lamps are on, the key is removed
from the ignition and the driver's door is opened.
Key-in-ignition warning chime
Sounds when the key is left in the ignition and the driver's door is
opened.
GAUGES
Instrument Cluster
19
Page 20 of 287

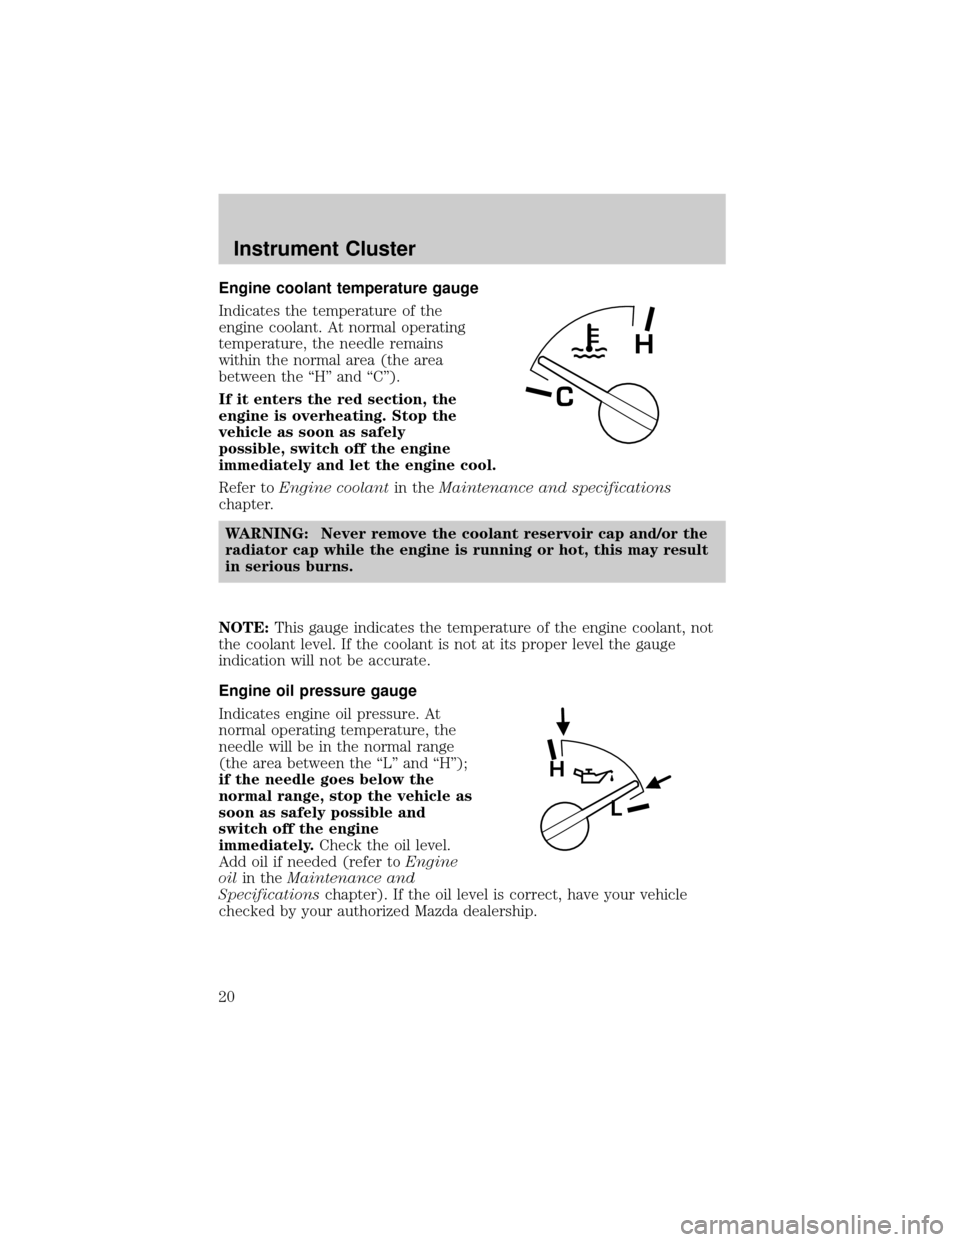
Engine coolant temperature gauge
Indicates the temperature of the
engine coolant. At normal operating
temperature, the needle remains
within the normal area (the area
between the ªHº and ªCº).
If it enters the red section, the
engine is overheating. Stop the
vehicle as soon as safely
possible, switch off the engine
immediately and let the engine cool.
Refer toEngine coolantin theMaintenance and specifications
chapter.
WARNING: Never remove the coolant reservoir cap and/or the
radiator cap while the engine is running or hot, this may result
in serious burns.
NOTE:This gauge indicates the temperature of the engine coolant, not
the coolant level. If the coolant is not at its proper level the gauge
indication will not be accurate.
Engine oil pressure gauge
Indicates engine oil pressure. At
normal operating temperature, the
needle will be in the normal range
(the area between the ªLº and ªHº);
if the needle goes below the
normal range, stop the vehicle as
soon as safely possible and
switch off the engine
immediately.Check the oil level.
Add oil if needed (refer toEngine
oilin theMaintenance and
Specificationschapter). If the oil level is correct, have your vehicle
checked by your authorized Mazda dealership.
C
H
H
L
Instrument Cluster
20
Page 77 of 287

HEADLAMP CONTROL
Rotate the headlamp control to the
first position to turn on the parking
lamps. Rotate to the second position
to turn on the headlamps.
FOG LAMP CONTROL (IF EQUIPPED)
The fog lamps can only be turned
on when the headlamp control is in
the low beams position.
Press the foglamp control to activate
the fog lamps. The fog lamp
indicator light will illuminate. When
the highbeams are activated, the fog
lamps will not operate.
Press the fog lamp control again to deactivate the fog lamps.
Daytime running lamps (DRL) (if equipped)
Turns the headlamps on with a reduced output. To activate:
²the ignition must be in the ON position and
²the headlamp control is in the OFF or Parking lamps position.
WARNING: Always remember to turn on your headlamps at
dusk or during inclement weather. The Daytime Running Lamp
(DRL) system does not activate with your tail lamps and
generally may not provide adequate lighting during these
conditions. Failure to activate your headlamps under these
conditions may result in a collision.
OFF
Lights
77
Page 88 of 287

WARNING: Never adjust the steering wheel when the vehicle is
moving. You could lose control of the vehicle.
AUXILIARY POWER POINT
Power outlets are designed for accessory plugs only. Do not hang
any type of accessory or accessory bracket from the plug.
Improper use of the power outlet can cause damage not covered
by your warranty.
The auxiliary power point is located on the instrument panel. This outlet
should be used in place of the cigarette lighter for optional electrical
accessories.
OFFA/CMAX
A/C
TUNESEEK12V
12
34AM-FM
Driver Controls
88
Page 91 of 287

OUTSIDE AIR TEMPERATURE
Display operation of the mirror with
the compass feature:
²Press the right button to toggle
the display between the compass
direction and no display.
Display operation of mirror with
temperature and compass feature:
²Press the right button once to
display temperature ÉF and
compass.
²Press the right button twice to display temperature ÉC and compass.
²Press the right button three times to turn the display OFF.
WARNING:
The outside temperature indicator is not designed to
serve as an ICE warning device and is therefore unsuitable for
that purpose. Indicated temperatures just above the freezing
point do not guarantee that the road surface is free of ice.
COMPASS ZONE ADJUSTMENT
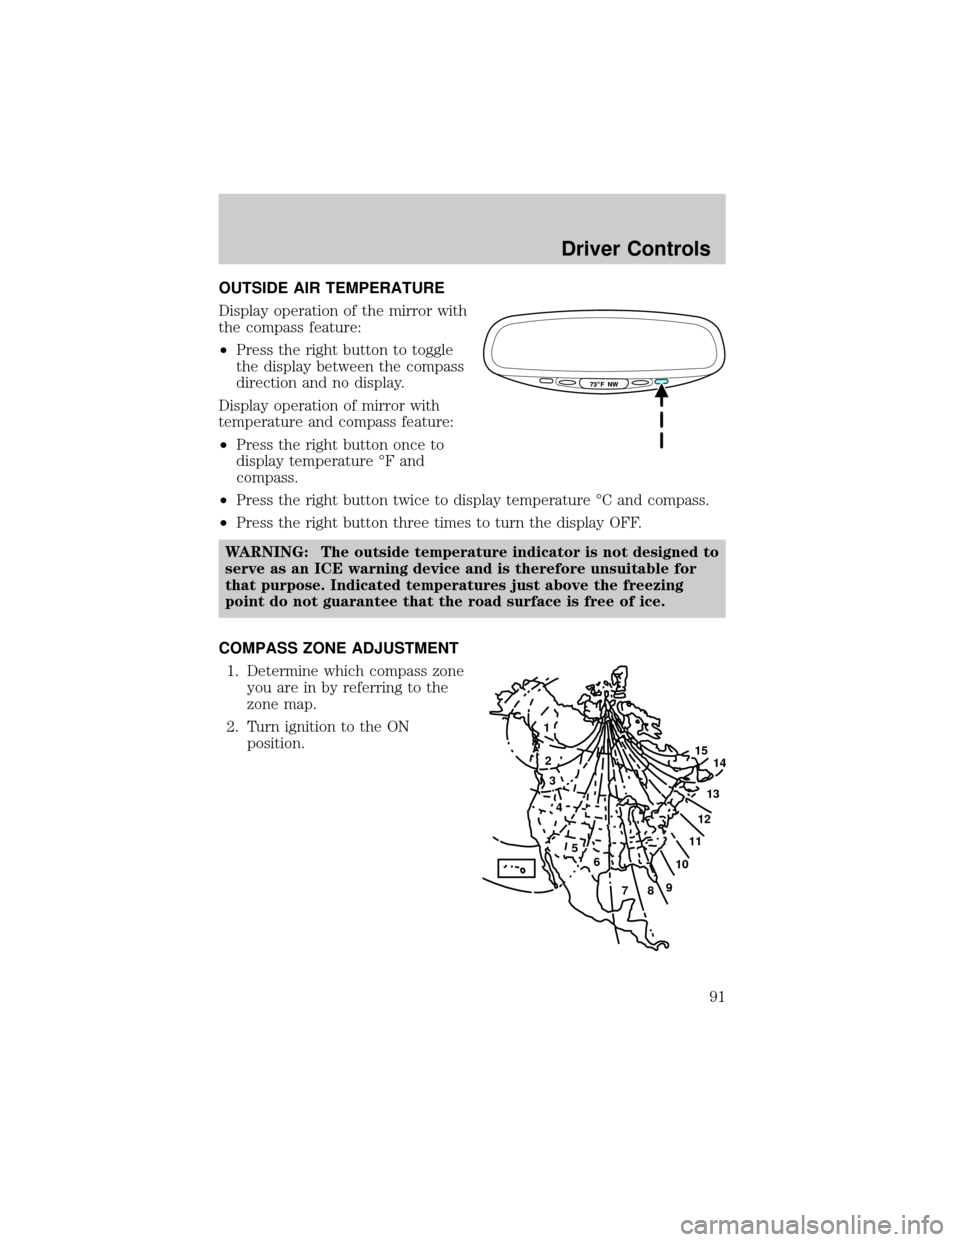
1. Determine which compass zone
you are in by referring to the
zone map.
2. Turn ignition to the ON
position.
1
2
3
4
5
6
7891011121314 15
Driver Controls
91
Page 93 of 287

POWER MIRROR CONTROL (IF EQUIPPED)
To adjust your mirrors:
1. Select
to adjust the left
mirror or
to adjust the right
mirror.
2. Move the control in the
direction you wish to tilt the
mirror.
3. Return to the center position to
lock mirrors in place.
SPEED CONTROL (IF EQUIPPED)
To turn speed control on
²Press ON.
NOTE:Vehicle speed cannot be
controlled until the vehicle is
traveling at or above 48 km/h
(30 mph).
WARNING: Do not use the
speed control in heavy traffic
or on roads that are winding,
slippery, or unpaved. You may
lose control of the vehicle.
WARNING: Do not shift the gearshift lever into N (Neutral)
with the speed control on. You may lose control of the vehicle
or cause engine system damage.
OFF ON
Driver Controls
93
Page 94 of 287

To turn speed control off
²Press OFF.
NOTE:Once speed control is
turned off or the ignition is switched
off, the previously programmed set
speed will be erased.
To set a speed
²Press SET ACC.
NOTE:For speed control to
operate, the speed control must be
ON and the vehicle speed must be
greater than 48 km/h (30 mph).
If you drive up or down a steep hill, your vehicle speed may vary
momentarily slower or faster than the set speed. This is normal.
Speed control cannot reduce the vehicle speed if it increases above the
set speed on a downhill. If your vehicle speed is faster than the set
speed while driving on a downhill, you may want to shift to the next
lower gear or apply the brakes to reduce your vehicle speed.
If your vehicle slows down more than 16 km/h (10 mph) below your set
speed on an uphill, your speed control will disengage. This is normal.
Pressing RSM will re-engage it.
WARNING: Do not use the speed control in heavy traffic or on
roads that are winding, slippery, mountainous, hilly, or unpaved.
This may cause an accident.
OFF ON
RSM
SET
ACC
COAST
Driver Controls
94
Page 98 of 287

To return to normal overdrive mode,
press the Transmission Control
Switch again. The O/D Off indicator
light will no longer be illuminated.
When you shut off and re-start your
vehicle, the transmission will automatically return to normal
(Overdrive) mode.
For additional information about the gearshift lever and the transmission
control switch operation refer to theAutomatic Transmission
Operationsection of theDrivingchapter.
CENTER CONSOLE (IF EQUIPPED)
Your vehicle may be equipped with a
variety of console features. These
include:
²Utility compartment with
cassette/compact disc storage
²Cupholders
²Coin holder slots
²Flip up armrest
WARNING: Use only soft cups in the cupholder. Hard objects
can injure you in a collision.
CARGO AREA FEATURES
Cargo area shade (if equipped)
Your vehicle may be equipped with notches in the side trim panels that
are used for a cargo area shade. See your dealer for more information.
O/D
ON/OFF
Driver Controls
98
Page 109 of 287

If your keys are lost or stolen you
will need to do the following:
²Use your spare key to start the
vehicle. or
²Have your vehicle towed to an
authorized Mazda dealership. .
The key codes will need to be
erased from your vehicle and new key codes will need to be re-coded.
Replacingcoded keycan be very costly and you may want to store an
extra programmed key away from the vehicle in a safe place to prevent
an unforeseen inconvenience.
WARNING: If an unprogrammed key is used in the ignition it
will cause a ªNO STARTº condition.
Programming spare keys
A maximum of eight keys can be coded to your vehicle. Only
SecuriLockykeys can be used. To program acoded keyyourself, you
will need two previously programmedcoded keys(keys that already
operate your vehicle's engine) and the new unprogrammed key(s) readily
accessible for timely implementation of each step in the procedure.
If two previously programmed coded keys are not available, you must
bring your vehicle to your dealership to have the spare coded key(s)
programmed.
NOTE:Please read and understand the entire procedure before you
begin.
NOTE:This procedure must be completed within the specified times. If
not completed within the specified time period, the reprogramming
procedure must be restarted from the beginning.
Locks and Security
109