clutch MAZDA MODEL B-SERIES 2002 Owners Manual (in English)
[x] Cancel search | Manufacturer: MAZDA, Model Year: 2002, Model line: MODEL B-SERIES, Model: MAZDA MODEL B-SERIES 2002Pages: 287, PDF Size: 2.47 MB
Page 96 of 287

To disengage speed control
²Depress the brake pedal or
²Depress the clutch pedal (if
equipped).
NOTE:Disengaging the speed
control will not erase the previously
programmed set speed.
NOTE:Fully depressing the clutch
pedal may cause a flare in engine
RPM as the throttle is returned to
idle. This is normal.
NOTE:Pressing OFF will erase the
previously programmed set speed.
OFF ON
Driver Controls
96
Page 97 of 287

To return to a previously set speed
²Press RSM. For RSM to operate,
the vehicle speed must be faster
than 48 km/h (30 mph).
Indicator light
This light comes on when either the
SET ACCEL or RES controls are
pressed. It turns off when the speed
control OFF control is pressed, the
brake or clutch is applied or the ignition is turned to the OFF position.
OVERDRIVE CONTROL (IF EQUIPPED)
Activating overdrive
(Overdrive) is the normal drive position for the best fuel economy.
The overdrive function allows automatic upshifts and downshifts through
all available gears.
Deactivating overdrive
Press the Transmission Control
Switch (TCS) located on the end of
the gearshift lever. The O/D Off
indicator light will illuminate on the
instrument cluster. The transmission
will operate in all gears except overdrive.
RSM
SET
ACC
COAST
SPEED
CONT
O/D
ON/OFF
Driver Controls
97
Page 149 of 287

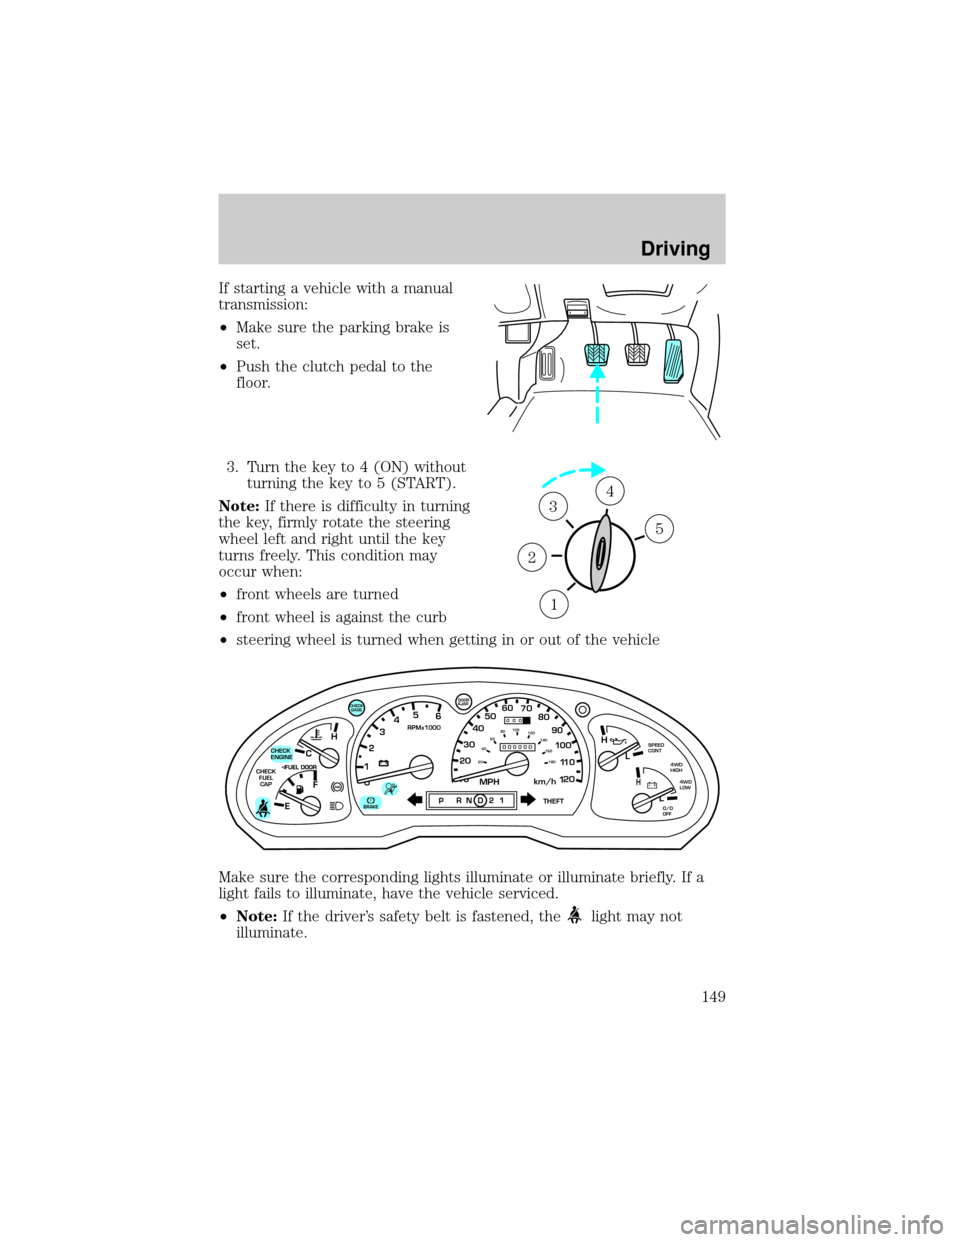
If starting a vehicle with a manual
transmission:
²Make sure the parking brake is
set.
²Push the clutch pedal to the
floor.
3. Turn the key to 4 (ON) without
turning the key to 5 (START).
Note:If there is difficulty in turning
the key, firmly rotate the steering
wheel left and right until the key
turns freely. This condition may
occur when:
²front wheels are turned
²front wheel is against the curb
²steering wheel is turned when getting in or out of the vehicle
Make sure the corresponding lights illuminate or illuminate briefly. If a
light fails to illuminate, have the vehicle serviced.
²Note:If the driver's safety belt is fastened, the
light may not
illuminate.
1
2
34
5
C
012345
6
RPMx1000
ABS!
BRAKE
CHECK
ENGINE
CHECK
FUEL
CAP
EFH
H
H
PRN D 2 1THEFT
SPEED
CONT
4WD
HIGH
4WD
LOW
O/D
OFFL
L
10MPH 205060
70
304080
90
km/h
0 0 0
10 100
1
20
1
0 0 0 0 0 0406080100
120
140
160
180
20
DOOR
AJAR
CHECK
GAGE
Driving
149
Page 161 of 287

MANUAL TRANSMISSION OPERATION (IF EQUIPPED)
USING THE CLUTCH
Vehicles equipped with a manual
transmission have a starter interlock
that prevents starting the engine
unless the clutch pedal is fully
depressed.
When starting a vehicle with a
manual transmission:
1. Hold down the brake pedal.
2. Depress the clutch pedal.
3. Put the gearshift lever in N
(Neutral).
4. Start the engine and let it idle for a few seconds.
²Put the gearshift lever in 1 (First) or R (Reverse).
5. Release the clutch slowly while pressing gradually down on the
accelerator pedal.
²Do not drive with your foot resting on the clutch pedal. Do not use
the clutch to hold your vehicle at a standstill while waiting on a hill.
These actions may reduce clutch life.
PARKING
1. Apply the brake, depress the
clutch and shift into N
(Neutral).
Driving
161
Page 163 of 287

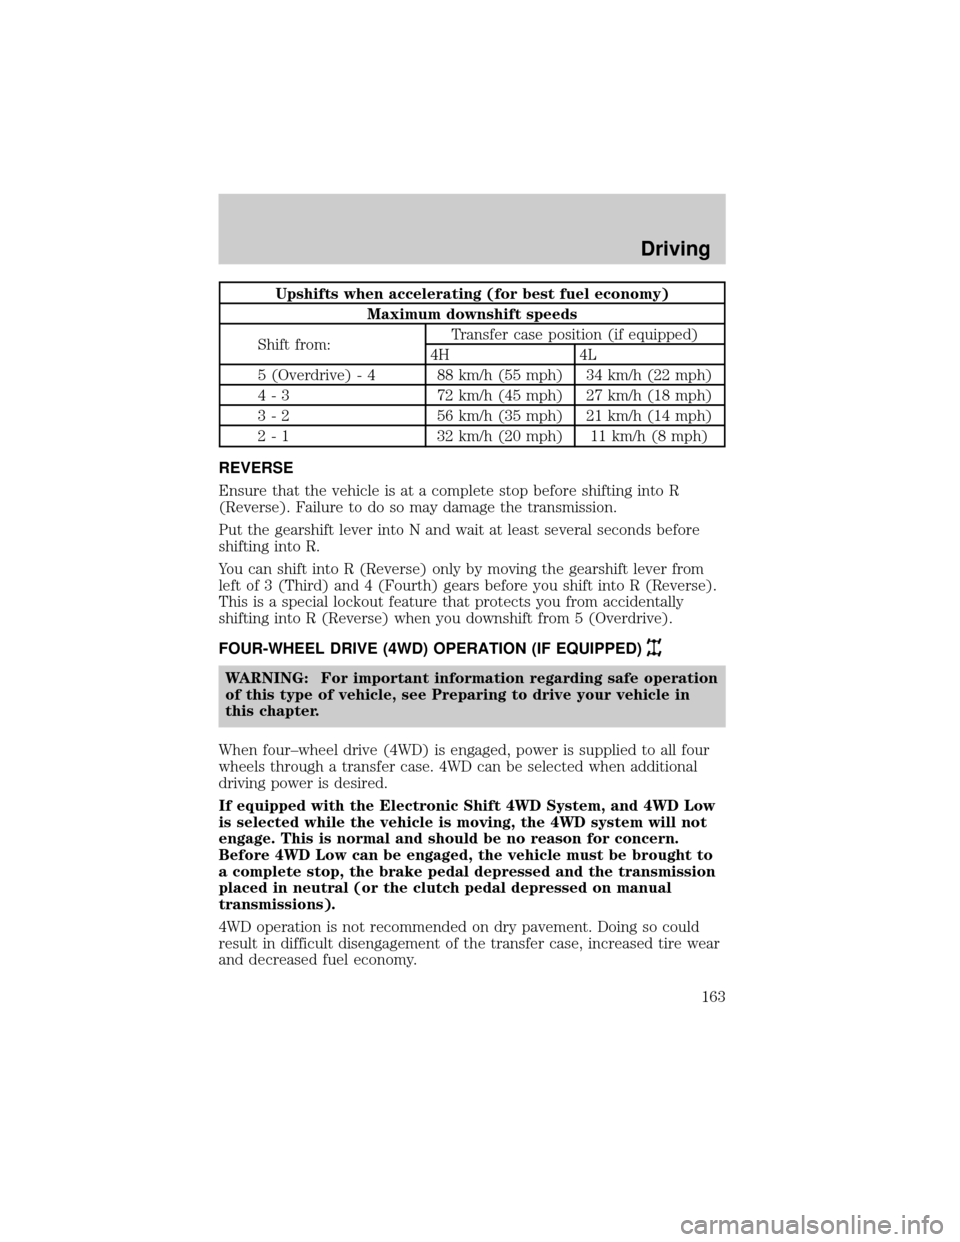
Upshifts when accelerating (for best fuel economy)
Maximum downshift speeds
Shift from:Transfer case position (if equipped)
4H 4L
5 (Overdrive) - 4 88 km/h (55 mph) 34 km/h (22 mph)
4 - 3 72 km/h (45 mph) 27 km/h (18 mph)
3 - 2 56 km/h (35 mph) 21 km/h (14 mph)
2 - 1 32 km/h (20 mph) 11 km/h (8 mph)
REVERSE
Ensure that the vehicle is at a complete stop before shifting into R
(Reverse). Failure to do so may damage the transmission.
Put the gearshift lever into N and wait at least several seconds before
shifting into R.
You can shift into R (Reverse) only by moving the gearshift lever from
left of 3 (Third) and 4 (Fourth) gears before you shift into R (Reverse).
This is a special lockout feature that protects you from accidentally
shifting into R (Reverse) when you downshift from 5 (Overdrive).
FOUR-WHEEL DRIVE (4WD) OPERATION (IF EQUIPPED)
WARNING: For important information regarding safe operation
of this type of vehicle, see Preparing to drive your vehicle in
this chapter.
When four±wheel drive (4WD) is engaged, power is supplied to all four
wheels through a transfer case. 4WD can be selected when additional
driving power is desired.
If equipped with the Electronic Shift 4WD System, and 4WD Low
is selected while the vehicle is moving, the 4WD system will not
engage. This is normal and should be no reason for concern.
Before 4WD Low can be engaged, the vehicle must be brought to
a complete stop, the brake pedal depressed and the transmission
placed in neutral (or the clutch pedal depressed on manual
transmissions).
4WD operation is not recommended on dry pavement. Doing so could
result in difficult disengagement of the transfer case, increased tire wear
and decreased fuel economy.
Driving
163
Page 165 of 287

Shifting from 4X4 HIGH (4WD high) to 2WD (2WD high)
Move the 4WD control to 2WD
position at any forward speed.
²Yo udo notneed to operate the
vehicle in R (Reverse) to
disengage your front hubs.
Shifting from 2WD (2WD high) to 4X4 LOW (4WD low)
1. Bring the vehicle to a stop.
2. Depress the brake.
3. Place the gearshift in N (Neutral) (automatic transmission) or
depress the clutch (manual transmission).
4. Move the 4WD control to the
4X4 LOW position.
Shifting from 4X4 LOW (4WD low) to 2WD (2WD high)
1. Bring the vehicle to a stop.
2. Depress the brake.
3. Place the gearshift in N (Neutral) (automatic transmission) or
depress the clutch (manual transmission).
4X4
HIGH
2WD4X4
LOW
4X4
HIGH
2WD4X4
LOW
Driving
165
Page 166 of 287

4. Move the 4WD control to the
2WD position.
Shifting between 4X4 HIGH (4WD high) and 4X4 LOW (4WD low)
1. Bring the vehicle to a stop.
2. Depress the brake.
3. Place the gearshift in N (Neutral) (automatic transmission) or
depress the clutch (manual transmission).
4. Move the 4WD control to the
4X4 HIGH or 4X4 LOW position.
Driving off-road with 4WD
Your vehicle is specially equipped for driving on sand, snow, mud and
rough terrain and has operating characteristics that are somewhat
different from conventional vehicles, both on and off the road.
Maintain steering wheel control at all times, especially in rough terrain.
Since sudden changes in terrain can result in abrupt steering wheel
motion, make sure you grip the steering wheel from the outside. Do not
grip the spokes.
Drive cautiously to avoid vehicle damage from concealed objects such as
rocks and stumps.
4X4
HIGH
2WD4X4
LOW
2WD4X4
LOW4X4
HIGH
Driving
166
Page 186 of 287

Fuse/Relay
LocationFuse Amp
RatingPassenger Compartment Fuse
Panel Description
10 7.5A Speed Control Servo/Amplifier
Assembly, Generic Electronic
Module (GEM), Shift Lock
Actuator, Turn Signals
11 7.5A Instrument Cluster, 4x4, Main
Light Switch, Central Security
Module (CSM)
12 Ð Not Used
13 20A Brake Pedal Position Switch
14 10A or Not Used 10A: If equipped with Anti-Lock
Brake System (ABS) Control
Module
15 Ð Not Used
16 30A Windshield Wiper Motor, Wiper
Hi-Lo Relay, Wiper Run/Park
Relay
17 20A Cigar Lighter, Data Link
Connector (DLC)
18 Ð Not Used
19 25A PCM Power Diode, Ignition, PATS
20 7.5A Generic Electronic Module
(GEM), Radio
21 15A Flasher (Hazard)
22 20A Auxiliary Power Socket
23 Ð Not Used
24 7.5A Clutch Pedal Position (CPP)
switch, Starter Interrupt Relay
25 Ð Not Used
Roadside Emergencies
186
Page 189 of 287

Fuse/Relay
LocationFuse Amp
RatingPower Distribution Box
Description
8 20A* Central Security Module, Power
Door Locks, Remote Entry
9 Ð Not Used
10 Ð Not Used
11 50A** Starter Relay, Ignition Switch
12 20A* Power Windows
13 Ð Not Used
14 Ð Not Used
15 Ð Not Used
16 40A** Blower Motor
17 20A** Auxiliary Cooling Fan
18 Ð Not Used
19 Ð Not Used
20 Ð Not Used
21 10A* PCM Memory
22 Ð Not Used
23 20A* Fuel Pump Motor
24 30A* Headlamps
25 10A* A/C Clutch Relay
26 Ð Not Used
27 Ð Not Used
28 30A* 4WABS Module
29 Ð Not Used
30 15A* Trailer Tow
31 20A* Foglamp, Daytime Running Lamps
(DRL)
32 Ð Not Used
33 15A* Park Lamp, Central Security
Module
34 Ð Not Used
35 Ð Not Used
Roadside Emergencies
189
Page 190 of 287

Fuse/Relay
LocationFuse Amp
RatingPower Distribution Box
Description
36 Ð Not Used
37 Ð Not Used
38 10A* Left Headlamp Low Beam
39 Ð Not Used
40 Ð Not Used
41 20A* Heated Oxygen Sensors
42 10A* Right Headlamp Low Beam
43 Ð (Resistor)
44 Ð Not Used
45A Ð Wiper High/Low Relay
45B Ð Wiper Park/Run Relay
46A Ð Fuel Pump Relay
46B Ð Trailer Tow Relay
47 Ð Starter Relay
48 Ð Auxiliary Cooling Fan
49 Ð Not Used
50 Ð Not Used
51 Ð Not Used
52 Ð Not Used
53 Ð Powertrain Control Module (PCM)
Diode
54 Ð Powertrain Control Module (PCM)
Relay
55 Ð Blower Motor Relay
56A Ð A/C Clutch Relay
56B Ð Front Washer Pump Relay
* Mini Fuses ** Maxi Fuses
Roadside Emergencies
190