change time MAZDA MODEL B-SERIES 2003 Owners Manual (in English)
[x] Cancel search | Manufacturer: MAZDA, Model Year: 2003, Model line: MODEL B-SERIES, Model: MAZDA MODEL B-SERIES 2003Pages: 245, PDF Size: 2.33 MB
Page 9 of 245

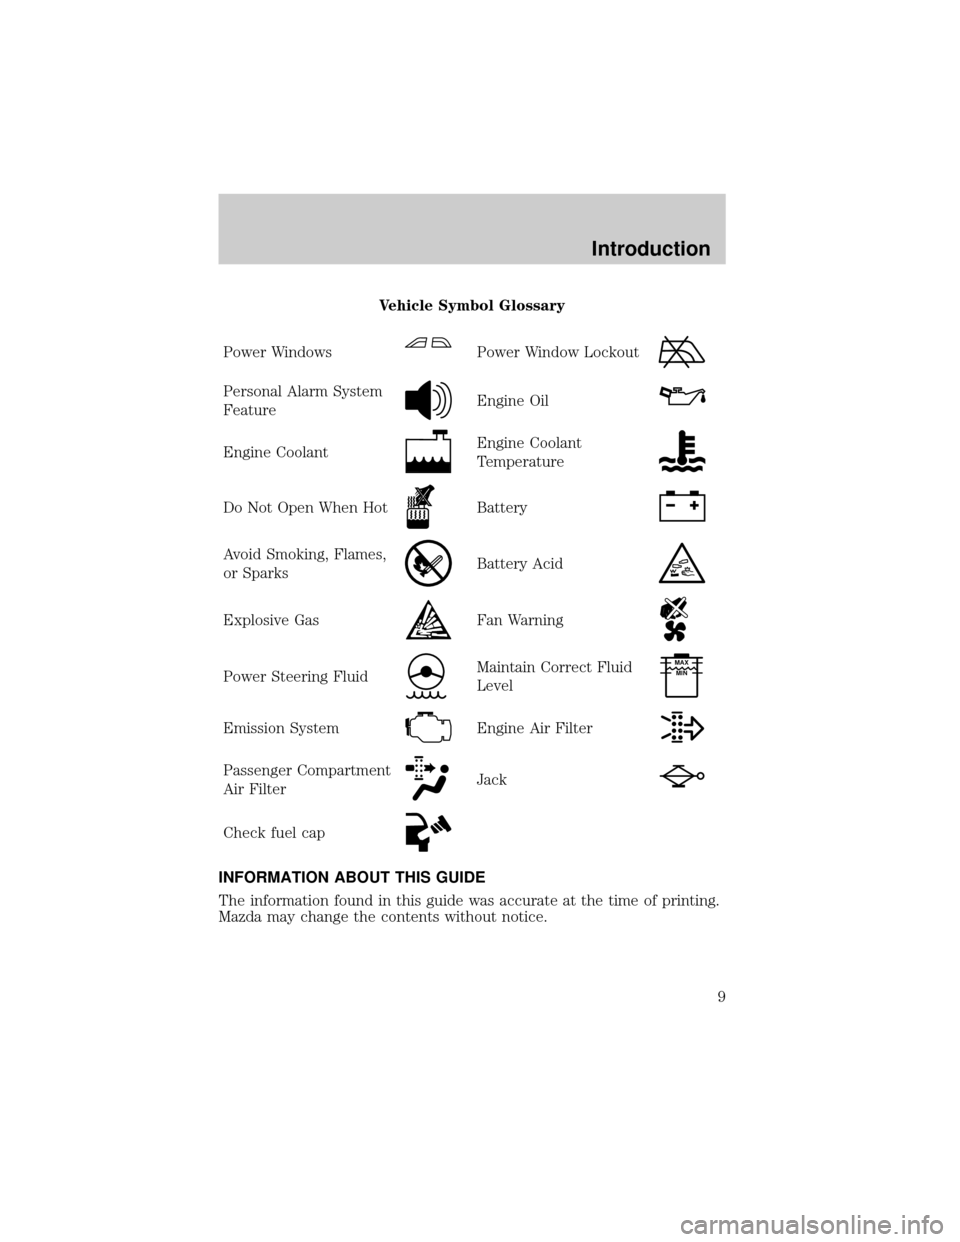
Vehicle Symbol Glossary
Power Windows
Power Window Lockout
Personal Alarm System
FeatureEngine Oil
Engine CoolantEngine Coolant
Temperature
Do Not Open When HotBattery
Avoid Smoking, Flames,
or SparksBattery Acid
Explosive GasFan Warning
Power Steering FluidMaintain Correct Fluid
LevelMAX
MIN
Emission SystemEngine Air Filter
Passenger Compartment
Air FilterJack
Check fuel cap
INFORMATION ABOUT THIS GUIDE
The information found in this guide was accurate at the time of printing.
Mazda may change the contents without notice.
Introduction
9
Page 32 of 245

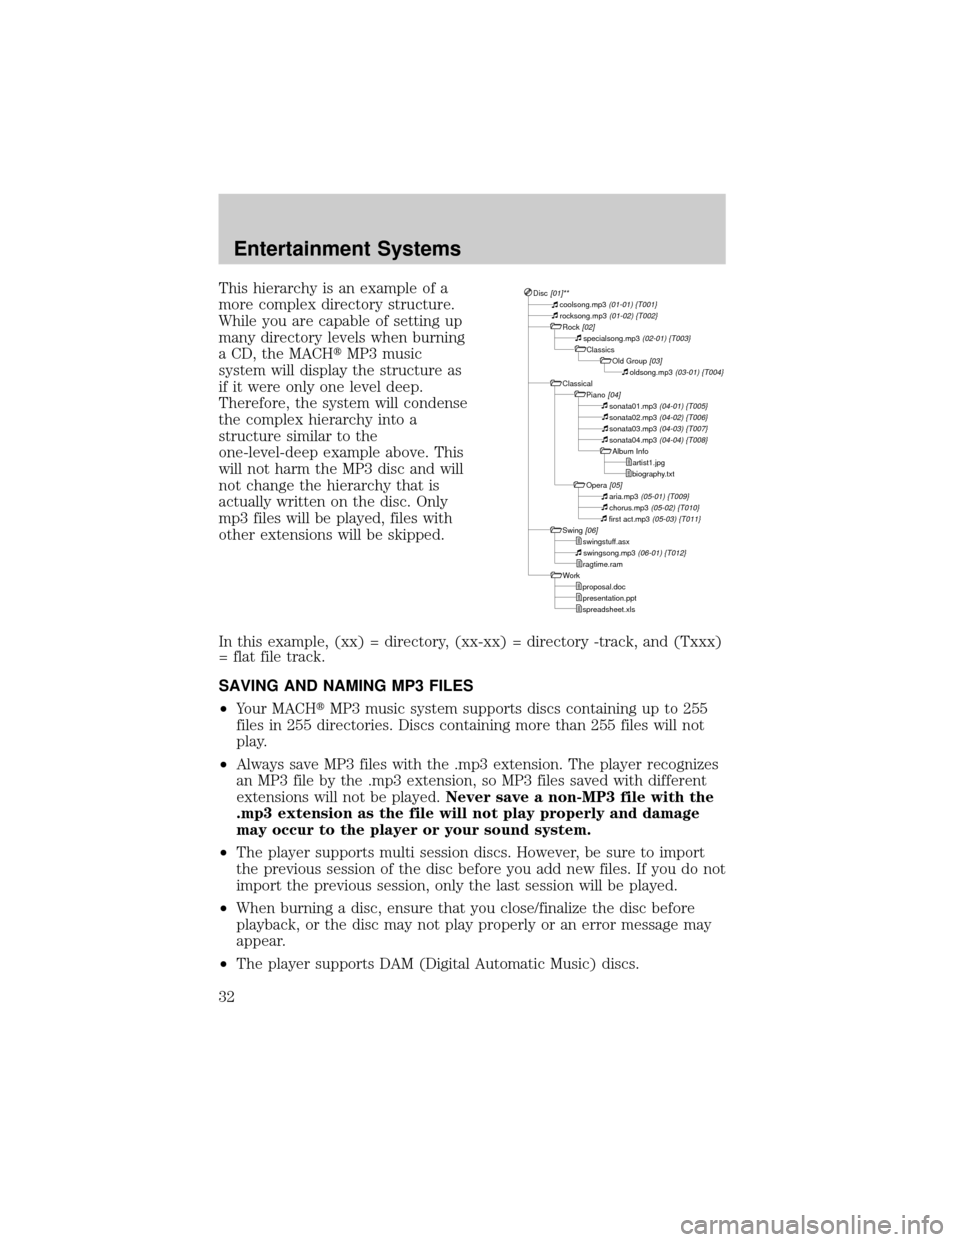
This hierarchy is an example of a
more complex directory structure.
While you are capable of setting up
many directory levels when burning
a CD, the MACHtMP3 music
system will display the structure as
if it were only one level deep.
Therefore, the system will condense
the complex hierarchy into a
structure similar to the
one-level-deep example above. This
will not harm the MP3 disc and will
not change the hierarchy that is
actually written on the disc. Only
mp3 files will be played, files with
other extensions will be skipped.
In this example, (xx) = directory, (xx-xx) = directory -track, and (Txxx)
= flat file track.
SAVING AND NAMING MP3 FILES
²Your MACHtMP3 music system supports discs containing up to 255
files in 255 directories. Discs containing more than 255 files will not
play.
²Always save MP3 files with the .mp3 extension. The player recognizes
an MP3 file by the .mp3 extension, so MP3 files saved with different
extensions will not be played.Never save a non-MP3 file with the
.mp3 extension as the file will not play properly and damage
may occur to the player or your sound system.
²The player supports multi session discs. However, be sure to import
the previous session of the disc before you add new files. If you do not
import the previous session, only the last session will be played.
²When burning a disc, ensure that you close/finalize the disc before
playback, or the disc may not play properly or an error message may
appear.
²The player supports DAM (Digital Automatic Music) discs.Disc [01]**coolsong.mp3 (01-01) {T001}rocksong.mp3 (01-02) {T002}Rock [02]specialsong.mp3 (02-01) {T003}Classics
Old Group [03]oldsong.mp3 (03-01) {T004}Classical
Piano [04]sonata01.mp3 (04-01) {T005}sonata02.mp3 (04-02) {T006}sonata03.mp3 (04-03) {T007}sonata04.mp3 (04-04) {T008}Album Info
artist1.jpg
biography.txt
Opera
[05]aria.mp3 (05-01) {T009}chorus.mp3 (05-02) {T010}first act.mp3 (05-03) {T011}Swing [06]swingstuff.asx
swingsong.mp3 (06-01) {T012}ragtime.ram
Work
proposal.doc
presentation.ppt
spreadsheet.xls
Entertainment Systems
32
Page 34 of 245

Don't:
²Expose discs to direct sunlight or heat sources for extended periods
of time.
²Insert more than one disc into each slot of the CD changer magazine.
²Clean using a circular motion.
CD units are designed to play commercially pressed 12 cm (4.75 in)
audio compact discs only. Due to technical incompatibility, certain
recordable and re-recordable compact discs may not function
correctly when used in CD players. Irregular shaped CDs, CDs
with a scratch protection film attached, and CDs with homemade
paper (adhesive) labels should not be inserted into the CD player.
The label may peel and cause the CD to become jammed. It is
recommended that homemade CDs be identified with permanent
felt tip marker rather than adhesive labels. Ball point pens may
damage CDs. Please contact your dealer for further information.
AUDIO SYSTEM WARRANTY AND SERVICE
Refer to theWarranty Guidefor audio system warranty information. If
service is necessary, see your authorized Mazda dealership.
Entertainment Systems
34
Page 43 of 245

To install the new bulb:
Handle a halogen headlamp bulb carefully and keep out of
children's reach. Grasp the bulb only by its plastic base and do
not touch the glass. The oil from your hands could cause the bulb
to break the next time the headlamps are operated. Always wear
safety glasses while handling bulbs.
NOTE: If the bulb is accidentally touched, it should be cleaned with
rubbing alcohol before being used.
1. With the flat side of the bulb's plastic base facing upward, insert the
glass end of the bulb into the lamp assembly. You may need to turn
the bulb left or right to align the grooves in the plastic base with the
tabs in the lamp assembly. When the grooves are aligned, push the
bulb into the lamp assembly until the plastic base contacts the rear
of the lamp assembly.
2. Install the bulb retaining ring over the plastic base until it contacts
the rear of the socket by rotating clockwise until you feel a ªstop.º
3. Install the electrical connector into the plastic base until it snaps,
locking it into position.
4. Install the headlamp on vehicle, push rearward and secure with two
retainer pins.
5. Turn the headlamps on and make sure they work properly. If the
headlamp was correctly aligned before you changed the bulb, you
should not need to align it again.
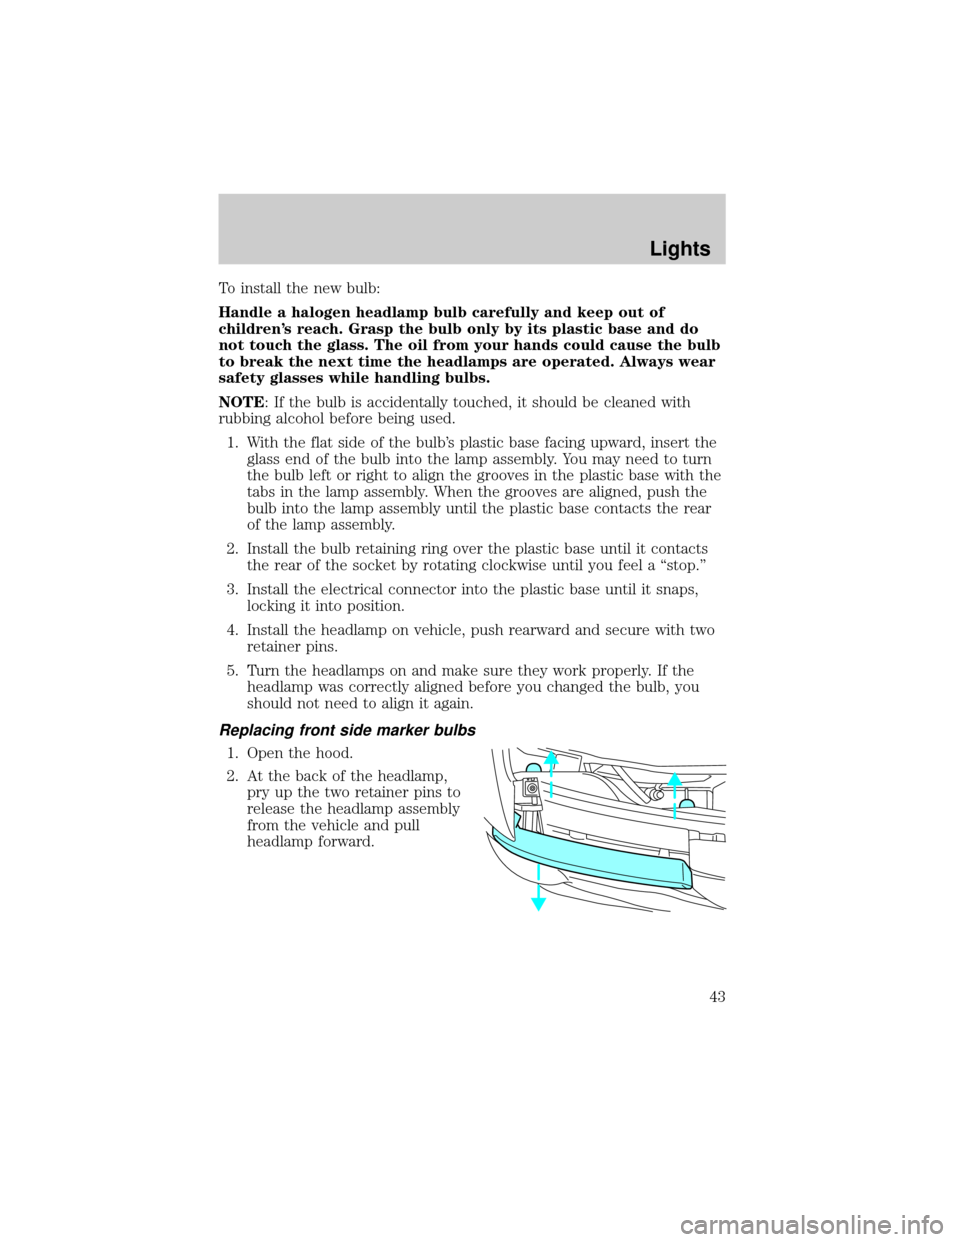
Replacing front side marker bulbs
1. Open the hood.
2. At the back of the headlamp,
pry up the two retainer pins to
release the headlamp assembly
from the vehicle and pull
headlamp forward.
Lights
43
Page 126 of 245

Shifting to/from 4X4 LOW (4WD Low)
1. Bring the vehicle to a complete stop
2. Depress the brake
3. On vehicles equipped with an automatic transmission, place the
transmission in N (Neutral); on vehicles equipped with a manual
transmission, depress the clutch.
4. Move the 4WD control to the desired position.
²If shifting into 4X4 LOW (4WD Low), wait for the LOW RANGE light
in the instrument cluster to turnonindicating the shift is complete.
²If shifting out of 4X4 LOW (4WD Low), wait for the LOW RANGE light
in the instrument cluster to turnoffindicating the shift is complete.
Driving off-road with 4WD
Your vehicle is specially equipped for driving on sand, snow, mud and
rough terrain and has operating characteristics that are somewhat
different from conventional vehicles, both on and off the road.
Maintain steering wheel control at all times, especially in rough terrain.
Since sudden changes in terrain can result in abrupt steering wheel
motion, make sure you grip the steering wheel from the outside. Do not
grip the spokes.
Drive cautiously to avoid vehicle damage from concealed objects such as
rocks and stumps.
You should either know the terrain or examine maps of the area before
driving. Map out your route before driving in the area. For more
information on driving off-road, read the ªFour Wheelingº supplement in
your owner's portfolio.
If your vehicle gets stuck
If the vehicle is stuck it may be rocked out by shifting from forward and
reverse gears, stopping between shifts, in a steady pattern. Press lightly
on the accelerator in each gear.
Do not rock the vehicle if the engine is not at normal operating
temperature or damage to the transmission may occur.
Do not rock the vehicle for more than a few minutes or damage
to the transmission and tires may occur or the engine may
overheat.
Driving
126
Page 127 of 245

WARNING: Do not spin the wheels at over 56 km/h (35 mph).
The tires may fail and injure a passenger or bystander.
Sand
When driving over sand, try to keep all four wheels on the most solid
area of the trail. Do not reduce the tire pressures but shift to a lower
gear and drive steadily through the terrain. Apply the accelerator slowly
and avoid spinning the wheels.
Mud and water
If you must drive through high water, drive slowly. Traction or brake
capability may be limited.
When driving through water, determine the depth; avoid water higher
than the bottom of the hubs (if possible) and proceed slowly. If the
ignition system gets wet, the vehicle may stall.
Once through water, always try the brakes. Wet brakes do not stop the
vehicle as effectively as dry brakes. Drying can be improved by moving
your vehicle slowly while applying light pressure on the brake pedal.
After driving through mud, clean off residue stuck to the driveshafts and
tires. Excess mud stuck on tires and rotating driveshafts causes an
imbalance that could damage drive components.
If the transmission, transfer case or front axle are submerged in water,
their fluids should be checked and changed, if necessary.
Driving through deep water where the transmission vent tube is
submerged may allow water into the transmission and cause
internal transmission damage.
Replace rear axle lubricant any time the axle has been submerged in
water. The rear axle does not normally require a lubricant change for the
life of the vehicle. Rear axle lubricant quantities are not to be checked or
changed unless a leak is suspected or repair is required.
Driving on hilly or sloping terrain
When driving on a hill, avoid driving crosswise or turning on steep
slopes. You could lose traction and slip sideways. Drive straight up,
straight down or avoid the hill completely. Know the conditions on the
other side of a hill before driving over the crest.
When climbing a steep hill, start in a lower gear rather than downshifting
to a lower gear from a higher gear once the ascent has started. This
reduces strain on the engine and the possibility of stalling.
Driving
127
Page 138 of 245

²Vehicles with trailers should not be parked on a grade. If you must
park on a grade, place wheel chocks under the trailer's wheels.
Launching or retrieving a boat
Disconnect the wiring to the trailer before backing the trailer
into the water. Reconnect the wiring to the trailer after the
trailer is removed from the water.
When backing down a ramp during boat launching or retrieval:
²do not allow the static water level to rise above the bottom edge of
the rear bumper.
²do not allow waves to break higher than 15 cm (6 inches) above the
bottom edge of the rear bumper.
Exceeding these limits may allow water to enter vehicle components:
²causing internal damage to the components.
²affecting driveability, emissions and reliability.
Replace the rear axle lubricant any time the axle has been submerged in
water. Rear axle lubricant quantities are not to be checked or changed
unless a leak is suspected or repair required.
RECREATIONAL TOWING
Follow these guidelines if you have a need for recreational towing. An
example of recreational towing would be towing your vehicle behind a
motorhome. These guidelines are designed to ensure that your
transmission is not damaged.
4x2 equipped with a manual transmission:
Before you have your vehicle towed:
²Release the parking brake.
²Move the gearshift to the neutral position.
²Turn the key in the ignition to the OFF/UNLOCKED position.
²The maximum recommended speed is 88 km/h (55 mph).
²The maximum recommended distance is unlimited.
²The vehicle must be towed in the forward position to ensure no
damage is done to the internal transfer case components.
In addition, it is recommended that you follow the instructions
provided by the aftermarket manufacturer of the towing
apparatus if one has been installed.
Driving
138
Page 184 of 245

Maintenance ItemMaintenance Interval (Number of months or km (miles),
whichever comes first)
Months 4 8 12 16 20 24 28 32 36 40 44 48
x 1000 Miles 5 10 15 20 25 30 35 40 45 50 55 60
(x 1000 km) (8) (16) (24) (32) (40) (48) (56) (64) (72) (80) (88) (96)
Caliper slide rails L L L L
Drum brake system, lines and hoses I I I I
Exhaust system for leaks, damage,
loosenessII
Manual transmission fluid R
Automatic
transmission fluid*2 I I
Exhaust system shielding (for
trapped material)II
Propeller shaft U-joints (if equipped
with grease fittings)LLLLLL
Parking brake system (for damage
and operation)III I
Ball joints (4x2) I/L I/L I/L I/L
Transfer case fluid (4x4) Replace every 150,000 miles (240,000 km)
Rear axle lubricant Does not require replacement unless rear axle
submerged in water
Accessory drive belts
Fuel filter *5 R R
Steering linkage, ball joints,
suspension and driveshaftIII I
Remarks:For * marked items in this maintenance chart, please pay
attention to the following points:
1. The wheel lug nuts must be retightened to the proper specifications
at 800 km (500 miles) of new vehicle operation, at any wheel
change, or at any other time the wheel lug nuts have been loosened.
2. Replace every 150,000 miles (240,000 km) unless submerged in
water.
3. At 60,000 miles (96,000 km), the dealer will replace the PCV valve at
no cost, except Canada and California vehicles.
4. Refer to vehicle emission control information label for spark plug and
gap specifications.
Maintenance and Specifications
184
Page 186 of 245

Maintenance ItemMaintenance Interval (Number of months or Miles (km),
whichever comes first)
Months 52 56 60 64 68 72 76 80 84 88 92 96
x 1000 Miles 65 70 75 80 85 90 95 100 105 110 115 120
(x 1000 km) (104) (112) (121) (128) (136) (144) (152) (160) (168)(176)(184) (192)
Drum brake system, lines and
hosesIIII
Exhaust system for leaks,
damage, loosenessII
Manual transmission fluid R
Automatic
transmission fluid*2 I I
Exhaust system shielding (for
trapped material)II
Propeller shaft U-joints (if
equipped with grease fittings)L LLLLL
Parking brake system (for
damage and operation)IIII
Ball joints (4x2) I/L I/L I/L I/L
Transfer case fluid (4x4) Replace every 150,000 miles (240,000 km)
Rear axle lubricant Does not require replacement unless rear axle
submerged in water
Accessory drive belts I
Fuel filter *5 R R
Steering linkage, ball joints,
suspension and driveshaftIIII
Remarks:For * marked items in this maintenance chart, please pay
attention to the following points:
1. The wheel lug nuts must be retightened to the proper specifications
at 800 km (500 miles) of new vehicle operation, at any wheel
change, or at any other time the wheel lug nuts have been loosened.
2. Replace every 150,000 miles (240,000 km) unless submerged in
water.
3. At 60,000 miles (96,000 km), the dealer will replace the PCV valve at
no cost, except Canada and California vehicles.
Maintenance and Specifications
186
Page 187 of 245

4. Refer to vehicle emission control information label for spark plug and
gap specifications.
5. The California Air Resources Board has determined that the failure
to perform this maintenance item will not nullify the emission
warranty nor limit recall liability prior to completion of the vehicle's
useful life.
SCHEDULE II ± SPECIAL OPERATING CONDITIONS
If your driving habitsFREQUENTLYinclude one or more of the
following conditions:
²Short trips oflessthan 16 km (10 miles) when outside temperatures
remain below freezing.
²Towing a trailer, or carrying maximum loads.
²Operating in severe dust conditions.
²Operating duringhot weatherin stop-and-go ªrush-hourº traffic.
²Extensive idling, such as police, taxi or door-to-door delivery service.
²High speed operation with a fully loaded vehicle (max. GVW).
²Off-road operation.
Change ENGINE OIL AND OIL FILTER every 3 months or 4,800 km
(3,000 miles) whichever occurs first.
NOTE:Idling the engine for extended periods will accumulate more
hours of use on your vehicle than is actually indicated by the mileage
odometer. Consequently, the odometer reading can be often misleading
when determining the right time to change your engine oil and filter. If
you are using your vehicle in a manner which allows it to remain
stationary while the engine is running for long periods (door-to-door
delivery, taxi, police, power/utility company trucks, or similar duty), then
Mazda recommends you increase the frequency of oil and filter changes
to an interval equivalent to 200 ENGINE HOURS of use. Since most
vehicles are not equipped with hour-meters, it may be necessary for you
to approximate your idle time and plan oil/filter changes accordingly.
Maintenance and Specifications
187