lights MAZDA MODEL B-SERIES 2005 (in English) User Guide
[x] Cancel search | Manufacturer: MAZDA, Model Year: 2005, Model line: MODEL B-SERIES, Model: MAZDA MODEL B-SERIES 2005Pages: 254, PDF Size: 2.13 MB
Page 40 of 254
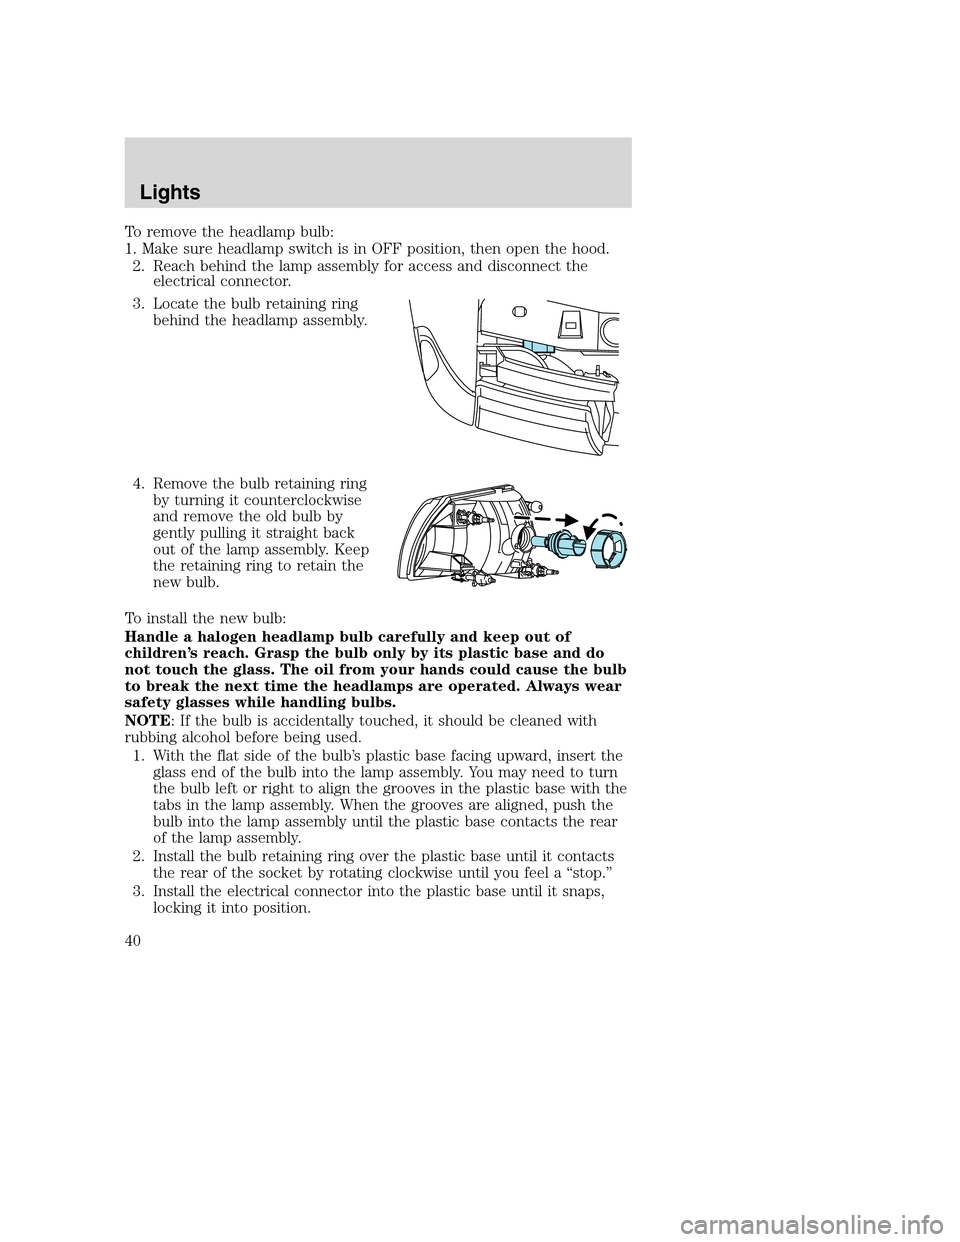
To remove the headlamp bulb:
1. Make sure headlamp switch is in OFF position, then open the hood.
2. Reach behind the lamp assembly for access and disconnect the
electrical connector.
3. Locate the bulb retaining ring
behind the headlamp assembly.
4. Remove the bulb retaining ring
by turning it counterclockwise
and remove the old bulb by
gently pulling it straight back
out of the lamp assembly. Keep
the retaining ring to retain the
new bulb.
To install the new bulb:
Handle a halogen headlamp bulb carefully and keep out of
children’s reach. Grasp the bulb only by its plastic base and do
not touch the glass. The oil from your hands could cause the bulb
to break the next time the headlamps are operated. Always wear
safety glasses while handling bulbs.
NOTE: If the bulb is accidentally touched, it should be cleaned with
rubbing alcohol before being used.
1. With the flat side of the bulb’s plastic base facing upward, insert the
glass end of the bulb into the lamp assembly. You may need to turn
the bulb left or right to align the grooves in the plastic base with the
tabs in the lamp assembly. When the grooves are aligned, push the
bulb into the lamp assembly until the plastic base contacts the rear
of the lamp assembly.
2. Install the bulb retaining ring over the plastic base until it contacts
the rear of the socket by rotating clockwise until you feel a “stop.”
3. Install the electrical connector into the plastic base until it snaps,
locking it into position.
REVIEW COPY
2005 Mazda B Series(mbs), Owners Guide (post-2002-fmt)(own2002),
Market:Canadian_French(fr_can)
Lights
40
Page 41 of 254
4. Turn the headlamps on and make sure they work properly. If the
headlamp was correctly aligned before you changed the bulb, you
should not need to align it again.
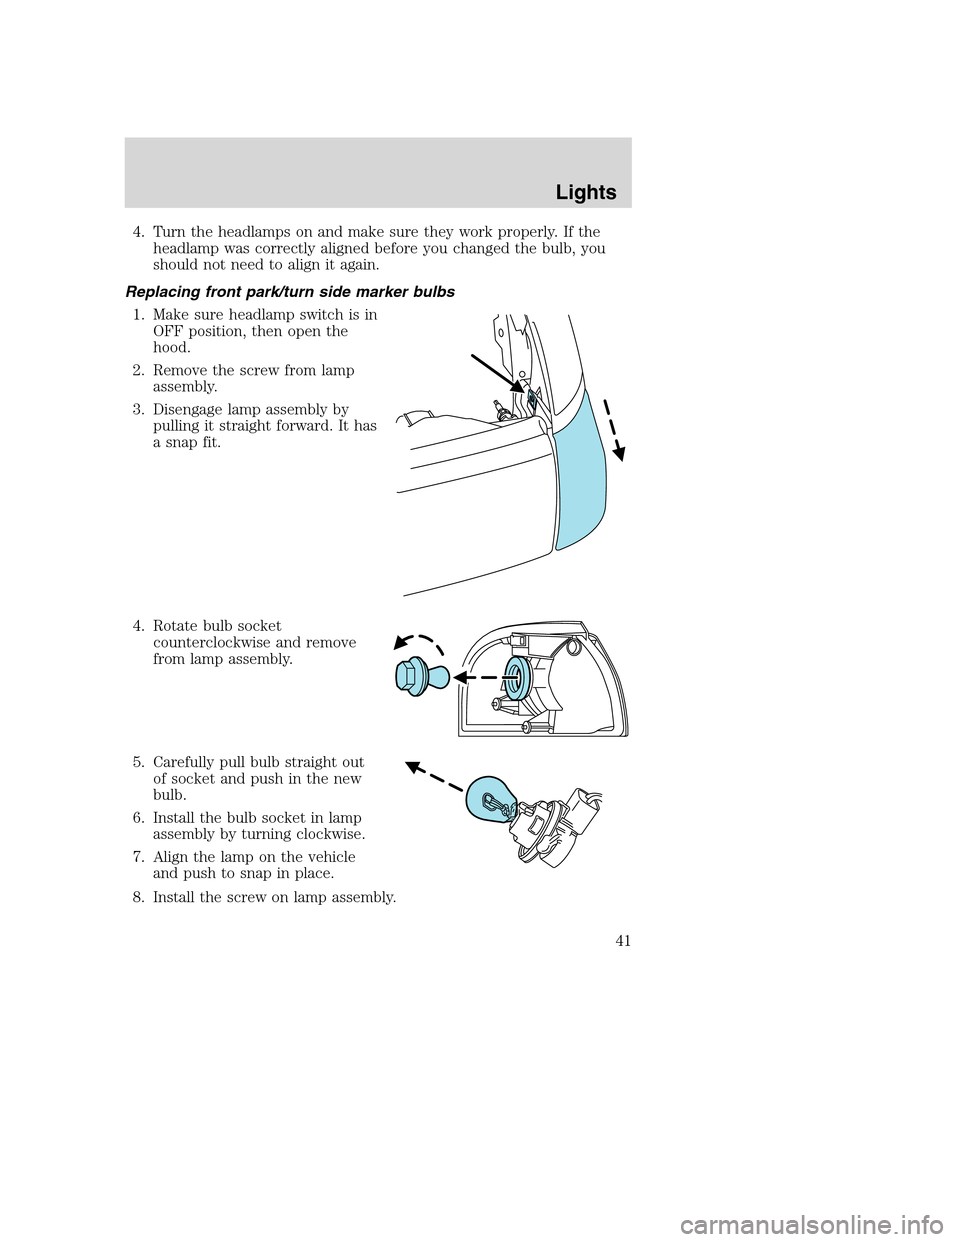
Replacing front park/turn side marker bulbs
1. Make sure headlamp switch is in
OFF position, then open the
hood.
2. Remove the screw from lamp
assembly.
3. Disengage lamp assembly by
pulling it straight forward. It has
a snap fit.
4. Rotate bulb socket
counterclockwise and remove
from lamp assembly.
5. Carefully pull bulb straight out
of socket and push in the new
bulb.
6. Install the bulb socket in lamp
assembly by turning clockwise.
7. Align the lamp on the vehicle
and push to snap in place.
8. Install the screw on lamp assembly.
REVIEW COPY
2005 Mazda B Series(mbs), Owners Guide (post-2002-fmt)(own2002),
Market:Canadian_French(fr_can)
Lights
41
Page 42 of 254
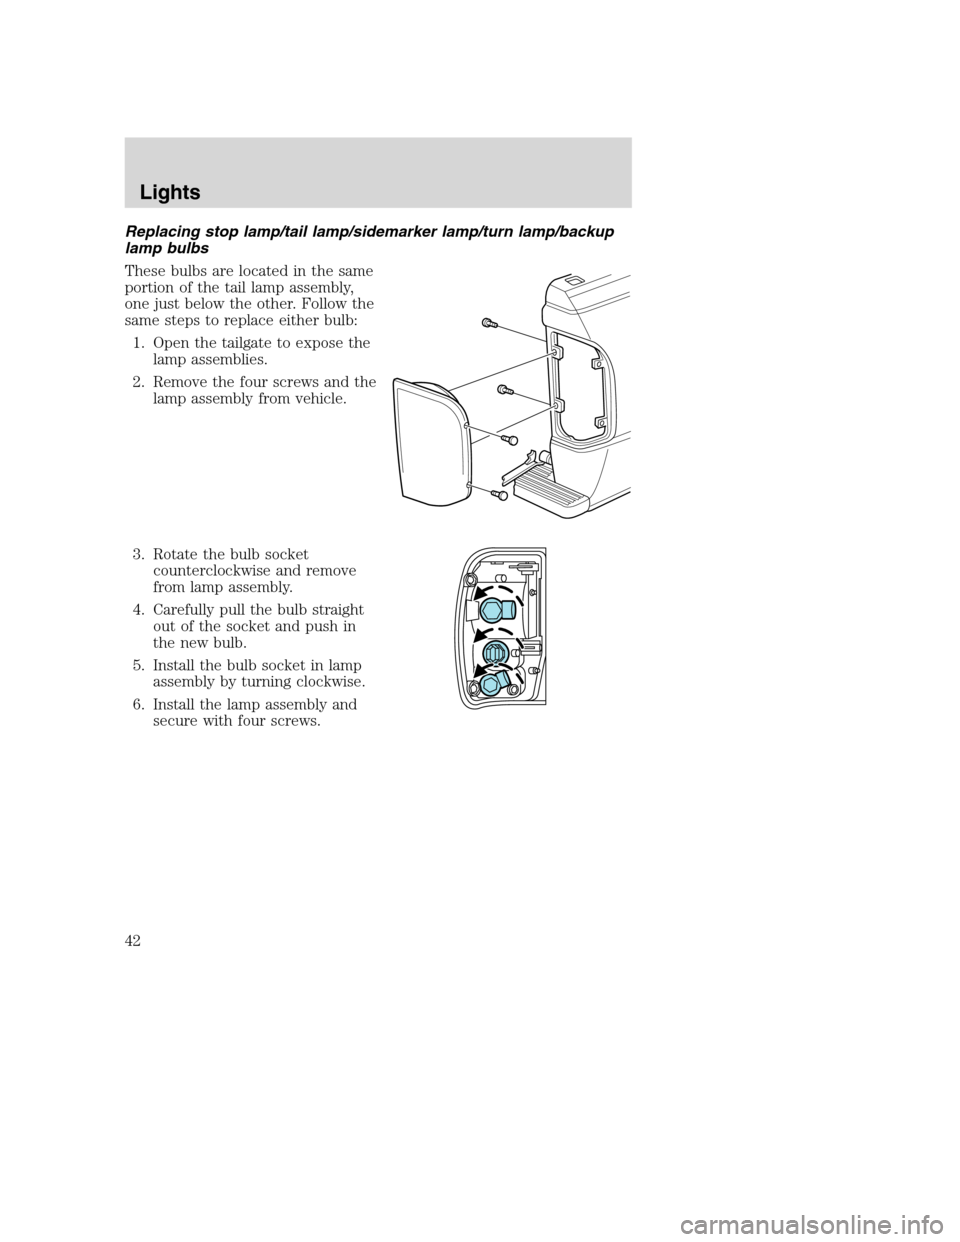
Replacing stop lamp/tail lamp/sidemarker lamp/turn lamp/backup
lamp bulbs
These bulbs are located in the same
portion of the tail lamp assembly,
one just below the other. Follow the
same steps to replace either bulb:
1. Open the tailgate to expose the
lamp assemblies.
2. Remove the four screws and the
lamp assembly from vehicle.
3. Rotate the bulb socket
counterclockwise and remove
from lamp assembly.
4. Carefully pull the bulb straight
out of the socket and push in
the new bulb.
5. Install the bulb socket in lamp
assembly by turning clockwise.
6. Install the lamp assembly and
secure with four screws.
REVIEW COPY
2005 Mazda B Series(mbs), Owners Guide (post-2002-fmt)(own2002),
Market:Canadian_French(fr_can)
Lights
42
Page 43 of 254
Replacing fog lamp bulbs
WARNING: Handling Halogen Bulbs: When a halogen bulb
breaks, it is dangerous. These bulbs contain pressurized gas. If
one is broken, it will explode and serious injuries could be
caused by the flying glass. If the glass portion of the bulb is
touched with bare hands, body oil could cause the bulb to
overheat and explode when lit. Never touch the glass portion of
the bulb with your bare hands and always wear eye protection
when handling or working around halogen bulbs.
Children and Halogen Bulbs: Playing with a halogen bulb is
dangerous. Serious injuries could be caused by dropping a
halogen bulb or breaking in some other way. Always keep
halogen bulbs out of the reach of children.
NOTE: If the bulb is accidentally touched, it should be cleaned with
rubbing alcohol before being used.
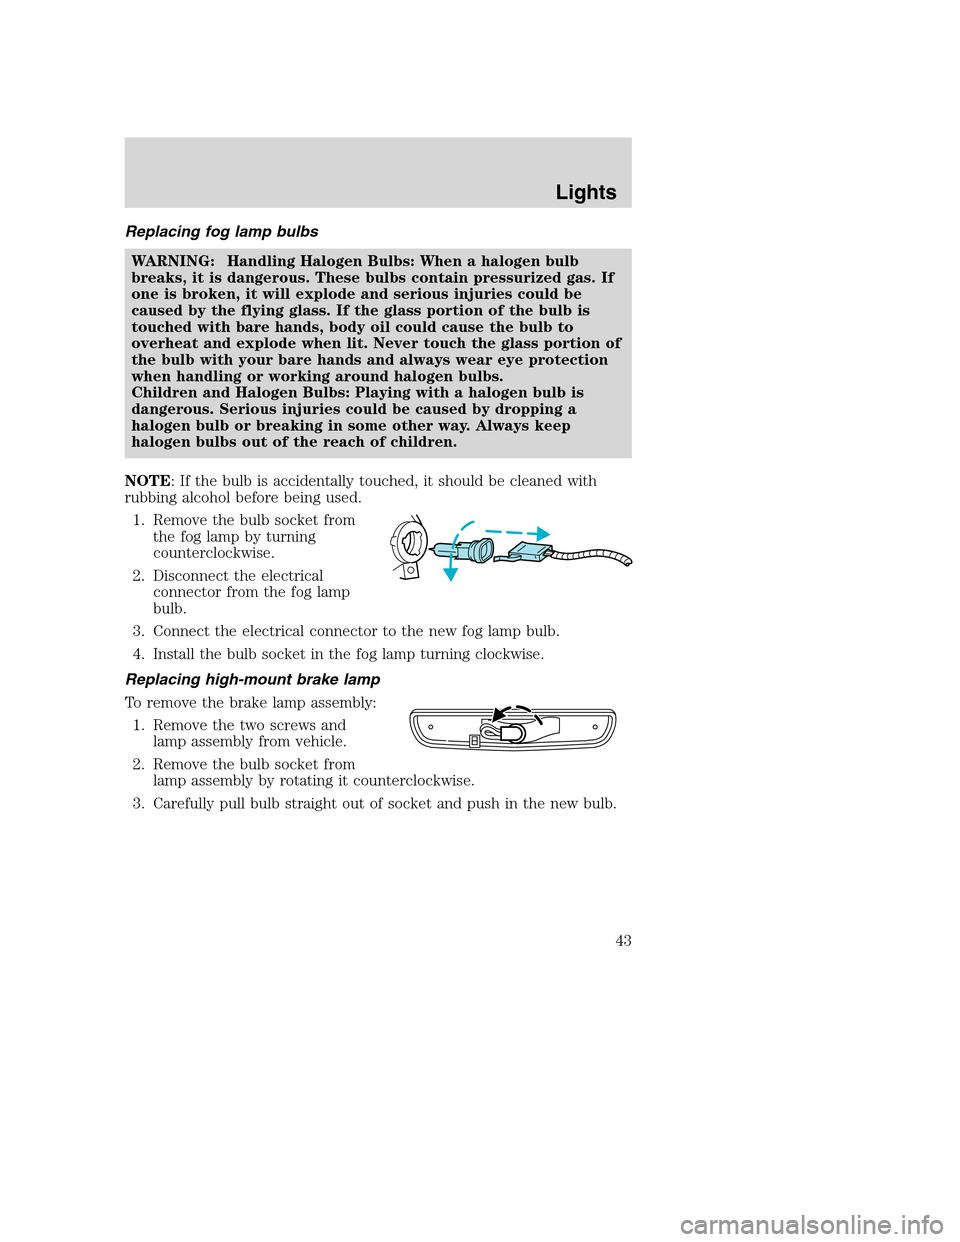
1. Remove the bulb socket from
the fog lamp by turning
counterclockwise.
2. Disconnect the electrical
connector from the fog lamp
bulb.
3. Connect the electrical connector to the new fog lamp bulb.
4. Install the bulb socket in the fog lamp turning clockwise.
Replacing high-mount brake lamp
To remove the brake lamp assembly:
1. Remove the two screws and
lamp assembly from vehicle.
2. Remove the bulb socket from
lamp assembly by rotating it counterclockwise.
3. Carefully pull bulb straight out of socket and push in the new bulb.
REVIEW COPY
2005 Mazda B Series(mbs), Owners Guide (post-2002-fmt)(own2002),
Market:Canadian_French(fr_can)
Lights
43
Page 44 of 254
To install the brake lamp assembly:
1. Install the bulb socket into the lamp assembly by rotating clockwise.
2. Install the lamp assembly on the vehicle and secure with two screws.
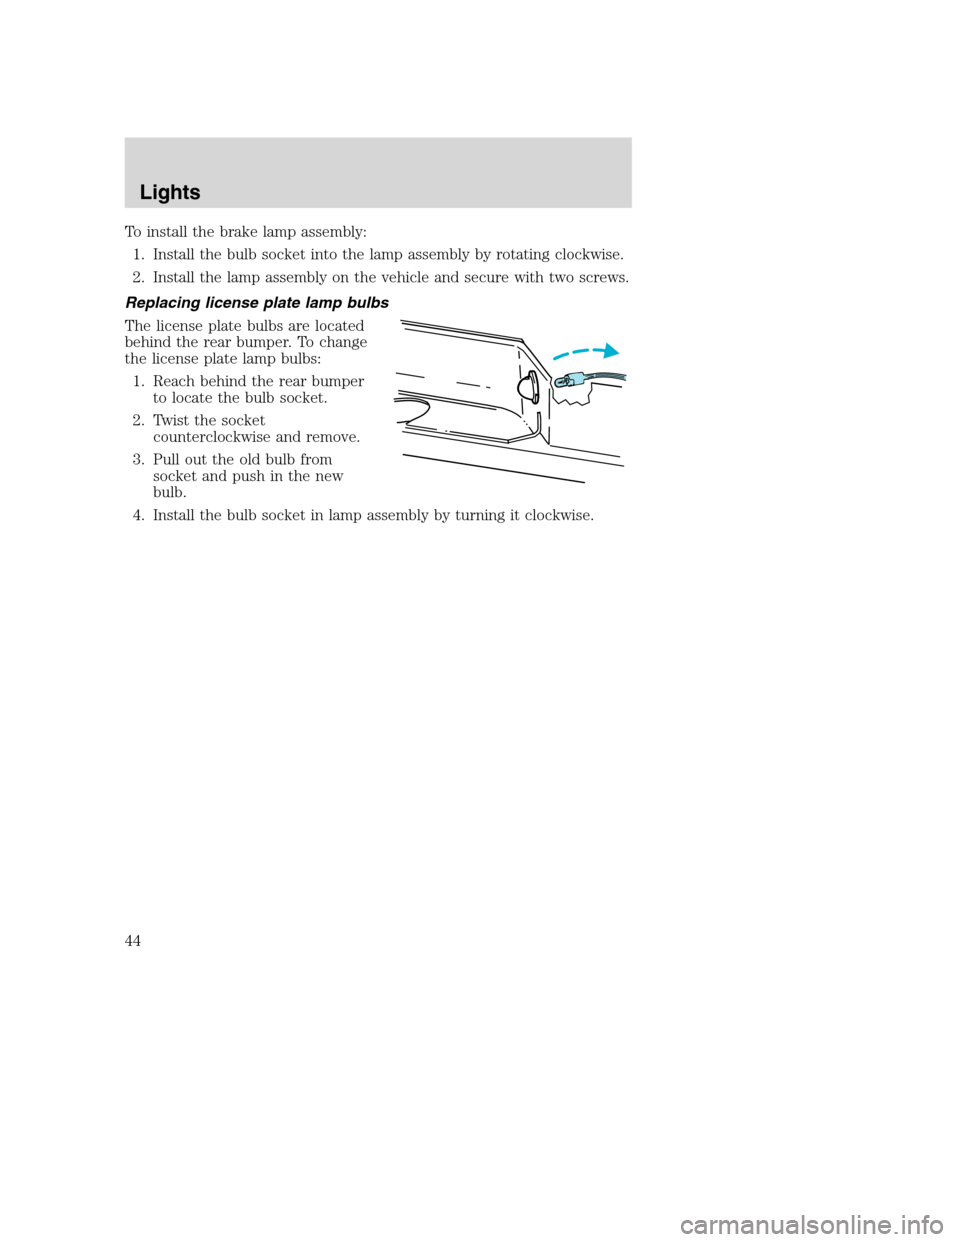
Replacing license plate lamp bulbs
The license plate bulbs are located
behind the rear bumper. To change
the license plate lamp bulbs:
1. Reach behind the rear bumper
to locate the bulb socket.
2. Twist the socket
counterclockwise and remove.
3. Pull out the old bulb from
socket and push in the new
bulb.
4. Install the bulb socket in lamp assembly by turning it clockwise.
REVIEW COPY
2005 Mazda B Series(mbs), Owners Guide (post-2002-fmt)(own2002),
Market:Canadian_French(fr_can)
Lights
44
Page 60 of 254

To reprogram the remote entry
transmitters:
1. Ensure the vehicle is
electronically unlocked.
2. Put the key in the ignition.
3. Turn the key from the 2
(LOCK) position to 3 (OFF).
4. Cycle eight times rapidly (within
10 seconds) between the 3
(OFF) position and 4 (ON).
Note:The eighth turn must end in the 4 (ON) position.
5. The doors will lock, then unlock, to confirm that the programming
mode has been activated.
6. Within 20 seconds press any button on the remote entry transmitter.
Note:If more than 20 seconds have passed you will need to start
the procedure over again.
7. The doors will lock, then unlock, to confirm that this remote entry
transmitter has been programmed.
8. Repeat Step 6 to program each additional remote entry transmitter.
9. Turn the ignition to the 3 (OFF) position after you have finished
programming all of the remote entry transmitters.Note:After 20
seconds, you will automatically exit the programming mode.
10. The doors will lock, then unlock, to confirm that the programming
mode has been exited.
Illuminated entry
The interior lamps illuminate when the remote entry system is used to
unlock the door(s) or sound the personal alarm.
The illuminated entry system will turn off the interior lights if:
•the ignition switch is turned to the ON position, or
•the remote transmitter lock control is pressed, or
•after 25 seconds of illumination.
The inside lights will not turn off if:
•they have been turned on with the dimmer control, or
•any door is open.
The battery saver will shut off the interior lamps after several minutes if
they are left on accidentally.
3
2
1
5
4
REVIEW COPY
2005 Mazda B Series(mbs), Owners Guide (post-2002-fmt)(own2002),
Market:Canadian_French(fr_can)
Locks and Security
60
Page 80 of 254
While the system is designed to help reduce serious injuries, it may also
cause minor abrasions, swelling or temporary hearing loss. Because air
bags must inflate rapidly and with considerable force, there is the risk of
death or serious injuries such as fractures, facial and eye injuries or
internal injuries, particularly to occupants who are not properly
restrained or are otherwise out of position at the time of air bag
deployment. Thus, it is extremely important that occupants be properly
restrained as far away from the air bag module as possible while
maintaining vehicle control.
WARNING: Several air bag system components get hot after
inflation. Do not touch them after inflation or you may be
burned.
WARNING: If the air bag has deployed, the air bag will not
function again and must be replaced immediately. If the air bag
is not replaced, the unrepaired area will increase the risk of
injury in a collision.
The SRS consists of:
•driver and passenger air bag modules (which include the inflators and
air bags),
•passenger air bag deactivation switch and restraint control module
(RCM)
•a readiness light and tone,
•and the electrical wiring which connects the components.
The RCM (restraints control module) monitors its own internal circuits
and the supplemental air bag electrical system wiring (including the
passenger air bag deactivation switch, the system wiring, the air bag
system readiness light, the air bag back up power and the air bag
ignitors).
Determining if the system is operational
The SRS uses readiness lights in the instrument cluster and the
passenger air bag deactivate switch or a tone to indicate the condition of
the system. Refer to theAir bag readinesssection in the
Instrumentationchapter orPassenger air bag deactivate switch
section in this chapter. Routine maintenance of the air bag is not
required.
REVIEW COPY
2005 Mazda B Series(mbs), Owners Guide (post-2002-fmt)(own2002),
Market:Canadian_French(fr_can)
Seating and Safety Restraints
80
Page 81 of 254
A difficulty with the system is indicated by one or more of the following:
•The readiness lights will either
flash or stay lit.
•The readiness lights will not
illuminate immediately after
ignition is turned on.
•A series of five beeps will be heard. The tone pattern will repeat
periodically until the problem and/or light are repaired.
If any of these things happen, even intermittently, have the SRS serviced
at your authorized Mazda dealership immediately.
WARNING: Unless serviced, the system may not function
properly in the event of a collision.
Disposal of air bags and air bag equipped vehicles (including
safety belt pretensioners)
For disposal of safety belt pretensioners, air bags, or air bag equipped
vehicles, see your authorized Mazda dealership or qualified technician.
Air bags MUST BE disposed of by qualified personnel.
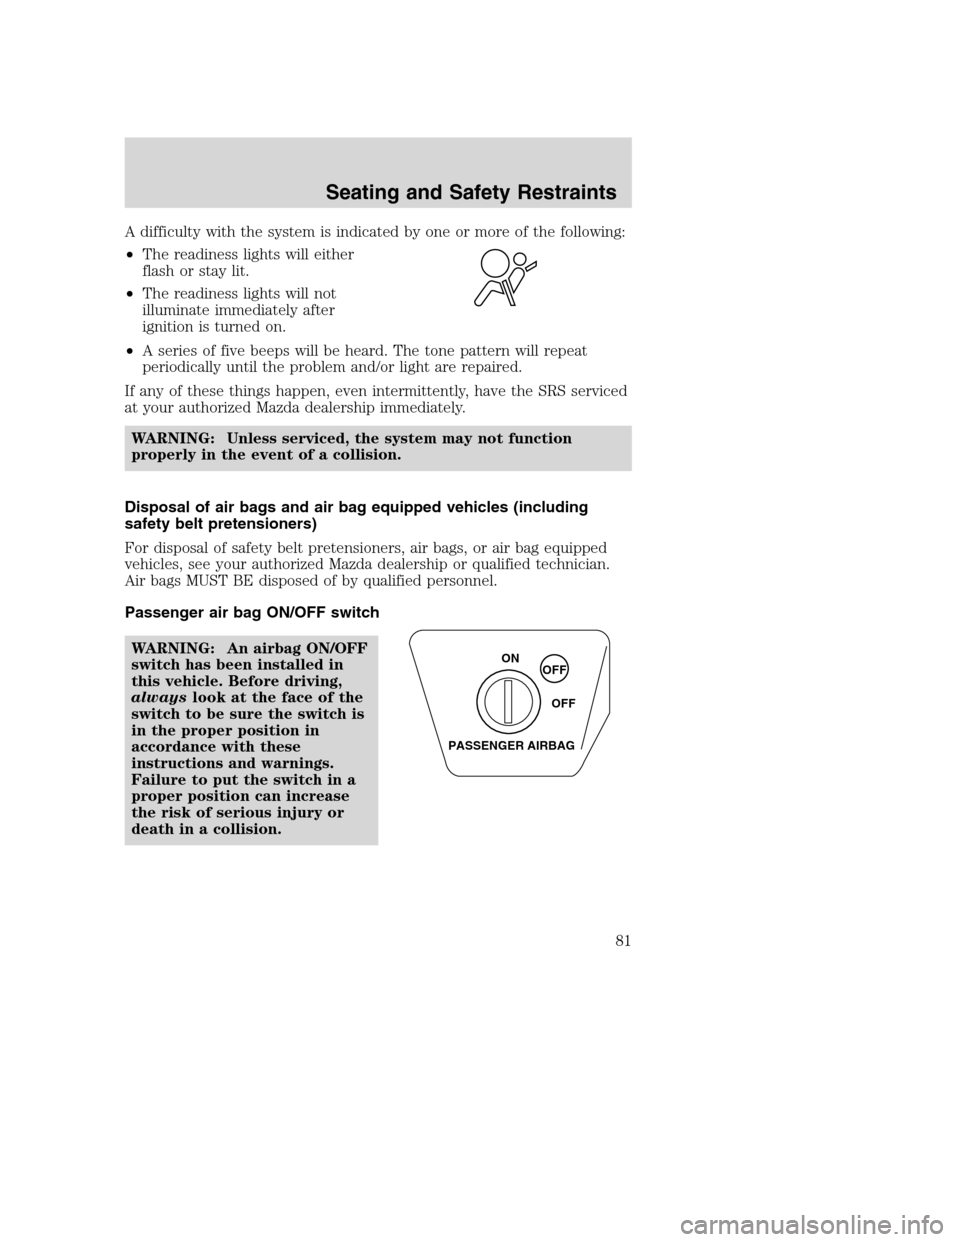
Passenger air bag ON/OFF switch
WARNING: An airbag ON/OFF
switch has been installed in
this vehicle. Before driving,
alwayslook at the face of the
switch to be sure the switch is
in the proper position in
accordance with these
instructions and warnings.
Failure to put the switch in a
proper position can increase
the risk of serious injury or
death in a collision.
ON
OFF
OFF
PASSENGER AIRBAG
REVIEW COPY
2005 Mazda B Series(mbs), Owners Guide (post-2002-fmt)(own2002),
Market:Canadian_French(fr_can)
Seating and Safety Restraints
81
Page 135 of 254
underbody structure. Use a frame-mounted weight distributing hitch for
trailers over 2,000 lbs (907 kg).
Do not install a single or multi-clamp type bumper hitch, or a hitch
which attaches to the axle. Underbody mounted hitches are acceptable if
they are installed properly. Follow the towing instructions of a reputable
rental agency.
Whenever a trailer hitch and hardware are removed, make sure all
mounting holes in the underbody are properly sealed to prevent noxious
gases or water from entering.
Safety chains
Always connect the trailer’s safety chains to the frame or hook retainers
of the vehicle hitch. To connect the trailer’s safety chains, cross the
chains under the trailer tongue and allow slack for turning corners.
If you use a rental trailer, follow the instructions that the rental agency
gives to you.
Do not attach safety chains to the bumper.
Trailer brakes
Electric brakes and manual, automatic or surge-type trailer brakes are
safe if installed properly and adjusted to the manufacturer’s
specifications. The trailer brakes must meet local and Federal
regulations.
WARNING: Do not connect a trailer’s hydraulic brake system
directly to your vehicle’s brake system. Your vehicle may not
have enough braking power and your chances of having a
collision greatly increase.
The braking system of the tow vehicle is rated for operation at the
GVWR not GCWR.
Trailer lamps
Trailer lamps are required on most towed vehicles. Make sure all running
lights, brake lights, turn signals and hazard lights are working. See your
dealer or trailer rental agency for proper instructions and equipment for
hooking up trailer lamps.
Using a step bumper
The optional step bumper is equipped with an integral hitch and requires
only a ball with a 3/4 inch (19 mm) shank diameter. The bumper has a
2,000 lb. (907 kg) trailer weight and 200 lb. (91 kg) tongue weight
capability.
REVIEW COPY
2005 Mazda B Series(mbs), Owners Guide (post-2002-fmt)(own2002),
Market:Canadian_French(fr_can)
Tires, Wheels and Loading
135
Page 140 of 254
STARTING
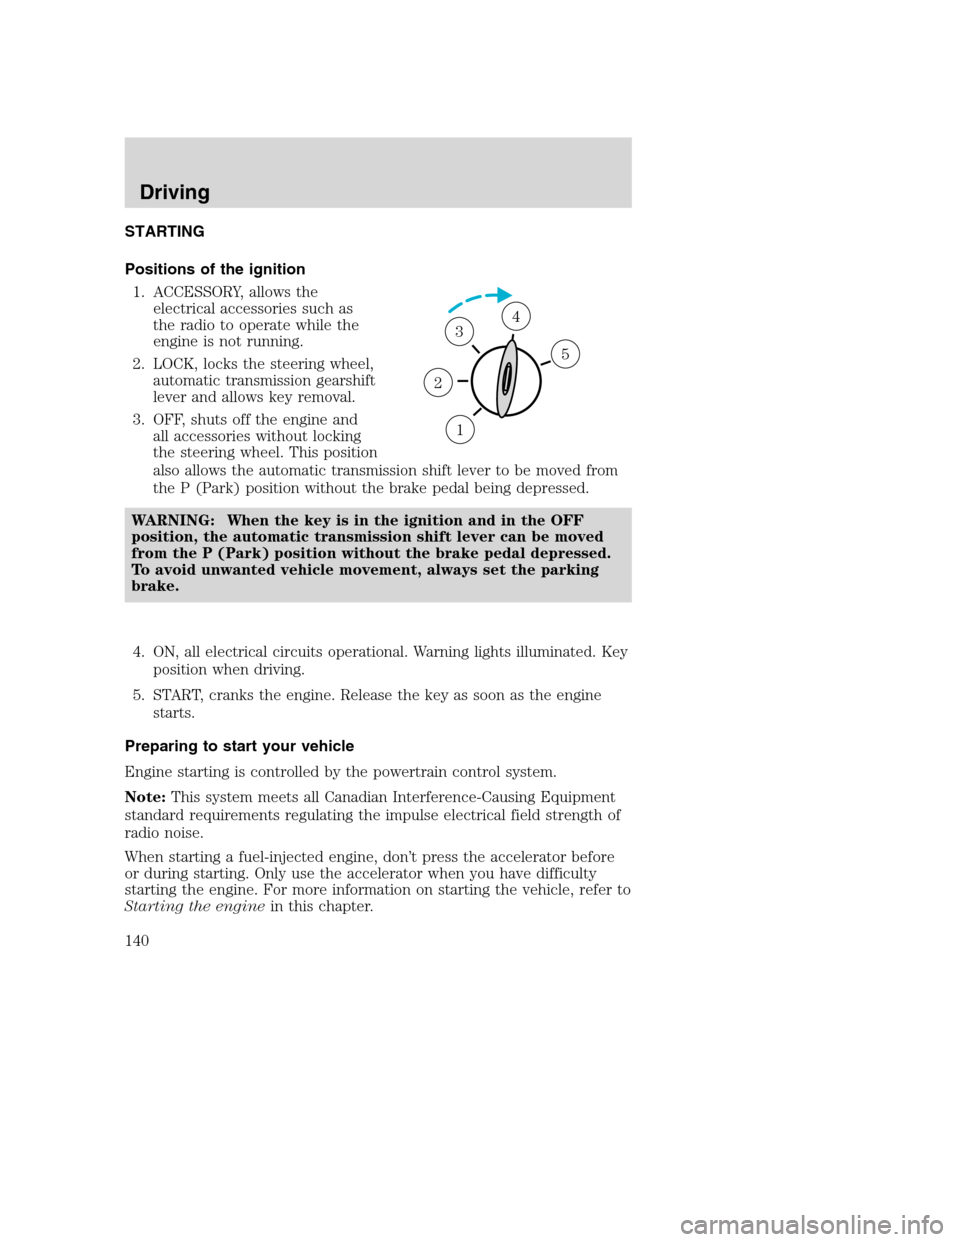
Positions of the ignition
1. ACCESSORY, allows the
electrical accessories such as
the radio to operate while the
engine is not running.
2. LOCK, locks the steering wheel,
automatic transmission gearshift
lever and allows key removal.
3. OFF, shuts off the engine and
all accessories without locking
the steering wheel. This position
also allows the automatic transmission shift lever to be moved from
the P (Park) position without the brake pedal being depressed.
WARNING: When the key is in the ignition and in the OFF
position, the automatic transmission shift lever can be moved
from the P (Park) position without the brake pedal depressed.
To avoid unwanted vehicle movement, always set the parking
brake.
4. ON, all electrical circuits operational. Warning lights illuminated. Key
position when driving.
5. START, cranks the engine. Release the key as soon as the engine
starts.
Preparing to start your vehicle
Engine starting is controlled by the powertrain control system.
Note:This system meets all Canadian Interference-Causing Equipment
standard requirements regulating the impulse electrical field strength of
radio noise.
When starting a fuel-injected engine, don’t press the accelerator before
or during starting. Only use the accelerator when you have difficulty
starting the engine. For more information on starting the vehicle, refer to
Starting the enginein this chapter.
1
2
34
5
REVIEW COPY
2005 Mazda B Series(mbs), Owners Guide (post-2002-fmt)(own2002),
Market:Canadian_French(fr_can)
Driving
Driving
140