ECO mode MAZDA MODEL B-SERIES 2005 Owners Manual (in English)
[x] Cancel search | Manufacturer: MAZDA, Model Year: 2005, Model line: MODEL B-SERIES, Model: MAZDA MODEL B-SERIES 2005Pages: 254, PDF Size: 2.13 MB
Page 12 of 254

WARNING LIGHTS AND CHIMES
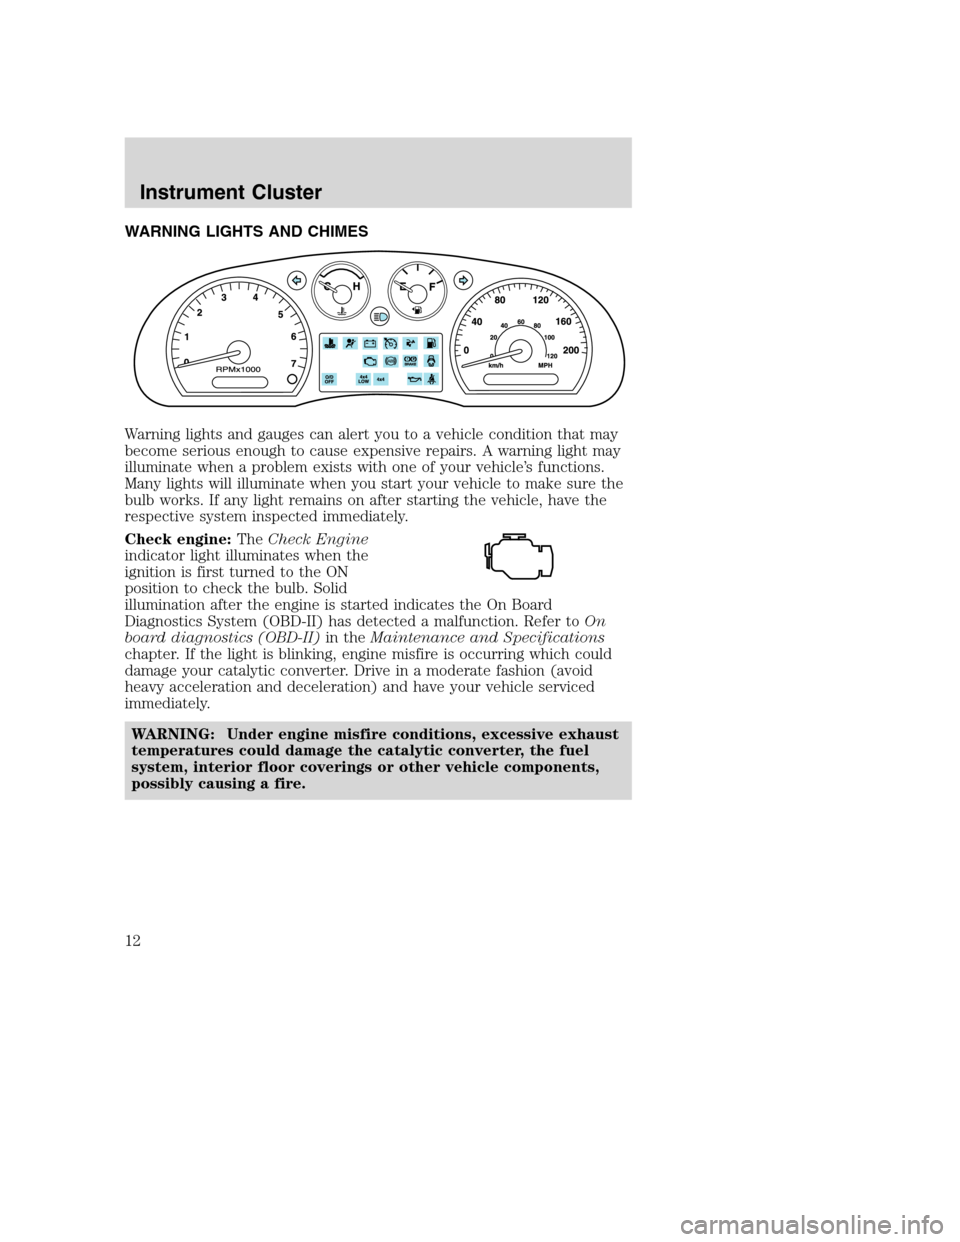
Warning lights and gauges can alert you to a vehicle condition that may
become serious enough to cause expensive repairs. A warning light may
illuminate when a problem exists with one of your vehicle’s functions.
Many lights will illuminate when you start your vehicle to make sure the
bulb works. If any light remains on after starting the vehicle, have the
respective system inspected immediately.
Check engine:TheCheck Engine
indicator light illuminates when the
ignition is first turned to the ON
position to check the bulb. Solid
illumination after the engine is started indicates the On Board
Diagnostics System (OBD-II) has detected a malfunction. Refer toOn
board diagnostics (OBD-II)in theMaintenance and Specifications
chapter. If the light is blinking, engine misfire is occurring which could
damage your catalytic converter. Drive in a moderate fashion (avoid
heavy acceleration and deceleration) and have your vehicle serviced
immediately.
WARNING: Under engine misfire conditions, excessive exhaust
temperatures could damage the catalytic converter, the fuel
system, interior floor coverings or other vehicle components,
possibly causing a fire.
REVIEW COPY
2005 Mazda B Series(mbs), Owners Guide (post-2002-fmt)(own2002),
Market:Canadian_French(fr_can)
Instrument Cluster
12
Page 19 of 254

4.Tune:Press to manually go down/up (/) the radio frequency
and in audio mode to select various settings.
5.Memory presets:To set a
station: Select frequency band
AM/FM; tune to a station, press
and hold a preset button until sound returns. To tune a preset
station, press the desired memory preset.
6.SEEK:Press
SEEKto
access the previous or next
radio station. If pressed for less
than .5 seconds, the system will seek to the next or previous station.
7.ON/OFF/Volume:Press to turn
the system ON/OFF. Turn to
adjust the volume levels.
If the volume is set above a
certain level, and the ignition is
turned off, the volume will come
back to a “nominal” listening level when the ignition is turned back
on.
AM/FM STEREO SINGLE CD/MP3 SYSTEM
REVIEW COPY
2005 Mazda B Series(mbs), Owners Guide (post-2002-fmt)(own2002),
Market:Canadian_French(fr_can)
Entertainment Systems
19
Page 25 of 254

14.AM/FM:Press to select
AM/FM1/FM2 frequency band.
15.SEEK/TRACK:In radio mode, press
/to access the
next/previous strong station. In CD and MP3 flat file mode, press to
access the next track. In MP3 directory mode, press to select the
next/previous track in the current directory.
16.Scan:In radio mode, scan
through the available stations.
In tape mode, you may set
SCAN on or off. If activated, the player will scan the tape and plays a
short Introduction of each song. In CD and MP3 flat file mode, you
may set the scan on or off. If activated, the system will scan through
each track. In MP3 directory mode, you may set scan on or off. If
activated, the system will scan in the current directory.
17.ON/OFF/Volume:Press to turn
ON/OFF. Turn to
increase/decrease volume.
If the volume is set above a
certain level and the ignition is
turned off, the volume will come
back on at a “nominal” listening level when the ignition switch is
turned back on.
18.CD:Press to enter CD mode. If
a CD is already in the system,
the disc will begin play.
19.CD slot:Insert a CD, label side
up.
CD units are designed to play commercially pressed 4.75 in (12
cm) audio compact discs only. Due to technical incompatibility,
certain recordable and re-recordable compact discs may not
function correctly when used in Mazda CD players. Irregular
shaped CDs, CDs with a scratch protection film attached, and CDs
with homemade paper (adhesive) labels should not be inserted
into the CD player. The label may peel and cause the CD to
become jammed. It is recommended that homemade CDs be
identified with permanent felt tip marker rather than adhesive
labels. Ballpoint pens may damage CDs. Please contact your
dealer for further information.
REVIEW COPY
2005 Mazda B Series(mbs), Owners Guide (post-2002-fmt)(own2002),
Market:Canadian_French(fr_can)
Entertainment Systems
25
Page 29 of 254

18.CD slot:Insert a CD, label side up.
CD units are designed to play commercially pressed 4.75 in (12
cm) audio compact discs only. Due to technical incompatibility,
certain recordable and re-recordable compact discs may not
function correctly when used in Mazda CD players. Irregular
shaped CDs, CDs with a scratch protection film attached, and CDs
with homemade paper (adhesive) labels should not be inserted
into the CD player. The label may peel and cause the CD to
become jammed. It is recommended that homemade CDs be
identified with permanent felt tip marker rather than adhesive
labels. Ballpoint pens may damage CDs. Please contact your
dealer for further information.
RADIO FREQUENCIES
AM and FM frequencies are established by the Federal Communications
Commission (FCC) and the Canadian Radio and Telecommunications
Commission (CRTC). Those frequencies are:
AM - 530, 540–1700, 1710 kHz
FM- 87.7, 87.9–107.7, 107.9 MHz
RADIO RECEPTION FACTORS
There are three factors that can affect radio reception:
•Distance/strength: The further you travel from an FM station, the
weaker the signal and the weaker the reception.
•Terrain: Hills, mountains, tall buildings, power lines, electric fences,
traffic lights and thunderstorms can interfere with your reception.
•Station overload: When you pass a broadcast tower, a stronger signal
may overtake a weaker one and play while the weak station frequency
is displayed.
CASSETTE/PLAYER CARE
Do:
•Use only cassettes that are 90 minutes long or less.
•Tighten very loose tapes by inserting a finger or pencil into the hole
and turning the hub.
•Remove loose labels before inserting tapes.
•Allow tapes which have been subjected to extreme heat, humidity or
cold to reach a moderate temperature before playing.
REVIEW COPY
2005 Mazda B Series(mbs), Owners Guide (post-2002-fmt)(own2002),
Market:Canadian_French(fr_can)
Entertainment Systems
29
Page 50 of 254

3. To change the zone setting,
push and hold the right button
until ZONE appears in the
display.
4. Press the right button
repeatedly until desired
compass zone number is
displayed. The display will
change back to the compass
direction after 3 seconds when
the button is not activated.
Compass calibration adjustment
The compass calibrates itself under normal driving conditions. There is
not a need for manual compass calibration. If calibration is still desired,
follow these instructions:
1. Start the vehicle.
2. For optimum calibration, turn off all electrical accessories and make
sure that all vehicle doors are shut.
3. Perform this adjustment in an open area free from steel structures
and high voltage lines.
4. Press and hold the left button
for approximately 3 seconds
until CAL appears in the display.
Release the left button to enter
the calibration mode.
5. Drive the vehicle slowly (less
than 5 km/h [3 mph] in a circle
until CAL indicator disappears
in the display (about two or
three circles).
6. The compass is now calibrated.
REVIEW COPY
2005 Mazda B Series(mbs), Owners Guide (post-2002-fmt)(own2002),
Market:Canadian_French(fr_can)
Driver Controls
50
Page 54 of 254

Turning off speed control
There are three ways to turn off the speed control:
•Depress the brake pedal or the clutch pedal (if equipped). This will
not erase your vehicle’s previously set speed.
•Press the speed control OFF
control.
•Turn OFF the ignition.
Note:When you turn off the speed
control or the ignition, your speed
control set speed memory is erased.
Note:Fully depressing the clutch
pedal may cause a flare in engine RPM as the throttle is returned to idle.
This is normal.
OVERDRIVE CONTROL (IF EQUIPPED)
Activating overdrive
(Overdrive) is the normal drive position for the best fuel economy.
The overdrive function allows automatic upshifts and downshifts through
all available gears.
Deactivating overdrive
Press the Transmission Control
Switch (TCS) located on the end of
the gearshift lever. The O/D Off
indicator light will illuminate on the
instrument cluster. The transmission
will operate in all gears except overdrive.
To return to normal overdrive mode, press the Transmission Control
Switch again. The O/D Off indicator light will no longer be illuminated.
When you shut off and re-start your vehicle, the transmission will
automatically return to normal
(Overdrive) mode.
For additional information about the gearshift lever and the transmission
control switch operation refer to theAutomatic Transmission
Operationsection of theDrivingchapter.
O/D
ON/OFF
REVIEW COPY
2005 Mazda B Series(mbs), Owners Guide (post-2002-fmt)(own2002),
Market:Canadian_French(fr_can)
Driver Controls
54
Page 60 of 254

To reprogram the remote entry
transmitters:
1. Ensure the vehicle is
electronically unlocked.
2. Put the key in the ignition.
3. Turn the key from the 2
(LOCK) position to 3 (OFF).
4. Cycle eight times rapidly (within
10 seconds) between the 3
(OFF) position and 4 (ON).
Note:The eighth turn must end in the 4 (ON) position.
5. The doors will lock, then unlock, to confirm that the programming
mode has been activated.
6. Within 20 seconds press any button on the remote entry transmitter.
Note:If more than 20 seconds have passed you will need to start
the procedure over again.
7. The doors will lock, then unlock, to confirm that this remote entry
transmitter has been programmed.
8. Repeat Step 6 to program each additional remote entry transmitter.
9. Turn the ignition to the 3 (OFF) position after you have finished
programming all of the remote entry transmitters.Note:After 20
seconds, you will automatically exit the programming mode.
10. The doors will lock, then unlock, to confirm that the programming
mode has been exited.
Illuminated entry
The interior lamps illuminate when the remote entry system is used to
unlock the door(s) or sound the personal alarm.
The illuminated entry system will turn off the interior lights if:
•the ignition switch is turned to the ON position, or
•the remote transmitter lock control is pressed, or
•after 25 seconds of illumination.
The inside lights will not turn off if:
•they have been turned on with the dimmer control, or
•any door is open.
The battery saver will shut off the interior lamps after several minutes if
they are left on accidentally.
3
2
1
5
4
REVIEW COPY
2005 Mazda B Series(mbs), Owners Guide (post-2002-fmt)(own2002),
Market:Canadian_French(fr_can)
Locks and Security
60
Page 74 of 254

5. Buckle then unbuckle the safety belt three times, ending with the
safety belt unbuckled.
•After step 5 the safety belt warning light will be turned on for three
seconds.
6. Within seven seconds of the safety belt warning light turning off,
buckle then unbuckle the safety belt.
•This will disable BeltMinder if it is currently enabled, or enable
BeltMinder if it is currently disabled.
7. Confirmation of disabling BeltMinder is provided by the safety belt
warning light flashing four times per second for three seconds.
8. Confirmation of enabling BeltMinder is provided by:
•The safety belt warning light flashing four times per second for three
seconds.
•Followed by three seconds with the safety belt warning light off.
•Once again, the safety belt warning light will flash four times per
second for three seconds.
9. After receiving confirmation, the deactivation/activation procedure is
complete.
Safety belt maintenance
Inspect the safety belt systems periodically to make sure they work
properly and are not damaged.
NOTE:If unsure about the proper procedures, bring your vehicle to an
authorized Mazda dealership for inspection. Inspect the safety belts to
make sure there are no nicks, tears or cuts, replacing if necessary. Check
all automatic locking retractors on all outboard seating positions as well
as the automatic locking mode for child safety seats on the passenger
front belt. All safety belt assemblies, including retractors, buckles, front
seat belt buckle assemblies, buckle support assemblies (slide bar-if
equipped), shoulder belt height adjusters (if equipped), shoulder belt
guide on seatback (if equipped), child safety seat tether bracket
assemblies (if equipped), LATCH child seat tether anchors and lower
anchors (if equipped), and attaching hardware, should be inspected after
a collision. Mazda recommends that all safety belt assemblies used in
vehicles involved in a collision be replaced. However, if the collision was
minor and an authorized Mazda technician finds that the belts do not
show damage and continue to operate properly, they do not need to be
replaced. Safety belt assemblies not in use during a collision should also
be inspected and replaced if either damage or improper operation is
noted.
REVIEW COPY
2005 Mazda B Series(mbs), Owners Guide (post-2002-fmt)(own2002),
Market:Canadian_French(fr_can)
Seating and Safety Restraints
74
Page 91 of 254

SAFETY SEATS FOR CHILDREN
Child and infant or child safety seats
Use a safety seat that is recommended for the size and weight of the
child. Carefully follow all of the manufacturer’s instructions with the
safety seat you put in your vehicle. If you do not install and use the
safety seat properly, the child may be injured in a sudden stop or
collision.
When installing a child safety seat:
•Review and follow the information
presented in theAir Bag
Supplemental Restraint System
section in this chapter.
•Use the correct safety belt buckle
for that seating position (the
buckle closest to the direction the
tongue is coming from).
•Insert the belt tongue into the
proper buckle until you hear a
snap and feel it latch. Make sure the tongue is securely fastened in the
buckle.
WARNING: Do not install a child seat in a center facing jump
seat.
•Keep the buckle release button pointing up and away from the safety
seat, with the tongue between the child seat and the release button,
to prevent accidental unbuckling.
•Place seat back in upright position.
•Put the safety belt in the automatic locking mode. Refer toAutomatic
locking mode(passenger side front seat).
•LATCH lower anchors are recommended for use by children up to 22
kg (48 pounds) in a child restraint. Top tether anchors can be used
for children up to 27 kg (60 pounds) in a child restraint, and to
provide upper torso restraint for children up to 36 kg (80 pounds)
using an upper torso harness and a belt-positioning booster.
REVIEW COPY
2005 Mazda B Series(mbs), Owners Guide (post-2002-fmt)(own2002),
Market:Canadian_French(fr_can)
Seating and Safety Restraints
91
Page 103 of 254

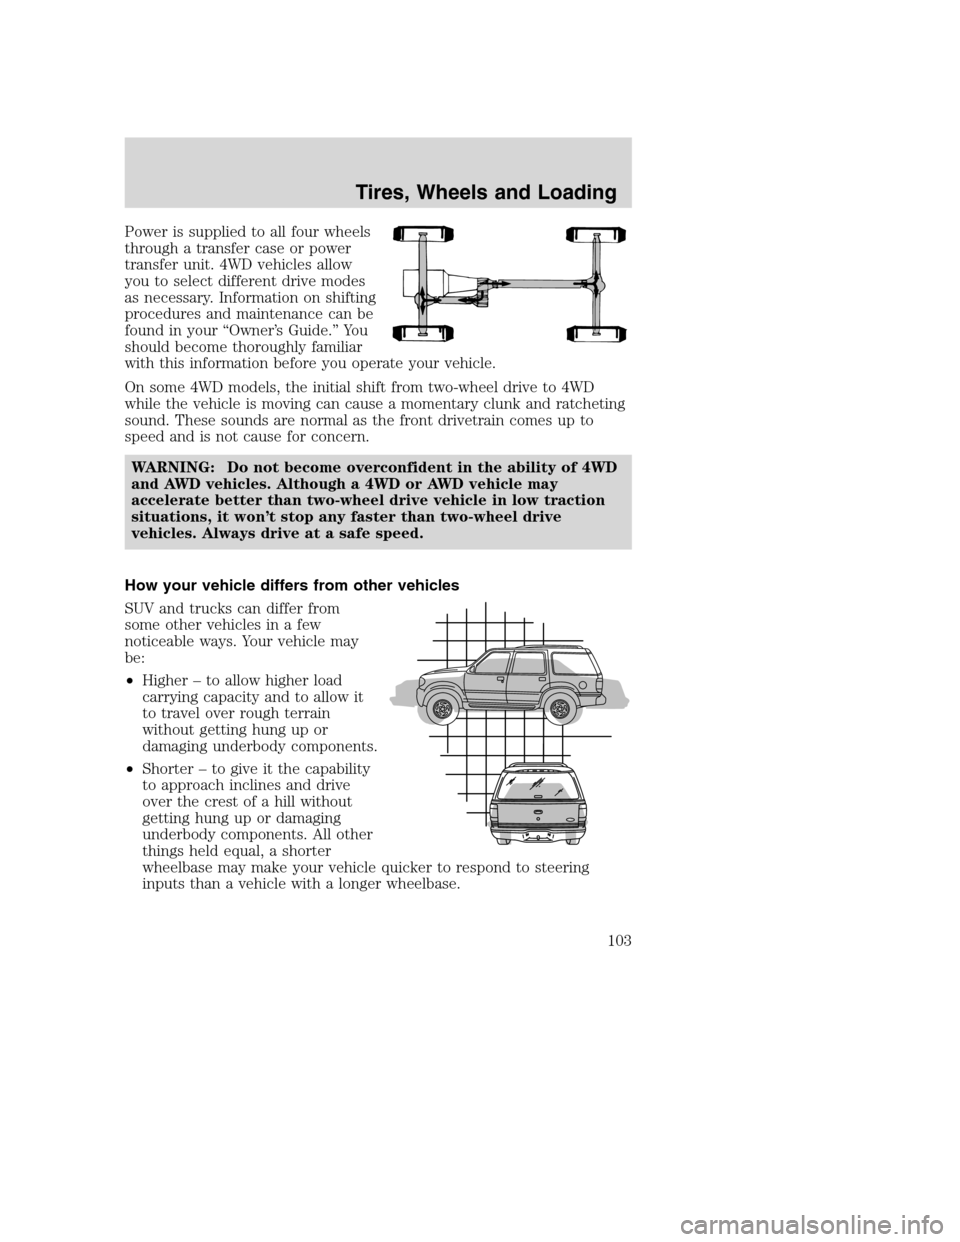
Power is supplied to all four wheels
through a transfer case or power
transfer unit. 4WD vehicles allow
you to select different drive modes
as necessary. Information on shifting
procedures and maintenance can be
found in your “Owner’s Guide.” You
should become thoroughly familiar
with this information before you operate your vehicle.
On some 4WD models, the initial shift from two-wheel drive to 4WD
while the vehicle is moving can cause a momentary clunk and ratcheting
sound. These sounds are normal as the front drivetrain comes up to
speed and is not cause for concern.
WARNING: Do not become overconfident in the ability of 4WD
and AWD vehicles. Although a 4WD or AWD vehicle may
accelerate better than two-wheel drive vehicle in low traction
situations, it won’t stop any faster than two-wheel drive
vehicles. Always drive at a safe speed.
How your vehicle differs from other vehicles
SUV and trucks can differ from
some other vehicles in a few
noticeable ways. Your vehicle may
be:
•Higher – to allow higher load
carrying capacity and to allow it
to travel over rough terrain
without getting hung up or
damaging underbody components.
•Shorter – to give it the capability
to approach inclines and drive
over the crest of a hill without
getting hung up or damaging
underbody components. All other
things held equal, a shorter
wheelbase may make your vehicle quicker to respond to steering
inputs than a vehicle with a longer wheelbase.
REVIEW COPY
2005 Mazda B Series(mbs), Owners Guide (post-2002-fmt)(own2002),
Market:Canadian_French(fr_can)
Tires, Wheels and Loading
103