child lock MAZDA MODEL B2300 TRUCK 2006 Owners Manual (in English)
[x] Cancel search | Manufacturer: MAZDA, Model Year: 2006, Model line: MODEL B2300 TRUCK, Model: MAZDA MODEL B2300 TRUCK 2006Pages: 268, PDF Size: 2.52 MB
Page 8 of 268
JOBNAME: No Job Name PAGE: 8 SESS: 1 OUTPUT: Tue Apr 12 14:52:56 2005
/ford_pdm/ford/own2002/mbs/mpdiff
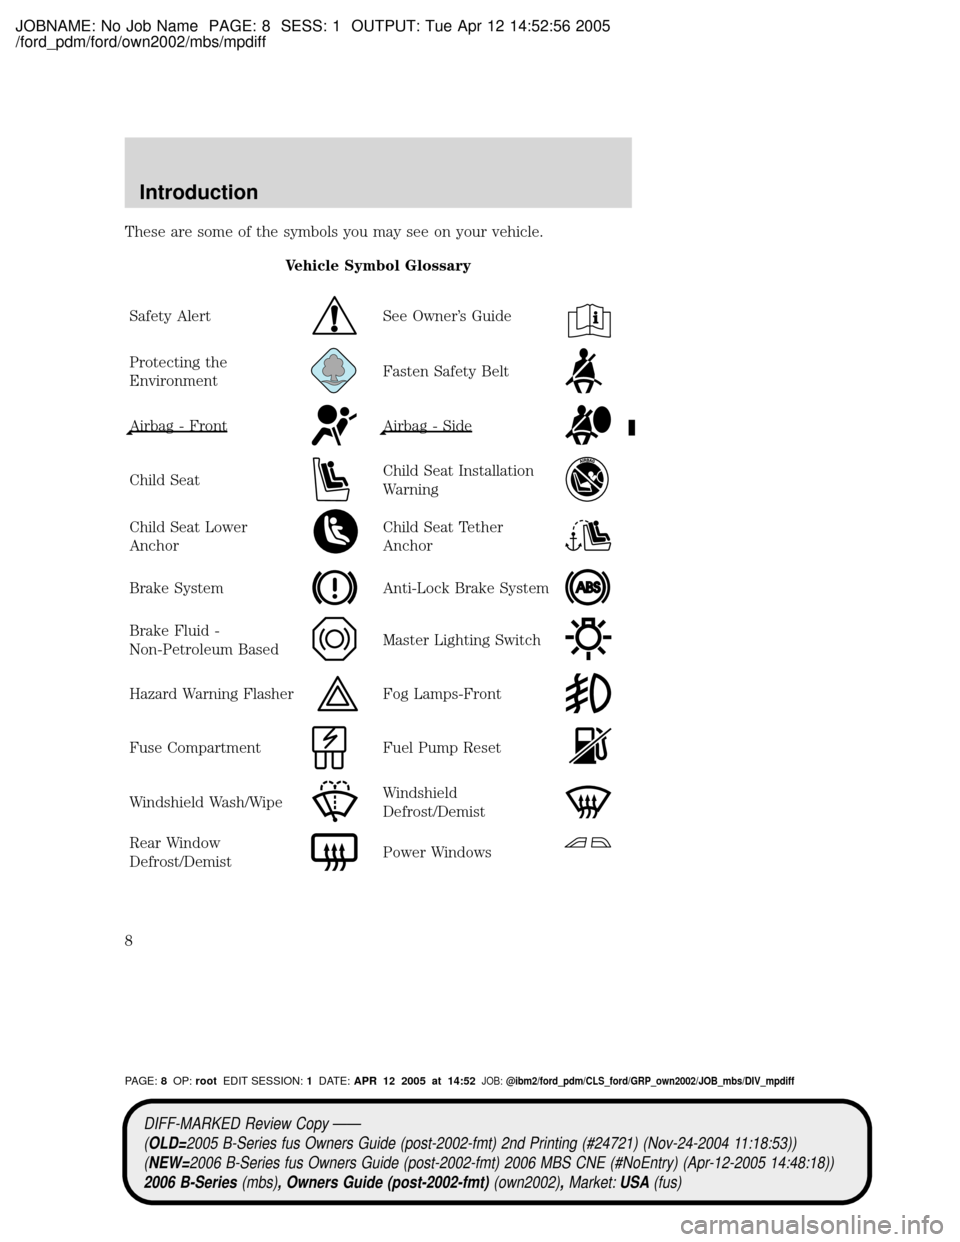
These are some of the symbols you may see on your vehicle.
Vehicle Symbol Glossary
Safety Alert
See Owner's Guide
Protecting the
EnvironmentFasten Safety Belt
Airbag - FrontAirbag - Side
Child SeatChild Seat Installation
Warning
Child Seat Lower
AnchorChild Seat Tether
Anchor
Brake SystemAnti-Lock Brake System
Brake Fluid -
Non-Petroleum BasedMaster Lighting Switch
Hazard Warning FlasherFog Lamps-Front
Fuse CompartmentFuel Pump Reset
Windshield Wash/WipeWindshield
Defrost/Demist
Rear Window
Defrost/DemistPower Windows
DIFF-MARKED Review Copy ÐÐ
(OLD=2005 B-Series fus Owners Guide (post-2002-fmt) 2nd Printing (#24721) (Nov-24-2004 11:18:53))
(NEW=2006 B-Series fus Owners Guide (post-2002-fmt) 2006 MBS CNE (#NoEntry) (Apr-12-2005 14:48:18))
2006 B-Series(mbs), Owners Guide (post-2002-fmt)(own2002),Market:USA(fus)
PAGE:8OP:rootEDIT SESSION:1DATE:APR 12 2005 at 14:52JOB:@ibm2/ford_pdm/CLS_ford/GRP_own2002/JOB_mbs/DIV_mpdiff
Introduction
8
Page 42 of 268
JOBNAME: No Job Name PAGE: 42 SESS: 1 OUTPUT: Tue Apr 12 14:52:56 2005
/ford_pdm/ford/own2002/mbs/mpdiff
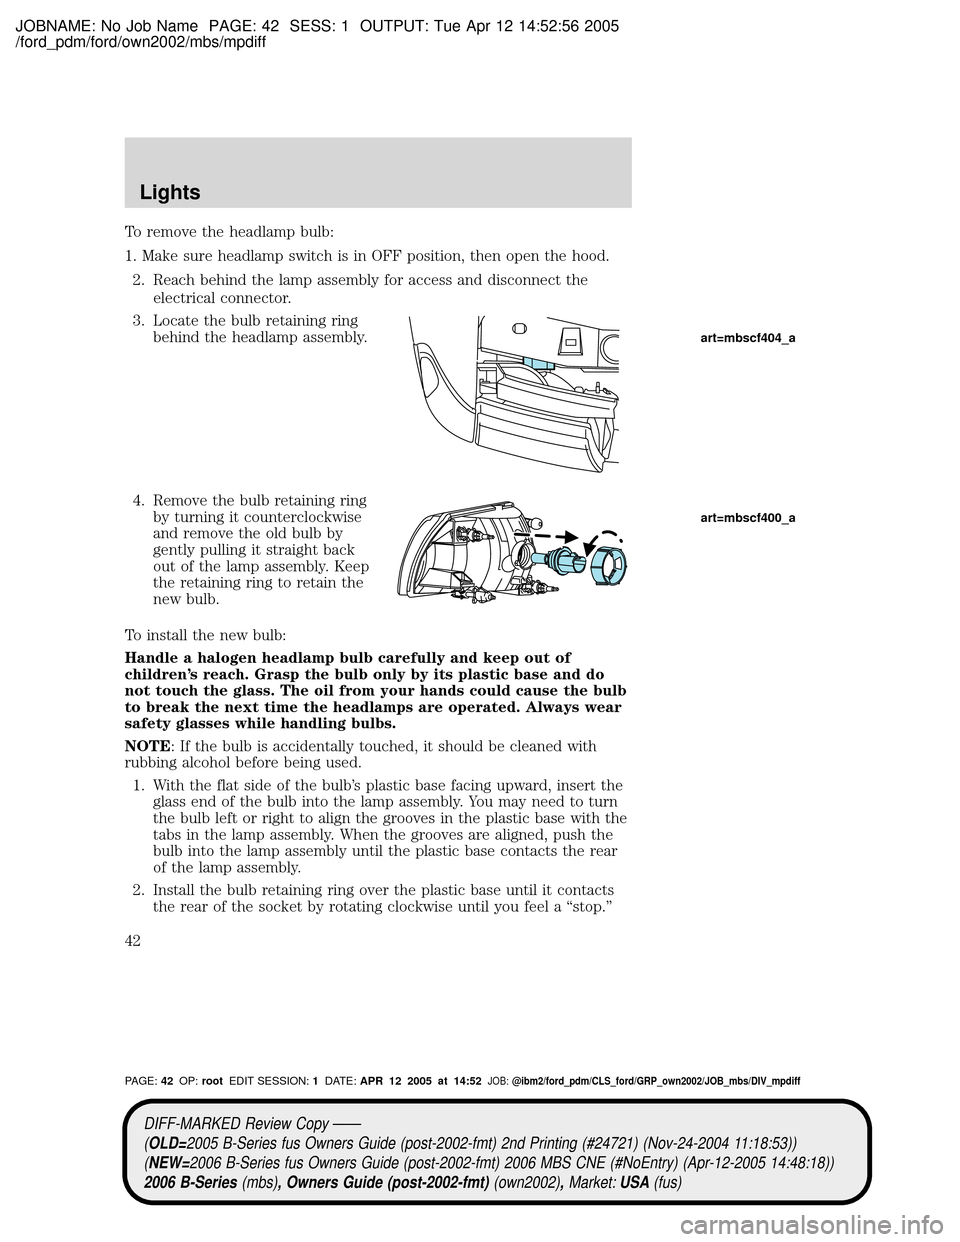
To remove the headlamp bulb:
1. Make sure headlamp switch is in OFF position, then open the hood.
2. Reach behind the lamp assembly for access and disconnect the
electrical connector.
3. Locate the bulb retaining ring
behind the headlamp assembly.
4. Remove the bulb retaining ring
by turning it counterclockwise
and remove the old bulb by
gently pulling it straight back
out of the lamp assembly. Keep
the retaining ring to retain the
new bulb.
To install the new bulb:
Handle a halogen headlamp bulb carefully and keep out of
children's reach. Grasp the bulb only by its plastic base and do
not touch the glass. The oil from your hands could cause the bulb
to break the next time the headlamps are operated. Always wear
safety glasses while handling bulbs.
NOTE: If the bulb is accidentally touched, it should be cleaned with
rubbing alcohol before being used.
1. With the flat side of the bulb's plastic base facing upward, insert the
glass end of the bulb into the lamp assembly. You may need to turn
the bulb left or right to align the grooves in the plastic base with the
tabs in the lamp assembly. When the grooves are aligned, push the
bulb into the lamp assembly until the plastic base contacts the rear
of the lamp assembly.
2. Install the bulb retaining ring over the plastic base until it contacts
the rear of the socket by rotating clockwise until you feel a ªstop.º
art=mbscf404_a
art=mbscf400_a
DIFF-MARKED Review Copy ÐÐ
(OLD=2005 B-Series fus Owners Guide (post-2002-fmt) 2nd Printing (#24721) (Nov-24-2004 11:18:53))
(NEW=2006 B-Series fus Owners Guide (post-2002-fmt) 2006 MBS CNE (#NoEntry) (Apr-12-2005 14:48:18))
2006 B-Series(mbs), Owners Guide (post-2002-fmt)(own2002),Market:USA(fus)
PAGE:42OP:rootEDIT SESSION:1DATE:APR 12 2005 at 14:52JOB:@ibm2/ford_pdm/CLS_ford/GRP_own2002/JOB_mbs/DIV_mpdiff
Lights
42
Page 45 of 268
JOBNAME: No Job Name PAGE: 45 SESS: 1 OUTPUT: Tue Apr 12 14:52:56 2005
/ford_pdm/ford/own2002/mbs/mpdiff
Replacing fog lamp bulbs
WARNING: Handling Halogen Bulbs: When a halogen bulb
breaks, it is dangerous. These bulbs contain pressurized gas. If
one is broken, it will explode and serious injuries could be
caused by the flying glass. If the glass portion of the bulb is
touched with bare hands, body oil could cause the bulb to
overheat and explode when lit. Never touch the glass portion of
the bulb with your bare hands and always wear eye protection
when handling or working around halogen bulbs.
Children and Halogen Bulbs: Playing with a halogen bulb is
dangerous. Serious injuries could be caused by dropping a
halogen bulb or breaking in some other way. Always keep
halogen bulbs out of the reach of children.
NOTE: If the bulb is accidentally touched, it should be cleaned with
rubbing alcohol before being used.
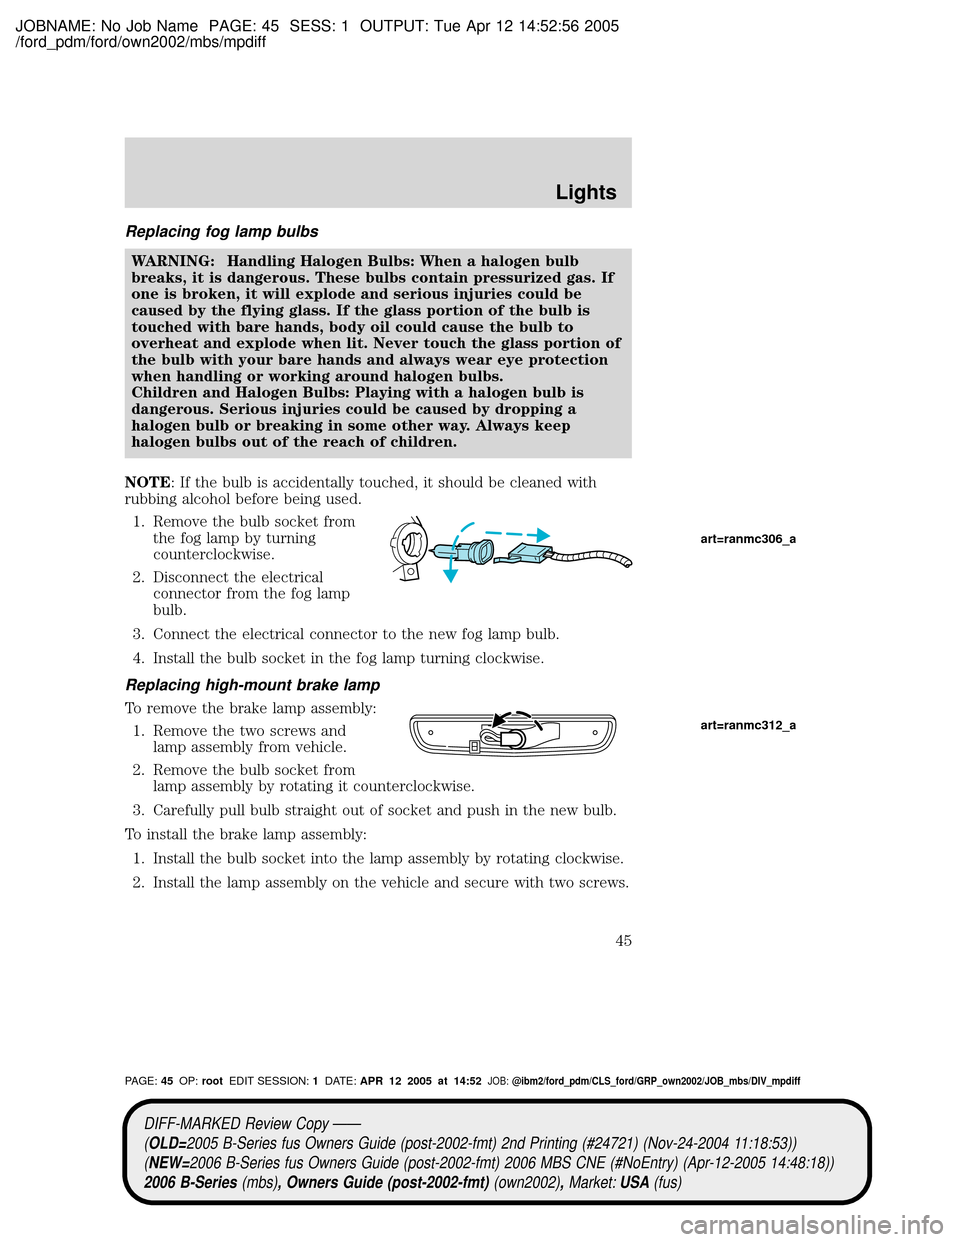
1. Remove the bulb socket from
the fog lamp by turning
counterclockwise.
2. Disconnect the electrical
connector from the fog lamp
bulb.
3. Connect the electrical connector to the new fog lamp bulb.
4. Install the bulb socket in the fog lamp turning clockwise.
Replacing high-mount brake lamp
To remove the brake lamp assembly:
1. Remove the two screws and
lamp assembly from vehicle.
2. Remove the bulb socket from
lamp assembly by rotating it counterclockwise.
3. Carefully pull bulb straight out of socket and push in the new bulb.
To install the brake lamp assembly:
1. Install the bulb socket into the lamp assembly by rotating clockwise.
2. Install the lamp assembly on the vehicle and secure with two screws.
art=ranmc306_a
art=ranmc312_a
DIFF-MARKED Review Copy ÐÐ
(OLD=2005 B-Series fus Owners Guide (post-2002-fmt) 2nd Printing (#24721) (Nov-24-2004 11:18:53))
(NEW=2006 B-Series fus Owners Guide (post-2002-fmt) 2006 MBS CNE (#NoEntry) (Apr-12-2005 14:48:18))
2006 B-Series(mbs), Owners Guide (post-2002-fmt)(own2002),Market:USA(fus)
PAGE:45OP:rootEDIT SESSION:1DATE:APR 12 2005 at 14:52JOB:@ibm2/ford_pdm/CLS_ford/GRP_own2002/JOB_mbs/DIV_mpdiff
Lights
45
Page 65 of 268
JOBNAME: No Job Name PAGE: 65 SESS: 1 OUTPUT: Tue Apr 12 14:52:56 2005
/ford_pdm/ford/own2002/mbs/mpdiff
To return seat to original position, slide the seat bottom back, then push
the seatback up to lock it in place. The seat will lock, and you will have
to use the release bar to move the seat back to the original position.
REAR SEATS
Center facing jump seat (two±door Cab Plus) (if equipped)
To open, pull inboard and down on the seat strap.
To stow the seat, pull seat bottom back to the fully upright position.
WARNING: Do not install a child seat in a center facing jump
seat.
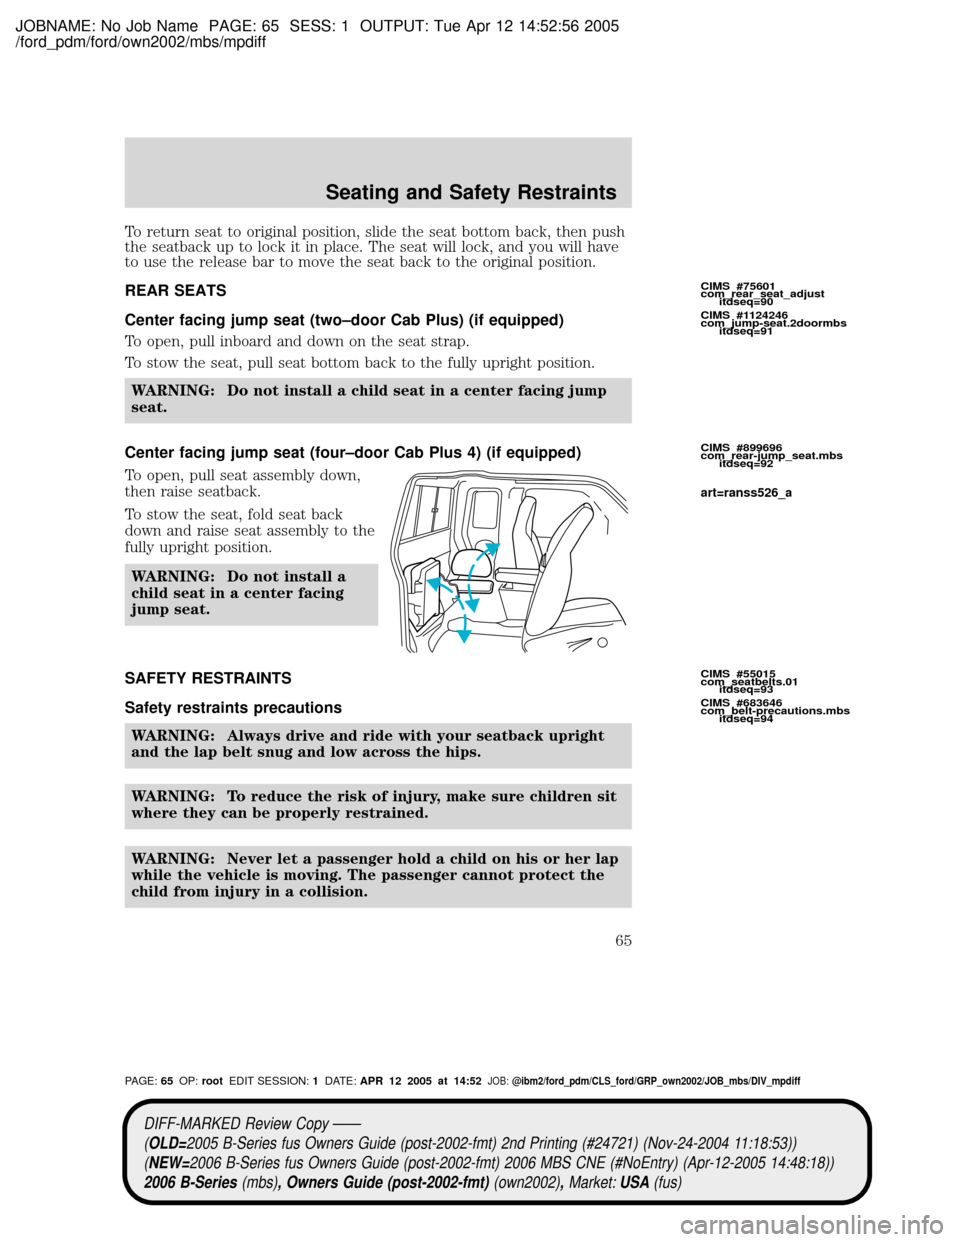
Center facing jump seat (four±door Cab Plus 4) (if equipped)
To open, pull seat assembly down,
then raise seatback.
To stow the seat, fold seat back
down and raise seat assembly to the
fully upright position.
WARNING: Do not install a
child seat in a center facing
jump seat.
SAFETY RESTRAINTS
Safety restraints precautions
WARNING: Always drive and ride with your seatback upright
and the lap belt snug and low across the hips.
WARNING: To reduce the risk of injury, make sure children sit
where they can be properly restrained.
WARNING: Never let a passenger hold a child on his or her lap
while the vehicle is moving. The passenger cannot protect the
child from injury in a collision.
CIMS #75601
com_rear_seat_adjust
itdseq=90
CIMS #1124246
com_jump-seat.2doormbs
itdseq=91
CIMS #899696
com_rear-jump_seat.mbs
itdseq=92
CIMS #55015
com_seatbelts.01
itdseq=93
CIMS #683646
com_belt-precautions.mbs
itdseq=94
art=ranss526_a
DIFF-MARKED Review Copy ÐÐ
(OLD=2005 B-Series fus Owners Guide (post-2002-fmt) 2nd Printing (#24721) (Nov-24-2004 11:18:53))
(NEW=2006 B-Series fus Owners Guide (post-2002-fmt) 2006 MBS CNE (#NoEntry) (Apr-12-2005 14:48:18))
2006 B-Series(mbs), Owners Guide (post-2002-fmt)(own2002),Market:USA(fus)
PAGE:65OP:rootEDIT SESSION:1DATE:APR 12 2005 at 14:52JOB:@ibm2/ford_pdm/CLS_ford/GRP_own2002/JOB_mbs/DIV_mpdiff
Seating and Safety Restraints
65
Page 68 of 268
JOBNAME: No Job Name PAGE: 68 SESS: 1 OUTPUT: Tue Apr 12 14:52:56 2005
/ford_pdm/ford/own2002/mbs/mpdiff
WARNING: The lap belts should fit snugly and as low as
possible around the hips, not around the waist. Failure to
position the lap belt correctly may cause serious injury in an
accident.
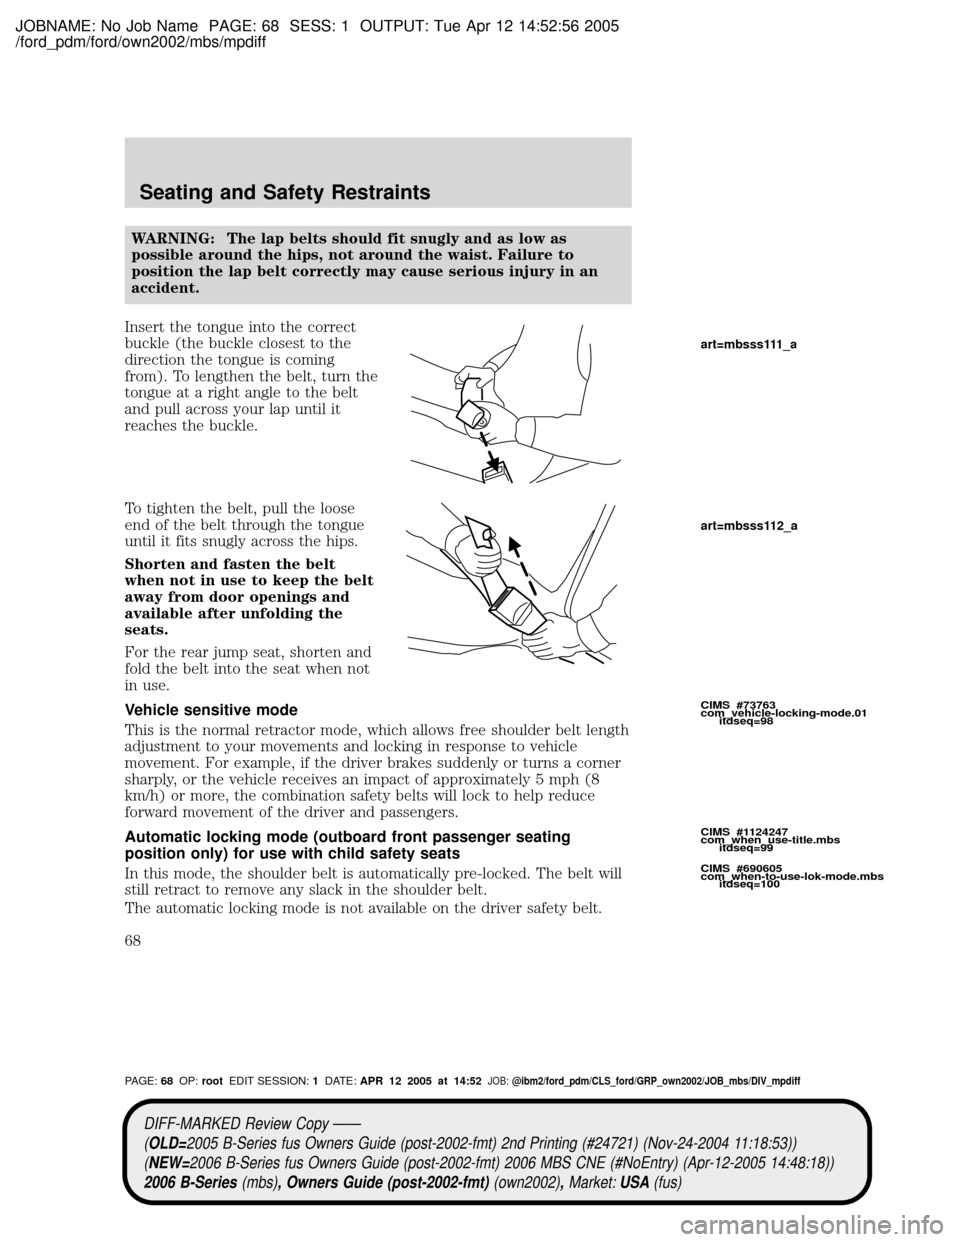
Insert the tongue into the correct
buckle (the buckle closest to the
direction the tongue is coming
from). To lengthen the belt, turn the
tongue at a right angle to the belt
and pull across your lap until it
reaches the buckle.
To tighten the belt, pull the loose
end of the belt through the tongue
until it fits snugly across the hips.
Shorten and fasten the belt
when not in use to keep the belt
away from door openings and
available after unfolding the
seats.
For the rear jump seat, shorten and
fold the belt into the seat when not
in use.
Vehicle sensitive mode
This is the normal retractor mode, which allows free shoulder belt length
adjustment to your movements and locking in response to vehicle
movement. For example, if the driver brakes suddenly or turns a corner
sharply, or the vehicle receives an impact of approximately 5 mph (8
km/h) or more, the combination safety belts will lock to help reduce
forward movement of the driver and passengers.
Automatic locking mode (outboard front passenger seating
position only) for use with child safety seats
In this mode, the shoulder belt is automatically pre-locked. The belt will
still retract to remove any slack in the shoulder belt.
The automatic locking mode is not available on the driver safety belt.
CIMS #73763
com_vehicle-locking-mode.01
itdseq=98
CIMS #1124247
com_when_use-title.mbs
itdseq=99
CIMS #690605
com_when-to-use-lok-mode.mbs
itdseq=100
art=mbsss111_a
art=mbsss112_a
DIFF-MARKED Review Copy ÐÐ
(OLD=2005 B-Series fus Owners Guide (post-2002-fmt) 2nd Printing (#24721) (Nov-24-2004 11:18:53))
(NEW=2006 B-Series fus Owners Guide (post-2002-fmt) 2006 MBS CNE (#NoEntry) (Apr-12-2005 14:48:18))
2006 B-Series(mbs), Owners Guide (post-2002-fmt)(own2002),Market:USA(fus)
PAGE:68OP:rootEDIT SESSION:1DATE:APR 12 2005 at 14:52JOB:@ibm2/ford_pdm/CLS_ford/GRP_own2002/JOB_mbs/DIV_mpdiff
Seating and Safety Restraints
68
Page 69 of 268
JOBNAME: No Job Name PAGE: 69 SESS: 1 OUTPUT: Tue Apr 12 14:52:56 2005
/ford_pdm/ford/own2002/mbs/mpdiff
When to use the automatic locking mode
²Any timea child safety seat is installed in a passenger front seat.
Refer toSafety Restraints for Children,Safety Seats for Children,
orPassenger airbag On/Off switchlater in this chapter.
How to use the automatic locking mode (Outboard front passenger
seating position only) for use with child safety seats
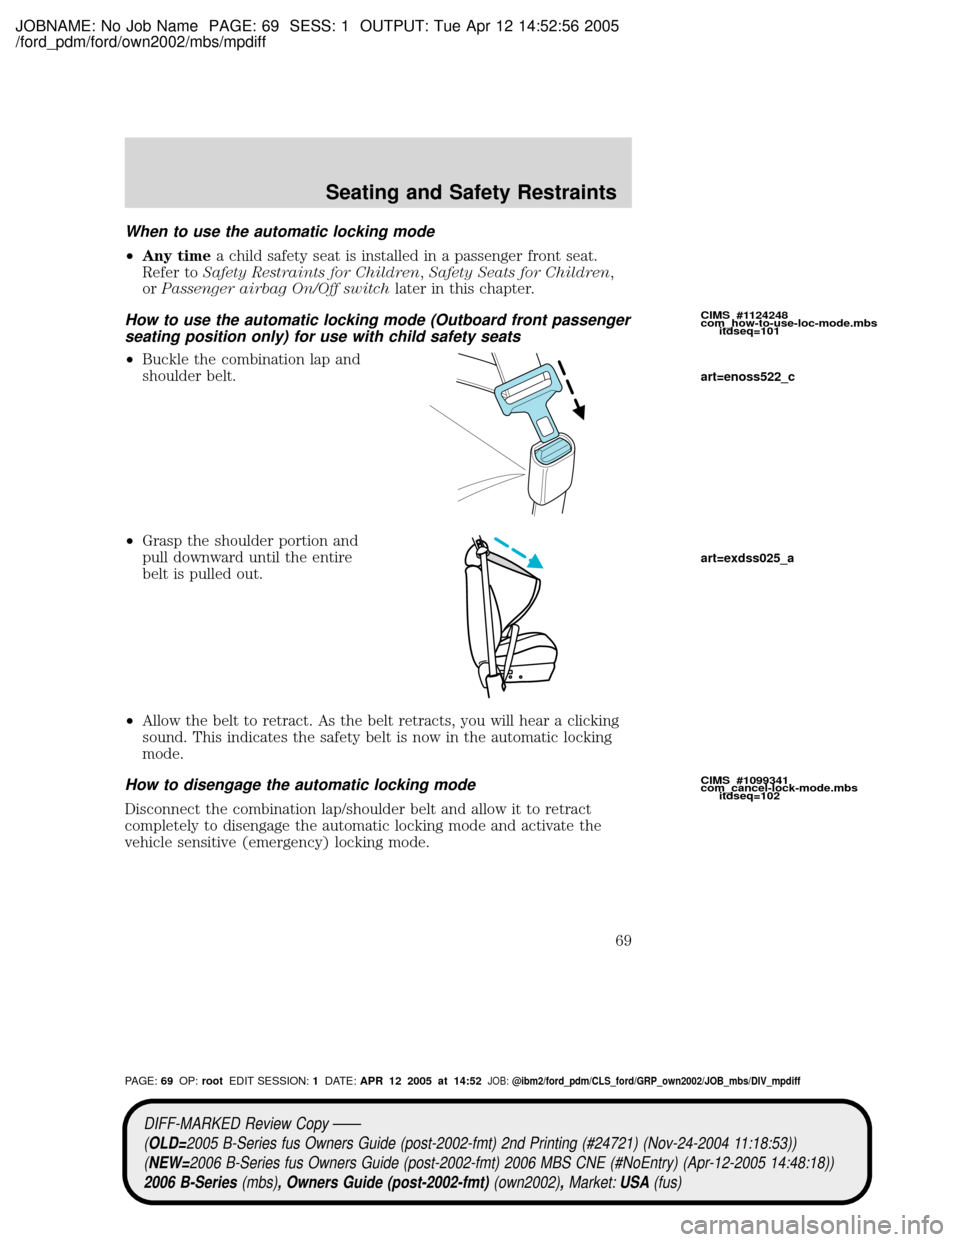
²Buckle the combination lap and
shoulder belt.
²Grasp the shoulder portion and
pull downward until the entire
belt is pulled out.
²Allow the belt to retract. As the belt retracts, you will hear a clicking
sound. This indicates the safety belt is now in the automatic locking
mode.
How to disengage the automatic locking mode
Disconnect the combination lap/shoulder belt and allow it to retract
completely to disengage the automatic locking mode and activate the
vehicle sensitive (emergency) locking mode.
CIMS #1124248
com_how-to-use-loc-mode.mbs
itdseq=101
CIMS #1099341
com_cancel-lock-mode.mbs
itdseq=102
art=enoss522_c
art=exdss025_a
DIFF-MARKED Review Copy ÐÐ
(OLD=2005 B-Series fus Owners Guide (post-2002-fmt) 2nd Printing (#24721) (Nov-24-2004 11:18:53))
(NEW=2006 B-Series fus Owners Guide (post-2002-fmt) 2006 MBS CNE (#NoEntry) (Apr-12-2005 14:48:18))
2006 B-Series(mbs), Owners Guide (post-2002-fmt)(own2002),Market:USA(fus)
PAGE:69OP:rootEDIT SESSION:1DATE:APR 12 2005 at 14:52JOB:@ibm2/ford_pdm/CLS_ford/GRP_own2002/JOB_mbs/DIV_mpdiff
Seating and Safety Restraints
69
Page 70 of 268
JOBNAME: No Job Name PAGE: 70 SESS: 1 OUTPUT: Tue Apr 12 14:52:56 2005
/ford_pdm/ford/own2002/mbs/mpdiff
WARNING: After any vehicle collision, the entire seat belt
system should be checked for proper operation by
an authorized
dealer. Verify that the(automatic locking retractorsº in all
outboard seating positions are functioning properly.
Additionally check that the(automatic locking mode(feature
for child safety seat in the passenger outboard seating position
is functioning properly.
WARNING: BELT AND RETRACTOR ASSEMBLY MUST BE
REPLACED if the seat belt assembly ªautomatic locking
retractorº feature or any other seat belt function is not
operating properly when checked according to the procedures in
Workshop Manual.
WARNING: Failure to replace the Belt and Retractor assembly
could increase the risk of injury in collisions.
Safety belt pretensioner
Your vehicle is equipped with safety belt pretensioners at the driver and
front outboard passenger seating positions.
The safety beltpretensioner is a device whichremoves excess webbing
from the safety belt system. The safety belt pretensioner uses the same
crash sensor system as the front airbag supplemental restraint system
(SRS). When the safety belt pretensioner deploys, webbingfrom the lap
and shoulderbelt is tightened. Refer to theSafety belt maintenance
section in this chapter.
WARNING: The driver and frontpassengerseat belt system
(including retractors,buckles and height adjusters) must be
replaced if the vehicle is involved in a collision that results in
deployment offront airbags and safety belt pretensioners.
Front safety belt height adjustment
Your vehicle has safety belt height adjustments for the driver and front
passenger. Adjust the height of the shoulder belt so the belt rests across
the middle of your shoulder.
CIMS #594556
com_pretensioner-title
itdseq=103
CIMS #1217381
com_pretensioner.mbs
itdseq=104
CIMS #911066
com_height-adjust.mbs
itdseq=105
DIFF-MARKED Review Copy ÐÐ
(OLD=2005 B-Series fus Owners Guide (post-2002-fmt) 2nd Printing (#24721) (Nov-24-2004 11:18:53))
(NEW=2006 B-Series fus Owners Guide (post-2002-fmt) 2006 MBS CNE (#NoEntry) (Apr-12-2005 14:48:18))
2006 B-Series(mbs), Owners Guide (post-2002-fmt)(own2002),Market:USA(fus)
PAGE:70OP:rootEDIT SESSION:1DATE:APR 12 2005 at 14:52JOB:@ibm2/ford_pdm/CLS_ford/GRP_own2002/JOB_mbs/DIV_mpdiff
Seating and Safety Restraints
70
Page 76 of 268
JOBNAME: No Job Name PAGE: 76 SESS: 1 OUTPUT: Tue Apr 12 14:52:56 2005
/ford_pdm/ford/own2002/mbs/mpdiff
5. At a moderate speed, buckle then unbuckle the safety belt three
times, ending with the safety belt unbuckled.
²After Step 5 the safety belt warning light will be turned on for three
seconds.
6. Within seven seconds of the safety belt warning light turning off, at a
moderate speed, buckle then unbuckle the safety belt.
²This will disable BeltMinderyif it is currently enabled, or enable
BeltMinderyif it is currently disabled.
7. Confirmation of disabling BeltMinderyis provided by the safety belt
warning light flashing four times per second for three seconds.
8. Confirmation of enabling BeltMinderyis provided by:
²The safety belt warning light flashing four times per second for three
seconds.
²Followed by three seconds with the safety belt warning light off.
²Once again, the safety belt warning light will flash four times per
second for three seconds.
9. After receiving confirmation, the deactivation/activation procedure is
complete.
Safety belt maintenance
Inspect the safety belt systems periodically to make sure they work
properly and are not damaged.
NOTE:If unsure about the proper procedures, bring your vehicle to an
authorized Mazda dealership for inspection. Inspect the safety belts to
make sure there are no nicks, tears or cuts, replacing if necessary. Check
all automatic locking retractors on all outboard seating positions as well
as the automatic locking mode for child safety seats on the passenger
front belt. All safety belt assemblies, including retractors, buckles, front
seat belt buckle assemblies, buckle support assemblies (slide bar-if
equipped), shoulder belt height adjusters (if equipped), shoulder belt
guide on seatback (if equipped), child safety seat tether bracket
assemblies (if equipped), LATCH child seat tether anchors and lower
anchors (if equipped), and attaching hardware, should be inspected after
a collision. Mazda recommends that all safety belt assemblies used in
vehicles involved in a collision be replaced. However, if the collision was
minor and an authorized Mazda technician finds that the belts do not
show damage and continue to operate properly, they do not need to be
replaced. Safety belt assemblies not in use during a collision should also
be inspected and replaced if either damage or improper operation is
noted.
CIMS #1112659
com_belt-maint.mbs
itdseq=114
DIFF-MARKED Review Copy ÐÐ
(OLD=2005 B-Series fus Owners Guide (post-2002-fmt) 2nd Printing (#24721) (Nov-24-2004 11:18:53))
(NEW=2006 B-Series fus Owners Guide (post-2002-fmt) 2006 MBS CNE (#NoEntry) (Apr-12-2005 14:48:18))
2006 B-Series(mbs), Owners Guide (post-2002-fmt)(own2002),Market:USA(fus)
PAGE:76OP:rootEDIT SESSION:1DATE:APR 12 2005 at 14:52JOB:@ibm2/ford_pdm/CLS_ford/GRP_own2002/JOB_mbs/DIV_mpdiff
Seating and Safety Restraints
76
Page 94 of 268
JOBNAME: No Job Name PAGE: 94 SESS: 1 OUTPUT: Tue Apr 12 14:52:56 2005
/ford_pdm/ford/own2002/mbs/mpdiff
SAFETY SEATS FOR CHILDREN
Child and infant or child safety seats
Use a safety seat that is recommended for the size and weight of the
child. Carefully follow all of the manufacturer's instructions with the
safety seat you put in your vehicle. If you do not install and use the
safety seat properly, the child may be injured in a sudden stop or
collision.
When installing a child safety seat:
²Review and follow the information
presented in theAirbag
Supplemental Restraint System
section in this chapter.
²Use the correct safety belt buckle
for that seating position (the
buckle closest to the direction the
tongue is coming from).
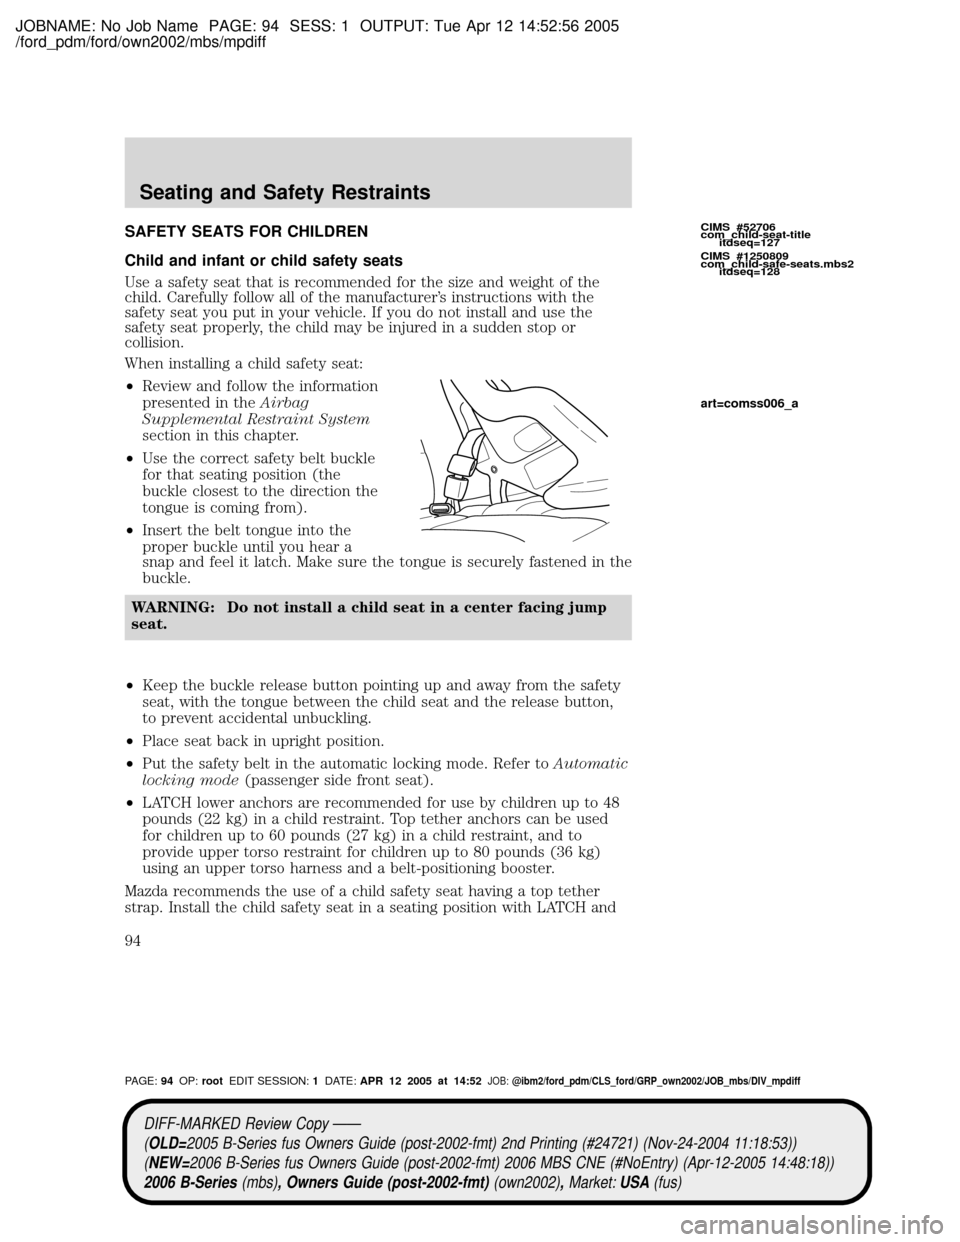
²Insert the belt tongue into the
proper buckle until you hear a
snap and feel it latch. Make sure the tongue is securely fastened in the
buckle.
WARNING: Do not install a child seat in a center facing jump
seat.
²Keep the buckle release button pointing up and away from the safety
seat, with the tongue between the child seat and the release button,
to prevent accidental unbuckling.
²Place seat back in upright position.
²Put the safety belt in the automatic locking mode. Refer toAutomatic
locking mode(passenger side front seat).
²LATCH lower anchors are recommended for use by children up to 48
pounds (22 kg) in a child restraint. Top tether anchors can be used
for children up to 60 pounds (27 kg) in a child restraint, and to
provide upper torso restraint for children up to 80 pounds (36 kg)
using an upper torso harness and a belt-positioning booster.
Mazda recommends the use of a child safety seat having a top tether
strap. Install the child safety seat in a seating position with LATCH andCIMS #52706
com_child-seat-title
itdseq=127
CIMS #1250809
com_child-safe-seats.mbs2
itdseq=128
art=comss006_a
DIFF-MARKED Review Copy ÐÐ
(OLD=2005 B-Series fus Owners Guide (post-2002-fmt) 2nd Printing (#24721) (Nov-24-2004 11:18:53))
(NEW=2006 B-Series fus Owners Guide (post-2002-fmt) 2006 MBS CNE (#NoEntry) (Apr-12-2005 14:48:18))
2006 B-Series(mbs), Owners Guide (post-2002-fmt)(own2002),Market:USA(fus)
PAGE:94OP:rootEDIT SESSION:1DATE:APR 12 2005 at 14:52JOB:@ibm2/ford_pdm/CLS_ford/GRP_own2002/JOB_mbs/DIV_mpdiff
Seating and Safety Restraints
94
Page 97 of 268
JOBNAME: No Job Name PAGE: 97 SESS: 1 OUTPUT: Tue Apr 12 14:52:56 2005
/ford_pdm/ford/own2002/mbs/mpdiff
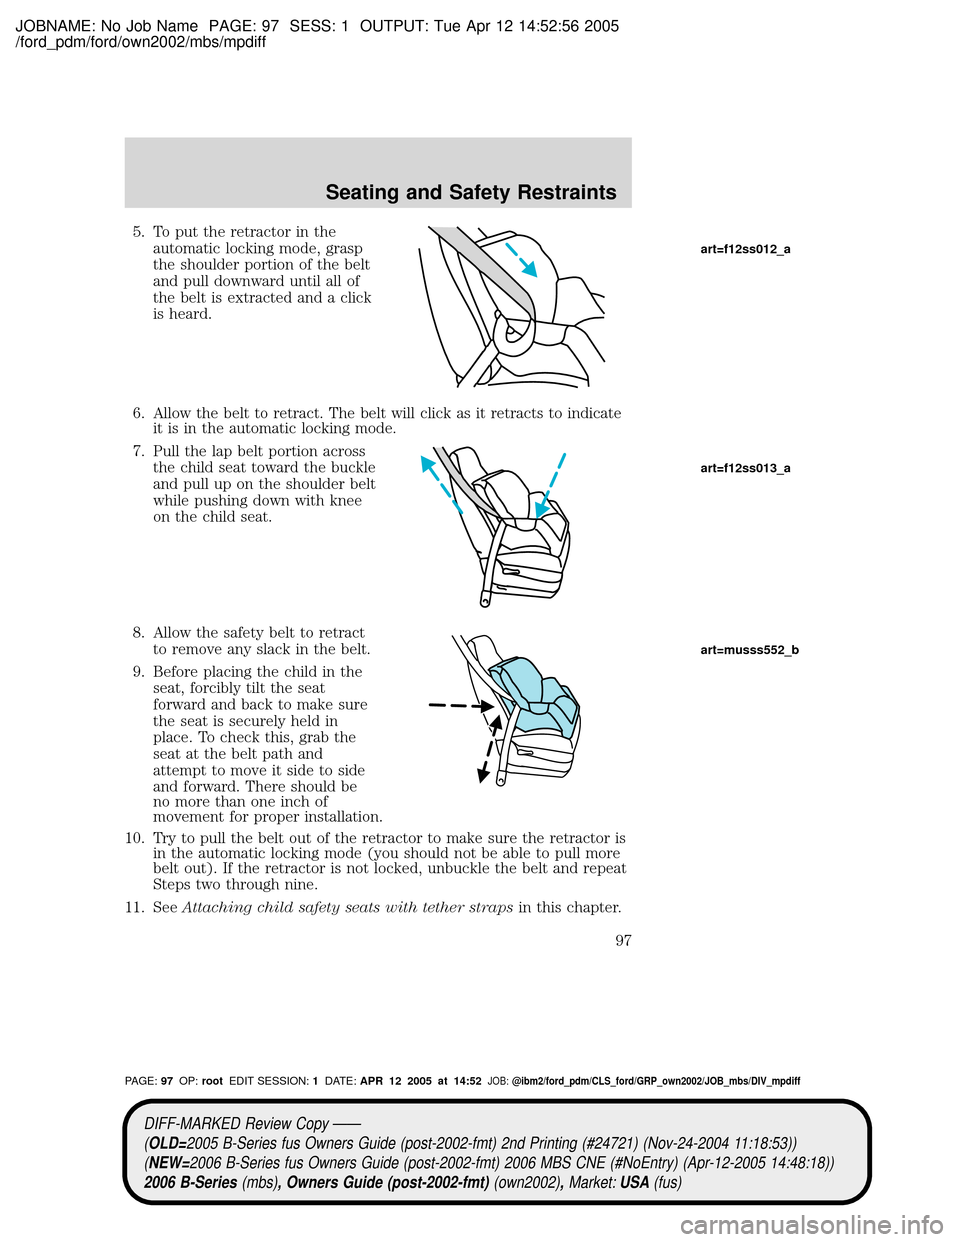
5. To put the retractor in the
automatic locking mode, grasp
the shoulder portion of the belt
and pull downward until all of
the belt is extracted and a click
is heard.
6. Allow the belt to retract. The belt will click as it retracts to indicate
it is in the automatic locking mode.
7. Pull the lap belt portion across
the child seat toward the buckle
and pull up on the shoulder belt
while pushing down with knee
on the child seat.
8. Allow the safety belt to retract
to remove any slack in the belt.
9. Before placing the child in the
seat, forcibly tilt the seat
forward and back to make sure
the seat is securely held in
place. To check this, grab the
seat at the belt path and
attempt to move it side to side
and forward. There should be
no more than one inch of
movement for proper installation.
10. Try to pull the belt out of the retractor to make sure the retractor is
in the automatic locking mode (you should not be able to pull more
belt out). If the retractor is not locked, unbuckle the belt and repeat
Steps two through nine.
11. SeeAttaching child safety seats with tether strapsin this chapter.
art=f12ss012_a
art=f12ss013_a
art=musss552_b
DIFF-MARKED Review Copy ÐÐ
(OLD=2005 B-Series fus Owners Guide (post-2002-fmt) 2nd Printing (#24721) (Nov-24-2004 11:18:53))
(NEW=2006 B-Series fus Owners Guide (post-2002-fmt) 2006 MBS CNE (#NoEntry) (Apr-12-2005 14:48:18))
2006 B-Series(mbs), Owners Guide (post-2002-fmt)(own2002),Market:USA(fus)
PAGE:97OP:rootEDIT SESSION:1DATE:APR 12 2005 at 14:52JOB:@ibm2/ford_pdm/CLS_ford/GRP_own2002/JOB_mbs/DIV_mpdiff
Seating and Safety Restraints
97