ECU MAZDA MODEL B3000 2002 (in English) Owner's Manual
[x] Cancel search | Manufacturer: MAZDA, Model Year: 2002, Model line: MODEL B3000, Model: MAZDA MODEL B3000 2002Pages: 288, PDF Size: 2.94 MB
Page 139 of 288

Installing child safety seats in the center front seating position
WARNING: Use the appropriate tether anchor when mounting a
child safety seat in the center seating position. SeeChild safety
seats with tether strapsin this chapter.
1. Lengthen the lap belt. To lengthen the belt, hold the tongue so that
its bottom is perpendicular to the direction of webbing while sliding
the tongue up the webbing.
2. Place the child safety seat in the center seating position.
3. Attach the tether strap on the child seat to the appropriate tether
anchor. SeeAttaching child safety seats with tether strapsin this
chapter.
4. Route the tongue and webbing through the child seat according to
the child seat manufacturer's instructions.
5. Insert the belt tongue into the proper buckle for the center seating
position until you hear a snap and feel it latch. Make sure the tongue
is securely fastened to the buckle by pulling on tongue.
6. Push down on the child seat with your knee while pulling on the
loose end of the lap belt webbing to tighten the belt. Tighten the
tether strap.
7. Before placing the child into the
child seat, forcibly move the
child seat from side to side and
forward to make sure that the
seat is held securely. If the child
seat moves excessively, repeat
steps 5 through 6, or properly
install the child seat in the
outboard seating position.
WARNING: Do not install a child seat in a center facing jump
seat.
Seating and Safety Restraints
139
Page 144 of 288

Center seating location 60/40 vinyl seats
When installing a child safety seat in the center position on a 60/40 vinyl
seat, route the tether strap through the guiding sleeve and clip it to the
center anchor.
WARNING: If the tether strap is clipped incorrectly, the child
safety seat may not be retained properly in the event of a
collision.
5. Refer to theInstalling child safety seats in combination lap and
shoulder belt seating positionssection of this chapter for further
instructions to secure the child safety seat.
6. Tighten the child safety seat tether strap according to the
manufacturer's instructions.
WARNING: If the safety seat is not anchored properly, the risk
of a child being injured in a collision greatly increases.
Seating and Safety Restraints
144
Page 146 of 288

WARNING: Do not put the LATCH type seat in the center seat
position Ð it only has one possible anchor point and the seat
will not be properly attached.
WARNING: If there are two LATCH seats to install Ð you can
only mount one LATCH seat in this vehicle with the LATCH
anchor bars. You need to mount the second seat with the center
seat belt using the normal lap belt method.
WARNING: Do not attach two seats to one LATCH anchor bar.
Connectors on the LATCH child seat
and the child seat instructions may
use the symbol shown here. Your
vehicle seat will have plain gray
buttons, instead of this symbol, to indicate the location of the LATCH
lower anchors.
The lower anchors for child seat
installation are located at the rear
section of the front passenger seat
between the cushion and seat back.
The LATCH anchors are below the
gray locator buttons on the seat
back. Two plastic LATCH guides
may be purchased from your local
Mazda dealer (part number
1F60±57±751). They snap onto the
latch lower anchor in the vehicle to
help attach a child seat with rigid
latch attachments. It will hold the
seat foam away and expose the
anchor making attachment of the
child seat easier.
Make sure you attach the proper
child safety seat tether after
securing the LATCH.
Seating and Safety Restraints
146
Page 156 of 288
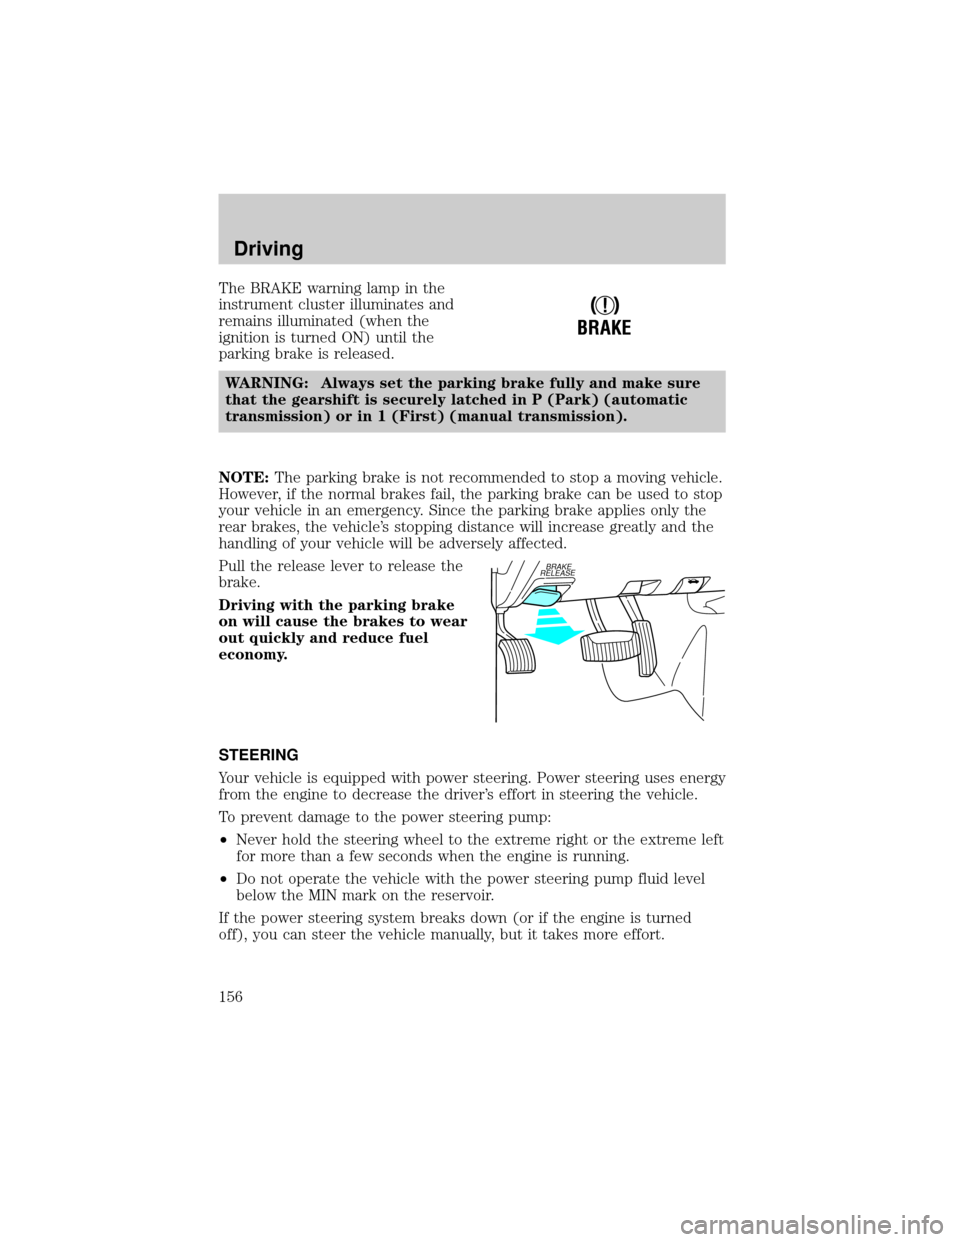
The BRAKE warning lamp in the
instrument cluster illuminates and
remains illuminated (when the
ignition is turned ON) until the
parking brake is released.
WARNING: Always set the parking brake fully and make sure
that the gearshift is securely latched in P (Park) (automatic
transmission) or in 1 (First) (manual transmission).
NOTE:The parking brake is not recommended to stop a moving vehicle.
However, if the normal brakes fail, the parking brake can be used to stop
your vehicle in an emergency. Since the parking brake applies only the
rear brakes, the vehicle's stopping distance will increase greatly and the
handling of your vehicle will be adversely affected.
Pull the release lever to release the
brake.
Driving with the parking brake
on will cause the brakes to wear
out quickly and reduce fuel
economy.
STEERING
Your vehicle is equipped with power steering. Power steering uses energy
from the engine to decrease the driver's effort in steering the vehicle.
To prevent damage to the power steering pump:
²Never hold the steering wheel to the extreme right or the extreme left
for more than a few seconds when the engine is running.
²Do not operate the vehicle with the power steering pump fluid level
below the MIN mark on the reservoir.
If the power steering system breaks down (or if the engine is turned
off), you can steer the vehicle manually, but it takes more effort.
!
BRAKE
BRAKE
RELEASE
Driving
156
Page 160 of 288
When the battery is disconnected or a new battery installed, the
transmission must learn its adaptive strategy. As a result of this, the
transmission may shift firmly. This operation is considered normal and
will fully update transmission operation to its optimum shift feel.
Understanding gearshift positions
WARNING: Hold the brake pedal down while you move the
gearshift lever from P (Park) to another position. If you do not
hold the brake pedal down, your vehicle may move unexpectedly
and injure someone.
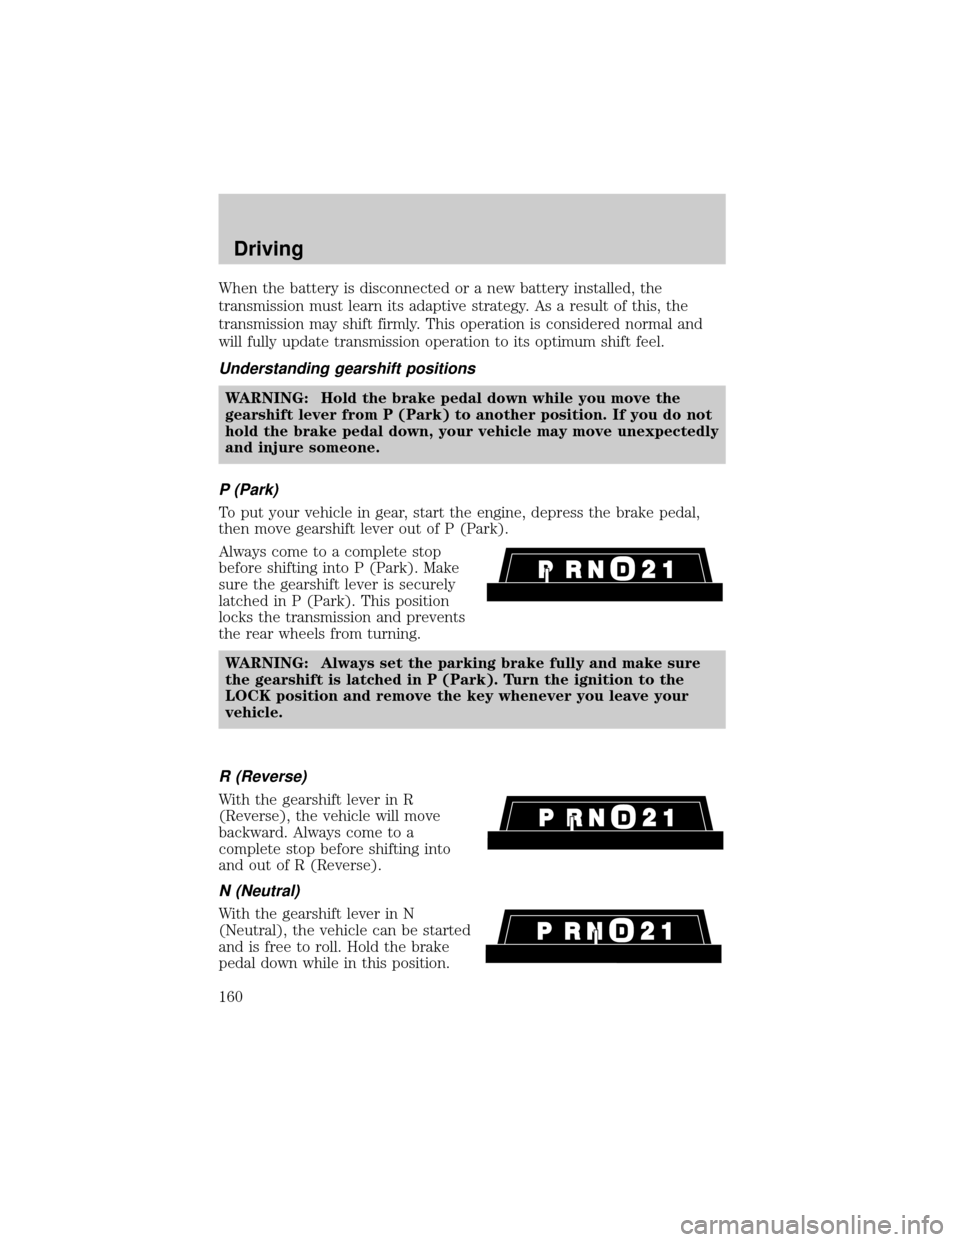
P (Park)
To put your vehicle in gear, start the engine, depress the brake pedal,
then move gearshift lever out of P (Park).
Always come to a complete stop
before shifting into P (Park). Make
sure the gearshift lever is securely
latched in P (Park). This position
locks the transmission and prevents
the rear wheels from turning.
WARNING: Always set the parking brake fully and make sure
the gearshift is latched in P (Park). Turn the ignition to the
LOCK position and remove the key whenever you leave your
vehicle.
R (Reverse)
With the gearshift lever in R
(Reverse), the vehicle will move
backward. Always come to a
complete stop before shifting into
and out of R (Reverse).
N (Neutral)
With the gearshift lever in N
(Neutral), the vehicle can be started
and is free to roll. Hold the brake
pedal down while in this position.
Driving
160
Page 186 of 288
The fuses are coded as follows:
Fuse/Relay
LocationFuse Amp
RatingPassenger Compartment Fuse
Panel Description
1 5A Power mirror switch
2 10A Daytime Running Lights (DRL),
Back-up lamps, Transmission,
Passenger air bag deactivation
switch, Blower motor relay
3 7.5A Right stop/turn trailer tow
connector
4 Ð Not used
5 15A 4x4 control module
6 2A Brake pressure switch
7 7.5A Left stop/turn trailer tow
connector
8 Ð Not used
9 7.5A Brake pedal position switch
10 7.5A Speed control servo/amplifier
assembly, Generic Electronic
Module (GEM), Shift lock
actuator, Turn signals
11 7.5A Instrument cluster, 4x4, Main light
switch, Central Security Module
(CSM)
12 Ð Not used
13 20A Brake pedal position switch
14 10A or Not Used 10A: Anti-lock Brake System
(ABS) Control Module (if
equipped)
15 Ð Not used
16 30A Windshield wiper motor, Wiper
HI/LO relay, Wiper run/park relay
17 20A Cigar lighter, Data Link Connector
(DLC)
Roadside Emergencies
186
Page 189 of 288
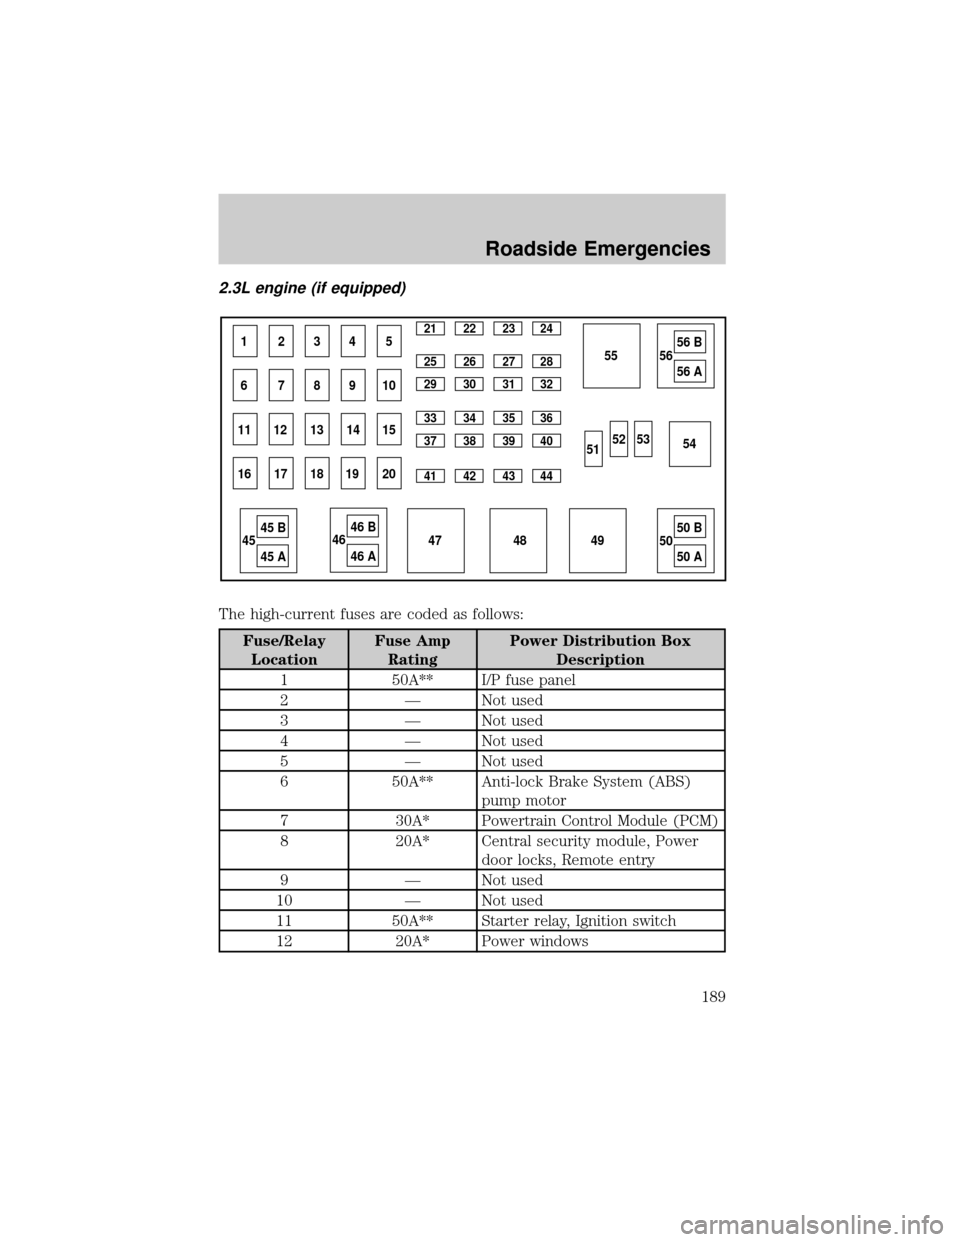
2.3L engine (if equipped)
The high-current fuses are coded as follows:
Fuse/Relay
LocationFuse Amp
RatingPower Distribution Box
Description
1 50A** I/P fuse panel
2 Ð Not used
3 Ð Not used
4 Ð Not used
5 Ð Not used
6 50A** Anti-lock Brake System (ABS)
pump motor
7 30A* Powertrain Control Module (PCM)
8 20A* Central security module, Power
door locks, Remote entry
9 Ð Not used
10 Ð Not used
11 50A** Starter relay, Ignition switch
12 20A* Power windows
1234521 22 23 24
25 26 27 28
29 30 31 32
33 34 35 36
37 38 39 40
41 42 43 44
67891055
49 4854 53 52
515656 B
56 A
5050 B
50 A 47 4545 B
45 A
4646 B
46 A 11 12 13 14 15
16 17 18 19 20
Roadside Emergencies
189
Page 190 of 288

Fuse/Relay
LocationFuse Amp
RatingPower Distribution Box
Description
13 Ð Not used
14 Ð Not used
15 Ð Not used
16 40A** Blower motor
17 20A** Auxiliary cooling fan
18 Ð Not used
19 Ð Not used
20 Ð Not used
21 10A* PCM memory
22 Ð Not used
23 20A* Fuel pump motor
24 30A* Headlamps
25 10A* A/C clutch relay
26 Ð Not used
27 Ð Not used
28 30A* ABS module
29 Ð Not used
30 15A* Trailer Tow
31 20A* Foglamp, Daytime Running Lamps
(DRL)
32 Ð Not used
33 15A* Park lamp, Central security
module
34 Ð Not used
35 Ð Not used
36 Ð Not used
37 Ð Not used
38 10A* Left headlamp low beam
39 Ð Not used
40 Ð Not used
41 20A* Heated oxygen sensors
Roadside Emergencies
190
Page 232 of 288

²Check battery water level (non-maintenance free).
²Check battery connections and clean if necessary.
SERVICE RECOMMENDATIONS
To help you service your vehicle:
²We highlight do-it-yourself items in the engine compartment for easy
location.
²We provide a Scheduled Maintenance section which makes tracking
routine service easy.
If your vehicle requires professional service, your dealership can provide
necessary parts and service. Check your ªWarranty Informationº to find
out which parts and services are covered.
Use only recommended fuels, lubricants, fluids and service parts
conforming to specifications. Genuine Mazda parts are designed and built
to provide the best performance in your vehicle.
PRECAUTIONS WHEN SERVICING YOUR VEHICLE
Be especially careful when inspecting or servicing your vehicle.
²Do not work on a hot engine.
²When the engine is running, make sure that loose clothing, jewelry or
long hair does not get caught up in moving parts.
²Do not work on a vehicle with the engine running in an enclosed
space, unless you are sure you have enough ventilation.
²Keep all lit cigarettes, open flames and other lit material away from
the battery and all fuel related parts.
If you disconnect the battery, the engine must ªrelearnº its idle
conditions before your vehicle will drive properly, as explained in the
Batterysection of this chapter.
Working with the engine off
²Automatic transmission:
1. Set the parking brake and ensure the gearshift is securely latched in
P (Park).
2. Turn off the engine and remove the key.
3. Block the wheels to prevent the vehicle from moving unexpectedly.
Maintenance and Specifications
232
Page 233 of 288
²Manual transmission:
1. Set the parking brake.
2. Depress the clutch and place the gearshift in 1 (First).
3. Turn off the engine and remove the key.
4. Block the wheels to prevent the vehicle from moving unexpectedly.
Working with the engine on
²Automatic transmission:
1. Set the parking brake and ensure the gearshift is securely latched in
P (Park).
2. Block the wheels to prevent the vehicle from moving unexpectedly.
Note:Do not start your engine with the air cleaner removed and do not
remove it while the engine is running.
²Manual transmission:
1. Set the parking brake, depress the clutch and place the gearshift in
neutral.
2. Block the wheels to prevent the vehicle from moving unexpectedly.
Note:Do not start your engine with the air cleaner removed and do not
remove it while the engine is running.
WARNING: The cooling fan is automatic and may come on at
any time. Always disconnect the negative terminal of the
battery before working near the fan.
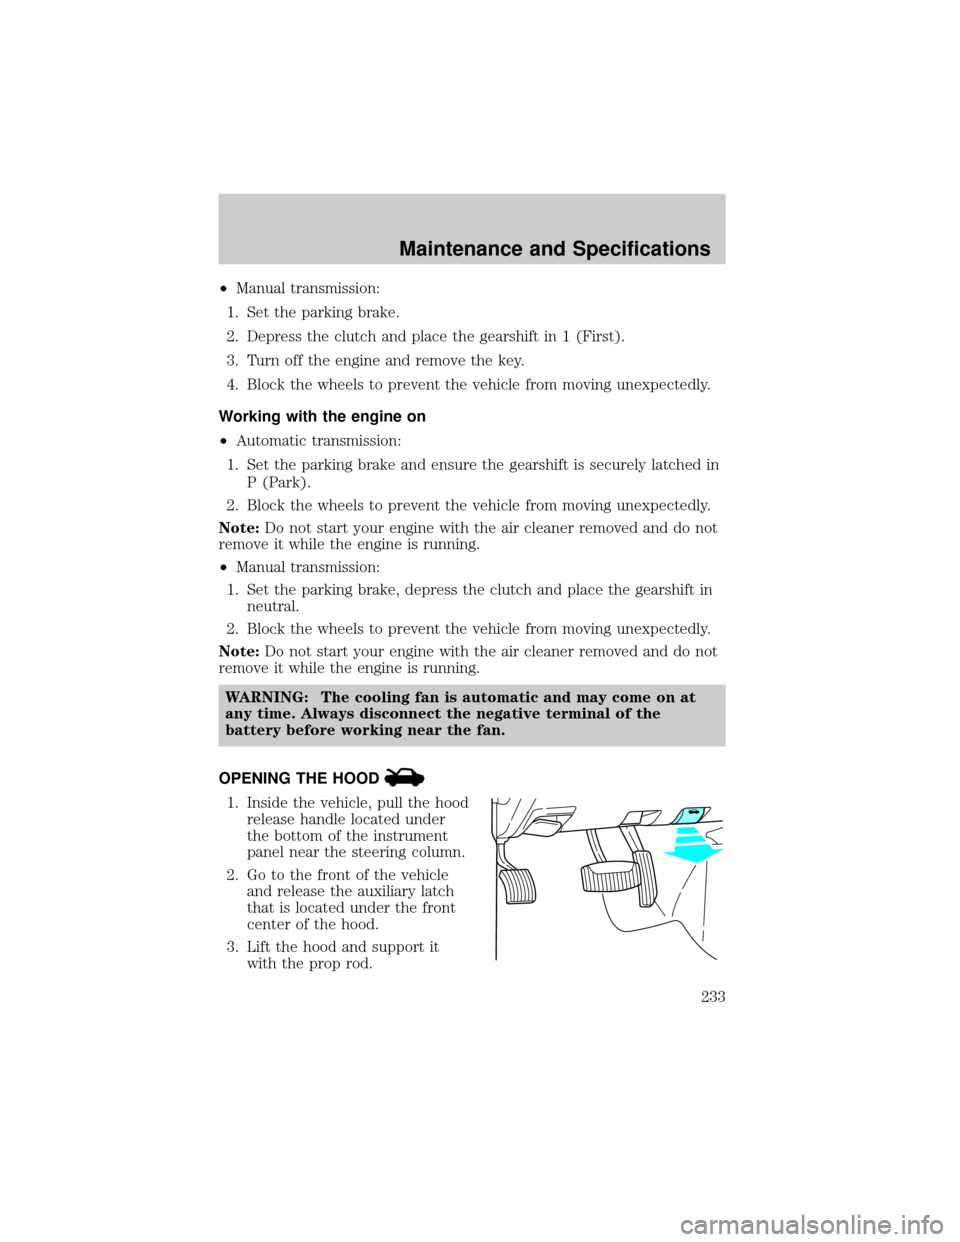
OPENING THE HOOD
1. Inside the vehicle, pull the hood
release handle located under
the bottom of the instrument
panel near the steering column.
2. Go to the front of the vehicle
and release the auxiliary latch
that is located under the front
center of the hood.
3. Lift the hood and support it
with the prop rod.
Maintenance and Specifications
233