lights MAZDA MODEL CX-3 2021 Repair Manual
[x] Cancel search | Manufacturer: MAZDA, Model Year: 2021, Model line: MODEL CX-3, Model: MAZDA MODEL CX-3 2021Pages: 618, PDF Size: 64.58 MB
Page 440 of 618

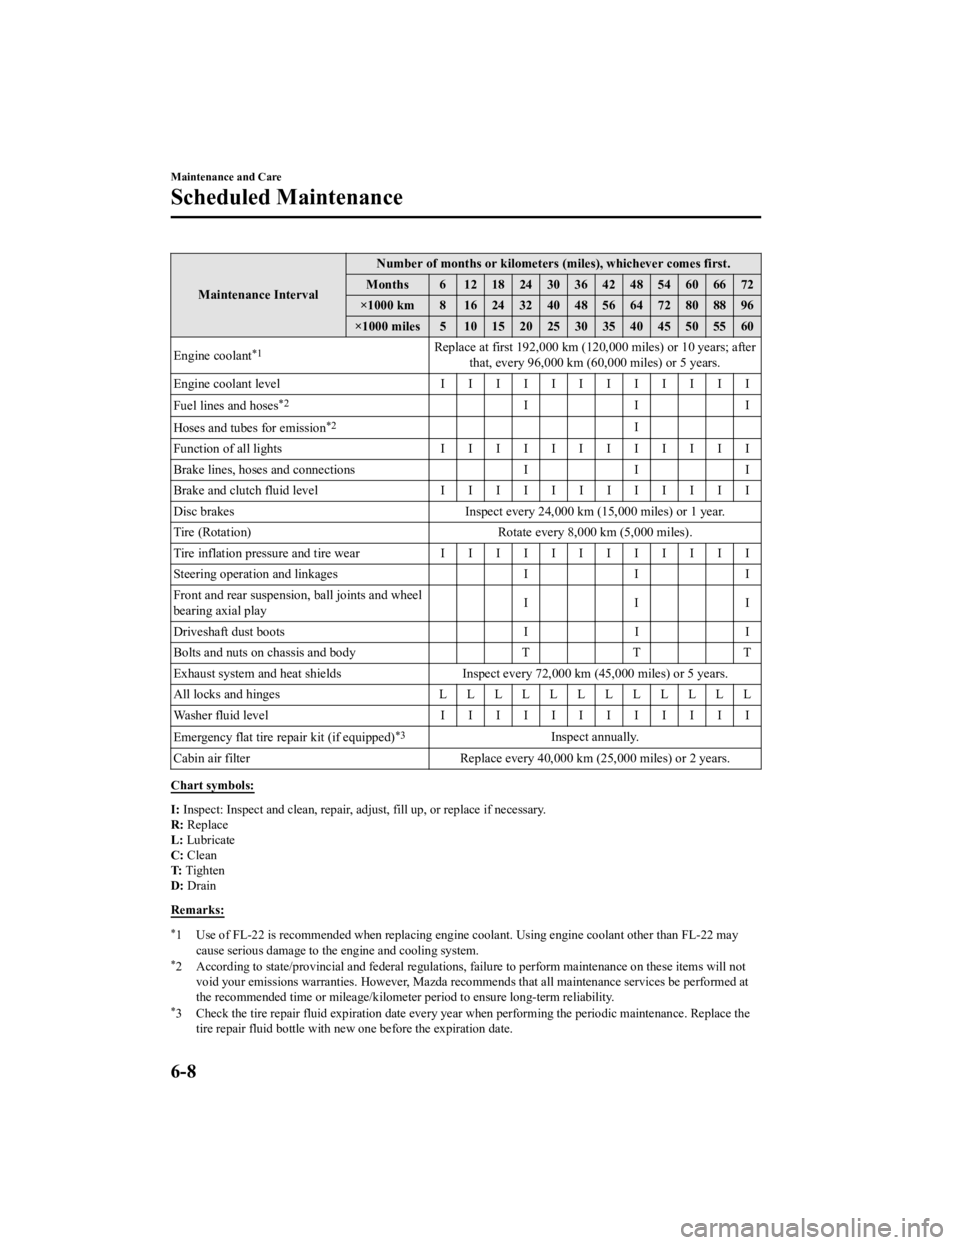
Maintenance IntervalNumber of months or kilometers (miles), whichever comes first.
Months 6 1218243036424854606672
×1000 km 8 1624324048566472808896
×1000 miles 5 10 15 20 25 30 35 40 45 50 55 60
Engine coolant
*1Replace at first 192,000 km (120,000 miles) or 10 years; after
that, every 96,000 km (60,000 miles) or 5 years.
Engine coolant level IIIIIIIIIIII
Fuel lines and hoses
*2III
Hoses and tubes for emission
*2I
Function of all lights IIIIIIIIIIII
Brake lines, hoses and connections II I
Brake and clutch fluid level IIIIIIIIIIII
Disc brakes Inspect every 24,000 km (15,000 miles) or 1 year.
Tire (Rotation) Rotate every 8,000 km (5,000 miles).
Tire inflation pressure and tire wear IIIIIIIIIIII
Steering operation and linkages II I
Front and rear suspension, ball joints and wheel
bearing axial play III
Driveshaft dust boots II I
Bolts and nuts on chassis and body TTT
Exhaust system and heat shields Inspect every 72,000 km (45,000 miles) or 5 years.
All locks and hinges LLLLLLLLLLLL
Washer fluid level IIIIIIIIIIII
Emergency flat tire repair kit (if equipped)
*3Inspect annually.
Cabin air filter Replace every 40,000 km (25,000 miles) or 2 years.
Chart symbols:
I: Inspect: Inspect and clean, repair, ad just, fill up, or replace if necessary.
R: Replace
L: Lubricate
C: Clean
T: Tighten
D: Drain
Remarks:
*1 Use of FL-22 is recommended when replacing engine coolant. Using engine coolant other than FL-22 may
cause serious damage to the engine and cooling system.
*2 According to state/provincial and fede ral regulations, failure to perform maintenance on these items will not
void your emissions warranties. However, Mazda recomme nds that all maintenance services be performed at
the recommended time or mileage/kilometer period to ensure long-term reliability.
*3 Check the tire repair fluid expiration date every year when performing the periodic maintenance. Replace the
tire repair fluid bottle with new one before the expiration date.
Maintenance and Care
Scheduled Maintenance
6-8
CX-3_8JL1-EA-20G_Edition1_old 2020-5-22 15:31:00
Page 443 of 618

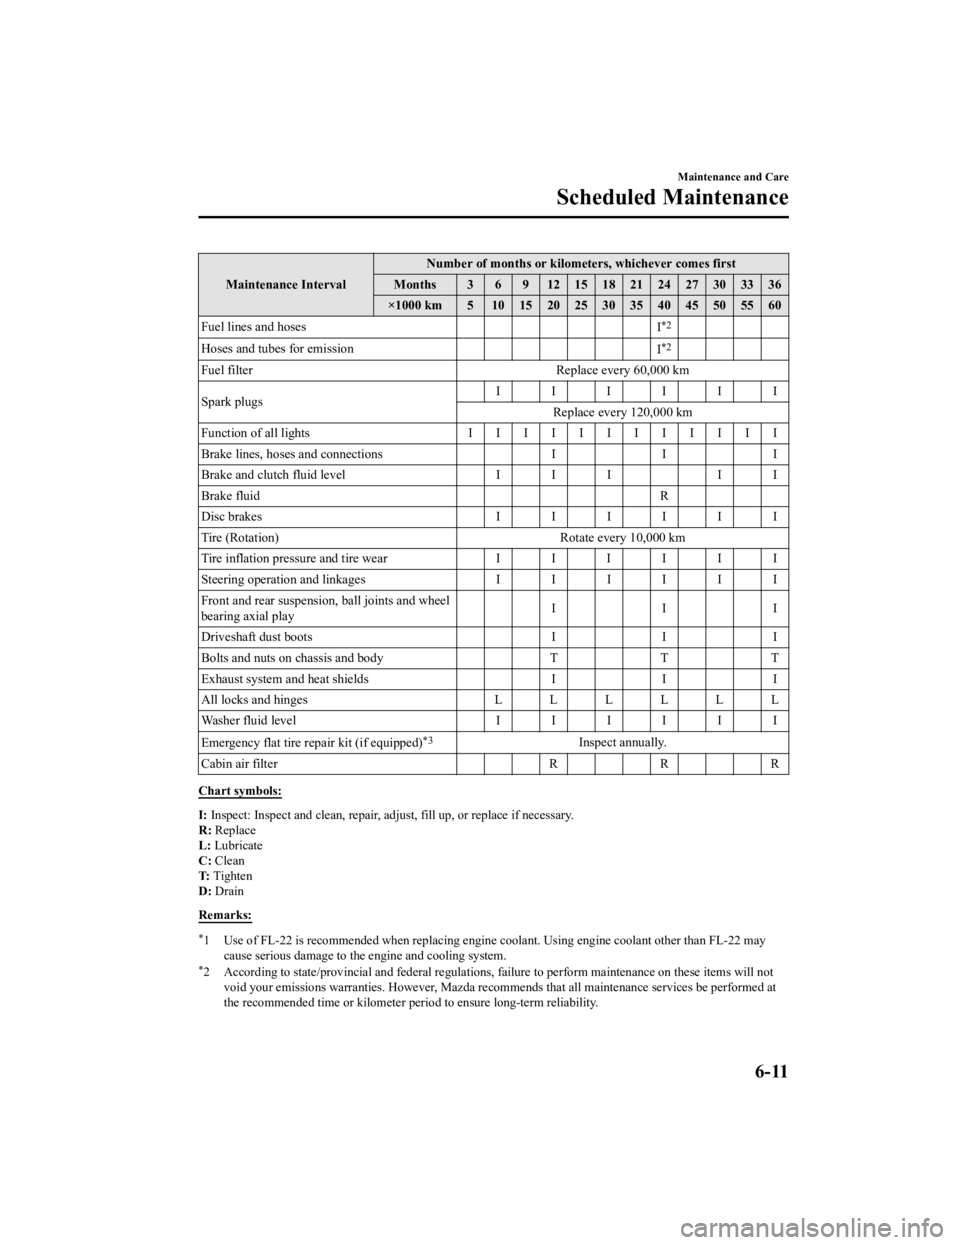
Maintenance IntervalNumber of months or kilometers, whichever comes first
Months 3 6 9 121518212427303336
×1000 km 5 1015202530354045505560
Fuel lines and hoses I
*2
Hoses and tubes for emission
I*2
Fuel filterReplace every 60,000 km
Spark plugs IIIIII
Replace every 120,000 km
Function of all lights I I I I I I I I I I I I
Brake lines, hoses and connections III
Brake and clutch fluid level I I II I
Brake fluid R
Disc brakes IIIIII
Tire (Rotation) Rotate every 10,000 km
Tire inflation pressure and tire wear IIIIII
Steering operation and linkages IIIIII
Front and rear suspensi on, ball joints and wheel
bearing axial play III
Driveshaft dust boots III
Bolts and nuts on chassis and body TT T
Exhaust system and heat shields III
All locks and hinges LLLLLL
Washer fluid level IIIIII
Emergency flat tire repair kit (if equipped)
*3Inspect annually.
Cabin air filter R R R
Chart symbols:
I: Inspect: Inspect and clean, repair, adju st, fill up, or replace if necessary.
R: Replace
L: Lubricate
C: Clean
T: Tighten
D: Drain
Remarks:
*1 Use of FL-22 is recommended when replacing engine coolant. Using engine coolant other than FL-22 may cause serious damage to the engine and cooling system.
*2 According to state/provincial and federal regulations , failure to perform maintenance on these items will not
void your emissions warranties. However, Mazda recomme nds that all maintenance services be performed at
the recommended time or kilometer period to ensure long-term reliability.
Maintenance and Care
Scheduled Maintenance
6-11
CX-3_8JL1-EA-20G_Edition1_old 2020-5-22 15:31:00
Page 444 of 618

*3 Check the tire repair fluid expiration date every year when performing the periodic maintenance. Replace the
tire repair fluid bottle with new one before the expiration date.
(Cont.)
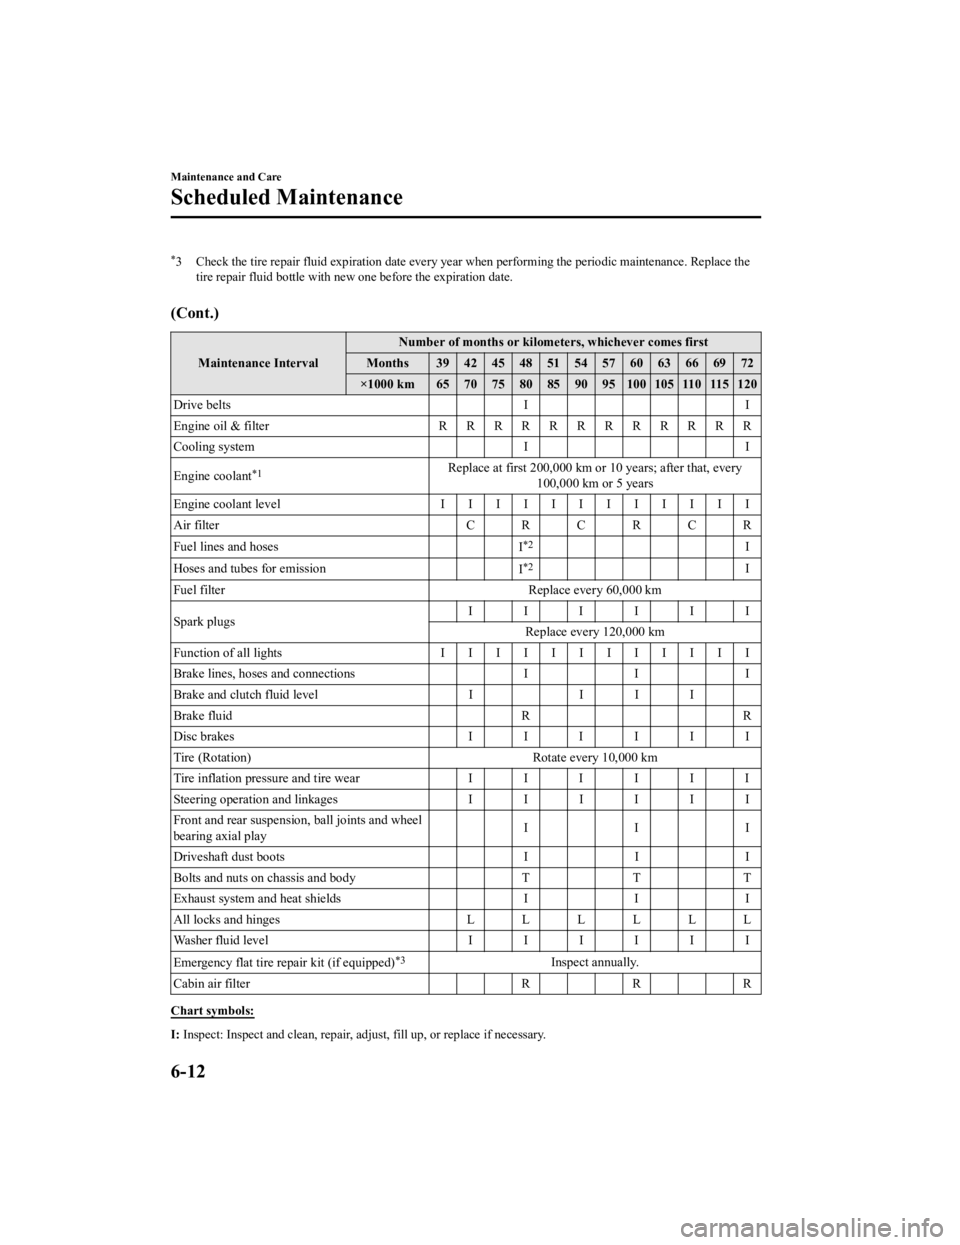
Maintenance Interval Number of months or kilometers, whichever comes first
Months 39 42 45 48 51 54 57 60 63 66 69 72
×1000 km 65 70 75 80 85 90 95 100 105 110 115 120
Drive belts II
Engine oil & filter RRRRRRRRRRRR
Cooling system II
Engine coolant
*1Replace at first 200,000 km or 10 years; after that, every 100,000 km or 5 years
Engine coolant level IIIIIIIIIIII
Air filter CRCRCR
Fuel lines and hoses I
*2I
Hoses and tubes for emission I
*2I
Fuel filter Replace every 60,000 km
Spark plugs IIIIII
Replace every 120,000 km
Function of all lights IIIIIIIIIIII
Brake lines, hoses and connections II I
Brake and clutch fluid level II I I
Brake fluid RR
Disc brakes IIIIII
Tire (Rotation) Rotate every 10,000 km
Tire inflation pressure and tire wear IIIIII
Steering operation and linkages IIIIII
Front and rear suspension, ball joints and wheel
bearing axial play III
Driveshaft dust boots II I
Bolts and nuts on chassis and body TTT
Exhaust system and heat shields II I
All locks and hinges LLLLLL
Washer fluid level IIIIII
Emergency flat tire repair kit (if equipped)
*3Inspect annually.
Cabin air filter R R R
Chart symbols:
I: Inspect: Inspect and clean, repair, ad just, fill up, or replace if necessary.
Maintenance and Care
Scheduled Maintenance
6-12
CX-3_8JL1-EA-20G_Edition1_old 2020-5-22 15:31:00
Page 472 of 618

Light Bulbs
With LED HeadlightsWith Halogen Headlights
Overhead lights (Front) /Map lights
Overhead lights (Rear)Overhead lights (Front) /Map lights
Headlights (High
beam)/Daytime running
lights
Headlights (Low beam)
Parking lights/Daytime
running lights Side turn signal lights
Fog lights
Parking lights/Front
side-marker lights
Front side-marker lights
Front turn signal lights
Luggage compartment light
License plate lights Reverse lights Taillights
Rear turn signal lights Rear side-marker lights
Brake lights/Taillights High-mount brake light
Some models.
Side turn signal lights
Headlights (High beam)
Headlights (Low beam)
Fog lights
Front turn signal lights
Maintenance and Care
Owner Maintenance
6-40
CX-3_8JL1-EA-20G_Edition1_old 2020-5-22 15:31:00
Page 473 of 618

WARNING
Never touch the glass portion of a halogen
bulb with your bare hands and always
wear eye protection when handling or
working around the bulbs:
When a halogen bulb breaks, it is
dangerous. These bulbs contain
pressurized gas. If one is broken, it will
explode and serious injuries could be
caused by the flying glass.
If the glass portion is touched with bare
hands, body oil could cause the bulb to
overheat and explode when lit.
Always keep halogen bulbs out of the reach
of children:
Playing with a halogen bulb is dangerous.
Serious injuries could be caused by
dropping a halogen bulb or breaking it
some other way.
CAUTION
When removing the lens or lamp unit using
a flathead screwdriver, make sure that the
flathead screwdriver does not contact the
interior terminal. If the flathead screwdriver
contacts the terminal, a short circuit may
occur.
NOTE
To replace the bulb, contact an
Authorized Mazda Dealer.
If the halogen bulb is accidentally
touched, it should be cleaned with
rubbing alcohol before being used.
Use the protective cover and carton for
the replacement bulb to dispose of the
old bulb promptly and out of the reach
of children.
▼Replacing Exterior Light Bulbs
Headlights (With LED headlights)
The LED bulb cannot be replaced as a
single unit because it is an integrated unit.
The LED bulb has to be replaced with the
unit. We recommend an Authorized
Mazda Dealer when the replacement is
necessary.
Headlights/Daytime running lights
(With halogen headlights)
High-beams bulbs/Daytime running
lights
1. Make sure the ignition is switched off,
and the headlight switch is off.
2. Lift the hood.
3. Disconnect the connector from the unit by pressing the tab on the connector
with your finger and pulling the
connector downward.
4. Turn the socket and bulb assembly toremove it. Carefully remove the bulb
from its socket in the reflector by
Maintenance and Care
Owner Maintenance
6-41
CX-3_8JL1-EA-20G_Edition1_old 2020-5-22 15:31:00
Page 474 of 618

gently pulling it straight backward out
of the socket.
5. Install the new bulb in the reverseorder of the removal procedure.
Low-beam bulbs
1. Make sure the ignition is switched off, and the headlight switch is off.
2. Lift the hood.
3. Disconnect the connector from the unit by pressing the tab on the connector
with your finger and pulling the
connector downward.
4. Turn the socket and bulb assembly toremove it. Carefully remove the bulb
from its socket in the reflector by
gently pulling it straight backward out
of the socket.
5. Install the new bulb in the reverse
order of the removal procedure.
Parking lights/Daytime running lights/
Front side-marker lights (With LED
headlights)
The LED bulb cannot be replaced as a
single unit because it is an integrated unit.
The LED bulb has to be replaced with the
unit. We recommend an Authorized
Mazda Dealer when the replacement is
necessary.
Parking lights/Front side-marker lights
(With halogen headlights)
1. Make sure the ignition is switched off, and the headlight switch is off.
2. Turn the socket and bulb assembly counterclockwise and remove it.
Maintenance and Care
Owner Maintenance
6-42
CX-3_8JL1-EA-20G_Edition1_old 2020-5-22 15:31:00
Page 475 of 618

3. Disconnect the bulb from the socket.
4. Install the new bulb in the reverseorder of the removal procedure.
Front turn signal lights
1. Make sure the ignition is switched off, and the headlight switch is off.
2. Turn the screw counterclockwise and remove it, and then partially peel back
the mudguard.
3. Turn the socket and bulb assembly
counterclockwise and remove it.
4. Disconnect the bulb from the socket.
5. Install the new bulb in the reverseorder of the removal procedure.
Fog lights
*, Side turn signal lights*,
Brake lights/Taillights (LED type), Rear
side-marker lights (LED type),Taillights
(LED type)*, High-mount brake light,
Reverse lights (LED type)
The LED bulb cannot be replaced as a
single unit because it is an integrated unit.
The LED bulb has to be replaced with the
unit. We recommend an Authorized
Mazda Dealer when the replacement is
necessary.
Rear turn signal lights, Brake lights/
Taillights (Bulb type), Rear side-marker
lights (Bulb type)
1. Make sure the ignition is switched off, and the headlight switch is off.
Maintenance and Care
Owner Maintenance
*Some models.6-43
CX-3_8JL1-EA-20G_Edition1_old 2020-5-22 15:31:00
Page 476 of 618

2. Turn the bolts counterclockwise andremove them.
3. Pull the unit rearward to remove it.
4. Turn the socket and bulb assemblycounterclockwise and remove it.
5. Disconnect the bulb from the socket.
Rear turn signal lights
Brake lights/Taillights
Rear side-marker lights
6. Install the new bulb in the reverse order of the removal procedure.
Maintenance and Care
Owner Maintenance
6-44
CX-3_8JL1-EA-20G_Edition1_old 2020-5-22 15:31:00
Page 477 of 618

Reverse lights (Bulb type)
1. Make sure the ignition is switched off,and the headlight switch is off.
2. Remove the cover.
3. Turn the socket and bulb assembly
counterclockwise and remove it.
4. Disconnect the bulb from the socket.
5. Install the new bulb in the reverseorder of the removal procedure.
License plate lights
1. Make sure the ignition is switched off, and the headlight switch is off.
2. Remove the cover.
3. Turn the socket and bulb assemblycounterclockwise and remove it.
4. Disconnect the bulb from the socket.
5. Install the new bulb in the reverse
order of the removal procedure.
▼Replacing Interior Light Bulbs
Overhead lights (Front)/Map lights,
Overhead lights (Rear)
1. Wrap a small flathead screwdriver with
a soft cloth to prevent damage to the
lens, and then remove the lens by
carefully prying on the edge of the lens
with the flathead screwdriver.
2. Disconnect the bulb by pulling it out.
Maintenance and Care
Owner Maintenance
6-45
CX-3_8JL1-EA-20G_Edition1_old 2020-5-22 15:31:00
Page 478 of 618

Overhead lights (Front)/Map lights
Overhead lights (Rear)
Edge
3. Install the new bulb in the reverseorder of the removal procedure.
Luggage compartment light
1. Wrap a small flathead screwdriver with
a soft cloth to prevent damage to the
lens and remove the lens unit by
carefully prying on the edge of the lens
unit with the fla thead screwdriver.
2. Disconnect the bulb by pulling it out.
3. Install the new bulb in the reverse
order of the removal procedure.
Maintenance and Care
Owner Maintenance
6-46
CX-3_8JL1-EA-20G_Edition1_old 2020-5-22 15:31:00