lock MAZDA MODEL CX-5 2014 (in English) User Guide
[x] Cancel search | Manufacturer: MAZDA, Model Year: 2014, Model line: MODEL CX-5, Model: MAZDA MODEL CX-5 2014Pages: 528, PDF Size: 7.97 MB
Page 29 of 528
Black plate (29,1)
Seat Belt
qFastening the Seat Belt
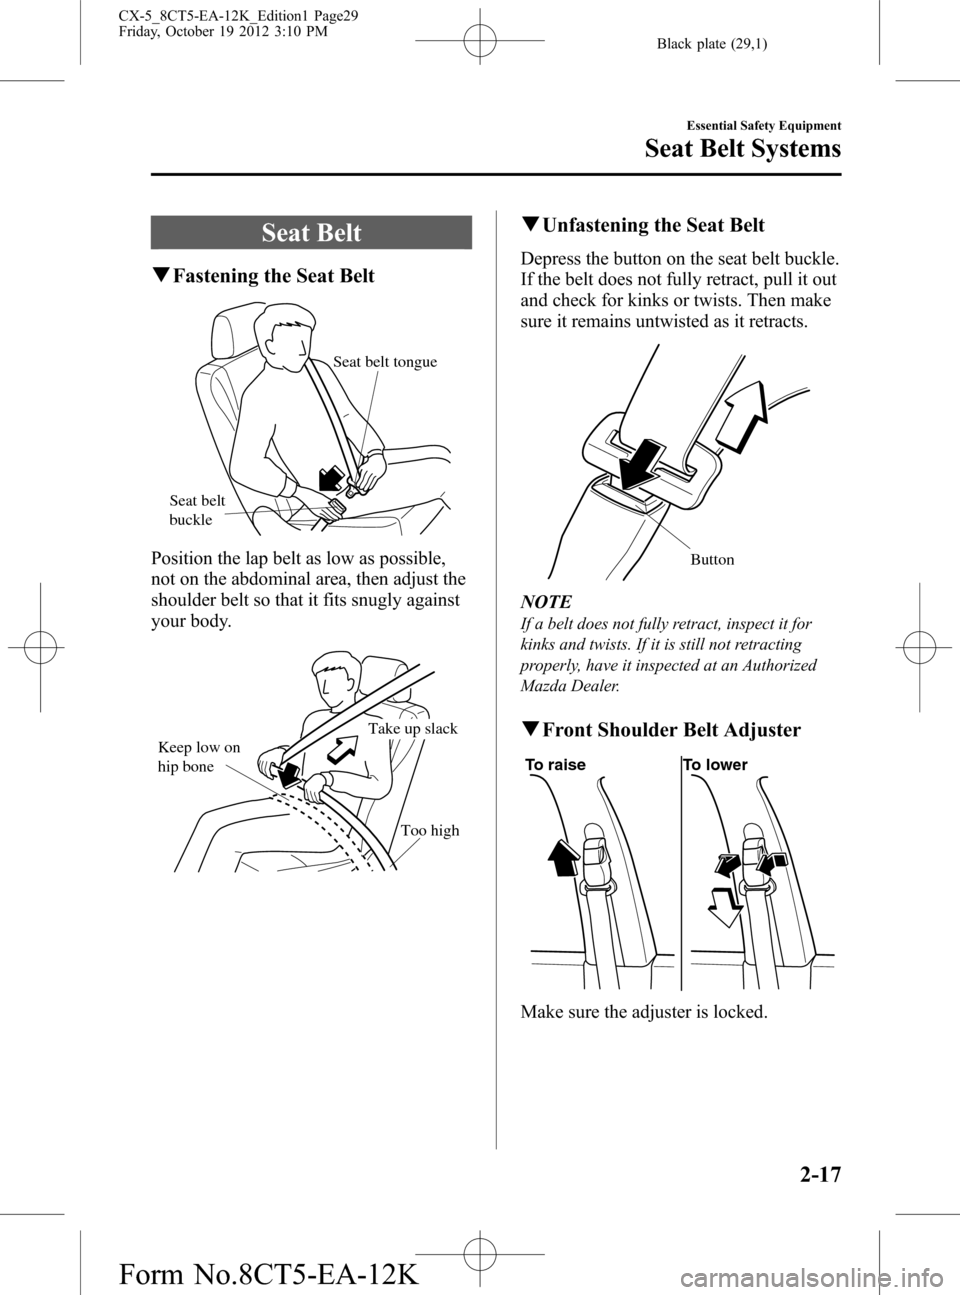
Seat belt
buckleSeat belt tongue
Position the lap belt as low as possible,
not on the abdominal area, then adjust the
shoulder belt so that it fits snugly against
your body.
Keep low on
hip bone
Too highTake up slack
qUnfastening the Seat Belt
Depress the button on the seat belt buckle.
If the belt does not fully retract, pull it out
and check for kinks or twists. Then make
sure it remains untwisted as it retracts.
Button
NOTE
If a belt does not fully retract, inspect it for
kinks and twists. If it is still not retracting
properly, have it inspected at an Authorized
Mazda Dealer.
qFront Shoulder Belt Adjuster
To raise To lower
Make sure the adjuster is locked.
Essential Safety Equipment
Seat Belt Systems
2-17
CX-5_8CT5-EA-12K_Edition1 Page29
Friday, October 19 2012 3:10 PM
Form No.8CT5-EA-12K
Page 38 of 528
Black plate (38,1)
Seating a child in a child-restraint system on the front passenger seat is dangerous
under certain conditions (With Front Passenger Occupant Classification System):
Your vehicle is equipped with front passenger seat weight sensors. Even with the
front passenger seat weight sensors, if you must use the front passenger seat to seat
a child, using a child-restraint system on the front passenger seat under the
following conditions increases the danger of the front passenger air bag deploying
and could result in serious injury or death to the child.
ØThe front passenger air bag deactivation indicator light does not illuminate when
seating a child in the child-restraint system.
ØLuggage or other items are placed on the seat with the child in the child-restraint
system.
ØA rear passenger or luggage pushing or pulling down on the front passenger
seatback.
ØA rear passenger puts their feet on the front seat rails.
ØLuggage or other items are placed on the seatback or hung on the head restraint.
ØHeavy items are placed in the seatback map pocket.
ØThe seat is washed.
ØLiquids are spilled on the seat.
ØThe front passenger seat is moved backward, pushing into luggage or other items
placed behind it.
ØThe front passenger seatback contacts the rear seat.
ØLuggage or other items are placed between the front passenger seat and driver
seat.
ØAny accessories, which might increase the total seated weight on the front
passenger seat, are attached to the front passenger seat.
The designated positions with seat belts on the rear seats are the safest places for
children. Always use seat belts and child restraints.
Do not allow a child or anyone to lean over or against the side window of a vehicle
with side and curtain air bags:
It is dangerous to allow anyone to lean over or against the side window, the area of
the front passenger seat, the front and rear window pillars and the roof edge along
both sides from which the side and curtain air bags deploy, even if a child-restraint
system is used. The impact of inflation from a side or curtain air bag could cause
serious injury or death to an out of position child. Furthermore, leaning over or
against the front door could block the side and curtain air bags and eliminate the
advantages of supplemental protection. With the front air bag and the additional
side air bag that comes out of the front seat, the rear seat is always a better location
for children. Take special care not to allow a child to lean over or against the side
window, even if the child is seated in a child-restraint system.
2-26
Essential Safety Equipment
Child Restraint
CX-5_8CT5-EA-12K_Edition1 Page38
Friday, October 19 2012 3:10 PM
Form No.8CT5-EA-12K
Page 43 of 528
Black plate (43,1)
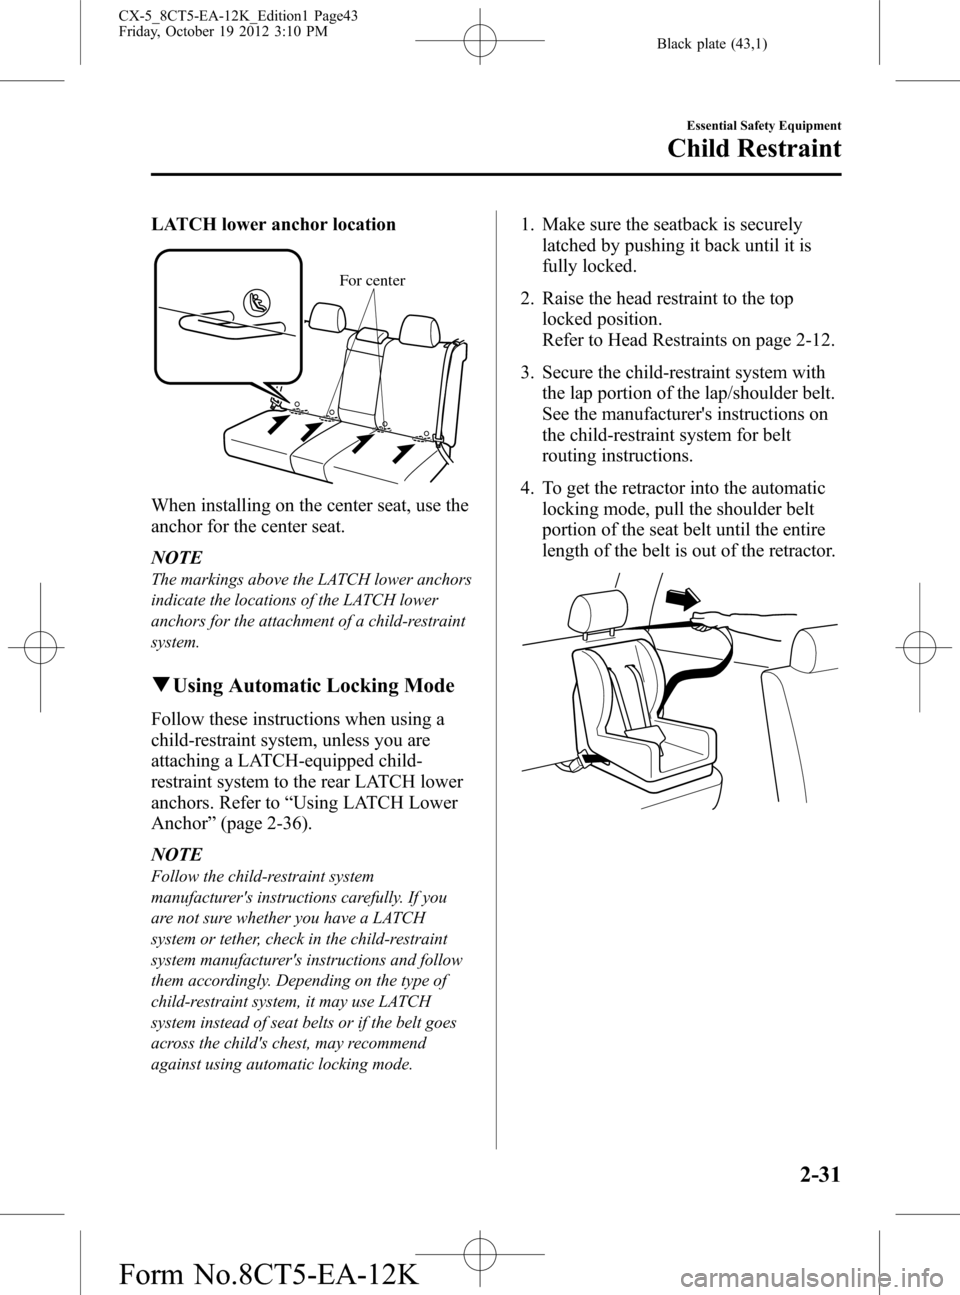
LATCH lower anchor location
For center
When installing on the center seat, use the
anchor for the center seat.
NOTE
The markings above the LATCH lower anchors
indicate the locations of the LATCH lower
anchors for the attachment of a child-restraint
system.
qUsing Automatic Locking Mode
Follow these instructions when using a
child-restraint system, unless you are
attaching a LATCH-equipped child-
restraint system to the rear LATCH lower
anchors. Refer to“Using LATCH Lower
Anchor”(page 2-36).
NOTE
Follow the child-restraint system
manufacturer's instructions carefully. If you
are not sure whether you have a LATCH
system or tether, check in the child-restraint
system manufacturer's instructions and follow
them accordingly. Depending on the type of
child-restraint system, it may use LATCH
system instead of seat belts or if the belt goes
across the child's chest, may recommend
against using automatic locking mode.
1. Make sure the seatback is securely
latched by pushing it back until it is
fully locked.
2. Raise the head restraint to the top
locked position.
Refer to Head Restraints on page 2-12.
3. Secure the child-restraint system with
the lap portion of the lap/shoulder belt.
See the manufacturer's instructions on
the child-restraint system for belt
routing instructions.
4. To get the retractor into the automatic
locking mode, pull the shoulder belt
portion of the seat belt until the entire
length of the belt is out of the retractor.
Essential Safety Equipment
Child Restraint
2-31
CX-5_8CT5-EA-12K_Edition1 Page43
Friday, October 19 2012 3:10 PM
Form No.8CT5-EA-12K
Page 44 of 528
Black plate (44,1)
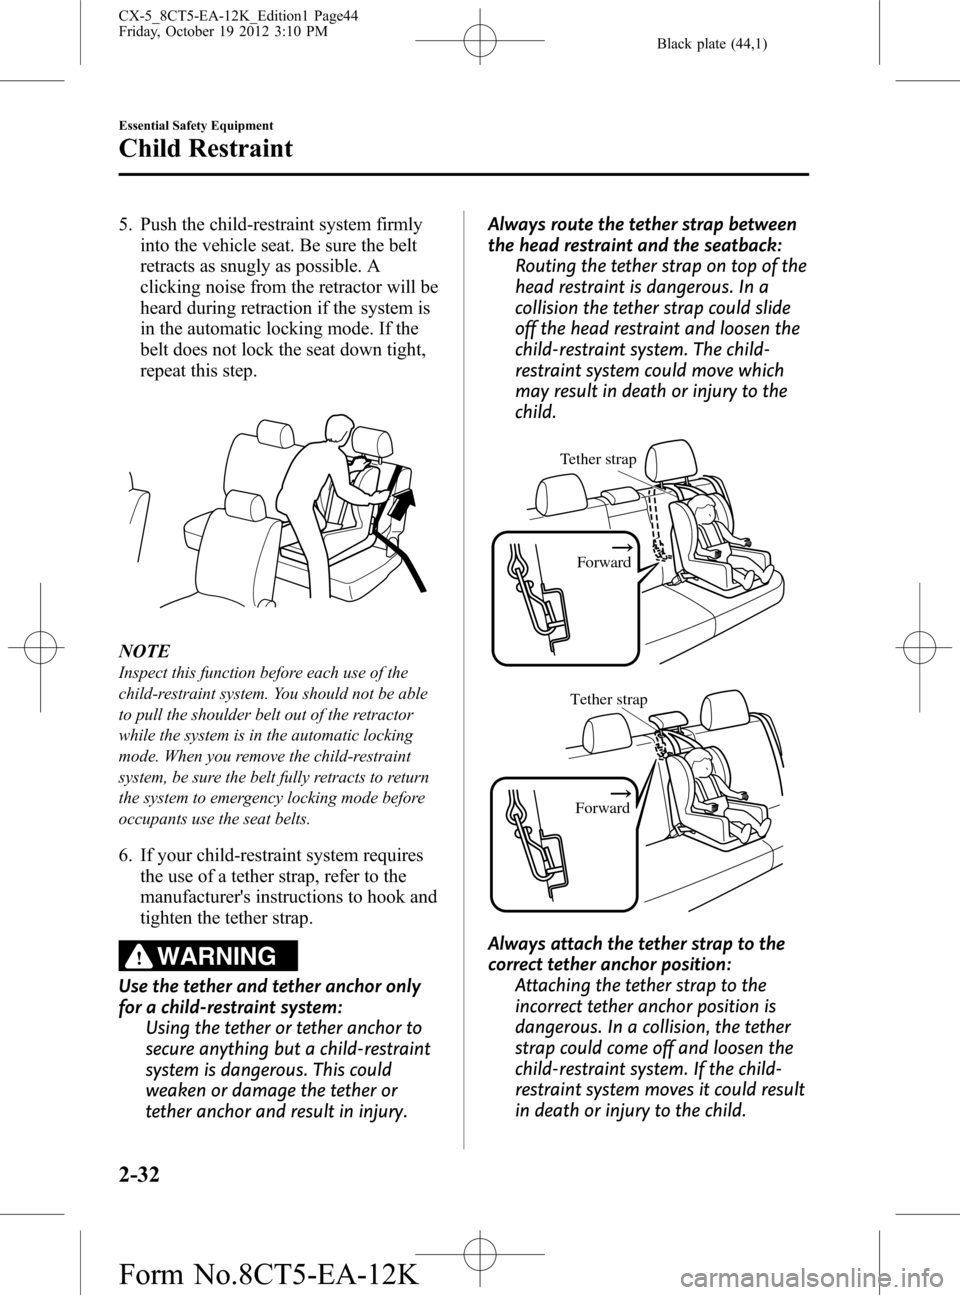
5. Push the child-restraint system firmly
into the vehicle seat. Be sure the belt
retracts as snugly as possible. A
clicking noise from the retractor will be
heard during retraction if the system is
in the automatic locking mode. If the
belt does not lock the seat down tight,
repeat this step.
NOTE
Inspect this function before each use of the
child-restraint system. You should not be able
to pull the shoulder belt out of the retractor
while the system is in the automatic locking
mode. When you remove the child-restraint
system, be sure the belt fully retracts to return
the system to emergency locking mode before
occupants use the seat belts.
6. If your child-restraint system requires
the use of a tether strap, refer to the
manufacturer's instructions to hook and
tighten the tether strap.
WARNING
Use the tether and tether anchor only
for a child-restraint system:
Using the tether or tether anchor to
secure anything but a child-restraint
system is dangerous. This could
weaken or damage the tether or
tether anchor and result in injury.Always route the tether strap between
the head restraint and the seatback:
Routing the tether strap on top of the
head restraint is dangerous. In a
collision the tether strap could slide
off the head restraint and loosen the
child-restraint system. The child-
restraint system could move which
may result in death or injury to the
child.
Tether strap
Forward
Tether strap
Forward
Always attach the tether strap to the
correct tether anchor position:
Attaching the tether strap to the
incorrect tether anchor position is
dangerous. In a collision, the tether
strap could come off and loosen the
child-restraint system. If the child-
restraint system moves it could result
in death or injury to the child.
2-32
Essential Safety Equipment
Child Restraint
CX-5_8CT5-EA-12K_Edition1 Page44
Friday, October 19 2012 3:10 PM
Form No.8CT5-EA-12K
Page 46 of 528
Black plate (46,1)
Do not allow a child or anyone to lean
over or against the side window of a
vehicle with side and curtain air bags:
It is dangerous to allow anyone to
lean over or against the side window,
the area of the front passenger seat,
the front and rear window pillars and
the roof edge along both sides from
which the side and curtain air bags
deploy, even if a child-restraint
system is used. The impact of
inflation from a side or curtain air
bag could cause serious injury or
death to an out of position child.
Furthermore, leaning over or against
the front door could block the side
and curtain air bags and eliminate
the advantages of supplemental
protection. With the front air bag and
the additional side air bag that
comes out of the front seat, the rear
seat is always a better location for
children. Take special care not to
allow a child to lean over or against
the side window, even if the child is
seated in a child-restraint system.
Front Passenger's Seat Child-Restraint
System Installation (With automatic
locking mode seat belt)
1. Switch the ignition ON.2. Slide the seat as far back as possible.
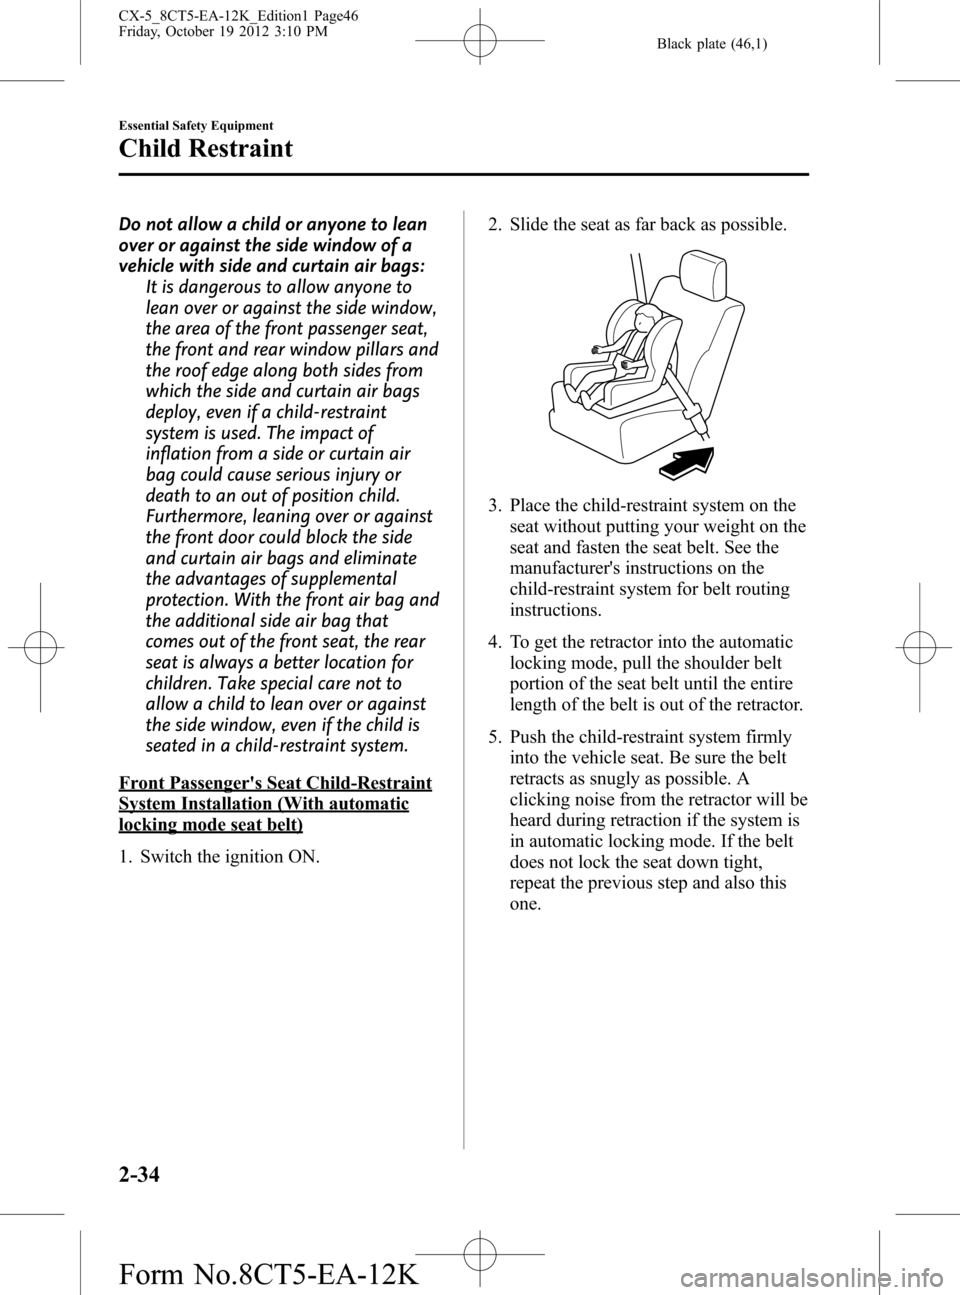
3. Place the child-restraint system on the
seat without putting your weight on the
seat and fasten the seat belt. See the
manufacturer's instructions on the
child-restraint system for belt routing
instructions.
4. To get the retractor into the automatic
locking mode, pull the shoulder belt
portion of the seat belt until the entire
length of the belt is out of the retractor.
5. Push the child-restraint system firmly
into the vehicle seat. Be sure the belt
retracts as snugly as possible. A
clicking noise from the retractor will be
heard during retraction if the system is
in automatic locking mode. If the belt
does not lock the seat down tight,
repeat the previous step and also this
one.
2-34
Essential Safety Equipment
Child Restraint
CX-5_8CT5-EA-12K_Edition1 Page46
Friday, October 19 2012 3:10 PM
Form No.8CT5-EA-12K
Page 47 of 528
Black plate (47,1)
NOTElInspect this function before each use of the
child-restraint system. You should not be
able to pull the shoulder belt out of the
retractor while the system is in the
automatic locking mode. When you remove
the child-restraint system, be sure the belt
fully retracts to return the system to
emergency locking mode before occupants
use the seat belts.
lFollow the child-restraint system
manufacturer's instructions carefully.
Depending on the type of child-restraint
system, it may not employ seat belts which
are in automatic locking mode.
6. Seat your child safely in the child-
restraint system and secure the child
according to the instructions from the
child-restraint system manufacturer.
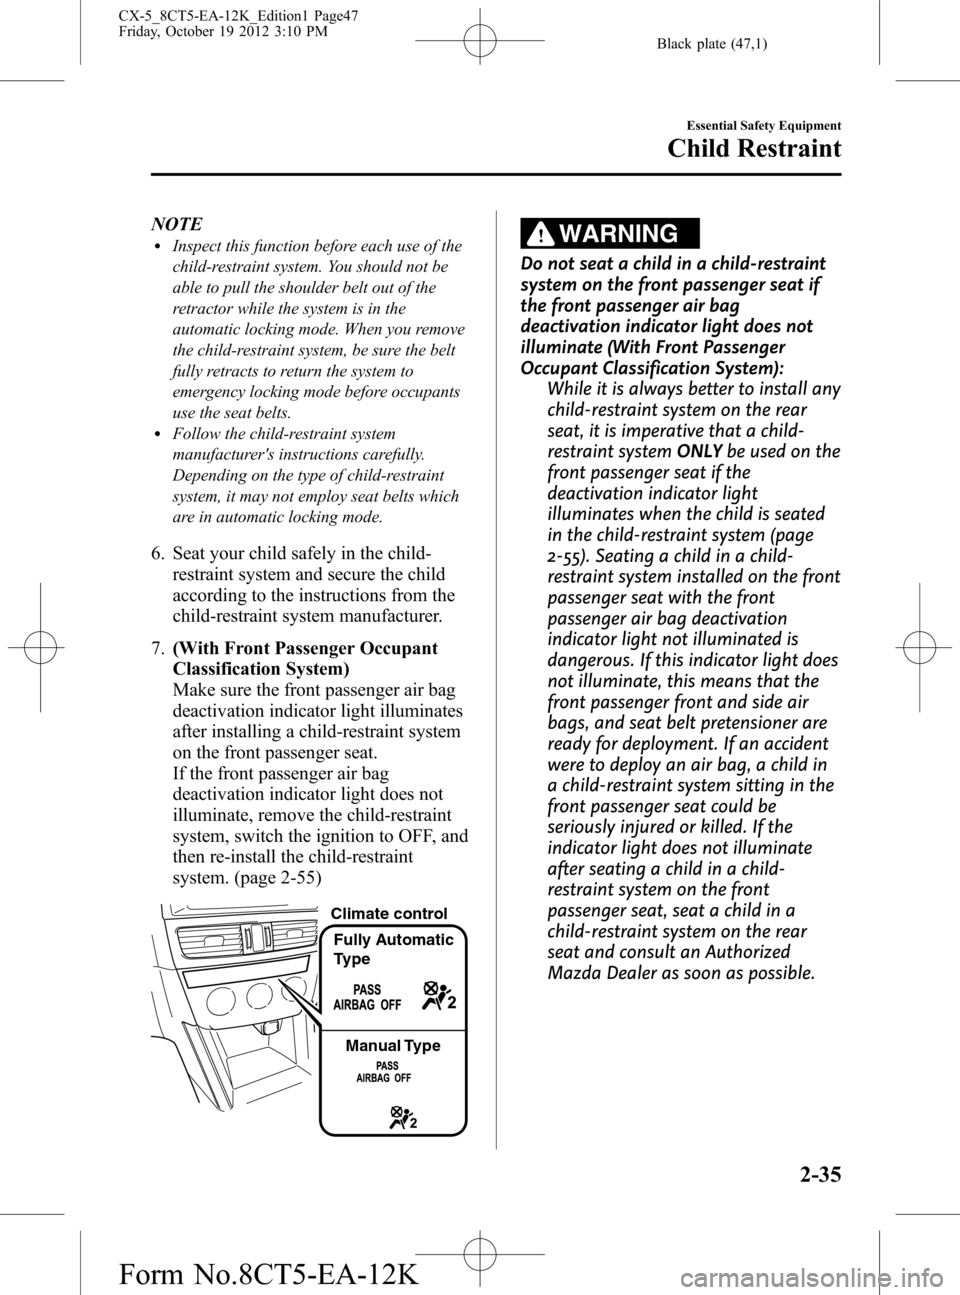
7.(With Front Passenger Occupant
Classification System)
Make sure the front passenger air bag
deactivation indicator light illuminates
after installing a child-restraint system
on the front passenger seat.
If the front passenger air bag
deactivation indicator light does not
illuminate, remove the child-restraint
system, switch the ignition to OFF, and
then re-install the child-restraint
system. (page 2-55)
Climate control
Fully Automatic
Type
Manual Type
WARNING
Do not seat a child in a child-restraint
system on the front passenger seat if
the front passenger air bag
deactivation indicator light does not
illuminate (With Front Passenger
Occupant Classification System):
While it is always better to install any
child-restraint system on the rear
seat, it is imperative that a child-
restraint systemONLYbe used on the
front passenger seat if the
deactivation indicator light
illuminates when the child is seated
in the child-restraint system (page
2-55). Seating a child in a child-
restraint system installed on the front
passenger seat with the front
passenger air bag deactivation
indicator light not illuminated is
dangerous. If this indicator light does
not illuminate, this means that the
front passenger front and side air
bags, and seat belt pretensioner are
ready for deployment. If an accident
were to deploy an air bag, a child in
a child-restraint system sitting in the
front passenger seat could be
seriously injured or killed. If the
indicator light does not illuminate
after seating a child in a child-
restraint system on the front
passenger seat, seat a child in a
child-restraint system on the rear
seat and consult an Authorized
Mazda Dealer as soon as possible.
Essential Safety Equipment
Child Restraint
2-35
CX-5_8CT5-EA-12K_Edition1 Page47
Friday, October 19 2012 3:10 PM
Form No.8CT5-EA-12K
Page 49 of 528
Black plate (49,1)
Installation on rear outboard seats
1. First, adjust the front seat to allow
clearance between the child-restraint
system and the front seat (page 2-4).
2. Make sure the seatback is securely
latched by pushing it back until it is
fully locked.
3. Expand the area between the seat
bottom and the seatback slightly to
verify the locations of the LATCH
lower anchors(page 2-29).
4. Raise the head restraint to the top
locked position.
Refer to Head Restraints on page 2-12.
5. Secure the child-restraint system using
BOTH LATCH lower anchors,
following the child-restraint system
manufacturer's instruction. Pull on the
child-restraint to be sure both anchors
are engaged.
6. If your child-restraint system came
equipped with a tether, that means it is
very important to properly secure the
tether for child safety. Please carefully
follow the child-restraint system
manufacturer's instructions when
installing tethers.WARNING
Use the tether and tether anchor only
for a child-restraint system:
Using the tether or tether anchor to
secure anything but a child-restraint
system is dangerous. This could
weaken or damage the tether or
tether anchor and result in injury.
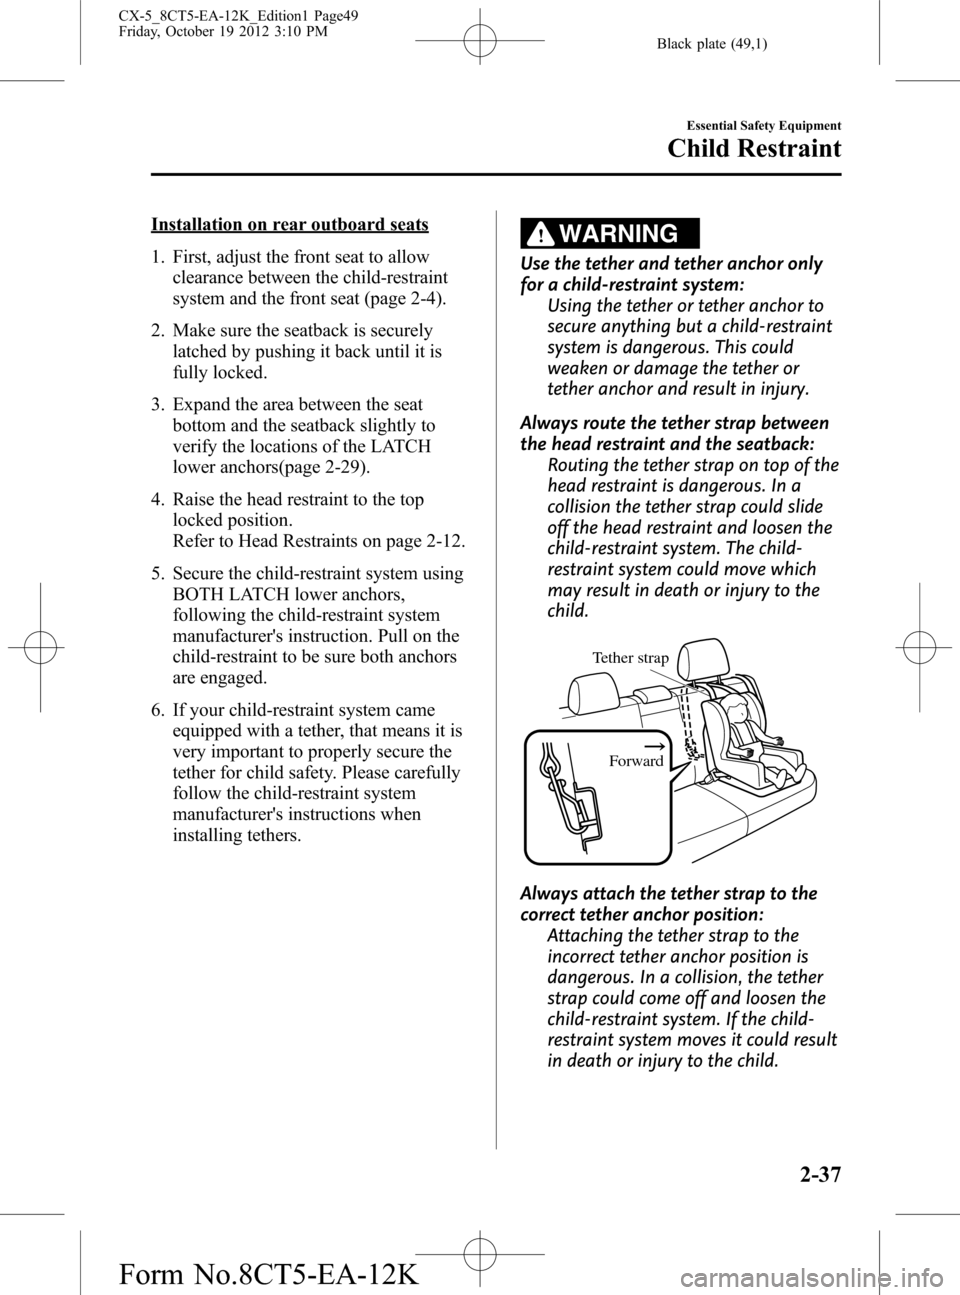
Always route the tether strap between
the head restraint and the seatback:
Routing the tether strap on top of the
head restraint is dangerous. In a
collision the tether strap could slide
off the head restraint and loosen the
child-restraint system. The child-
restraint system could move which
may result in death or injury to the
child.
Tether strap
Forward
Always attach the tether strap to the
correct tether anchor position:
Attaching the tether strap to the
incorrect tether anchor position is
dangerous. In a collision, the tether
strap could come off and loosen the
child-restraint system. If the child-
restraint system moves it could result
in death or injury to the child.
Essential Safety Equipment
Child Restraint
2-37
CX-5_8CT5-EA-12K_Edition1 Page49
Friday, October 19 2012 3:10 PM
Form No.8CT5-EA-12K
Page 75 of 528

Black plate (75,1)
3Before Driving
Use of various features, including keys, doors, mirrors and windows.
Keys .......................................................... 3-2
Keys .................................................... 3-2
Keyless Entry System ......................... 3-3
Advanced Keyless Entry System ............ 3-8
Advanced Keyless Entry System
í..... 3-8
Operational Range .............................. 3-9
Doors and Locks .................................... 3-10
Door Locks ....................................... 3-10
Liftgate .............................................. 3-18
Fuel and Emission ................................. 3-21
Fuel and Engine Exhaust
Precautions ........................................ 3-21
Fuel-Filler Lid and Cap ..................... 3-24
Steering Wheel ....................................... 3-26
Steering Wheel .................................. 3-26
Mirrors ................................................... 3-27
Mirrors .............................................. 3-27
Windows ................................................. 3-30
Power Windows ................................ 3-30
Moonroof
í....................................... 3-33
Security System ..................................... 3-35
Modification and Add-On
Equipment ......................................... 3-35
Immobilizer System .......................... 3-35
Theft-Deterrent System
í.................. 3-37Driving Tips ........................................... 3-39
Break-In Period ................................. 3-39
Money-Saving Suggestions .............. 3-39
Hazardous Driving ............................ 3-40
Floor Mat .......................................... 3-40
Rocking the Vehicle .......................... 3-41
Winter Driving .................................. 3-41
Driving In Flooded Area ................... 3-43
Overloading ...................................... 3-43
Driving on Uneven Road .................. 3-44
Towing .................................................... 3-45
Trailer Towing (U.S.A. and
Canada) ............................................. 3-45
Recreational Towing ......................... 3-53
3-1íSome models.
CX-5_8CT5-EA-12K_Edition1 Page75
Friday, October 19 2012 3:10 PM
Form No.8CT5-EA-12K
Page 77 of 528

Black plate (77,1)
A code number is stamped on the plate
attached to the key set; detach this plate
and store it in a safe place (not in the
vehicle) for use if you need to make a
replacement key (auxiliary key).
Also write down the code number and
keep it in a separate safe and convenient
place, but not in the vehicle.
If your key (auxiliary key) is lost, consult
your Authorized Mazda Dealer and have
your code number ready.
NOTE
The driver must carry the key to ensure the
system functions properly.
Operation indicator light Auxiliary key
Key code number plate
Transmitter
Pull out the auxiliary key from the key.
Keyless Entry System
This system uses the key buttons to
remotely lock and unlock the doors and
the liftgate.
The system can start the engine without
having to take the key out of your purse
or pocket.
It can also help you signal for attention.
Operating the theft-deterrent system is
also possible on theft-deterrent system-
equipped vehicles.
Press the buttons slowly and carefully.
System malfunctions or operations are
indicated by the following warnings.
lKEY Warning Light (Red)/KEY
Indicator (Green)
Refer to Warning/Indicator Lights on
page 4-22.
lIgnition Not Switched Off (STOP)
Warning Beep
Refer to Ignition Not Switched Off
(STOP) Warning Beep on page 7-33.
lKey Removed from Vehicle Warning
Beep
Refer to Key Removed from Vehicle
Warning Beep on page 7-33.
If you have a problem with the key,
consult an Authorized Mazda Dealer.
If your key is lost or stolen, consult an
Authorized Mazda Dealer as soon as
possible for a replacement and to make
the lost or stolen key inoperative.
Before Driving
Keys
3-3
CX-5_8CT5-EA-12K_Edition1 Page77
Friday, October 19 2012 3:10 PM
Form No.8CT5-EA-12K
Page 78 of 528

Black plate (78,1)
CAUTION
Radio equipment like this is governed
by laws.
Changes or modifications not
expressly approved by the party
responsible for compliance could void
the user's authority to operate the
equipment.
NOTE
lThe keyless entry system operation may
vary due to local conditions.
lThe keyless entry system is fully operational
(door/liftgate lock/unlock) when the push
button start is switched off. The system does
not operate if the push button start is
switched to any position other than off.
lIf the key does not operate when pressing a
button or the operational range becomes
too small, the battery may be dead. To
install a new battery, refer to Replace
Electrical Battery(page 6-33).
lAdditional keys can be obtained at an
Authorized Mazda Dealer. Up to 6 keys can
be used with the keyless functions per
vehicle. Bring all keys to an Authorized
Mazda Dealer when additional keys are
required.
qTransmitter
NOTEl(With theft-deterrent system)
The hazard warning lights flash when the
theft-deterrent system is armed or turned
off.
Refer to Theft-Deterrent System on page
3-37.
l(With the advanced keyless function)
A beep sound can be heard for confirmation
when the doors and liftgate are locked/
unlocked using the key. If you prefer, the
beep sound can be turned off.
The volume of the beep sound can also be
changed.
Refer to Personalization Features on page
9-10.
Use the following procedure to change the
setting.
1. Switch the ignition off and close all of the
doors and the liftgate.
2. Open the driver's door.
3. Within 30 seconds of opening the driver's
door, press and hold the LOCK button on
the key for 5 seconds or longer.
All of the doors and the liftgate lock and the
beep sound activates at the currently set
volume. (If the beep sound is currently set
to not activate, it will not activate.) The
setting changes each time the LOCK button
on the key is pressed and the beep sound
activates at the set volume. (If the beep
sound has been set to not activate, it will
not activate.)
4. The setting change is completed by doing
any one of the following:
lSwitch the ignition to ACC or ON.lClose the driver's door.lOpen the liftgate.lThe key is not operated for 10 seconds.lPress any button except the LOCK
button on the key.
lA request switch is pressed.
3-4
Before Driving
Keys
CX-5_8CT5-EA-12K_Edition1 Page78
Friday, October 19 2012 3:10 PM
Form No.8CT5-EA-12K