ECO mode MAZDA MODEL CX-5 2014 (in English) Owner's Manual
[x] Cancel search | Manufacturer: MAZDA, Model Year: 2014, Model line: MODEL CX-5, Model: MAZDA MODEL CX-5 2014Pages: 528, PDF Size: 7.97 MB
Page 179 of 528

Black plate (179,1)
Second gear fixed mode
When the shift lever is tapped back (
)
while the vehicle is stopped or driven at
the following speeds, the transaxle is set
in the second gear fixed mode.
(SKYACTIV-G 2.0)
9.3 km/h (5.7 mph) or less
(SKYACTIV-G 2.5)
Except Mexico
9.2 km/h (5.7 mph) or less
Mexico
9.6 km/h (5.9 mph) or less
The gear is fixed in second while in this
mode for easier starting and driving on
slippery roads. If the shift lever is tapped
back (
) or forward () while in the
second gear fixed mode, the mode will be
canceled.
Shifting specification
Shifting up
If the vehicle speed is lower than the
speed specified for each gear, the gear
cannot be shifted up to a higher gear.
(SKYACTIV-G 2.0)
Gear Vehicle speed*1
M1→M2 0 km/h (0 mph)
M2→M3 22.5 km/h (14.0 mph)
M3→M4 31.2 km/h (19.4 mph)
M4→M5 43.8 km/h (27.3 mph)
M5→M6 53.5 km/h (33.3 mph)
*1: Always observe local speed limit regulations.
(SKYACTIV-G 2.5)
Except Mexico
Gear Vehicle speed*1
M1→M2 0 km/h (0 mph)
M2→M3 22.5 km/h (14.0 mph)
M3→M4 31.2 km/h (19.4 mph)
M4→M5 42.8 km/h (26.6 mph)
M5→M6 70 km/h (44 mph)
*1: Always observe local speed limit regulations.
Mexico
Gear Vehicle speed*1
M1→M2 0 km/h (0 mph)
M2→M3 24.1 km/h (15.0 mph)
M3→M4 33.4 km/h (20.8 mph)
M4→M5 45.8 km/h (28.5 mph)
M5→M6 57.2 km/h (35.6 mph)
*1: Always observe local speed limit regulations.
Shifting down
If the vehicle speed is higher than the
speed specified for each gear, the gear
cannot be shifted to a lower gear so as to
protect the transaxle.
(SKYACTIV-G 2.0)
Gear Vehicle speed*1
M6→M5 251.4 km/h (156.2 mph)
M5→M4 176.7 km/h (109.7 mph)
M4→M3 122 km/h (75.8 mph)
M3→M2 86.3 km/h (53.6 mph)
M2→M1 45.4 km/h (28.2 mph)
*1: Always observe local speed limit regulations.
When Driving
Transaxle
4-51
CX-5_8CT5-EA-12K_Edition1 Page179
Friday, October 19 2012 3:11 PM
Form No.8CT5-EA-12K
Page 185 of 528

Black plate (185,1)
Auto-light control
When the headlight switch is in the
position and the ignition is switched ON, the
light sensor senses the surrounding lightness or darkness and automatically turns the
headlights, other exterior lights and dashboard illumination on or off (see chart above).
CAUTION
ØDo not shade the light sensor by adhering a sticker or a label on the windshield.
Otherwise the light sensor will not operate correctly.
Light sensor
ØThe light sensor also works as a rain sensor for the auto-wiper control. Keep
hands and scrapers clear of the windshield when the wiper lever is in the
position and the ignition is switched ON as fingers could be pinched or the wipers
and wiper blades damaged when the wipers activate automatically. If you are
going to clean the windshield, be sure the wipers are turned off completely―this
is particularly important when clearing ice and snow―when it is particularly
tempting to leave the engine running.
NOTE
lThe headlights, other exterior lights and dashboard illumination may not turn off immediately
even if the surrounding area becomes well-lit because the light sensor determines that it is
nighttime if the surrounding area is continuously dark for several minutes such as inside long
tunnels, traffic jams inside tunnels, or in indoor parking lots.
In this case, the lights turn off if the light switch is turned to the
position.lWhen the headlight switch is in theposition and the ignition is switched to ACC or the
ignition is switched off, the headlights, other exterior lights and dashboard illumination will turn
off.
lThe dashboard illumination can be adjusted by rotating the knob in the instrument cluster. Also,
the day/night mode can be changed by rotating the knob until a beep sound is heard. To adjust the
brightness of the dashboard illumination:
Refer to Dashboard Illumination on page 4-13.
lThe sensitivity of the AUTO lights may be changed by an Authorized Mazda Dealer.
Refer to Personalization Features on page 9-10.
When Driving
Switches and Controls
4-57
CX-5_8CT5-EA-12K_Edition1 Page185
Friday, October 19 2012 3:11 PM
Form No.8CT5-EA-12K
Page 196 of 528

Black plate (196,1)
HomeLink Wireless
Control System
í
NOTE
HomeLink and HomeLink house are registered
trademarks of Johnson Controls.
The HomeLink system replaces up to 3
hand-held transmitters with a single built-
in component in the auto-dimming mirror.
Pressing the HomeLink button on the
auto-dimming mirror activates garage
doors, gates and other devices
surrounding your home.
HomeLink button
Indicator light
WARNING
Do not use the HomeLink system with
any garage door opener that lacks the
safety stop and reverse feature:
Using the HomeLink system with any
garage door opener that lacks the
safety stop and reverse feature as
required by federal safety standards
is dangerous. (This includes garage
doors manufactured before April 1,
1982.)
Using these garage door openers can
increase the risk of serious injury or
death. For further information,
contact HomeLink at 1-800-355-3515
or www.homelink.com or your
Authorized Mazda Dealer.
Always check the areas surrounding
garage doors and gates for people or
obstructions before programming or
during operation of the HomeLink
system:
Programming or operating the
HomeLink system without verifying
the safety of areas surrounding
garage doors and gates is dangerous
and could result in an unexpected
accident and serious injury if
someone were to be hit.
NOTE
The programming will not be erased even if
the battery is disconnected.
qPre-programming the HomeLink
System
NOTE
It is recommended that a new battery be
placed in the hand-held transmitter of the
device being programmed to HomeLink for
quicker training and accurate transmission of
the radio-frequency signal.
4-68
When Driving
íSome models.
Switches and Controls
CX-5_8CT5-EA-12K_Edition1 Page196
Friday, October 19 2012 3:11 PM
Form No.8CT5-EA-12K
Page 259 of 528

Black plate (259,1)
lWMA files written under specifications
other than the indicated specification
may not play normally or files or folder
names may not display correctly.
lThe file extension may not be provided
depending on the computer operating
system, version, software, or settings.
In this case, add the file extension“.
wma”to the end of the file name, and
then write it to the disc.
qOperating Tips for AAC
AAC stands for Advanced Audio Coding,
which is standardized voice compression
established by the ISO
*1working group
(MPEG). Audio data can be created and
stored at a higher compression ratio than
MP3.
*1 International Organization for
Standardization
Playable AAC file specifications
This unit supports playback of AAC files
recorded in CD-R and CD-RW.
Playable AAC files are as follows:
Item Content
Specification MPEG-4 AAC
Sampling rate8/11.025/12 kHz
16/22.05/24 kHz
32/44.1/48 kHz
Bit rate 24―320 kbps
CAUTION
This unit plays files with the file
extension (m4a) as an AAC file. Do
not use the AAC file extension for files
other than AAC files. Otherwise, it
could result in noise or a
malfunction.
lSong, artist, and album name
information in the AAC file is recorded
as data termed“iTunes, m4a, Meta-
Data applicable”, and this information
is displayable.
lAAC files written under specifications
other than the indicated specification
may not play normally or files or folder
names may not display correctly.
lThe file extension may not be provided
depending on the computer operating
system, version, software, or settings.
In this case, add the file extension“.
m4a”to the end of the file name, then
write it to the disc.
qOperating Tips for USB device
This unit supports playback of MP3/
WMA/AAC files recorded to USB device.
NOTE
lMusic data (MP3/WMA/AAC (.m4a)
format) stored in a USB mass-storage class
compliant device (such as USB flash
memory) can be played.
lPlayback may not be possible depending on
the type and condition of the USB flash
memory even if the audio file complies with
the standard above.
lA copyright protected WMA/AAC file
cannot be played in this unit.
lThe order of the music data stored in the
device may differ from the playback order.
lTo prevent loss or damage of stored data,
we recommend that you always back up
your data.
lIf a device exceeds the maximum electric
current value of 500 mA, it may not operate
or recharge when connected.
lDo not pull out the USB device while in the
USB mode (only pull it out while in FM/AM
radio or CD mode).
lThe device will not operate if the data is
password protected.
Interior Features
Audio System
5-21
CX-5_8CT5-EA-12K_Edition1 Page259
Friday, October 19 2012 3:11 PM
Form No.8CT5-EA-12K
Page 265 of 528
Black plate (265,1)
NOTE
About 5 seconds after selecting any mode, the
volume function will be automatically selected.
To reset bass, treble, fade, and balance, press
the audio control dial for 2 seconds. The unit
will beep and“CLEAR”will be displayed.
Automatic Level Control (ALC)
The automatic level control (ALC)
changes the audio volume automatically
according to the vehicle speed. The faster
the vehicle speed, the higher the volume
increases. ALC has ALC OFF and ALC
LEVEL 1 to 7 modes. At ALC LEVEL 7,
the amount that the volume can increase is
at the maximum. Select the mode
according to the driving conditions.
Interior Features
Audio System
5-27
CX-5_8CT5-EA-12K_Edition1 Page265
Friday, October 19 2012 3:11 PM
Form No.8CT5-EA-12K
Page 266 of 528
Black plate (266,1)
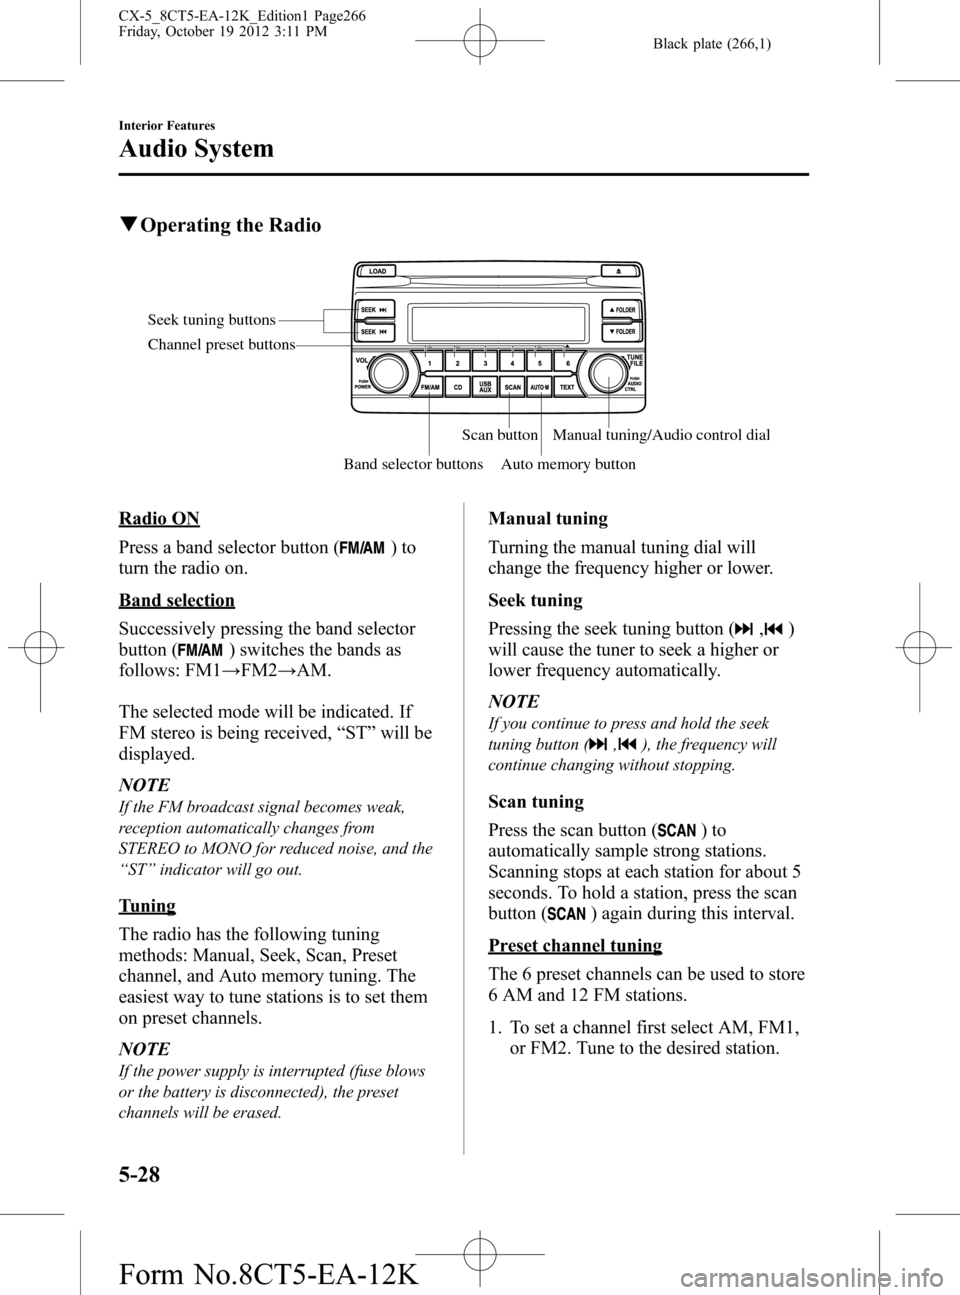
qOperating the Radio
Seek tuning buttons
Band selector buttonsScan button
Auto memory buttonManual tuning/Audio control dial Channel preset buttons
Radio ON
Press a band selector button (
)to
turn the radio on.
Band selection
Successively pressing the band selector
button (
) switches the bands as
follows: FM1→FM2→AM.
The selected mode will be indicated. If
FM stereo is being received,“ST”will be
displayed.
NOTE
If the FM broadcast signal becomes weak,
reception automatically changes from
STEREO to MONO for reduced noise, and the
“ST”indicator will go out.
Tuning
The radio has the following tuning
methods: Manual, Seek, Scan, Preset
channel, and Auto memory tuning. The
easiest way to tune stations is to set them
on preset channels.
NOTE
If the power supply is interrupted (fuse blows
or the battery is disconnected), the preset
channels will be erased.
Manual tuning
Turning the manual tuning dial will
change the frequency higher or lower.
Seek tuning
Pressing the seek tuning button (
,)
will cause the tuner to seek a higher or
lower frequency automatically.
NOTE
If you continue to press and hold the seek
tuning button (
,), the frequency will
continue changing without stopping.
Scan tuning
Press the scan button (
)to
automatically sample strong stations.
Scanning stops at each station for about 5
seconds. To hold a station, press the scan
button (
) again during this interval.
Preset channel tuning
The 6 preset channels can be used to store
6 AM and 12 FM stations.
1. To set a channel first select AM, FM1,
or FM2. Tune to the desired station.
5-28
Interior Features
Audio System
CX-5_8CT5-EA-12K_Edition1 Page266
Friday, October 19 2012 3:11 PM
Form No.8CT5-EA-12K
Page 275 of 528
Black plate (275,1)
The display can be turned back on as
follows:
lPress the audio button ()to
display the audio screen.
lPress the navigation button ()to
display the navigation screen.
lPress the phone button ()to
display the Bluetooth®dial screen.lPress the setup button ()to
display the setup dial setting screen.
lPress the audio control dial to display
the setup sound setting screen.
lShift to the R position to change to the
rear view camera mode.
Shift to a position other than R to
return to the display off condition.
NOTE
The screen can also be turned off using voice
recognition.
Refer to Component Parts on page 5-78.
Display setting reset
All of the screen setting values can be
reset to their initial settings.
1. Touch the
on-screen button.
2. Touch the
on-screen button.
Audio sound adjustment
Press the audio control dial or touch the
on-screen button to display the
sound setting screen.
Indication Setting value
Bass
(Low pitch sound)
: Low pitch
enhancement
: Low pitch
reduction
Treble
(Treble sound)
: Treble
enhancement
: Treble reduction
Balance
(Left/right volume
balance)
: Right side
volume reduction
: Left side
volume reduction
Fader
(Front/back volume
balance)
: Front speaker
volume reduction
: Rear speaker
volume reduction
Button Beep
(Audio operation sound)
: on/off*1
Auto Level Control*2
(Automatic volume
adjustment): Level up: Level down
AudioPilot
*3
(Automatic volume
adjustment): on/off
Centerpoint
*3
(Automatic surround
level adjustment): on/off
*1 Some functions do not turn off
*2 Standard audio
*3 Bose
®Sound System
Automatic Level Control (ALC)
The automatic level control is a feature
that automatically adjusts audio volume
and sound quality according to the vehicle
speed. The volume increases in
accordance with the increase in vehicle
speed, and decreases as vehicle speed
decreases.
Interior Features
Audio System
5-37
CX-5_8CT5-EA-12K_Edition1 Page275
Friday, October 19 2012 3:11 PM
Form No.8CT5-EA-12K
Page 279 of 528
Black plate (279,1)
Scan tuning
You can search for receivable radio
stations by touching the
on-screen
button.
Scanning stops at each station for about
five seconds.
Touch the
on-screen button one time
during reception to continue receiving a
broadcasting station.
Preset channel tuning
The six preset channels can be used to
store six AM and twelve FM stations.
1. To set a channel, first select AM, FM1,
or FM2. Tune to the desired station.
2. Press and hold any of the preset on-
screen buttons. The reception
frequency is programmed and
displayed on the preset button.
3. Repeat this operation for the other
stations and bands you want to store.
When receiving a programmed
frequency, select AM, FM1, or FM2
and touch the preset on-screen button.
NOTE
The programmed frequency is displayed on the
preset button.
Auto memory tuning
This is especially useful when driving in
an area where the local stations are
unknown. Additional AM/FM stations
can be stored without disturbing the
previously set channels.
1. Touch the
on-screen button. The
auto memory preset list is displayed
and the previously tuned frequency is
received.2. Touch the
on-screen button to
display the frequencies of up to ten
radio stations on the auto memory
preset list.
3. Touch the desired frequency.
NOTE
Touch theon-screen button during
auto memory tuning to return to the AM/FM
main screen.
Radio Broadcast Data System (RBDS)
Radio text information display
A maximum of 64 characters of radio text
information sent from a broadcasting
station is displayed in the audio display.
NOTE
Radio text information is a function of FM
radio. Text information is not displayed in the
following:
lDuringreceptionlNot an RBDS broadcastlDuring HD receptionlRBDS broadcast, but radio text is not
transmitted from the radio station
Genre Seek
Some FM stations transmit Genre codes
(Program type like a Rock, News, and so
on). This code enables alternative stations
transmitting the same Genre code to be
found quickly. To select from the genre
list, touch the
on-screen button
while in the FM mode and the desired
Genre Seek.
(To scan for Genre Seek:)
1. Touch the genre type which you want
to select.
2. Touch the
,on-screen
button.
Interior Features
Audio System
5-41
CX-5_8CT5-EA-12K_Edition1 Page279
Friday, October 19 2012 3:11 PM
Form No.8CT5-EA-12K
Page 293 of 528

Black plate (293,1)
Display scroll
If a whole title cannot be displayed at one
time, touch the
on-screen button on
the right side of the title. When the last
character is displayed, touch the
on-
screen button to display the first character
of the title.
NOTE
lTheon-screen button is displayed only
if a whole title cannot be displayed at one
time.
lThe information viewable in the display is
only CD information (such as artist name,
song title) which has been recorded to the
CD.
lThis unit cannot display some characters.
Characters which cannot be displayed are
indicated by an asterisk (
).lThe number of characters which can be
displayed is restricted.
Message Display
If“CD Error”is displayed, it means that
there is some CD malfunction. Check the
CD for damage, dirt, or smudges, and
then properly reinsert. If the message
appears again, take the unit to an
Authorized Mazda Dealer for service.
qHow to use Auxiliary jack/USB port
Audio can be heard from the vehicle's
speakers by connecting a commercially-
available portable audio unit to the
auxiliary jack.
Use a commercially-available, non-
impedance (3.5
) stereo mini plug cable.
Contact an Authorized Mazda Dealer for
details.
In addition, audio can be played from the
vehicle audio device by connecting USB
device or an iPod to the USB port.
Refer to AUX/USB/iPod mode on page
5-58.
qError Indications
If you see an error indication on the
display, find the cause in the chart. If you
cannot clear the error indication, take the
vehicle to an Authorized Mazda Dealer.
IndicationCause Solution
CD
ErrorCD is inserted
upside downInsert the CD
properly. If the error
indication continues
to display, consult an
Authorized Mazda
Dealer.
CD is defectiveInsert another CD
properly. If the error
indication continues
to display, consult an
Authorized Mazda
Dealer.
qSetup
You can customize settings in the setup
display as follows:
Display
Refer to Power/Volume/Display/Sound
Controls on page 5-36.
Interior Features
Audio System
5-55
CX-5_8CT5-EA-12K_Edition1 Page293
Friday, October 19 2012 3:11 PM
Form No.8CT5-EA-12K
Page 295 of 528
Black plate (295,1)
NOTElThe talk button, pick-up button, and hang-
up button are operable with the audio unit
turned off.
lMazda has installed this system to prevent
distraction while driving the vehicle and
using audio controls on the dashboard.
Always make safe driving your first priority.
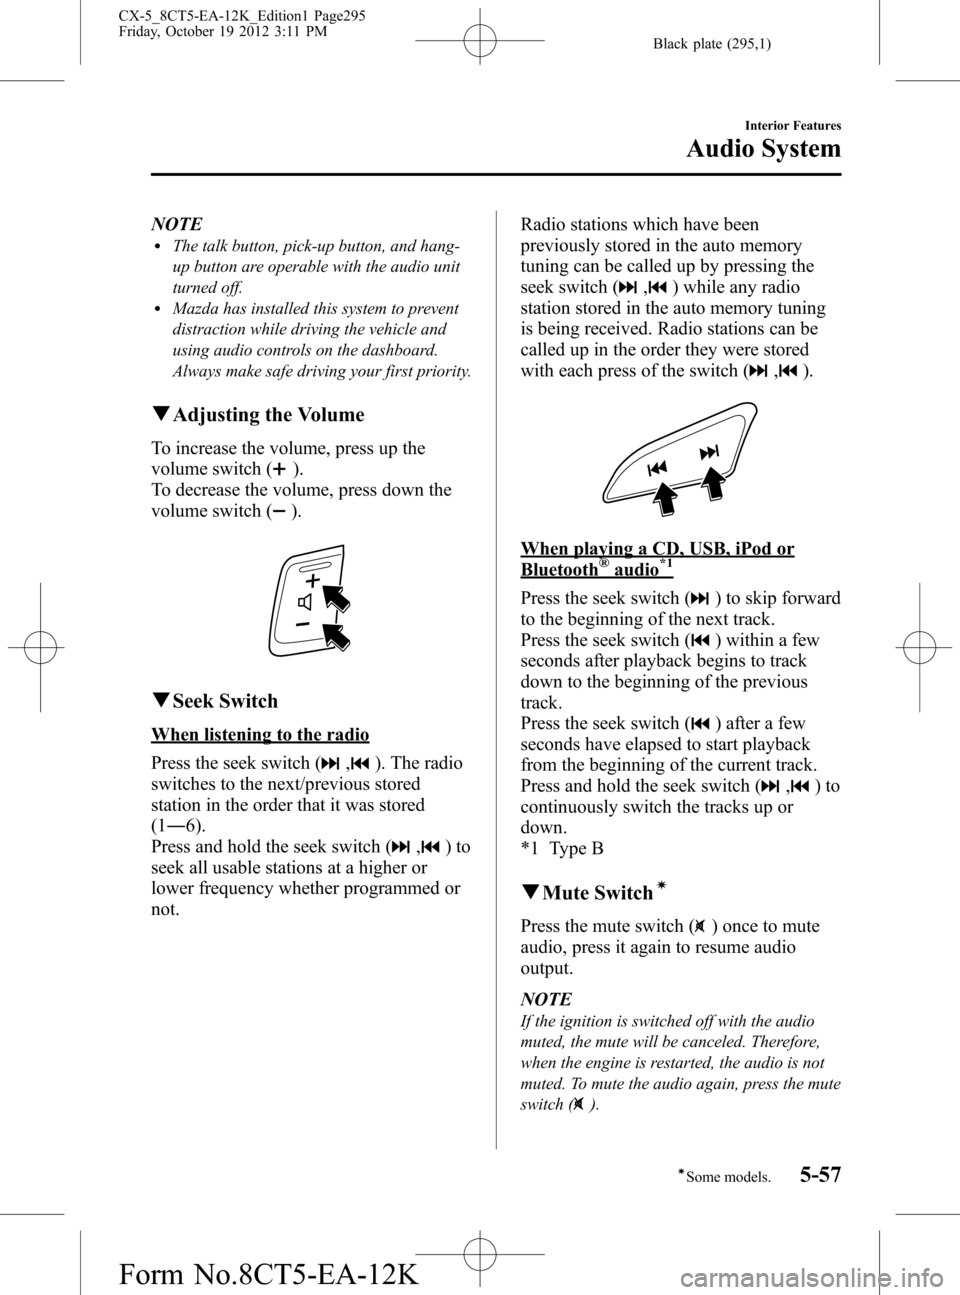
qAdjusting the Volume
To increase the volume, press up the
volume switch (
).
To decrease the volume, press down the
volume switch (
).
qSeek Switch
When listening to the radio
Press the seek switch (
,). The radio
switches to the next/previous stored
station in the order that it was stored
(1―6).
Press and hold the seek switch (
,)to
seek all usable stations at a higher or
lower frequency whether programmed or
not.Radio stations which have been
previously stored in the auto memory
tuning can be called up by pressing the
seek switch (
,) while any radio
station stored in the auto memory tuning
is being received. Radio stations can be
called up in the order they were stored
with each press of the switch (
,).
When playing a CD, USB, iPod or
Bluetooth®audio*1
Press the seek switch () to skip forward
to the beginning of the next track.
Press the seek switch (
) within a few
seconds after playback begins to track
down to the beginning of the previous
track.
Press the seek switch (
) after a few
seconds have elapsed to start playback
from the beginning of the current track.
Press and hold the seek switch (
,)to
continuously switch the tracks up or
down.
*1 Type B
qMute Switchí
Press the mute switch () once to mute
audio, press it again to resume audio
output.
NOTE
If the ignition is switched off with the audio
muted, the mute will be canceled. Therefore,
when the engine is restarted, the audio is not
muted. To mute the audio again, press the mute
switch (
).
Interior Features
Audio System
5-57íSome models. CX-5_8CT5-EA-12K_Edition1 Page295
Friday, October 19 2012 3:11 PM
Form No.8CT5-EA-12K