change MAZDA MODEL CX-5 2014 (in English) Repair Manual
[x] Cancel search | Manufacturer: MAZDA, Model Year: 2014, Model line: MODEL CX-5, Model: MAZDA MODEL CX-5 2014Pages: 528, PDF Size: 7.97 MB
Page 281 of 528
Black plate (281,1)
The number of multi-cast channels which
can be received differs depending on the
radio station.
NOTE
lIf an analog broadcast is received once and
is received while HD1 is
selected, the audio unit switches to the
station automatically.lWhen thebutton is
illuminated, there could be a noticeable
difference in sound quality and volume
when a change from digital to analog
signals occurs. If the sound quality and
volume become noticeably diminished or
cut off, touch the HD button to turn off
(button is not
illuminated).
lOnce an analog broadcast is received when
HD1 is selected from the preset channels, it
is switched to
automatically. If
the radio reception conditions are poor, or
is off, switching to
broadcasts is not possible.lWhen an HD specialty channel (HD2 to
HD8) is selected from the preset channels,
“No HD signal”is displayed and no audio
is output until
is received. If
the radio reception conditions are poor,
“No HD signal”continues to be displayed.
lIf theis not illuminated or does not
illuminate in orange, information such as
song titles of the
station are
received, however, the audio output is
analog. If information can no longer be
received and the non-reception condition
continues,
andon-
screen buttons disappear.
Interior Features
Audio System
5-43
CX-5_8CT5-EA-12K_Edition1 Page281
Friday, October 19 2012 3:11 PM
Form No.8CT5-EA-12K
Page 283 of 528
Black plate (283,1)
Be sure you are parked outside with a
clear view of open sky, you will be
instructed to turn on your radio (in
SIRIUS mode and tuned to channel 184).
Activation typically takes only 2―5
minutes.
Displaying the SIRIUS ID (ESN)
Turn the manual tuning dial and select
channel 0 to display the twelve-digit
Electronic Serial Number (ESN) for the
SIRIUS tuner.
SIRIUS operation
All operations of the satellite radio are
conducted by means of the audio unit.
SIRIUS radio mode selection
Touch the
on-screen tab on the
audio screen to receive the previously
received SIRIUS channel.
Every time the
on-screen tab is
touched, the bank changes in the order
shown below.
SIRIUS1 SIRIUS2 SIRIUS3
NOTElSIRIUS1, SIRIUS2 and SIRIUS3: six
stations can be stored in each bank for
convenient access to your favorite stations.
lis displayed when SIRIUS1 is
selected,
is displayed when
SIRIUS2 is selected, and
is
displayed when SIRIUS3 is selected.
Operation in the initial state
It may take some time to start up the
equipment when it is in the initial state,
when there is a change in the user's
subscription condition, when the firmware
is updated or when the SIRIUS channel
map is changed.
“Updating Channels XXX %”is
displayed when the SIRIUS channel map
is changed.
If the user contract content is changed,
“Subscription Updated”is displayed.
When the firmware is updated, the
“Updating Receiver”is displayed.
Updating could take as long as a few
minutes depending on the geographical
area. When the unit is in an initialized
state, channel 184 is displayed after the
display indicates“Updating Receiver”.
NOTE
Do not perform the following operation while
“Updating Channels XXX %”,“Updating
Receiver”is displayed. Otherwise, the
updating procedure will be canceled.
lTurning off the audio powerlSwitching to other modeslSwitching the ignition off
When the SIRIUS mode is switched to
another mode, or when the power is
turned off, the present channel which is
being received is stored as the last
channel.
Channel up
Turn the manual tuning dial to the right or
press the seek up button (
).
Channel down
Turn the manual tuning dial to the left or
press the seek down button (
).
Interior Features
Audio System
5-45
CX-5_8CT5-EA-12K_Edition1 Page283
Friday, October 19 2012 3:11 PM
Form No.8CT5-EA-12K
Page 285 of 528
Black plate (285,1)
Display scroll
If a whole title cannot be displayed at one
time, touch the
on-screen button on
the right side of the title. When the last
character is displayed, touch the
on-
screen button to display the first character
of the title.
NOTE
Theon-screen button is displayed only if a
whole title cannot be displayed at one time.
Instant replay
This function allows you to rewind and
replay the program that you were
previously or are currently listening to.
When the
on-screen button is
touched, playback starts from the
beginning of the current program.
When the
on-screen button is
touched twice, playback starts from the
beginning of the previous program.
Touch and hold the
on-screen
button to reverse the program while the
button is being pressed.
When the
on-screen button is
touched, playback starts from the
beginning of the next program.
When the
on-screen button is
touched while the last program is being
played, the instant replay mode is
canceled.
Touch and hold the
on-screen
button to fast-forward the program while
the button is being pressed.
When touching and holding the button
until the end of the program, the instant
replay mode is canceled.
Instant replay (PAUSE)
If the
on-screen button is touched,
instant replay mode is turned on in a
paused condition (PAUSE).Touch the
on-screen button again
to resume playback from the point at
which it was paused.
Parental lock
Parental lock, parental unlock, parental
lock code change, and parental lock code
reset can be set.
NOTE
lTouch theon-screen button during
all the settings to return to the previous
display.
lTouch theon-screen button during the
code and master code input to delete an
input number.
lIf only a four-digit code or master code is
input,“Done”can be selected.
lIf the registered code has been forgotten,
reset the code in“Initialize Parental Code”
to [0000].
Parental lock
If a channel is locked, the channel is
muted.
1. Turn the manual tuning dial to select
the desired channel.
2. Touch the
on-screen button to
display the settings screen.
3. Touch the
on-screen
button to display the parental lock
settings screen.
4.“Input Parental Code”is displayed, and
input of the registered code is possible.
To enter a number, use the numerical
keypad.
5. After inputting the four digits, touch
the
on-screen button to confirm
the four digits.
Interior Features
Audio System
5-47
CX-5_8CT5-EA-12K_Edition1 Page285
Friday, October 19 2012 3:11 PM
Form No.8CT5-EA-12K
Page 286 of 528

Black plate (286,1)
6. If the four digits match the registered
code,“Channel XXX locked”appears
and mute is turned on. If they do not
match the registered code,“Wrong
code”appears and then the display
returns to“Input Parental Code”.
Parental unlock
Channels locked using the parental lock
function can be unlocked.
1. Select a channel to be unlocked by
turning the manual tuning dial.
2. Touch the
on-screen button to
display the settings screen.
3. Touch the
on-screen
button to display the parental unlock
settings screen.
4.“Input Parental Code”is displayed, and
input of the registered code is possible.
To enter a number, use the numerical
keypad.
5. After inputting the four digits, touch
the
on-screen button to confirm
the four digits.
6. If the four digits match the registered
code,“Channel XXX unlocked”
appears and mute is canceled. If they
do not match the registered code,
“Wrong code”appears and then the
display returns to“Input Parental
Code”.
Parental-lock code change
When changing the code, the new code is
input after the previous one is input first.
1. Touch the
on-screen button to
display the settings screen.
2. Touch the
on-
screen button to display the code
change screen.3.“Enter Current Code”is displayed, and
input of the registered code is possible.
To enter a number, use the numerical
keypad.
4. After inputting the four digits, touch
the
on-screen button to confirm
the four digits.
5. If the four digits match the registered
code,“Enter New Code”is displayed.
If they do not match the registered
code,“Wrong code”appears and then
the display returns to“Enter Current
Code”. To enter a number, use the
numerical keypad.
6. After inputting the four digits, touch
the
on-screen button to confirm
the four digits.
7.“Code changed”appears to indicate
that the new code input has been
completed.
8. The display returns to its normal
display.
NOTE
Channels locked before changing the code
remain after changing the code. To unlock a
channel, input the changed code.
Parental-lock code reset
If the registered code has been forgotten,
reset the code to the default [0000] code.
1. Touch the
on-screen button to
display the settings screen.
2. Touch the
on-
screen button to display the code initial
screen.
3.“Enter Master Code”is displayed, and
input of the registered code is possible.
To enter a number, use the numerical
keypad.
5-48
Interior Features
Audio System
CX-5_8CT5-EA-12K_Edition1 Page286
Friday, October 19 2012 3:11 PM
Form No.8CT5-EA-12K
Page 288 of 528

Black plate (288,1)
Seek alert setting
On or off switching to song seek, artist
seek, or game alert function, and deletion
of stored information can be performed.
Touch the
on-screen button and the
on-screen button. Touch the button
you want to change from
,,or
.
(On or off switching)
Touch the
,, and
on-screen button.
(Deletion)
1. Select song title, artist name, or sports
team name that you want to delete from
the list.
2. Touch the
on-screen button to
display“XXXXX (song, artist, sports
team name) deleted”.
5-50
Interior Features
Audio System
CX-5_8CT5-EA-12K_Edition1 Page288
Friday, October 19 2012 3:11 PM
Form No.8CT5-EA-12K
Page 298 of 528

Black plate (298,1)
Connecting with connector cable
1. Open the console lid.
2. Open the auxiliary jack/USB port lid.
3. Pass the connection plug cord through
the cutout of the console and insert the
plug into the auxiliary jack.
WARNING
Do not allow the connection plug cord
to get tangled with the parking brake
or the shift lever:
Allowing the plug cord to become
tangled with the parking brake or
the shift lever is dangerous as it
could interfere with driving, resulting
in an accident.
CAUTION
Do not place objects or apply force to
the auxiliary jack with the plug
connected.
NOTE
lInsert the plug to the auxiliary jack/USB
port securely.
lInsert or pull out the plug with the plug
perpendicular to the auxiliary jack/USB
port hole.
lInsert or remove the plug by holding its
base.
qHow to use AUX mode
Type A Type B
(Type A)
1. Switch the ignition to ACC or ON.
2. Press the power/volume dial to turn the
audio system on.
3. Press the USB/AUX button (
) of the
audio unit to change to the AUX mode.
(Type B)
1. Switch the ignition to ACC or ON.
2. Press the power/volume dial to turn the
audio system on.
3. Press the audio button (
)to
display the audio screen.
4. Press the
on-screen tab to switch
to the AUX mode.
5-60
Interior Features
Audio System
CX-5_8CT5-EA-12K_Edition1 Page298
Friday, October 19 2012 3:11 PM
Form No.8CT5-EA-12K
Page 300 of 528

Black plate (300,1)
qHow to use USB mode (Type A)
Track up/Fast-forward button
Track down/Reverse buttonRepeat button
Random button
Folder down button Folder up button
Text button
Scan button USB/AUX button
File dial
Type Playable data
USB mode MP3/WMA/AAC file
Playback
1. Switch the ignition to ACC or ON.
2. Press the power/volume dial to turn the
audio system on.
3. Press the USB/AUX button (
)to
switch to the USB mode and start
playback.
NOTE
lSome devices such as smart phones may
require a setting change to allow USB
operation.
lWhen the USB device is not connected, the
mode does not switch to USB mode.
lWhen there is no playable data in the USB
device,“NO CONTENTS”is flashed.
lPlayback of the USB device is in the order
of the folder numbers. Folders which have
no MP3/WMA/AAC files are skipped.
lDo not remove the USB device while in the
USB mode. The data may be damaged.
Fast-forward/Reverse
Press and hold the fast-forward button
(
) to advance through a track at high
speed.Press and hold the reverse button (
)to
reverse through a track at high speed.
Track search
Press the track up button (
) or turn the
file dial clockwise once to skip forward to
the beginning of the next track.
Press the track down button (
) or turn
the file dial counterclockwise within a few
seconds after playback begins to track
down to the beginning of the previous
track.
Press the track down button (
) or turn
the file dial counterclockwise after a few
seconds have elapsed to start playback
from the beginning of the current track.
Folder search
To change to the previous folder, press the
folder down button (
), or press the
folder up button (
) to advance to the
next folder.
Music Scan
This function scans the titles in a folder
currently being played and plays ten
seconds of each song to aid you in finding
a song you want to listen to.
5-62
Interior Features
Audio System
CX-5_8CT5-EA-12K_Edition1 Page300
Friday, October 19 2012 3:11 PM
Form No.8CT5-EA-12K
Page 304 of 528
Black plate (304,1)
qHow to use USB mode (Type B)
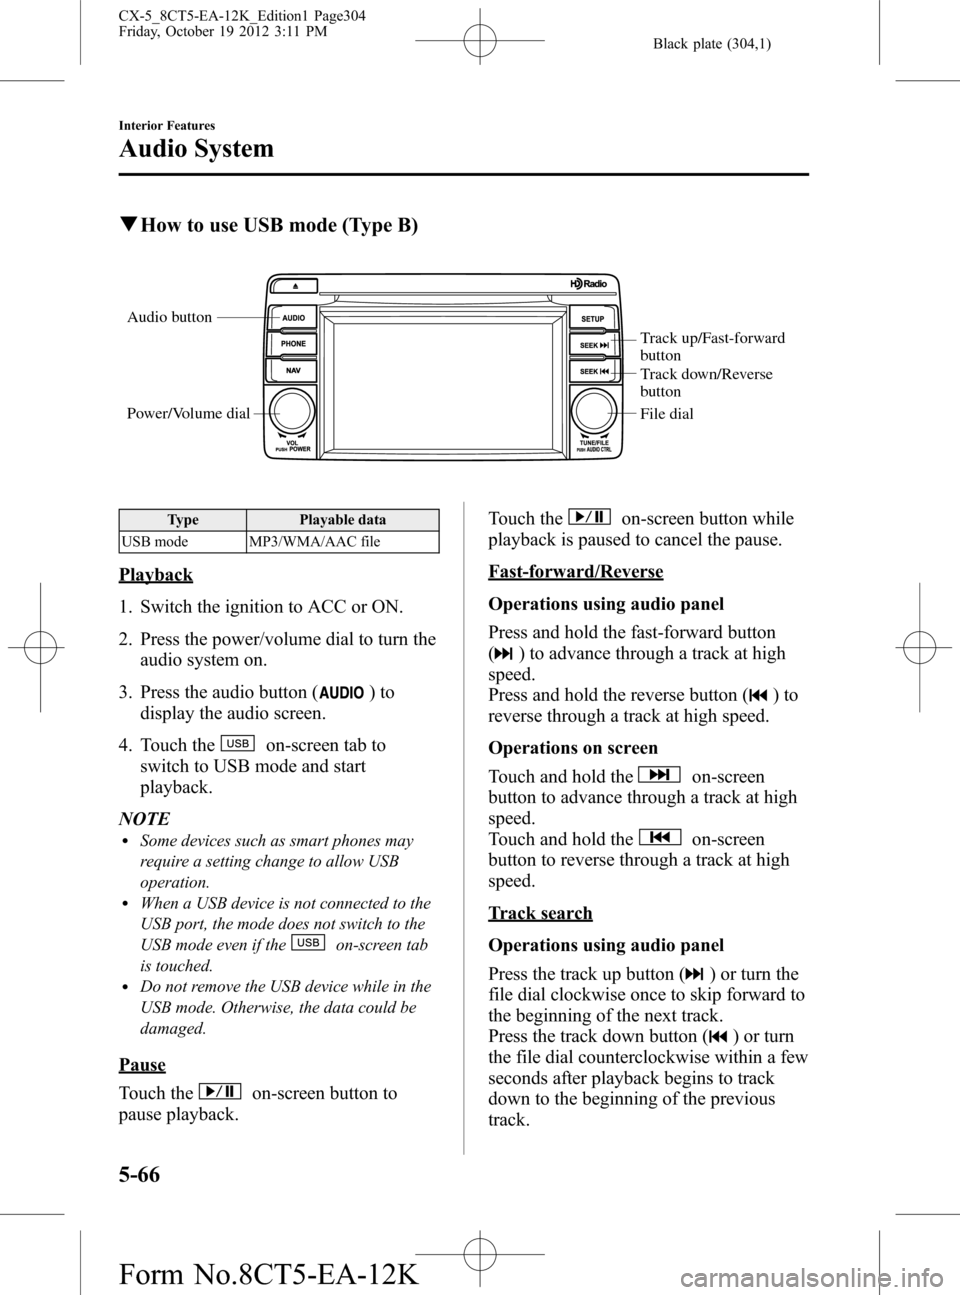
Audio button
Power/Volume dial
Track up/Fast-forward
button
Track down/Reverse
button
File dial
Type Playable data
USB mode MP3/WMA/AAC file
Playback
1. Switch the ignition to ACC or ON.
2. Press the power/volume dial to turn the
audio system on.
3. Press the audio button (
)to
display the audio screen.
4. Touch the
on-screen tab to
switch to USB mode and start
playback.
NOTE
lSome devices such as smart phones may
require a setting change to allow USB
operation.
lWhen a USB device is not connected to the
USB port, the mode does not switch to the
USB mode even if the
on-screen tab
is touched.
lDo not remove the USB device while in the
USB mode. Otherwise, the data could be
damaged.
Pause
Touch the
on-screen button to
pause playback.Touch the
on-screen button while
playback is paused to cancel the pause.
Fast-forward/Reverse
Operations using audio panel
Press and hold the fast-forward button
(
) to advance through a track at high
speed.
Press and hold the reverse button (
)to
reverse through a track at high speed.
Operations on screen
Touch and hold the
on-screen
button to advance through a track at high
speed.
Touch and hold the
on-screen
button to reverse through a track at high
speed.
Track search
Operations using audio panel
Press the track up button (
) or turn the
file dial clockwise once to skip forward to
the beginning of the next track.
Press the track down button (
) or turn
the file dial counterclockwise within a few
seconds after playback begins to track
down to the beginning of the previous
track.
5-66
Interior Features
Audio System
CX-5_8CT5-EA-12K_Edition1 Page304
Friday, October 19 2012 3:11 PM
Form No.8CT5-EA-12K
Page 312 of 528
Black plate (312,1)
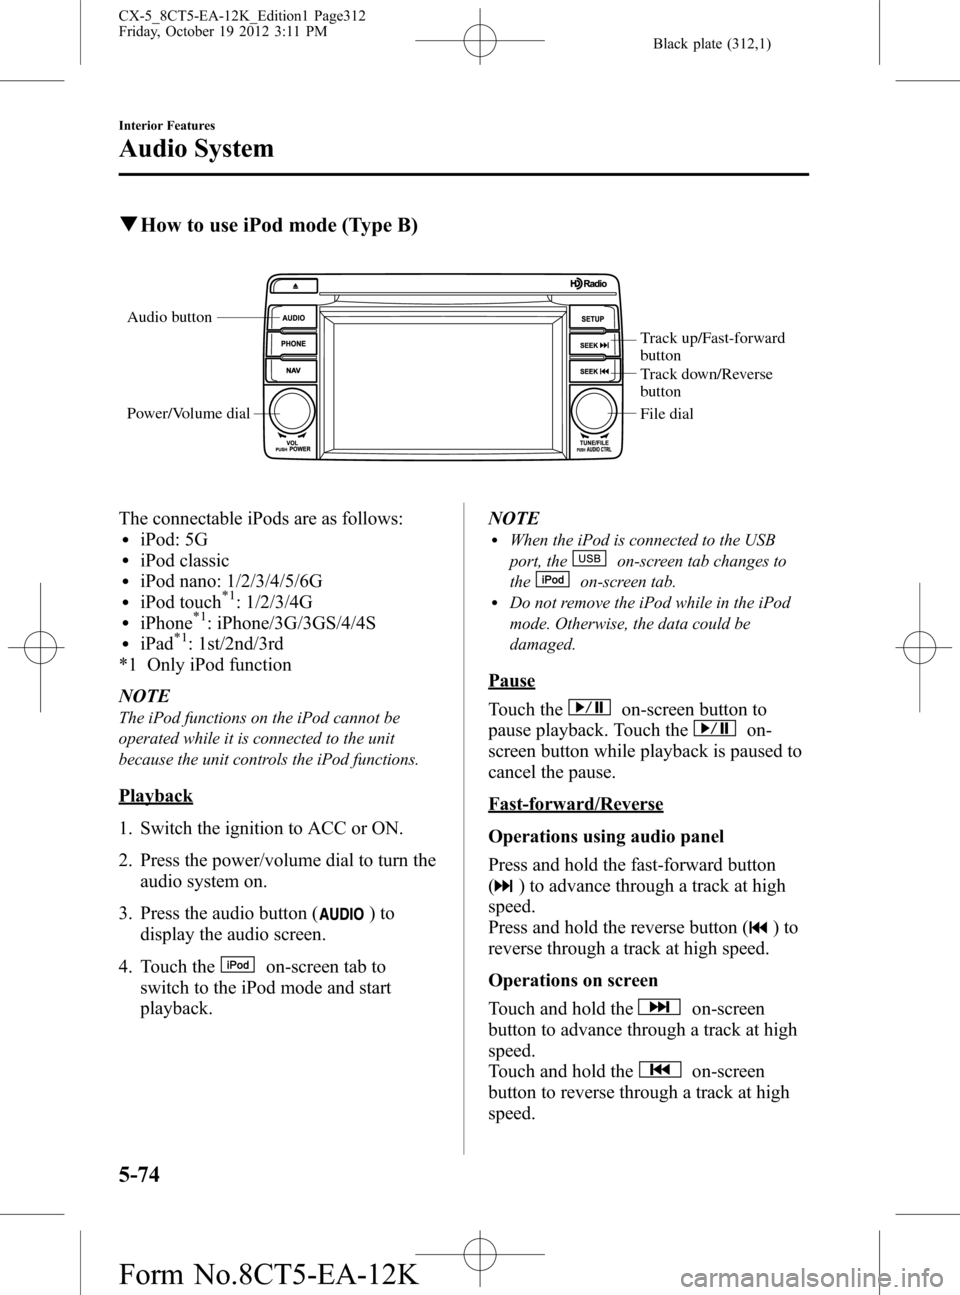
qHow to use iPod mode (Type B)
Audio button
Power/Volume dial
Track up/Fast-forward
button
Track down/Reverse
button
File dial
The connectable iPods are as follows:liPod: 5GliPod classicliPod nano: 1/2/3/4/5/6GliPod touch*1: 1/2/3/4GliPhone*1: iPhone/3G/3GS/4/4SliPad*1: 1st/2nd/3rd
*1 Only iPod function
NOTE
The iPod functions on the iPod cannot be
operated while it is connected to the unit
because the unit controls the iPod functions.
Playback
1. Switch the ignition to ACC or ON.
2. Press the power/volume dial to turn the
audio system on.
3. Press the audio button (
)to
display the audio screen.
4. Touch the
on-screen tab to
switch to the iPod mode and start
playback.NOTE
lWhen the iPod is connected to the USB
port, the
on-screen tab changes to
the
on-screen tab.lDo not remove the iPod while in the iPod
mode. Otherwise, the data could be
damaged.
Pause
Touch the
on-screen button to
pause playback. Touch the
on-
screen button while playback is paused to
cancel the pause.
Fast-forward/Reverse
Operations using audio panel
Press and hold the fast-forward button
(
) to advance through a track at high
speed.
Press and hold the reverse button (
)to
reverse through a track at high speed.
Operations on screen
Touch and hold the
on-screen
button to advance through a track at high
speed.
Touch and hold the
on-screen
button to reverse through a track at high
speed.
5-74
Interior Features
Audio System
CX-5_8CT5-EA-12K_Edition1 Page312
Friday, October 19 2012 3:11 PM
Form No.8CT5-EA-12K
Page 318 of 528
Black plate (318,1)
4. Touch theon-screen button to
display the message and switch to the
device operation.
5. Using your device, perform a search
for the Bluetooth
®device (Peripheral
device).
6. Select“Mazda”from the device list
searched by the device.
7.(Device with Bluetooth
®version 2.0)
Input the displayed 4-digit pairing code
into the device.
(Device with Bluetooth
®version 2.1
or higher)
lJust Works is detected
The pairing is performed
automatically.
lNumeric Comparison is detected
Make sure the displayed 6-digit
code on the audio is also displayed
on the device, and touch the
on-screen button. A connection
license agreement may be required
depending on the device.
8.(Device with PBAP profile)
Call history (incoming/outgoing
history) for the device is downloaded
automatically. The operation may be
required depending on the device.
After a device is registered, the system
automatically identifies the device. By
activating Bluetooth
®Hands-Free again,
or by activating Bluetooth®Hands-Free
first after switching the ignition from OFF
to ACC, the device connection condition
is indicated in the display.
Device selection
If several devices have been programmed,
the Bluetooth
®unit links the device last
programmed. If you would like to link a
different programmed device, it is
necessary to change the link. The order of
device priority after the link has been
changed is maintained even when the
ignition is switched off.
NOTE
If the device name cannot be displayed,“...”is
added at the end of the title which is displayed.
Connecting other devices
1. Touch the
on-screen tab.
2. Touch the
on-screen
button.
3. Touch the device name which you
want to connect to display the device
information screen.
4. Touch the
on-screen button to
connect as a Hands-Free device. Touch
the
on-screen button to connect
as a Bluetooth®audio device.
5. Touch the
on-screen button.
6.(Device with PBAP profile)
Call history (incoming/outgoing
history) for the device is downloaded
automatically.
If the connection is completed, the device
name is displayed. Touch the
on-
screen button to display the device list
screen and display the
oricon in the
new device name which is connected.
Disconnecting a device
1. Touch the
on-screen tab.
2. Touch the
on-screen
button.
5-80
Interior Features
Bluetooth®
CX-5_8CT5-EA-12K_Edition1 Page318
Friday, October 19 2012 3:11 PM
Form No.8CT5-EA-12K