buttons MAZDA MODEL CX-5 2016 Owners Manual (in English)
[x] Cancel search | Manufacturer: MAZDA, Model Year: 2016, Model line: MODEL CX-5, Model: MAZDA MODEL CX-5 2016Pages: 626, PDF Size: 13.81 MB
Page 20 of 626

Black plate (20,1)
NOTElIf the ignition is switched off while the seat
warmer is operating (High, Mid or Low)
and then switched ON again, the seat
warmer will automatically operate at the
temperature set before switching off the
ignition.
lUse the seat warmer when the engine is
running. Leaving the seat warmer on for
long periods with the engine not running
could cause the battery power to be
depleted.
lThe temperature of the seat warmer cannot
be adjusted beyond High, Mid and Low
because the seat warmer is controlled by a
thermostat.
qSeat Position Memory (Driver's
seat)í
The seat position memory function allows
you to program the driver's seat to a
desired seat position and to call up a
programmed position with the simple
touch of a button.
CAUTION
Do not place fingers or hands around
the bottom of the seat while the seat
memory function is operating. The
seat moves automatically while the
seat memory function is operating
and fingers or hands could get
pinched and injured.
SET button
The seat position can be programmed or
operated using the following operations.
lOperation of the buttons on the side of
the seat.
lOperation using the key.
NOTE
lIndividual seat positions can be
programmed to the two available
programming buttons on the side of the
driver's seat, plus one seat position for each
registered key.
lIf the vehicle has been serviced and the
battery cables disconnected, the
programmed seat positions will have been
erased. Re-program the seat positions.
Programming
1. Switch the ignition OFF.
2. Adjust the seat to the desired position
using the slide lifter and reclining
switches.
Refer to Seat Operation on page 2-5.
3. Press and hold the memory SET button
until a beep sound is heard.
2-8
Essential Safety Equipment
íSome models.
Seats
CX-5_8DV2-EA-14K_Edition3 Page20
Thursday, February 26 2015 5:31 PM
Form No.8DV2-EA-14K
Page 82 of 626

Black plate (82,1)
Keyless Entry System
This system uses the key buttons to
remotely lock and unlock the doors and
the liftgate.
The system can start the engine without
having to take the key out of your purse
or pocket.
It can also help you signal for attention.
Operating the theft-deterrent system is
also possible on theft-deterrent system-
equipped vehicles.
Press the buttons slowly and carefully.
System malfunctions or warnings are
indicated by the following warning lights
or beeps.
For vehicles with the type A instrument
cluster, check the displayed message for
more information and, if necessary, have
the vehicle inspected at an Authorized
Mazda Dealer, according to the indication.
lKEY Warning Light (Red)
Refer to Warning/Indicator Lights on
page 4-20.
lIgnition Not Switched Off (STOP)
Warning Beep
Refer to Ignition Not Switched Off
(STOP) Warning Beep on page 7-36.
lKey Removed from Vehicle Warning
Beep
Refer to Key Removed from Vehicle
Warning Beep on page 7-36.
If you have a problem with the key,
consult an Authorized Mazda Dealer.
If your key is lost or stolen, consult an
Authorized Mazda Dealer as soon as
possible for a replacement and to make
the lost or stolen key inoperative.
CAUTION
Radio equipment like this is governed
by laws.
Changes or modifications not
expressly approved by the party
responsible for compliance could void
the user's authority to operate the
equipment.
NOTE
lThe keyless entry system operation may
vary due to local conditions.
lThe keyless entry system is fully operational
(door/liftgate lock/unlock) when the push
button start is switched off. The system does
not operate if the push button start is
switched to any position other than off.
lIf the key does not operate when pressing a
button or the operational range becomes
too small, the battery may be dead. To
install a new battery, refer to Replace
Electrical Battery(page 6-39).
lBattery life is about one year. Replace the
battery with a new one if the KEY indicator
light (green) flashes in the instrument
cluster. Replacing the battery about once a
year is recommended because the KEY
warning light/indicator light may not
illuminate or flash depending on the rate of
battery depletion.
lAdditional keys can be obtained at an
Authorized Mazda Dealer. Up to 6 keys can
be used with the keyless functions per
vehicle. Bring all keys to an Authorized
Mazda Dealer when additional keys are
required.
3-4
Before Driving
Keys
CX-5_8DV2-EA-14K_Edition3 Page82
Thursday, February 26 2015 5:32 PM
Form No.8DV2-EA-14K
Page 83 of 626

Black plate (83,1)
qTransmitter
Operation buttons Operation indicator light
NOTElThe headlights turn on/off by operating the
transmitter.
Refer to Leaving Home Light System on
page 4-62.
l(With theft-deterrent system)
The hazard warning lights flash when the
theft-deterrent system is armed or turned
off.
Refer to Theft-Deterrent System on page
3-39.
l(With the advanced keyless function)
A beep sound can be heard for confirmation
when the doors and liftgate are locked/
unlocked using the key. If you prefer, the
beep sound can be turned off.
The volume of the beep sound can also be
changed.
Refer to Personalization Features on page
9-10.
Use the following procedure to change the
setting.
1. Switch the ignition off and close all of the
doors and the liftgate.
2. Open the driver's door.3. Within 30 seconds of opening the driver's
door, press and hold the LOCK button on
the key for 5 seconds or longer.
All of the doors and the liftgate lock and the
beep sound activates at the currently set
volume. (If the beep sound is currently set
to not activate, it will not activate.) The
setting changes each time the LOCK button
on the key is pressed and the beep sound
activates at the set volume. (If the beep
sound has been set to not activate, it will
not activate.)
4. The setting change is completed by doing
any one of the following:
lSwitch the ignition to ACC or ON.lClose the driver's door.lOpen the liftgate.lThe key is not operated for 10 seconds.lPress any button except the LOCK
button on the key.
lA request switch is pressed.
The operation indicator light flashes when
the buttons are pressed.
Lock button
To lock the doors and the liftgate, press
the lock button and the hazard warning
lights will flash once.
(With the advanced keyless function)
A beep sound will be heard once.
To confirm that all doors and the liftgate
have been locked, press the lock button
again within 5 seconds. If they are closed
and locked, the horn will sound.
Before Driving
Keys
3-5
CX-5_8DV2-EA-14K_Edition3 Page83
Thursday, February 26 2015 5:32 PM
Form No.8DV2-EA-14K
Page 109 of 626

Black plate (109,1)
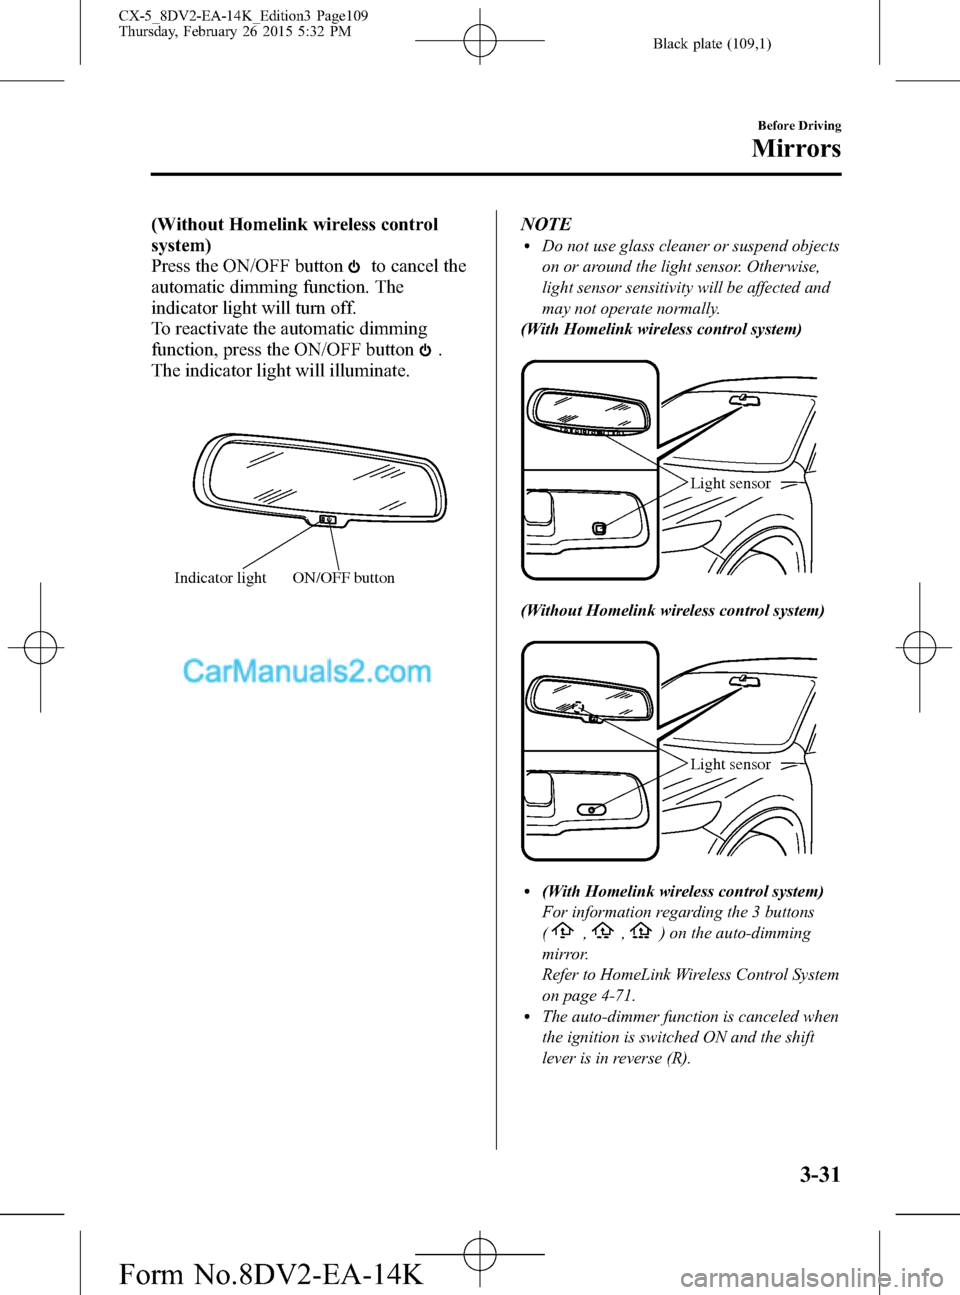
(Without Homelink wireless control
system)
Press the ON/OFF button
to cancel the
automatic dimming function. The
indicator light will turn off.
To reactivate the automatic dimming
function, press the ON/OFF button
.
The indicator light will illuminate.
ON/OFF button Indicator light
NOTElDo not use glass cleaner or suspend objects
on or around the light sensor. Otherwise,
light sensor sensitivity will be affected and
may not operate normally.
(With Homelink wireless control system)
Light sensor
(Without Homelink wireless control system)
Light sensor
l(With Homelink wireless control system)
For information regarding the 3 buttons
(
,,) on the auto-dimming
mirror.
Refer to HomeLink Wireless Control System
on page 4-71.
lThe auto-dimmer function is canceled when
the ignition is switched ON and the shift
lever is in reverse (R).
Before Driving
Mirrors
3-31
CX-5_8DV2-EA-14K_Edition3 Page109
Thursday, February 26 2015 5:32 PM
Form No.8DV2-EA-14K
Page 206 of 626

Black plate (206,1)
lVerify that there is a remote control
transmitter available for the device you
would like to program.
lDisconnect the power to the device.
qProgramming the HomeLink System
CAUTION
When programming a garage door
opener or a gate, disconnect the
power to these devices before
performing programming, as
continuous operation of the devices
could damage the motor.
The HomeLink system provides 3 buttons
which can be individually selected and
programmed using the transmitters for
current, on-market devices as follows:
1. Position the end of your hand-held
transmitter 2.5―7.5 cm (1―3 inches)
away from the HomeLink button you
wish to program while keeping the
indicator light in view.
2. Simultaneously press and hold both the
chosen HomeLink and hand-held
transmitter buttons.Do not release the
buttons until step 3 has been
completed.
NOTE
Some gate operators and garage door openers
may require you to replace this Programming
Step 2 with procedures noted in the“Gate
Operator/Canadian Programming”section.
3. After the HomeLink indicator light
changes from a slow to a rapidly
blinking light, release both the
HomeLink and hand-held transmitter
buttons.NOTE
If the HomeLink indicator light does not
change to a rapidly blinking light, contact
HomeLink atwww.homelink.comor call1-
800-355-3515for assistance.
4. Firmly press and hold the programmed
HomeLink button for five seconds, and
then release it. Perform this operation
two times to activate the door. If the
door does not activate, press and hold
the just-trained HomeLink button and
observe the indicator light.
If the indicator lightstays on constantly,
programming is completeand your
device should activate when the
HomeLink button is pressed and released.
NOTE
To program the remaining two HomeLink
buttons, begin with“Programming”―step 1.
If the indicator light blinksrapidly for
two seconds and then turns to a
constant light, continue with
“Programming”steps 5―7to complete
the programming of a rolling code
equipped device (most commonly a
garage door opener).
5. At the garage door opener receiver
(motor-head unit) in the garage, locate
the“learn”or“smart”button. This can
usually be found where the hanging
antenna wire is attached to the motor-
head unit.
6. Firmly press and release the“learn”or
“smart”button. (The name and color of
the button may vary by manufacturer.)
NOTE
Complete the programming within 30 seconds.
4-72
When Driving
Switches and Controls
CX-5_8DV2-EA-14K_Edition3 Page206
Thursday, February 26 2015 5:32 PM
Form No.8DV2-EA-14K
Page 207 of 626

Black plate (207,1)
7. Return to the vehicle and firmlypress,
hold for two seconds and releasethe
programmed HomeLink button. Repeat
the“press/hold/release”sequence a
second time, and, depending on the
brand of the garage door opener (or
other rolling code equipped device),
repeat this sequence a third time to
complete the programming process.
HomeLink should now activate your
rolling code equipped device.
NOTE
To program the remaining two HomeLink
buttons, begin with“Programming”―step 1.
For questions or comments, please contact
HomeLink atwww.homelink.comor1-
800-355-3515.
qGate operator/Canadian
Programming
Canadian radio-frequency laws require
transmitter signals to“time-out”(or quit)
after several seconds of transmission―
which may not be long enough for
HomeLink to pick up the signal during
programming. Similar to this Canadian
law, some U.S. gate operators are
designed to“time-out”in the same
manner.
If you live in Canada or you are having
difficulties programming a gate operator
by using the“Programming”procedures
(regardless of where you live),replace
“Programming HomeLink”step 2with
the following:
NOTE
If programming a garage door opener or gate
operator, it is advised to unplug the device
during the“cycling”process to prevent
possible overheating.
Continue to press and hold the HomeLink
button while youpress and release―
every two seconds(“cycle”) your hand-
held transmitter until the frequency signal
has successfully been accepted by
HomeLink. (The indicator light will flash
slowly and then rapidly.)
Proceed with“Programming”step 3 to
complete.
qOperating the HomeLink System
Press the programmed HomeLink button
to operate a programmed device. The
code will continue being transmitted for a
maximum of 20 seconds.
qReprogramming the HomeLink
system
To program a device to HomeLink using a
HomeLink button previously trained,
follow these steps:
1. Press and hold the desired HomeLink
button.DO NOTrelease the button.
2. The indicator light will begin to flash
after 20 seconds. Without releasing the
HomeLink button, proceed with
“Programming”- step 1.
qErasing Programmed HomeLink
Buttons
To erase the existing programming from
all three operating channels, press and
hold the two outside buttons (
,)
on the auto-dimming mirror until the
HomeLink indicator light begins to flash
after approximately 10 seconds.
Verify that the programming has been
erased when you resell the vehicle.
When Driving
Switches and Controls
4-73
CX-5_8DV2-EA-14K_Edition3 Page207
Thursday, February 26 2015 5:32 PM
Form No.8DV2-EA-14K
Page 322 of 626

Black plate (322,1)
qOperating the Radio
Band selector button Scan button Seek tuning buttons
Channel preset buttons
Auto memory buttonManual tuning dial Audio display
Radio ON
Press a band selector button (
)to
turn the radio on.
Band selection
Successively pressing the band selector
button (
) switches the bands as
follows: FM1→FM2→AM.
The selected mode will be indicated.
NOTE
If the FM broadcast signal becomes weak,
reception automatically changes from
STEREO to MONO for reduced noise.
Tuning
The radio has the following tuning
methods: Manual, Seek, Scan, Preset
channel, and Auto memory tuning. The
easiest way to tune stations is to set them
on preset channels.
Manual tuning
Turning the manual tuning dial will
change the frequency higher or lower.Seek tuning
Pressing the seek tuning button (
,)
will cause the tuner to seek a higher or
lower frequency automatically.
NOTE
If you continue to press and hold the button,
the frequency will continue changing without
stopping.
Scan tuning
Press the scan button (
)to
automatically sample strong stations.
Scanning stops at each station for about 5
seconds. To hold a station, press the scan
button (
) again during this interval.
Preset channel tuning
The 6 preset channels can be used to store
6 AM and 12 FM stations.
1. To set a channel first select AM, FM1,
or FM2. Tune to the desired station.
2. Press a channel preset button for about
2 seconds until a beep is heard. The
preset channel number or station
frequency will be displayed. The
station is now held in the memory.
5-26
Interior Features
Audio System
CX-5_8DV2-EA-14K_Edition3 Page322
Thursday, February 26 2015 5:33 PM
Form No.8DV2-EA-14K
Page 324 of 626

Black plate (324,1)
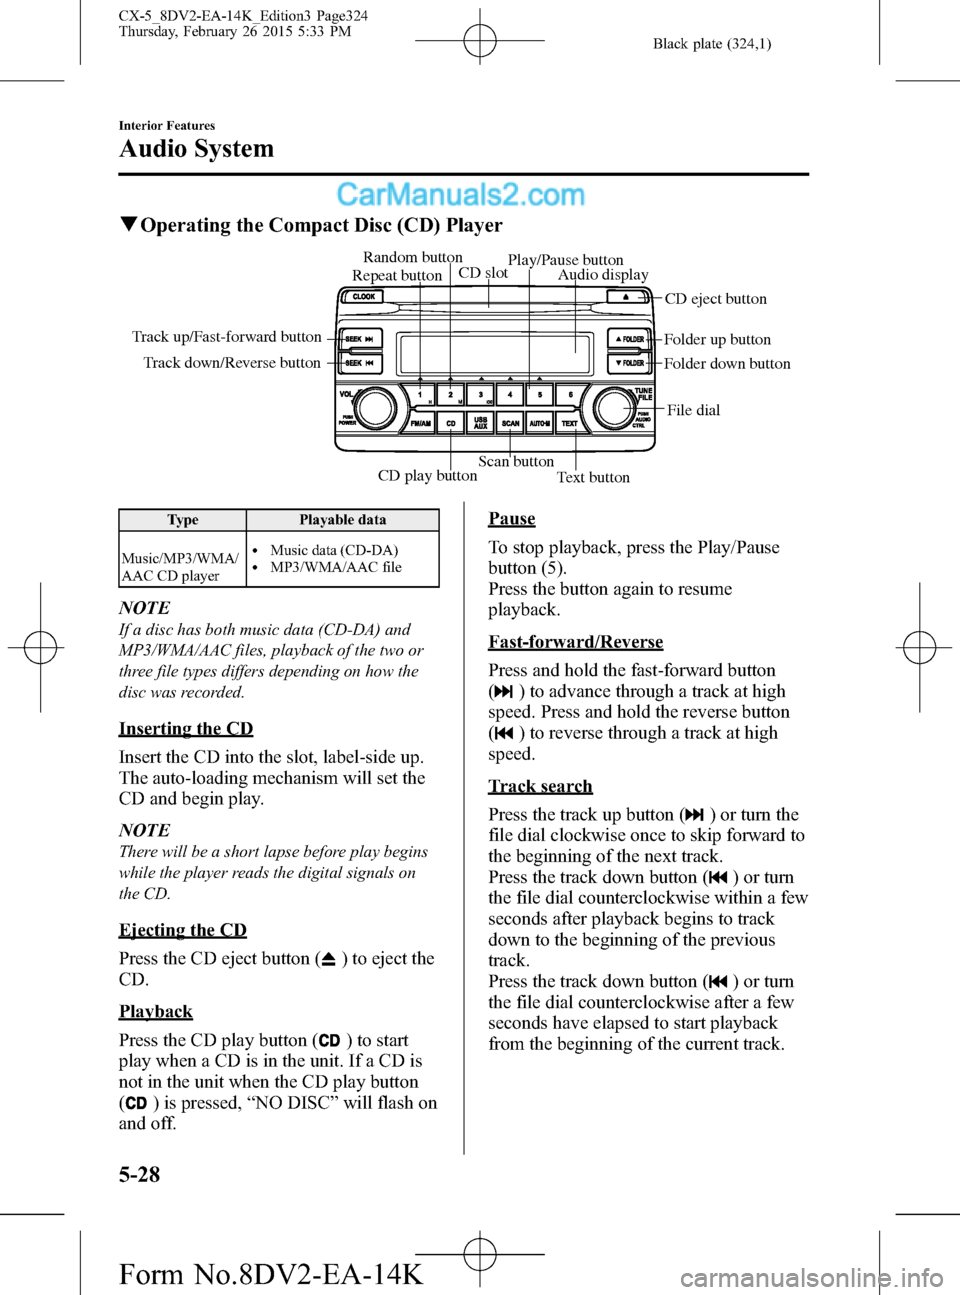
qOperating the Compact Disc (CD) Player
CD play buttonScan button
Text button Track down/Reverse button Track up/Fast-forward button
File dial Folder up button
Folder down button Audio display
CD eject button CD slot Random button
Play/Pause button
Repeat button
Type Playable data
Music/MP3/WMA/
AAC CD player
lMusic data (CD-DA)lMP3/WMA/AAC file
NOTE
If a disc has both music data (CD-DA) and
MP3/WMA/AAC files, playback of the two or
three file types differs depending on how the
disc was recorded.
Inserting the CD
Insert the CD into the slot, label-side up.
The auto-loading mechanism will set the
CD and begin play.
NOTE
There will be a short lapse before play begins
while the player reads the digital signals on
the CD.
Ejecting the CD
Press the CD eject button (
) to eject the
CD.
Playback
Press the CD play button (
) to start
play when a CD is in the unit. If a CD is
not in the unit when the CD play button
(
) is pressed,“NO DISC”will flash on
and off.
Pause
To stop playback, press the Play/Pause
button (5).
Press the button again to resume
playback.
Fast-forward/Reverse
Press and hold the fast-forward button
(
) to advance through a track at high
speed. Press and hold the reverse button
(
) to reverse through a track at high
speed.
Track search
Press the track up button (
) or turn the
file dial clockwise once to skip forward to
the beginning of the next track.
Press the track down button (
) or turn
the file dial counterclockwise within a few
seconds after playback begins to track
down to the beginning of the previous
track.
Press the track down button (
) or turn
the file dial counterclockwise after a few
seconds have elapsed to start playback
from the beginning of the current track.
5-28
Interior Features
Audio System
CX-5_8DV2-EA-14K_Edition3 Page324
Thursday, February 26 2015 5:33 PM
Form No.8DV2-EA-14K
Page 328 of 626

Black plate (328,1)
Audio Set (Type B)
NOTE
The explanation of functions described in this manual may differ from the actual operation, and
the shapes of screens and buttons and the letters and characters displayed may also differ from the
actual appearance.
Additionally, depending on future software updates, the content may successively change without
notice.
Audio Set (Type B) has three different human interfaces.lCommander switchlTouch panellVoice recognition with steering switch and microphone
Commander switch operation
NOTE
For safety reasons, some operations are disabled while the vehicle is being driven.
Volume dial operation
Volume dial
Press the volume dial to switch the audio MUTE on and off.
Turn the volume dial to adjust the volume. The volume increases by turning the dial
clockwise, and decreases by turning it counterclockwise.
5-32
Interior Features
Audio System
CX-5_8DV2-EA-14K_Edition3 Page328
Thursday, February 26 2015 5:33 PM
Form No.8DV2-EA-14K
Page 339 of 626

Black plate (339,1)
NOTElTo listen to SiriusXM, a prior subscription
(fee-based) is required.
lThe channels which you can receive depend
on the package you subscribe to.
lSatellite radio is broadcast as Sirius, XM,
and SiriusXM in the U.S.A., and Sirius and
XM in Canada. In this owner’s manual,
only the name SiriusXM is used.
lFor traffic and weather channels, map
information is not displayed and only audio
broadcasts can be received.
lCall 888-539-7474 to activate. For more
information, visit www.siriusxm.com.
Satellite radio is only available in regions
providing satellite radio service (some
areas of the United States and Canada).
Contact Authorized Mazda Dealer for
details.
How to Activate Satellite Radio
You must call SiriusXM to activate your
service. Activation is free and takes only a
few minutes.
SiriusXM service uses an ID code to
identify your radio. This code is needed to
activate SiriusXM service, and report any
problems.
Please have the following information
ready:
lRadio ID (8-digit electronic serial no -
See below for how to find your ESN)
lValid credit card information (may not
be required at initial sign-up)
Be sure you are parked outside with a
clear view of open sky, you will be
instructed to turn on your radio (in
SiriusXM mode and tuned to channel 184
(Sirius)/1 (XM and SiriusXM)).
Activation typically takes only 2―5
minutes.
Displaying the Radio ID (ESN)
When channel 0 is selected, the radio ID
is displayed. Use the PREVIOUS or
NEXT channel buttons to select channel
0.
Interior Features
Audio System
5-43
CX-5_8DV2-EA-14K_Edition3 Page339
Thursday, February 26 2015 5:33 PM
Form No.8DV2-EA-14K