weight MAZDA MODEL CX-5 2018 (in English) User Guide
[x] Cancel search | Manufacturer: MAZDA, Model Year: 2018, Model line: MODEL CX-5, Model: MAZDA MODEL CX-5 2018Pages: 628, PDF Size: 82.38 MB
Page 132 of 628

▼Safety Chains
Safety chains must be used as a precautionary measure should th
e trailer become
unintentionally unhitched. They should cross under the trailer tongue and attach to the hitch.
Leave enough slack to allow full turns. Consult literature publ ished by your trailer or hitch
manufacturer for more details.
WA R N I N G
Make sure the safety chain is securely attached to both the trailer and the vehicle prior to
departure:
Towing a trailer without using a safety chain securely attached to both the trailer and the
vehicle is dangerous. If damage occurs to the coupling unit or hitch ball, the trailer could
wander into another lane and cause a collision.
▼ Trailer Lights
Trailer lights must comply with
all federal, state, and local regulations. Equip your trailer as
required before towing it day or night.
CAUTION
Do not connect a trailer lighting system directl y to the lighting system of your Mazda. This
may damage your vehicle's electrical system an d lighting systems. Have a recreational vehicle
dealer or trailer rental agency connect the system, and inspect the brake lights and turn
signals yourself before each trip.
▼ Trailer Brakes
If the total trailer weight ex
ceeds 450 kg (1,000 lb), trailer brakes are required. If your trailer
has brakes, make sure they comply with all federal, state, and local regulations.
WA R N I N G
Do not connect a hydraulic trailer-brake system to your vehicle's brake system:
Connecting a hydraulic trailer-brake system directly to the vehicle brake system is dangerous
and will result in inadequate braking and possible injury.
Before Driving
To w i n g
3-56
CX-5_8GN5-EA-17J_Edition1 2017-8-18 12:58:27
Page 133 of 628
▼Trailer Towing Tips
•Verify that your Mazda
maintains a near-normal attitude when a loaded or unloaded trailer
is connected. Do not drive if it has an abn ormal front-up or front-down position. Inspect
for incorrect tongue load, worn suspension parts, and trailer o verloading.
•Make sure the trailer is properly loaded and the cargo is secur e to prevent it from shifting.
•Make sure the mirrors conform to all government regulations. If they do not, install
required rear view mirrors appr opriate for towing purposes.
The three main causes of vehicle-trailer accidents are driver e rror, excessive speed, and
improper trailer loading.
Before driving
•Have your cooling and braking system checked by an Authorized M azda Dealer.
•Before starting out, inspect the operation of all vehicle and trailer lights and all
vehicle-to-trailer connections. S top and re-inspect all lights and connections after driving
a short distance.
Driving
•Your Mazda will handle differe ntly with a trailer in tow, so practice turning, backing, and
stopping in a traffic-free area.
•Take time to get accustomed to the extra weight and length.
•Allow more room between your vehicle and the one in front becau se braking distance
increases with a trailer. For eac h 16 km/h (10 mph) of speed, a llow at least one vehicle
and trailer length between your Mazda and the vehicle ahead.
•Avoid jerky starts or sudden acceleration.
•Avoid sudden braking. It may cau se loss of control and result in jackknifing, especially so
on wet or slippery roads.
•Shift the selector lever to the D position when towing a traile r in hilly terrain or when
heavily loaded.
The D position will allow opera ting the vehicle without frequen t shifting.
Lane changes and turning
Avoid quick lane changes, sudden turns, and tight turns. Slow d own before turning to avoid
the need of sudden braking.
A turning trailer will make a tigh ter arc than the tow vehicle. Compensate with turns that are
larger than normal.
Before Driving
To w i n g
3-57
CX-5_8GN5-EA-17J_Edition1 2017-8-18 12:58:27
Page 134 of 628
Passing
Plan well ahead to pass other vehicles, and provide plenty of r oom before changing lanes.
Crosswinds from passing vehicles, especially larger ones, and t he effects of rough roads will
affect handling.
If swaying occurs, firmly grip the steering wheel and reduce sp eed immediately, but
gradually.
Steer straight ahead. If no extr eme correction of steering or b raking is made, the
combination of less speed and firm steering will result in stab ility.
Backing up
Backing a vehicle with a traile r requires practice and patience . Back slowly, and have a
helper outside at the rear of th e trailer to reduce the risk of an accident.
To turn the trailer, place your ha nd at the bottom of the steering wheel and turn it in the
direction you want the trailer to go. Make only slight movement s to prevent sharp or
prolonged turning.
Ascending a hill
Shift into a lower gear to redu ce the possibility of overloadin g or overheating the engine, or
both.
Descending a hill
Shift into a lower gear and use engine compression as a braking effect.
WA R N I N G
Always use lower gears to reduce speed:
Holding the brake pedal down too long or too frequently is dangerous as it could cause the
brakes to overheat and lose power, resulting in loss of control and a serious accident. Use
lower gears to help reduce speed. Pull off th e road and allow brakes to cool down whenever
braking performance feels reduced.
Overheated engine
The extra weight of the trailer may strain the engine on hot days and on long or steep
upgrades.
If the temperature gauge indicates overheating, turn off the ai r conditioner, drive safely to
the side of the road, park off the right-of-way and wait for en gine to cool. Refer to
Overheating on page 7-18.
Before Driving
To w i n g
3-58
CX-5_8GN5-EA-17J_Edition1 2017-8-18 12:58:27
Page 181 of 628
Driving Tips
WA R N I N G
Do not let the vehicle move in a direction
opposite to the direction selected by the
selector lever:
Do not let the vehicle move backward with
the selector lever in a forward position, or
do not let the vehicle move forward with
the selector lever in the reverse position.
Otherwise, the engine may stop, causing
the loss of the power brake and power
steering functions, and make it difficult to
control the vehicle which could result in an
accident.
Passing
For extra power when passing another
vehicle or climbing steep grades, depress
the accelerator fully. The transaxle will
shift to a lower gear, depending on vehicle
speed.
NOTE
•The accelerator pedal may initially feel
heavy as it is being depressed, then feel
lighter as it is depressed further. This
change in pedal force aids the engine
control system in determining how much
the accelerator pedal has been
depressed for performing kickdown, and
functions to control whether or not
kickdown should be performed.
•While the selector lever is in the M
position and the TCS is turned off,
manual shift mode does not switch to
automatic shift mode even if the
accelerator pedal is completely
depressed. Operate the selector lever.
Climbing steep grades from a stop
To climb a steep grade from a stopped
position:
1. Depress the brake pedal.
2. Shift to D or M1, depending on the load weight and grade steepness.
3. Release the brake pedal while gradually accelerating.
Descending steep grades
When descending a steep grade, shift to
lower gears, depending on load weight and
grade steepness. Desce nd slowly, using the
brakes only occasionally to prevent them
from overheating.
When Driving
Automatic Transaxle
4-45
CX-5_8GN5-EA-17J_Edition1 2017-8-18 12:58:27
Page 186 of 628
▼Leaving Home Light
The leaving home light turns on the lights
when the transmitte
r unlock button is
pressed while away from the vehicle.
The following light s turn on when the
leaving home light is operated.
Low beams, Parking lights, Taillights,
License plate lights.
To turn on the lights
When the ignition switch and the headlight
switch are in the following conditions, the
headlights will il luminate when the
transmitter unlock button is pressed and
the vehicle receives the transmitter signal.
The headlights turn off after a certain
period of time has elapsed (30 seconds).
•Ignition switch: off
•Headlight switch: , , or
Unlock button
Lock button
NOTE
•Operation of the leaving home light can
be turned on or off.
Refer to Personalization Features on
page 9-9.
•When the transmitter lock button is
pressed and the vehicle receives the
transmitter signal, the headlights turn
off.
•When the headlight switch is turned to
the
position, the headlights turn off.
▼ Headlight Leveling
The number of passengers and weight of
cargo in the luggage compartment change
the angle of the headlights.
Auto type
The angle of the headlights will be
automatically adjusted when turning on
the headlights.
A system malfunction or operation
conditions are indicated by a warning.
Refer to Warning/Indicator Lights on page
4-30.
Manual type
The headlight leveling switch is used to
adjust the angle o
f the headlights
manually.
Select the proper headlight angle from the
following chart.
Front seat Rear
seat LoadSwitch
Posi-tion
Driver Passenger
×―――0
××――0
×××―1
××××1
When Driving
Switches and Controls
4-50
CX-5_8GN5-EA-17J_Edition1 2017-8-18 12:58:27
Page 308 of 628

▼Variance Between Actual Road C
onditions and Displayed Image
Some variance occurs between the actual road and the displayed road. Such variance in
distance perspective could lead to an accident. Note the follow ing conditions that may cause
a variance in distance perspective.
When the vehicle is tilted due to the weight of passengers and load
When the vehicle rear is lowered, the object displayed on the screen appears farther than the
actual distance.
Variance
Object
When there is a steep grade behind the vehicle
When there is a steep upgrade (downgrade) behind the vehicle, t he object displayed on the
screen appears farther (downgrade: closer) than the actual dist ance.
A
AB
B
Appears
farther than
actual
distance
Object at actual
position
Object at actual position
Object on screen
A: Distance between the vehicle and object displayed on the screen.
B: Actual distance between the vehicle and object. Object on screenAppears
closer than
actual
distance
When Driving
Rear View Monitor
4-172
CX-5_8GN5-EA-17J_Edition1
2017-8-18 12:58:27
Page 465 of 628

▼Closing the Hood
1. Check under the hood area to make
certain all filler caps are in place and
all loose items (e.g. tools, oil
containers, etc.) have been removed.
2. Lift the hood, grasp the padded area on the support rod, and secure the support
rod in the clip. Verify that the support
rod is secured in the clip before closing
the hood.
Clip ClipClip
3. Lower the hood slowly to a height of
about 20 cm (7.9 in) above its closed
position and then let it drop.
CAUTION
When closing the hood, do not push it
excessively such as by applying your
weight. Otherwise, the hood could be
deformed.
Maintenance and Care
Owner Maintenance
6-15
CX-5_8GN5-EA-17J_Edition1 2017-8-18 12:58:27
Page 481 of 628
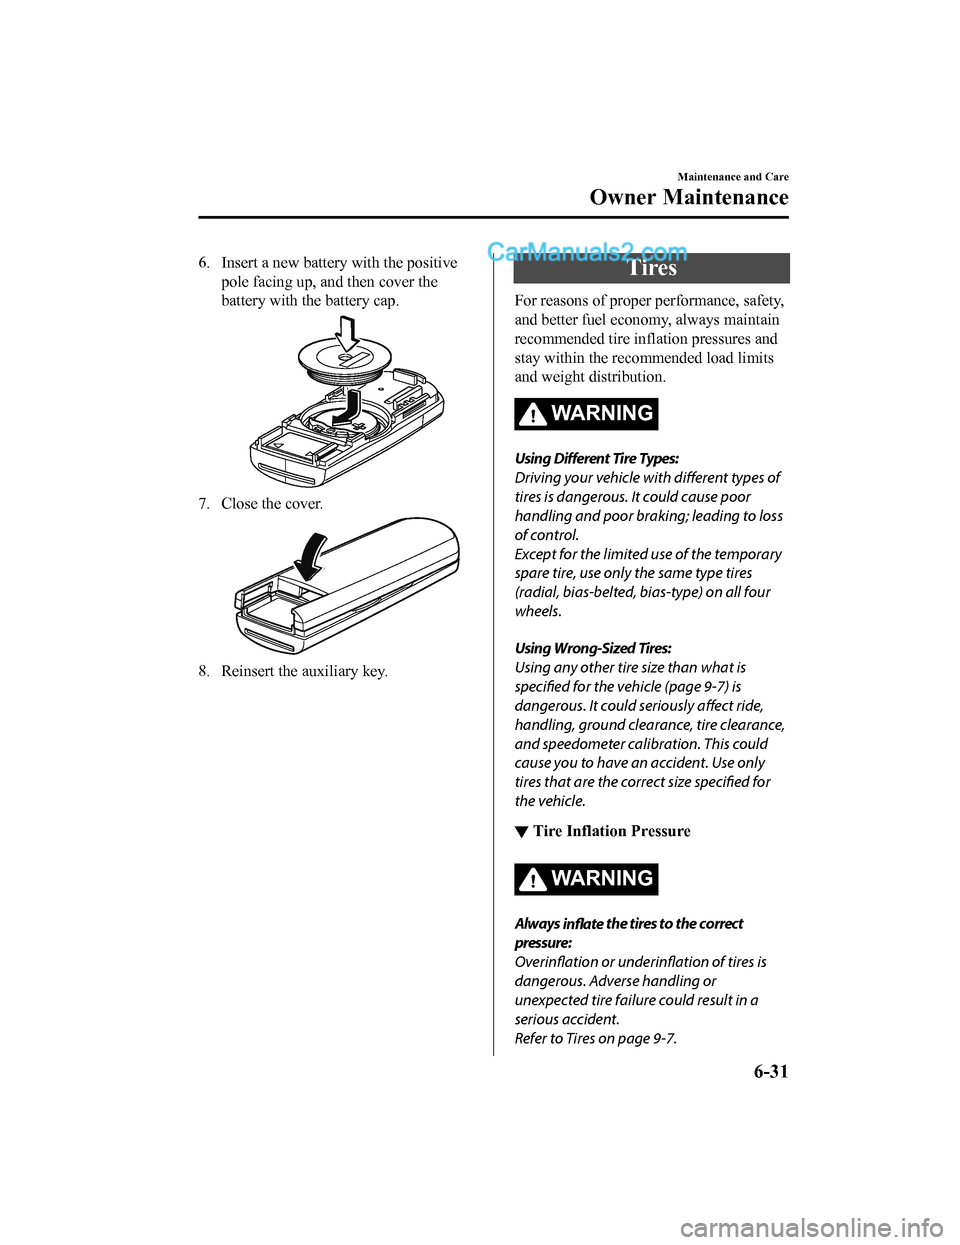
6. Insert a new battery with the positivepole facing up, and then cover the
battery with the battery cap.
7. Close the cover.
8. Reinsert the auxiliary key.
Tires
For reasons of proper performance, safety,
and better fuel economy, always maintain
recommended tire inflation pressures and
stay within the recommended load limits
and weight distribution.
WA R N I N G
Using Different Tire Types:
Driving your vehicle with different types of
tires is dangerous. It could cause poor
handling and poor braking; leading to loss
of control.
Except for the limited use of the temporary
spare tire, use only the same type tires
(radial, bias-belted, bias-type) on all four
wheels.
Using Wrong-Sized Tires:
Using any other tire size than what is
specified for the vehicle (page 9-7) is
dangerous. It could seriously affect ride,
handling, ground clearance, tire clearance,
and speedometer calibration. This could
cause you to have an accident. Use only
tires that are the correct size specified for
the vehicle.
▼ Tire Inflation Pressure
WA R N I N G
Always
inflate the tires to the correct
pressure:
Overinflation or underinflation of tires is
dangerous. Adverse handling or
unexpected tire failure could result in a
serious accident.
Refer to Tires on page 9-7.
Maintenance and Care
Owner Maintenance
6-31
CX-5_8GN5-EA-17J_Edition1 2017-8-18 12:58:27
Page 580 of 628

P215/65R15 95H is an example of a tire size and load index rating. Here is an explanation
of the various components of tha t tire size and load index rating. Note that the tire size and
load index rating may be different from the example.
P
Indicates a tire that may be ins talled on cars, SUVs, minivans and light trucks as designated
by the Tire and Rim Association (T&RA).
NOTE
If your tire size does not begin with a letter this may mean it is designated by either ETRTO
(European Tire and Rim Technical Organization) or JATMA (Japan Tire Manufacturing
Association).
215
“215” is the nominal width of the tire in millimeters. This thr ee-digit number gives the
width in millimeters of the tire from sidewall edge to sidewall edge. In general, the larger
the number, the wider the tire.
65
“65” is the aspect ratio. This two-digit number indicates the t ire's ratio of height to width.
R
“R” is the tire construction symbol. R indicates “Radial ply co nstruction”.
15
“15” is the wheel rim diameter in inches.
95
“95” is the Load Index. This two-or three-digit number indicate s how much weight each tire
can support.
H
“H” is the speed rating. The speed rating denotes the maximum s peed for which the use of
the tire is rated.
Letter Rating Speed Rating
Q9 9 m ph
R1 06 m ph
S 112 mph
T 118 mph
U1 24 m ph
H1 30 m ph
Customer Information and Reporting Safety Defects
Tire Information (U.S.A.)
8-24
CX-5_8GN5-EA-17J_Edition1 2017-8-18 12:58:27
Page 581 of 628

Letter RatingSpeed Rating
V 149 mph
W 168
* mph
Y 186
* mph
* For tires with a maximum speed capability over 149 mph, tire manufacturers sometimes use the letters ZR. For
tires with a maximum speed cap ability over 186 mph, tire manufa cturers always use the letters ZR.
MS or M/S: Mud and Snow
AT: All Terrain.
AS: All Season. The “M
S” or “M/S” indicates that the tire has some functional use in mud
and snow.
U.S. DOT Tire Identifi cation Number (TIN)
This begins with the letters “DOT” which indicates the tire mee ts all federal standards. The
next two numbers or letters are the plant code where it was man ufactured, and the last four
numbers represent the week and year the tire was manufactured. For example, the numbers
457 means the 45st week of 1997. After 2000 the numbers go to f our digits. For example,
the number 2102 means the 21th week of 2002. The other numbers are marketing codes
used at the manufacturer's discretion. This information is used to contact consumers if a tire
defect requires a recall.
Tire Ply Composition and Materials Used
The number of plies indicates the number of layers of rubber-co ated fabric in the tire. In
general, the greater the number of plies, the more weight a tir e can support. Tire
manufacturers also must indicate the tire materials, which incl ude steel, nylon, polyester,
and other.
Maximum Load Rating
This number indicates the maximum load in kilograms and pounds that can be carried by the
tire.
Maximum Permissible Inflation Pressure
This number is the greatest amoun t of air pressure that should ever be put in the tire under
normal driving conditions.
Tread Wear, Traction and Temperature Grades
Tr e a d w e a r : The tread wear grade is a comparative rating based on the wear rate of the tire
when tested under controlled con ditions on a specified government test course. For
example, a tire graded 150 would wear one and one-half (1 1/2) times as well on the
government course as a tire graded 100.
Customer Information and Reporting Safety Defects
Tire Information (U.S.A.)
8-25
CX-5_8GN5-EA-17J_Edition1 2017-8-18 12:58:27