headlight bulb MAZDA MODEL CX-7 2010 Owners Manual (in English)
[x] Cancel search | Manufacturer: MAZDA, Model Year: 2010, Model line: MODEL CX-7, Model: MAZDA MODEL CX-7 2010Pages: 510, PDF Size: 8.55 MB
Page 227 of 510

Black plate (227,1)
Ignition switched OFF
Switch Position
Headlights Off Off Off On
Taillights
Parking lights
License lights
Side-marker
lights
Dashboard
illuminationOff Off On On
*1 Daytime running lights on
*2 The headlight and other light settings switch
automatically depending on the surrounding
brightness detected by the sensor.
Xenon fusion headlight bulbsí
The low-beam bulbs of the headlights
have xenon fusion bulbs that produce a
bright white beam over a wide area.
WARNING
Do not replace the xenon fusion bulbs
yourself:
Replacing the xenon fusion bulbs
yourself is dangerous. Because the
xenon fusion bulbs require high
voltage, you could receive an electric
shock if the bulbs are handled
incorrectly. Consult an Authorized
Mazda Dealer when the replacement
is necessary.
NOTE
If the headlights flicker, or the brightness
weakens, the bulb-life may be depleted and a
replacement is necessary. Consult an
Authorized Mazda Dealer.
qHeadlight High-Low Beam
Push the lever forward for high beam.
Pull back to original position for low
beam.
High beam
Low beam
qFlashing the Headlights
To flash the headlights, pull the lever fully
toward you. The headlight switch does
not need to be on, and the lever will return
to the normal position when released.
OFF
Flashing
Driving Your Mazda
Switches and Controls
5-63íSome models. CX-7_8AS7-EA-09E_Edition2 Page227
Friday, June 5 2009 2:25 PM
Form No.8AS7-EA-09E
Page 228 of 510

Black plate (228,1)
qHeadlight Levelingí
The number of passengers and weight of
cargo in the luggage compartment change
the angle of the headlights.
The headlight leveling switch adjusts this
angle.
Select the proper setting from the following chart.
Front seat
Rear
seatLoadSwitch
Position
Driver Passenger
×―――0
××――0
×× ×―1
×× ×× 2
×――×3
×: Yes
―:No
qDaytime Running Lights
(Canada)
In Canada, vehicles must be driven with
the headlights on during daytime
operation.
(Except Canada)
í
Some vehicles are equipped with daytime
running lights.
Refer to Headlights on page 5-60.
Turn and Lane-Change
Signals
qTurn Signal
Move the signal lever down (for a left
turn) or up (for a right turn) to the stop
position. The signal will self-cancel after
the turn is completed.
If the indicator light continues to flash
after a turn, manually return the lever to
its original position.
Right turn
Left turn Right lane change
Left lane changeOFF
Green indicators on the dashboard show
which signal is working.
Lane-change signals
Move the lever slightly toward the
direction of the change―until the
indicator flashes―and hold it there. It
will return to the off position when
released.
NOTE
If an indicator light stays on without flashing
or if it flashes abnormally, one of the turn
signal bulbs may be burned out.
5-64
Driving Your Mazda
íSome models.
Switches and Controls
CX-7_8AS7-EA-09E_Edition2 Page228
Friday, June 5 2009 2:25 PM
Form No.8AS7-EA-09E
Page 425 of 510

Black plate (425,1)
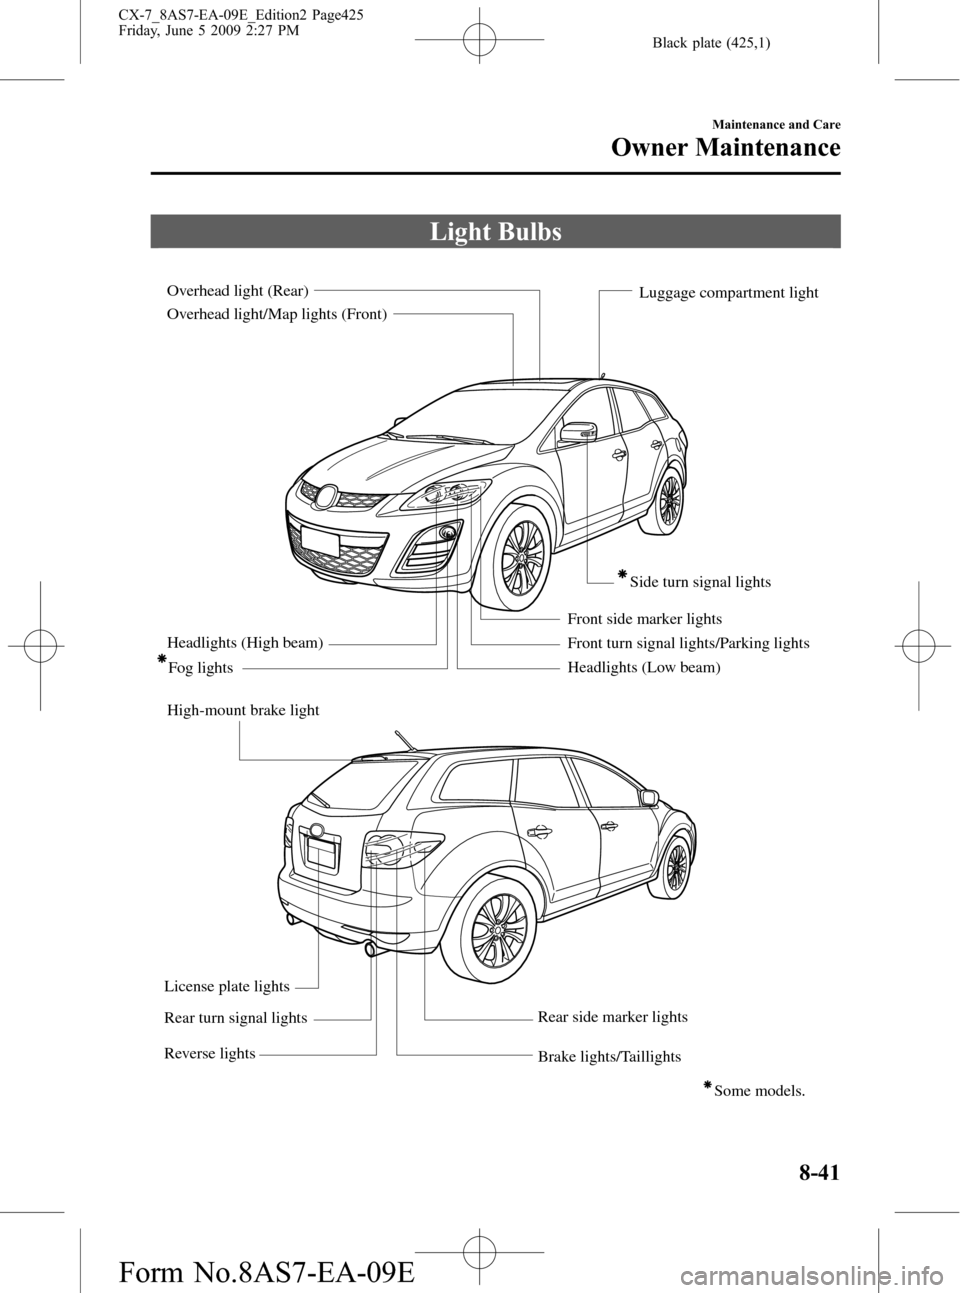
Light Bulbs
Headlights (Low beam) Headlights (High beam)
High-mount brake lightFog lights
Front turn signal lights/Parking lightsSide turn signal lights
License plate lights
Brake lights/Taillights Overhead light/Map lights (Front) Overhead light (Rear)
Front side marker lights
Rear turn signal lights
Rear side marker lights
Reverse lights
Luggage compartment light
Some models.
Maintenance and Care
Owner Maintenance
8-41
CX-7_8AS7-EA-09E_Edition2 Page425
Friday, June 5 2009 2:27 PM
Form No.8AS7-EA-09E
Page 426 of 510

Black plate (426,1)
WARNING
Do not replace the xenon fusion bulbs
yourself:
Replacing the xenon fusion bulbs
yourself is dangerous. Because the
xenon fusion bulbs require high
voltage, you could receive an electric
shock if the bulbs are handled
incorrectly. Consult an Authorized
Mazda Dealer when the replacement
is necessary.
Never touch the glass portion of a
halogen bulb with your bare hands and
always wear eye protection when
handling or working around the bulbs:
When a halogen bulb breaks, it is
dangerous. These bulbs contain
pressurized gas. If one is broken, it
will explode and serious injuries
could be caused by the flying glass.
If the glass portion is touched with
bare hands, body oil could cause the
bulb to overheat and explode when
lit.
Always keep halogen bulbs out of the
reach of children:
Playing with a halogen bulb is
dangerous. Serious injuries could be
caused by dropping a halogen bulb
or breaking it some other way.
qReplacing Exterior Light Bulbs
Replacing a headlight bulb
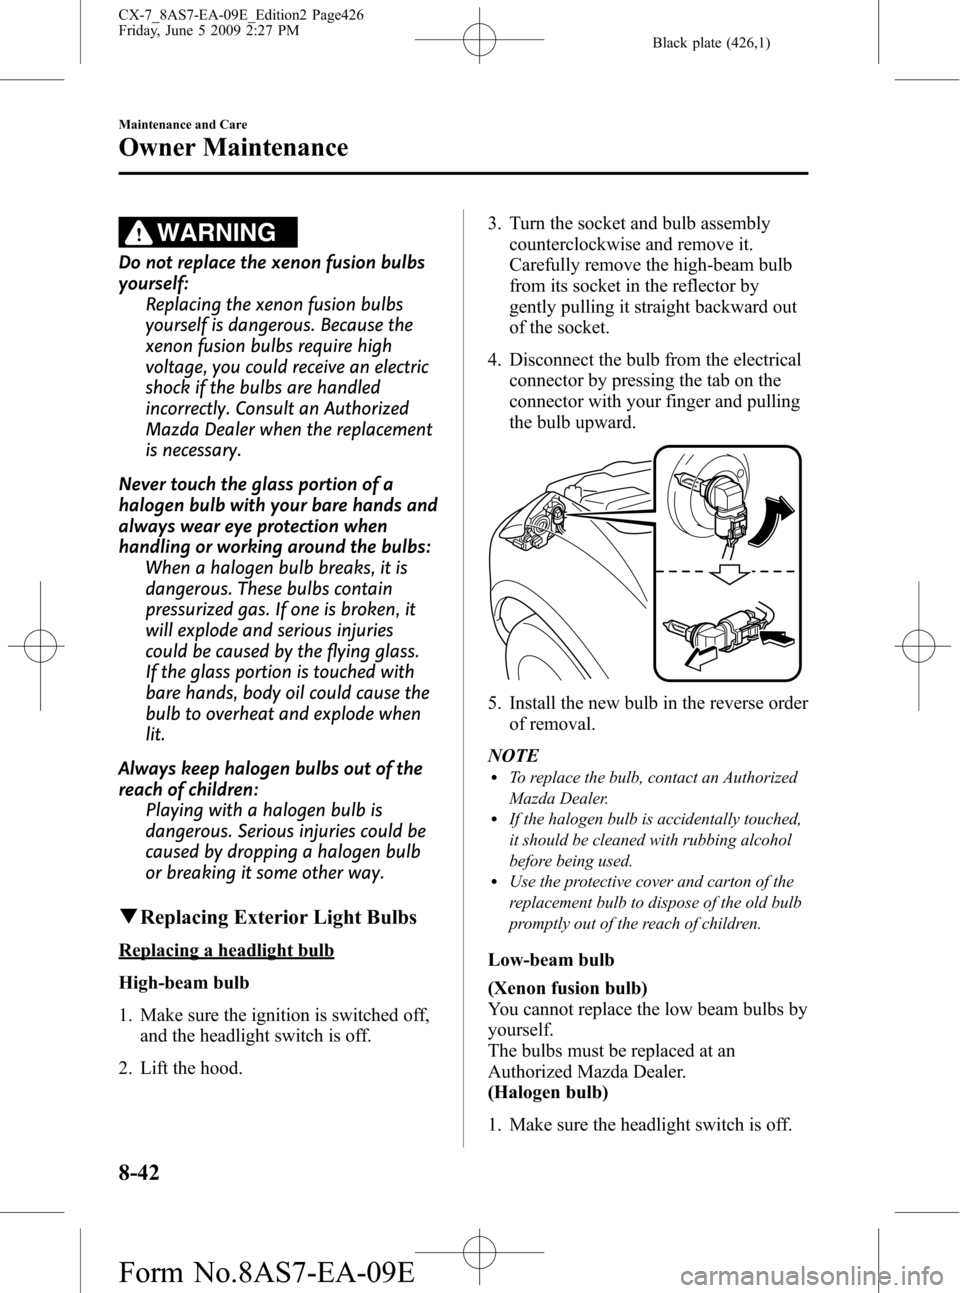
High-beam bulb
1. Make sure the ignition is switched off,
and the headlight switch is off.
2. Lift the hood.3. Turn the socket and bulb assembly
counterclockwise and remove it.
Carefully remove the high-beam bulb
from its socket in the reflector by
gently pulling it straight backward out
of the socket.
4. Disconnect the bulb from the electrical
connector by pressing the tab on the
connector with your finger and pulling
the bulb upward.
5. Install the new bulb in the reverse order
of removal.
NOTE
lTo replace the bulb, contact an Authorized
Mazda Dealer.
lIf the halogen bulb is accidentally touched,
it should be cleaned with rubbing alcohol
before being used.
lUse the protective cover and carton of the
replacement bulb to dispose of the old bulb
promptly out of the reach of children.
Low-beam bulb
(Xenon fusion bulb)
You cannot replace the low beam bulbs by
yourself.
The bulbs must be replaced at an
Authorized Mazda Dealer.
(Halogen bulb)
1. Make sure the headlight switch is off.
8-42
Maintenance and Care
Owner Maintenance
CX-7_8AS7-EA-09E_Edition2 Page426
Friday, June 5 2009 2:27 PM
Form No.8AS7-EA-09E
Page 428 of 510

Black plate (428,1)
Front side marker lights, Front turn
signal lights/Parking lights
1. Make sure the headlight switch is off.
2. If you are changing a bulb in the right
headlight unit, start the engine, turn the
steering wheel all the way to the right,
and turn off the engine. If you are
changing a bulb in the left headlight
unit, turn the steering wheel to the left.
3. Turn the screws and the center section
of the plastic retainers
counterclockwise and remove them,
then partially peel back the mudguard.
InstallationRemoval
4. Turn the socket and bulb assembly
counterclockwise and remove it.
5. Disconnect the bulb from the socket.
Front side marker lights
Front turn signal lights/Parking lights
6. Install the new bulb in the reverse order
of removal.
Fog lightsí
1. Make sure the ignition is switched off,
and the headlight switch is off.
2. Loosen the screws securing the fog
light cover.
3. Remove the fog light cover.
4. Loosen the screws securing the fog
light unit.
8-44
Maintenance and Care
íSome models.
Owner Maintenance
CX-7_8AS7-EA-09E_Edition2 Page428
Friday, June 5 2009 2:27 PM
Form No.8AS7-EA-09E
Page 429 of 510

Black plate (429,1)
5. Remove the fog light unit.
6. Press the tab on the bulb socket and
disconnect the connector cord.
7. Rotate the bulb socket
counterclockwise as shown in the
figure and remove it.
8. Install the new bulb in the reverse order
of removal.
NOTE
lTo replace the bulb, contact an Authorized
Mazda Dealer.
lIf the halogen bulb is accidentally touched,
it should be cleaned with rubbing alcohol
before being used.
lUse the protective cover and carton for the
replacement bulb to dispose of the old bulb
promptly and out of the reach of children.
Brake lights/Taillights, Rear turn signal
lights, Reverse lights, Rear side-marker
lights
1. Make sure the ignition is switched off,
and the headlight switch is off.
2. Remove the cover.
3. Turn the socket and bulb assembly
counterclockwise and remove it.
4. Disconnect the bulb from the socket.
Rear side-marker lights
Maintenance and Care
Owner Maintenance
8-45
CX-7_8AS7-EA-09E_Edition2 Page429
Friday, June 5 2009 2:27 PM
Form No.8AS7-EA-09E
Page 430 of 510

Black plate (430,1)
Brake lights/Taillights
Rear turn signal lights
Reverse lights
5. Install the new bulb in the reverse order
of removal.NOTE
To replace the bulb, contact an Authorized
Mazda Dealer.
High-mount brake light, Side turn
signal lightsí
Due to the complexity and difficulty of
the procedure, the LED bulbs should be
replaced by an Authorized Mazda Dealer.
NOTE
LED bulb replacement is not possible. The
rear combination component must be replaced.
License plate lights
1. Make sure the ignition is switched off,
and the headlight switch is off.
2. Wrap a flathead screwdriver with a soft
cloth to prevent damage to the lens and
remove the lens by carefully prying on
the edge of the lens with a flathead
screwdriver.
3. Disconnect the bulb by pulling it out.
4. Install the new bulb in the reverse order
of removal.
8-46
Maintenance and Care
íSome models.
Owner Maintenance
CX-7_8AS7-EA-09E_Edition2 Page430
Friday, June 5 2009 2:27 PM
Form No.8AS7-EA-09E
Page 500 of 510

Black plate (500,1)
2.5-liter engine
Item Weight
GVWR (Gross Vehicle Weight Rating) 2,125 kg (4,685 lbs)
GAWR (Gross Axle Weight Rating)Front 1,104 kg (2,434 lbs)
Rear 1,025 kg (2,260 lbs)
qAir Conditioner
Item Classification
Refrigerant Type HFC134a (R-134a)
qLight Bulbs
Exterior light
Light bulbCategory
Wattage ECE R (SAE)
HeadlightsHigh beam 60 HB3 (#9005)
Low beamHalogen 55 H7 (H7)
Xenon fusion 35 D2S (D2S)
Front turn signal lights/Parking lights 27/8―(#1157NA)
Front side-marker lights 5 W5W (#168)
Fog lights
í55 H11 (H11)
Side turn signal lights (Integrated with outside mirrors)íLED*1―(―)
High-mount brake light LED*1―(―)
Rear turn signal lights 21 WY21W (―)
Brake lights/Taillights 21/5 W21/5W (#7743)
Reverse lights 21 W21W (#7440)
License plate lights 5 W5W (#168)
Rear side-marker lights 5 W5W (#168)
*1 LED is the abbreviation for Light Emitting Diode.
Interior light
Light bulbCategory
Wattage ECE R
Overhead lights/Map lights (Front) 5 W5W
Overhead light (Rear) 10―
Luggage compartment light 10―
Vanity mirror light 1.8―
10-6íSome models.
Specifications
CX-7_8AS7-EA-09E_Edition2 Page500
Friday, June 5 2009 2:27 PM
Form No.8AS7-EA-09E