MAZDA MODEL CX-7 2012 Navigation Manual (in English)
MODEL CX-7 2012
MAZDA
MAZDA
https://www.carmanualsonline.info/img/28/13892/w960_13892-0.png
MAZDA MODEL CX-7 2012 Navigation Manual (in English)
Trending: phone, battery, roof, maintenance, lights, air condition, turn signal
Page 31 of 58
31
Before
UseGetting
started
Routing
● For Character Entry, please refer to page 20.
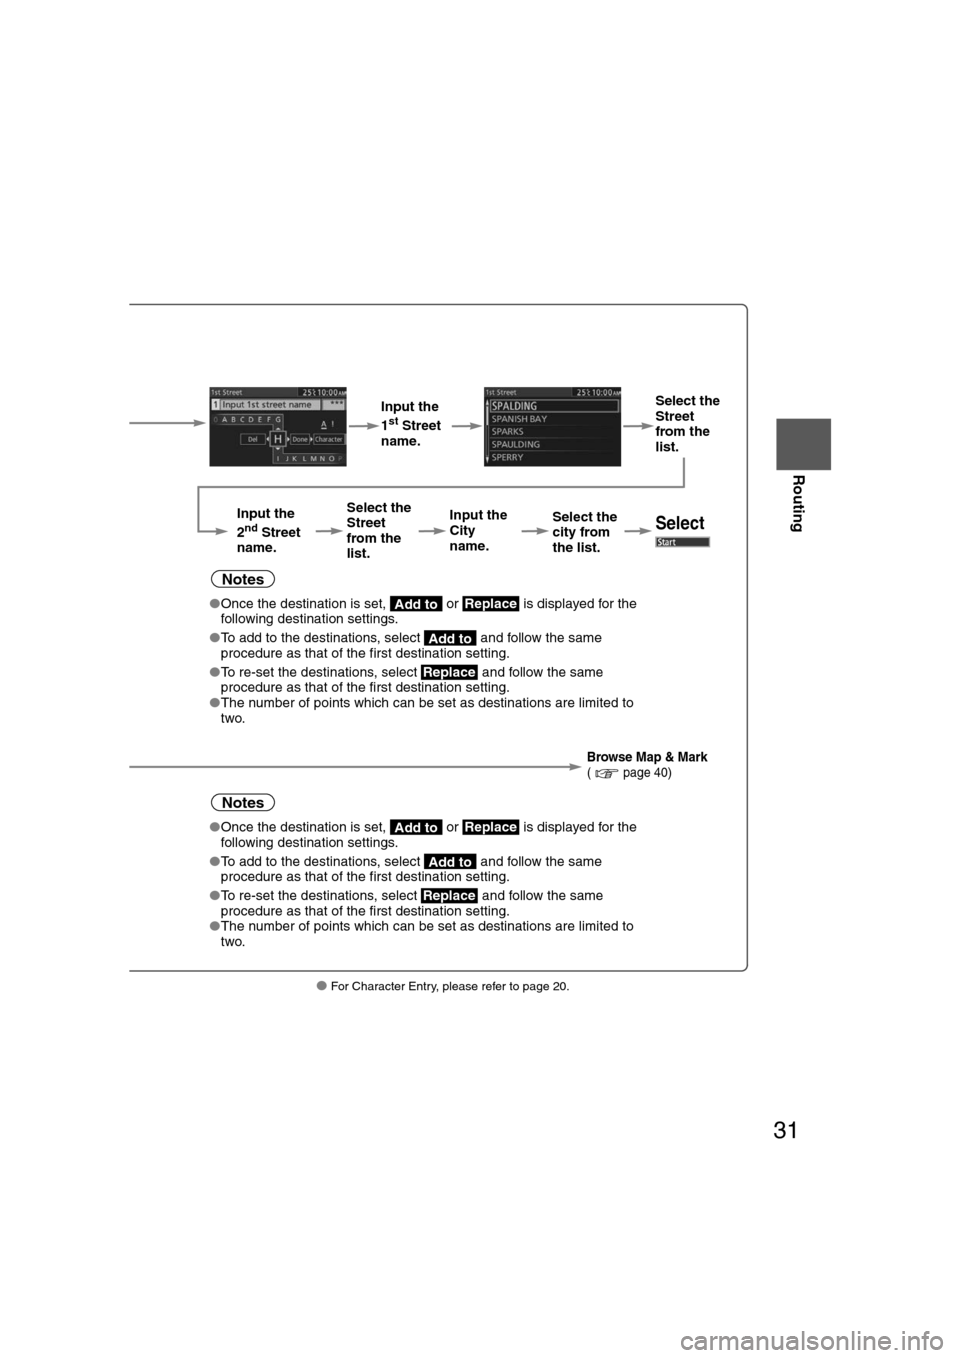
Select
( page 22)
Input the
1st Street
name. Select the
Street
from the
list.
Input the
2
nd Street
name. Select the
Street
from the
list.
Input the
City
name.
Select the
city from
the list.Select
Notes
●
Once the destination is set, or is displayed for the
following destination settings.
● To add to the destinations, select and follow the same
procedure as that of the first destination setting.
● To re-set the destinations, select and follow the same
procedure as that of the first destination setting.
● The number of points which can be set as destinations are limited to
two.
Browse Map & Mark( page 40)
Notes
●Once the destination is set, or is displayed for the
following destination settings.
● To add to the destinations, select and follow the same
procedure as that of the first destination setting.
● To re-set the destinations, select and follow the same
procedure as that of the first destination setting.
● The number of points which can be set as destinations are limited to
two.
Add toReplace
Add to
Replace
Add toReplace
Add to
Replace
�0�#�8���6�8�7�'�'���D�Q�Q�M�����������M�o�+����9Þ9Ü9Ý9Ý��9å�¬9Ý9ä�ã�“�ã�
Page 32 of 58
32
Before
UseGetting
started
Routing
Find Local POI
●
The POI around current location or destination can be searched.
Before Steps Select
Open the [Find
Local POI]
Menu Select the
search point.
Pressing th
the POI for
Select the
category from
the list.
Dist.:P
thName:POn Route:D
�0�#�8���6�8�7�'�'���D�Q�Q�M�����������M�o�+����9Þ9Ü9Ý9Ý��9å�¬9Ý9ä�ã�“�ã�
Page 33 of 58
33
Before
UseGetting
started
Routing
● For Character Entry, please refer to page 20.
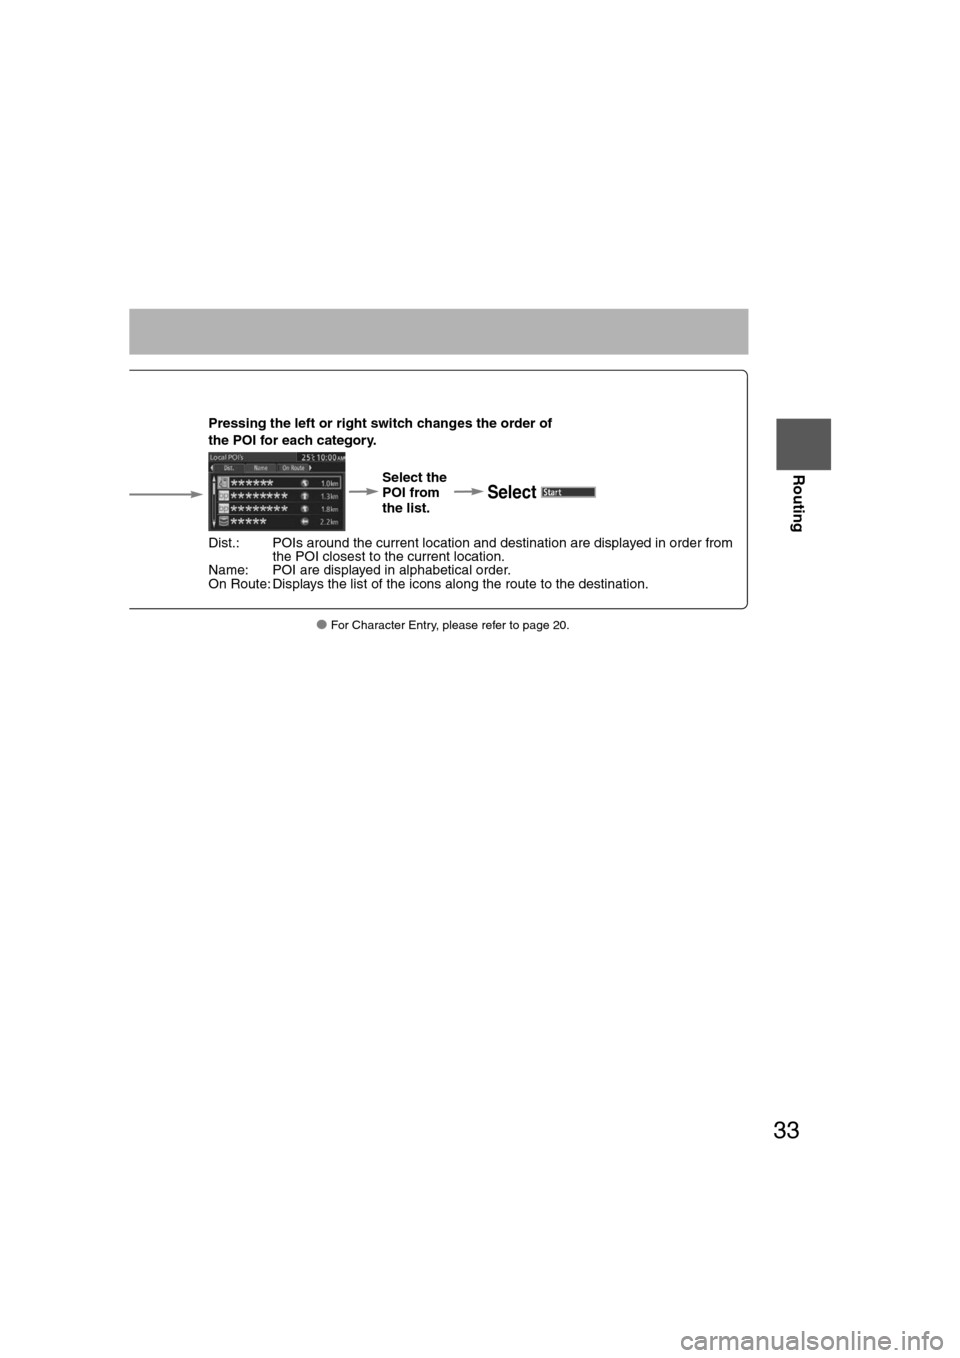
Pressing the left or right switch changes the order of
the POI for each category.
Select the
POI from
the list.
Select
Dist.: POIs around the current location and destination are displayed in order from the POI closest to the current location.
Name: POI are displayed in alphabetical order.
On Route: Displays the list of the icons along the route to the destination.
�0�#�8���6�8�7�'�'���D�Q�Q�M�����������M�o�+����9Þ9Ü9Ý9Ý��9å�¬9Ý9ä�ã�“�ã�
Page 34 of 58
34
Before
UseGetting
started
Routing
Cancel/Edit Route
●
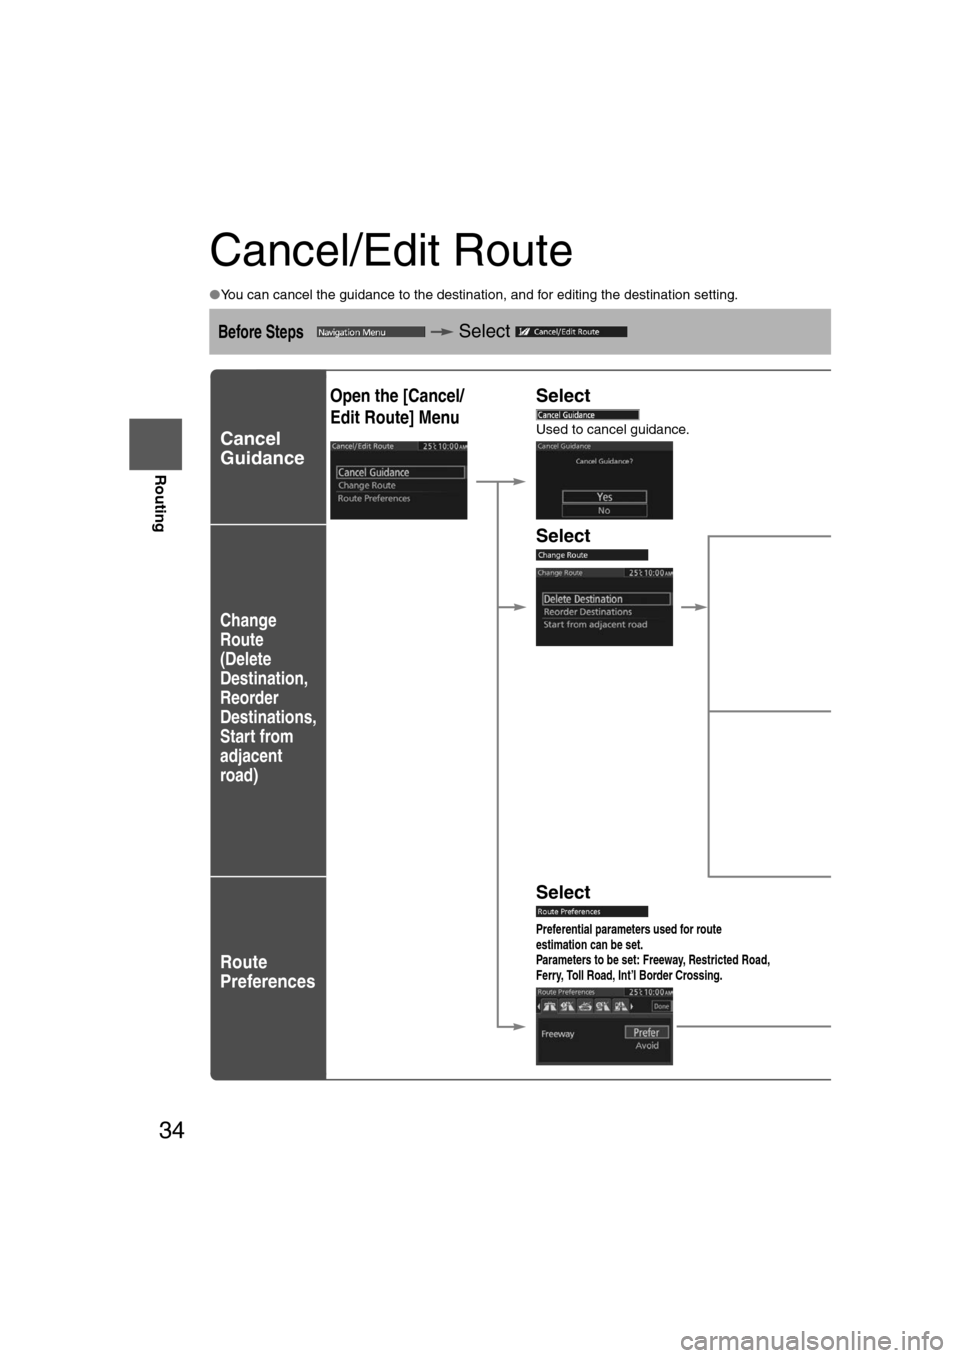
You can cancel the guidance to the destination, and for editing the destination setting.
Before Steps Select
Cancel
Guidance
Change
Route
(Delete
Destination,
Reorder
Destinations,
Start from
adjacent
road)
Route
Preferences
Open the [Cancel/
Edit Route] MenuSelect
Used to cancel guidance.
SelectSelect
Used to de
Note
Not displa
Select
Used to ch
Note
Not displa
Select
Preferential parameters used for route
estimation can be set.
Parameters to be set: Freeway, Restricted Road,
Ferry, Toll Road, Int’l Border Crossing.
Select theusing theright swit
�0�#�8���6�8�7�'�'���D�Q�Q�M�����������M�o�+����9Þ9Ü9Ý9Ý��9å�¬9Ý9ä�ã�“�ã�
Page 35 of 58
35
Before
UseGetting
started
Routing
● For Character Entry, please refer to page 20.
ce.
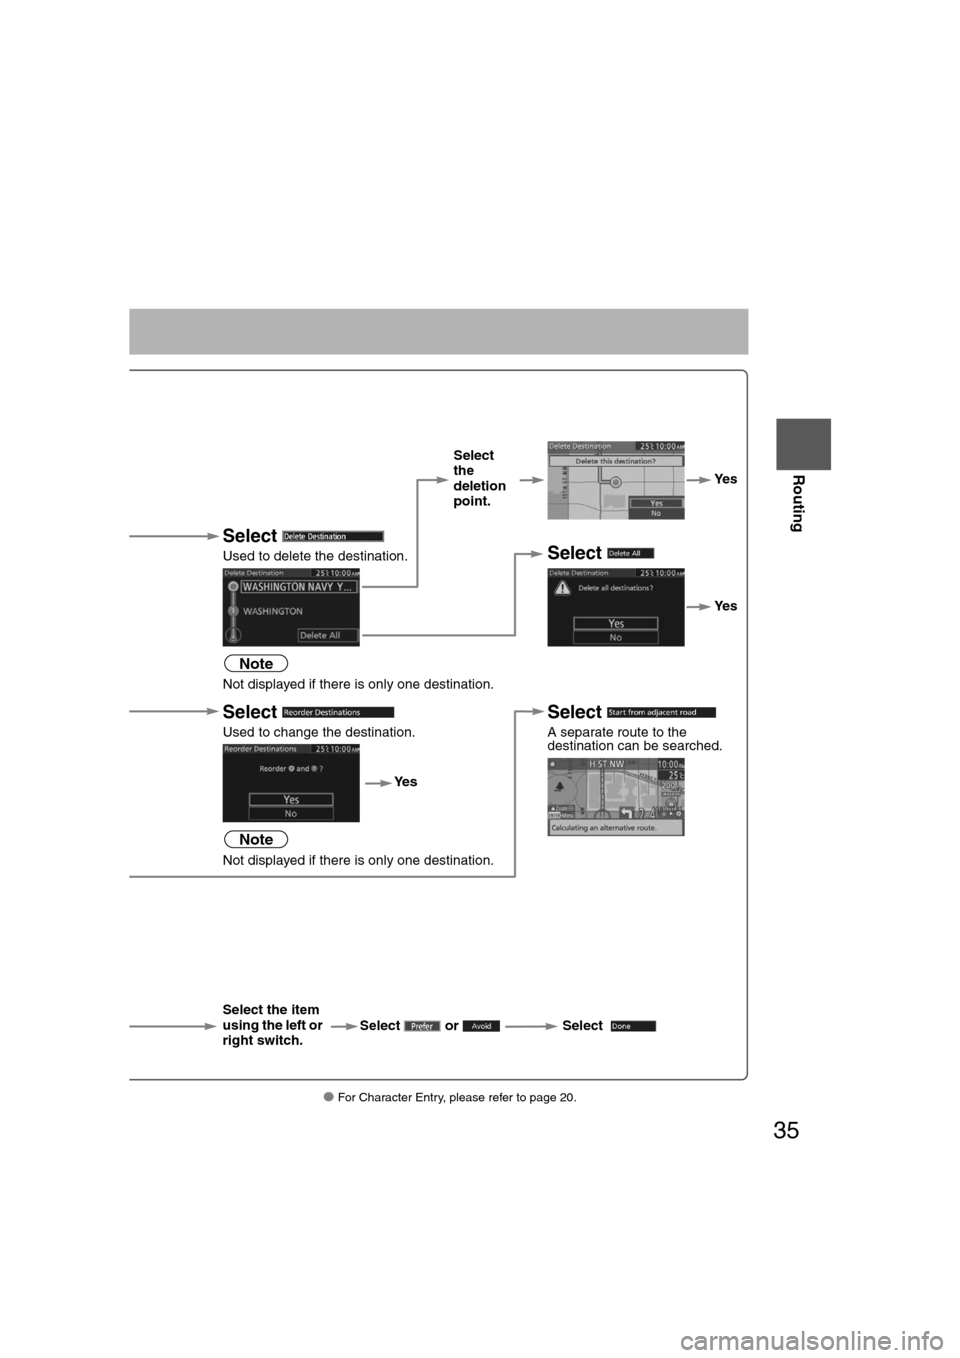
Select
the
deletion
point.Ye s
Select
Used to delete the destination.Select
Ye s
Note
Not displayed if there is only one destination.
Select
Used to change the destination.
Select
A separate route to the
destination can be searched.
Ye s
Note
Not displayed if there is only one destination.
for route
ay, Restricted Road, Crossing.
Select the item
using the left or
right switch. Select or Select
�0�#�8���6�8�7�'�'���D�Q�Q�M�����������M�o�+����9Þ9Ü9Ý9Ý��9å�¬9Ý9ä�ã�“�ã�
Page 36 of 58
36
Before
UseGetting
startedGetting
started
Editing
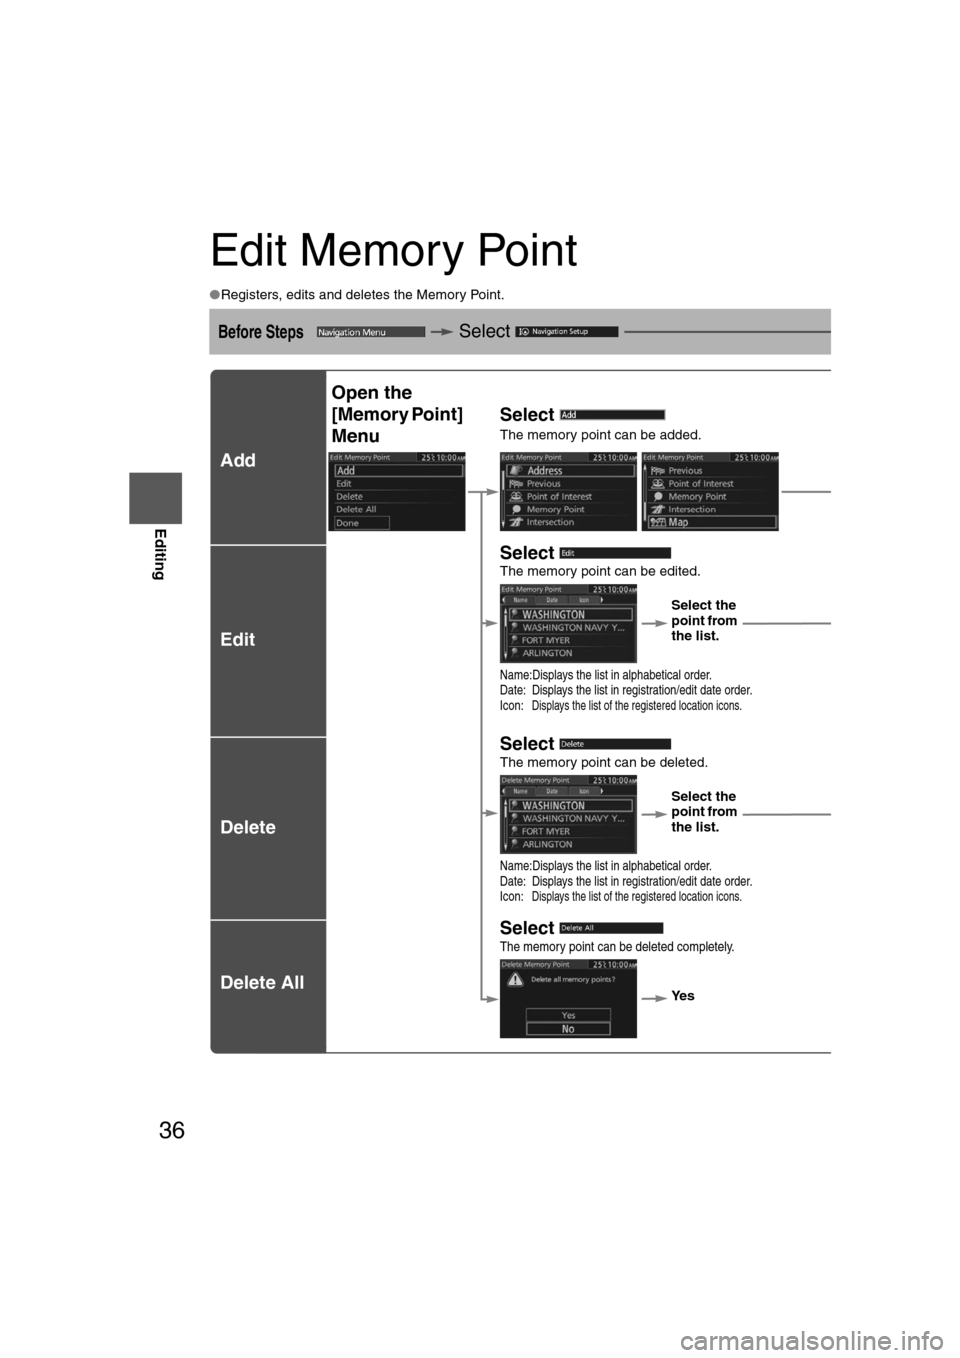
Edit Memory Point
●
Registers, edits and deletes the Memory Point.
Before Steps Select Sel
Add
Edit
Delete
Delete All
Open the
[Memory Point]
MenuSelect
The memory point can be added.
Select
The memory point can be edited.
Select the
point from
the list.
Name:Displays the list in alphabetical order.
Date: Displays the list in registration/edit date order.
Icon:
Displays the list of the registered location icons.
Select
The memory point can be deleted.Select the
point from
the list.
Name:Displays the list in alphabetical order.
Date: Displays the list in registration/edit date order.
Icon:
Displays the list of the registered location icons.
Select
The memory point can be deleted completely.
Ye s
�0�#�8���6�8�7�'�'���D�Q�Q�M�����������M�o�+����9Þ9Ü9Ý9Ý��9å�¬9Ý9ä�ã�“�ã�
Page 37 of 58
37
Before
UseGetting
startedGetting
started
Editing
● For Character Entry, please refer to page 20.
Select
Select
ded.
Select the
point.
Select
ited.Select the item to be edited.
Select the point from he list.
The memory point
icon can be edited.
The name of memory
point can be edited.
The location of memory
point can be edited.
The phone number of
memory point can be
edited.
Press
when
editing is
finished.Select
to switch to the
Map screen.
al order./edit date order.location icons.
leted.
Select the point from he list.
Ye s
al order./edit date order.location icons.
completely.
Yes
�0�#�8���6�8�7�'�'���D�Q�Q�M�����������M�o�+����9Þ9Ü9Ý9Ý��9å�¬9Ý9ä�ã�“�ã�
Page 38 of 58
38
Before
UseGetting
startedGetting
started
Editing
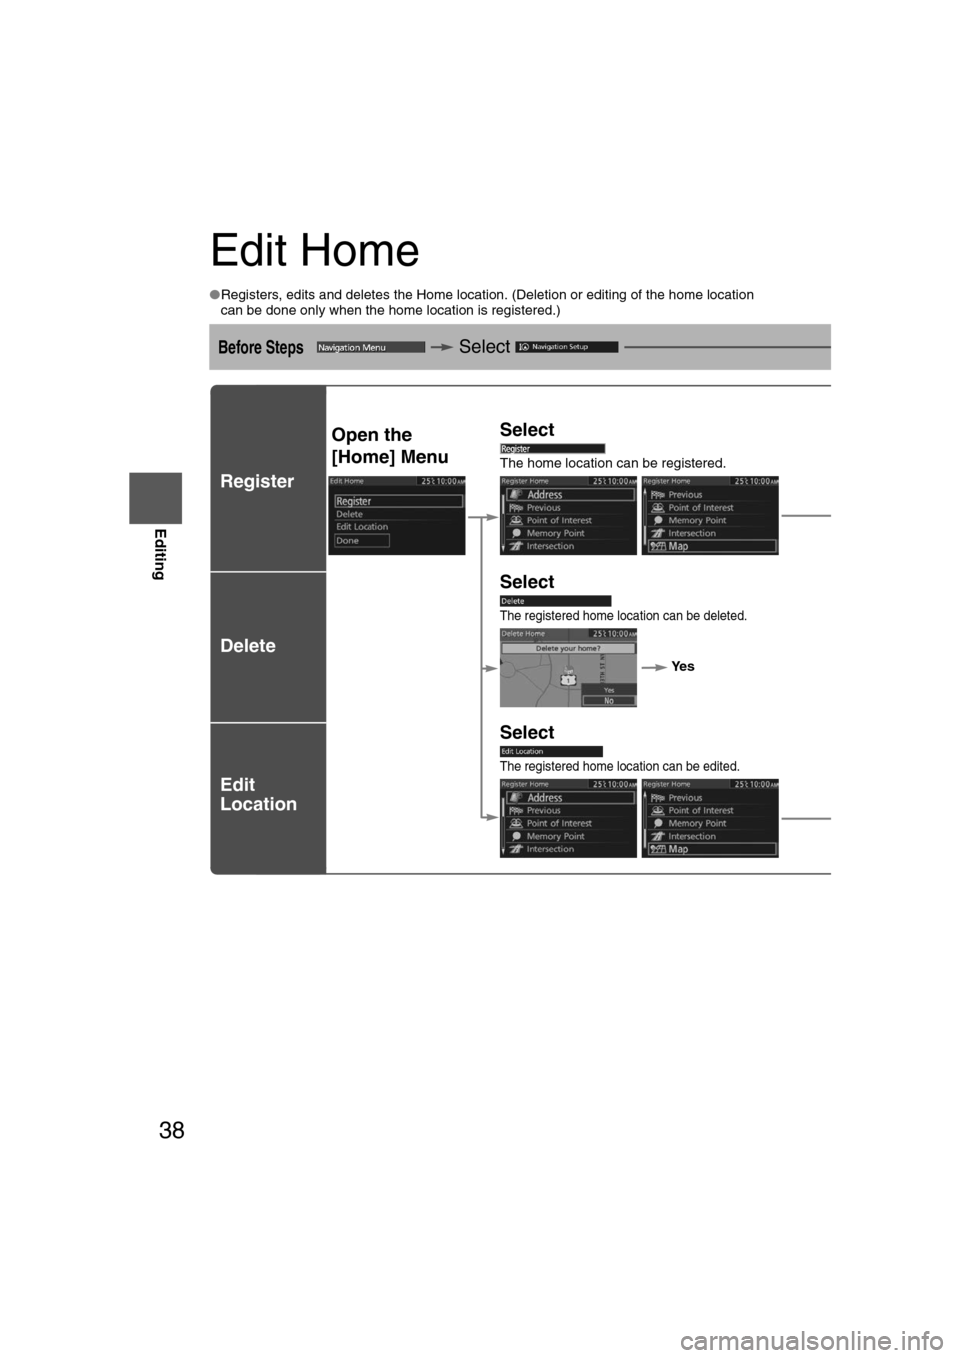
Edit Home
●
Registers, edits and deletes the Home location. (Deletion or editing of the home\
location
can be done only when the home location is registered.)
Before Steps Select Sel
Register
Delete
Edit
Location
Open the
[Home] MenuSelect
The home location can be registered.
Select the
point.
Select
The registered home location can be deleted.
Ye s
Select
The registered home location can be edited.
Select the
point.
�0�#�8���6�8�7�'�'���D�Q�Q�M�����������M�o�+����9Þ9Ü9Ý9Ý��9å�¬9Ý9ä�ã�“�ã�
Page 39 of 58
39
Before
UseGetting
startedGetting
started
Editing
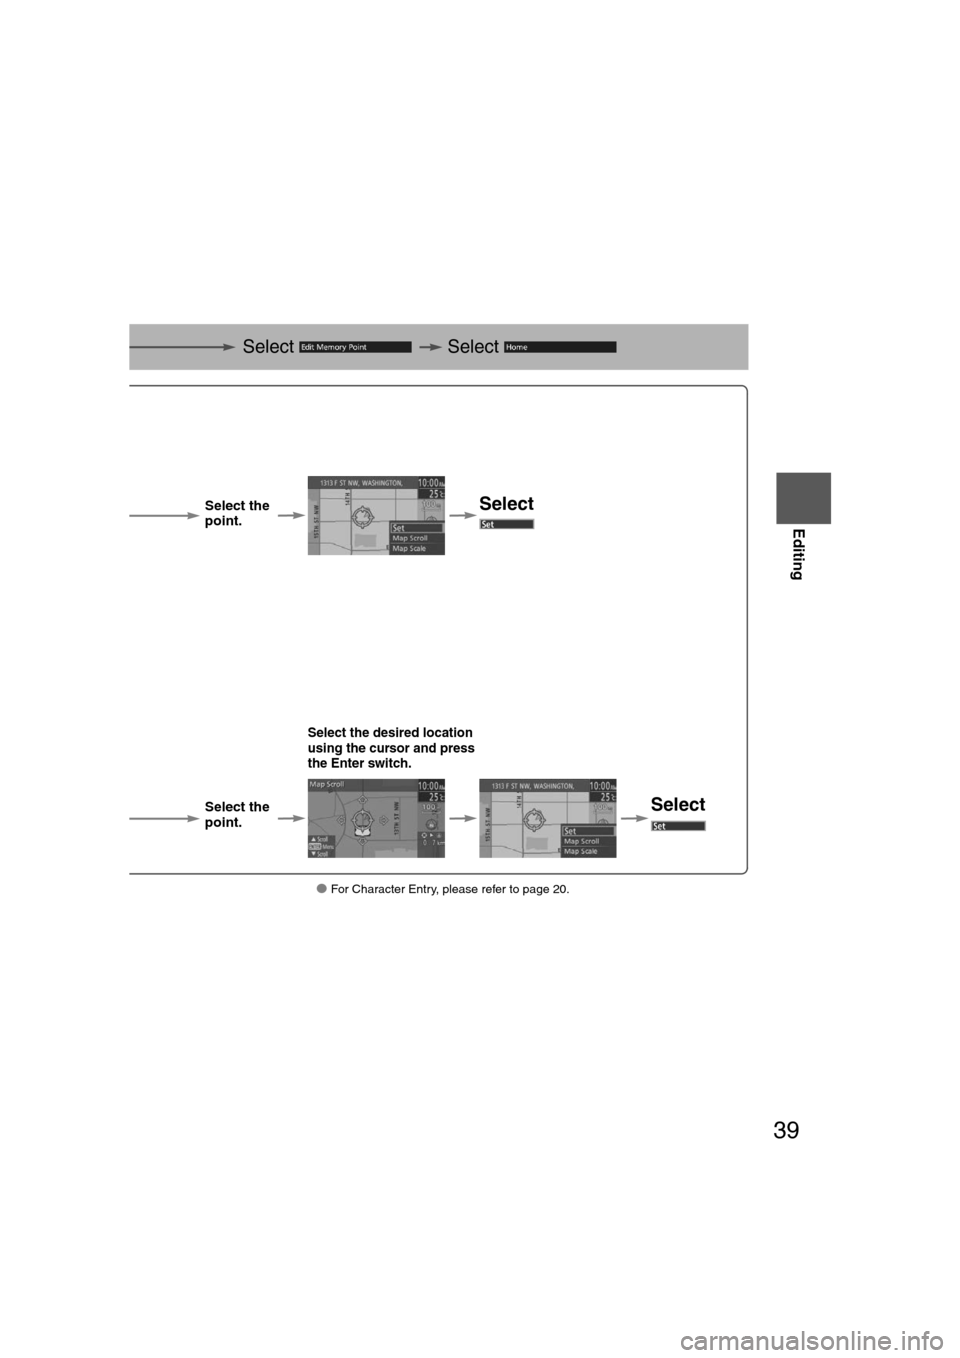
● For Character Entry, please refer to page 20.
Select
Select
gistered.
Select the
point.
Select
n be deleted.
Yes
n be edited.
Select the desired location
using the cursor and press
the Enter switch.
Select the
point.Select
�0�#�8���6�8�7�'�'���D�Q�Q�M�����������M�o�+����9Þ9Ü9Ý9Ý��9å�¬9Ý9ä�ã�“�ã�
Page 40 of 58
40
Before
UseGetting
startedGetting
started
Editing
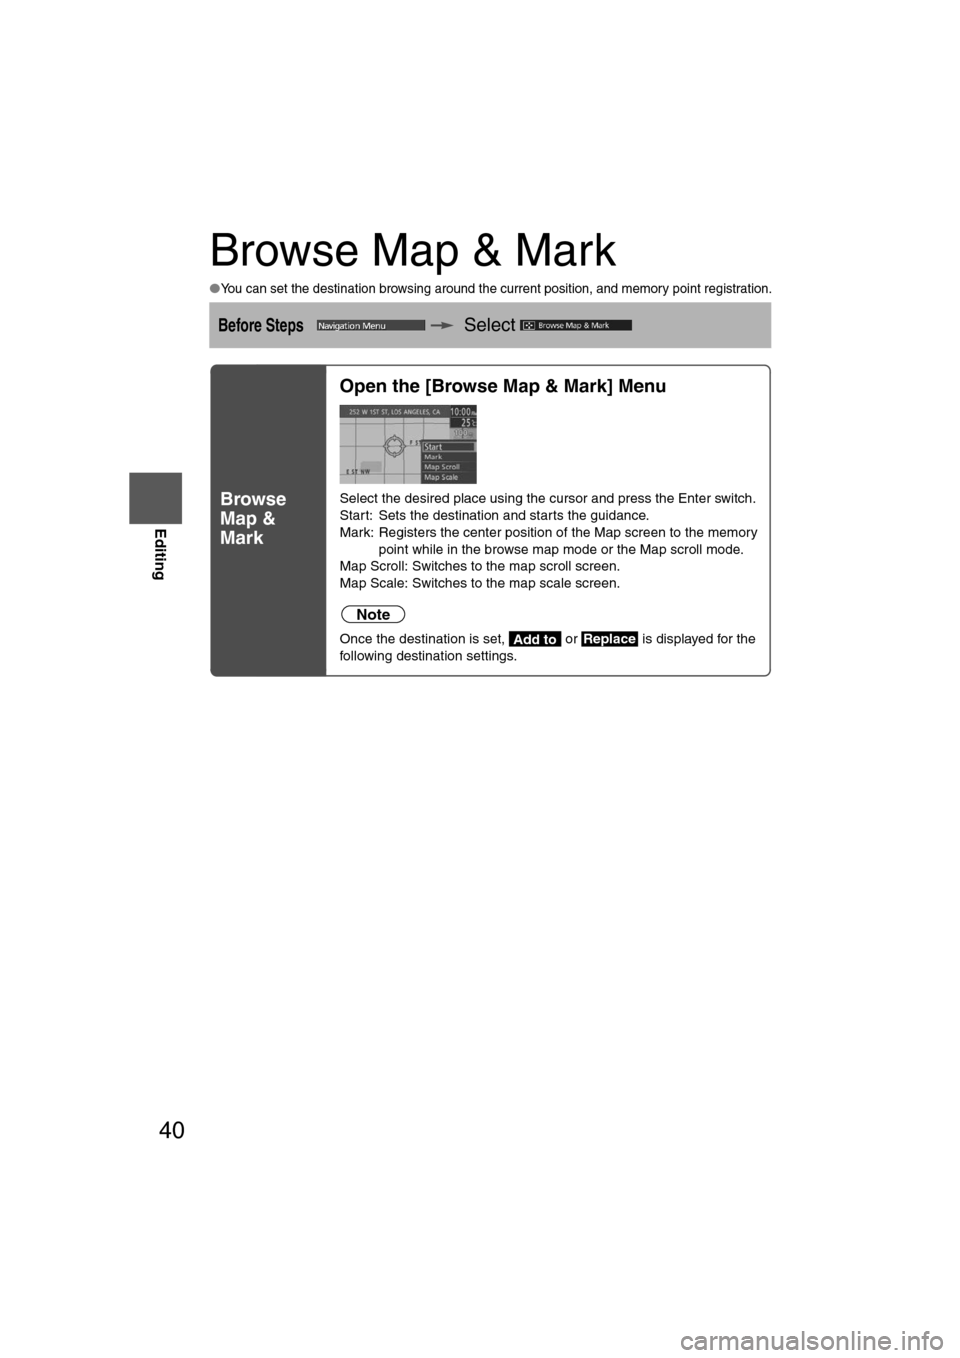
Browse Map & Mark
●You can set the destination browsing around the current position, and memory point registration.
Before StepsSelect
Browse
Map &
Mark
Open the [Browse Map & Mark] Menu
Select the desired place using the cursor and press the Enter switch.
Start: Sets the destination and starts the guidance.
Mark: Registers the center position of the Map screen to the memory
point while in the browse map mode or the Map scroll mode.
Map Scroll: Switches to the map scroll screen.
Map Scale: Switches to the map scale screen.
Note
Once the destination is set, or is displayed for the
following destination settings.Add toReplace
�0�#�8���6�8�7�'�'���D�Q�Q�M�����������M�o�+����9Þ9Ü9Ý9Ý��9å�¬9Ý9ä�ã�“�ã�
Trending: radio, transmission, light, stop start, roof, change time, ad blue

![MAZDA MODEL CX-7 2012 Navigation Manual (in English) 32
Before
UseGetting
started
Routing
Find Local POI
●
The POI around current location or destination can be searched.
Before Steps Select
Open the [Find
Local POI]
Menu Select the
search poin MAZDA MODEL CX-7 2012 Navigation Manual (in English) 32
Before
UseGetting
started
Routing
Find Local POI
●
The POI around current location or destination can be searched.
Before Steps Select
Open the [Find
Local POI]
Menu Select the
search poin](/img/28/13892/w960_13892-31.png)


