height MAZDA MODEL CX-7 2012 Owners Manual (in English)
[x] Cancel search | Manufacturer: MAZDA, Model Year: 2012, Model line: MODEL CX-7, Model: MAZDA MODEL CX-7 2012Pages: 522, PDF Size: 8.79 MB
Page 16 of 522

Black plate (16,1)
CAUTION
When returning a rear-reclined
seatback to its upright position,
make sure you hold onto the
seatback with your other hand while
operating the lever. If the seatback is
not supported, it will flip forward
suddenly and could cause injury.
qHeight Adjustment (Driver's Seat)
To adjust the seat height, move the lever
up or down.
DownUp
Front Seats (Electrically
Operated Seats)
WARNING
Do not modify or replace the front
seats:
Modifying or replacing the front seats
such as replacing the upholstery or
loosening any bolts is dangerous. The
front seats contain air bag
components essential to the
supplemental restraint system. Such
modifications could damage the
supplemental restraint system and
result in serious injury. Consult an
Authorized Mazda Dealer if there is
any need to remove or reinstall the
front seats.
Do not drive with damaged front seats:
Driving with damaged front seats is
dangerous. A collision, even one not
strong enough to inflate the air bags,
could damage the front seats which
contain essential air bag
components. If there was a
subsequent collision, an air bag may
not deploy which could lead to
injuries. Always have an Authorized
Mazda Dealer inspect the front seats,
front seat belt pretensioners and air
bags after a collision.
Adjust the driver's seat only when the
vehicle is stopped:
Adjusting the driver's seat while the
vehicle is moving is dangerous. The
driver could lose control of the vehicle
and have an accident.
2-4
Essential Safety Equipment
Seats
CX-7_8CG3-EA-11J_Edition1 Page16
Saturday, September 24 2011 10:31 AM
Form No.8CG3-EA-11J
Page 18 of 522

Black plate (18,1)
To change the seatback angle, press the
front or rear side of the reclining switch.
Release the switch at the desired position.
qHeight Adjustment (Driver's Seat)
To adjust the seat height, move the switch
up or down.
qSeat Position Memoryí
One-touch seat position programming and
activation is available on the driver's seat.
CAUTION
When activating the seat position, do
not place your hands or fingers
around the seat bottom. The seat
moves to the desired position
automatically, and if your hands or
fingers are placed around the seat
bottom, it could cause injury.
SET button
Programming of the driver's seat positions
is possible using the following functions:
lProgramming buttons 1, 2, or 3 and the
SET button.
lOperation using the advanced key/
retractable type key
Programmed seat positions can be
activated using the following functions:
lProgramming buttons 1, 2, or 3.lOperation using advanced keyless
functions/keyless entry system
NOTE
Individual seat positions can be programmed
to the three available programming buttons on
the side of the driver's seat, plus one seat
position for each advanced key/retractable
type key used with the vehicle.
2-6
Essential Safety Equipment
íSome models.
Seats
CX-7_8CG3-EA-11J_Edition1 Page18
Saturday, September 24 2011 10:31 AM
Form No.8CG3-EA-11J
Page 19 of 522
Black plate (19,1)
Operation using the seat-side buttons
Programming
Park the vehicle in a safe location before
performing the seat position
programming. (Vehicle must be stopped)
1. Adjust the seat to the desired position.
For each seat position adjustment
method refer to the following pages:
Seat Slide (page 2-5)
Seat Recline (page 2-5)
Height Adjustment (page 2-6)
2. While holding the SET button in, press
the desired programming button 1, 2,
or 3 until a beep sound is heard.
The button is programmed after a beep
sound is heard. Other buttons can be
programmed using the same procedure.
NOTE
Vehicle maintenance or other reasons
requiring the vehicle battery to be
disconnected will result in the seat position
memory being erased.
In this case, re-program the seat positions.
Setting the driver's seat to a pre-
programmed position
There are two methods for setting the
driver's seat to a pre-programmed
position. For example, the type A method
can be used before sitting in the seat and
while the driver's door is open, and the
type B method can be used after getting in
the vehicle with the driver's door closed.
TYPE A
When the ignition is switched off and the
driver's door is open, press the
programming button 1, 2, or 3 for the
desired seating position.NOTE
In the following cases, the seat position set
function cancels:
lAny of the seat adjustment switches are
operated.
lThe SET button is pressed.lA programming button 1, 2, or 3 is pressed.lThe vehicle starts moving.lVehicle locking/unlocking is done using the
transmitter.
lVehicle locking/unlocking is done using the
advanced keyless functions.
TYPE B
When the ignition is switched ON or the
driver's door is closed, press and hold the
desired programming button 1, 2, or 3.
NOTE
In the following cases, the seat position set
function cancels:
lAny of the seat adjustment switches are
operated.
lThe SET button is pressed.lThe vehicle starts moving.
Operation using the advanced key/
retractable type key
Programming
One seat position can be programmed into
each advanced key/retractable type key.
After the following conditions have been
met, operate the seat and the advanced
key/retractable type key to program the
seat positions.
lThe ignition is switched off
(The auxiliary key/retractable type key
is removed from the ignition switch)
lThe driver's door is open
Essential Safety Equipment
Seats
2-7
CX-7_8CG3-EA-11J_Edition1 Page19
Saturday, September 24 2011 10:31 AM
Form No.8CG3-EA-11J
Page 20 of 522
Black plate (20,1)
1. Adjust the seat to the desired position.
For each seat position adjustment
method, refer to the following pages:
Seat Slide (page 2-5)
Seat Recline (page 2-5)
Height Adjustment (page 2-6)
2. While holding the SET button in, press
and hold the
button on the advanced
key/retractable type key until a beep
sound is heard.
The advanced key/retractable type key
is programmed after a beep sound is
heard.
Seat position memory setting procedure
To set the driver's seat to pre-programmed
position, switch the ignition off, unlock
the doors using any of the following
methods, and then open the driver's door
within about 40 seconds.
lPress thebutton on the advanced
key/retractable type key.
lPress the request switch on a front door
or liftgate while the advanced key is
being carried.
NOTE
If any of the following occurs, the seat position
activation function cancels:
lThe/button on the advanced key/
retractable type key is pressed while the key
is not inserted into the ignition switch.
lA seat adjustment switch is operated.lThe vehicle starts moving.lThe selected programming button 1, 2, or 3
is pressed.
lVehicle unlocking is done using the
advanced keyless functions.
lThe SET button is pressed.
Erasing memory
After the following conditions have been
met, while holding the SET button in,
press the
button on the advanced key/
retractable type key until a beep sound is
heard.
lThe ignition is switched off
(The auxiliary key/retractable type key
is removed from the ignition switch)
lThe driver's door is open
NOTE
Memory will also be erased if any of the
following operations are performed:
lThe advanced key/retractable type key code
has been changed.
Refer to Immobilizer System (with
Advanced Key) on page 3-45.
Refer to Immobilizer System (without
Advanced Key) on page 3-49.
lThe vehicle battery is disconnected for
vehicle maintenance or other reasons.
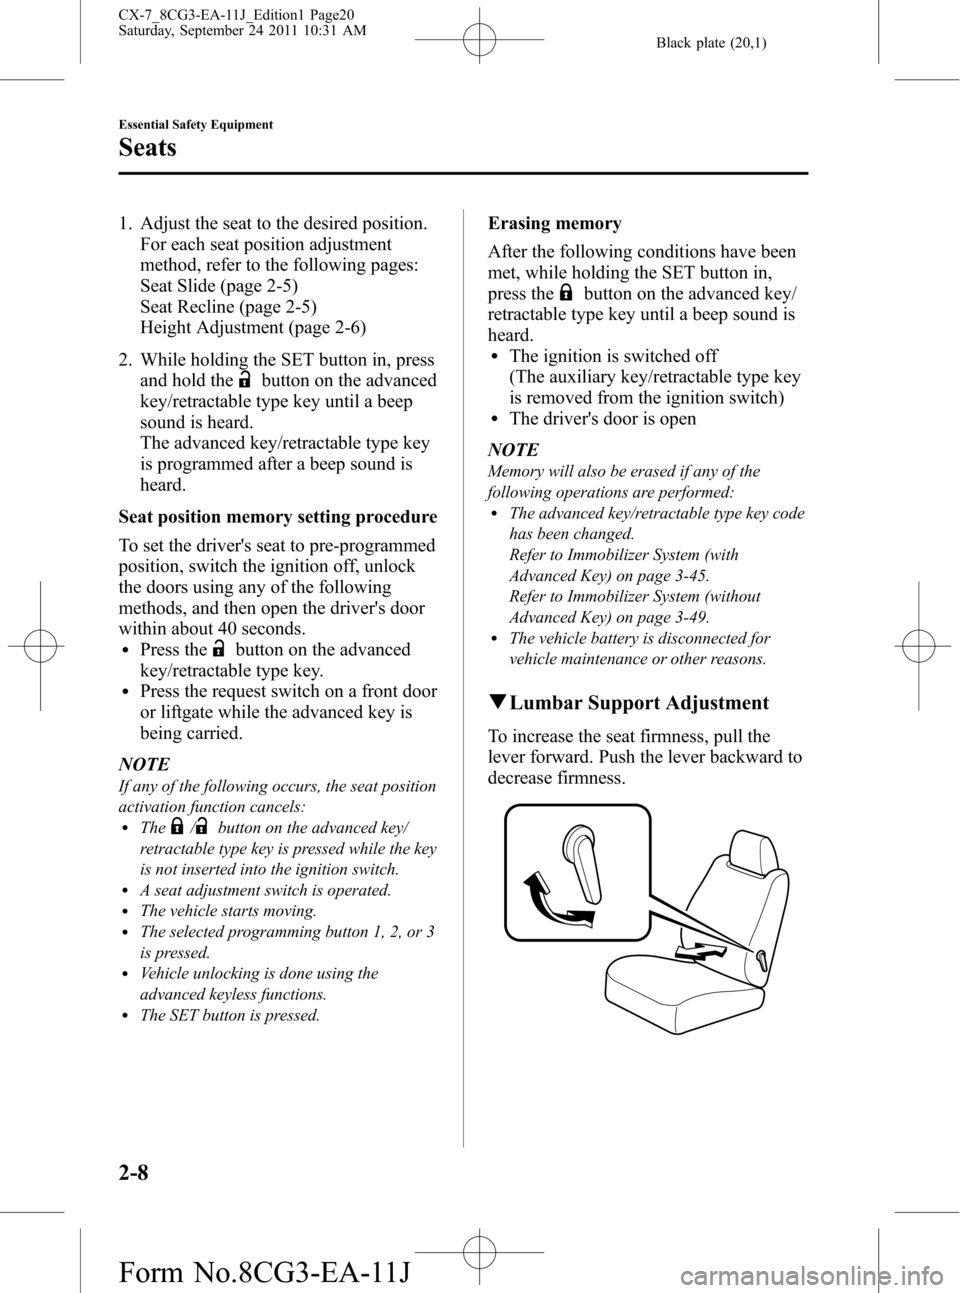
qLumbar Support Adjustment
To increase the seat firmness, pull the
lever forward. Push the lever backward to
decrease firmness.
2-8
Essential Safety Equipment
Seats
CX-7_8CG3-EA-11J_Edition1 Page20
Saturday, September 24 2011 10:31 AM
Form No.8CG3-EA-11J
Page 24 of 522

Black plate (24,1)
qArmrest
The rear armrest in the center of the rear
seatback can be used (no occupant in the
center seat) or placed upright.
Head Restraints
Your vehicle is equipped with head
restraints on all outboard seats. The head
restraints are intended to help protect you
and the passengers from neck injury.
WARNING
Always drive with the head restraints
installed when seats are being used
and make sure they are properly
adjusted:
Driving with the head restraints
adjusted too low or removed is
dangerous. With no support behind
your head, your neck could be
seriously injured in a collision.
Height adjustment
To raise a head restraint, pull it up to the
desired position.
To lower the head restraint, press the stop-
catch release, then push the head restraint
down.
Adjust the head restraint so that the top is
even with the top of the passenger's ears,
never the passenger's neck to prevent
injury.
Front outboard seat
2-12
Essential Safety Equipment
Seats
CX-7_8CG3-EA-11J_Edition1 Page24
Saturday, September 24 2011 10:31 AM
Form No.8CG3-EA-11J
Page 32 of 522
Black plate (32,1)
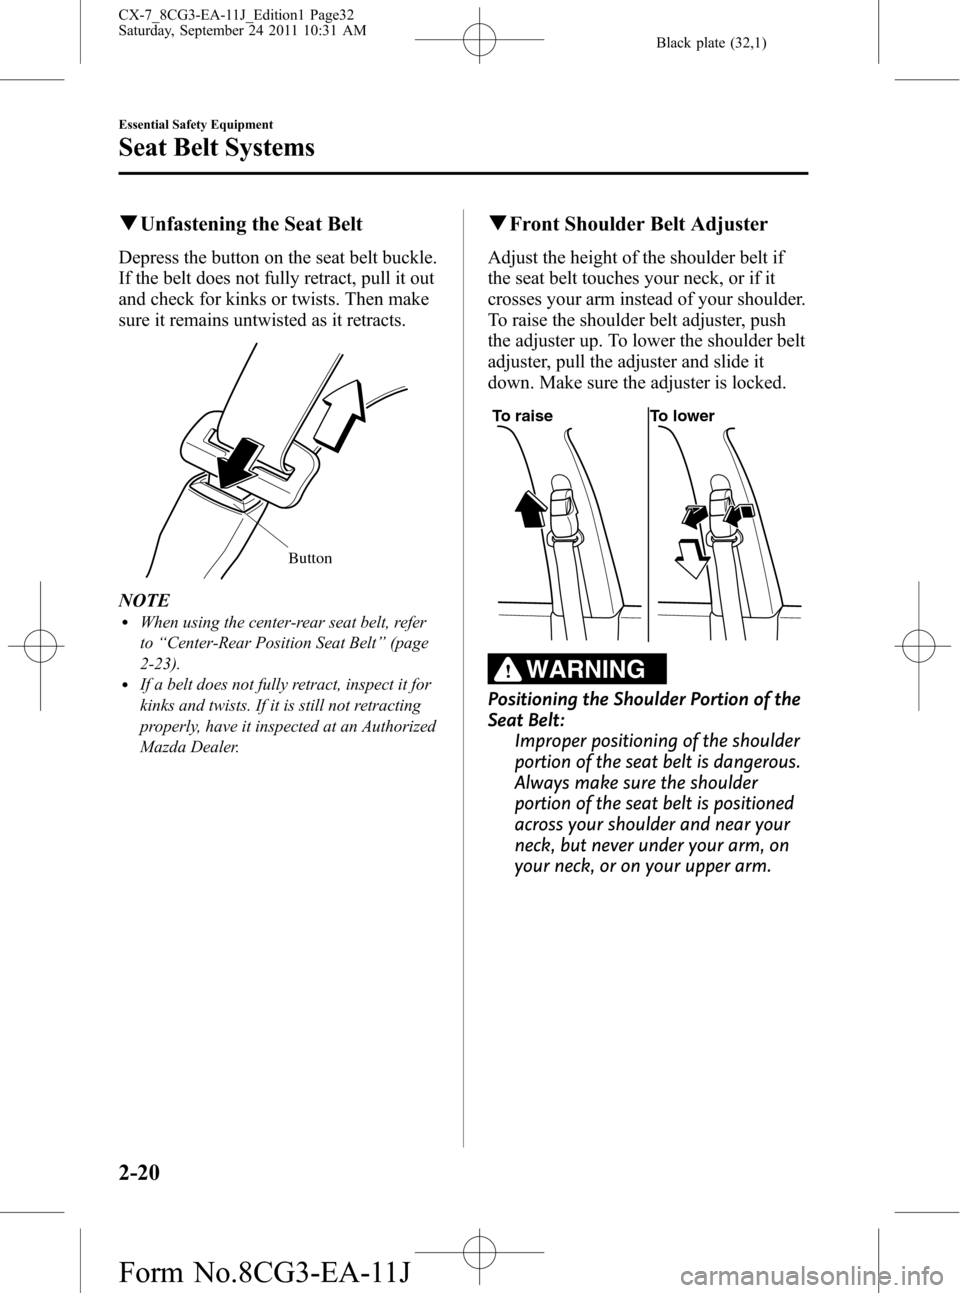
qUnfastening the Seat Belt
Depress the button on the seat belt buckle.
If the belt does not fully retract, pull it out
and check for kinks or twists. Then make
sure it remains untwisted as it retracts.
Button
NOTElWhen using the center-rear seat belt, refer
to“Center-Rear Position Seat Belt”(page
2-23).
lIf a belt does not fully retract, inspect it for
kinks and twists. If it is still not retracting
properly, have it inspected at an Authorized
Mazda Dealer.
qFront Shoulder Belt Adjuster
Adjust the height of the shoulder belt if
the seat belt touches your neck, or if it
crosses your arm instead of your shoulder.
To raise the shoulder belt adjuster, push
the adjuster up. To lower the shoulder belt
adjuster, pull the adjuster and slide it
down. Make sure the adjuster is locked.
To raise To lower
WARNING
Positioning the Shoulder Portion of the
Seat Belt:
Improper positioning of the shoulder
portion of the seat belt is dangerous.
Always make sure the shoulder
portion of the seat belt is positioned
across your shoulder and near your
neck, but never under your arm, on
your neck, or on your upper arm.
2-20
Essential Safety Equipment
Seat Belt Systems
CX-7_8CG3-EA-11J_Edition1 Page32
Saturday, September 24 2011 10:31 AM
Form No.8CG3-EA-11J
Page 61 of 522
Black plate (61,1)
Do not modify the suspension:
Modifying the vehicle suspension is dangerous. If the vehicle's height or the
suspension is modified, the vehicle will be unable to accurately detect a collision or
roll-over accident resulting in incorrect or unexpected air bag deployment and the
possibility of serious injuries.
To prevent false detection by the air bag sensor system, heed the following:
ØDo not use tires or wheels other than those specified for your Mazda:
Use of any tire or wheel other than those specified for your Mazda (page 10-7) is
dangerous. Use of such wheels will prevent the vehicle's accident detections
system from accurately detecting a collision or roll-over accident resulting in
incorrect or unexpected air bag deployment and the possibility of serious injuries.
ØDo not overload your vehicle:
Overloading your vehicle is dangerous as it could prevent the air bag crash sensor
system from accurately detecting a collision or roll-over accident resulting in
incorrect or unexpected air bag deployment and the possibility of serious injuries.
The gross axle weight rating (GAWR) and the gross vehicle weight rating (GVWR)
for your vehicle are on the Motor Vehicle Safety Standard Label on the driver's
door frame. Do not exceed these ratings.
ØDo not drive the vehicle off-road:
Driving your Mazda off-road is dangerous because the vehicle has not been
designed to do so. Driving the vehicle off-road could prevent the air bag crash
sensor system from accurately detecting a collision or roll-over accident resulting
in incorrect or unexpected air bag deployment and the possibility of serious
injuries.
Do not modify the supplemental restraint system:
Modifying the components or wiring of the supplemental restraint system is
dangerous. You could accidentally activate it or make it inoperable. Do not make
any modifications to the supplemental restraint system. This includes installing trim,
badges, or anything else over the air bag modules. It also includes installing extra
electrical equipment on or near system components or wiring. An Authorized Mazda
Dealer can provide the special care needed in the removal and installation of front
seats. It is important to protect the air bag wiring and connections to assure that the
bags do not accidentally deploy, the driver seat slide position sensor and front
passenger seat weight sensors are not damaged and that the seats retain an
undamaged air bag connection.
NOTE
lWhen an air bag deploys, a loud inflation noise can be heard and some smoke will be released.
Neither is likely to cause injury, however, the texture of the air bags may cause light skin injuries
on body parts not covered with clothing through friction.
lShould you sell your Mazda, we urge you to tell the new owner of its air bag systems and that
familiarization with all instructions about them, from the Owner's Manual, is important.
Essential Safety Equipment
SRS Air Bags
2-49
CX-7_8CG3-EA-11J_Edition1 Page61
Saturday, September 24 2011 10:31 AM
Form No.8CG3-EA-11J
Page 156 of 522

Black plate (156,1)
WARNING
Always make sure the trailer hitch is securely attached before departure:
An unsecured trailer hitch is dangerous as it causes greater trailer sway from
crosswinds, rough roads or other causes, resulting in loss of control and a serious
accident.
Examine all trailer-hitch mounting bolts regularly and tighten any that are loose. If
the hitch is removed, seal any open mounting holes to prevent exhaust, dust, water,
dirt and other foreign elements from filtering in, possibly endangering personal
safety and damaging your vehicle.
Do not install a hitch that stiffens the bumper as it will reduce the bumper's
performance.
Make sure there are no exhaust gas leaks into the passenger compartment if any
mounting bolts are connected to the body:
Modifying your vehicle exhaust system is dangerous. Exhaust gas entering the
vehicle could cause loss of consciousness or even death.
When mounting the trailer hitch, make no modifications to the vehicle exhaust
system.
CAUTION
ØMake all hitch adjustments with actual loads. Do not load and unload vehicle
while adjusting hitch. This action will change the vehicle height.
ØDo not use an axle-mounted hitch. This may damage the axle and related parts.
qTires
When towing a trailer, make sure all tires are inflated to the recommended cold-tire
pressure, as indicated on the tire pressure chart on the driver's door frame. Trailer tire size,
load rating, and inflation pressures should conform to tire manufacturer specifications.
WARNING
Never use the temporary spare tire when towing:
Using the temporary spare tire on your vehicle when towing a trailer is dangerous as
it could result in tire failure, loss of control, and injury to vehicle occupants.
4-18
Before Driving Your Mazda
Towing
CX-7_8CG3-EA-11J_Edition1 Page156
Saturday, September 24 2011 10:32 AM
Form No.8CG3-EA-11J
Page 196 of 522
Black plate (196,1)
lThe detectability of the radar sensors has its limitations. The BSM system may not operate
properly under the following conditions:
lIce, snow, or soil adheres to the rear bumper surface around the radar sensors.lDuring adverse weather conditions such as rain or snow, or under conditions where water is
sprayed.
lThe rear bumper area around the radar sensors is blocked by foreign material (such as
stickers or a bicycle carrier).
lThe radar sensors may not detect all types of vehicles around your vehicle, especially the
following types of vehicles:
lMotorcycleslVehicles with body shapes that radar may not reflect such as a flatbed trailer with no cargo.lVehicles with lower body height such as sports cars.lHave the radar sensors inspected at an Authorized Mazda Dealer if any shock is applied to the
rear bumper, even in a minor accident. If the vehicle is driven with a damaged radar sensor, the
system may not operate properly resulting in an accident.
lFor repairs or paintwork around the radar sensors, or replacement of the bumper, consult an
Authorized Mazda Dealer.
lThe radar sensors of the BSM system may be regulated under the radio wave related laws of the
country where the vehicle is driven. The sensors in this system are approved for use in the U.S.A.
(including territories), Canada, and Mexico. If a vehicle with a BSM system is driven in a country
other than the U.S.A., Canada, or Mexico, the system has to be turned off using the BSM OFF
switch.
lThe detection area of the system has been determined based on the lane width of general
freeways. Therefore on a road with a narrower lane width, the system may detect vehicles on a
lane next to the adjacent lane and operate the warning light/beep. On a road with wider lane
width, the system may not detect vehicles on the adjacent lane and may not operate the warning
light/beep.
lOperation of the warning light/beep may be delayed or the system may not operate the warning
light/beep under the following conditions:
lThe vehicle accelerates from a standing-start with a vehicle alongside.lA vehicle moves from a lane two lanes over to the adjacent lane.lThe difference in vehicle speed between your vehicle and another vehicle is larger when
passing or being passed, and the vehicle passes the detection area within a short period of
time.
lOn a steep incline, or when there is a difference in height between lanes.lImmediately after the system has been activated by pressing the BSM OFF switch again after it
has been turned off (BSM OFF indicator light in instrument panel illuminates) by pressing the
switch.
lAlthough the system may detect objects on the road side such as parked vehicles or guardrails and
operate the warning light/beep, it does not indicate a malfunction.
lIf the vehicle is driven on a road with less traffic and few vehicles that the radar sensors can
detect, the system may pause (The BSM OFF indicator light in the instrument panel flashes).
However, it does not indicate a malfunction.
5-36
Driving Your Mazda
Starting and Driving
CX-7_8CG3-EA-11J_Edition1 Page196
Saturday, September 24 2011 10:32 AM
Form No.8CG3-EA-11J
Page 433 of 522
Black plate (433,1)
CAUTION
ØA wrong-sized wheel may
adversely affect:
ØTire fit
ØWheel and bearing life
ØGround clearance
ØSnow-chain clearance
ØSpeedometer calibration
ØHeadlight aim
ØBumper height
ØTire Pressure Monitoring
System
Ø(With Tire Pressure Monitoring
System)
ØWhen replacing/repairing the
tires or wheels or both, have the
work done by an Authorized
Mazda Dealer, or the tire
pressure sensors may be
damaged.
ØThe wheels equipped on your
Mazda are specially designed
for installation of the tire
pressure sensors. Do not use
non-genuine wheels, otherwise
it may not be possible to install
the tire pressure sensors.
NOTE
Be sure to install the tire pressure sensors
whenever tires or wheels are replaced. Refer to
Tires and Wheels on page 5-33.
When replacing a wheel, make sure the
new one is the same as the original factory
wheel in diameter, rim width, and offset
(inset/outset).
Proper tire balancing provides the best
riding comfort and helps reduce tread
wear. Out-of-balance tires can cause
vibration and uneven wear, such as
cupping and flat spots.
Maintenance and Care
Owner Maintenance
8-41
CX-7_8CG3-EA-11J_Edition1 Page433
Saturday, September 24 2011 10:33 AM
Form No.8CG3-EA-11J