display MAZDA MODEL CX-9 2007 (in English) Service Manual
[x] Cancel search | Manufacturer: MAZDA, Model Year: 2007, Model line: MODEL CX-9, Model: MAZDA MODEL CX-9 2007Pages: 502, PDF Size: 9.94 MB
Page 305 of 502
Black plate (305,1)
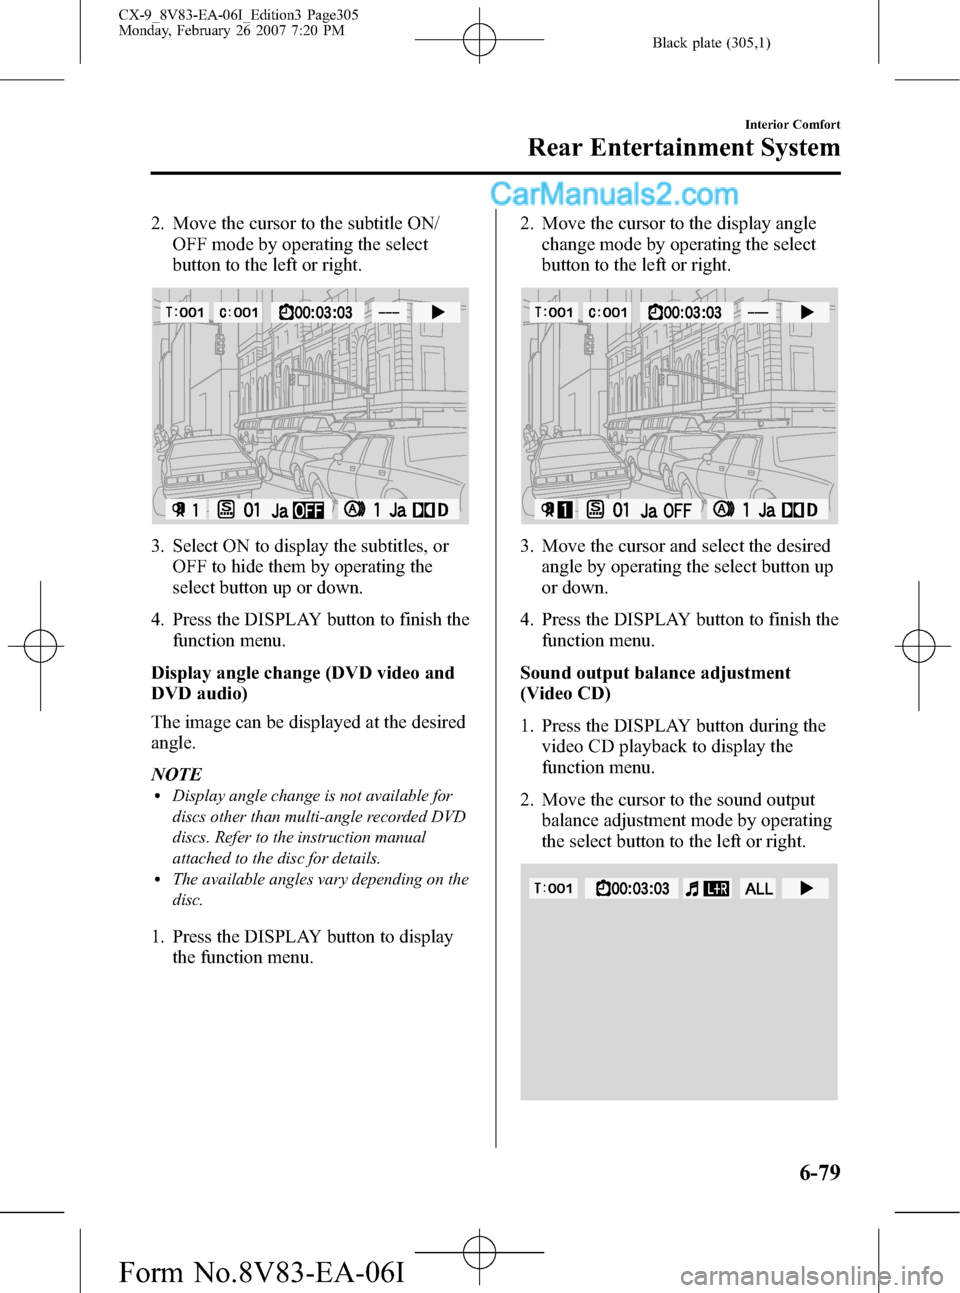
2. Move the cursor to the subtitle ON/
OFF mode by operating the select
button to the left or right.
3. Select ON to display the subtitles, or
OFF to hide them by operating the
select button up or down.
4. Press the DISPLAY button to finish the
function menu.
Display angle change (DVD video and
DVD audio)
The image can be displayed at the desired
angle.
NOTE
lDisplay angle change is not available for
discs other than multi-angle recorded DVD
discs. Refer to the instruction manual
attached to the disc for details.
lThe available angles vary depending on the
disc.
1. Press the DISPLAY button to display
the function menu.2. Move the cursor to the display angle
change mode by operating the select
button to the left or right.
3. Move the cursor and select the desired
angle by operating the select button up
or down.
4. Press the DISPLAY button to finish the
function menu.
Sound output balance adjustment
(Video CD)
1. Press the DISPLAY button during the
video CD playback to display the
function menu.
2. Move the cursor to the sound output
balance adjustment mode by operating
the select button to the left or right.
Interior Comfort
Rear Entertainment System
6-79
CX-9_8V83-EA-06I_Edition3 Page305
Monday, February 26 2007 7:20 PM
Form No.8V83-EA-06I
Page 306 of 502
Black plate (306,1)
3. Set the sound output to the desired
balance by operating the select button
up or down.
Press the button and the settings
changes in the order of L+R→L→R.
The sound balance changes according
to the setting.
L: Audio recorded in the audio output
channel from the left is output.
R: Audio recorded in the audio output
channel from the right is output.
L
R: Audio recorded in the audio
output channel from the left/right is
output.
4. Press the DISPLAY button to finish the
function menu.
Repeat/random playback (Video CD,
DVD audio and audio CD)
Tracks can be played repeatedly or
randomly.
1. Press the DISPLAY button while in the
playback to display the function menu
on the monitor screen.
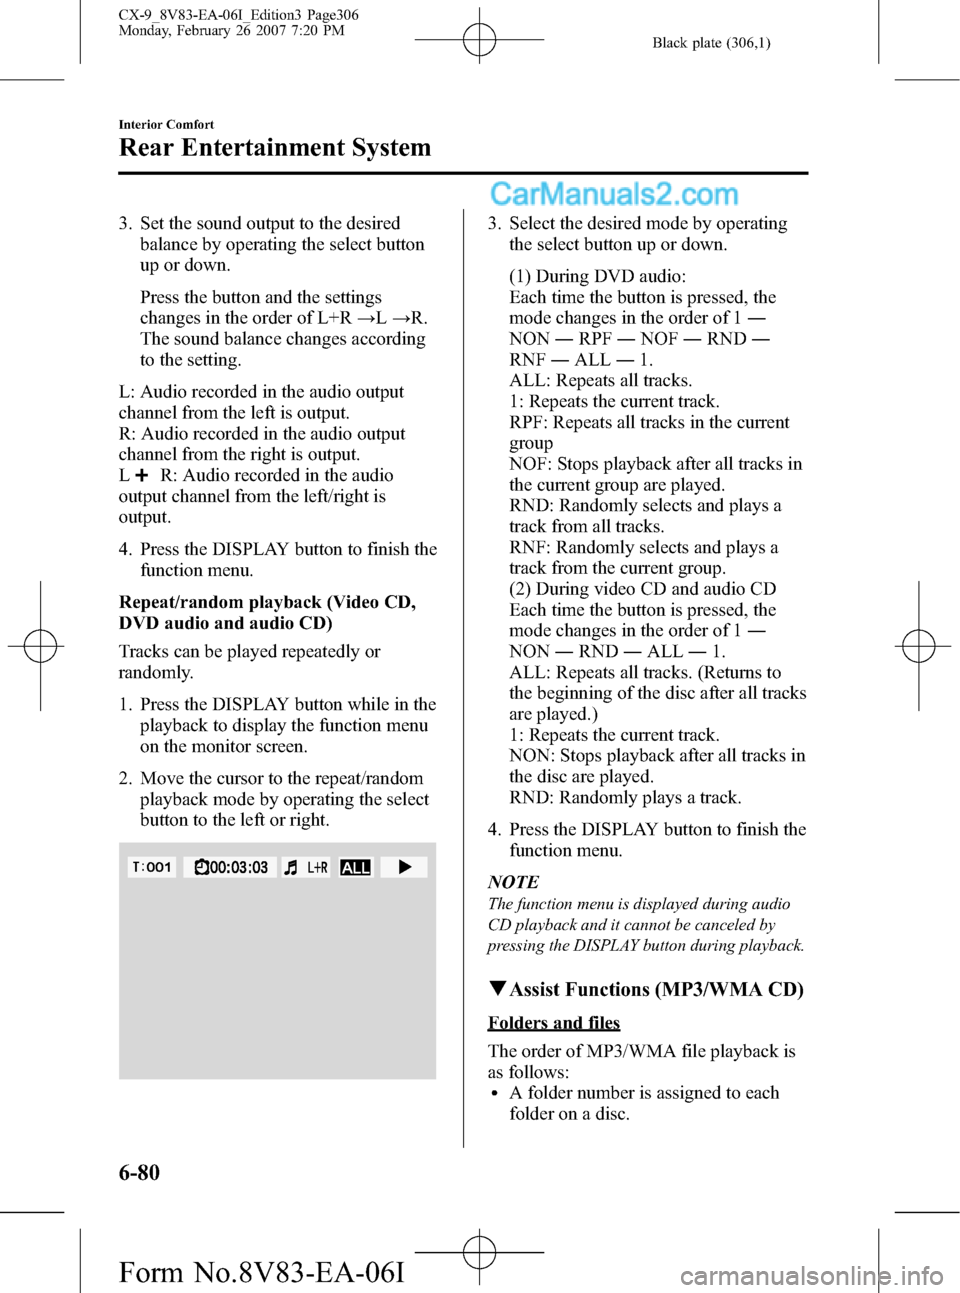
2. Move the cursor to the repeat/random
playback mode by operating the select
button to the left or right.
3. Select the desired mode by operating
the select button up or down.
(1) During DVD audio:
Each time the button is pressed, the
mode changes in the order of 1―
NON―RPF―NOF―RND―
RNF―ALL―1.
ALL: Repeats all tracks.
1: Repeats the current track.
RPF: Repeats all tracks in the current
group
NOF: Stops playback after all tracks in
the current group are played.
RND: Randomly selects and plays a
track from all tracks.
RNF: Randomly selects and plays a
track from the current group.
(2) During video CD and audio CD
Each time the button is pressed, the
mode changes in the order of 1―
NON―RND―ALL―1.
ALL: Repeats all tracks. (Returns to
the beginning of the disc after all tracks
are played.)
1: Repeats the current track.
NON: Stops playback after all tracks in
the disc are played.
RND: Randomly plays a track.
4. Press the DISPLAY button to finish the
function menu.
NOTE
The function menu is displayed during audio
CD playback and it cannot be canceled by
pressing the DISPLAY button during playback.
qAssist Functions (MP3/WMA CD)
Folders and files
The order of MP3/WMA file playback is
as follows:
lA folder number is assigned to each
folder on a disc.
6-80
Interior Comfort
Rear Entertainment System
CX-9_8V83-EA-06I_Edition3 Page306
Monday, February 26 2007 7:20 PM
Form No.8V83-EA-06I
Page 307 of 502
Black plate (307,1)
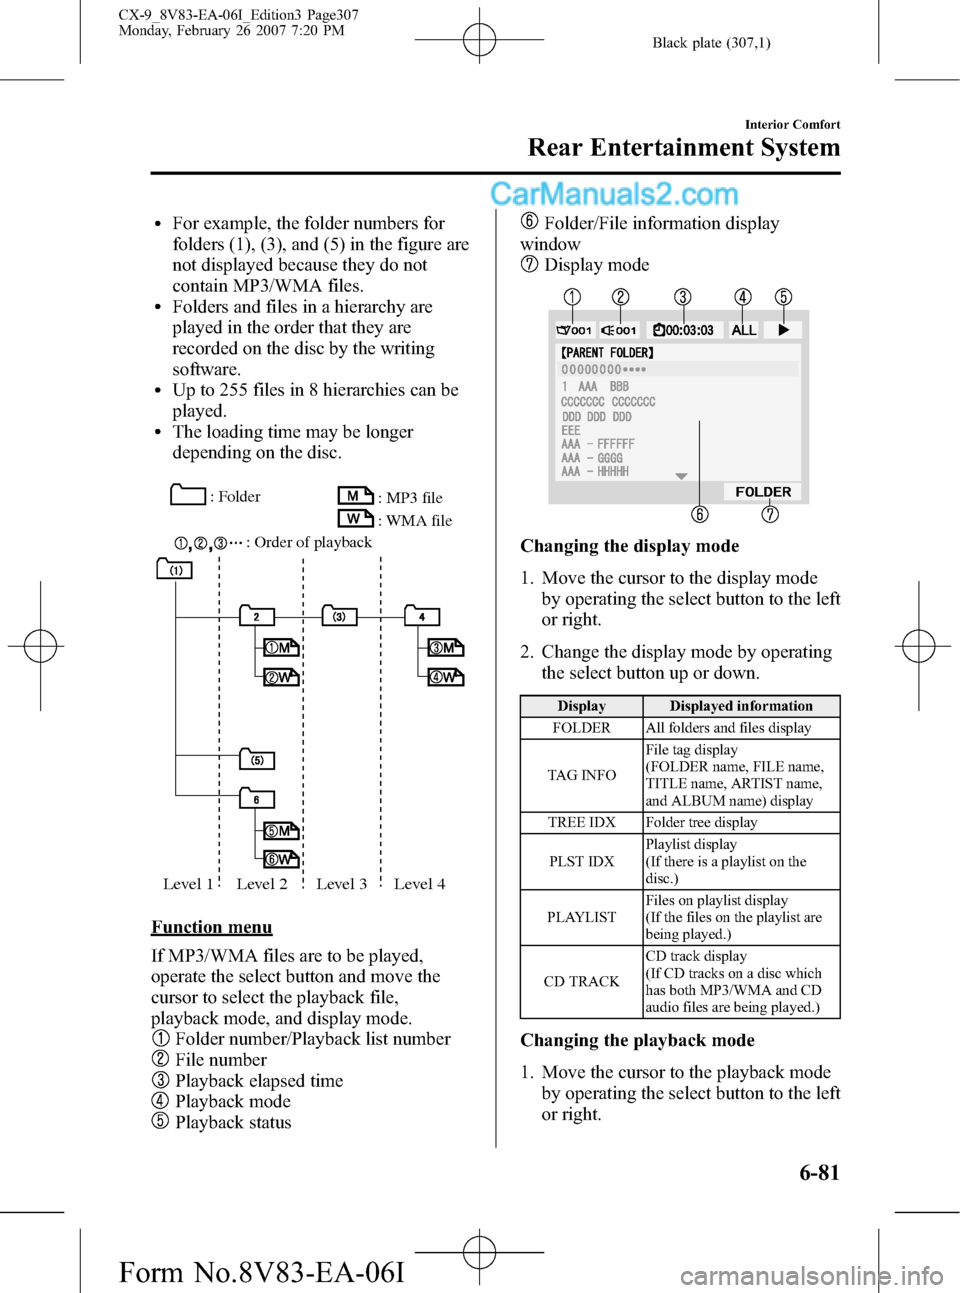
lFor example, the folder numbers for
folders (1), (3), and (5) in the figure are
not displayed because they do not
contain MP3/WMA files.
lFolders and files in a hierarchy are
played in the order that they are
recorded on the disc by the writing
software.
lUp to 255 files in 8 hierarchies can be
played.
lThe loading time may be longer
depending on the disc.
: Folder
: Order of playback: MP3 file
: WMA file
Level 1 Level 2 Level 3 Level 4
Function menu
If MP3/WMA files are to be played,
operate the select button and move the
cursor to select the playback file,
playback mode, and display mode.
Folder number/Playback list number
File number
Playback elapsed time
Playback mode
Playback status
Folder/File information display
window
Display mode
Changing the display mode
1. Move the cursor to the display mode
by operating the select button to the left
or right.
2. Change the display mode by operating
the select button up or down.
Display Displayed information
FOLDER All folders and files display
TAG INFOFile tag display
(FOLDER name, FILE name,
TITLE name, ARTIST name,
and ALBUM name) display
TREE IDX Folder tree display
PLST IDXPlaylist display
(If there is a playlist on the
disc.)
PLAYLISTFiles on playlist display
(If the files on the playlist are
being played.)
CD TRACKCD track display
(If CD tracks on a disc which
has both MP3/WMA and CD
audio files are being played.)
Changing the playback mode
1. Move the cursor to the playback mode
by operating the select button to the left
or right.
Interior Comfort
Rear Entertainment System
6-81
CX-9_8V83-EA-06I_Edition3 Page307
Monday, February 26 2007 7:20 PM
Form No.8V83-EA-06I
Page 308 of 502
Black plate (308,1)
2. Change the display mode by operating
the select button up or down.
Display Playback mode
ALL All files are played repeatedly.
1The current file is played
repeatedly.
NONAll files are played once and the
playback stops.
RPFAll files in the current folder are
played repeatedly.
NOFFiles in the current folder are
played once and the playback
stops.
RND All files are played randomly.
RNFFiles in the current folder are
played randomly.
NOTE
If RND or RNF is selected during a playlist
playback, files on the playlist are played
randomly. Refer to Playlist File Playback on
page 6-82.
Selection file
While in FOLDER display mode
1. Move the cursor to the folder/file
information display window by
operating the select button to the left or
right.
2. Move the cursor to the desired folder/
file by operating the select button up or
down.
3. Press the ENTER button to play the
selected file or to move to the selected
folder.
NOTE
To return to an upper hierarchy, move the
cursor to the“PARENT FOLDER”and press
the ENTER button.
While in TREEIDX display mode
1. Move the cursor to the folder/file
information display window by
operating the select button to the left or
right.
2. Move the cursor to the folder where the
desired file is located by operating the
select button up or down.
3. Press the ENTER button. Playback
starts from the first track in the selected
folder.
NOTE
l“”mark is attached to a folder if the
folder has a playable MP3/WMA file.
lIf a disc including a playlist is being
played, the playlist file can be selected.
Playlist file playback
Playlist files can be played using the
following procedure:
1. Set the display mode to the TREEIDX
mode. Refer to Changing the display
mode on page 6-80.
2. Move the cursor to the PLAYLIST by
operating the select button.
3. Press the ENTER button to change the
display from TREEIDX to PLSTIDX.
4. Move the cursor to the desired playlist
file by operating the select button up or
down.
5. Press the ENTER button. Playback
starts in the order programmed in the
playlist file.
NOTE
The loading time after pressing the ENTER
button may be longer depending on the disc.
6-82
Interior Comfort
Rear Entertainment System
CX-9_8V83-EA-06I_Edition3 Page308
Monday, February 26 2007 7:20 PM
Form No.8V83-EA-06I
Page 309 of 502
Black plate (309,1)
qInitial Setting Function
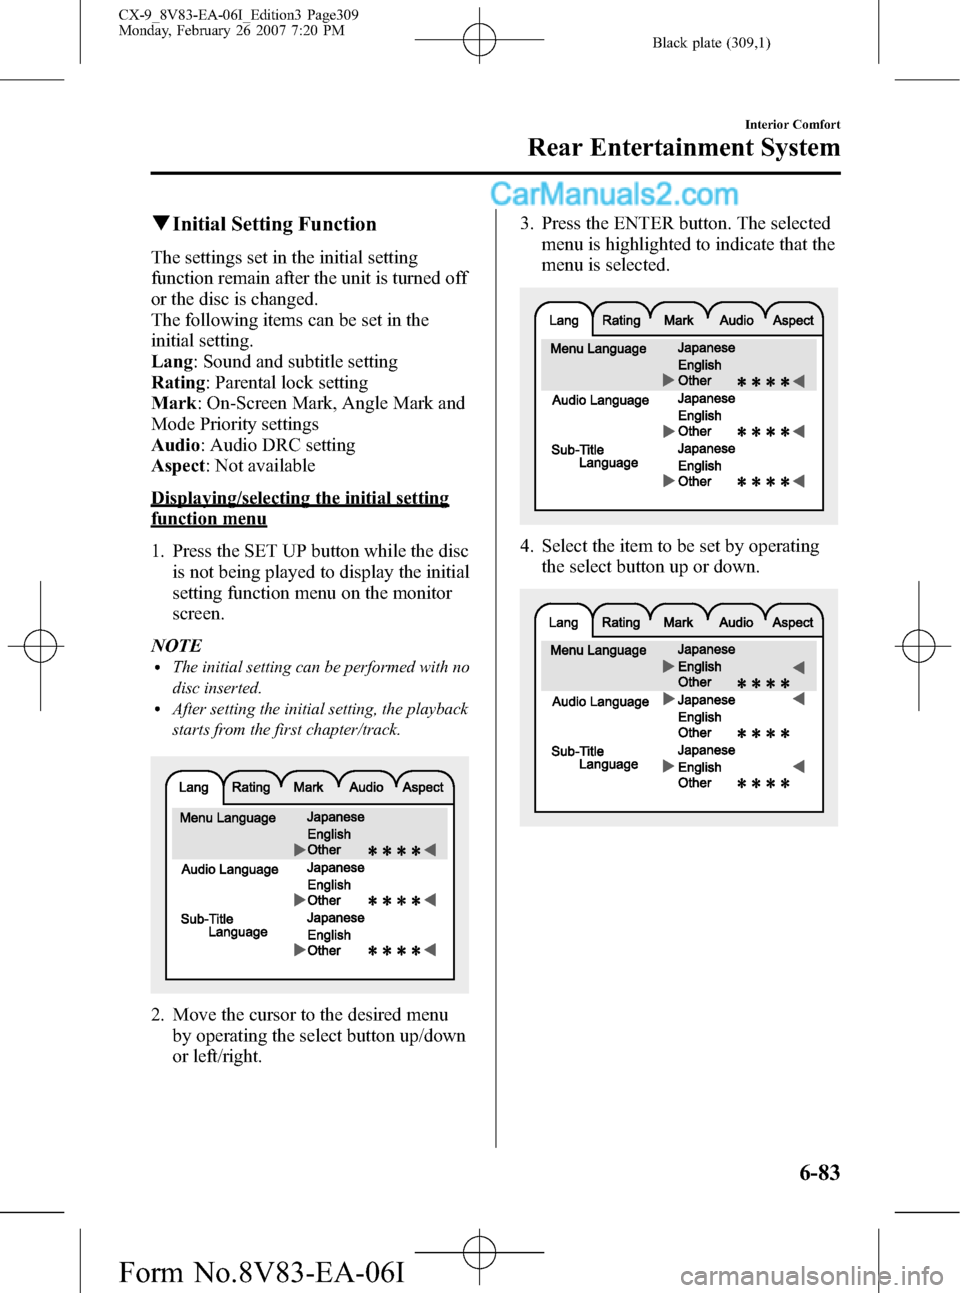
The settings set in the initial setting
function remain after the unit is turned off
or the disc is changed.
The following items can be set in the
initial setting.
Lang: Sound and subtitle setting
Rating: Parental lock setting
Mark: On-Screen Mark, Angle Mark and
Mode Priority settings
Audio: Audio DRC setting
Aspect: Not available
Displaying/selecting the initial setting
function menu
1. Press the SET UP button while the disc
is not being played to display the initial
setting function menu on the monitor
screen.
NOTE
lThe initial setting can be performed with no
disc inserted.
lAfter setting the initial setting, the playback
starts from the first chapter/track.
2. Move the cursor to the desired menu
by operating the select button up/down
or left/right.3. Press the ENTER button. The selected
menu is highlighted to indicate that the
menu is selected.
4. Select the item to be set by operating
the select button up or down.
Interior Comfort
Rear Entertainment System
6-83
CX-9_8V83-EA-06I_Edition3 Page309
Monday, February 26 2007 7:20 PM
Form No.8V83-EA-06I
Page 310 of 502
Black plate (310,1)
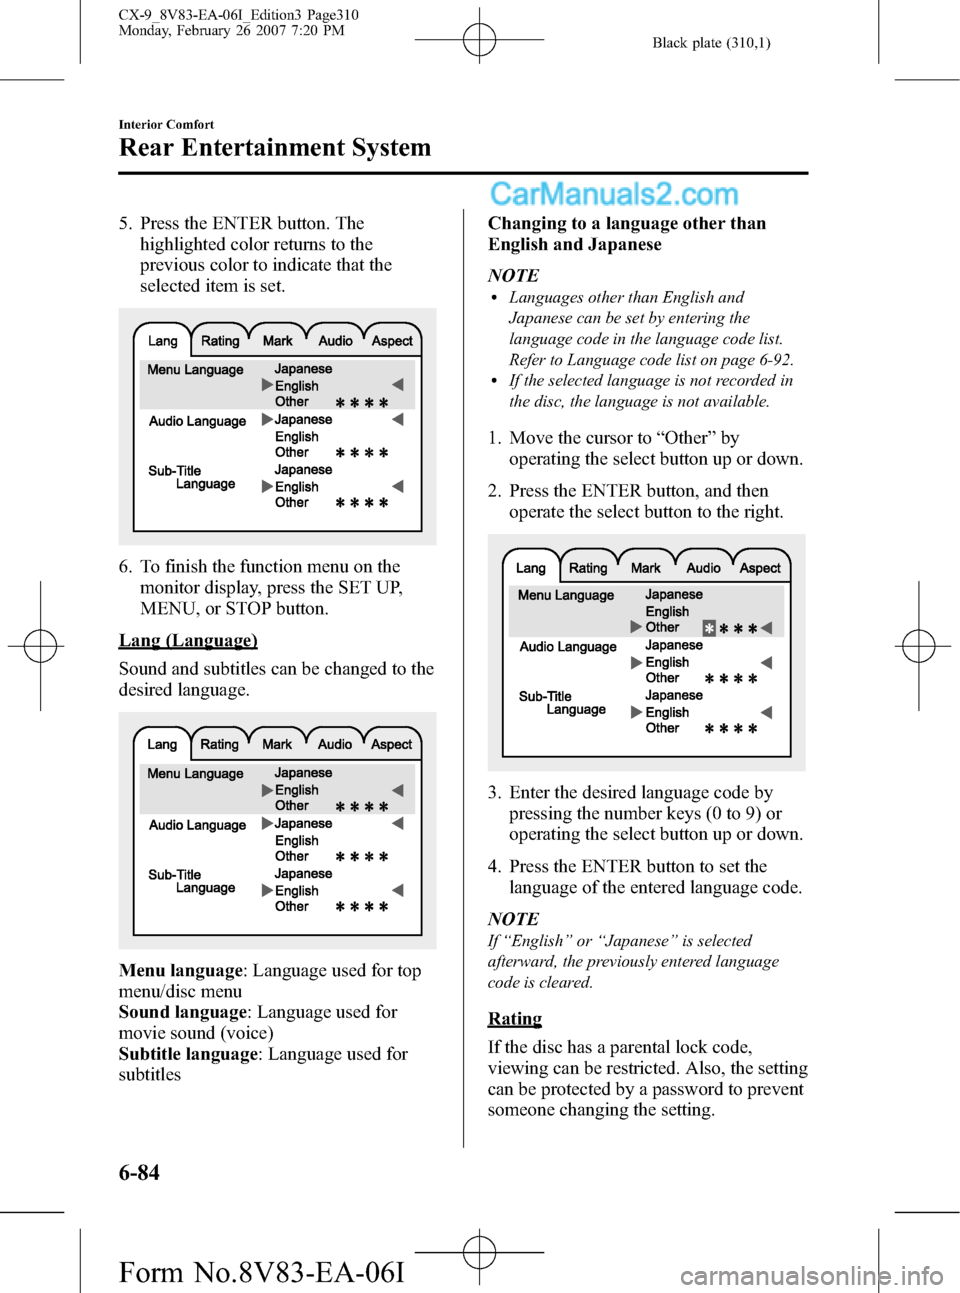
5. Press the ENTER button. The
highlighted color returns to the
previous color to indicate that the
selected item is set.
6. To finish the function menu on the
monitor display, press the SET UP,
MENU, or STOP button.
Lang (Language)
Sound and subtitles can be changed to the
desired language.
Menu language: Language used for top
menu/disc menu
Sound language: Language used for
movie sound (voice)
Subtitle language: Language used for
subtitlesChanging to a language other than
English and Japanese
NOTE
lLanguages other than English and
Japanese can be set by entering the
language code in the language code list.
Refer to Language code list on page 6-92.
lIf the selected language is not recorded in
the disc, the language is not available.
1. Move the cursor to“Other”by
operating the select button up or down.
2. Press the ENTER button, and then
operate the select button to the right.
3. Enter the desired language code by
pressing the number keys (0 to 9) or
operating the select button up or down.
4. Press the ENTER button to set the
language of the entered language code.
NOTE
If“English”or“Japanese”is selected
afterward, the previously entered language
code is cleared.
Rating
If the disc has a parental lock code,
viewing can be restricted. Also, the setting
can be protected by a password to prevent
someone changing the setting.
6-84
Interior Comfort
Rear Entertainment System
CX-9_8V83-EA-06I_Edition3 Page310
Monday, February 26 2007 7:20 PM
Form No.8V83-EA-06I
Page 311 of 502
Black plate (311,1)
Viewing can be restricted by setting the
parent lock level.
For example, if the level is set to 6, level 7
or higher viewing is locked and cannot be
played.
NOTE
lParent lock is not available depending on
the disc.
lThe initial password setting (when
purchased) is“0000”.
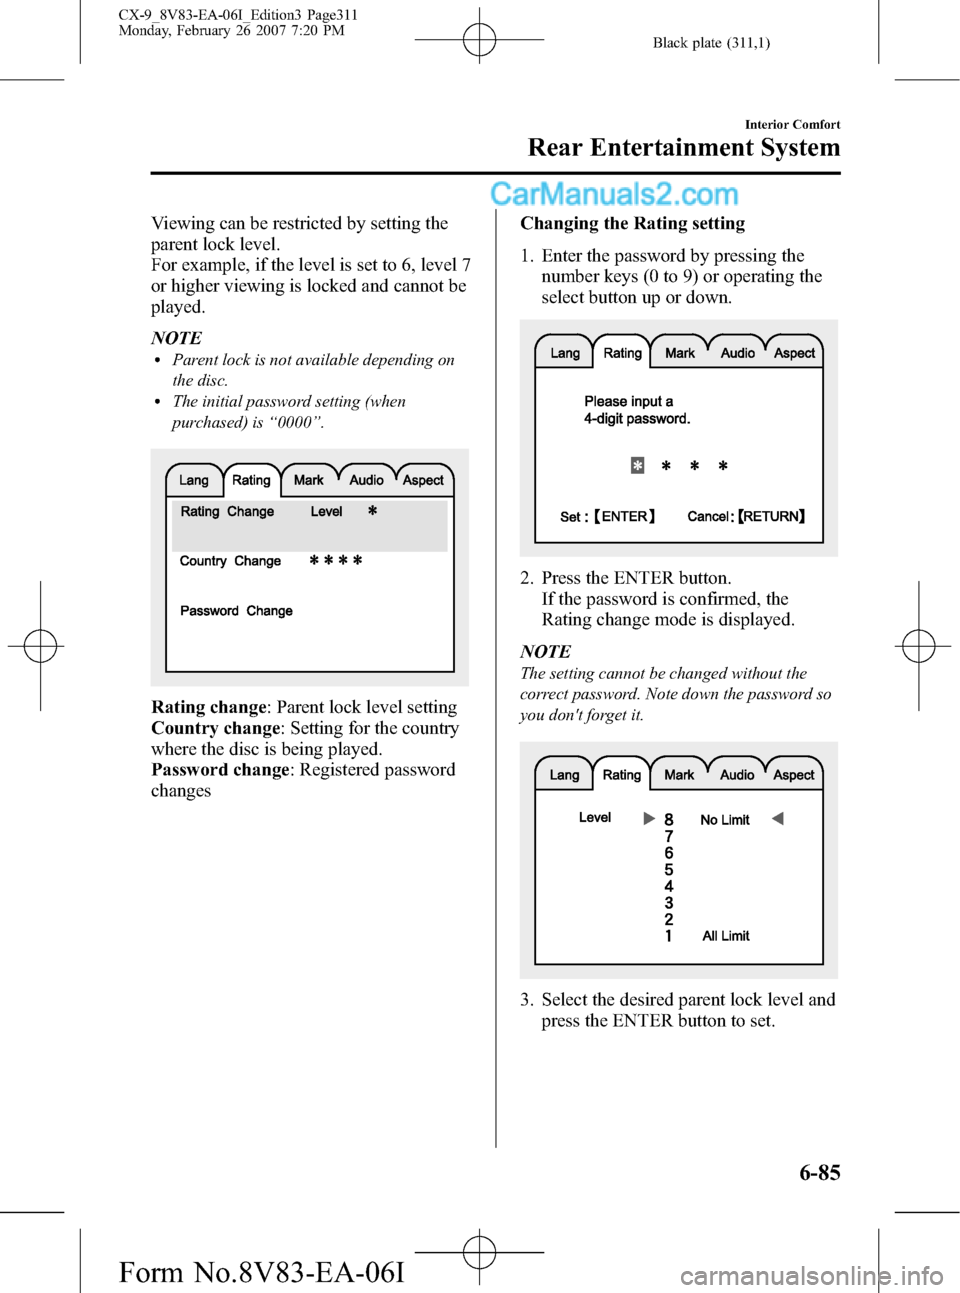
Rating change: Parent lock level setting
Country change: Setting for the country
where the disc is being played.
Password change: Registered password
changesChanging the Rating setting
1. Enter the password by pressing the
number keys (0 to 9) or operating the
select button up or down.
2. Press the ENTER button.
If the password is confirmed, the
Rating change mode is displayed.
NOTE
The setting cannot be changed without the
correct password. Note down the password so
you don't forget it.
3. Select the desired parent lock level and
press the ENTER button to set.
Interior Comfort
Rear Entertainment System
6-85
CX-9_8V83-EA-06I_Edition3 Page311
Monday, February 26 2007 7:20 PM
Form No.8V83-EA-06I
Page 312 of 502
Black plate (312,1)
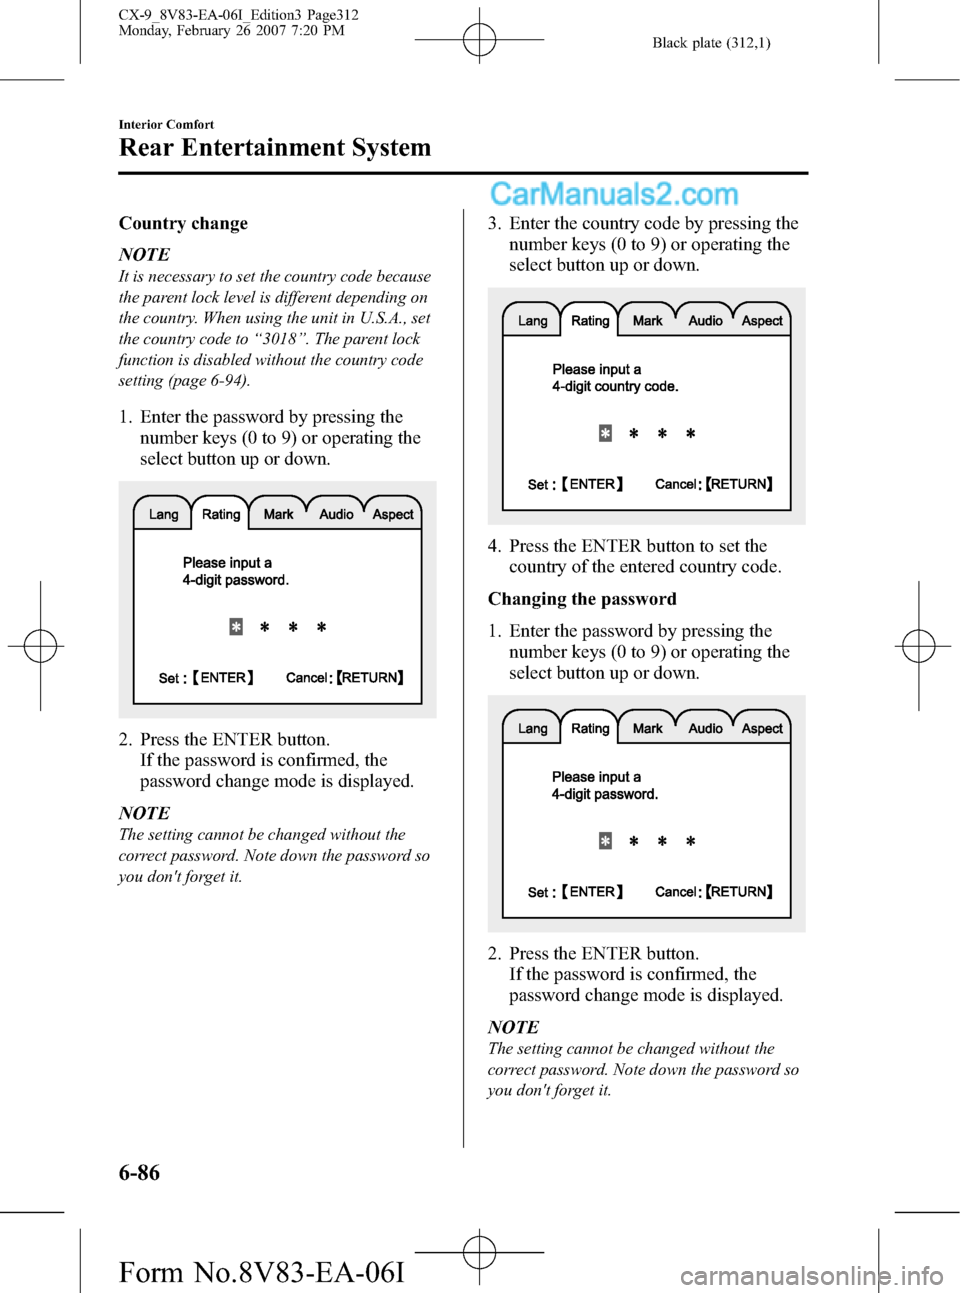
Country change
NOTE
It is necessary to set the country code because
the parent lock level is different depending on
the country. When using the unit in U.S.A., set
the country code to“3018”. The parent lock
function is disabled without the country code
setting (page 6-94).
1. Enter the password by pressing the
number keys (0 to 9) or operating the
select button up or down.
2. Press the ENTER button.
If the password is confirmed, the
password change mode is displayed.
NOTE
The setting cannot be changed without the
correct password. Note down the password so
you don't forget it.
3. Enter the country code by pressing the
number keys (0 to 9) or operating the
select button up or down.
4. Press the ENTER button to set the
country of the entered country code.
Changing the password
1. Enter the password by pressing the
number keys (0 to 9) or operating the
select button up or down.
2. Press the ENTER button.
If the password is confirmed, the
password change mode is displayed.
NOTE
The setting cannot be changed without the
correct password. Note down the password so
you don't forget it.
6-86
Interior Comfort
Rear Entertainment System
CX-9_8V83-EA-06I_Edition3 Page312
Monday, February 26 2007 7:20 PM
Form No.8V83-EA-06I
Page 313 of 502
Black plate (313,1)
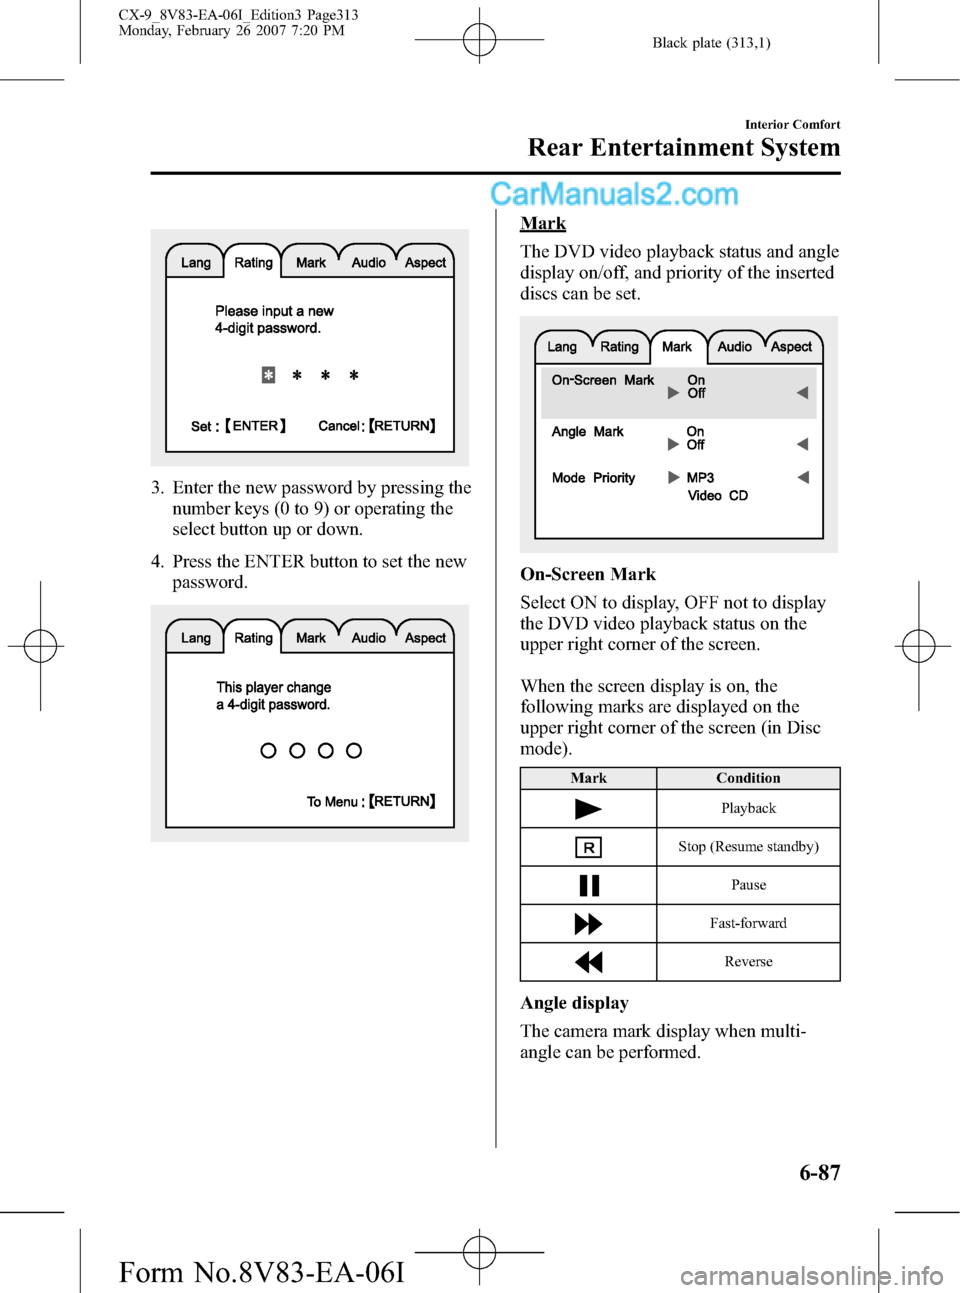
3. Enter the new password by pressing the
number keys (0 to 9) or operating the
select button up or down.
4. Press the ENTER button to set the new
password.
Mark
The DVD video playback status and angle
display on/off, and priority of the inserted
discs can be set.
On-Screen Mark
Select ON to display, OFF not to display
the DVD video playback status on the
upper right corner of the screen.
When the screen display is on, the
following marks are displayed on the
upper right corner of the screen (in Disc
mode).
Mark Condition
Playback
Stop (Resume standby)
Pause
Fast-forward
Reverse
Angle display
The camera mark display when multi-
angle can be performed.
Interior Comfort
Rear Entertainment System
6-87
CX-9_8V83-EA-06I_Edition3 Page313
Monday, February 26 2007 7:20 PM
Form No.8V83-EA-06I
Page 314 of 502
Black plate (314,1)
NOTElThe display angle change is not available
for discs other than multi-angle recorded
DVD discs. Refer to the instruction manual
accompanying the disc for details.
lThe screen size and angle can be changed
when On-Screen Mark and Angle Mark is
off.
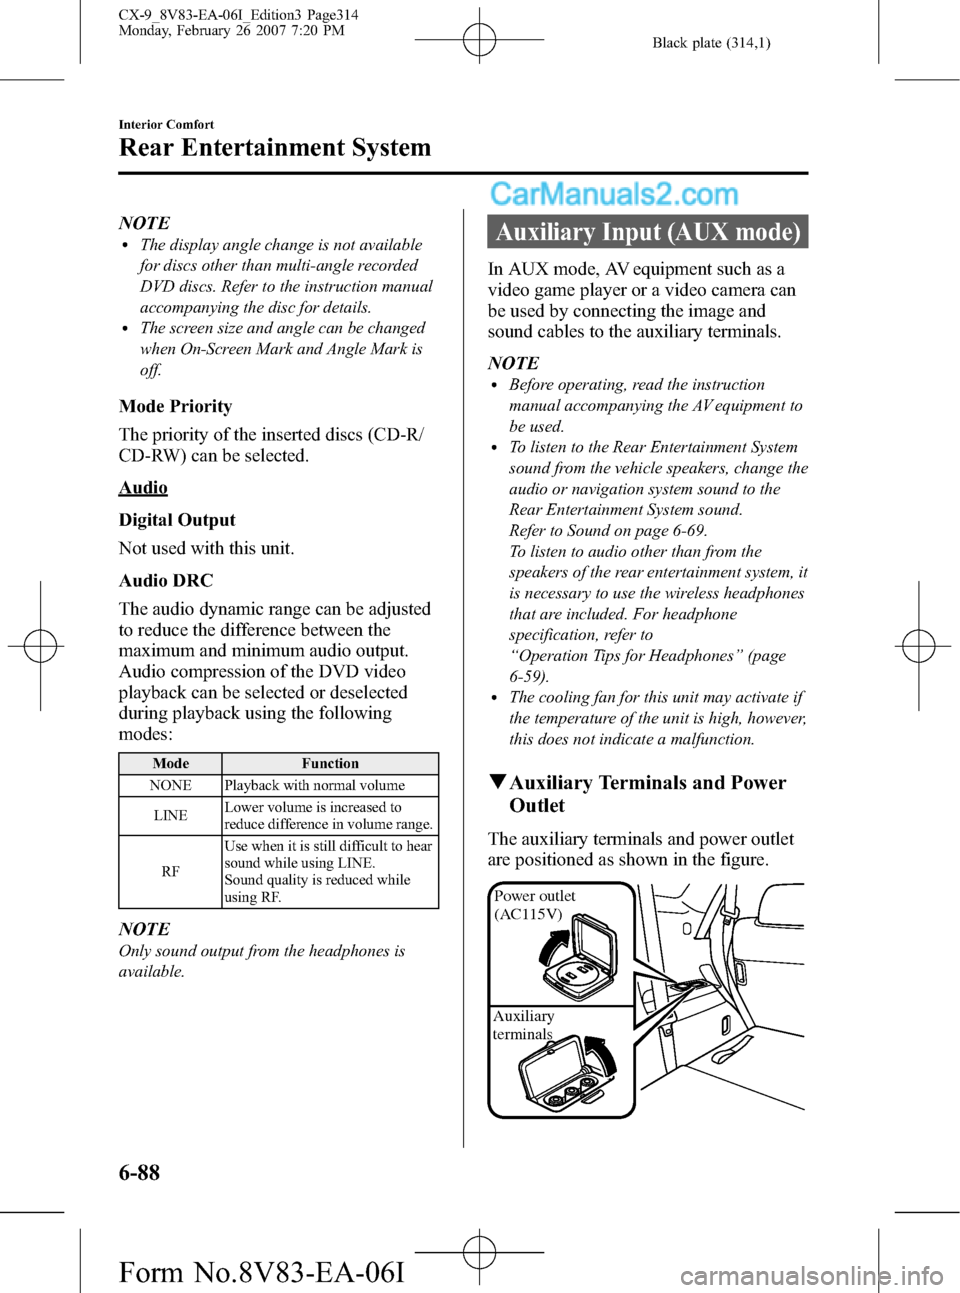
Mode Priority
The priority of the inserted discs (CD-R/
CD-RW) can be selected.
Audio
Digital Output
Not used with this unit.
Audio DRC
The audio dynamic range can be adjusted
to reduce the difference between the
maximum and minimum audio output.
Audio compression of the DVD video
playback can be selected or deselected
during playback using the following
modes:
Mode Function
NONE Playback with normal volume
LINELower volume is increased to
reduce difference in volume range.
RFUse when it is still difficult to hear
sound while using LINE.
Sound quality is reduced while
using RF.
NOTE
Only sound output from the headphones is
available.
Auxiliary Input (AUX mode)
In AUX mode, AV equipment such as a
video game player or a video camera can
be used by connecting the image and
sound cables to the auxiliary terminals.
NOTE
lBefore operating, read the instruction
manual accompanying the AV equipment to
be used.
lTo listen to the Rear Entertainment System
sound from the vehicle speakers, change the
audio or navigation system sound to the
Rear Entertainment System sound.
Refer to Sound on page 6-69.
To listen to audio other than from the
speakers of the rear entertainment system, it
is necessary to use the wireless headphones
that are included. For headphone
specification, refer to
“Operation Tips for Headphones”(page
6-59).
lThe cooling fan for this unit may activate if
the temperature of the unit is high, however,
this does not indicate a malfunction.
qAuxiliary Terminals and Power
Outlet
The auxiliary terminals and power outlet
are positioned as shown in the figure.
Power outlet
(AC115V)
Auxiliary
terminals
6-88
Interior Comfort
Rear Entertainment System
CX-9_8V83-EA-06I_Edition3 Page314
Monday, February 26 2007 7:20 PM
Form No.8V83-EA-06I