steering MAZDA MODEL CX-9 2008 Quick Tips (in English)
[x] Cancel search | Manufacturer: MAZDA, Model Year: 2008, Model line: MODEL CX-9, Model: MAZDA MODEL CX-9 2008Pages: 15, PDF Size: 2.04 MB
Page 2 of 15

DRIVER’S VIEW
Always check the Owner’s Manual for more operating information and safety features
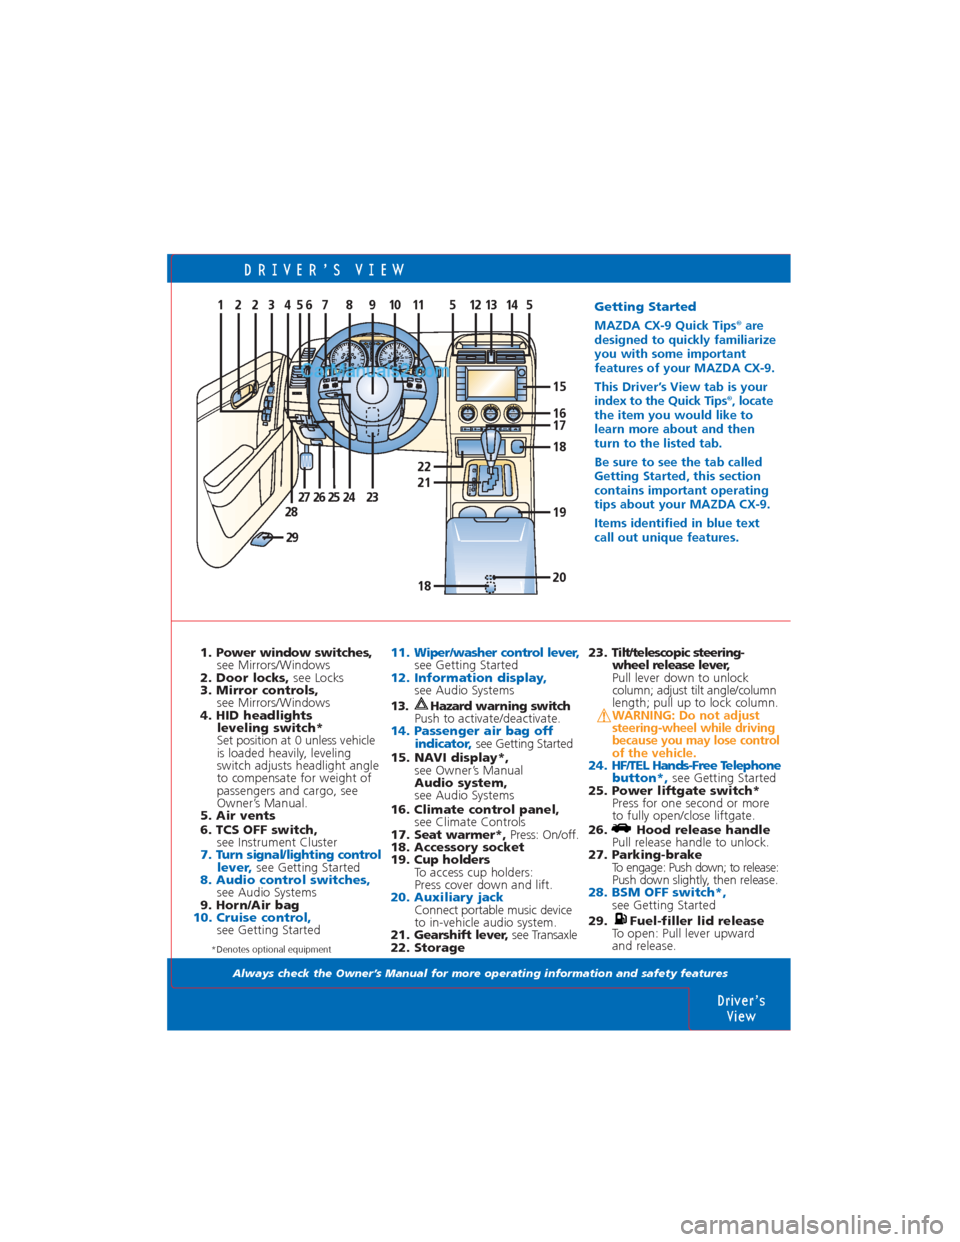
1. Power window switches,
see Mirrors/Windows
2. Door locks, see Locks
3. Mirror controls,
see Mirrors/Windows
4. HID headlights
leveling switch*
Set position at 0 unless vehicle
is loaded heavily, leveling
switch adjusts headlight angle
to compensate for weight of
passengers and cargo, see
Owner’s Manual.
5. Air vents
6. TCS OFF switch,
see Instrument Cluster
7. Turn signal/lighting control
lever, see Getting Started8. Audio control switches,see Audio Systems
9. Horn/Air bag
10. Cruise control, see Getting Started
11. Wiper/washer control lever,see Getting Started12. Information display,see Audio Systems
13. Hazard warning switch
Push to activate/deactivate.
14. Passenger air bag off
indicator, see Getting Started
15. NAVI display*,
see Owner’s Manual
Audio system,
see Audio Systems
16. Climate control panel,
see Climate Controls
17. Seat warmer*, Press: On/off.
18. Accessory socket
19. Cup holders
To access cup holders:
Press cover down and lift.
20. Auxiliary jackConnect portable music device
to in-vehicle audio system.
21. Gearshift lever, see Transaxle
22. Storage
Driver’s
View
AUTO
OFF DUAL
PASS OUTSIDE A/C
MODE C H C H
FRONT REAR REAR
CONTROL
km/h mph
E F H
C
x10002 3 4
5
6
7
8
TRIP 1
0 0 20 40 60 80
10 0
12 0
140 220 20 40 60 80 100 120
140
160
180
200
P
R
N
D
M
8 2112
382.3
1 2 2 3 5 5 5 4 121413
272826
29
19
22
REAR
S
E
T
+
S
E
T
-
O
N
O
F
F VOL
+
– MOD
E
1197810
232524M
P
R
N
D 21
18 20
16
18
15
17
6
23. Tilt/telescopic steering-
wheel release lever,
Pull lever down to unlock
column; adjust tilt angle/column
length; pull up to lock column.
WARNING: Do not adjust
steering-wheel while driving
because you may lose control
of the vehicle.
24. HF/TEL Hands-Free Telephone
button*,
see Getting Started
25. Power liftgate switch*
Press for one second or more
to fully open/close liftgate.
26. Hood release handle
Pull release handle to unlock.
27. Parking-brake
To engage: Push down; to release:
Push down slightly, then release.
28. BSM OFF switch*, see Getting Started
29. Fuel-filler lid release
To open: Pull lever upward
and release.
Getting Started
MAZDA CX-9 Quick Tips®are
designed to quickly familiarize
you with some important
features of your MAZDA CX-9.
This Driver’s View tab is your
index to the Quick Tips
®, locate
the item you would like to
learn more about and then
turn to the listed tab.
Be sure to see the tab called
Getting Started, this section
contains important operating
tips about your MAZDA CX-9.
Items identified in blue text
call out unique features.
*Denotes optional equipment
Page 3 of 15

GETTING STARTED
Always check the Owner’s Manual for more operating information and safety features
Bluetooth
Hands-Free
Telephone
(HF/TEL)*
System consists
of Hands-Free
Telephone
(HF/TEL) button
(1) located on
steering-wheel, information display,
microphone and audio/navigation
system*; system only functions
with a Bluetooth type mobile
telephone, a mobile telephone
can be programmed only when
vehicle is parked.
Hands-Free Telephone setup
Pair a phone
1. Press telephone button (1);
say “setup.”
2. System prompts you with available
options; say “pairing options.”BSM warning
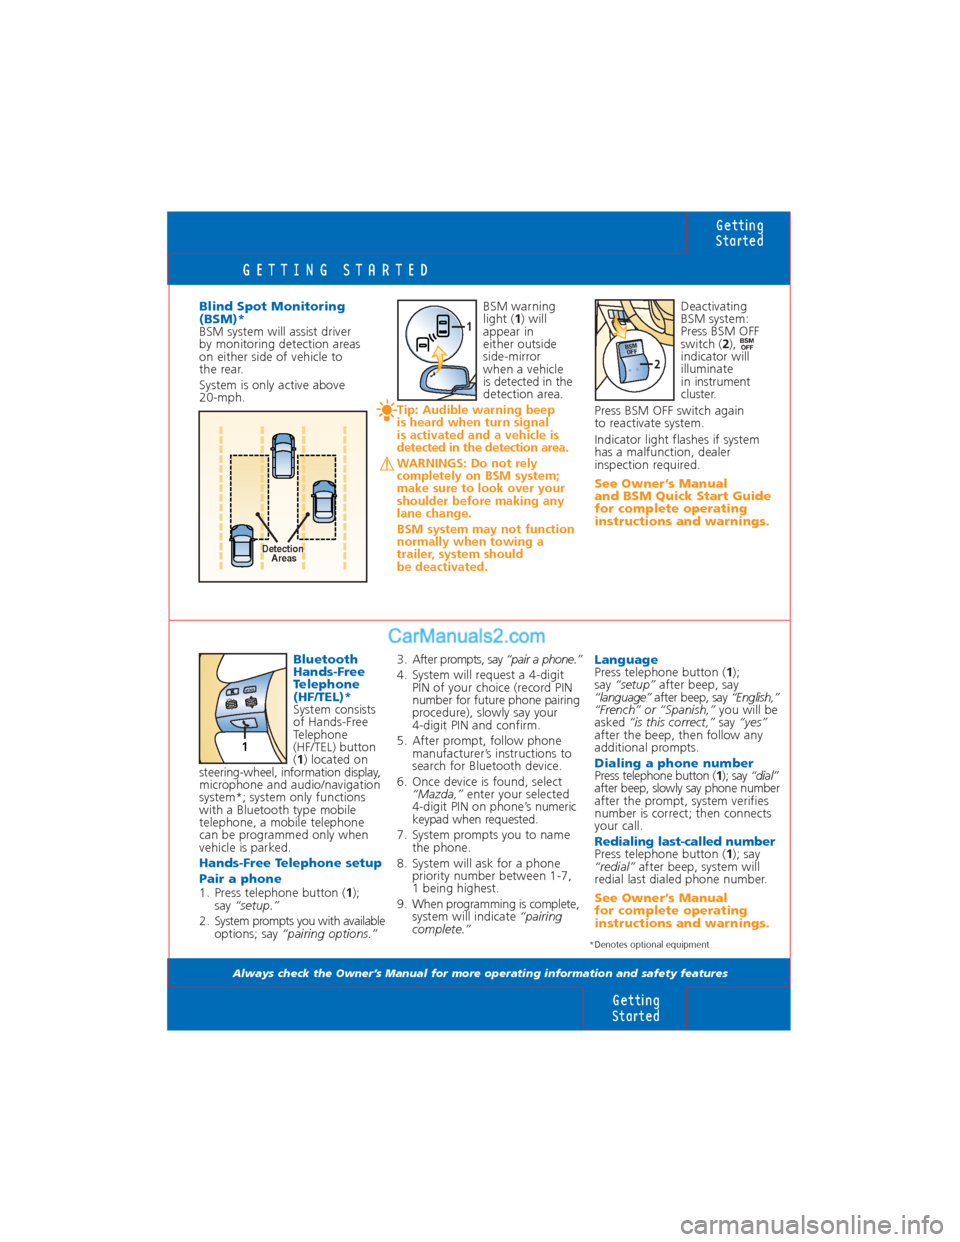
light (1) will
appear in
either outside
side-mirror
when a vehicle
is detected in the
detection area.
Tip: Audible warning beep
is heard when turn signal
is activated and a vehicle is
detected in the detection area.
WARNINGS: Do not rely
completely on BSM system;
make sure to look over your
shoulder before making any
lane change.
BSM system may not function
normally when towing a
trailer, system should
be deactivated.
Getting
Started
Getting
Started
LanguagePress telephone button (1);
say “setup”after beep, say
“language”after beep, say “English,”
“French” or “Spanish,”you will be
asked “is this correct,”say “yes”
after the beep, then follow any
additional prompts.
Dialing a phone numberPress telephone button (1); say “dial”
after beep, slowly say phone number
after the prompt, system verifies
number is correct; then connects
your call.
Redialing last-called numberPress telephone button (1); say
“redial”after beep, system will
redial last dialed phone number.
See Owner’s Manual
for complete operating
instructions and warnings. Blind Spot Monitoring
(BSM)*
BSM system will assist driver
by monitoring detection areas
on either side of vehicle to
the rear.
System is only active above
20-mph.
3. After prompts, say “pair a phone.”
4. System will request a 4-digit
PIN of your choice (record PIN
number for future phone pairing
procedure), slowly say your
4-digit PIN and confirm.
5. After prompt, follow phone
manufacturer’s instructions to
search for Bluetooth device.
6. Once device is found, select
“Mazda,”enter your selected
4-digit PIN on phone’s numeric
keypad when requested.
7. System prompts you to name
the phone.
8. System will ask for a phone
priority number between 1-7,
1 being highest.
9. When programming is complete,
system will indicate“pairing
complete.”
*Denotes optional equipment
1
Detection
Areas
VOL+
–MOD
E
1
Deactivating
BSM system:
Press BSM OFF
switch (2),
indicator will
illuminate
in instrument
cluster.
Press BSM OFF switch again
to reactivate system.
Indicator light flashes if system
has a malfunction, dealer
inspection required.
See Owner’s Manual
and BSM Quick Start Guide
for complete operating
instructions and warnings.
BSMOFFBSM
OFF
2
Page 12 of 15

AM/FM STEREO/CD/CD CHANGER
Always check the Owner’s Manual for more operating information and safety features
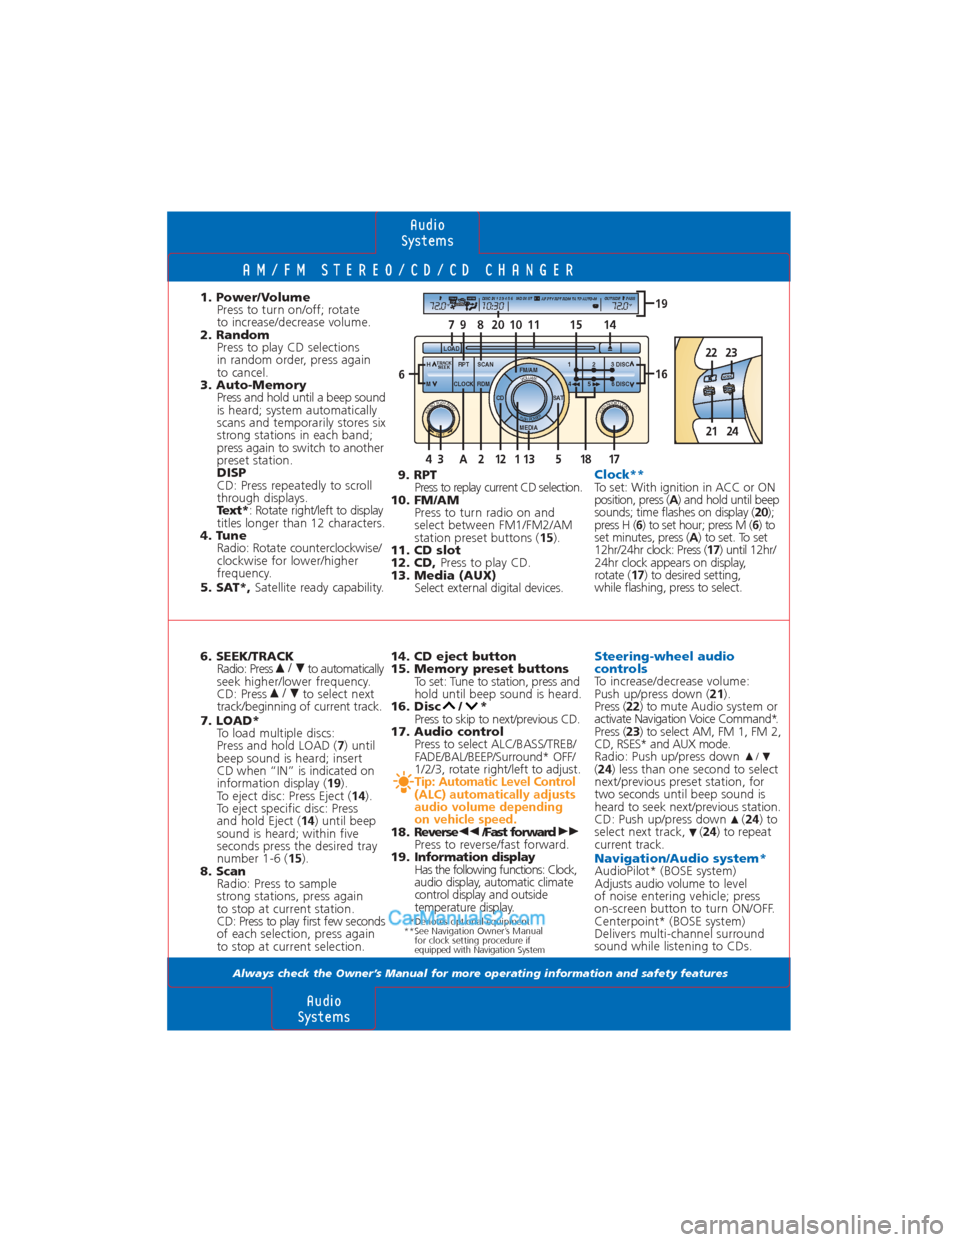
6. SEEK/TRACKRadio: Press to automatically
seek higher/lower frequency.
CD: Press to select next
track/beginning of current track.
7. LOAD* To load multiple discs:
Press and hold LOAD ( 7) until
beep sound is heard; insert
CD when “IN” is indicated on
information display ( 19).
To eject disc: Press Eject ( 14).
To eject specific disc: Press
and hold Eject ( 14) until beep
sound is heard; within five
seconds press the desired tray
number 1-6 ( 15).
8. Scan Radio: Press to sample
strong stations, press again
to stop at current station.
CD: Press to play first few seconds
of each selection, press again
to stop at current selection.
/
/
1. Power/VolumePress to turn on/off; rotate
to increase/decrease volume.
2. Random Press to play CD selections
in random order, press again
to cancel.
3. Auto-Memory Press and hold until a beep sound
is heard; system automatically
scans and temporarily stores six
strong stations in each band;
press again to switch to another
preset station.
DISP
CD: Press repeatedly to scroll
through displays.
Text* : Rotate right/left to display
titles longer than 12 characters.
4. Tune Radio: Rotate counterclockwise/
clockwise for lower/higher
frequency.
5. SAT*, Satellite ready capability.
14. CD eject button
15. Memory preset buttonsTo set: Tune to station, press and
hold until beep sound is heard.
16. Disc / * Press to skip to next/previous CD.
17. Audio control Press to select ALC/BASS/TREB/
FADE/BAL/BEEP/Surround* OFF/
1/2/3, rotate right/left to adjust.
Tip: Automatic Level Control
(ALC) automatically adjusts
audio volume depending
on vehicle speed.
18. Reverse /Fast forward
Press to reverse/fast forward.
19. Information display
Has the following functions: Clock,
audio display, automatic climate
control display and outside
temperature display.
9. RPT Press to replay current CD selection.
10. FM/AM Press to turn radio on and
select between FM1/FM2/AM
station preset buttons ( 15).
11. CD slot
12. CD, Press to play CD.
13. Media (AUX) Select external digital devices.
Steering-wheel audio
controls
To increase/decrease volume:
Push up/press down ( 21).
Press ( 22) to mute Audio system or
activate Navigation Voice Command*.
Press ( 23) to select AM, FM 1, FM 2,
CD, RSES* and AUX mode.
Radio: Push up/press down
( 24 ) less than one second to select
next/previous preset station, for
two seconds until beep sound is
heard to seek next/previous station.
CD: Push up/press down ( 24) to
select next track, ( 24) to repeat
current track.
Navigation/Audio system*AudioPilot* (BOSE system)
Adjusts audio volume to level
of noise entering vehicle; press
on-screen button to turn ON/OFF.
Centerpoint* (BOSE system)
Delivers multi-channel surround
sound while listening to CDs.
/
Clock**To set: With ignition in ACC or ON
position, press ( A) and hold until beep
sounds; time flashes on display ( 20);
press H ( 6) to set hour; press M ( 6) to
set minutes, press ( A) to set. To set
12hr/24hr clock: Press ( 17) until 12hr/
24hr clock appears on display,
rotate ( 17) to desired setting,
while flashing, press to select.
Audio
Systems
Audio
Systems
SCAN
LOAD
RPT
H
M CLOCK RDM 4 5 6 DISC 1 3 DISC
FM/AM
MEDIA 2
SAT
111079814
PUSH AUDIO CONT AUDIO PUSH AUTO TEXT
VOLUME
TRACK SEEK
CD
PUSH POWER
13 1 12 2A 517 18 3 4
72.0 10:30 DISC IN 1 2 3 4 5 6 MD IN ST OUTSIDE PASSAF PTY RPT RDM TA TP AUTO-M AUTO DUAL
A/C oF 72.0 oF
16 6
19
1520
*Denotes optional equipment
**See Navigation Owner’s Manual for clock setting procedure if
equipped with Navigation System
VO L
+
– M
OD
E
2223
2124
Page 14 of 15

UNDER HOOD
Always check the Owner’s Manual for more operating information and safety features
Under Hood
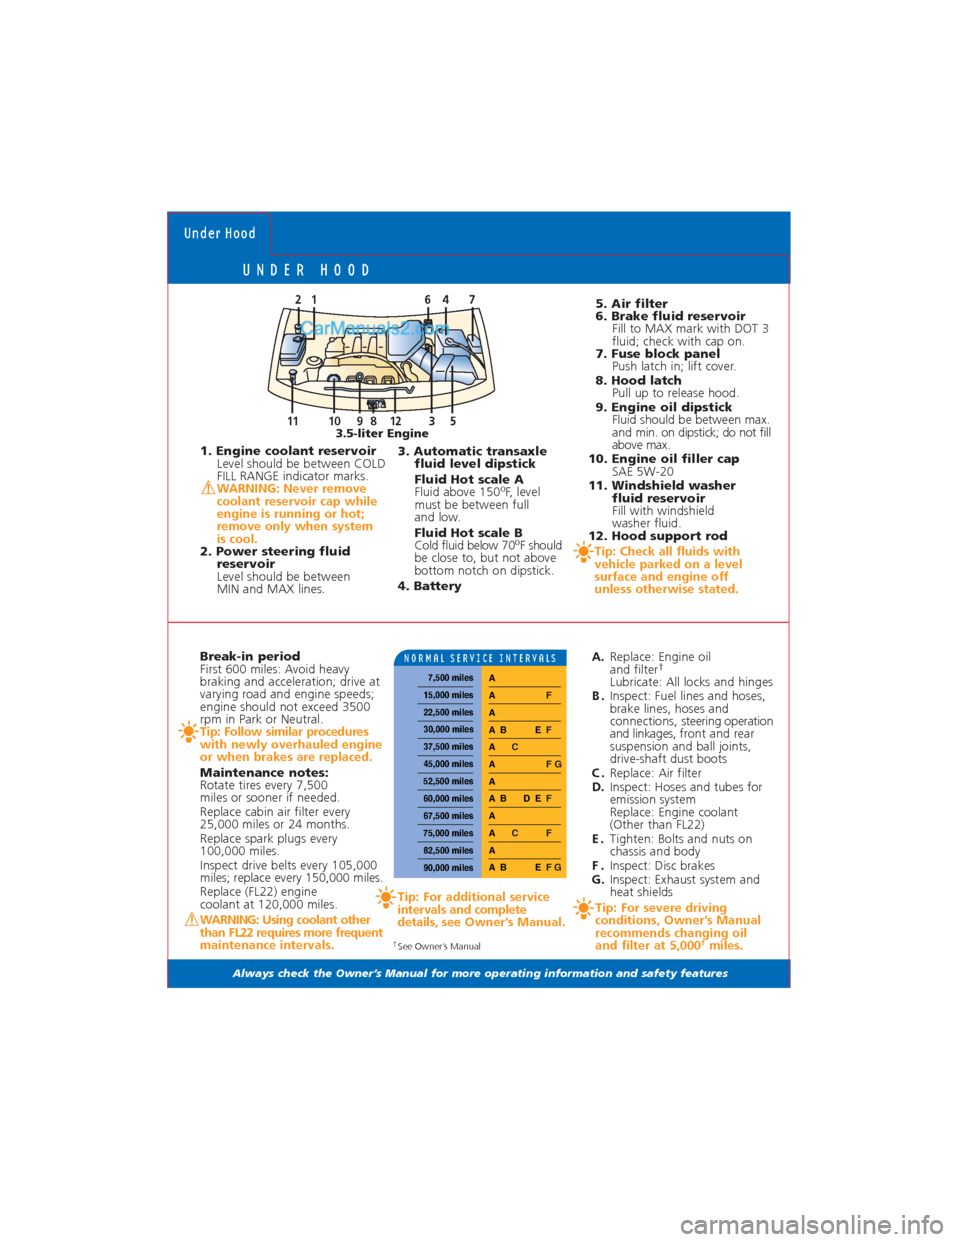
1. Engine coolant reservoir
Level should be between COLD
FILL RANGE indicator marks.
WARNING: Never remove
coolant reservoir cap while
engine is running or hot;
remove only when system
is cool.
2. Power steering fluid
reservoir
Level should be between
MIN and MAX lines.
Break-in period
First 600 miles: Avoid heavy
braking and acceleration; drive at
varying road and engine speeds;
engine should not exceed 3500
rpm in Park or Neutral.
Tip: Follow similar procedures
with newly overhauled engine
or when brakes are replaced.
Maintenance notes:
Rotate tires every 7,500
miles or sooner if needed.
Replace cabin air filter every
25,000 miles or 24 months.
Replace spark plugs every
100,000 miles.
Inspect drive belts every 105,000
miles; replace every 150,000 miles.
Replace (FL22) engine
coolant at 120,000 miles.
WARNING: Using coolant other
than FL22 requires more frequent
maintenance intervals.Tip: For additional service
intervals and complete
details, see Owner’s Manual.
3. Automatic transaxle
fluid level dipstick
Fluid Hot scale A
Fluid above 150
oF, level
must be between full
and low.
Fluid Hot scale B
Cold fluid below 70
oF should
be close to, but not above
bottom notch on dipstick.
4. Battery
A.Replace: Engine oil
and filter
†Lubricate: All locks and hinges
B.Inspect: Fuel lines and hoses,
brake lines, hoses and
connections, steering operation
and linkages, front and rear
suspension and ball joints,
drive-shaft dust boots
C.Replace: Air filter
D.Inspect: Hoses and tubes for
emission system
Replace: Engine coolant
(Other than FL22)
E.Tighten: Bolts and nuts on
chassis and body
F.Inspect: Disc brakes
G.Inspect: Exhaust system and
heat shields
Tip: For severe driving
conditions, Owner’s Manual
recommends changing oil
and filter at 5,000
†miles.
5. Air filter
6. Brake fluid reservoir
Fill to MAX mark with DOT 3
fluid; check with cap on.
7. Fuse block panel
Push latch in; lift cover.
8. Hood latch
Pull up to release hood.
9. Engine oil dipstick
Fluid should be between max.
and min. on dipstick; do not fill
above max.
10. Engine oil filler cap
SAE 5W-20
11. Windshield washer
fluid reservoir
Fill with windshield
washer fluid.
12. Hood support rod
Tip: Check all fluids with
vehicle parked on a level
surface and engine off
unless otherwise stated.
1 2 4 7
8 3 12 5 10 9 11
6
3.5-liter Engine
†See Owner’s Manual
NORMAL SERVICE INTERVALS
7,500 miles
15,000 miles
22,500 miles
30,000 miles
37,500 miles
45,000 miles
52,500 miles
60,000 miles
67,500 miles
75,000 miles
82,500 miles
90,000 miles
A BEF G A A
C F
A A
B D E F A A
F G A C A
BEF
A A F A