lights MAZDA MODEL CX-9 2009 (in English) Service Manual
[x] Cancel search | Manufacturer: MAZDA, Model Year: 2009, Model line: MODEL CX-9, Model: MAZDA MODEL CX-9 2009Pages: 538, PDF Size: 12.18 MB
Page 229 of 538
Black plate (229,1)
Select the proper setting from the following chart.
Front seat Rear seat
LoadSwitch
Position
Driver
PassengerSecond-
rowThird-
row
×――――0
××―― ―0
××―×―1
××××―1
××××× 2
×―――×3
×: Yes
―:No
qDaytime Running Lights (Canada)
In Canada, vehicles must be driven with
the headlights on during daytime
operation.
For that reason, the daytime running lights
automatically turn on when the ignition
switch is turned to the ON position.
NOTE
The Daytime Running Lights turn off when the
parking brake is applied.
Turn and Lane-Change
Signals
qTurn Signal
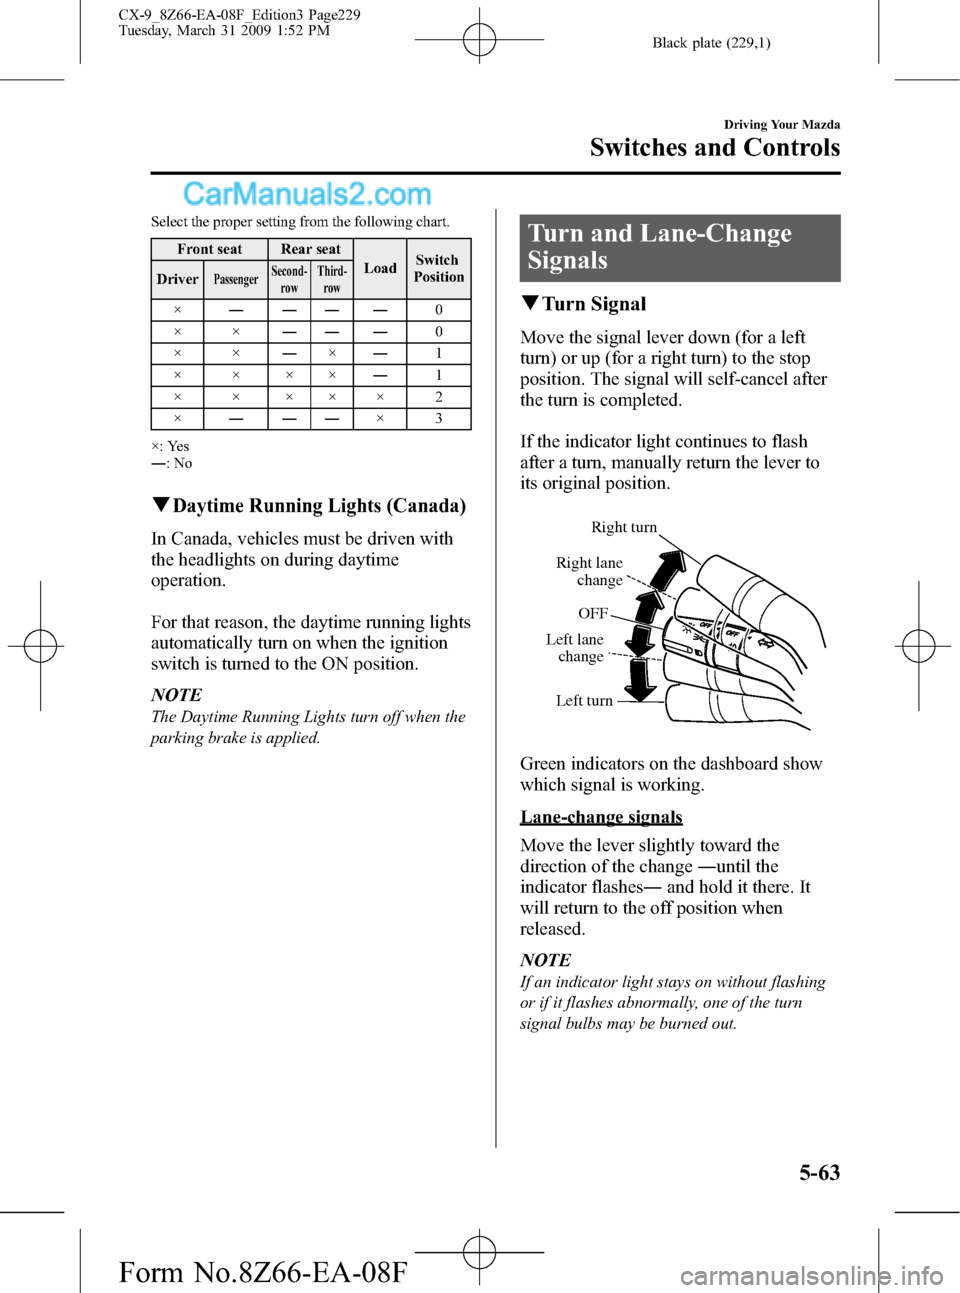
Move the signal lever down (for a left
turn) or up (for a right turn) to the stop
position. The signal will self-cancel after
the turn is completed.
If the indicator light continues to flash
after a turn, manually return the lever to
its original position.
Right turn
Right lane
change
Left lane
changeOFF
Left turn
Green indicators on the dashboard show
which signal is working.
Lane-change signals
Move the lever slightly toward the
direction of the change―until the
indicator flashes―and hold it there. It
will return to the off position when
released.
NOTE
If an indicator light stays on without flashing
or if it flashes abnormally, one of the turn
signal bulbs may be burned out.
Driving Your Mazda
Switches and Controls
5-63
CX-9_8Z66-EA-08F_Edition3 Page229
Tuesday, March 31 2009 1:52 PM
Form No.8Z66-EA-08F
Page 230 of 538
Black plate (230,1)
Fog Lightsí
Use this switch to turn on the fog lights.
They help you to see as well as to be seen.
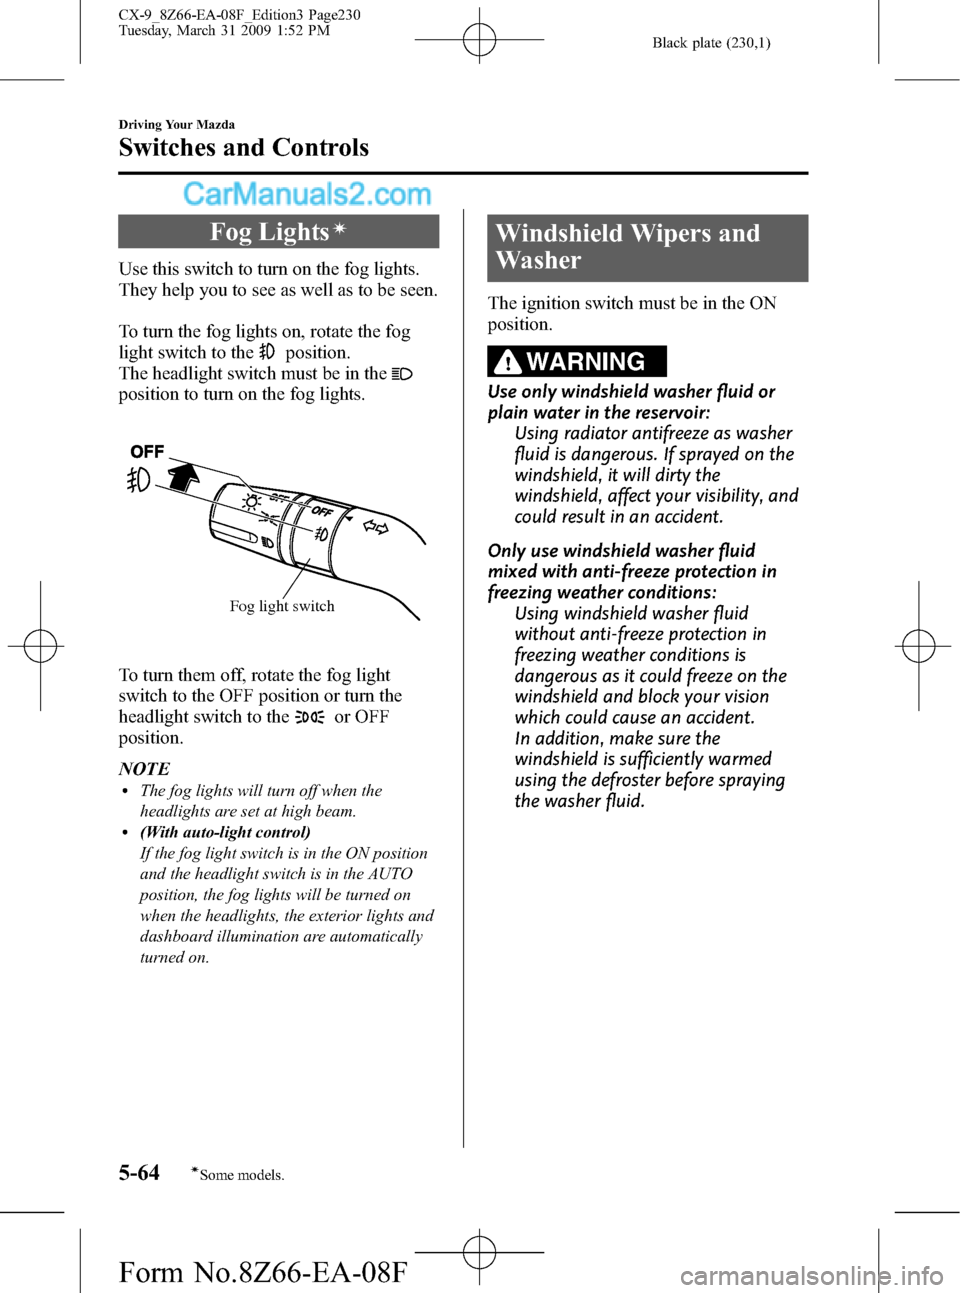
To turn the fog lights on, rotate the fog
light switch to the
position.
The headlight switch must be in the
position to turn on the fog lights.
Fog light switch
To turn them off, rotate the fog light
switch to the OFF position or turn the
headlight switch to the
or OFF
position.
NOTE
lThe fog lights will turn off when the
headlights are set at high beam.
l(With auto-light control)
If the fog light switch is in the ON position
and the headlight switch is in the AUTO
position, the fog lights will be turned on
when the headlights, the exterior lights and
dashboard illumination are automatically
turned on.
Windshield Wipers and
Washer
The ignition switch must be in the ON
position.
WARNING
Use only windshield washer fluid or
plain water in the reservoir:
Using radiator antifreeze as washer
fluid is dangerous. If sprayed on the
windshield, it will dirty the
windshield, affect your visibility, and
could result in an accident.
Only use windshield washer fluid
mixed with anti-freeze protection in
freezing weather conditions:
Using windshield washer fluid
without anti-freeze protection in
freezing weather conditions is
dangerous as it could freeze on the
windshield and block your vision
which could cause an accident.
In addition, make sure the
windshield is sufficiently warmed
using the defroster before spraying
the washer fluid.
5-64
Driving Your Mazda
íSome models.
Switches and Controls
CX-9_8Z66-EA-08F_Edition3 Page230
Tuesday, March 31 2009 1:52 PM
Form No.8Z66-EA-08F
Page 236 of 538

Black plate (236,1)
Horn
To sound the horn, press themark on
the steering wheel.
Hazard Warning Flasher
The hazard warning lights should always
be used when you stop on or near a
roadway in an emergency.
The hazard warning lights warn other
drivers that your vehicle is a traffic hazard
and that they must take extreme caution
when near it.
Depress the hazard warning flasher and all
the turn signals will flash.
NOTE
lThe turn signals do not work when the
hazard warning lights are on.
lCheck local regulations about the use of
hazard warning lights while the vehicle is
being towed to verify that it is not in
violation of the law.
5-70
Driving Your Mazda
Switches and Controls
CX-9_8Z66-EA-08F_Edition3 Page236
Tuesday, March 31 2009 1:52 PM
Form No.8Z66-EA-08F
Page 239 of 538

Black plate (239,1)
5. Press and hold the just-trained
HomeLink button and observe the
indicator light.
If the indicator lightstays on constantly,
programming is completeand your
device should activate when the
HomeLink button is pressed and released.
NOTE
To program the remaining two HomeLink
buttons, begin with“Programming”―step 2.
Do not repeat step 1.
If the indicator light blinksrapidly for
two seconds and then turns to a
constant light, continue with
“Programming”steps 6―8to complete
the programming of a rolling code
equipped device (most commonly a
garage door opener).
6. At the garage door opener receiver
(motor-head unit) in the garage, locate
the“learn”or“smart”button. This can
usually be found where the hanging
antenna wire is attached to the motor-
head unit.
7. Firmly press and release the“learn”or
“smart”button. (The name and color of
the button may vary by manufacturer.)
NOTE
There are 30 seconds in which to initiate step
8.
8. Return to the vehicle and firmlypress,
hold for two seconds and releasethe
programmed HomeLink button. Repeat
the“press/hold/release”sequence a
second time, and, depending on the
brand of the garage door opener (or
other rolling code equipped device),
repeat this sequence a third time to
complete the programming process.HomeLink should now activate your
rolling code equipped device.
NOTE
To program the remaining two HomeLink
buttons, begin with“Programming”―step 2.
Do not repeat step 1.
For questions or comments, please contact
HomeLink atwww.homelink.comor1-
800-355-3515.
qGate operator/Canadian
Programming
Canadian radio-frequency laws require
transmitter signals to“time-out”(or quit)
after several seconds of transmission―
which may not be long enough for
HomeLink to pick up the signal during
programming. Similar to this Canadian
law, some U.S. gate operators are
designed to“time-out”in the same
manner.
If you live in Canada or you are having
difficulties programming a gate operator
by using the“Programming”procedures
(regardless of where you live),replace
“Programming HomeLink”step 3with
the following:
NOTE
If programming a garage door opener or gate
operator, it is advised to unplug the device
during the“cycling”process to prevent
possible overheating.
Driving Your Mazda
Switches and Controls
5-73
CX-9_8Z66-EA-08F_Edition3 Page239
Tuesday, March 31 2009 1:52 PM
Form No.8Z66-EA-08F
Page 241 of 538
Black plate (241,1)
6Interior Comfort
Use of various features for drive comfort, including air-conditioning and audio
system.
Climate Control System .......................... 6-2
Operating Tips .................................... 6-2
Vent Operation (Front) ........................ 6-4
Fully Automatic Type ......................... 6-6
Vent Operation (Rear) ....................... 6-12
Control Panel (Rear) ......................... 6-14
Audio System ......................................... 6-17
Antenna ............................................. 6-17
Operating Tips for Audio System ..... 6-17
Audio Set .......................................... 6-27
Audio Control Switch Operation (Steering
Wheel) ............................................... 6-58
AUX Mode (Auxiliary input) ........... 6-61
Safety Certification ........................... 6-63
Rear Entertainment System ................. 6-64
Rear Entertainment System
í............ 6-64
Part Names ........................................ 6-73
Before Operation ............................... 6-76
Sound Output .................................... 6-82
Rear Entertainment System
Functions ........................................... 6-86
DVD video, DVD audio, Video CD, Audio
CD and MP3/WMA CD Playback (Disc
Mode) ................................................ 6-87
Auxiliary Input (AUX mode) .......... 6-101
Language Code List ........................ 6-105
Country Code List ........................... 6-107
Error Message ................................. 6-111
Symptoms and Actions ................... 6-113Bluetooth Hands-Free ......................... 6-116
Bluetooth Hands-Free
í.................. 6-116
Basic Bluetooth Hands-Free
Operation ........................................ 6-120
Convenient Use of the Hands-Free
System ............................................. 6-124
Hands-Free Setting .......................... 6-130
When Bluetooth Hands-Free Cannot be
Used ................................................ 6-136
Safety Certification ......................... 6-137
Mazda Bluetooth Hands-Free Customer
Service ............................................ 6-137
Interior Equipment ............................. 6-138
Sunvisors ......................................... 6-138
Interior Lights ................................. 6-139
Information Display ........................ 6-141
Cup Holder ...................................... 6-146
Bottle Holder ................................... 6-147
Storage Compartments .................... 6-148
Accessory Sockets .......................... 6-151
Power Outlet
í................................ 6-152
6-1íSome models.
CX-9_8Z66-EA-08F_Edition3 Page241
Tuesday, March 31 2009 1:52 PM
Form No.8Z66-EA-08F
Page 379 of 538

Black plate (379,1)
Interior Lights
qIlluminated Entry System
When the illuminated entry system
operates, the overhead light (switch is in
the DOOR position)and the courtesy
lights turn on for:
lAbout 30 seconds after the driver's
door is unlocked and the ignition
switch is in the LOCK position (with
the ignition key removed).
l(With Advanced key)
About 5 seconds after all doors when
the advanced key is outside of the
vehicle.
(Without Advanced key)
About 15 seconds after all doors are
closed.
lAbout 15 seconds after the ignition
switch is in the LOCK position (with
the ignition key removed) with all
doors closed.
The light also turns off when:
lThe ignition switch is turned to the ON
position and all doors are closed.
lThe driver's door is locked.
NOTE
Battery saver
If any door is left opened, the light turns off
after about 30 minutes to save the battery.
The light turns on again when the ignition
switch is turned to the ON position, or when
any door is opened after all doors have been
closed.
qOverhead Lights
When the center/rear overhead light
switch is in the DOOR position, the
center/rear overhead light can be turned
on or off using the front overhead light
switch.
Front
Switch
PositionOverhead Lights
lLight offlAll overhead lights are off when
the center/rear overhead light
switch is in the DOOR position
lLight is on when any door is openlLight is on or off when the
illuminated entry system is on
lLight onlAll overhead lights are on when
the center/rear overhead light
switch is in the DOOR position
Interior Comfort
Interior Equipment
6-139
CX-9_8Z66-EA-08F_Edition3 Page379
Tuesday, March 31 2009 1:53 PM
Form No.8Z66-EA-08F
Page 380 of 538
Black plate (380,1)
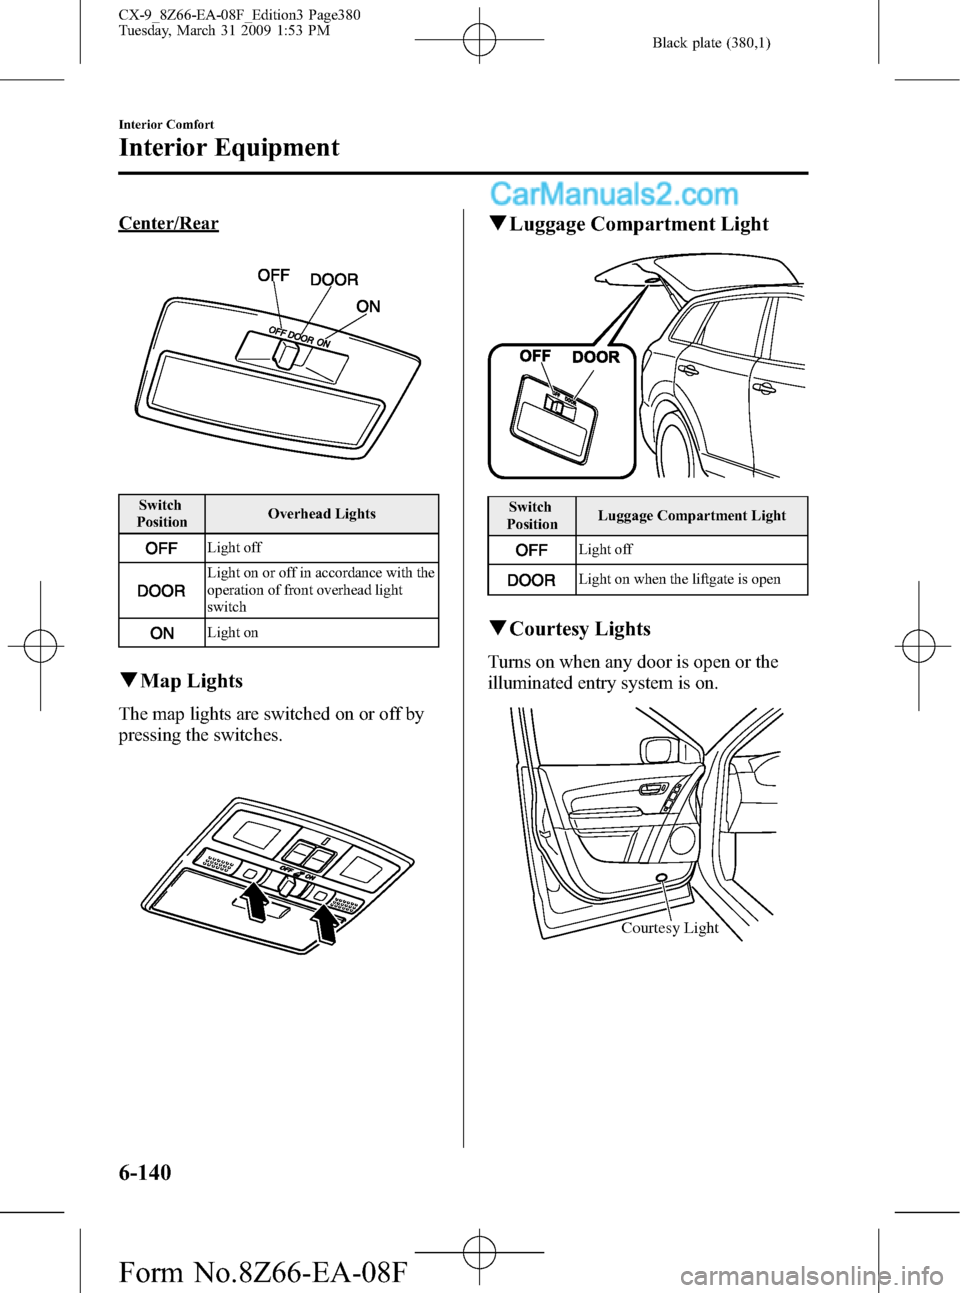
Center/Rear
Switch
PositionOverhead Lights
Light off
Light on or off in accordance with the
operation of front overhead light
switch
Light on
qMap Lights
The map lights are switched on or off by
pressing the switches.
qLuggage Compartment Light
Switch
PositionLuggage Compartment Light
Light off
Light on when the liftgate is open
qCourtesy Lights
Turns on when any door is open or the
illuminated entry system is on.
Courtesy Light
6-140
Interior Comfort
Interior Equipment
CX-9_8Z66-EA-08F_Edition3 Page380
Tuesday, March 31 2009 1:53 PM
Form No.8Z66-EA-08F
Page 394 of 538

Black plate (394,1)
Parking in an Emergency
The hazard warning lights should always
be used when you stop on or near a
roadway in an emergency.
The hazard warning lights warn other
drivers that your vehicle is a traffic hazard
and that they must take extreme caution
when near it.
Depress the hazard warning flasher and all
the turn signals will flash.
NOTE
lThe turn signals do not work when the
hazard warning lights are on.
lCheck local regulations about the use of
hazard warning lights while the vehicle is
being towed to verify that it is not in
violation of the law.
7-2
In Case of an Emergency
Parking in an Emergency
CX-9_8Z66-EA-08F_Edition3 Page394
Tuesday, March 31 2009 1:54 PM
Form No.8Z66-EA-08F
Page 420 of 538
Black plate (420,1)
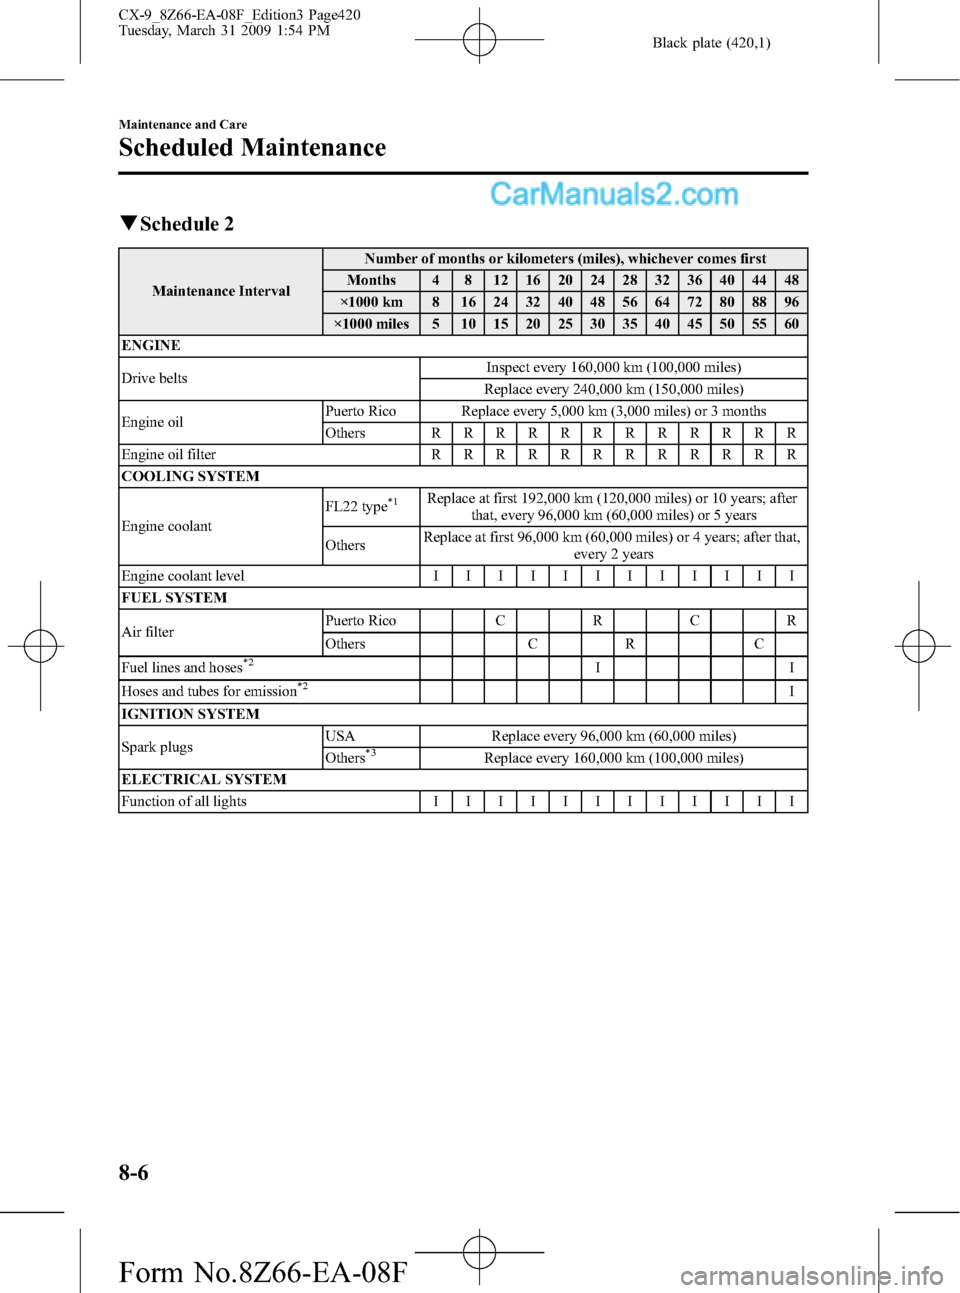
qSchedule 2
Maintenance IntervalNumber of months or kilometers (miles), whichever comes first
Months 4 8 12 16 20 24 28 32 36 40 44 48
×1000 km 8 16 24 32 40 48 56 64 72 80 88 96
×1000 miles 5 10 15 20 25 30 35 40 45 50 55 60
ENGINE
Drive beltsInspect every 160,000 km (100,000 miles)
Replace every 240,000 km (150,000 miles)
Engine oilPuerto Rico Replace every 5,000 km (3,000 miles) or 3 months
OthersRRRRRRRRRRRR
Engine oil filterRRRRRRRRRRRR
COOLING SYSTEM
Engine coolantFL22 type
*1Replace at first 192,000 km (120,000 miles) or 10 years; after
that, every 96,000 km (60,000 miles) or 5 years
OthersReplace at first 96,000 km (60,000 miles) or 4 years; after that,
every 2 years
Engine coolant levelIIIIIIIIIIII
FUEL SYSTEM
Air filterPuerto RicoCRCR
Others C R C
Fuel lines and hoses
*2II
Hoses and tubes for emission*2I
IGNITION SYSTEM
Spark plugsUSA Replace every 96,000 km (60,000 miles)
Others
*3Replace every 160,000 km (100,000 miles)
ELECTRICAL SYSTEM
Function of all lightsIIIIIIIIIIII
8-6
Maintenance and Care
Scheduled Maintenance
CX-9_8Z66-EA-08F_Edition3 Page420
Tuesday, March 31 2009 1:54 PM
Form No.8Z66-EA-08F
Page 426 of 538
Black plate (426,1)
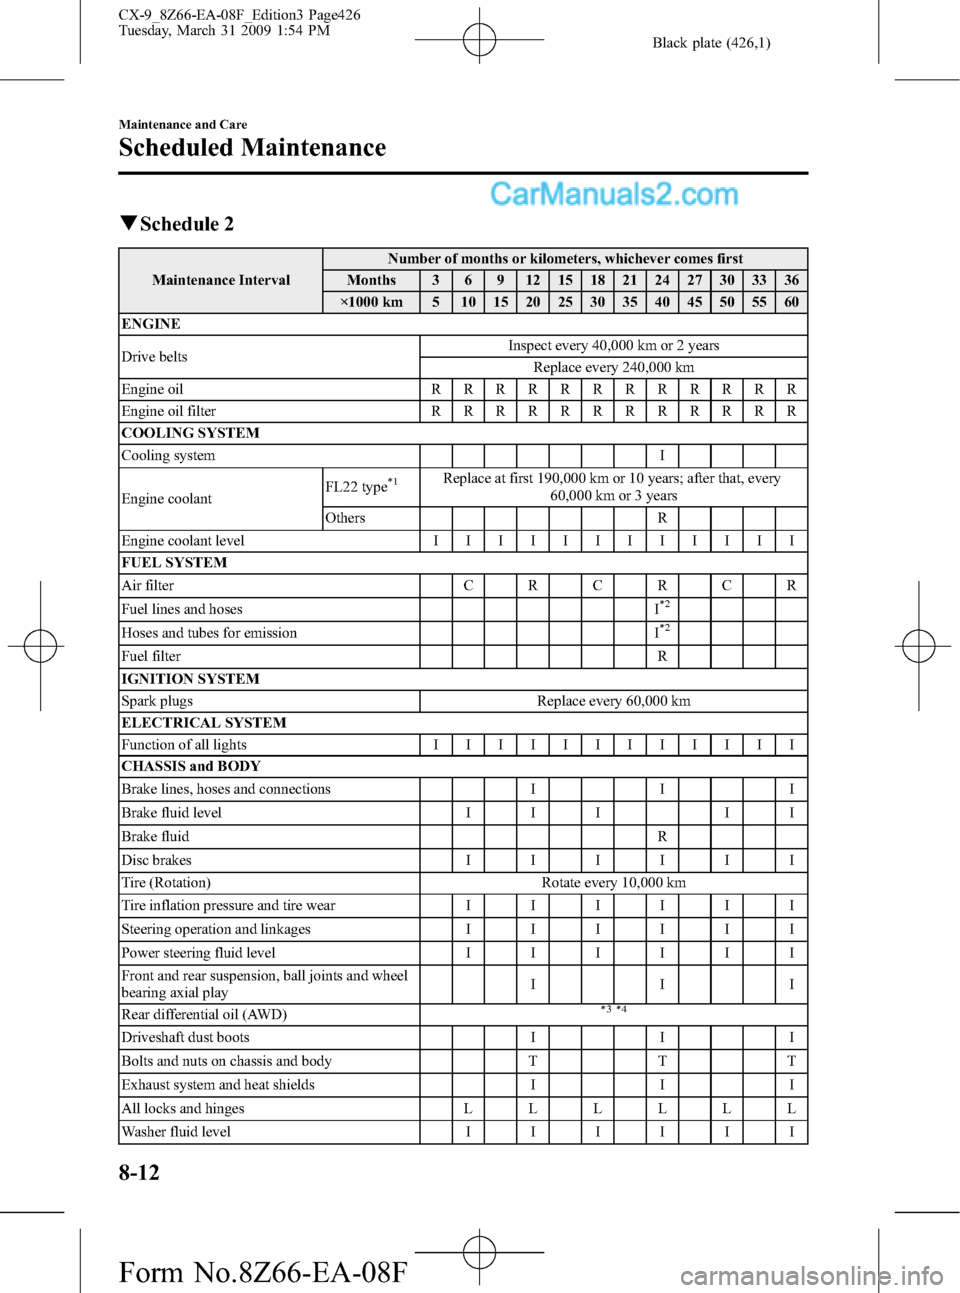
qSchedule 2
Maintenance IntervalNumber of months or kilometers, whichever comes first
Months 3 6 9 12 15 18 21 24 27 30 33 36
×1000 km 5 10 15 20 25 30 35 40 45 50 55 60
ENGINE
Drive beltsInspect every 40,000 km or 2 years
Replace every 240,000 km
Engine oilRRRRRRRRRRRR
Engine oil filterRRRRRRRRRRRR
COOLING SYSTEM
Cooling system I
Engine coolantFL22 type
*1Replace at first 190,000 km or 10 years; after that, every
60,000 km or 3 years
Others R
Engine coolant levelIIIIIIIIIIII
FUEL SYSTEM
Air filterCRCRCR
Fuel lines and hoses I
*2
Hoses and tubes for emission I*2
Fuel filter R
IGNITION SYSTEM
Spark plugs Replace every 60,000 km
ELECTRICAL SYSTEM
Function of all lightsIIIIIIIIIIII
CHASSIS and BODY
Brake lines, hoses and connections I I I
Brake fluid level I I I I I
Brake fluid R
Disc brakesIIIIII
Tire (Rotation) Rotate every 10,000 km
Tire inflation pressure and tire wearIIIIII
Steering operation and linkagesIIIIII
Power steering fluid levelIIIIII
Front and rear suspension, ball joints and wheel
bearing axial playIII
Rear differential oil (AWD)
*3 *4
Driveshaft dust boots I I I
Bolts and nuts on chassis and body T T T
Exhaust system and heat shields I I I
All locks and hingesLLLLLL
Washer fluid levelIIIIII
8-12
Maintenance and Care
Scheduled Maintenance
CX-9_8Z66-EA-08F_Edition3 Page426
Tuesday, March 31 2009 1:54 PM
Form No.8Z66-EA-08F