mirror MAZDA MODEL CX-9 2010 (in English) User Guide
[x] Cancel search | Manufacturer: MAZDA, Model Year: 2010, Model line: MODEL CX-9, Model: MAZDA MODEL CX-9 2010Pages: 592
Page 166 of 592

Black plate (166,1)
qSafety Chains
Safety chains must be used as a precautionary measure should the trailer become
unintentionally unhitched. They should cross under the trailer tongue and attach to the
hitch. Leave enough slack to allow full turns. Consult literature published by your trailer or
hitch manufacturer for more details.
WARNING
Make sure the safety chain is securely attached to both the trailer and the vehicle
prior to departure:
Towing a trailer without using a safety chain securely attached to both the trailer
and the vehicle is dangerous. If damage occurs to the coupling unit or hitch ball, the
trailer could wander into another lane and cause a collision.
qTrailer Lights
Trailer lights must comply with all federal, state, and local regulations. Equip your trailer
as required before towing it day or night.
CAUTION
Do not connect a trailer lighting system directly to the lighting system of your
Mazda. This may damage your vehicle's electrical system and lighting systems. Have
a recreational vehicle dealer or trailer rental agency connect the system, and inspect
the brake lights and turn signals yourself before each trip.
qTrailer Brakes
If the total trailer weight exceeds 450 kg (1,000 lb), trailer brakes are required. If your
trailer has brakes, make sure they comply with all federal, state, and local regulations.
WARNING
Do not connect a hydraulic trailer-brake system to your vehicle's brake system:
Connecting a hydraulic trailer-brake system directly to the vehicle brake system is
dangerous and will result in inadequate braking and possible injury.
qTrailer Towing Tips
lVerify that your Mazda maintains a near-normal attitude when a loaded or unloaded
trailer is connected. Do not drive if it has an abnormal front-up or front-down position.
Inspect for incorrect tongue load, worn suspension parts, and trailer overloading.
lMake sure the trailer is properly loaded and the cargo is secure to prevent it from
shifting.
lMake sure the mirrors conform to all government regulations. If they do not, install
required rear view mirrors appropriate for towing purposes.
4-18
Before Driving Your Mazda
Towing
CX-9_8AU2-EA-09G_Edition5 Page166
Thursday, May 6 2010 4:52 PM
Form No.8AU2-EA-09G
Page 206 of 592

Black plate (206,1)
lThe following conditions may affect the visibility of the BSM warning lights on the outside mirror,
making it difficult to confirm the illumination of the lights:
lIce or snow adheres to the surface of the outside mirrors.lThe door window glass is tinted.
qBSM Warning Light/Beep
BSM warning light
Equipped on the left and right door
mirrors.
This warning light illuminates for a few
seconds when the ignition switch is turned
to the ON position.
If the BSM system detects a vehicle in the
detection area while the vehicle is driven
at a speed of about 32 km/h (20 mph) or
more, the BSM warning light illuminates
on the side of the vehicle where the rear
on-coming vehicle is detected.
NOTE
lIf ice or snow adhere to the outer mirror
surface, the BSM warning light may not be
visible.
lIf the door window glass is tinted, it may
affect the visibility of the BSM warning
light, making it difficult to confirm the
illumination of the light.
BSM warning beep
The warning beep operates when the turn
signal lever is operated to the side where
the BSM warning light is illuminated.
NOTE
The system can be customized so that the BSM
warning beep does not operate. Consult an
Authorized Mazda Dealer.
qBSM OFF Indicator Light
This indicator light illuminates for a few
seconds when the ignition switch is turned
to the ON position.
The BSM OFF indicator light illuminates
when the BSM system is turned off by
pressing the BSM OFF switch.
The indicator light flashes if the BSM
system has a malfunction. Consult an
Authorized Mazda Dealer.
NOTE
If the vehicle is driven on a road with less
traffic and few vehicles that the radar sensors
can detect, the system may pause (The BSM
OFF indicator light in the instrument panel
flashes). However, it does not indicate a
malfunction.
5-36
Driving Your Mazda
Starting and Driving
CX-9_8AU2-EA-09G_Edition5 Page206
Thursday, May 6 2010 4:52 PM
Form No.8AU2-EA-09G
Page 243 of 592

Black plate (243,1)
Rear Window Defroster
The rear window defroster clears frost,
fog, and thin ice from the rear window.
The ignition switch must be in the ON
position.
Press the switch to turn on the rear
window defroster. The rear window
defroster operates for about 15 minutes
and turns off automatically.
The indicator light illuminates during
operation.
The defroster operation can be confirmed
by the indicator in the display.
To turn off the rear window defroster
before the 15 minutes has elapsed, press
the switch again.
Indicator light
CAUTION
Do not use sharp instruments or
window cleaners with abrasives to
clean the inside of the rear window
surface. They may damage the
defroster grid inside the window.NOTE
This defroster is not designed for melting snow.
If there is an accumulation of snow on the rear
window, remove it before using the defroster.
qMirror Defrosterí
To turn on the mirror defrosters, turn the
ignition switch to the ON position and
press the rear window defroster switch
(page 5-73).
Driving Your Mazda
Switches and Controls
5-73íSome models. CX-9_8AU2-EA-09G_Edition5 Page243
Thursday, May 6 2010 4:53 PM
Form No.8AU2-EA-09G
Page 245 of 592

Black plate (245,1)
HomeLink Wireless
Control System
í
NOTE
HomeLink and HomeLink house are registered
trademarks of Johnson Controls.
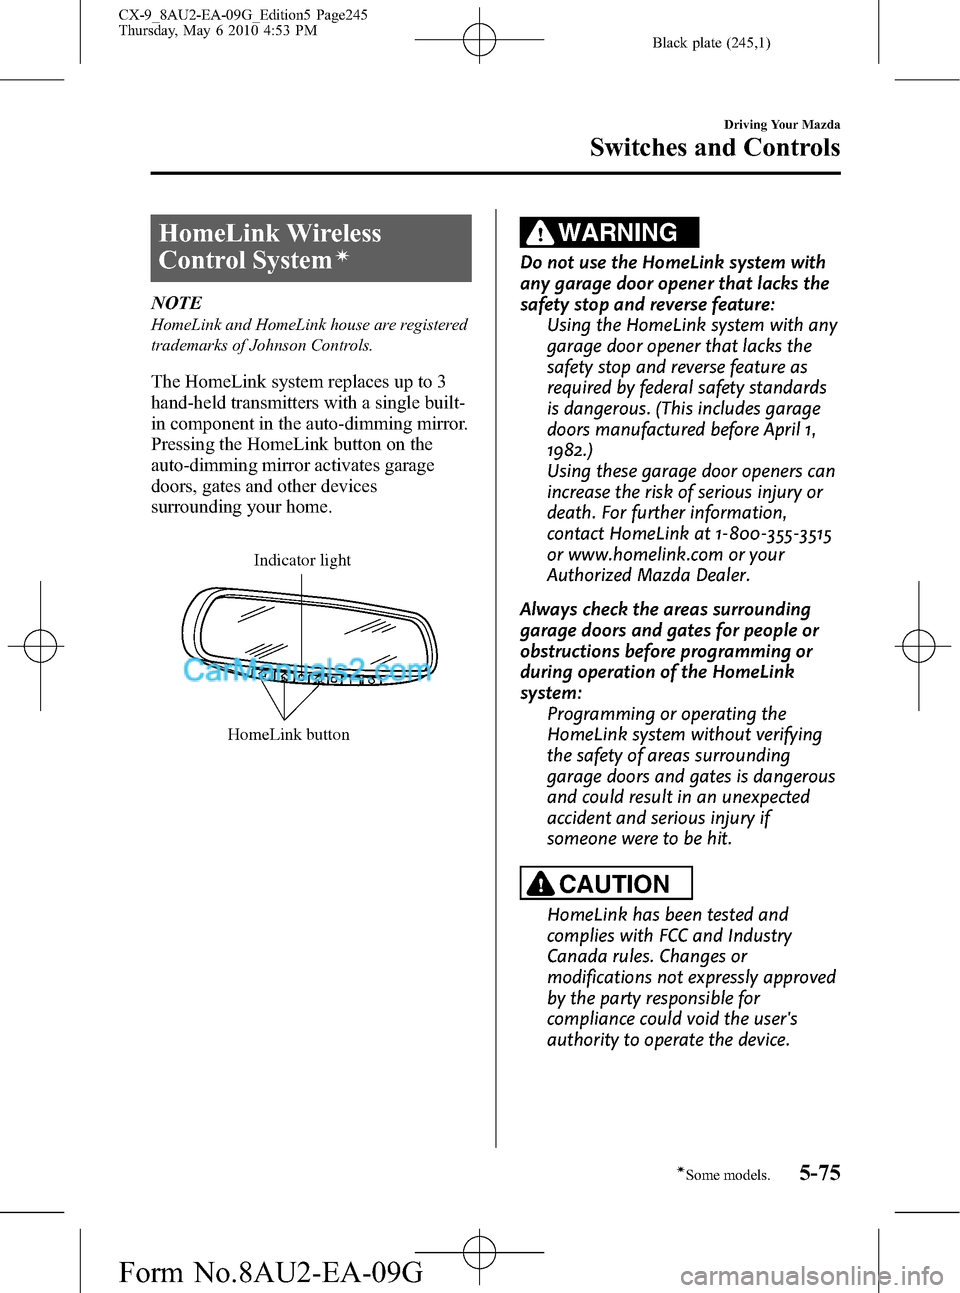
The HomeLink system replaces up to 3
hand-held transmitters with a single built-
in component in the auto-dimming mirror.
Pressing the HomeLink button on the
auto-dimming mirror activates garage
doors, gates and other devices
surrounding your home.
HomeLink button
Indicator light
WARNING
Do not use the HomeLink system with
any garage door opener that lacks the
safety stop and reverse feature:
Using the HomeLink system with any
garage door opener that lacks the
safety stop and reverse feature as
required by federal safety standards
is dangerous. (This includes garage
doors manufactured before April 1,
1982.)
Using these garage door openers can
increase the risk of serious injury or
death. For further information,
contact HomeLink at 1-800-355-3515
or www.homelink.com or your
Authorized Mazda Dealer.
Always check the areas surrounding
garage doors and gates for people or
obstructions before programming or
during operation of the HomeLink
system:
Programming or operating the
HomeLink system without verifying
the safety of areas surrounding
garage doors and gates is dangerous
and could result in an unexpected
accident and serious injury if
someone were to be hit.
CAUTION
HomeLink has been tested and
complies with FCC and Industry
Canada rules. Changes or
modifications not expressly approved
by the party responsible for
compliance could void the user's
authority to operate the device.
Driving Your Mazda
Switches and Controls
5-75íSome models. CX-9_8AU2-EA-09G_Edition5 Page245
Thursday, May 6 2010 4:53 PM
Form No.8AU2-EA-09G
Page 248 of 592

Black plate (248,1)
Continue to press and hold the HomeLink
button while youpress and release―
every two seconds(“cycle”) your hand-
held transmitter until the frequency signal
has successfully been accepted by
HomeLink. (The indicator light will flash
slowly and then rapidly.)
Proceed with“Programming”step 4 to
complete.
qOperating the HomeLink System
Press the programmed HomeLink button
to operate a programmed device. The
code will continue being transmitted for a
maximum of 20 seconds.
qReprogramming the HomeLink
system
To program a device to HomeLink using a
HomeLink button previously trained,
follow these steps:
1. Press and hold the desired HomeLink
button.DO NOTrelease the button.
2. The indicator light will begin to flash
after 20 seconds. Without releasing the
HomeLink button, proceed with
“Programming”- step 2.
qErasing Programmed HomeLink
Buttons
To erase the existing programming from
all three operating channels, press and
hold the two outside buttons (
,)
on the auto-dimming mirror until the
HomeLink indicator light begins to flash
after approximately 20 seconds.
Verify that the programming has been
erased when you resell the vehicle.
5-78
Driving Your Mazda
Switches and Controls
CX-9_8AU2-EA-09G_Edition5 Page248
Thursday, May 6 2010 4:53 PM
Form No.8AU2-EA-09G
Page 423 of 592

Black plate (423,1)
qRear View Monitor Operation
The operation of the rear view monitor when reversing the vehicle varies depending on the
traffic, road, and vehicle conditions. The amount of steering and the timing also varies
depending on conditions, so confirm the surrounding conditions directly with your eyes
and steer the vehicle in accordance with the conditions.
Be well aware of the above cautions prior to using the rear view monitor.
NOTE
Images displayed on the monitor from the rear view parking camera are reversed images (mirror
images).
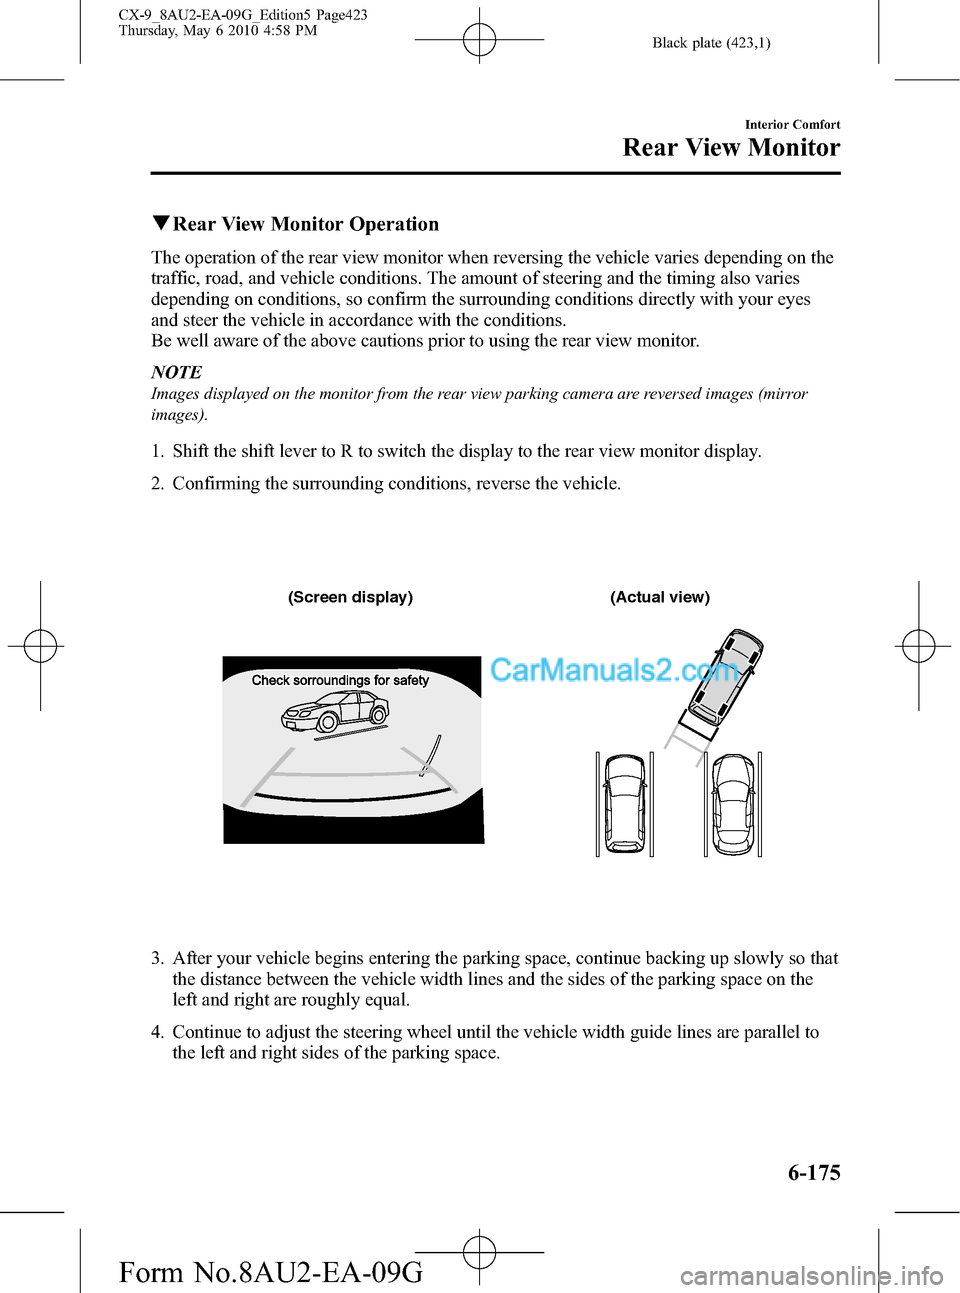
1. Shift the shift lever to R to switch the display to the rear view monitor display.
2. Confirming the surrounding conditions, reverse the vehicle.
(Screen display)
(Actual view)
3. After your vehicle begins entering the parking space, continue backing up slowly so that
the distance between the vehicle width lines and the sides of the parking space on the
left and right are roughly equal.
4. Continue to adjust the steering wheel until the vehicle width guide lines are parallel to
the left and right sides of the parking space.
Interior Comfort
Rear View Monitor
6-175
CX-9_8AU2-EA-09G_Edition5 Page423
Thursday, May 6 2010 4:58 PM
Form No.8AU2-EA-09G
Page 429 of 592

Black plate (429,1)
Sunvisors
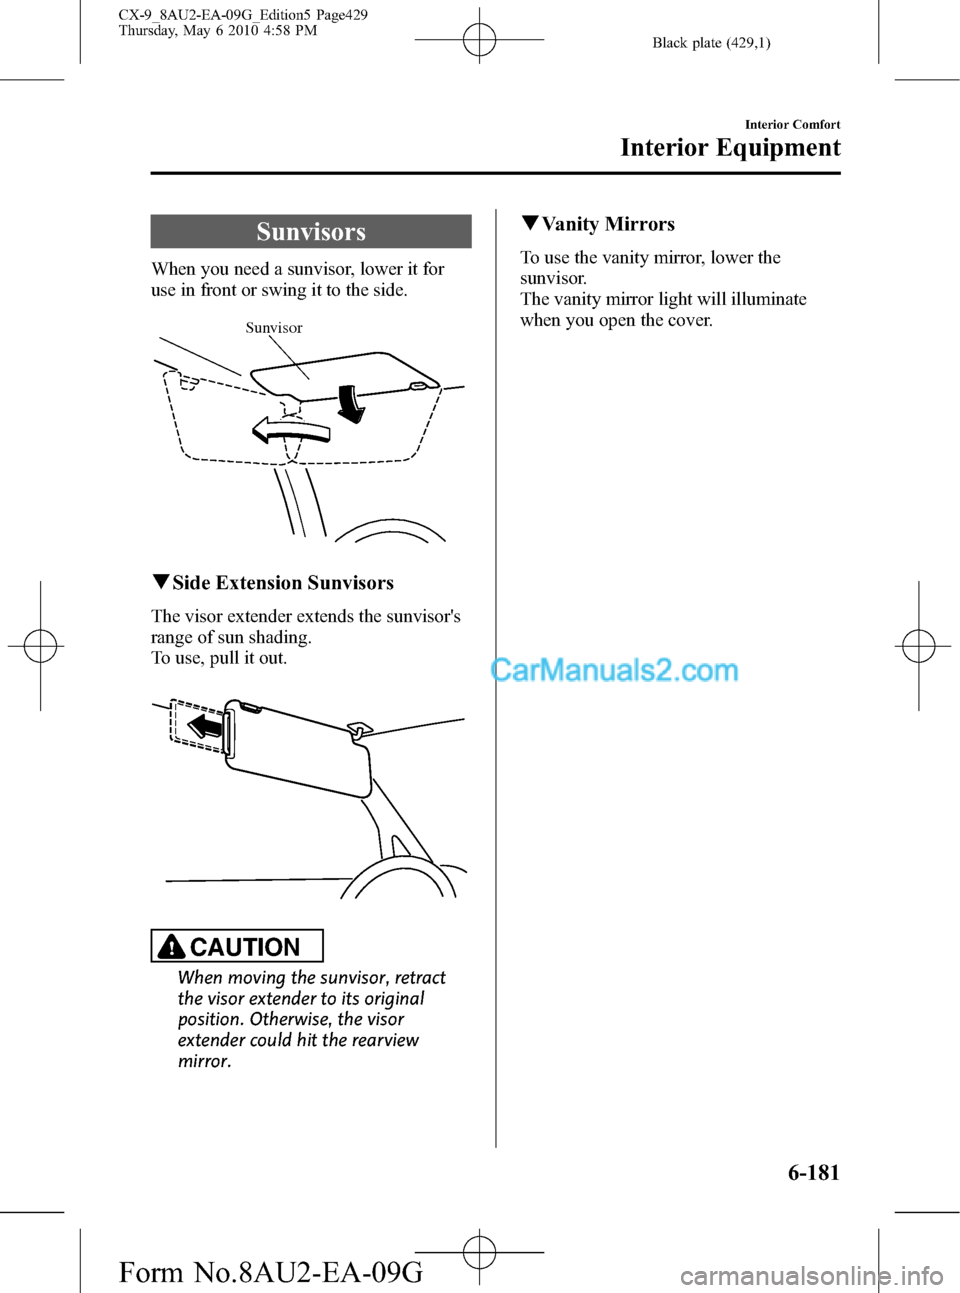
When you need a sunvisor, lower it for
use in front or swing it to the side.
Sunvisor
qSide Extension Sunvisors
The visor extender extends the sunvisor's
range of sun shading.
To use, pull it out.
CAUTION
When moving the sunvisor, retract
the visor extender to its original
position. Otherwise, the visor
extender could hit the rearview
mirror.
qVanity Mirrors
To use the vanity mirror, lower the
sunvisor.
The vanity mirror light will illuminate
when you open the cover.
Interior Comfort
Interior Equipment
6-181
CX-9_8AU2-EA-09G_Edition5 Page429
Thursday, May 6 2010 4:58 PM
Form No.8AU2-EA-09G
Page 504 of 592

Black plate (504,1)
Light Bulbs
Headlights (Low beam) Headlights (High beam)
High-mount brake lightFog lights
Front turn signal lightsSide turn signal lights
Courtesy lights
Some models.
License plate lights
Brake lights/TaillightsOverhead light/Map lights (Front)
Vanity mirror lights Overhead light (Center) Overhead light (Rear)
Front side marker lights
Rear side marker lights
Rear turn signal lights Reverse lights
Luggage
compartment light
Parking lights
8-38
Maintenance and Care
Owner Maintenance
CX-9_8AU2-EA-09G_Edition5 Page504
Thursday, May 6 2010 5:0 PM
Form No.8AU2-EA-09G
Page 511 of 592

Black plate (511,1)
Reverse lights
1. Remove the cover.
2. Turn the socket and bulb assembly
counterclockwise and remove it.
3. Disconnect the bulb from the socket.
4. Install the new bulb in the reverse order
of removal.
NOTE
To replace the bulb, contact an Authorized
Mazda Dealer.
License plate lights
1. Wrap a flathead screwdriver with a soft
cloth to prevent damage to the lens and
remove the lens by carefully prying on
the edge of the lens with a flathead
screwdriver.2. Disconnect the bulb by pulling it out.
3. Install the new bulb in the reverse order
of removal.
qReplacing Interior Light Bulbs
Overhead light/Map lights (Front),
Overhead light (Center, Rear), Luggage
compartment light, Courtesy lights,
Vanity mirror lights
1. Wrap a small flathead screwdriver with
a soft cloth to prevent damage to the
lens and remove the lens by carefully
prying on the edge of the lens with the
flathead screwdriver.
2. Disconnect the bulb by pulling it out.
Overhead light/Map lights (Front)
Maintenance and Care
Owner Maintenance
8-45
CX-9_8AU2-EA-09G_Edition5 Page511
Thursday, May 6 2010 5:1 PM
Form No.8AU2-EA-09G
Page 512 of 592

Black plate (512,1)
Overhead light (Center, Rear)
Luggage compartment light
Courtesy lights
Vanity mirror lights
3. Install the new bulb in the reverse order
of removal.
8-46
Maintenance and Care
Owner Maintenance
CX-9_8AU2-EA-09G_Edition5 Page512
Thursday, May 6 2010 5:1 PM
Form No.8AU2-EA-09G