radio MAZDA MODEL CX-9 2010 (in English) Owner's Manual
[x] Cancel search | Manufacturer: MAZDA, Model Year: 2010, Model line: MODEL CX-9, Model: MAZDA MODEL CX-9 2010Pages: 592
Page 278 of 592

Black plate (278,1)
qOperating the Radio
Band selector button Scan button
Seek tuning
buttonsManual tuning dial/Auto memory button
Channel preset buttons
Radio ON
Press a band selector button (
)to
turn the radio on.
Band selection
Successively pressing the band selector
button (
) switches the bands as
follows: FM1→FM2→AM.
The selected mode will be indicated. If
FM stereo is being received,“ST”will be
displayed.
NOTE
If the FM broadcast signal becomes weak,
reception automatically changes from
STEREO to MONO for reduced noise, and the
“ST”indicator will go out.
Tuning
The radio has the following tuning
methods: Manual, Seek, Scan, Preset
channel, and Auto memory tuning. The
easiest way to tune stations is to set them
on preset channels.
NOTE
If the power supply is interrupted (fuse blows
or the battery is disconnected), the preset
channels will be erased.
Manual tuning
Turning the manual tuning dial will
change the frequency higher or lower.
Seek tuning
Pressing the seek tuning button (
,)
will cause the tuner to seek a higher or
lower frequency automatically.
6-30
Interior Comfort
Audio System
CX-9_8AU2-EA-09G_Edition5 Page278
Thursday, May 6 2010 4:53 PM
Form No.8AU2-EA-09G
Page 285 of 592

Black plate (285,1)
Audio Set (Type B)
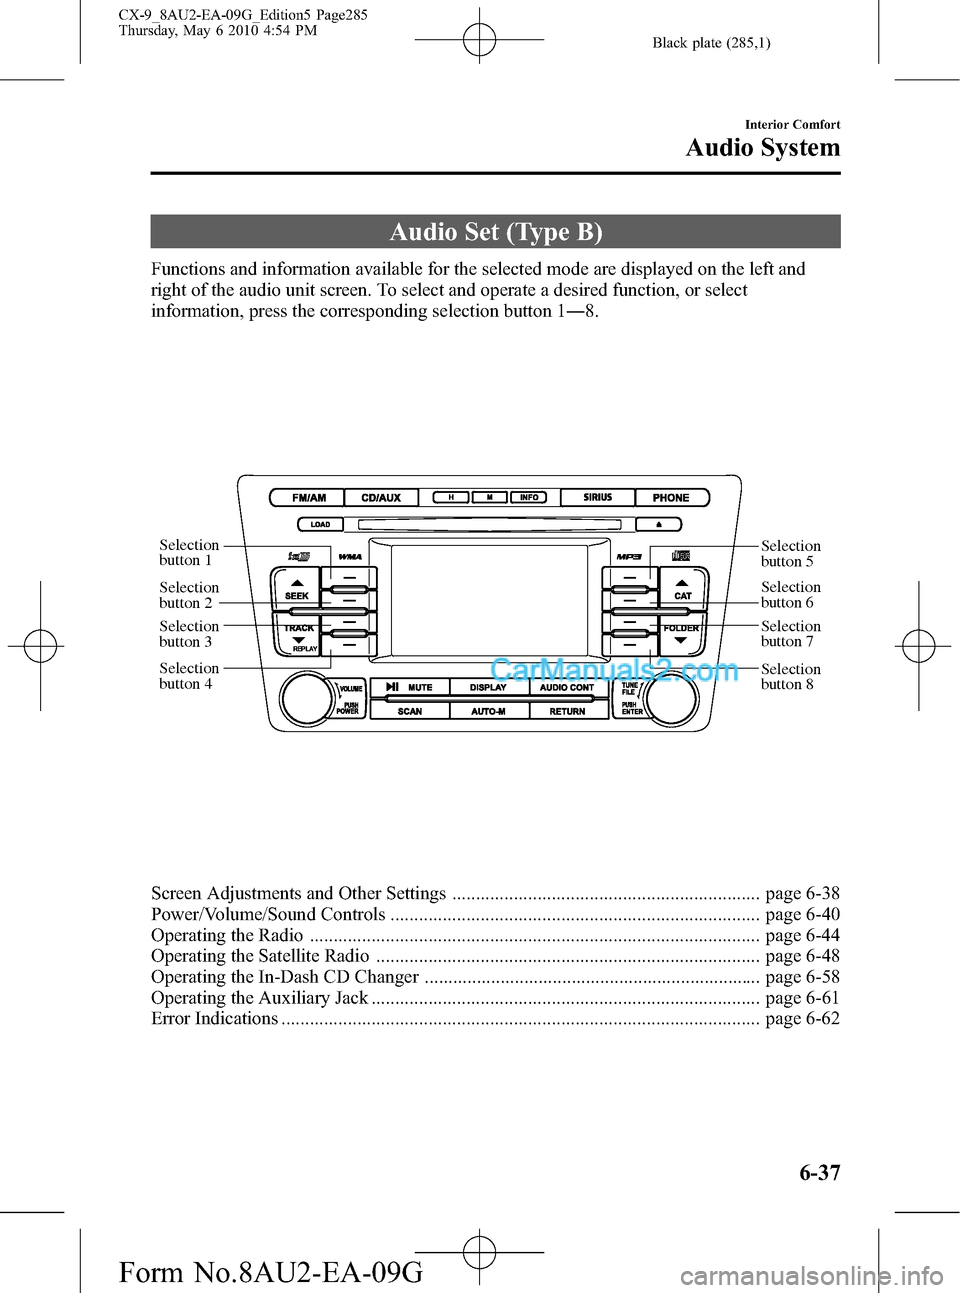
Functions and information available for the selected mode are displayed on the left and
right of the audio unit screen. To select and operate a desired function, or select
information, press the corresponding selection button 1―8.
Selection
button 1
Selection
button 2
Selection
button 3
Selection
button 4Selection
button 5
Selection
button 6
Selection
button 7
Selection
button 8
Screen Adjustments and Other Settings ................................................................. page 6-38
Power/Volume/Sound Controls .............................................................................. page 6-40
Operating the Radio ............................................................................................... page 6-44
Operating the Satellite Radio ................................................................................. page 6-48
Operating the In-Dash CD Changer ....................................................................... page 6-58
Operating the Auxiliary Jack .................................................................................. page 6-61
Error Indications ..................................................................................................... page 6-62
Interior Comfort
Audio System
6-37
CX-9_8AU2-EA-09G_Edition5 Page285
Thursday, May 6 2010 4:54 PM
Form No.8AU2-EA-09G
Page 287 of 592

Black plate (287,1)
Color adjustment*
To deepen a color
Press selection button 7.
To fade color
Press selection button 3.
* Adjustment is available depending on
the display.
NOTE
Continuous adjustment of the brightness,
contrast, tint, and color can be done by long-
pressing the selection button for the adjustment
item.
Daytime/Night screen
When the headlights are on, daytime
mode can also be selected (if a brighter
screen is needed at night). This selection
can only be done when the headlights are
on.
The screen can be returned to the daytime
screen while the headlights or running
lights are on by pressing the dashboard
illumination knob.
Language setting
The displayed language can be changed to
one of the three available languages.
Press selection button 5 to display the
language setting screen.
English display
Press selection button 2.
French display
Press selection button 3.
Spanish display
Press selection button 4.NOTE
A language setting is unavailable for the
satellite radio. English is constantly displayed.
Screen display off
Press selection button 4.
Press the display button (
)to
return to the previously selected mode's
screen.
Interior Comfort
Audio System
6-39
CX-9_8AU2-EA-09G_Edition5 Page287
Thursday, May 6 2010 4:54 PM
Form No.8AU2-EA-09G
Page 290 of 592

Black plate (290,1)
Centerpoint®on
Press selection button 6.
Centerpoint
®off
Press selection button 2.
NOTE
lCenterpoint®operates optimally with a 2-
channel stereo CD. MP3 audio files can be
played, however, MP3 audio files encoded
with high compression may result in poor
sound quality.
lCenterpoint®is available for 2-channel
stereo audio except for AM radio/FM radio/
SIRIUS digital satellite radio/AUX/BT
audio.
* Centerpoint®is a registered trademark
of Bose Corporation.
Rear Seat Surround (Rear
Entertainment System-equipped model)
The rear seat-optimized function allows
passengers to optimize the audio output to
the rear for a more pleasurable acoustic
field when selecting the 5.1-channel
sound mode.
Rear Seat Surround can be set on or off.
NOTE
Rear seat-optimized is only effective if a CD or
a DVD inserted in the Rear Entertainment
System main unit is 5.1 Dolby Digital/DTS
audio.
Rear Seat Surround on
Press selection button 7.
Rear Seat Surround off
Press selection button 3.
Surround Volume
Surround Volume up
Press selection button 6.Surround Volume down
Press selection button 2.
NOTE
Surround Volume adjustment is available if
Centerpoint®or Rear Seat Surround is on.
6-42
Interior Comfort
Audio System
CX-9_8AU2-EA-09G_Edition5 Page290
Thursday, May 6 2010 4:54 PM
Form No.8AU2-EA-09G
Page 292 of 592

Black plate (292,1)
qOperating the Radio
Mute buttonAuto memory buttonScan button Seek tuning
buttonsManual tuning dial
Band selector button
Selection
button 2
Selection
button 3
Selection
button 4Selection
button 5
Selection
button 6
Selection
button 7
Selection
button 8
Radio ON
Press a band selector button (
)to
turn the radio on.
Band selection
Successively pressing the band selector
button (
) switches the bands as
follows: FM1→FM2→AM.
The selected mode will be indicated. If
FM stereo is being received,“ST”will be
displayed.
NOTE
If the FM broadcast signal becomes weak,
reception automatically changes from
STEREO to MONO for reduced noise, and the
“ST”indicator will no longer display.
Tuning
The radio has the following tuning
methods: Manual, Seek, Scan, Preset
channel, and Auto memory tuning. The
easiest way to tune stations is to set them
on preset channels.
NOTE
If the power supply is interrupted (fuse blows
or the battery is disconnected), the preset
channels will be erased.
Manual tuning
Turning the manual tuning dial will
change the frequency higher or lower.
Seek tuning
Pressing the seek tuning button (
,)
will cause the tuner to seek a higher or
lower frequency automatically.
6-44
Interior Comfort
Audio System
CX-9_8AU2-EA-09G_Edition5 Page292
Thursday, May 6 2010 4:54 PM
Form No.8AU2-EA-09G
Page 293 of 592

Black plate (293,1)
NOTE
If you continue to press and hold the seek
tuning button (
,), the frequency will
continue changing without stopping.
Scan tuning
Press the scan button (
)to
automatically sample stations with the
strongest frequencies. Scanning stops at
each station for about five seconds. To
hold a station, press the scan button
(
) again during this interval.
Preset channel tuning
The six preset channels can be used to
store six AM and twelve FM stations.
1. To set a channel, first select AM, FM1,
or FM2. Tune to the desired station.
2. Press and hold selection button 2, 3, 4,
6, 7, or 8. The station frequency will be
displayed. The station is now held in
the memory.
3. Repeat this operation for the other
stations and bands you want to store.
To tune into one stored in the memory,
select AM, FM1, or FM2 and then
press its selection button. The station
frequency will be displayed.
NOTE
If the power supply is interrupted (fuse blows
or the battery is disconnected), the preset
channels will be erased.
Auto memory tuning
This is especially useful when driving in
an area where the local stations are
unknown. Additional AM/FM stations
can be stored without disturbing the
previously set channels.Press and hold the auto memory button
(
). The system will automatically
scan and temporarily store up to six
stations with the strongest frequencies in
each selected band in that area.
After scanning is completed, the radio
tunes into the station with the strongest
frequency, and its frequency is displayed.
Press the auto memory button (
)to
recall stations from the auto-stored
stations. One stored station will be
selected each time, and its frequency will
be displayed.
NOTE
lIf any of the following operations is
performed, auto-memory mode is cleared
and the normal display appears.
lBand selector button ()is
pressed
lManual tuning dial is turnedlSeek tuning button (,) is pressedlIf the radio is unable to tune into any
station after the scanning operation is
completed,“No Channel”will be
displayed.
Mute
Press the mute button (
) once to
mute the audio. Press it again to resume
audio output.
Radio Data System (RDS)
Radio text information display
A maximum of 64 characters of radio text
information sent from a broadcasting
station is displayed in the audio display.
Press selection button 5.
Interior Comfort
Audio System
6-45
CX-9_8AU2-EA-09G_Edition5 Page293
Thursday, May 6 2010 4:54 PM
Form No.8AU2-EA-09G
Page 294 of 592

Black plate (294,1)
NOTE
If any of the following operations is performed,
the radio text information display is cleared
and the normal display appears.
lReturn button () is pressedlBand selector button () is pressedlManual tuning dial is turnedlSeek tuning button (,) is pressed
6-46
Interior Comfort
Audio System
CX-9_8AU2-EA-09G_Edition5 Page294
Thursday, May 6 2010 4:54 PM
Form No.8AU2-EA-09G
Page 296 of 592

Black plate (296,1)
qOperating the Satellite Radio
Category down
buttonCategory up
button
Play/Pause buttonManual tuning dial/Enter button
Scan button Seek tuning
buttonsReturn button
SIRIUS button
Selection
button 1Selection
button 3Selection
button 8
Selection
button 4Selection
button 7
Selection
button 5
Selection
button 6 Selection
button 2
6-48
Interior Comfort
Audio System
CX-9_8AU2-EA-09G_Edition5 Page296
Thursday, May 6 2010 4:54 PM
Form No.8AU2-EA-09G
Page 297 of 592

Black plate (297,1)
NOTE
This equipment has been tested and found to
comply with the limits for a Class B digital
device, pursuant to Part 15 of the FCC Rules.
These limits are designed to provide
reasonable protection against harmful
interference in a residential installation. This
equipment generates, uses, and can radiate
radio frequency energy and if not installed and
used in accordance with the instructions, may
cause harmful interference to radio
communications. However, there is no
guarantee that interference will not occur in a
particular installation. If this equipment does
cause harmful interference to radio or
television reception, which can be determined
by turning the equipment off and on, the user
is encouraged to try to correct the interference
by one or more of the following measures:
lIncrease the separation between the
equipment and tuner.
lConnect the equipment into an outlet on a
circuit different from that to which the tuner
is connected.
lConsult the dealer or an experienced radio/
TV technician for help.
What is satellite radio?
With over 130 channels, SIRIUS Satellite
Radio brings you more of what you love.
Get 69 channels of 100 % commercial-
free music, plus all your favorite sports,
news, talk and entertainment. Everything
worth listening to is now on SIRIUS.
100 % Commercial-free Music―With
music from every genre, artist-dedicated
channels, live performances and more,
SIRIUS is the home of 100 %
commercial-free music.
Live Sports Play-by-Play & Expert
Talk―Hear every NFL game, every
NASCAR
®race and college sports
coverage from over 150 schools. Plus
24/7 sports talk with channels like
SIRIUS NFL Radio, SIRIUS NASCAR
Radio and more.
Exclusive Entertainment and
Talk―The biggest names, compelling
talk, hilarious comedy. Hear Howard
Stern, Martha Stewart, Jamie Foxx, Blue
Collar Comedy, Playboy Radio, political
talk and more.
World-class News―Stay informed with
FOX, CNN, CNBC, NPR
®, BBC and
more.
Plus local traffic and weather.
Family & Kids―Entertain the entire
family with Radio Disney, Kids Place
Live, Laugh USA and more.
Sign up for SIRIUS Radio today! For
more information, visit www.sirius.com.
Satellite radio can be subscribed to and
received in the United States (Except
Alaska and Hawaii) and Canada.
How to Activate Satellite Radio
You must call SIRIUS to activate your
service. Activation is free and takes only a
few minutes.
Interior Comfort
Audio System
6-49
CX-9_8AU2-EA-09G_Edition5 Page297
Thursday, May 6 2010 4:54 PM
Form No.8AU2-EA-09G
Page 298 of 592

Black plate (298,1)
SIRIUS service uses an ID code to
identify your radio. This code is needed to
activate SIRIUS service, and report any
problems.
To activate you SIRIUS radio tuner, call a
SIRIUS customer service specialist at 1-
888-539-7474 or you can visit SIRIUS
online at www.sirius.com.
Please have the following information
ready:
lSIRIUS ID (12-digit electronic serial
no., or ESN*)lValid credit card information (may not
be required at initial sign-up)
Be sure you are parked outside with a
clear view of open sky, you will be
instructed to turn on your radio (in
SIRIUS mode and tuned to channel 184).
Activation typically takes only 2―5
minutes.
* ESN: Electronic Serial Number
SIRIUS operation
All operations of the satellite radio are
conducted by means of the audio unit.
SIRIUS radio mode selection
When the SIRIUS button (
)is
pressed during ACC ON, it will play the
last SIRIUS channel in use before the
mode was switched over to another mode
or the power was turned off.When the SIRIUS button (
)is
pressed in a mode other than the SIRIUS
mode, the last channel in use will be
received. Every time the SIRIUS button
(
) is pressed, the bank changes in
the order shown below.
SIRIUS1 SIRIUS2 SIRIUS3
NOTE
SIRIUS1, SIRIUS2 and SIRIUS3: six stations
can be stored in each bank for convenient
access to your favorite stations.
Operation in the initial state
It may take some time to start up the
equipment when it is in the initial state,
when there is a change in the user's
subscription condition, or when the
SIRIUS channel map is changed.
6-50
Interior Comfort
Audio System
CX-9_8AU2-EA-09G_Edition5 Page298
Thursday, May 6 2010 4:54 PM
Form No.8AU2-EA-09G