language MAZDA MODEL CX-9 2010 Owners Manual (in English)
[x] Cancel search | Manufacturer: MAZDA, Model Year: 2010, Model line: MODEL CX-9, Model: MAZDA MODEL CX-9 2010Pages: 592
Page 249 of 592
Black plate (249,1)
6Interior Comfort
Use of various features for drive comfort, including air-conditioning and audio
system.
Climate Control System .......................... 6-2
Operating Tips .................................... 6-2
Vent Operation (Front) ........................ 6-4
Fully Automatic Type ......................... 6-6
Vent Operation (Rear) ....................... 6-12
Fully Automatic Type (Rear) ............ 6-14
Audio System ......................................... 6-17
Antenna ............................................. 6-17
Operating Tips for Audio System ..... 6-17
Audio Set (Type A) ........................... 6-27
Audio Set (Type B) ........................... 6-37
Audio Control Switch Operation
í.... 6-63
AUX Mode (Auxiliary input)í........ 6-66
Safety Certification ........................... 6-69
Rear Entertainment System ................. 6-70
Rear Entertainment System
í............ 6-70
Part Names ........................................ 6-80
Before Operation ............................... 6-83
Sound Output .................................... 6-89
Rear Entertainment System
Functions ........................................... 6-93
DVD video, DVD audio, Video CD, Audio
CD and MP3/WMA CD Playback (Disc
Mode) ................................................ 6-94
Auxiliary Input (AUX mode) .......... 6-108
Language Code List ........................ 6-112
Country Code List ........................... 6-114
Error Message ................................. 6-118
Symptoms and Actions ................... 6-120
Bluetooth Audio (Type B) ................... 6-123
Bluetooth Audio (Type B)
í............ 6-123Bluetooth Hands-Free (Voice
Recognition) ......................................... 6-131
Bluetooth Hands-Free
í.................. 6-131
Basic Bluetooth Hands-Free Operation... 6-136
Convenient Use of the Hands-Free
System ............................................. 6-141
Hands-Free Setting .......................... 6-149
When Bluetooth Hands-Free Cannot be
Used ................................................ 6-157
Safety Certification ......................... 6-157
Mazda Bluetooth Hands-Free Customer
Service ............................................ 6-158
Bluetooth Hands-Free (Panel
Operation) ............................................ 6-159
Bluetooth Hands-Free
í.................. 6-159
Basic Bluetooth Hands-Free Operation... 6-161
Convenient Use of the Hands-Free
System ............................................. 6-164
Hands-Free Setting .......................... 6-167
When Bluetooth Hands-Free Cannot be
Used ................................................ 6-169
Safety Certification ......................... 6-169
Mazda Bluetooth Hands-Free Customer
Service ............................................ 6-170
Rear View Monitor .............................. 6-171
Rear View Monitor
í...................... 6-171
Interior Equipment ............................. 6-181
Sunvisors ......................................... 6-181
Interior Lights ................................. 6-182
Information Display ........................ 6-184
Cup Holder ...................................... 6-189
Bottle Holder ................................... 6-191
Storage Compartments .................... 6-191
Accessory Sockets .......................... 6-195
Power Outlet
í................................ 6-196
6-1íSome models.
CX-9_8AU2-EA-09G_Edition5 Page249
Thursday, May 6 2010 4:53 PM
Form No.8AU2-EA-09G
Page 286 of 592
Black plate (286,1)
qScreen Adjustments and Other Settings
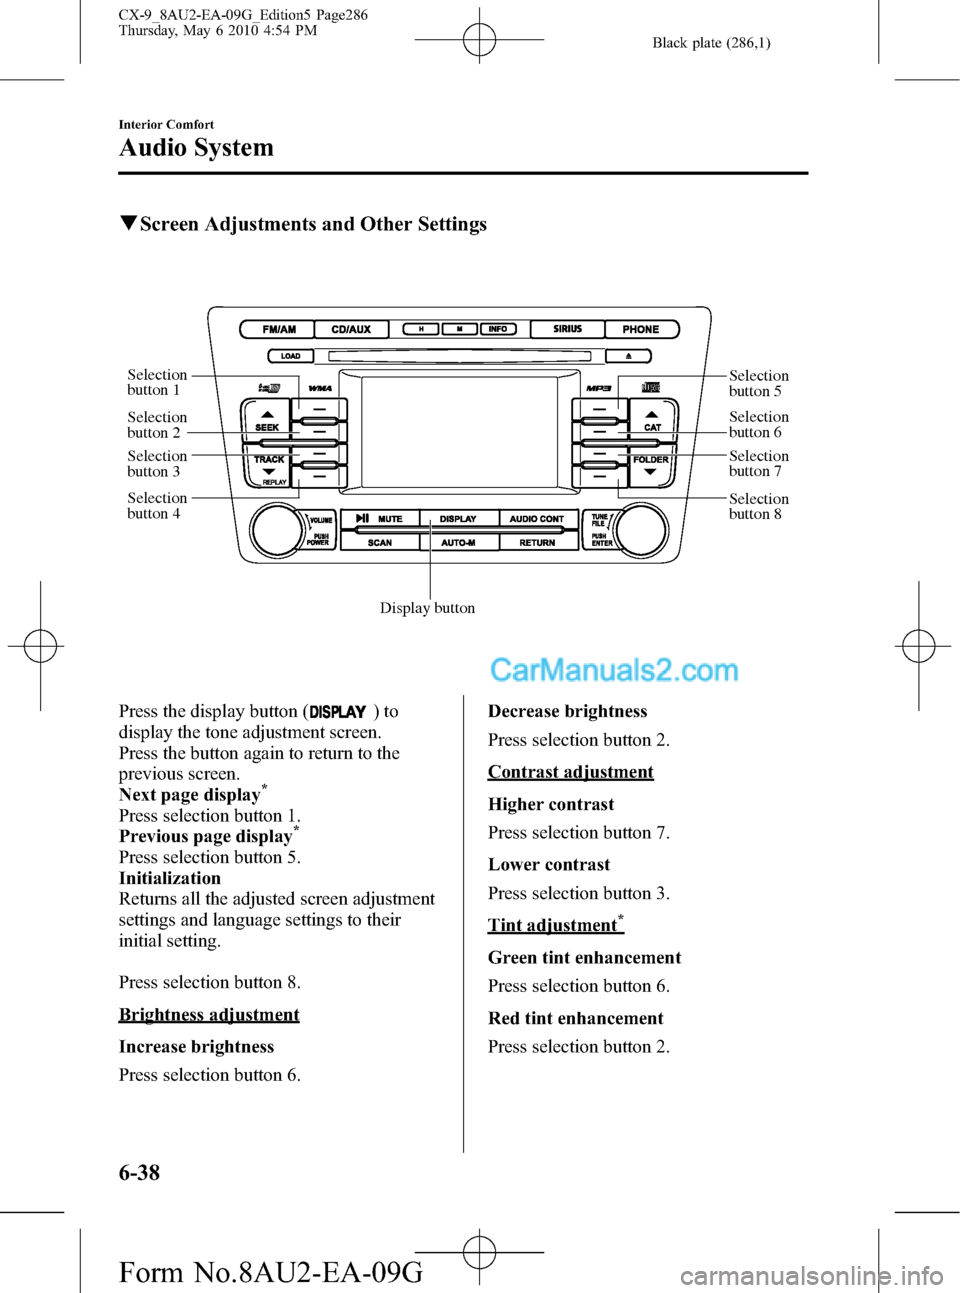
Selection
button 1
Selection
button 2
Selection
button 3
Selection
button 4
Display button
Selection
button 5
Selection
button 6
Selection
button 7
Selection
button 8
Press the display button ()to
display the tone adjustment screen.
Press the button again to return to the
previous screen.
Next page display
*
Press selection button 1.
Previous page display*
Press selection button 5.
Initialization
Returns all the adjusted screen adjustment
settings and language settings to their
initial setting.
Press selection button 8.
Brightness adjustment
Increase brightness
Press selection button 6.Decrease brightness
Press selection button 2.
Contrast adjustment
Higher contrast
Press selection button 7.
Lower contrast
Press selection button 3.
Tint adjustment*
Green tint enhancement
Press selection button 6.
Red tint enhancement
Press selection button 2.
6-38
Interior Comfort
Audio System
CX-9_8AU2-EA-09G_Edition5 Page286
Thursday, May 6 2010 4:54 PM
Form No.8AU2-EA-09G
Page 287 of 592
Black plate (287,1)
Color adjustment*
To deepen a color
Press selection button 7.
To fade color
Press selection button 3.
* Adjustment is available depending on
the display.
NOTE
Continuous adjustment of the brightness,
contrast, tint, and color can be done by long-
pressing the selection button for the adjustment
item.
Daytime/Night screen
When the headlights are on, daytime
mode can also be selected (if a brighter
screen is needed at night). This selection
can only be done when the headlights are
on.
The screen can be returned to the daytime
screen while the headlights or running
lights are on by pressing the dashboard
illumination knob.
Language setting
The displayed language can be changed to
one of the three available languages.
Press selection button 5 to display the
language setting screen.
English display
Press selection button 2.
French display
Press selection button 3.
Spanish display
Press selection button 4.NOTE
A language setting is unavailable for the
satellite radio. English is constantly displayed.
Screen display off
Press selection button 4.
Press the display button (
)to
return to the previously selected mode's
screen.
Interior Comfort
Audio System
6-39
CX-9_8AU2-EA-09G_Edition5 Page287
Thursday, May 6 2010 4:54 PM
Form No.8AU2-EA-09G
Page 345 of 592
Black plate (345,1)
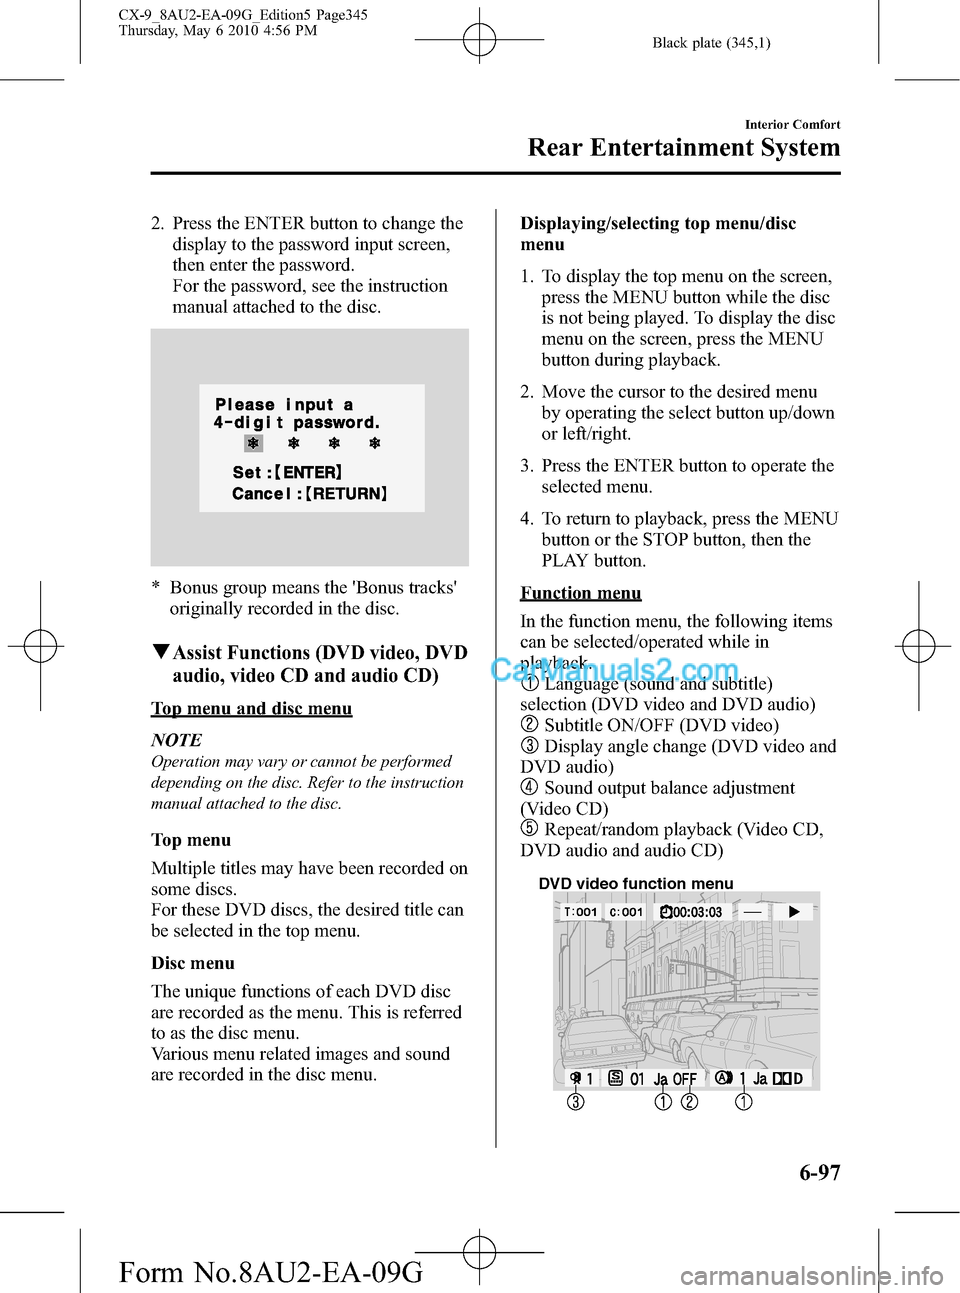
2. Press the ENTER button to change the
display to the password input screen,
then enter the password.
For the password, see the instruction
manual attached to the disc.
* Bonus group means the 'Bonus tracks'
originally recorded in the disc.
qAssist Functions (DVD video, DVD
audio, video CD and audio CD)
Top menu and disc menu
NOTE
Operation may vary or cannot be performed
depending on the disc. Refer to the instruction
manual attached to the disc.
Top menu
Multiple titles may have been recorded on
some discs.
For these DVD discs, the desired title can
be selected in the top menu.
Disc menu
The unique functions of each DVD disc
are recorded as the menu. This is referred
to as the disc menu.
Various menu related images and sound
are recorded in the disc menu.Displaying/selecting top menu/disc
menu
1. To display the top menu on the screen,
press the MENU button while the disc
is not being played. To display the disc
menu on the screen, press the MENU
button during playback.
2. Move the cursor to the desired menu
by operating the select button up/down
or left/right.
3. Press the ENTER button to operate the
selected menu.
4. To return to playback, press the MENU
button or the STOP button, then the
PLAY button.
Function menu
In the function menu, the following items
can be selected/operated while in
playback.
Language (sound and subtitle)
selection (DVD video and DVD audio)
Subtitle ON/OFF (DVD video)
Display angle change (DVD video and
DVD audio)
Sound output balance adjustment
(Video CD)
Repeat/random playback (Video CD,
DVD audio and audio CD)
DVD video function menu
Interior Comfort
Rear Entertainment System
6-97
CX-9_8AU2-EA-09G_Edition5 Page345
Thursday, May 6 2010 4:56 PM
Form No.8AU2-EA-09G
Page 346 of 592
Black plate (346,1)
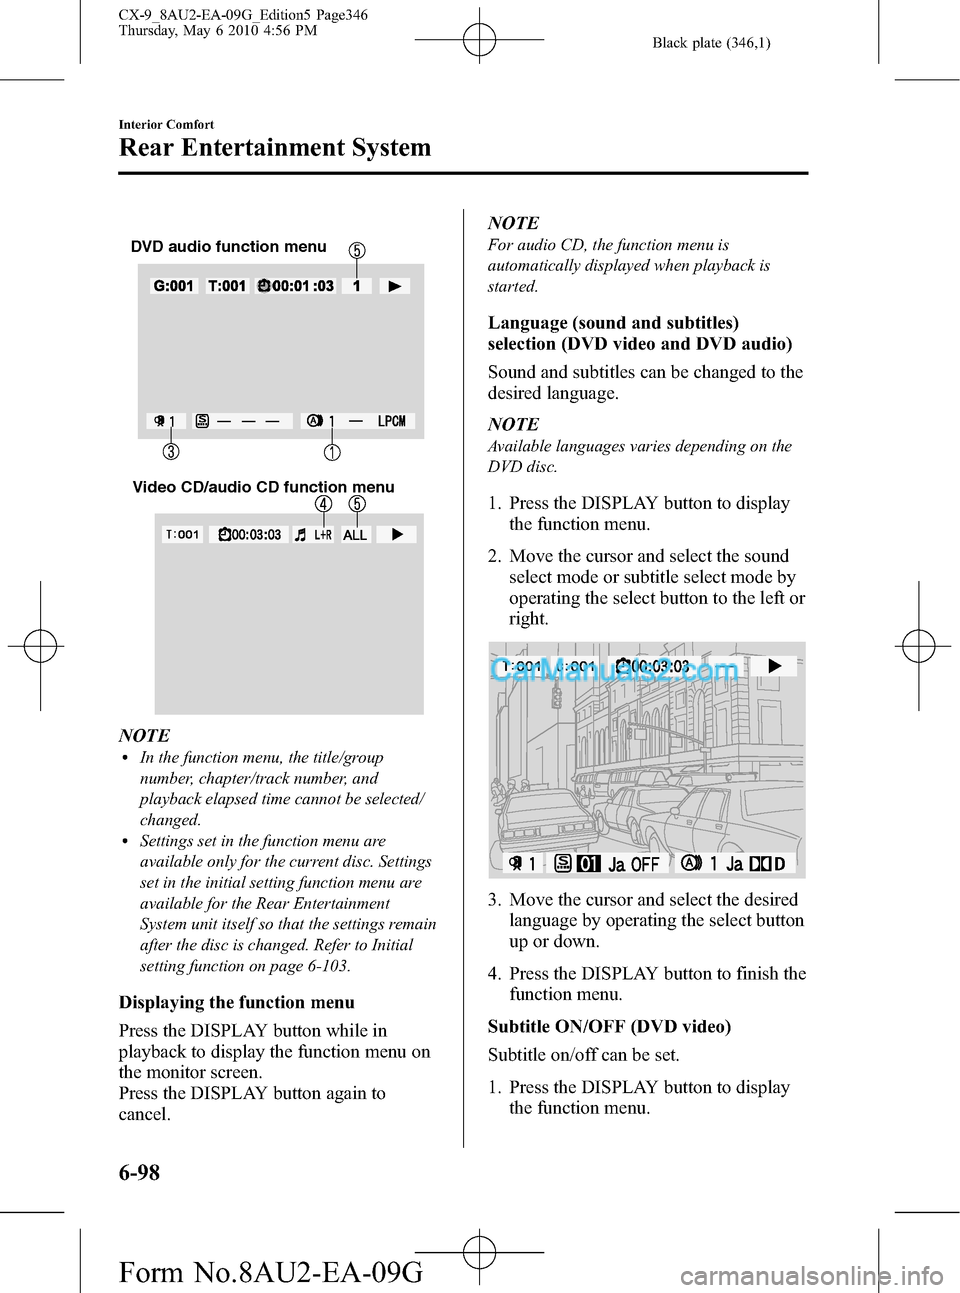
DVD audio function menu
Video CD/audio CD function menu
NOTElIn the function menu, the title/group
number, chapter/track number, and
playback elapsed time cannot be selected/
changed.
lSettings set in the function menu are
available only for the current disc. Settings
set in the initial setting function menu are
available for the Rear Entertainment
System unit itself so that the settings remain
after the disc is changed. Refer to Initial
setting function on page 6-103.
Displaying the function menu
Press the DISPLAY button while in
playback to display the function menu on
the monitor screen.
Press the DISPLAY button again to
cancel.NOTE
For audio CD, the function menu is
automatically displayed when playback is
started.
Language (sound and subtitles)
selection (DVD video and DVD audio)
Sound and subtitles can be changed to the
desired language.
NOTE
Available languages varies depending on the
DVD disc.
1. Press the DISPLAY button to display
the function menu.
2. Move the cursor and select the sound
select mode or subtitle select mode by
operating the select button to the left or
right.
3. Move the cursor and select the desired
language by operating the select button
up or down.
4. Press the DISPLAY button to finish the
function menu.
Subtitle ON/OFF (DVD video)
Subtitle on/off can be set.
1. Press the DISPLAY button to display
the function menu.
6-98
Interior Comfort
Rear Entertainment System
CX-9_8AU2-EA-09G_Edition5 Page346
Thursday, May 6 2010 4:56 PM
Form No.8AU2-EA-09G
Page 352 of 592
Black plate (352,1)
5. Press the ENTER button. The
highlighted color returns to the
previous color to indicate that the
selected item is set.
6. To finish the function menu on the
monitor display, press the SET UP,
MENU, or STOP button.
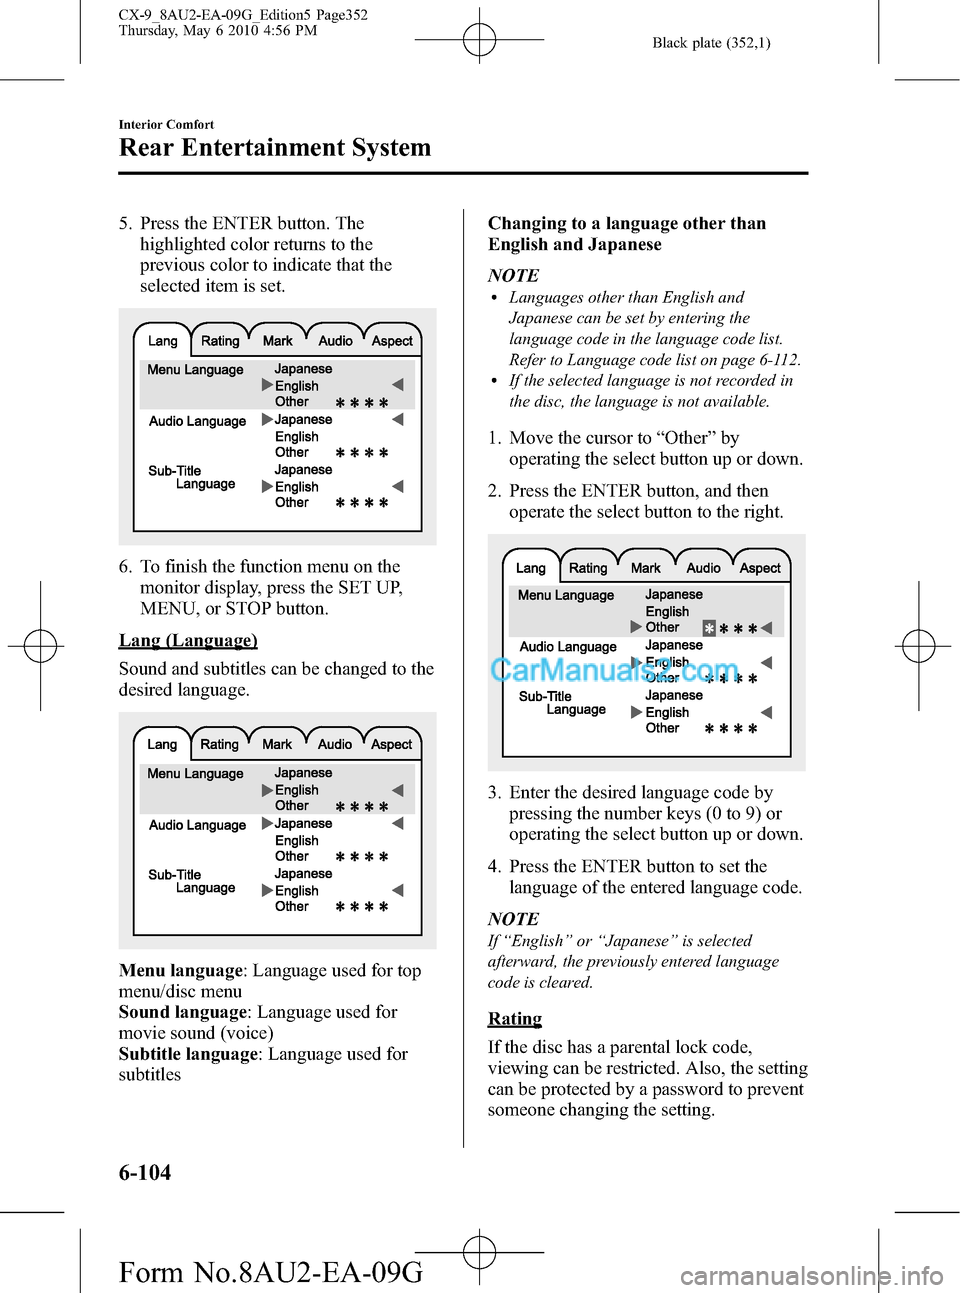
Lang (Language)
Sound and subtitles can be changed to the
desired language.
Menu language: Language used for top
menu/disc menu
Sound language: Language used for
movie sound (voice)
Subtitle language: Language used for
subtitlesChanging to a language other than
English and Japanese
NOTE
lLanguages other than English and
Japanese can be set by entering the
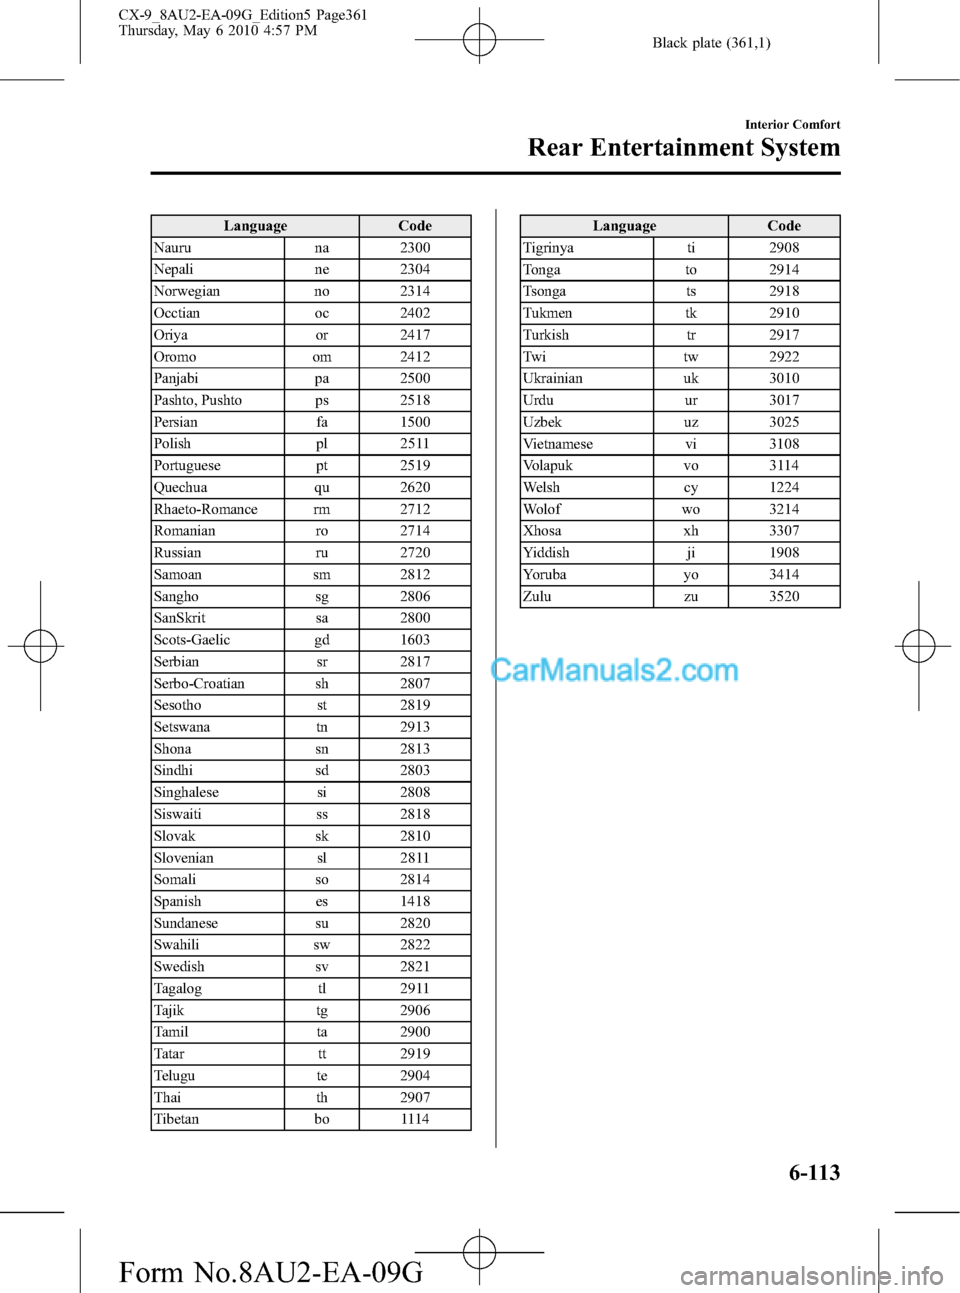
language code in the language code list.
Refer to Language code list on page 6-112.
lIf the selected language is not recorded in
the disc, the language is not available.
1. Move the cursor to“Other”by
operating the select button up or down.
2. Press the ENTER button, and then
operate the select button to the right.
3. Enter the desired language code by
pressing the number keys (0 to 9) or
operating the select button up or down.
4. Press the ENTER button to set the
language of the entered language code.
NOTE
If“English”or“Japanese”is selected
afterward, the previously entered language
code is cleared.
Rating
If the disc has a parental lock code,
viewing can be restricted. Also, the setting
can be protected by a password to prevent
someone changing the setting.
6-104
Interior Comfort
Rear Entertainment System
CX-9_8AU2-EA-09G_Edition5 Page352
Thursday, May 6 2010 4:56 PM
Form No.8AU2-EA-09G
Page 360 of 592

Black plate (360,1)
Language Code List
Language Code
Abkhazian ab 1001
Afar aa 1000
Afrekaans af 1005
Albanian sq 2816
Amharic am 1012
Arabic ar 1017
Armenian hy 1724
Assamase as 1018
Aymara ay 1024
Azerbaijani az 1025
Bashkir ba 1100
Basque eu 1420
Bengali bn 1113
Bhutani dz 1325
Bihari bh 1107
Bislama bi 1108
Breton br 1117
Bulgarian bg 1106
Burmese my 2224
Byelorussian be 1104
Cambodian km 2012
Catalan ca 1200
Chinese zh 3507
Corsican co 1214
Croatian hr 1717
Czech cs 1218
Danish da 1300
Dutch nl 2311
English en 1413
Esperanto eo 1414
Estonian et 1419
Faroese fo 1514
Fiji fj 1509
Finnish fi 1508
French fr 1517
Friesian fy 1524
Galician gl 1611
German de 1304
Gorgian ka 2000Language Code
Greek el 1411
Greenlandic kl 2011
Guarani gn 1613
Gujarati gu 1620
Hausa ha 1700
Hebrew iw 1822
Hindi hi 1708
Hungarian hu 1720
Icelandic is 1818
Indonesian in 1813
Interlingua ia 1800
Interlingue ie 1804
Inupiak ik 1810
Irish ga 1600
Italian it 1819
Japanese ja 1900
Javanese jw 1922
Kannada kn 2013
Kashmiri ks 2018
Kazakh kk 2010
Kinyarwanda rw 2722
Kirghiz ky 2024
Kirundi rn 2713
Korean ko 2014
Kurdish ku 2020
Laothian lo 2114
Latin la 2100
Latvian lv 2121
Lingala ln 2113
Lithuanian lt 2119
Macedonian mk 2210
Malagasy mg 2206
Malay ms 2218
Malayalam ml 2211
Maltese mt 2219
Maori mi 2208
Marathi mr 2217
Moldavian mo 2214
Mongolian mn 2213
6-112
Interior Comfort
Rear Entertainment System
CX-9_8AU2-EA-09G_Edition5 Page360
Thursday, May 6 2010 4:57 PM
Form No.8AU2-EA-09G
Page 361 of 592
Black plate (361,1)
Language Code
Nauru na 2300
Nepali ne 2304
Norwegian no 2314
Occtian oc 2402
Oriya or 2417
Oromo om 2412
Panjabi pa 2500
Pashto, Pushto ps 2518
Persian fa 1500
Polish pl 2511
Portuguese pt 2519
Quechua qu 2620
Rhaeto-Romance rm 2712
Romanian ro 2714
Russian ru 2720
Samoan sm 2812
Sangho sg 2806
SanSkrit sa 2800
Scots-Gaelic gd 1603
Serbian sr 2817
Serbo-Croatian sh 2807
Sesotho st 2819
Setswana tn 2913
Shona sn 2813
Sindhi sd 2803
Singhalese si 2808
Siswaiti ss 2818
Slovak sk 2810
Slovenian sl 2811
Somali so 2814
Spanish es 1418
Sundanese su 2820
Swahili sw 2822
Swedish sv 2821
Tagalog tl 2911
Tajik tg 2906
Tamil ta 2900
Tatar tt 2919
Telugu te 2904
Thai th 2907
Tibetan bo 1114Language Code
Tigrinya ti 2908
Tonga to 2914
Tsonga ts 2918
Tukmen tk 2910
Turkish tr 2917
Twi tw 2922
Ukrainian uk 3010
Urdu ur 3017
Uzbek uz 3025
Vietnamese vi 3108
Volapuk vo 3114
Welsh cy 1224
Wolof wo 3214
Xhosa xh 3307
Yiddish ji 1908
Yoruba yo 3414
Zulu zu 3520
Interior Comfort
Rear Entertainment System
6-113
CX-9_8AU2-EA-09G_Edition5 Page361
Thursday, May 6 2010 4:57 PM
Form No.8AU2-EA-09G
Page 369 of 592
Black plate (369,1)
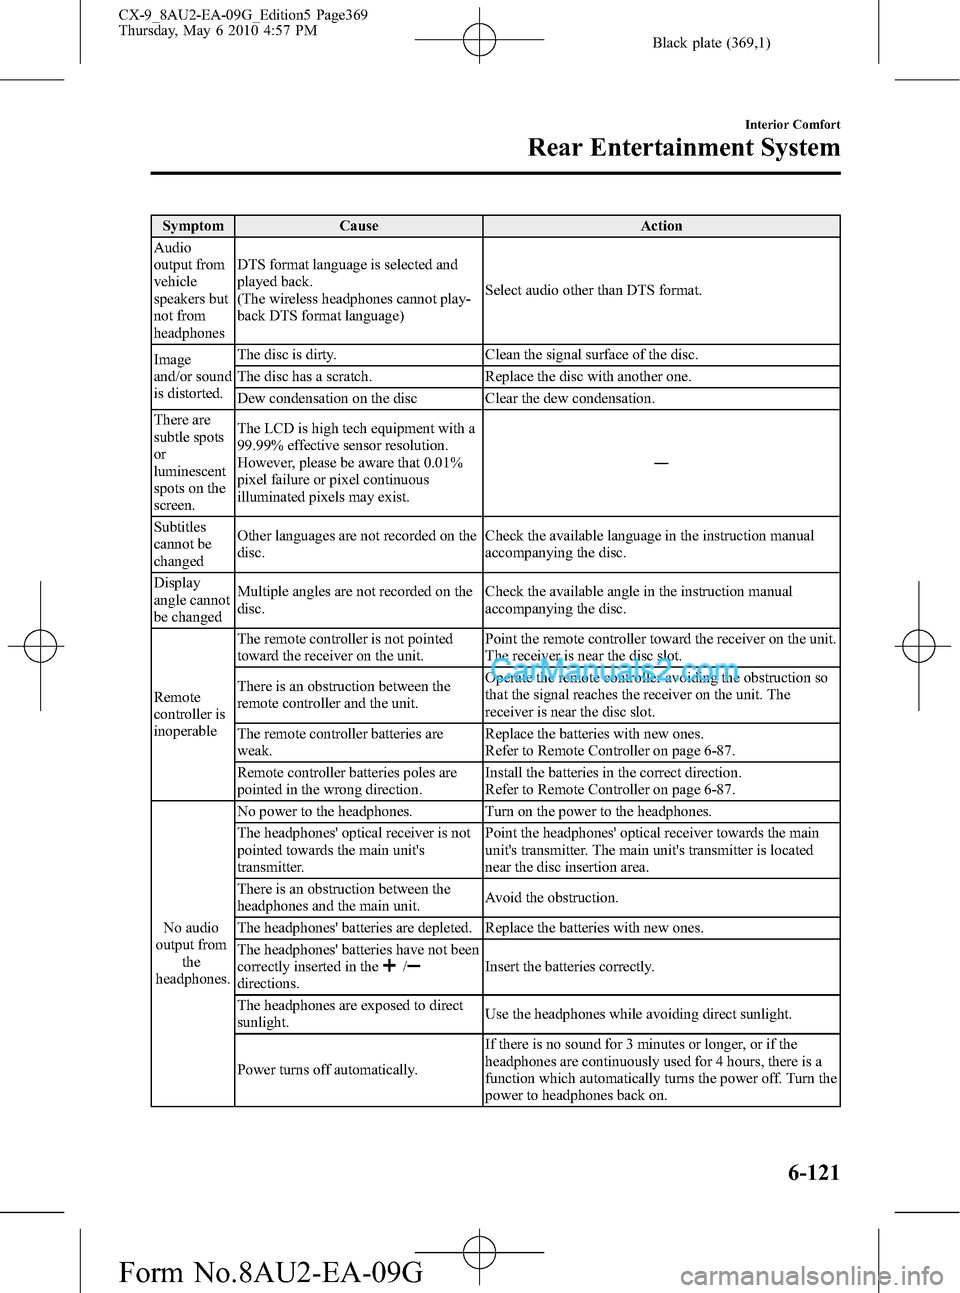
Symptom Cause Action
Audio
output from
vehicle
speakers but
not from
headphonesDTS format language is selected and
played back.
(The wireless headphones cannot play-
back DTS format language)Select audio other than DTS format.
Image
and/or sound
is distorted.The disc is dirty. Clean the signal surface of the disc.
The disc has a scratch. Replace the disc with another one.
Dew condensation on the disc Clear the dew condensation.
There are
subtle spots
or
luminescent
spots on the
screen.The LCD is high tech equipment with a
99.99% effective sensor resolution.
However, please be aware that 0.01%
pixel failure or pixel continuous
illuminated pixels may exist.―
Subtitles
cannot be
changedOther languages are not recorded on the
disc.Check the available language in the instruction manual
accompanying the disc.
Display
angle cannot
be changedMultiple angles are not recorded on the
disc.Check the available angle in the instruction manual
accompanying the disc.
Remote
controller is
inoperableThe remote controller is not pointed
toward the receiver on the unit.Point the remote controller toward the receiver on the unit.
The receiver is near the disc slot.
There is an obstruction between the
remote controller and the unit.Operate the remote controller avoiding the obstruction so
that the signal reaches the receiver on the unit. The
receiver is near the disc slot.
The remote controller batteries are
weak.Replace the batteries with new ones.
Refer to Remote Controller on page 6-87.
Remote controller batteries poles are
pointed in the wrong direction.Install the batteries in the correct direction.
Refer to Remote Controller on page 6-87.
No audio
output from
the
headphones.No power to the headphones. Turn on the power to the headphones.
The headphones' optical receiver is not
pointed towards the main unit's
transmitter.Point the headphones' optical receiver towards the main
unit's transmitter. The main unit's transmitter is located
near the disc insertion area.
There is an obstruction between the
headphones and the main unit.Avoid the obstruction.
The headphones' batteries are depleted. Replace the batteries with new ones.
The headphones' batteries have not been
correctly inserted in the
/directions.Insert the batteries correctly.
The headphones are exposed to direct
sunlight.Use the headphones while avoiding direct sunlight.
Power turns off automatically.If there is no sound for 3 minutes or longer, or if the
headphones are continuously used for 4 hours, there is a
function which automatically turns the power off. Turn the
power to headphones back on.
Interior Comfort
Rear Entertainment System
6-121
CX-9_8AU2-EA-09G_Edition5 Page369
Thursday, May 6 2010 4:57 PM
Form No.8AU2-EA-09G
Page 384 of 592
Black plate (384,1)
Basic Bluetooth Hands-
Free Operation
qBluetooth Hands-Free Preparation
Language setting
The available languages are English,
Spanish, and Canadian French. If the
language setting is changed, all of the
voice guidance and voice input
commands are done in the selected
language.
NOTE
lIf the language setting is changed, device
registration is maintained.
Phonebook records are not cleared, but
each language has a separate phonebook.
Therefore, entries created in one language
will need to be re-entered in the phonebook
of the new language.
lDo these steps before you start driving.
These less used functions are too
distracting to undertake while driving until
you are fully familiar with the system.
Method 1
1. Press the pick-up button (with/without
navigation system) or talk button with
a short press (without navigation
system) or a long press (with
navigation system).
NOTE
For vehicles with the navigation system, you
can also press the talk button with a short
press and say: [Beep]“Telephone”or
“Phone”.
2.Say:[Beep]“Setup”3.(Type A)
Prompt:“Select one of the following:
Pairing options, confirmation prompts,
language, passcode, or select phone.”
(Type B/Navigation system)
Prompt:“Select one of the following:
Pairing options, confirmation prompts,
language, passcode, select phone or
select music player.”
4.Say:[Beep]“Language”
5.Prompt:“Select a language: English,
French, or Spanish.”
6.Say:[Beep]“French”(Speak the
desired language:“English”,“French”
or“Spanish”)
NOTE
Other language settings can also be made
while in the current setting by saying the name
of the language in the native pronunciation.
7.Prompt:“French (Desired language)
selected. Is this correct?”
8.Say:[Beep]“Ye s”
9.Prompt:“French (Desired language)
selected, returning to main menu”
(Spoken in the newly selected
language).
Method 2
1. Press the pick-up button (with/without
navigation system) or talk button with
a short press (without navigation
system) or a long press (with
navigation system).
NOTE
For vehicles with the navigation system, you
can also press the talk button with a short
press and say: [Beep]“Telephone”or
“Phone”.
6-136
Interior Comfort
Bluetooth Hands-Free (Voice Recognition)
CX-9_8AU2-EA-09G_Edition5 Page384
Thursday, May 6 2010 4:58 PM
Form No.8AU2-EA-09G