belt MAZDA MODEL CX-9 2010 Smart Start Guide (in English)
[x] Cancel search | Manufacturer: MAZDA, Model Year: 2010, Model line: MODEL CX-9, Model: MAZDA MODEL CX-9 2010Pages: 16, PDF Size: 3.68 MB
Page 3 of 16

34
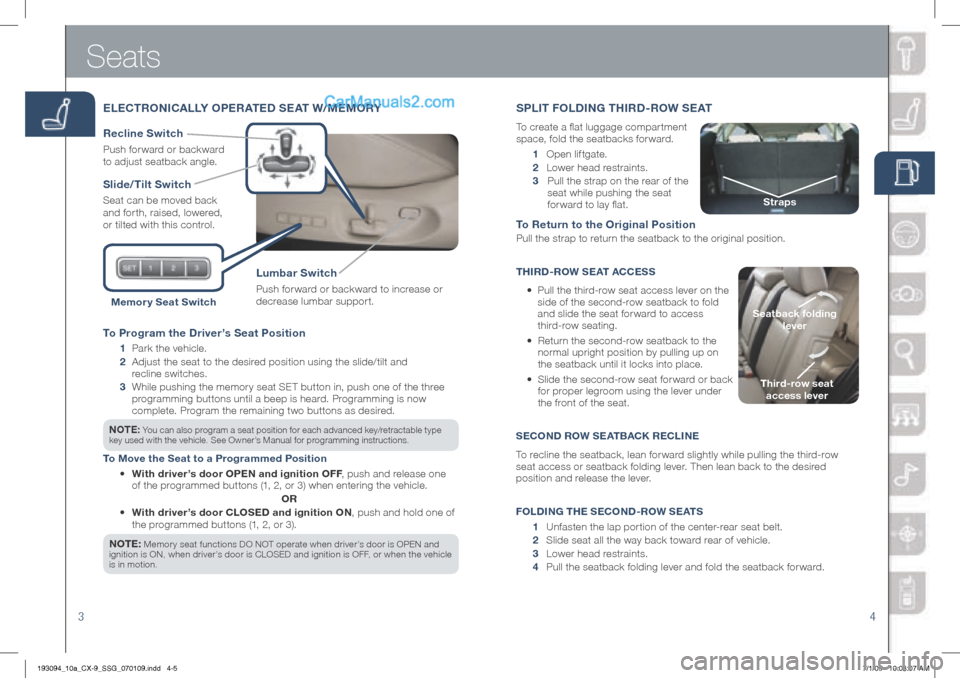
To Program the Driver’s Seat Position
1 Pa rk the vehicle.
2
Adjust the seat to the desired position using the slide/tilt and
recline switches.
3
While pushing the memory seat SET button in, push one of the three
programming buttons until a beep is heard. Programming is now
complete. Pr ogram the remaining two buttons as desired.
nOTE: You can als o program a seat position for each advanced key/retractable type
key used with the vehicle. See Owner’s Manual for programming instructions.
To Move the Seat to a Programmed Position
• With driver’s door OPE n and ignition OFF, push and release one
of the programmed buttons (1, 2, or 3) when entering the vehicle.
Or
• With driver’s door CLOSED and ignition O n, push and hold one of
the programmed buttons ( 1, 2, or 3).
n OTE:
Me mory seat functions DO NOT operate when driver’s door is OPEN and
ignition is ON, when driver’s door is CLOSED and ignition is OFF, or when the vehicle
is in motion.
Seats
ELECT rO nICALL y OPE rATED SEAT W/MEMO ry
Slide/Tilt Switch
Seat can be moved back
and forth, raised, lowered,
or tilted with this control.
Lumbar Switch
Push forward or backward to increase or
decrease lumbar support.
r ecline Switch
Push forward or backward
to adjust seatback angle.
Memor y Seat Switch
1 Open liftgate.
2
Lower head restraints.
3 Pull the strap on the rear of the
seat while pushing the seat
forward to lay flat.
To r eturn to the Original Position
Pull the strap to return the seatback to the original position.
ThIr D -rOW S EAT ACCESS
• Pull the third-row seat access lever on the
side of the second-row seatback to fold
and slide the seat forward to access
third-row seating.
•
Return the second-row seatback to the
normal upright position by pulling up on
the seatback until it locks into place.
•
Slide the second-row seat for ward or back
for proper legroom using the lever under
the front of the seat.
S ECO nD rOW S EATBACK rECLI nE
To recline the seatback, lean forward slightly while pulling the third-row
seat access or seatback folding lever. Then lean back to the desired
position and release the lever.
F OLDI nG T hE S ECO nD -rOW S EATS
1 Unfasten the lap portion of the center-rear seat belt.
2 Slide seat all the way back toward rear of vehicle.
3 Lower head restraints.
4 Pull the seatback folding lever and fold the seatback forward.
SPLIT F OLDInG Th Ir D -r OW SEAT
To create a flat luggage compar tment
space, fold the seatbacks forward.
Third-row seat
access lever
Seatback folding
lever
Straps
193094_10a_CX-9_SSG_070109.indd 4-57/1/09 10:08:07 AM
Page 4 of 16

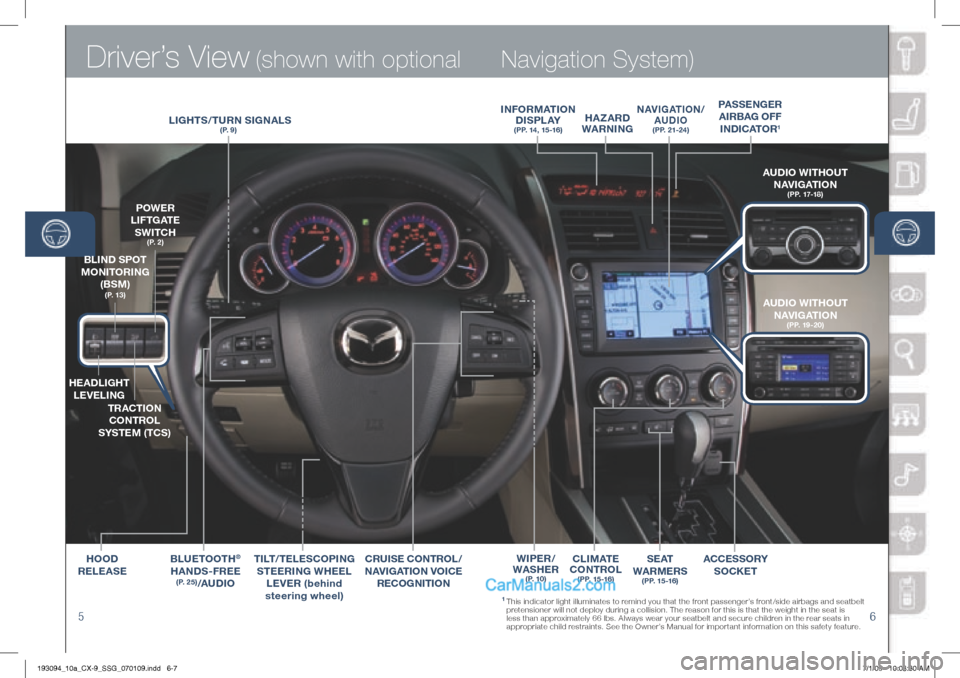
Driver’s View (shown with optional
56
Navigation System)
BLUETOOT h®
hA nDS -F r EE (P. 25)/ AUDIO
AUDIO WIT hOUT
n AVIGATIOn
(PP. 17-18)
hEADLIG hT
LEVELI nG
T r ACTIO n
CO nTr OL
S y STEM (TCS)
P OWE r
L I F T G AT E
SWITC h
(P. 2)
BLI nD SPOT
MOn ITOrInG
(BS M)
(P. 13) AUDIO WIT hOUT
n AVIGATIOn
(PP. 19-20)
1 This indicator light illuminates to remind you that the front passenger’s front/side airbags and seatbelt
pretensioner will not deploy during a collision. The reason for this is that the weight in the seat is
less than approximately 66 lbs. Always wear your seatbelt and secure children in the rear seats in
appropriate child restraints. See the Owner’s Manual for important information on this safety feature.
n AVI GATIOn/
AUDIO (PP. 21-24)
Cr UISE CO nTr OL /
nAVIGATIOn V OICE
rECOG nITIOn In
FOrMATIOn
D I S P L Ay
(PP. 14, 15 -16)
C L I M AT E
CO nTr OL
(PP. 15 -16)
LIG hTS/TU rn SIG nALS(P. 9)
hOOD
r ELEASE ACCESSO
ry
SOCKET
TILT
/TELESCOPI nG
S TEE rIn G W hEEL
LEVE r (behind
steering wheel)
hA zA r D
WA rnInG
SEAT
WA rME rS
(PP. 15 -16)
W IPE r/
WAS hEr
(P. 10)
PASSE nGE r
AI rBAG OFF
In DICATOr
1
193094_10a_CX-9_SSG_070109.indd 6-77/1/09 10:08:30 AM
Page 5 of 16

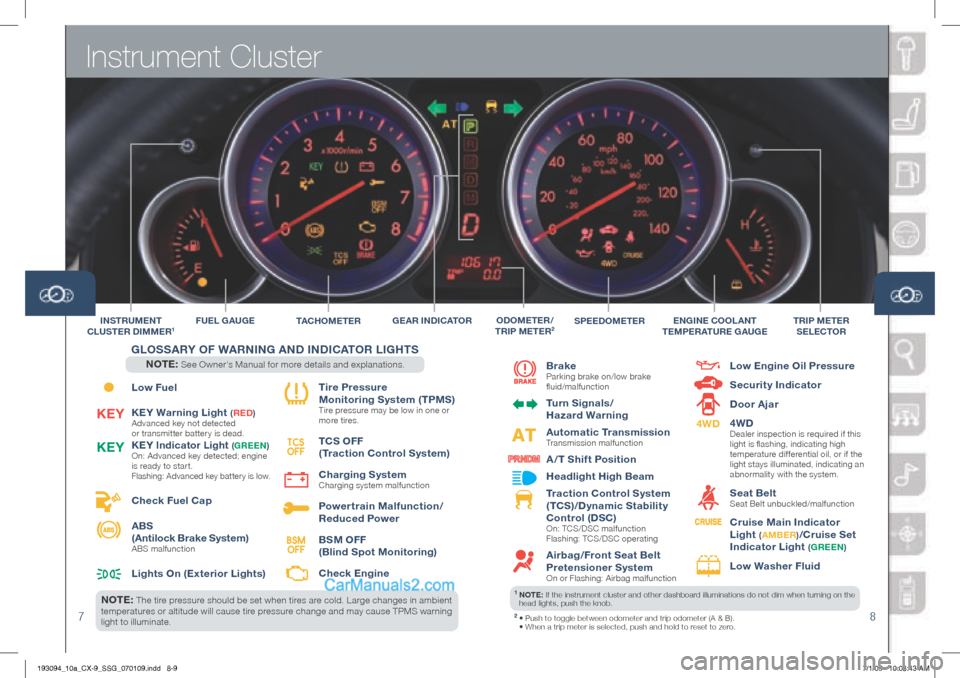
Instrument Cluster
78
Low Fuel
KEy Warning Light
(rED )
Advanced key not detected
or transmitter battery is dead.
KEy Indicator Light (Gr EEn )
On: Advanced key detected; engine
is ready to star t.
Flashing: Advanced key battery is low.
Check Fuel Cap
ABS
(Antilock Brake System)
ABS malfunction
Lights On (Exterior Lights) Tire Pressure
Monitoring System (TPMS)
Tire pressure may be low in one or
more tires.
TCS OFF
(Traction Control System)
Charging System
Charging system malfunction
Powertrain Malfunction/
reduced Power
BSM OFF
(Blind Spot Monitoring)
Check Engine
TAC hO M E T E r
F
UEL G AUGE
Brake
Parking brake on/low brake
fluid/malfunction
Turn Signals/
h azard Warning
Automatic Transmission
Transmission malfunction
A /T Shift Position
h eadlight h igh Beam
Traction Control System
(TCS)/Dynamic Stability
Control (DSC)
On: TCS/DSC malfunction
Flashing: TCS/DSC operating
Airbag/Front Seat Belt
Pretensioner System
On or Flashing: Airbag malfunction
Low Engine Oil Pressure
Security Indicator
Door Ajar
4WD
Dealer inspection is required if this
light is flashing, indicating high
temperature dif ferential oil, or if the
light stays illuminated, indicating an
abnormality with the system.
Seat Belt Seat Belt unbuckled/malfunction
Cruise Main Indicator
Light
( A MBE r)/Cruise Set
Indicator Light
( Gr EEn )
Low Washer Fluid
SPEEDOMETErT r IP METE r
SELECTO r
In
ST rUME nT
CLUSTE r DIMME r1EnGInE COOLA nT
TEMPE rATU rE GAUGEODOMETE r/
Tr IP METE r2GEA r In DICATO r
TCS
OFFKE y
KE
y
4WD
BSM
OFF
GLOSSA ry OF W Arn In G A nD I nDICATO r LIGhTS
n OTE: See Owner’s Manual for more details and explanations.
nOTE: The tire pressure should be set when tires are cold. Large changes in ambient
temperatures or altitude will cause tire pressure change and may cause TPMS warning
light to illuminate.1 nOTE: If the instrument cluster and other dashboard illuminations do not dim when turning on the
head lights, push the knob.
2 • Push to toggle between odometer and trip odometer (A & B).
• When a trip meter is selected, push and hold to reset to zero.
193094_10a_CX-9_SSG_070109.indd 8-97/1/09 10:08:43 AM