engine MAZDA MODEL CX-9 2010 Smart Start Guide (in English)
[x] Cancel search | Manufacturer: MAZDA, Model Year: 2010, Model line: MODEL CX-9, Model: MAZDA MODEL CX-9 2010Pages: 16, PDF Size: 3.68 MB
Page 2 of 16
Key
12
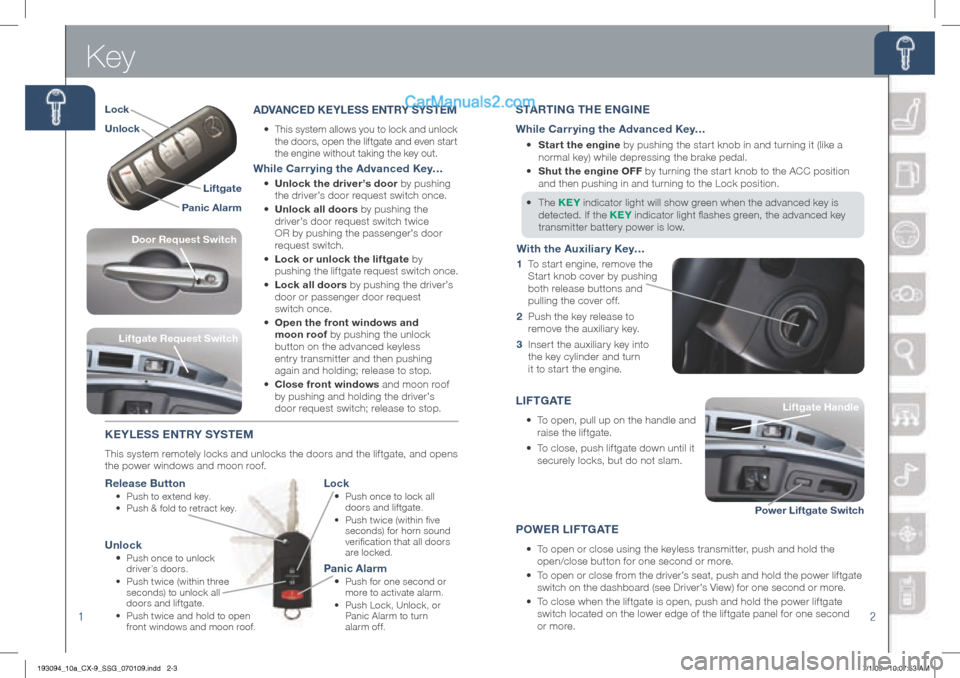
L I F T G AT E
•
To open, pull up on the handle and
raise the liftgate.
•
To close, push liftgate down until it
securely locks, but do not slam.
S TA rTI nG T hE E nGI nE
While Carrying the Advanced Key…
•
Start the engine by pushing the start knob in and turning it (like a
normal key) while depressing the brake pedal.
•
Shut the engine OFF by turning the star t knob to the ACC position
and then pushing in and turning to the Lock position.
•
The KE y indicator light will show green when the advanced key is
detected. If the KE y indicator light flashes green, the advanced key
transmitter battery power is low.
P OWE r LIFTGATE
•
To open or close using the keyless transmitter, push and hold the
open/close button for one second or more.
•
To open or close from the driver’s seat, push and hold the power liftgate
switch on the dashboard (see Driver’s View) for one second or more.
•
To close when the liftgate is open, push and hold the power liftgate
switch located on the lower edge of the liftgate panel for one second
or more. Liftgate
h andle
Liftgate handle
Power Liftgate Switch
ADVA nCED KE yLESS E nTry S ySTEM
• This system allows you to lock and unlock
the doors, open the liftgate and even start
the engine without taking the key out.
While Carrying the Advanced Key…
• Unlock the driver’s door by pushing
the driver’s door request switch once.
• Unlock all doors by pushing the
driver’s door request switch twice
OR by pushing the passenger’s door
request switch.
• Lock or unlock the liftgate by
pushing the lif tgate request switch once.
•
Lock all doors by pushing the driver’s
door or passenger door request
switch once.
• Open the front windows and
moon roof by pushing the unlock
button on the advanced keyless
entry transmitter and then pushing
again and holding; release to stop.
• Close front windows and moon roof
by pushing and holding the driver’s
door request switch; release to stop.
KE yLESS E nTry S ySTEM
This system remotely locks and unlocks the doors and the liftgate, and opens
the power windows and moon roof.
r elease Button
• Push to extend key.
• Push & fold to retract key.
Lock
• Push once to lock all
doors and liftgate.
•
Push twice (within five
seconds) for horn sound
verification that all doors
are locked.
Unlock
• Push once to unlock
driver’s doors.
•
Push twice (within three
seconds) to unlock all
doors and liftgate.
•
Push twice and hold to open
front windows and moon roof.
Panic Alarm
• Push for one second or
more to activate alarm.
•
Push Lock, Unlock, or
Panic Alarm to turn
alarm off.
Liftgate r equest Switch
With the Auxiliary Key…
1 To start engine, remove the
Star t knob cover by pushing
both release buttons and
pulling the cover off.
2 Push the key release to
remove the auxiliary key.
3 Inser t the auxiliar y key into
the key cylinder and turn
it to start the engine.
Liftgate
Panic Alarm
Lock
Unlock
Door r
equest Switch
193094_10a_CX-9_SSG_070109.indd 2-37/1/09 10:07:53 AM
Page 5 of 16
Instrument Cluster
78
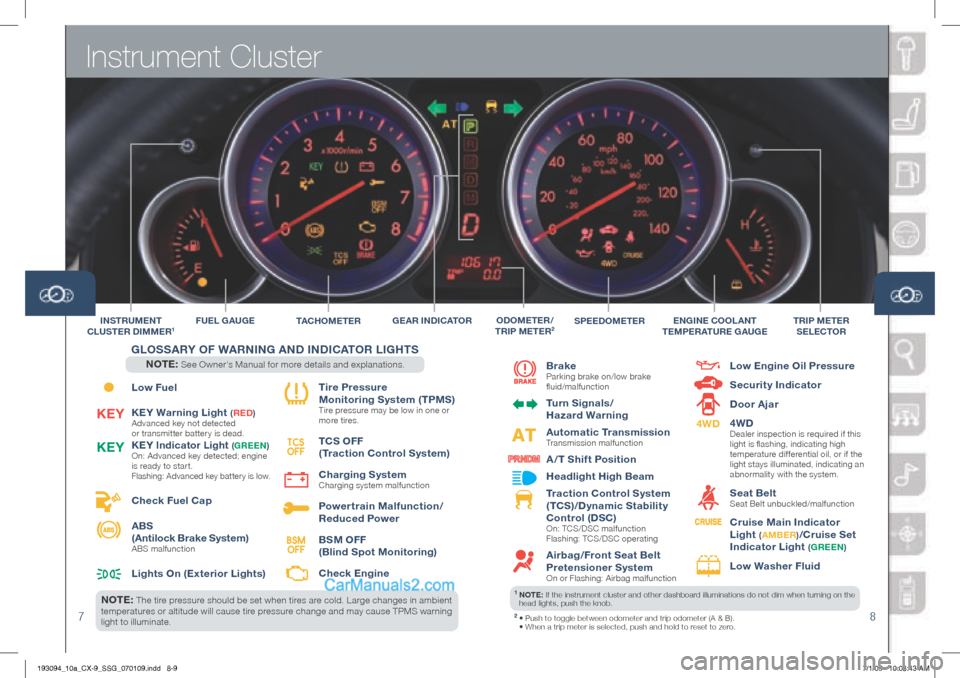
Low Fuel
KEy Warning Light
(rED )
Advanced key not detected
or transmitter battery is dead.
KEy Indicator Light (Gr EEn )
On: Advanced key detected; engine
is ready to star t.
Flashing: Advanced key battery is low.
Check Fuel Cap
ABS
(Antilock Brake System)
ABS malfunction
Lights On (Exterior Lights) Tire Pressure
Monitoring System (TPMS)
Tire pressure may be low in one or
more tires.
TCS OFF
(Traction Control System)
Charging System
Charging system malfunction
Powertrain Malfunction/
reduced Power
BSM OFF
(Blind Spot Monitoring)
Check Engine
TAC hO M E T E r
F
UEL G AUGE
Brake
Parking brake on/low brake
fluid/malfunction
Turn Signals/
h azard Warning
Automatic Transmission
Transmission malfunction
A /T Shift Position
h eadlight h igh Beam
Traction Control System
(TCS)/Dynamic Stability
Control (DSC)
On: TCS/DSC malfunction
Flashing: TCS/DSC operating
Airbag/Front Seat Belt
Pretensioner System
On or Flashing: Airbag malfunction
Low Engine Oil Pressure
Security Indicator
Door Ajar
4WD
Dealer inspection is required if this
light is flashing, indicating high
temperature dif ferential oil, or if the
light stays illuminated, indicating an
abnormality with the system.
Seat Belt Seat Belt unbuckled/malfunction
Cruise Main Indicator
Light
( A MBE r)/Cruise Set
Indicator Light
( Gr EEn )
Low Washer Fluid
SPEEDOMETErT r IP METE r
SELECTO r
In
ST rUME nT
CLUSTE r DIMME r1EnGInE COOLA nT
TEMPE rATU rE GAUGEODOMETE r/
Tr IP METE r2GEA r In DICATO r
TCS
OFFKE y
KE
y
4WD
BSM
OFF
GLOSSA ry OF W Arn In G A nD I nDICATO r LIGhTS
n OTE: See Owner’s Manual for more details and explanations.
nOTE: The tire pressure should be set when tires are cold. Large changes in ambient
temperatures or altitude will cause tire pressure change and may cause TPMS warning
light to illuminate.1 nOTE: If the instrument cluster and other dashboard illuminations do not dim when turning on the
head lights, push the knob.
2 • Push to toggle between odometer and trip odometer (A & B).
• When a trip meter is selected, push and hold to reset to zero.
193094_10a_CX-9_SSG_070109.indd 8-97/1/09 10:08:43 AM
Page 7 of 16
Feature Highlights
1112
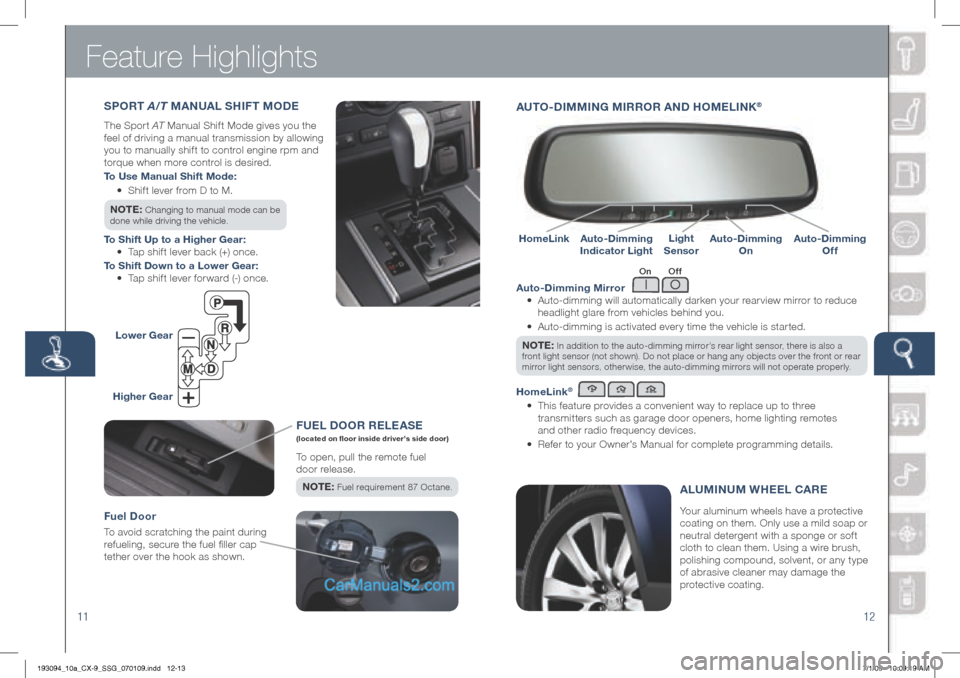
Auto-Dimming Mirror
• Auto-dimming will automatically darken your rearview mirror to reduce
headlight glare from vehicles behind you.
•
Auto-dimming is activated every time the vehicle is started.
n OTE:
In addition to the auto-dimming mirror’s rear light sensor, there is also a
front light sensor (not shown). Do not place or hang any objects over the front or rear
mirror light sensors, otherwise, the auto-dimming mirrors will not operate properly.
homeLink®
•
This feature provides a convenient way to replace up to three
transmitters such as garage door openers, home lighting remotes
and other radio frequency devices.
• Refer to your Owner’s Manual for complete programming details.
A UTO -DIMMI nG MI rrOr AnD hOME LInK®
Auto-Dimming
Indicator LightAuto-Dimming
On
homeLinkLight
SensorAuto-Dimming
Off
On Off
SPO rT A/T MAnUAL S hIFT MODE
The Sport AT Manual Shift Mode gives you the
feel of driving a manual transmission by allowing
you to manually shift to control engine rpm and
torque when more control is desired.
To Use Manual Shift Mode:
• Shift lever from D to M.
n OTE:
Changing to manual mode can be
done while driving the vehicle.
To Shift Up to a higher Gear:
• Tap shift lever back (+) once.
To Shift Down to a Lower Gear:
• Tap shift lever forward (-) once.
Lower Gear
h igher Gear
Your aluminum wheels have a protective
coating on them. Only use a mild soap or
neutral detergent with a sponge or sof t
cloth to clean them. Using a wire brush,
polishing compound, solvent, or any type
of abrasive cleaner may damage the
protective coating.
ALUMI nUM W hEEL CA rE
FUE L DOOr rELE ASE (located on floor inside driver’s side door)
To open, pull the remote fuel
door release.
n OTE :
Fuel requirement 87 Octane.
Fuel Door
To avoid scratching the paint during
refueling, secure the fuel filler cap
tether over the hook as shown.
193094_10a_CX-9_SSG_070109.indd 12-137/1/09 10:09:19 AM
Page 9 of 16
1516
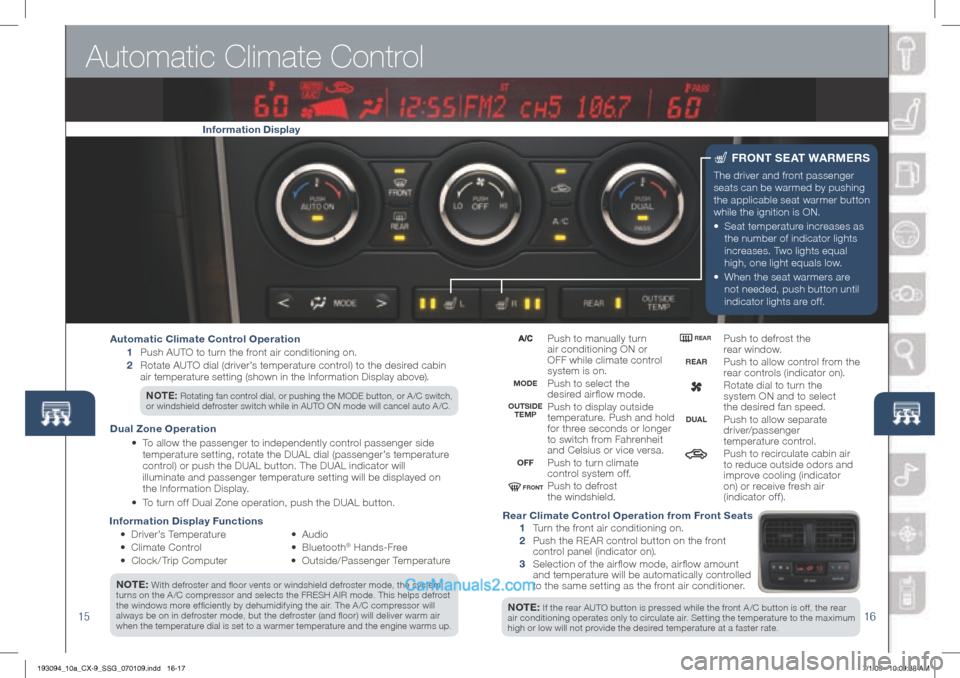
Information Display Functions
• Driver’s Temperature
•
Climate Control
• Clock / Trip Computer •
Audio
• B l u e t o o t h
® Hands-Free
•
Outside/Passenger Temperature
n OTE:
With defroster and floor vents or windshield defroster mode, the system
turns on the A /C compressor and selects the FRESH AIR mode. This helps defrost
the windows more efficiently by dehumidifying the air. The A /C compressor will
always be on in defroster mode, but the defroster (and floor) will deliver warm air
when the temperature dial is set to a warmer temperature and the engine warms up.
n OTE: If the rear AUTO button is pressed while the front A /C button is off, the rear
air conditioning operates only to circulate air. Setting the temperature to the maximum
high or low will not provide the desired temperature at a faster rate.
Automatic Climate Control
The driver and front passenger
seats can be warmed by pushing
the applicable seat warmer button
while the ignition is ON.
•
Seat temperature increases as
the number of indicator lights
increases. Two lights equal
high, one light equals low.
•
When the seat warmers are
not needed, push button until
indicator lights are off.
Fr OnT S EAT W Ar ME rS
Push to manually turn
air conditioning ON or
OFF while climate control
system is on.
Push to select the
desired airflow mode.
Push to display outside
temperature. Push and hold
for three seconds or longer
to switch from Fahrenheit
and Celsius or vice versa.
Push to turn climate
control system off.
Push to defrost
the windshield. Push to defrost the
rear window.
Push to allow control from the
rear controls (indicator on).
Rotate dial to turn the
system ON and to select
the desired fan speed.
Push to allow separate
driver/passenger
temperature control.
Push to recirculate cabin air
to reduce outside odors and
improve cooling (indicator
on) or receive fresh air
(indicator off).
Automatic Climate Control Operation
1 Push AUTO to turn the front air conditioning on.
2 Rotate AUTO dial (driver’s temperature control) to the desired cabin
air temperature setting (shown in the Information Display above).
n OTE: Rotating fan control dial, or pushing the MODE button, or A /C switch,
or windshield defroster switch while in AUTO ON mode will cancel auto A /C.
Dual z one Operation
• To allow the passenger to independently control passenger side
temperature setting, rotate the DUAL dial (passenger’s temperature
control) or push the DUAL button. The DUAL indicator will
illuminate and passenger temperature setting will be displayed on
the Information Display.
• To turn off Dual Zone operation, push the DUAL button.
rear Climate Control Operation from Front Seats
1 Turn the front air conditioning on.
2 Push the REAR control button on the front
control panel (indicator on).
3 Selection of the air flow mode, air flow amount
and temperature will be automatically controlled
to the same setting as the front air conditioner.
Information Display
MODE
OFF
rEAr
OUTSIDE
TEMP rEAr
FrOnT
DUAL
193094_10a_CX-9_SSG_070109.indd 16-177/1/09 10:09:38 AM
Page 15 of 16
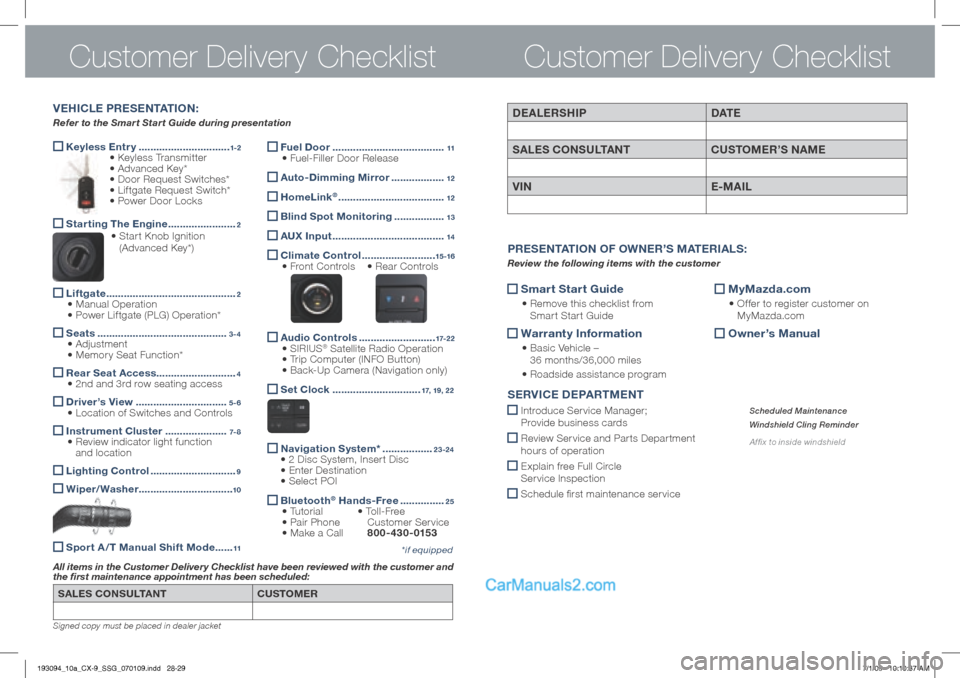
Keyless Entr y
...............................1-2 • Keyless Transmitter
• Advanced Key*
• Door Request Switches*
• Liftgate Request Switch*
• Power Door Locks
Starting The Engine
.......................2 • Star t Knob Ignition
(Advanced Key*)
Liftgate
............................................2
• Manual Operation
• Power Liftgate (PLG) Operation*
Seats
............................................3-4 • Adjustment
• Memory Seat Function*
r
ear Seat Access ...........................4 • 2nd and 3rd row seating access
Driver’s View
...............................5-6 • Location of Switches and Controls
Instrument Cluster
.....................7- 8 • Review indicator light function
and location
Lighting Control
.............................9
Wiper/Washer
................................10
Sport A /T Manual Shift Mode ......11
Customer Delivery ChecklistCustomer Delivery Checklist
SALES COnSULTA nT CUSTOMEr
All items in the Customer Delivery Checklist have been reviewed with the customer and
the first maintenance appointment has been scheduled:
*if equipped
Signed copy must be placed in dealer jacket
DEALErSh IP DAT E
SALES CO nSULTA nT CUSTOMEr’S n AME
VIn E-MAIL
Smart Start Guide
•
Remove this checklist from
Smart Start Guide
Warranty Information
•
Basic Vehicle –
36 months/36,000 miles
• Roadside assistance program
MyMazda.com
•
Offer to register customer on
MyMazda.com
Owner’s Manual
Pr
ESE nTATIO n OF O WnEr’ S M ATE rIALS :
Review the following items with the customer
SErVICE D EPArTME nT
Introduce Service Manager;
Provide business cards
Review Ser vice and Par ts Depar tment
hours of operation
Explain free Full Circle
Ser vice Inspection
Schedule first maintenance service
Scheduled Maintenance
Windshield Cling Reminder
Affix to inside windshield
V E h ICLE P rESE nTATIO n:
Refer to the Smart Start Guide during presentation
Fuel Door
......................................11 • Fuel-Filler Door Release
Auto-Dimming Mirror ..................12
homeLink® ....................................12
Blind Spot Monitoring
.................13
AUX Input
......................................14
Climate Control
.........................15 -16 • Front Controls • Rear Controls
Audio Controls
..........................17-2 2 • SIRIUS® Satellite Radio Operation
• Trip Computer (INFO Button)
• Back-Up Camera (Navigation only)
Set Clock
..............................17, 19, 22
n
avigation System* .................23-24
• 2 Disc System, Insert Disc
• Enter Destination
• Select POI
Bluetooth®
h ands-Free ...............25 • Tutorial • To l l - F r e e
• Pair Phone Customer Service
• Make a Call 800-430-0153
193094_10a_CX-9_SSG_070109.indd 28-297/1/09 10:10:37 AM