turn signal MAZDA MODEL CX-9 2012 (in English) Owner's Manual
[x] Cancel search | Manufacturer: MAZDA, Model Year: 2012, Model line: MODEL CX-9, Model: MAZDA MODEL CX-9 2012Pages: 604, PDF Size: 13.45 MB
Page 428 of 604
Black plate (428,1)
Making a call using the incoming call
record
1. Press selection button 4 to display the
incoming call record screen.
2. Press the desired selection button of the
incoming call record.
The content of the incoming call record
is displayed.
3. Press selection button 1 or the pick-up
button of the audio control switch to
make a call.
Deleting one incoming call record
1. Press selection button 4 to display the
incoming call record screen.
2. Press the desired selection button of the
incoming call record.
The content of the incoming call record
is displayed.
3. Press selection button 2 to display
“Delete recent incoming call?”.
4. Press selection button 1 to delete the
incoming call record.
NOTE
Press the return button () to return
to the previous display.
Deleting all the incoming call records
1. Press selection button 4 to display the
incoming call record screen.
2. Press selection button 5 to display
“Delete all recent incoming calls?”.
3. Press selection button 1 to delete all the
incoming call records.
NOTE
Press the return button () to return
to the previous display.
qDTMF (Dual Tone Multi-
Frequency Signal) Transmission
This function is used when transmitting
DTMF via the audio control panel's
manual tuning dial.
The receiver of a DTMF transmission is
generally a home telephone answering
machine or a company's automated
guidance call center.
1. Press selection button 4 after
connecting to a home device or service
to display the tone transmission screen.
2. Turn the manual tuning dial to select a
number or symbol and then press the
enter button (
) to transmit the
code.
NOTE
If the DTMF code has two or more digits or
symbols, each one must be transmitted
individually.
6-172
Interior Comfort
Bluetooth Hands-Free (Panel Operation)
CX-9_8CA8-EA-11G_Edition1 Page428
Thursday, June 23 2011 11:5 AM
Form No.8CA8-EA-11G
Page 456 of 604

Black plate (456,1)
Parking in an Emergency
The hazard warning lights should always
be used when you stop on or near a
roadway in an emergency.
The hazard warning lights warn other
drivers that your vehicle is a traffic hazard
and that they must take extreme caution
when near it.
Depress the hazard warning flasher and all
the turn signals will flash.
NOTE
lThe turn signals do not work when the
hazard warning lights are on.
lCheck local regulations about the use of
hazard warning lights while the vehicle is
being towed to verify that it is not in
violation of the law.
7-2
In Case of an Emergency
Parking in an Emergency
CX-9_8CA8-EA-11G_Edition1 Page456
Thursday, June 23 2011 11:6 AM
Form No.8CA8-EA-11G
Page 463 of 604

Black plate (463,1)
NOTElMake sure the jack is well lubricated before
using it.
(With Tire Pressure Monitoring System)
lBe sure to register the tire pressure sensor
ID signal code whenever tires or wheels are
changed (page 5-32).
1. Park on a level surface off the right-of-
way and firmly set the parking brake.
2. Shift into Park (P) and turn off the
engine.
3. Turn on the hazard warning flasher.
4. Have everyone get out of the vehicle
and away from the vehicle and traffic.
5. Remove the jack, tool, and spare tire
(page 7-3).
6. Block the wheel diagonally opposite
the flat tire. When blocking a wheel,
place a tire block both in front and
behind the tire.
NOTE
When blocking a tire, use rocks or wood blocks
of sufficient size if possible to hold the tire in
place.
qRemoving a Flat Tire
1. Loosen the lug nuts by turning them
counterclockwise one turn each, but do
not remove any lug nuts until the tire
has been raised off the ground.
2. Place the jack on the ground.
3. Turn the jack screw in the direction
shown in the figure and adjust the jack
head so that it is close to the jack-up
position.
Jack head
In Case of an Emergency
Flat Tire
7-9
CX-9_8CA8-EA-11G_Edition1 Page463
Thursday, June 23 2011 11:6 AM
Form No.8CA8-EA-11G
Page 516 of 604
Black plate (516,1)
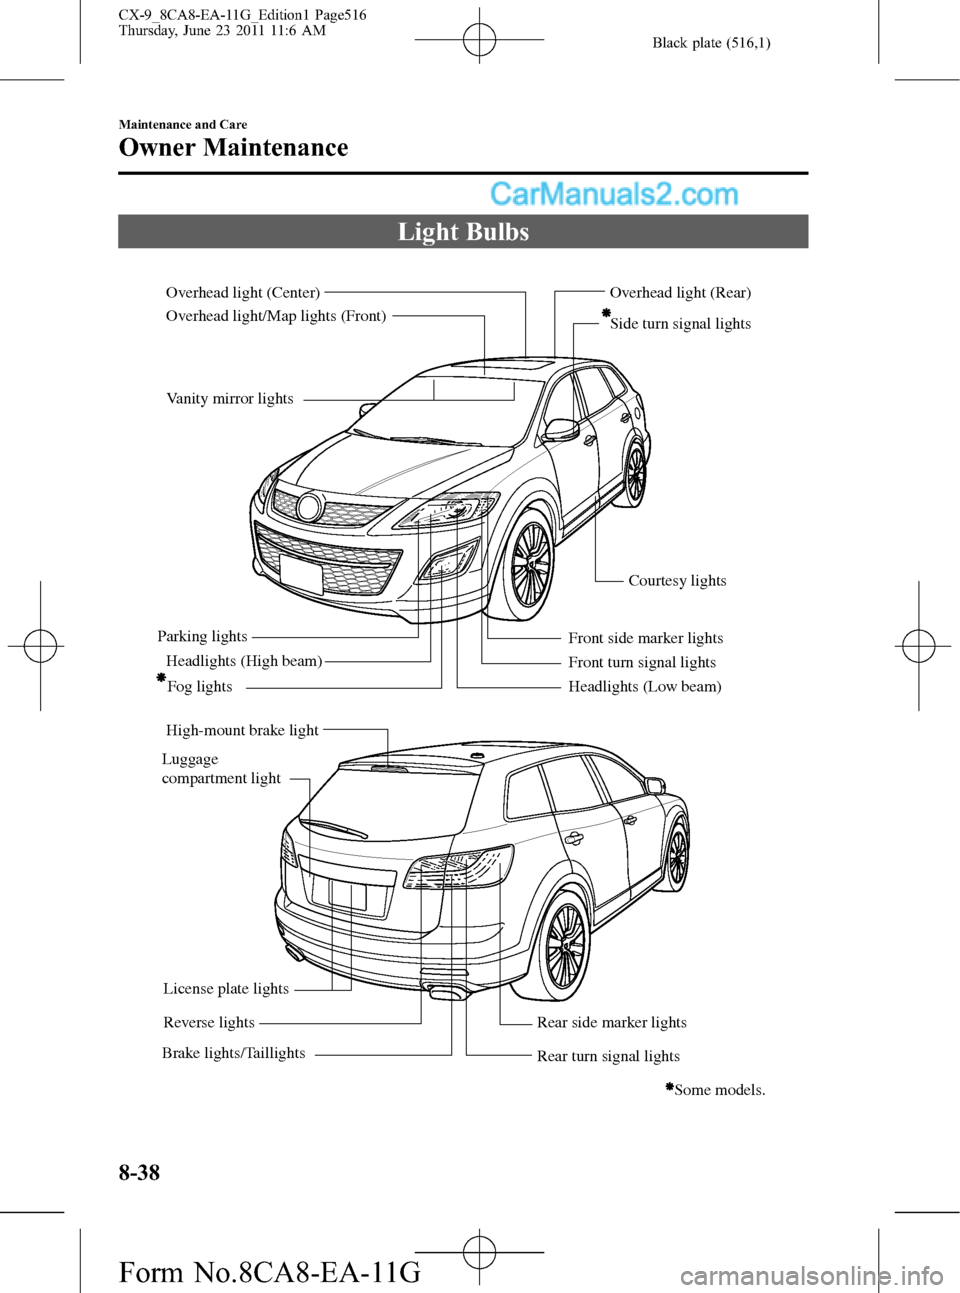
Light Bulbs
Headlights (Low beam) Headlights (High beam)
High-mount brake lightFog lights
Front turn signal lightsSide turn signal lights
Courtesy lights
Some models.
License plate lights
Brake lights/TaillightsOverhead light/Map lights (Front)
Vanity mirror lights Overhead light (Center) Overhead light (Rear)
Front side marker lights
Rear side marker lights
Rear turn signal lights Reverse lights
Luggage
compartment light
Parking lights
8-38
Maintenance and Care
Owner Maintenance
CX-9_8CA8-EA-11G_Edition1 Page516
Thursday, June 23 2011 11:6 AM
Form No.8CA8-EA-11G
Page 520 of 604
Black plate (520,1)
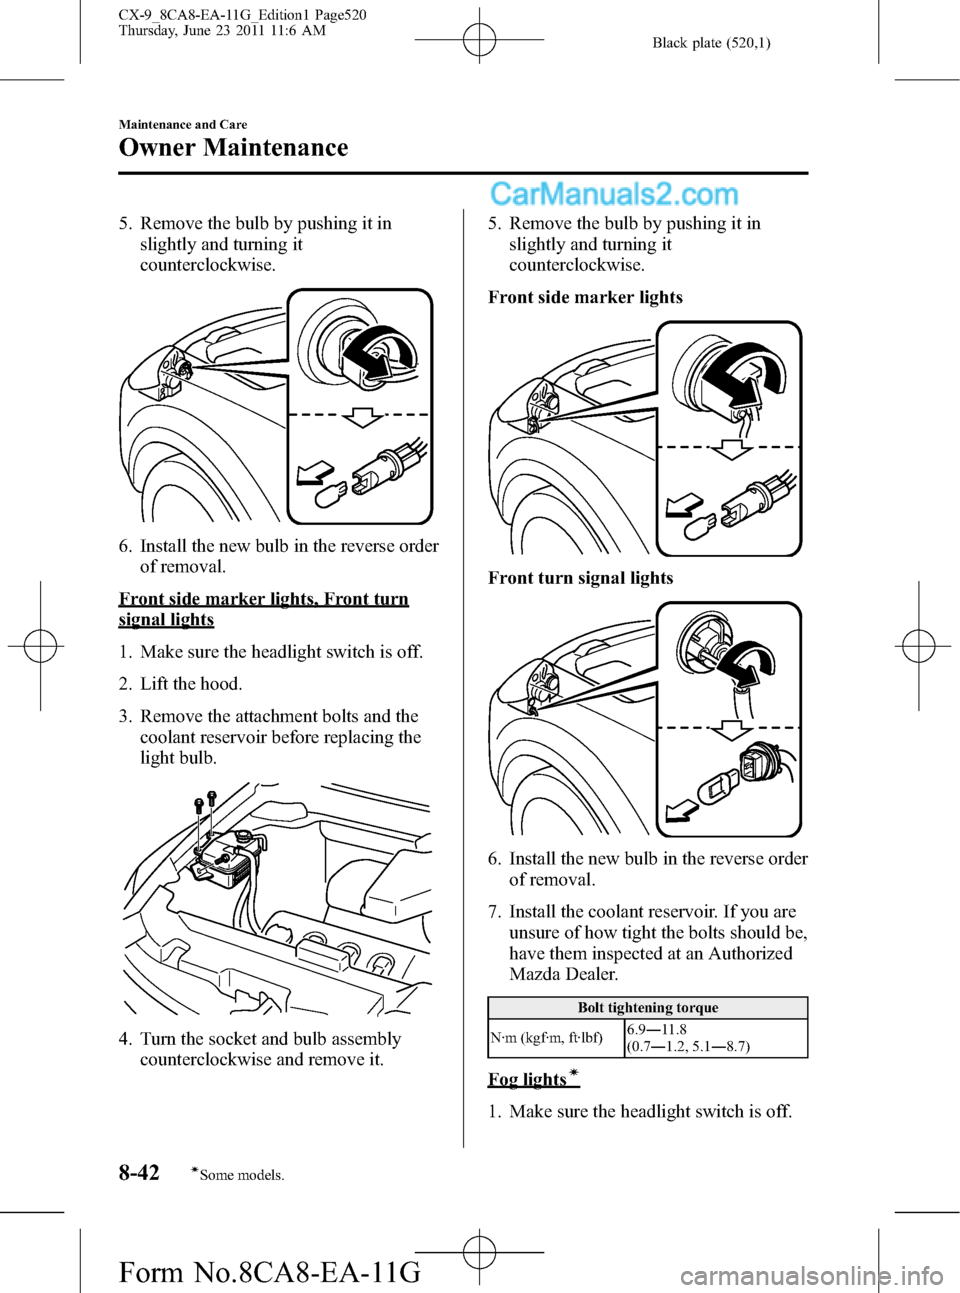
5. Remove the bulb by pushing it in
slightly and turning it
counterclockwise.
6. Install the new bulb in the reverse order
of removal.
Front side marker lights, Front turn
signal lights
1. Make sure the headlight switch is off.
2. Lift the hood.
3. Remove the attachment bolts and the
coolant reservoir before replacing the
light bulb.
4. Turn the socket and bulb assembly
counterclockwise and remove it.5. Remove the bulb by pushing it in
slightly and turning it
counterclockwise.
Front side marker lights
Front turn signal lights
6. Install the new bulb in the reverse order
of removal.
7. Install the coolant reservoir. If you are
unsure of how tight the bolts should be,
have them inspected at an Authorized
Mazda Dealer.
Bolt tightening torque
N·m (kgf·m, ft·lbf)6.9―11.8
(0.7―1.2, 5.1―8.7)
Fog lightsí
1. Make sure the headlight switch is off.
8-42
Maintenance and Care
íSome models.
Owner Maintenance
CX-9_8CA8-EA-11G_Edition1 Page520
Thursday, June 23 2011 11:6 AM
Form No.8CA8-EA-11G
Page 521 of 604

Black plate (521,1)
2. Turn the screws counterclockwise and
remove them.
3. Turn the screws and the center section
of the plastic retainers
counterclockwise and remove them,
then remove the mudguard.
Removal
Installation
4. Disconnect the electrical connector
from the bulb by pressing the tab on
the connector with your finger and
pulling the connector downward.
5. Turn the socket and bulb assembly
counterclockwise and remove it.
Carefully remove the bulb from its
socket in the reflector by gently pulling
it straight backward out of the socket.
6. Install the new bulb in the reverse order
of removal.
NOTE
lTo replace the bulb, contact an Authorized
Mazda Dealer
lIf the halogen bulb is accidentally touched,
it should be cleaned with rubbing alcohol
before being used.
lUse the protective cover and carton of the
replacement bulb to dispose of the old bulb
promptly out of the reach of children.
Side turn signal lightsí, Brake lights,
Taillights, High-mount brake light
Due to the complexity and difficulty of
the procedure, the LED bulbs must be
replaced by an Authorized Mazda Dealer.
NOTE
LED bulb replacement is not possible because
it is built into the unit. Replace the unit.
Maintenance and Care
Owner Maintenance
8-43íSome models. CX-9_8CA8-EA-11G_Edition1 Page521
Thursday, June 23 2011 11:6 AM
Form No.8CA8-EA-11G
Page 522 of 604

Black plate (522,1)
Rear turn signal lights, Rear side-
marker light
1. Turn the bolts counterclockwise and
remove them.
2. Pull the unit rearward to remove it.
3. Turn the socket and bulb assembly
counterclockwise and remove it.Rear turn signal lights
Rear side-marker light
4. Disconnect the bulb from the socket.
5. Install the new bulb in the reverse order
of removal.
8-44
Maintenance and Care
Owner Maintenance
CX-9_8CA8-EA-11G_Edition1 Page522
Thursday, June 23 2011 11:6 AM
Form No.8CA8-EA-11G
Page 594 of 604
Black plate (594,1)
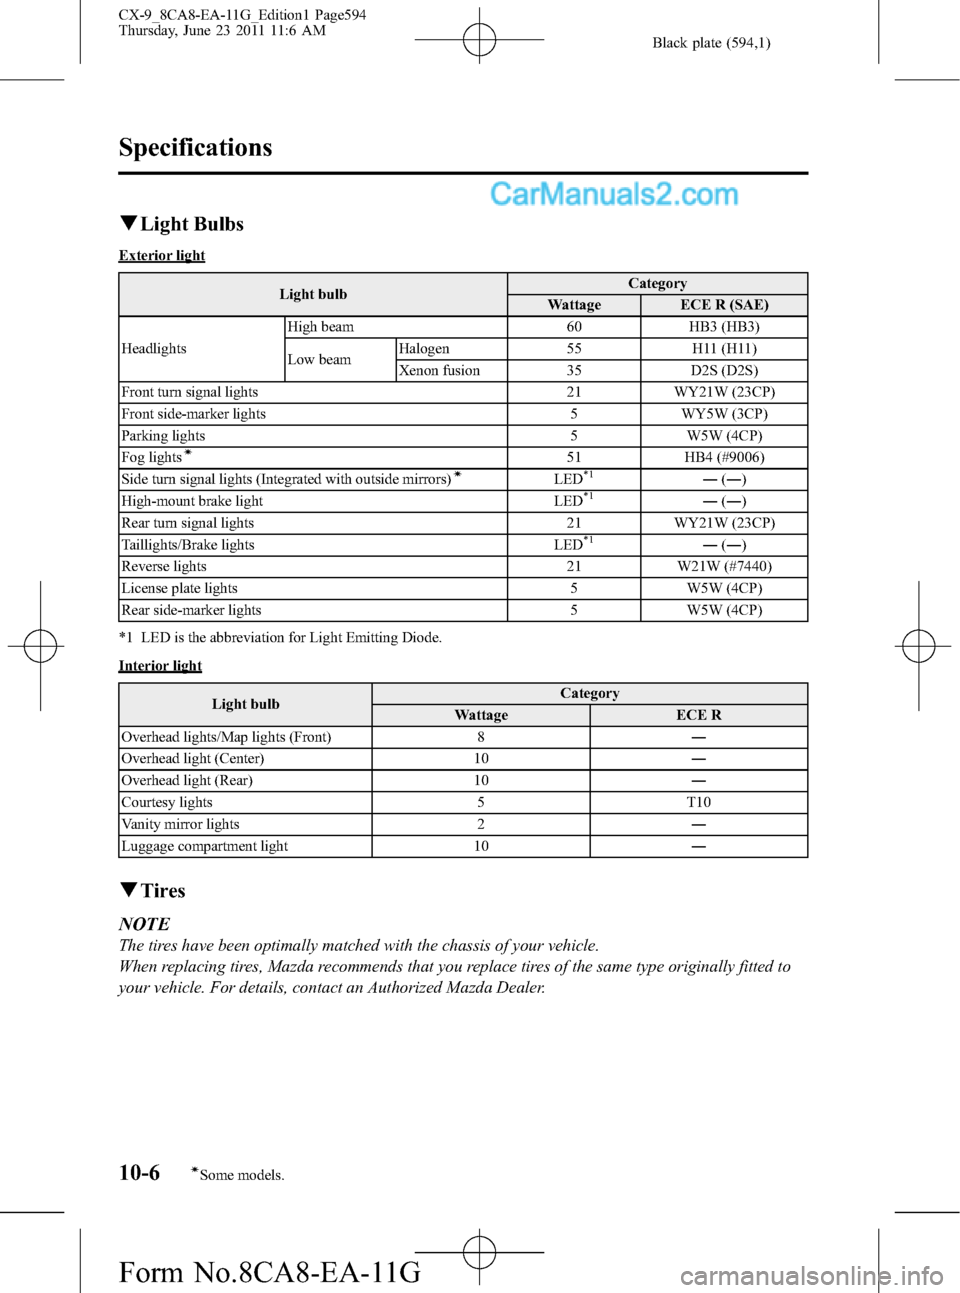
qLight Bulbs
Exterior light
Light bulbCategory
Wattage ECE R (SAE)
HeadlightsHigh beam 60 HB3 (HB3)
Low beamHalogen 55 H11 (H11)
Xenon fusion 35 D2S (D2S)
Front turn signal lights 21 WY21W (23CP)
Front side-marker lights 5 WY5W (3CP)
Parking lights 5 W5W (4CP)
Fog lights
í51 HB4 (#9006)
Side turn signal lights (Integrated with outside mirrors)íLED*1―(―)
High-mount brake light LED*1―(―)
Rear turn signal lights 21 WY21W (23CP)
Taillights/Brake lights LED
*1―(―)
Reverse lights 21 W21W (#7440)
License plate lights 5 W5W (4CP)
Rear side-marker lights 5 W5W (4CP)
*1 LED is the abbreviation for Light Emitting Diode.
Interior light
Light bulbCategory
Wattage ECE R
Overhead lights/Map lights (Front) 8―
Overhead light (Center) 10―
Overhead light (Rear) 10―
Courtesy lights 5 T10
Vanity mirror lights 2―
Luggage compartment light 10―
qTires
NOTE
The tires have been optimally matched with the chassis of your vehicle.
When replacing tires, Mazda recommends that you replace tires of the same type originally fitted to
your vehicle. For details, contact an Authorized Mazda Dealer.
10-6íSome models.
Specifications
CX-9_8CA8-EA-11G_Edition1 Page594
Thursday, June 23 2011 11:6 AM
Form No.8CA8-EA-11G
Page 601 of 604
Black plate (601,1)
H
HomeLink Wireless Control
System .............................................. 5-75
Hood Release .................................... 3-49
Horn .................................................. 5-74
I
Ignition
Keys ........................................... 3-21
Switch .......................................... 5-2
Illuminated Entry System ............... 6-184
Immobilizer System
(with Advanced Key) ........................ 3-54
Immobilizer System
(without Advanced Key) ................... 3-58
Indicator Lights ................................. 5-44
BSM OFF ................................... 5-57
Cruise ......................................... 5-56
Headlight high-beam .................. 5-55
Security ...................................... 5-55
Shift position .............................. 5-55
TCS OFF .................................... 5-56
TCS/DSC/RSC ........................... 5-56
Turn-signal/hazard warning ....... 5-57
Information Display ........................ 6-186
Ambient temperature display .... 6-187
Audio display ........................... 6-188
Climate control display ............ 6-188
Clock ........................................ 6-187
Information display functions ... 6-186
Trip computer ........................... 6-188
Instrument Cluster ............................. 5-39
Interior Care ...................................... 8-60
Interior Lights ................................. 6-184
J
Jump-Starting .................................... 7-18
K
Keyless Entry System ....................... 3-22
Keys .................................................. 3-21
L
Label Information ............................. 10-2
Lane-Change Signals ........................ 5-66
Liftgate .............................................. 3-33
Light Bulbs
Replacement ............................... 8-38
Specifications ............................. 10-6
Lighting Control ............................... 5-60
Lubricant Quality .............................. 10-4
Luggage Compartment Light .......... 6-185
M
Maintenance
Introduction .................................. 8-2
Owner maintenance
precautions ................................. 8-17
Owner maintenance schedule ..... 8-16
Scheduled ..................................... 8-3
Map Lights ...................................... 6-185
Mirror Defroster ................................ 5-74
Mirrors
Outside mirrors .......................... 3-65
Rearview mirror ......................... 3-66
Money-Saving Suggestions ................ 4-6
Moonroof .......................................... 3-51
O
Odometer and Trip Meter .................. 5-40
Outside Mirrors ................................. 3-65
Overhead Console ........................... 6-193
Overhead Lights .............................. 6-184
Overheating ....................................... 7-16
Index
11-5
CX-9_8CA8-EA-11G_Edition1 Page601
Thursday, June 23 2011 11:6 AM
Form No.8CA8-EA-11G
Page 603 of 604
Black plate (603,1)
S
SRS Air Bags
Driver and front passenger occupant
classification system .................. 2-69
How the SRS air bags work ....... 2-62
Limitations to SRS air bag ......... 2-67
Monitoring and maintenance ..... 2-74
SRS air bag deployment
criteria ........................................ 2-66
Supplemental restraint system
(SRS) precautions ...................... 2-55
Supplemental restraint system
components ................................ 2-61
Starting the Engine .............................. 5-4
Steering Wheel .................................. 3-65
Horn ........................................... 5-74
Storage Compartments .................... 6-193
Armrest box ............................. 6-194
Cargo securing loops ................ 6-194
Cargo sub-compartment ........... 6-195
Center console .......................... 6-194
Coin box ................................... 6-194
Glove compartment .................. 6-194
Overhead console ..................... 6-193
Rear coat hooks ........................ 6-196
Shopping bag hook .................. 6-195
Sunshade ........................................... 3-53
Sunvisors ........................................ 6-183
T
Tachometer ........................................ 5-41
Temporary Spare Tire ....................... 8-35
Theft-Deterrent System ..................... 3-62
Third-Row Seat ................................. 2-13
Tiedown
Hook .......................................... 7-22
Tire Information ................................ 9-25
T
Tire Pressure Monitoring System ...... 5-28
System error activation .............. 5-32
Tire pressure monitoring system
warning light .............................. 5-30
Tires and wheels ......................... 5-32
Tires
Flat tire ......................................... 7-3
Inflation pressure ........................ 8-32
Replacement ............................... 8-34
Rotation ...................................... 8-33
Snow tires .................................. 4-10
Spare tire and tool storage ............ 7-3
Specifications ............................. 10-6
Tire chains .................................. 4-11
Uniform tire quality grading system
(UTQGS) ................................... 9-23
Tool ..................................................... 7-3
Towing
Description ................................. 7-21
Emergency towing ..................... 7-21
Recreational towing ................... 7-24
Trailer Towing
(U.S.A. and Canada) .................. 4-14
Traction Control System (TCS) ........ 5-23
TCS OFF indicator light ............ 5-24
TCS OFF switch ........................ 5-25
TCS/DSC/RSC indicator light .... 5-24
Trailer Towing .................................. 4-14
Trip Meter ......................................... 5-40
Turn and Lane-Change Signals ......... 5-66
V
Vanity Mirrors ................................. 6-183
Vehicle Information Labels ............... 10-2
Index
11-7
CX-9_8CA8-EA-11G_Edition1 Page603
Thursday, June 23 2011 11:6 AM
Form No.8CA8-EA-11G